
HCM-DD900BKSS - Coffee maker Heinner - Free user manual and instructions
Find the device manual for free HCM-DD900BKSS Heinner in PDF.


| Product Type | Digital coffee maker |
| Power | 900 W |
| Water Tank Capacity | 1.8 L |
| Display | Digital LCD with touch control |
| Number of Cups (Hot) | Up to 12 (max hot line) |
| Number of Cups (Iced) | Up to 6 (max iced line) |
| Brew Timer | Yes, up to 24 hours delay |
| Keep Warm Function | Yes, 40 minutes automatic |
| Strength Selection | Yes, Strong brew option |
| Iced Coffee Function | Yes, with dedicated iced coffee trivet |
| Self-Clean Cycle | Yes, with Clean button and vinegar/water solution |
| Freshness Timer | Yes, displays time since brewing |
| Automatic Shut-Off | Yes, after keep warm cycle ends (40 min) |
| Carafe Material | Glass |
| Warming Plate | Yes, keep hot |
| Filter Type | Paper filter (not included) |
| Package Contents | Coffee maker, user manual, warranty certificate, declaration of conformity |
| Polarized Plug | Yes |
| Descaling Frequency | Every 100 brews or when Clean light blinks |
| Voltage | 120V / 220-240V (see rating label) |
Frequently Asked Questions - HCM-DD900BKSS Heinner
User questions about HCM-DD900BKSS Heinner
0 question about this device. Answer the ones you know or ask your own.
Ask a new question about this device
Download the instructions for your Coffee maker in PDF format for free! Find your manual HCM-DD900BKSS - Heinner and take your electronic device back in hand. On this page are published all the documents necessary for the use of your device. HCM-DD900BKSS by Heinner.
USER MANUAL HCM-DD900BKSS Heinner
natural_image
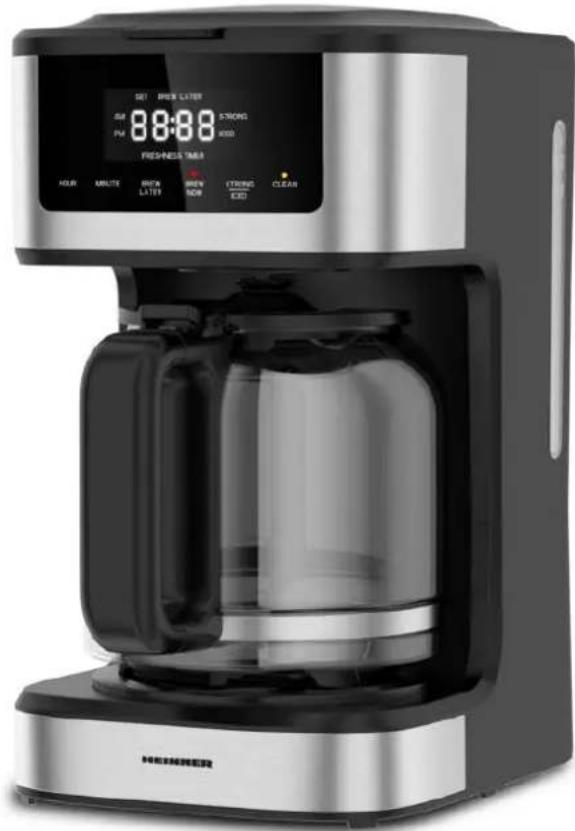
Modern digital coffee maker with glass jar and digital display (no visible text or symbols on main body)- Power: 900 W
• Water tank capacity: 1.8L
• Digital display with touch control
1. INTRODUCTION
Please read the instructions carefully and keep the manual for future information.
This manual is designed to give all necessary instructions concerning installation, use and maintenance of the unit. In order to operate the unit correctly and safely, please read this instruction manual carefully before installation and use.
2. CONTENT OF YOUR PACKAGE
→ Digital coffee maker
→ User manual
→ Certificate of warranty
→ Declaration of conformity
3. SAFETY MEASURES
GENERAL
When using electrical appliances basic safety precautions should always be followed including the following:
- Read all instructions.
- Make sure that your outlet voltage corresponds to the voltage stated on the rating label of the coffee maker.
- To protect against fire, electric shock and injury to persons do not immerse cord, plug, or in water or other liquid.
- Close supervision is necessary when any appliance is used by or near children.
- Unplug from outlet when not in use and before cleaning. Allow you to cool before putting on or taking off parts, and before cleaning the appliance.
- Do not operate any appliance with a damaged cord or plug or after the appliance malfunctions or has been damaged in any manner. Return appliance to an authorized service facility for examination, repair or adjustment.
- The use of accessories not recommended by the appliance manufacturer may result in fire, electric shock or injury to people.
- Do not use the outdoors.
- Do not let cord hang over edge of table or counter or touch hot surface.
- Do not place on or near a hot gas or electric burner, or in a heated oven.
- Do not use appliances for other than intended use.
- Do not clean container with cleansers, steel wool pads, or other abrasive material.
- To disconnect, turn any control to "Off", remove plug from wall outlet. Always hold the plug. But never pull the cord.
- Scalding may occur if the cover is removed during the brewing cycles. Be careful not to get burned by the steam.
-
Some parts of appliance are hot when operated, so do not touch with hand. Use handles or knobs only.
-
Never leave the empty carafe on the warming plate otherwise the carafe is liable to crack.
- Never use the appliance if the carafe shows any signs of cracks or carafe having a loose or weakened handle. Only use the carafe with this appliance. Use carefully as the carafe is very fragile.
- This appliance is not intended for used by persons (including children) with reduced physical, sensory or mental capabilities, or lack of experience and knowledge, unless they have been given supervision or instruction concerning use of the appliances by a person responsible for their safety.
- Children should be supervised to ensure that they do not play with the appliance.
- Do not set a hot container on a hot or cold surface.
- Do not let the coffee maker operate without water.
CORD PLUG
This appliance has a polarized plug, to reduce the risk of electric shock, this plug is intended to fit into a polarized outlet only one way, If the plug does not fit fully into the outlet, reverse the plug, If it still does not fit, contact a qualified electrician, do not attempt to modify the plug in any way.
Notes on the cord:
a) A short power-supply cord (or detached power-supply cord) is to be provided to reduce risks resulting from becoming entangled in or tripping over a long cord.
b) Longer detachable power-supply cords or extension cords are available and may be used if care is exercised in their use.
c) If a long detachable power-supply cords or extension cord is used:
- The marked electrical rating of the detachable power-supply cord or extension cord should be at least as great as the electrical rating of the appliance.
• If the appliance if of the grounded type, the extension cord should be a grounding-type 3-wire cord. - The longer cord should be arranged so that it will not drape over the countertop or tabletop where it can be pulled on by children or tripped over.
4. PRODUCT DESCRIPTION
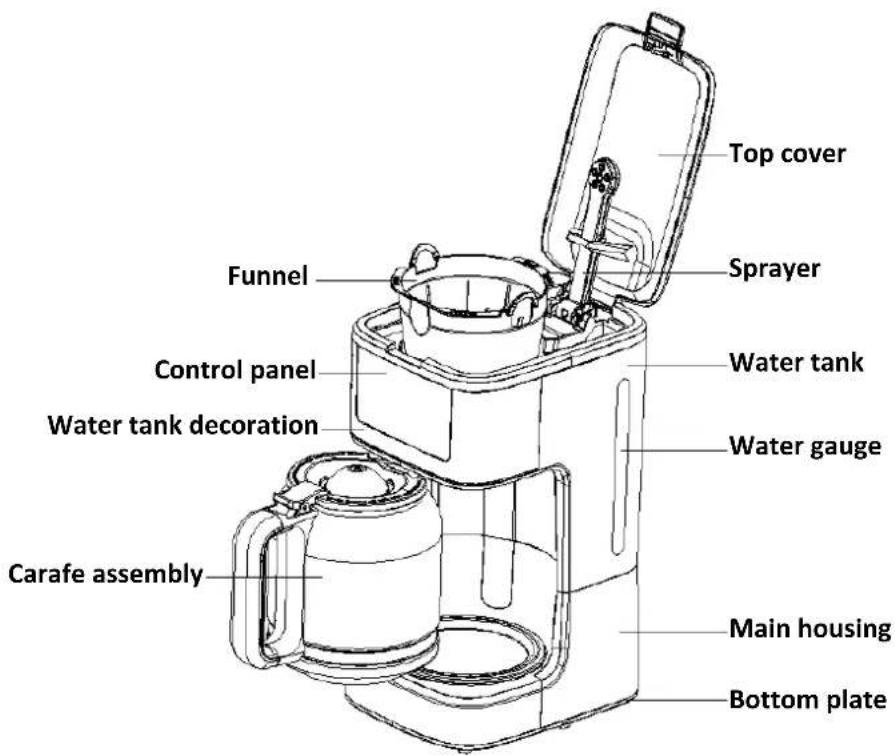
CONTROL PANEL
SET BREW LATER
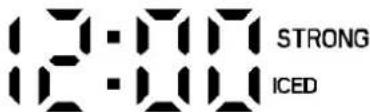
FRESHNESS TIMER
HOUR
MINUTE
BREW
BREW
STRONG
CLEAN
LATER
NOW
ICED
5. USING THE APPLIANCE
Check that all accessories are complete, and the unit is not damaged. Add water into water tank to the MAX level of water gauge and brew water for several times without coffee powder, then discard the water. Clean all detachable parts thoroughly with warm water.
CLOCK SETTING
After power on, the clock displays 12:00 and flashes until the user adjusts the time, the number stops flashing.
-
Set the hour by pressing the HOUR button.
-
Set the minute by pressing the MINUTE button.
NOTE: Press and hold the HOUR / MINUTE buttons to adjust the time rapidly. NOTE: The time cycle is 24 hours.
-
Open the water reservoirs lid.
-
Fill the water reservoir. Follow the water windows markings to fill to your desired number of cups.
NOTE:
- Do not fill the water reservoir above the "12 MAX HOT"/ maximum mark or below the "2 MIN"/ minimum mark.
-
Place the funnel into the funnel support, make sure it is assembled correctly, otherwise the top cover cannot be closed. Place a paper filter in the funnel.
-
Add coffee powder into paper filter. Usually, a cup of coffee needs a level spoon of coffee powder, but you may adjust according to personal taste. Close the top cover completely.
-
The carafe must be on the warming plate to begin brewing.
-
Press the BREW NOW button. The brew light blinks while brewing and stays on while keeping the coffee warm.
-
During brewing, you can remove the carafe for serving, and the machine will temporarily stop dispensing. Do not remove for more than 30s or the machine will overflow.
NOTE:
- For extra robust coffee, press the STRONG / ICED button once. STRONG appears on the display. - To cancel the stronger coffee, press the STRONG/ICED button twice. STRONG no longer appears on the display.
- After brewing, it will enter the thermal insulation setting by default, which will keep the coffee warm for 40 minutes.
- While in keep warm mode, the FRESHNESS INDICATOR on the display counts, showing the time since the coffee was brewed.
NOTE:
- To turn off keep warm mode at any time, press the BREW NOW button and ensure the brew light is off. - The above insulation functions are available when making hot coffee and are disabled automatically when brewing iced coffee.
WARNING:
- Do not open the water reservoir's lid while brewing is in process!
- Do not touch the warming plate after brewing, it will be very hot! Only hold the carafe by the handle, the glass is very hot!
- Place the appliance on a stable, level, and heat-resistant surface.
DELAY FUNCTION
If you do not want the coffee maker to start operation immediately follow the steps below to program the start of coffee brewing up to 24 hours in advance.
- Press the BREW LATER key, the reservation indicator SET and BREW LATER will flash at the same time.
- Press the HOUR and MINUTE buttons to select your desired brew start time.
- After setting, press the BREW LATER key once or after 5 seconds of inactivity. The BREW LATER will appear on the display, open and enter the reservation status. If the current time is set to 12:00 and the auto start time is set to 12:03 at noon, after setting, press the BREW LATER key once or after 5 seconds of inactivity. The BREW LATER will appear on the display, open and enter the reservation status.
Two minutes later (12:03), the red work LED will flash, and the reservation indicator BREW later will go off; The heat pipe starts to work.
- During the reservation process, press the BREW LATER key to cancel the reservation.
NOTE: When the user set the automatic start function, the user cannot select the ICED function, or the user cannot set the automatic start time after selecting the ICED function
HEAT PRESERVATION TIME
When the normal coffee or strong coffee program is finished, the FRESHNESS TIMER is always on, and the BREW NOW red LED is always on, which indicates that it enters the heat preservation state and starts to time. the colon flashes, and the LCD starts to time from 00:00. until the end of 40minute of heat preservation. The screen displays the clock. If it's iced coffee, after the program, it doesn't need to enter the heat preservation, the clock will be displayed directly, and the red LED will be turned off. During the heat preservation process, if user press brew now key, the red LED goes out, and the heat preservation ends.
AUTOMATIC POWER OFF
After the thermostat is disconnected for the first time, the machine will automatically turn off the power without heating after keeping warm for 40 minute and enter into standby mode.
BREW ICED COFFEE
1.Open the water reservoir's lid.
- Fill the water reservoir. Follow the water window's markings to fill to your desired number of servings. Refer to the table below for recommended amounts of water.
NOTE: Do not fill the water reservoir above the "6 MAX ICED" / maximum mark or below the "2 MIN" / minimum mark.
- Add pre-ground coffee into the filter. Refer to the table below for recommended amounts of ground coffee.
| SERVINGS | Fill water reservoir with water to | Amount of ground coffee | Fill carafe with ice to |
| 6 | 6 Mark | 12 tbs. | 6 Mark |
| 4 | 4 Mark | 8 tbs. | 4 Mark |
| 2 | 2 Mark | 4 tbs. | 2 Mark |
**1 serving = 300ML of iced coffee
**Never place ice into water reservoir
-
Gently add ice to the carafe to the desired line and place the ice-filled carafe on the iced coffee trivet.
-
Close the lid. Place the iced coffee trivet on the warming plate.
Refer to the table above for recommended amounts of ice cubes.
CAUTION: Gently place ice into the carafe. Dropping ice into the empty carafe can damage the glass.
-
Press the STRONG / ICED button twice. ICED appears on the display.
-
Press the BREW NOW button. The brew light blinks while brewing.
-
After brewing, remove the carafe and the iced coffee trivet from the warming plate.
Note: When the product starts the reservation function, it cannot select the ICED function.
SELF-CLEAN CYCLE
After using your coffee maker for a while, limescale will begin to build up inside the machine. It is important to descale your appliance.
It is recommended to run the self-clean cycle after 100 brews.
The Time-to-Clean light (orange LED) will blink above to notify you that a clean cycle is needed.
6. CLEANING AND MAINTENANCE
DESCALE
- Plug the coffee maker into an outlet.
- Mix equal parts vinegar and water and pour it into the water reservoir. Close the lid. Place the carafe on the warming plate.
- Press the CLEAN button to start the cleaning process.
- User puts the vinegar + water mixture into the water tank of the coffee machine (add it to 12 cups of the water tank), press the CLEAN button to start the cleaning process.
- The cleaning lamp is always on, and the heating tube is powered; after 10 minutes, the cleaning lamp changed from normal light to flashing, and the heating tube was closed for 40 minutes. Let the mixed solution soak and deposit in the heating tube. After 40 minutes, it changes from flashing to normal light. The heating tube is electrified and heated. After finish brewing the vinegar in the water tank, the thermostat is disconnected, the heating tube is powered off, the cleaning lamp is off, the cleaning procedure is completed, and the number of service cycles is cleared.
- When the brewing process is complete, fill up the coffee maker with water and begin brewing again. This washes out any remaining vinegar.
- If an odor of vinegar persists, run another cycle with water.
- Use a soft sponge and baking soda to remove stains from the carafe. If the stains remain, mix 1 cup water, 1 cup vinegar and 1/4 cup of baking soda and allow it to sit in the carafe overnight.
CLEANING
CAUTION: Be sure to unplug this appliance before cleaning. To protect against electrical shock, do not immerse cord, plug or unit in water or liquid. After each use, always make sure plug is first removed from wall outlet.
1) Clean all detachable parts after each use in hot, sudsy water.
2) Wipe the products' exterior surface with a soft, damp cloth to remove stains.
3) Water droplets may buildup in the area above the funnel and drip onto the product base during brewing.
To control the dripping, wipe off the area with a clean, dry cloth after each use of the product.
4) Use a damp cloth to gently wipe the warming plate. Never use abrasive cleaner to clean it.
5) Replace all parts and keep for next use.
HINTS FOR GREAT TASTING COFFEE
- A clean coffee maker is essential for making great-tasting coffee. Regularly clean the coffee maker as specified in the "CLEANING AND MAINTENANCE" section. Always use fresh, cold water in the coffee maker.
- Store unused coffee powder in a cool, dry place. After opening a package of coffee powder, reseal it tightly and store it in a refrigerator to maintain its freshness.
- For an optimum coffee taste, buy whole coffee beans and finely grind them just before brewing.
-
Do not reuse coffee powder since this will greatly reduce the coffee' flavor. Reheating coffee is not recommended as coffee is at its peak flavor immediately after brewing.
-
Clean the coffee maker when over-extraction causes oiliness. Small oil droplets on the surface of brewed, black coffee are due to the extraction of oil from the coffee powder.
- Oiliness may occur more frequently if heavily roasted coffees are used.
CUSTOMER CARE AND SERVICE
Always use original spare parts.
When contacting our Authorised Service Centre, ensure that you have the following data available: Model and Serial Number.
The information can be found on the rating plate. Subject to change without notice.
TECHNICAL DATA
| Capacity | 1.8 L |
| Power | 900 W |
Thank you for purchasing this product. If you need support with your product, visit our website using the links below.
Get User manuals: https://www.heinner.ro
Get Service information: https://www.heinner.ro

Environment friendly disposal
You can help protect the environment!
Please remember to respect the local regulations: hand in the non-working electrical equipment's to an appropriate waste disposal center.

HEINNER is a registered trademark of Network One Distribution SRL. Other brands and product names are trademarks or registered trademarks of their respective holders.
No part of the specifications may be reproduced in any form or by any means or used to make any derivative such as translation, transformation, or adaptation without permission from NETWORK ONE DISTRIBUTION.
Copyright © 2013 Network One Distribution. All rights reserved.
www.heinner.com, http://www.nod.ro

This product is in conformity with norms and standards of European Community.

Importer: Network One Distribution
Marcel Iancu Street, 3-5, Bucharest, Romania
Tel: +40 21 211 18 56, www.heinner.com, www.nod.ro
CAFETIERĂ DIGITALĂ
Model:
Riffeto
HCM-DD900BKSS
natural_image
Modern digital coffee maker with glass jar and digital display (no visible text or symbols on main body)- Putere: 900 W
FRESHNESS TIMER
HOUR
MINUTE
BREW
BREW
STRONG
CLEAN
LATER
NOW
ICED
5. UTILIZAREA APARATULUI
natural_image
Modern digital coffee maker with glass jar and digital display (no visible text or symbols on main body)- Мощност: 900 W
FRESHNESS TIMER
HOUR
MINUTE
BREW
BREW
STRONG
CLEAN
LATER
NOW
ICED
5. ИЗПОЛЗВАНЕ НА УРЕДА
DIGITÁLIS KÁVÉFŐZŐGÉP
Modell:
Riffeto
HCM-DD900BKSS
natural_image
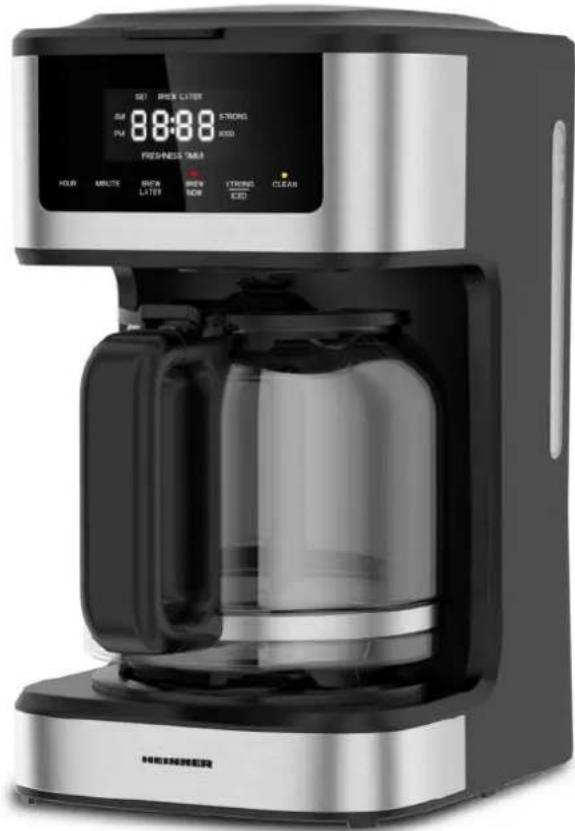
Modern digital coffee maker with glass jar and digital display (no visible text or symbols on main body)FRESHNESS TIMER
HOUR
MINUTE
BREW
BREW
STRONG
CLEAN
LATER
NOW
ICED
5. KÉSZÜLÉK HASZNÁLATA
- INTRODUCTION
- CONTENT OF YOUR PACKAGE
- SAFETY MEASURES
- GENERAL
- CORD PLUG
- PRODUCT DESCRIPTION
- CONTROL PANEL
- USING THE APPLIANCE
- CLOCK SETTING
- NOTE:
- WARNING:
- DELAY FUNCTION
- HEAT PRESERVATION TIME
- AUTOMATIC POWER OFF
- BREW ICED COFFEE
- SELF-CLEAN CYCLE
- CLEANING AND MAINTENANCE
- DESCALE
- CLEANING
- HINTS FOR GREAT TASTING COFFEE
- CUSTOMER CARE AND SERVICE
- TECHNICAL DATA
- Environment friendly disposal
- CAFETIERĂ DIGITALĂ
- UTILIZAREA APARATULUI
- ИЗПОЛЗВАНЕ НА УРЕДА
- DIGITÁLIS KÁVÉFŐZŐGÉP
- KÉSZÜLÉK HASZNÁLATA
Brand : Heinner
Model : HCM-DD900BKSS
Category : Coffee maker