
SRC 2600 B - Radio SENCOR - Free user manual and instructions
Find the device manual for free SRC 2600 B SENCOR in PDF.


| Product Type | Radio |
| Brand | Sencor |
| Model | SRC 2600 B |
| Frequency Range (FM) | 87.5 - 108 MHz |
| Frequency Range (AM) | 530 - 1710 kHz |
| Number of Preset Stations | 30 (FM) + 20 (AM) |
| Speaker Output Power | 2 W |
| Dimensions (W x H x D) | 200 x 120 x 80 mm |
| Weight | 0.5 kg |
| Power Supply | AC 230V 50Hz or 4 x AA batteries (not included) |
| Power Consumption | 5 W |
| Antenna | FM telescopic antenna, AM internal ferrite |
| Headphone Jack | 3.5 mm stereo |
| Display | LCD with backlight |
| Additional Features | Sleep timer, alarm clock, volume control, tuning knob |
| Maintenance | Clean with soft dry cloth. Avoid moisture and solvents. |
| Safety Warnings | Do not expose to rain or moisture. Unplug during storms. |
| Spare Parts Availability | Contact Sencor authorized service center. |
| Repairability | Repair should be done by qualified personnel. |
Frequently Asked Questions - SRC 2600 B SENCOR
User questions about SRC 2600 B SENCOR
0 question about this device. Answer the ones you know or ask your own.
Ask a new question about this device
Download the instructions for your Radio in PDF format for free! Find your manual SRC 2600 B - SENCOR and take your electronic device back in hand. On this page are published all the documents necessary for the use of your device. SRC 2600 B by SENCOR.
USER MANUAL SRC 2600 B SENCOR
EN User Manual Clock radio
Disposal of your old appliance or battery ....3
Care, maintenance and storage....3
Overview of the product....4
Getting started 5
Backup system....5
Setting the clock....5
Using the antenna....5
Controlling the sound volume....5
Listening to radio....6
Setting preset stations....6
Using the alarms....6
Setting alarms 6
Turning the alarms on or off 6
Deactivating a sounding alarm....6
Snooze....7
Sleep....7
Display information....7
Display brightness....7
Specifications....7
Adapter technical specifications....7
WARNING
- Minimum distances 5 cm around the apparatus for sufficient ventilations.
- The ventilation should not be impeded by covering the ventilation openings with items such as newspaper, table-cloths, curtains etc.
- No naked flame sources such as lighted candles should be placed on the apparatus.
- Attention should be drawn to the environmental aspects of battery disposal.
- The use of apparatus in moderate climates.
- Where the mains plug is used as the disconnect device, the disconnect device shall remain readily operable.
- Please refer the information on exterior bottom enclosure for electrical and safety information before installing or operating the apparatus.
- The batteries (battery pack or batteries installed) shall not be exposed to excessive heat such as sunshine, fire or the like.
- CAUTION - Danger of explosion if battery is incorrectly replaced. Replace only with the same or equivalent type

WARNING
DO NOT INGEST BATTERY, CHEMICAL BURN HAZARD
This product contains a coin/button cell battery. If the coin/button cell battery is swallowed, it can cause severe internal burns in just 2 hours and can lead to death.
Keep new and used batteries away from children. If the battery compartment does not close securely, stop using the product and keep it away from children.
If you think batteries might have been swallowed or placed inside any part of the body, seek immediate medical attention.
DISPOSAL OF YOUR OLD APPLIANCE OR BATTERY
- When this crossed-out wheeled bin symbol is attached to a product, it means the product is covered by the European Directive.
- All electrical and electronic products including battery should be disposed of separately from the municipal waste stream via designated collection facilities appointed by the government or the local authorities.
- The correct disposal of your old appliance will help prevent potential negative consequences for the environment and human health.
- For more detailed information about disposal of your old appliance, please contact your city office, waste disposal service or the shop where you purchased the product.

CARE, MAINTENANCE AND STORAGE
- Clean the radio with a soft damp cloth and let all parts dry completely after cleaning.
- Do not use any aggressive cleaners, brushes with nylon bristles, sharp or metallic cleaning utensils, knives, hard scrapers and the like. They could damage the surfaces of the radio.
- Do not immerse the radio in water and do not let water getting into the housing of the radio.
- Unplug the power adapter and clean the radio before storage.
• Always store the radio in a dry and clean place.
OVERVIEW OF THE PRODUCT
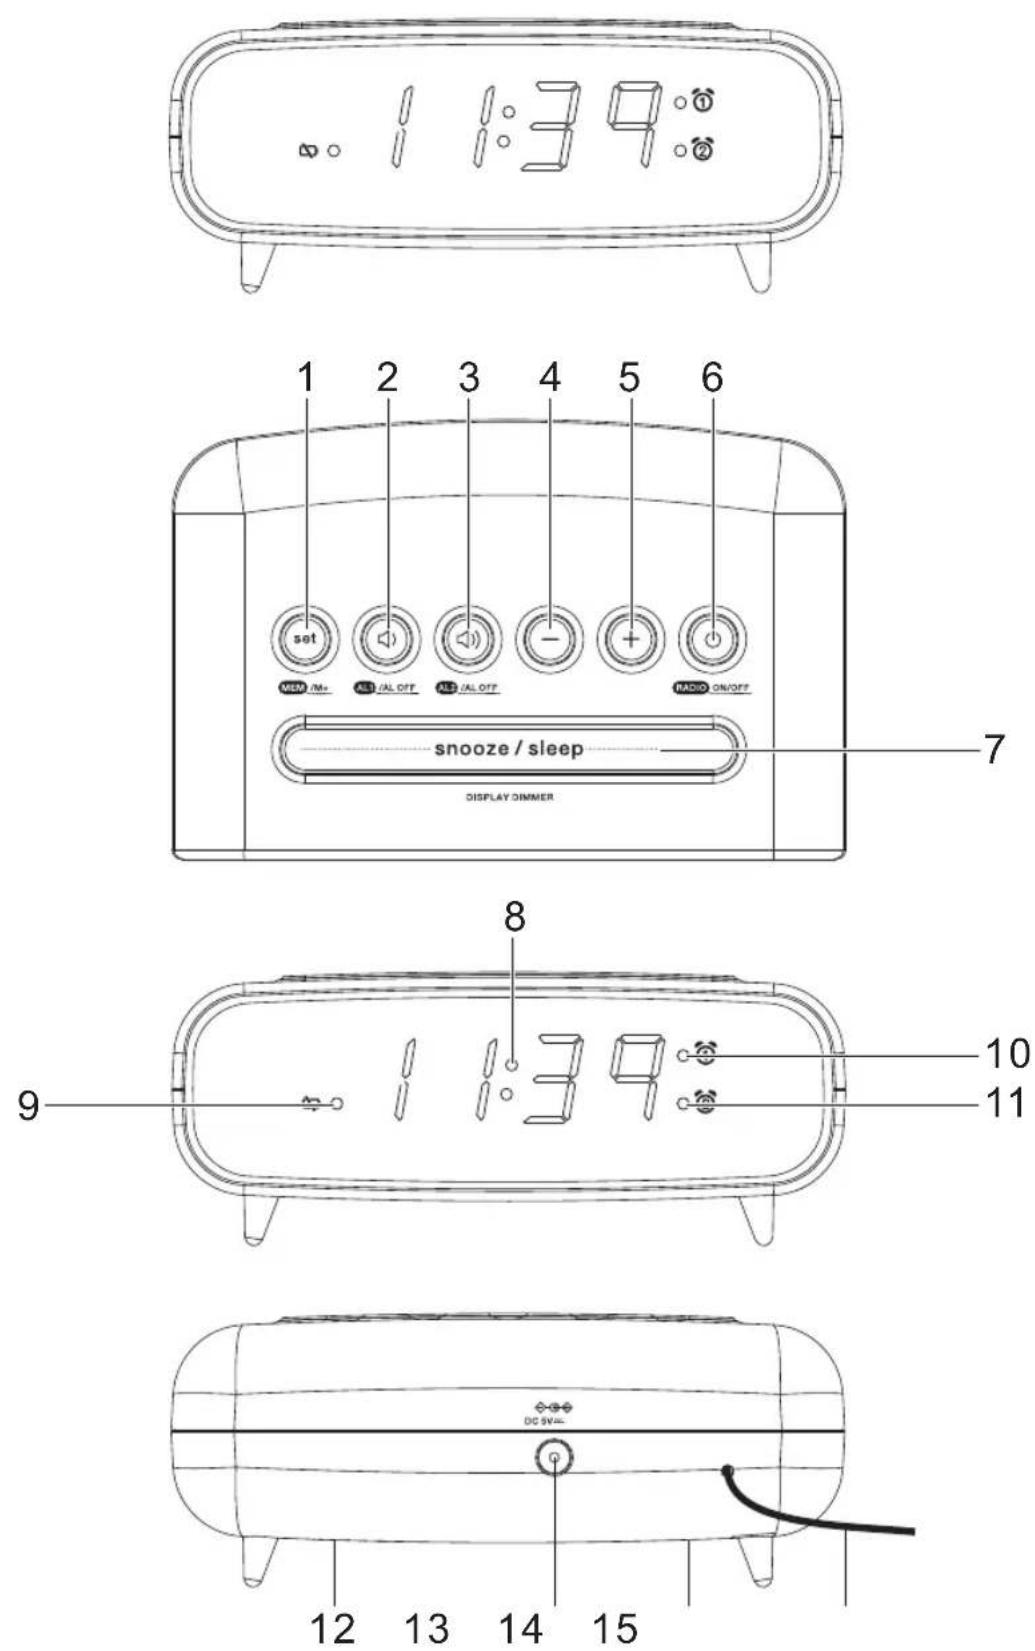
EN-4
- MEM/M+ button / SET button
- ALARM 1 button / VOL DOWN button / ALARM OFF button
- ALARM 2 button / VOL UP button / ALARM OFF button
- BACKWARD button
- FORWARD button
- RADIO ON/OFF button
- SNOOZE button / SLEEP button / DISPLAY DIMMER button
- Display
- Low Battery Indicator (When lit, indicates backup batteries should be replaced.)
- Alarm 1 indicator (When lit, indicates Alarm 1 is armed. If not lit, Alarm 1 is not armed.)
- Alarm 2 indicator (When lit, indicates Alarm 2 is armed. If not lit, Alarm 2 is not armed.
- Speaker
- DC IN jack
- Battery compartment
- Antenna
GETTING STARTED
- Connect the cord of the power adapter to the DC IN jack of the radio.
- Connect the plug of the power adapter to a wall socket.
The radio is powered and in standby mode when you see the display is switched on.
Backup system
- The radio is equipped with a backup system. It requires a 3 V lithium battery (type: CR2032). Insert the battery into the battery compartment and make sure the positive and negative (+ or -) sides of the battery are in contact with the corresponding terminals in the battery compartment.
- If there is a power failure, the clock and timer settings are retained.
- To open the battery compartment, use a screwdriver to detach the screw on the compartment door.
- When replacing the battery, do not disconnect the power adapter. Otherwise, all clock and alarm settings will be lost.
Setting the clock
-
In standby mode, press and hold the SET button to enter the clock setting mode.
-
Setting the time: Press the BACKWARD button to set the hour time and FORWARD button to set the minute time.
- Press the SET button to confirm each setting option.
Using the antenna
Unroll and extend the antenna to improve FM signal reception.
Controlling the sound volume
While listening to the radio, press the VOL UP or DOWN button to control the volume.
LISTENING TO RADIO
- Press the RADIO ON/OFF button to switch the radio on.
- Press the BACKWARD or FORWARD button to adjust frequency.
- Press and hold the BACKWARD or FORWARD button to automatically tune to the next available FM station.
- Press the RADIO ON/OFF button to switch the radio off.
Setting preset stations
You can store up to 10 preset stations.
- Tune to a station.
- Press and hold the MEM/M+ button until "P01" (or the next available preset slot) shows on the display.
- Press the BACKWARD or FORWARD button to select a preset number (P01-P10).
- Press the SET button to confirm. The preset station has been set up.
- Press the MEM/M+ button repeatedly while listening to the radio to select a preset station. Alternatively, press the MEM/M+ button once and then press the BACKWARD or FORWARD button to select a preset station.
USING THE ALARMS
Setting alarms
The radio lets you have 2 alarm settings. To set the alarms:
- Make sure the RADIO ON/OFF button is NOT activated. If the radio is playing, press the RADIO ON/OFF button to switch it OFF.
- Hold down the ALARM 1 or ALARM 2 button to open the alarm time setting mode.
- In alarm setting mode, press the -BACKWARD button to set the hours, +FORWARD button to set the minutes.
Confirm the alarm setting by pressing the Alarm 1 or 2 button and this will take you to the alarm sound source step (see note 1)
- Press the BACKWARD or FORWARD button to adjust the values in each setting option. Press and hold the button to change the values quickly.
- To confirm the settings, press the ALARM 1 or ALARM 2 button.
- Once settings are done, the alarm is enabled and the corresponding AL 1 or AL 2 icon will turn on.
Note:
- Select the buzzer ("bu" shows on the display), the radio (the last played radio frequency shows on the display), as the alarm sound source.
- When the alarm is set to radio mode, the alarm will use the last tuned radio station.
Turning the alarms on or off
When the clock time is displayed, press the ALARM 1 or ALARM 2 button to enable or disable the respective alarm. The corresponding Alarm 1 or Alarm 2 indicator (alarm or radio) will switch on when the alarm is enabled.
Deactivating a sounding alarm
- Press any ALARM OFF button to switch off a sounding alarm.
- When the alarm sounds, the corresponding Alarm 1 or Alarm 2 indicator (alarm or radio) flashes on the display.
Snooze
- To temporarily silence a sounding alarm, press the SNOOZE button. The alarm will sound again when the snooze period (9 minutes) is over.
- The corresponding Alarm 1 or Alarm 2 indicator (alarm or radio) flashes on the display during the snooze period.
- To cancel the snooze period and the alarm, press any ALARM OFF button.
Sleep
- This sleep function defines the duration of time before the radio switches itself off automatically.
- When the radio is switched on, press the SLEEP button repeatedly to select a sleep period (Options: Off, 10, 20, 30, 40, 50, 60, 70, 80 and 90 minutes).
- The radio will automatically switch off when the sleep period is over.
- Press the SLEEP button to check the remaining time before the radio switches off.
- Press the RADIO ON/OFF button to cancel this function.
DISPLAY INFORMATION
- In radio mode, press the BACKWARD or FORWARD button once to briefly change the display from the clock time to the current radio frequency.
Display brightness
- In standby mode, press the DIMMER button to change the brightness level of the display (off, low, medium or high).
Specifications
Tuner Range: FM: 87.50 – 108.00 MHz
Number of preset radio stations: 10
Amplifier Rated Output Power: 350 mW (RMS)
Temperature range for Indoor: 15°C to +35°C or 59 to 122°F
Adapter technical specifications
Manufacturer's name or trade mark, commercial registration number and address:
DongGuan Obelieve Electronic Co., Ltd, HuaZhaoXin Industrial Park B-4/F, Golden Phoenix Industrial Zone, Fenggan Town, Dongguan, Guangdong Province, P.R. China, 91441900050747698U
Model identifier: OBL-0501000E
Input voltage: AC100 - 240V
Input AC frequency: 50/60Hz
Output voltage: DC5.0V
Output current: 1.0A
Output power: 5.0W
Average active efficiency: ≥73.62%
Efficiency at low load (10 %): 75.20%
No-load power consumption: ≤0.1W
INSTRUCTIONS AND INFORMATION ON THE DISPOSAL OF DISCARDED PACKAGING MATERIALS
Take the packaging material to a collection yard for disposal.
DISPOSAL OF DISCARDED ELECTRICAL AND ELECTRONIC EQUIPMENT
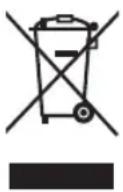
This symbol on the product, accessory or packaging indicates that the product must not be treated as normal household waste. Please dispose of this product in a collection yard designated for the recycling of electrical and electronic equipment. In some EU countries or in some European countries, you can return your products to your local retailer when you buy an equivalent new product. Correct disposal of this product helps save valuable natural resources and prevents possible adverse impacts on the environment and human health that might be caused by improper waste disposal. Please contact your local authority or the nearest waste collection yard for further details. Improper disposal of this type of waste may be subject to a legal fine.
For companies in the European Union
If you need to dispose of electrical or electronic equipment, ask your dealer or supplier for the necessary information.
Disposal in countries outside the European Union
To dispose of this product, please ask your local authorities or dealer for the necessary information on correct disposal.

This product complies with EU requirements.
FAST ČR, a. s. hereby declares that the radio device type SRC 2600 complies with Directive 2014/53/EU. For full version of the EU declaration of conformity, please refer to the website: www.sencor.com
Changes in the text, design and technical specifications may be made without prior notice and we reserve the right to make such changes.
The original version is in Czech.
Manufacturer: FAST ČR, a.s., U Sanitasu 1621, Říčany 251 01, Czech Republic
Authorized service centers: Visit www.sencor.com for detailed information about authorized service centers.
SENCOR®
EN Warranty conditions
Warranty card is not a part of the device packaging.
This product is warranted for the period of 24 months from the date of purchase to the end-user. Warranty is limited to the following conditions. Warranty is referred only to the customer goods using for common domestic use. The claim for service can be applied either at dealer's shop where the product was bought, or at below mentioned authorized service shops. The end-user is obligated to set up a claim immediately when the defects appeared but only till the end of warranty period. The end user is obligated to cooperate to certify the claiming defects. Only completed and clean (according to hygienic standards) product will be accepted. In case of eligible warranty claim the warranty period will be prolonged by the period from the date of claim application till the date of taking over the product by end-user, or the date the end-user is obligated to take it over. To obtain the service under this warranty, end-user is obligated to certify his claim with duly completed following documents: receipt, certificate of warranty, certificate of installation.
This warranty is void especially if apply as follows:
■ Defects which were put on sale.
■ Wear-out or damage caused by common use.
The product was damaged by unprofessional or wrong installation, used in contrary to the applicable instruction manual, used in contrary to legal enactment and common process of use or used for another purpose which has been designed for.
■ The product was damaged by uncared-for or insufficient maintenance.
■ The product was damaged by dirt, accident of force majeure (natural disaster, fire, and flood).
■ Defects on functionality caused by low duality of signal, electromagnetic field interference etc.
■ The product was mechanically damaged (e.g. broken button, fall).
■ Damage caused by use of unsuitable media, fillings, expendable supplies (batteries) or by unsuitable working conditions (e.g. high temperatures, high humidity, quakes).
■ Repair, modification or other failure action to the product by unauthorized person.
■ End-user did not prove enough his right to claim (time and place of purchase).
■ Data on presented documents differs from data on products.
Cases when the claiming product cannot be identified according to the presented documents (e.g. the serial number or the warranty seal has been damaged).
Manufacturer:
FAST ČR, a.s., U Sanitasu 1621, Řičany 251 O1, Czech Republic
Visit www.sencor.com for detailed information about authorized service centers.
The original version of the instructions is in the Czech language, other language versions are made by the appropriate translation.
OBSAH
DongGuan Obelieve Electronic Co., Ltd, HuaZhaoXin Industrial Park B-4/F, Golden Phoenix Industrial Zone, Fenggan Town, Dongguan, Guangdong Province, P. R. China, 91441900050747698U
DongGuan Obelieve Electronic Co., Ltd, HuaZhaoXin Industrial Park B-4/F, Golden Phoenix Industrial Zone, Fenggan Town, Dongguan, Guangdong Province, P. R. China, 91441900050747698U
Označenie modelu: 0BL-0501000E
Vstupné napätie: AC 100 – 240 V
Vstupná striedavá frekvencia: 50/60 Hz
DongGuan Obelieve Electronic Co., Ltd, HuaZhaoXin Industrial Park B-4/F, Golden Phoenix Industrial Zone, Fenggan Town, Dongguan, Guangdong Province, P. R. China, 91441900050747698U
- WARNING
- DO NOT INGEST BATTERY, CHEMICAL BURN HAZARD
- DISPOSAL OF YOUR OLD APPLIANCE OR BATTERY
- CARE, MAINTENANCE AND STORAGE
- GETTING STARTED
- Backup system
- Setting the clock
- Using the antenna
- Controlling the sound volume
- LISTENING TO RADIO
- Setting preset stations
- USING THE ALARMS
- Setting alarms
- Note:
- Turning the alarms on or off
- Deactivating a sounding alarm
- Snooze
- Sleep
- DISPLAY INFORMATION
- Display brightness
- Specifications
- Adapter technical specifications
- INSTRUCTIONS AND INFORMATION ON THE DISPOSAL OF DISCARDED PACKAGING MATERIALS
- DISPOSAL OF DISCARDED ELECTRICAL AND ELECTRONIC EQUIPMENT
- For companies in the European Union
- Disposal in countries outside the European Union
- SENCOR®
- EN Warranty conditions
- This warranty is void especially if apply as follows:
- Manufacturer:
- OBSAH
Brand : SENCOR
Model : SRC 2600 B
Category : Radio