
Omega S3 - TV Tuner for Computer Evolveo - Free user manual and instructions
Find the device manual for free Omega S3 Evolveo in PDF.


| Product Type | TV Tuner for Computer |
| Brand | Evolveo |
| Model | Omega S3 |
| Interface | USB 2.0 |
| TV Standard | DVB-T/T2 |
| Video Resolution | Up to 1080p |
| Dimensions (approx.) | 75 x 28 x 12 mm |
| Weight | 30 g |
| Power Supply | USB bus-powered |
| Main Functions | Watch and record digital TV, timeshift, electronic program guide (EPG) |
| Software Included | Application for Windows (DVB viewer and recorder) |
| Operating System Compatibility | Windows 10/8/7 |
| Antenna Input | Coaxial (IEC) connector |
| Remote Control | Infrared remote included |
| Maintenance | Keep dry; clean with soft, dry cloth |
| Safety Precautions | Protect from moisture and extreme temperatures; do not disassemble |
| Spare Parts / Repairability | No user-serviceable parts; contact support for issues |
| General Information | Full user manual available in multiple languages; 156 pages |
Frequently Asked Questions - Omega S3 Evolveo
User questions about Omega S3 Evolveo
0 question about this device. Answer the ones you know or ask your own.
Ask a new question about this device
Download the instructions for your TV Tuner for Computer in PDF format for free! Find your manual Omega S3 - Evolveo and take your electronic device back in hand. On this page are published all the documents necessary for the use of your device. Omega S3 by Evolveo.
USER MANUAL Omega S3 Evolveo
TOOLS (NÁSTROJE)....11
SYSTEM SETUP (NASTAVENÍ SYSTÉMU)....13
MULTIMEDIÁLNÍ PŘEHRÁVAČ PVR 15
RECORDING (NAHRÁVÁNÍ) 18
EPG ELEKTRONICKÝ PROGRAMOVÝ PRŮVODCE ...... 18
ŘEŠENÍ POTÍŽÍ 19
DÜLEŽITÉ BEZPEČNOSTNÍ INSTRUKCE
natural_image
Line drawing of a battery pack with two batteries and an open lid, showing internal components (no text or symbols)PRIPOJENÍ K TELEVIZORU
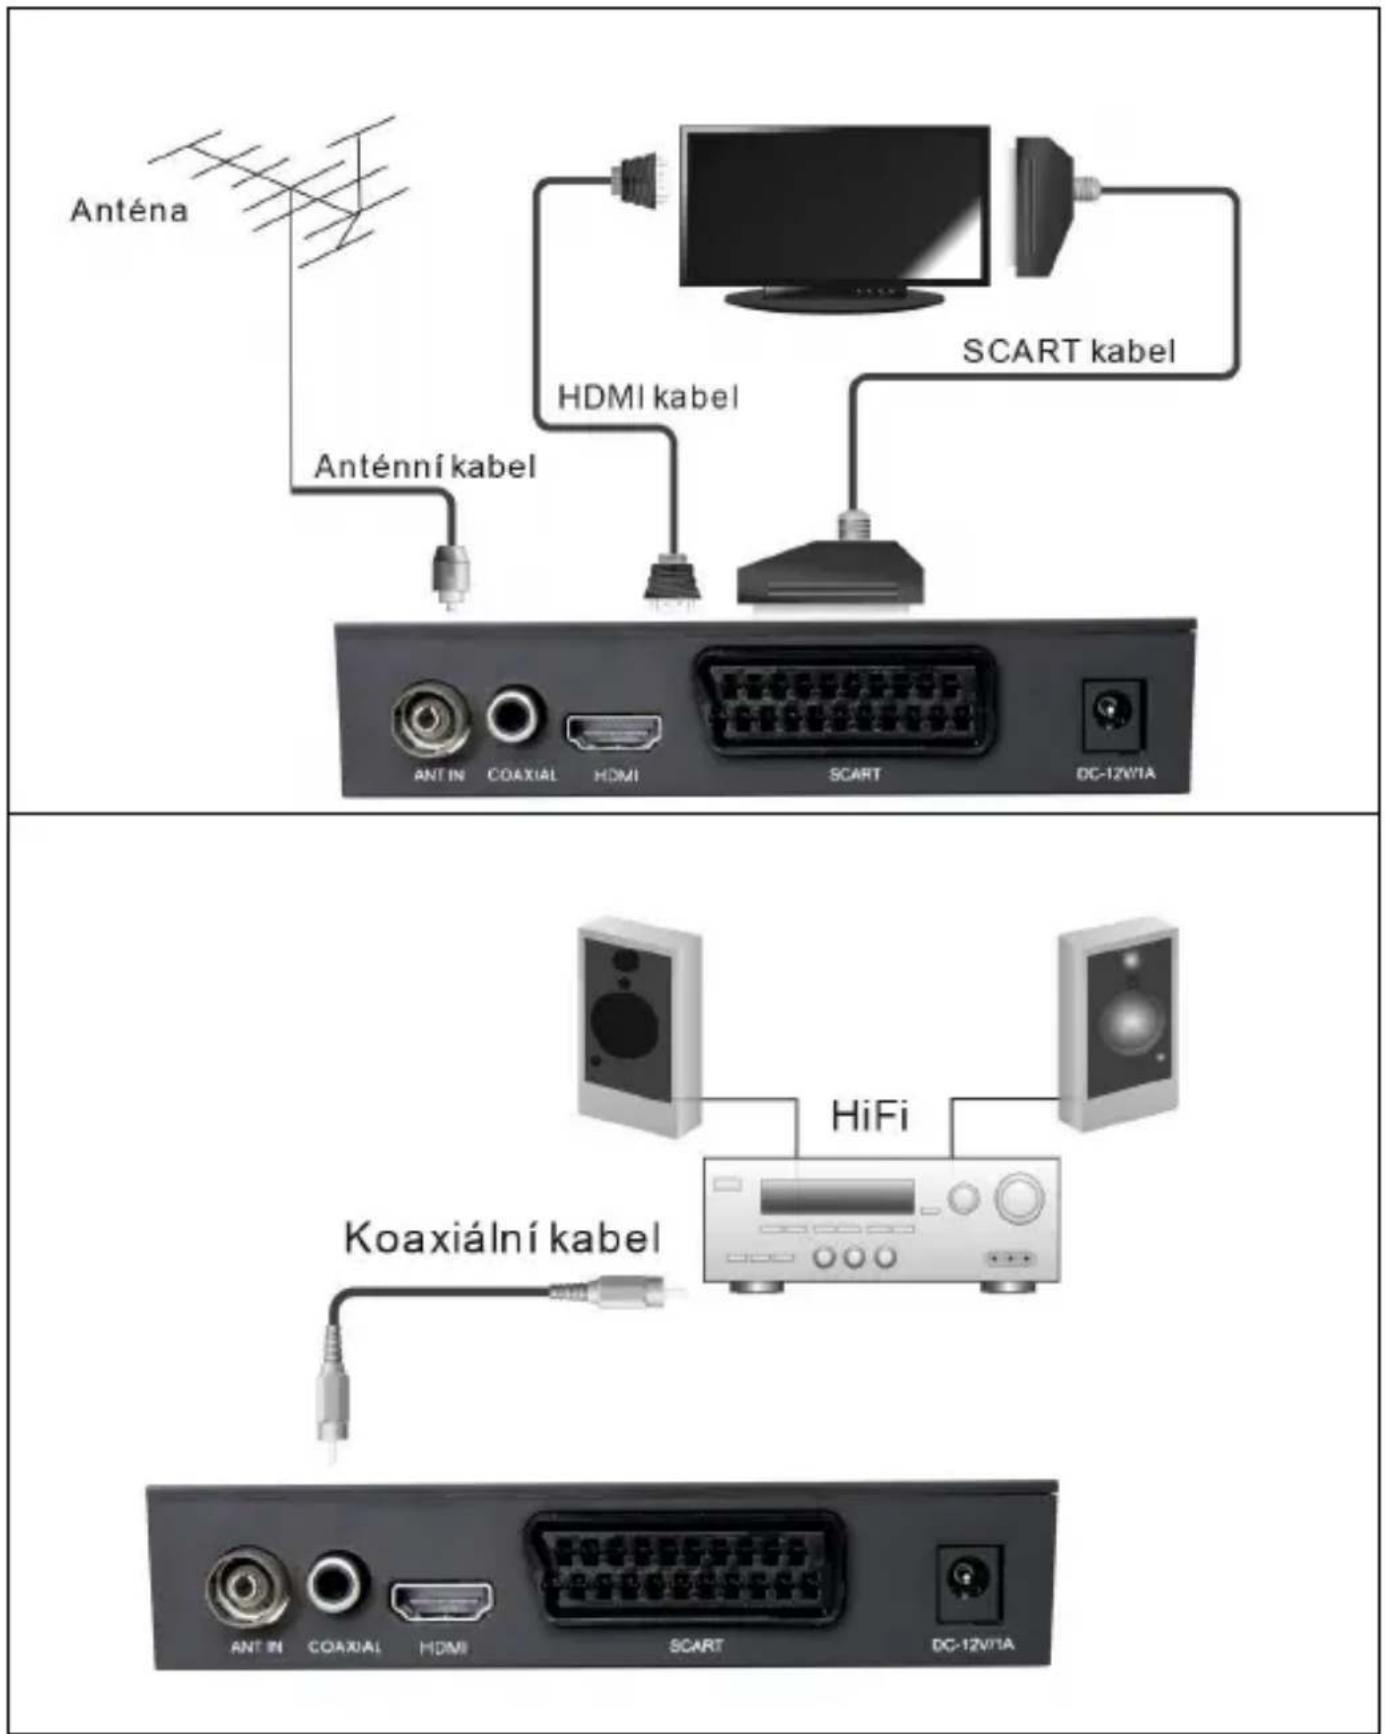
HLAVNÍ MENU
RYCHLÁ INSTALACE
Region: Vyberte zemi.
FAV
EDIT (UPRAVIT KANÁL)
UPGRADE BY USB (MODERNIZACE PŘES USB)
TV SYSTEM
PVR Video Music Image
TIMESHIFT (ČASOVÝ POSUN)
Copyright © Abacus Electric, s.r.o.
www.evolveo.com
www.facebook.com/EvolveoCZ
DÔLEŽITÉ BEZPEČNOSTNÉ POKYNY
EXIT: Ponuka Exit/Exit
natural_image
Line drawing of a battery pack with three batteries and an open lid, showing internal components (no text or symbols)PRIPOJENIE K TELEVÍZORU
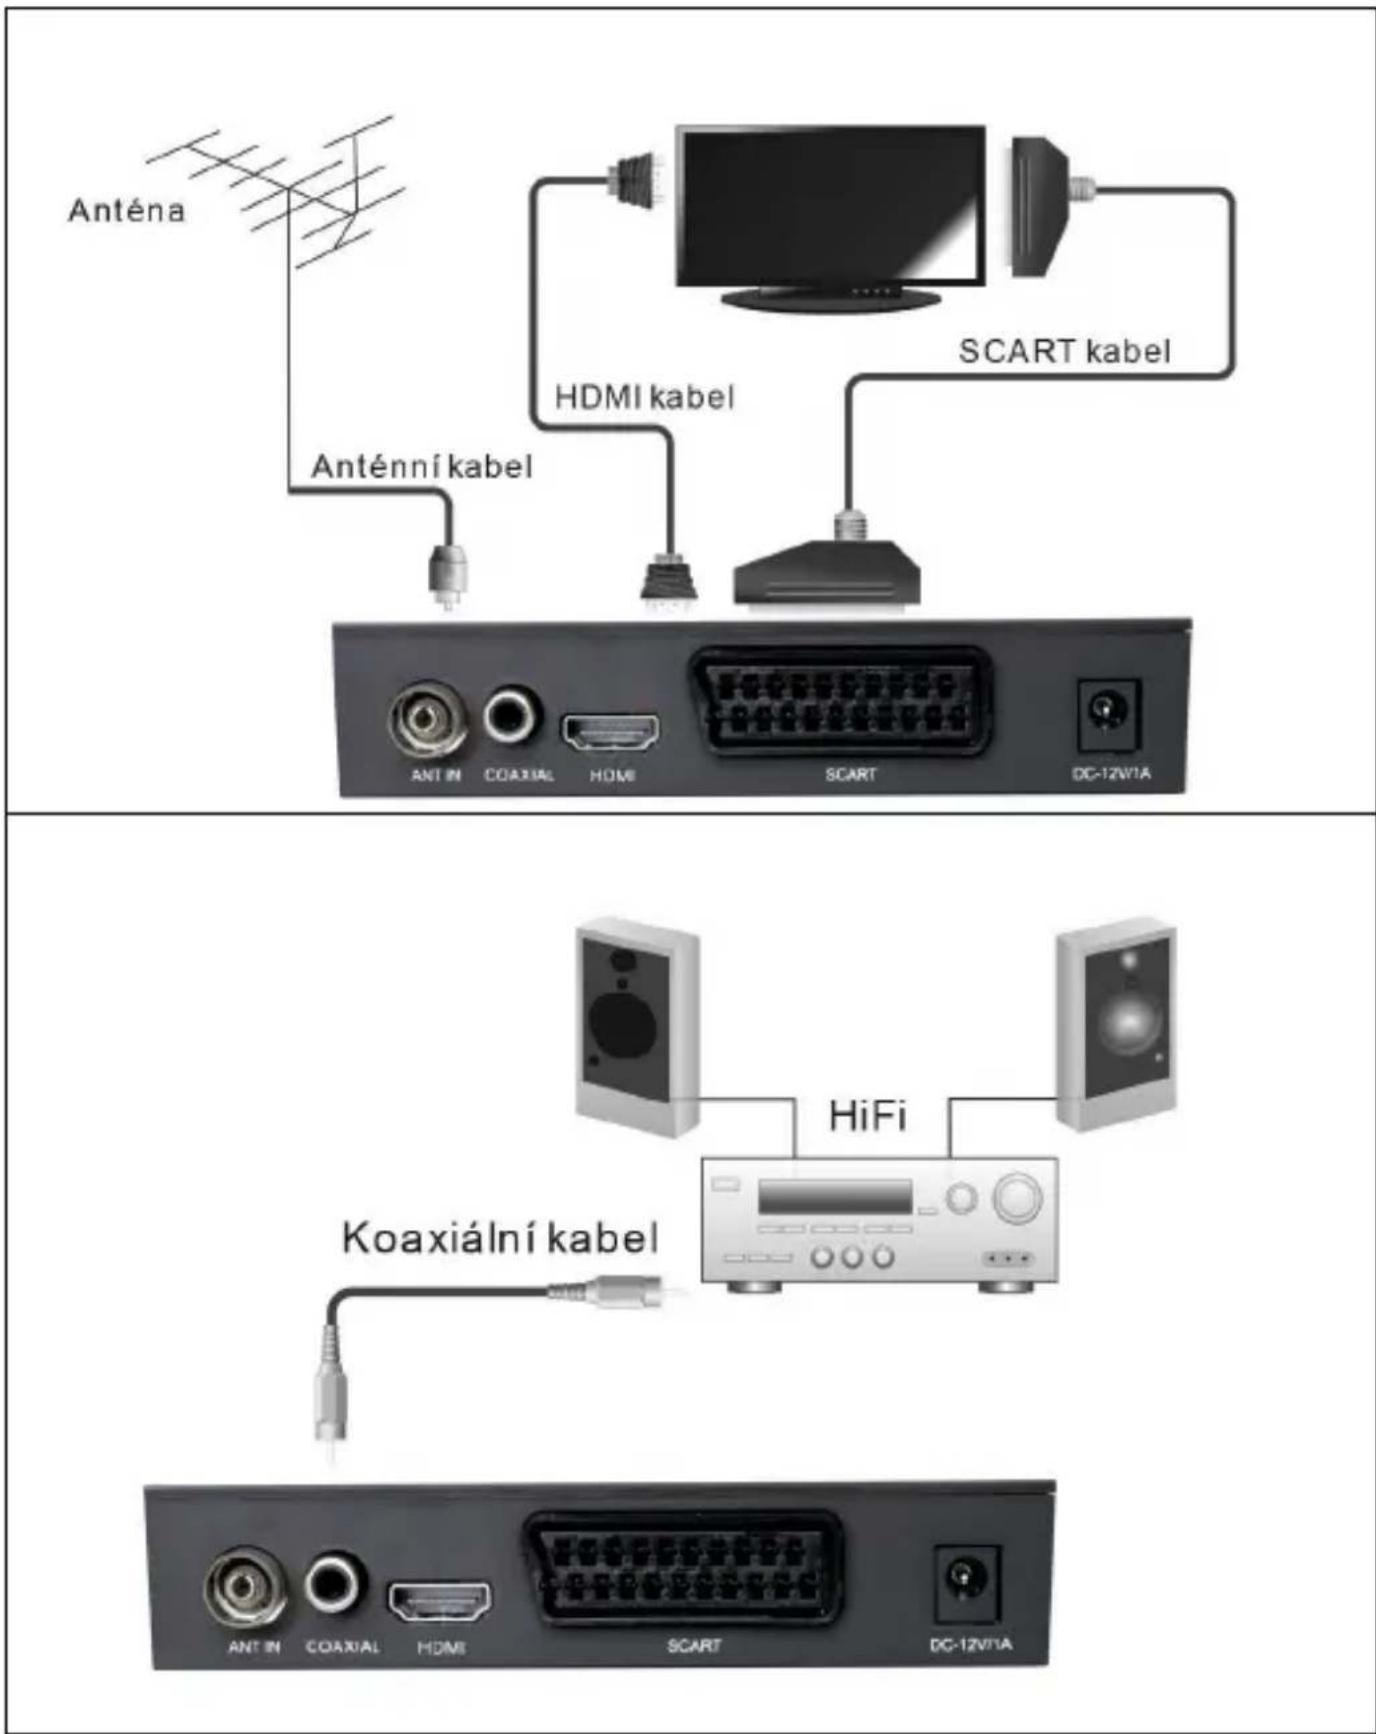
HLAVNÉ MENU
RÝCHLA INŠTALÁCIA
FAV
UPGRADE CEZ USB (UPGRADE CEZ USB)
TV SYSTEM
PREHRAVAC MEDI PVR (MEDIA PLAYER PVR)
PVR Video Music Image
PVR Storage Information (informácie o úložnom zariadení PVR)
TIMESHIFT (ČASOVÝ POSUN)
Copyright © Abacus Electric, s.r.o.
www.evolveo.com
www.facebook.com/EvolveoCZ
IMPORTANT SAFETY INSTRUCTIONS....42
CONTROL ELEMENTS....43
INSERTION OF BATTERIES 45
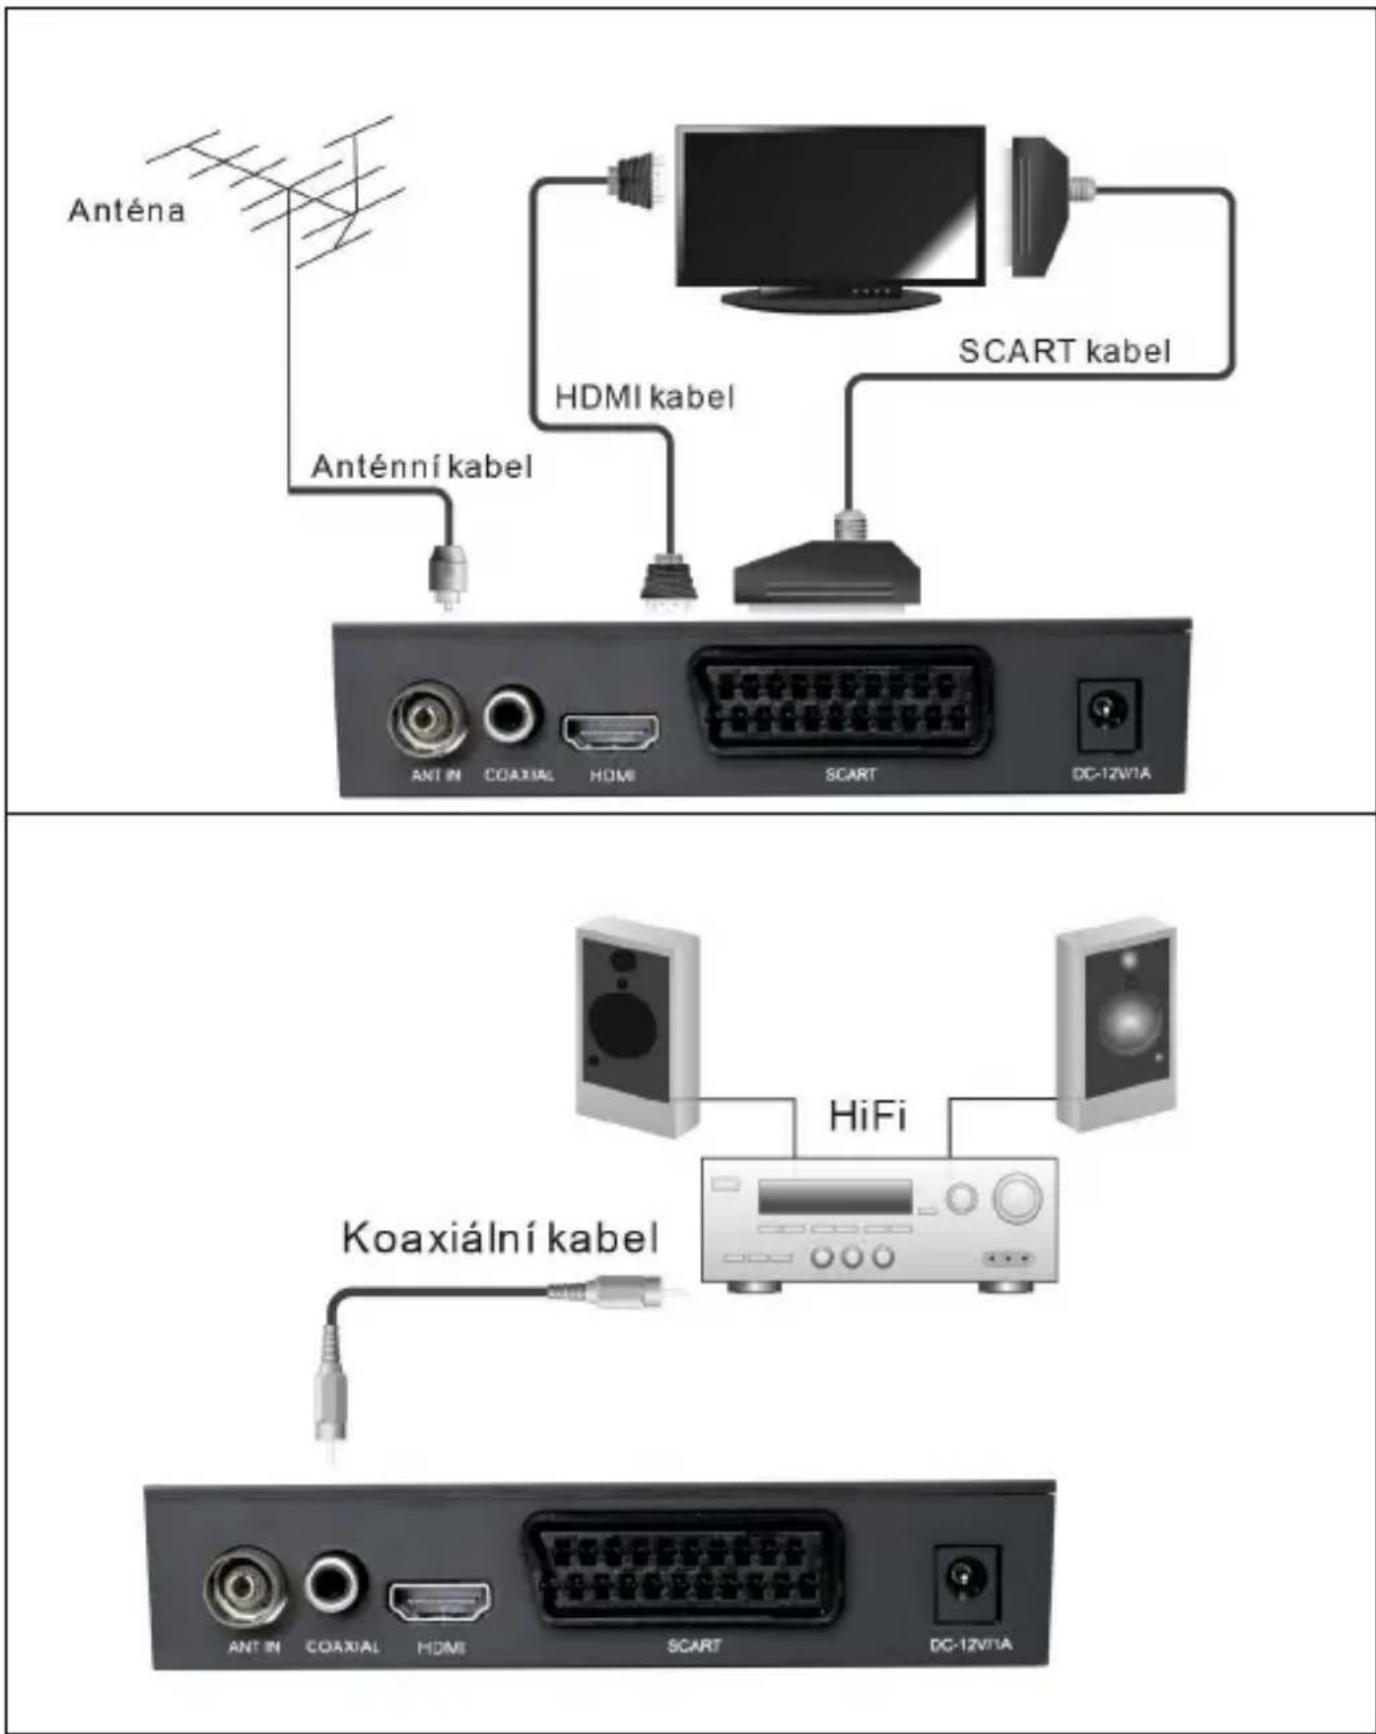
CONNECTION TO THE TV....46
MAIN MENU 47
TOOLS 49
SYSTEM SETUP....50
MEDIA PLAYER PVR (MEDIA PLAYER PVR) 53
RECORDING 55
EPG (ELECTRONIC PROGRAM GUIDE)......56
SOLVING THE PROBLEMS 56
IMPORTANT SAFETY INSTRUCTIONS
1) Do not use this device near water.
2) Clean only with a dry cloth.
3) Do not place near any heat sources such as radiators, underfloor heating grids, fireplaces, or other devices (including amplifiers) that produce high heat.
4) Operate this equipment only with the type of power supply indicated on the label. If you are unsure about the voltage in your home, check with your energy supplier. Before any maintenance or installation, disconnect the equipment from the mains voltage.
5) Protect the power cord from damage and stress.
6) Use only the accessories and accessories specified by the manufacturer.
7) If the equipment is not used for a long time or during a storm, disconnect the equipment from the mains.
8) Leave all repairs to a qualified service technician. Repairs are necessary if the equipment has been damaged in any way, including damage to the power cord or plug, if the equipment has been spilled on or exposed to moisture, if the equipment has fallen, or if the equipment is not working properly.
9) Do not prevent air from entering the equipment by covering the ventilation openings.
10) Dispose of batteries in an environmentally friendly manner.
WARNING: Prevent fire or electrical short circuit - do not expose the unit to rain or moisture.
WARNING: Batteries should not be exposed to excessive heat such as direct sunlight, fire, etc.

This symbol draws attention to dangerous voltages posing a risk of electric shock present in this equipment.

This symbol draws attention to important operating and maintenance instructions in the literature accompanying this equipment.

This symbol points out the double isolation between dangerous mains voltage and user accessible parts. Only use identical spare parts for repairs.
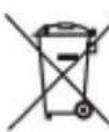
This symbol on the product or in the instructions indicates the disposal of your electrical and electronic equipment at the end of its life separately from your household waste. Separate collection systems exist for recycling. If you need more information, please contact your local authorities or the retailer from whom you purchased the goods.
CONTROL ELEMENTS
FRONT PANEL
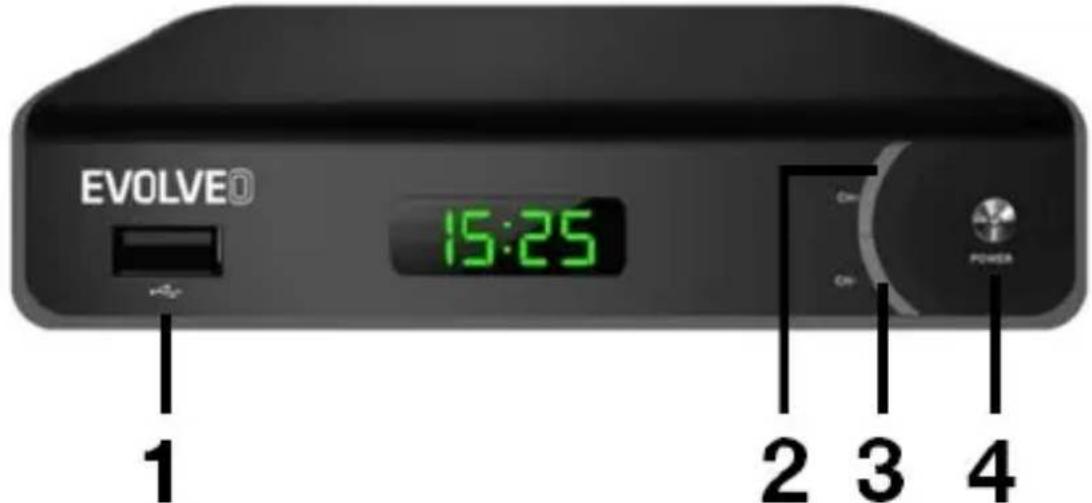
1) USB port
2) CH+ (channel selector button)
3) CH- (channel select button)
4) ON/OFF button
REAR PANEL
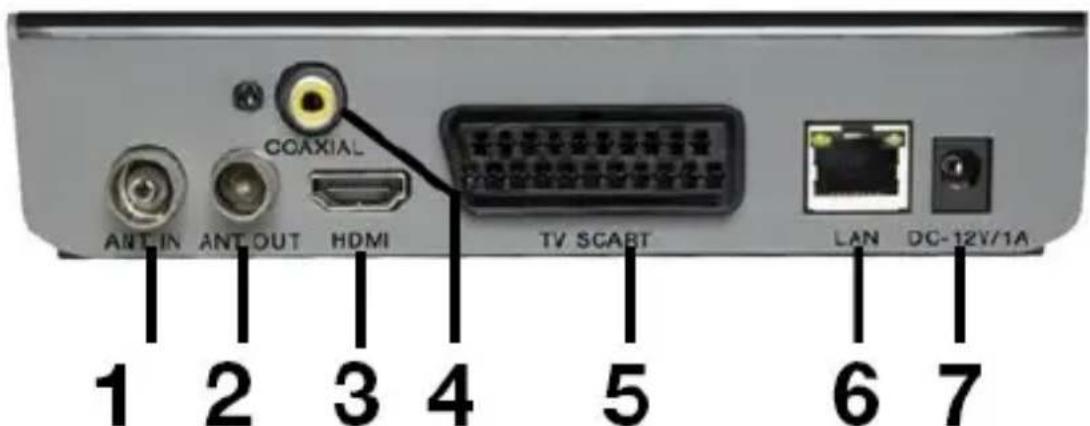
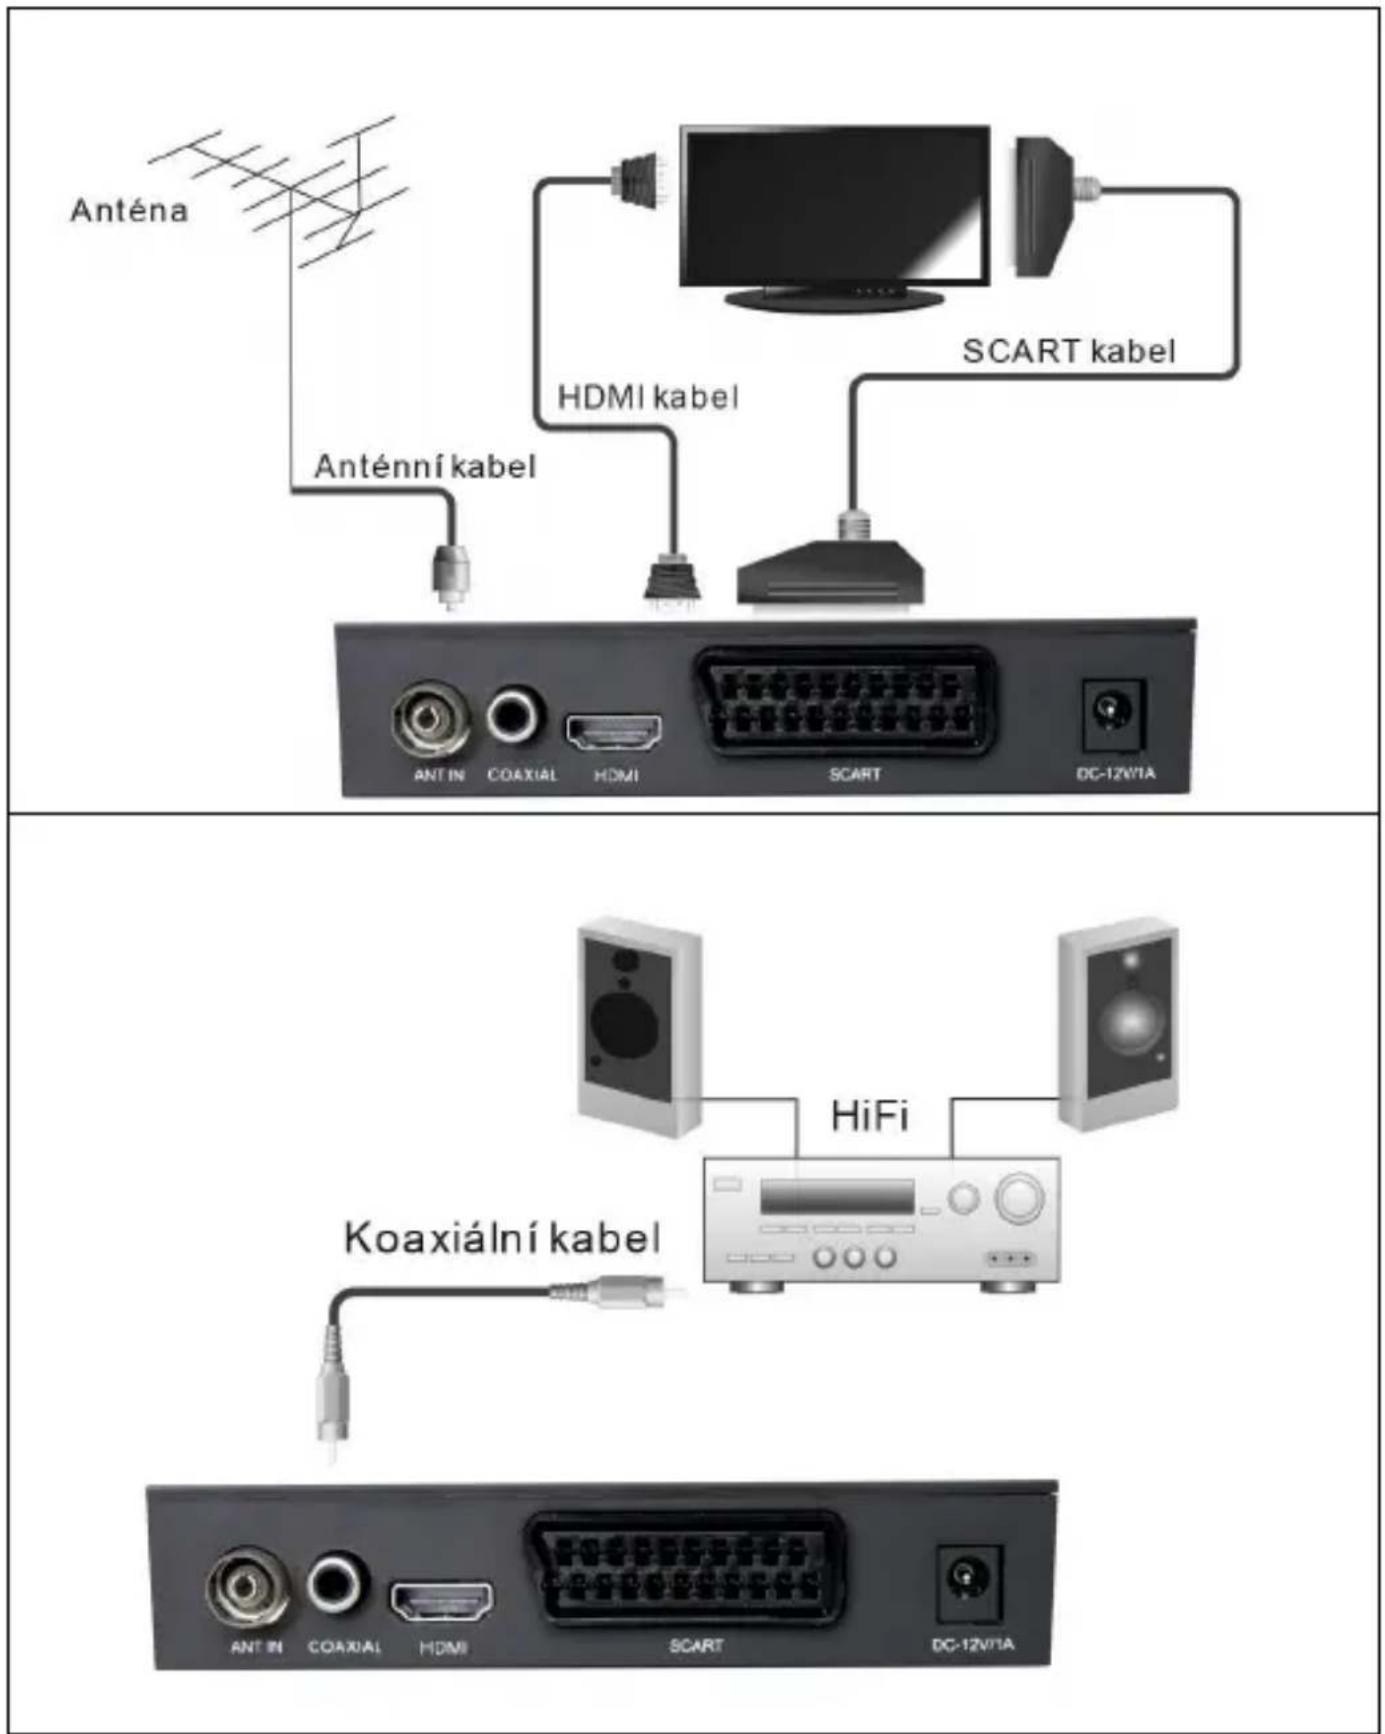
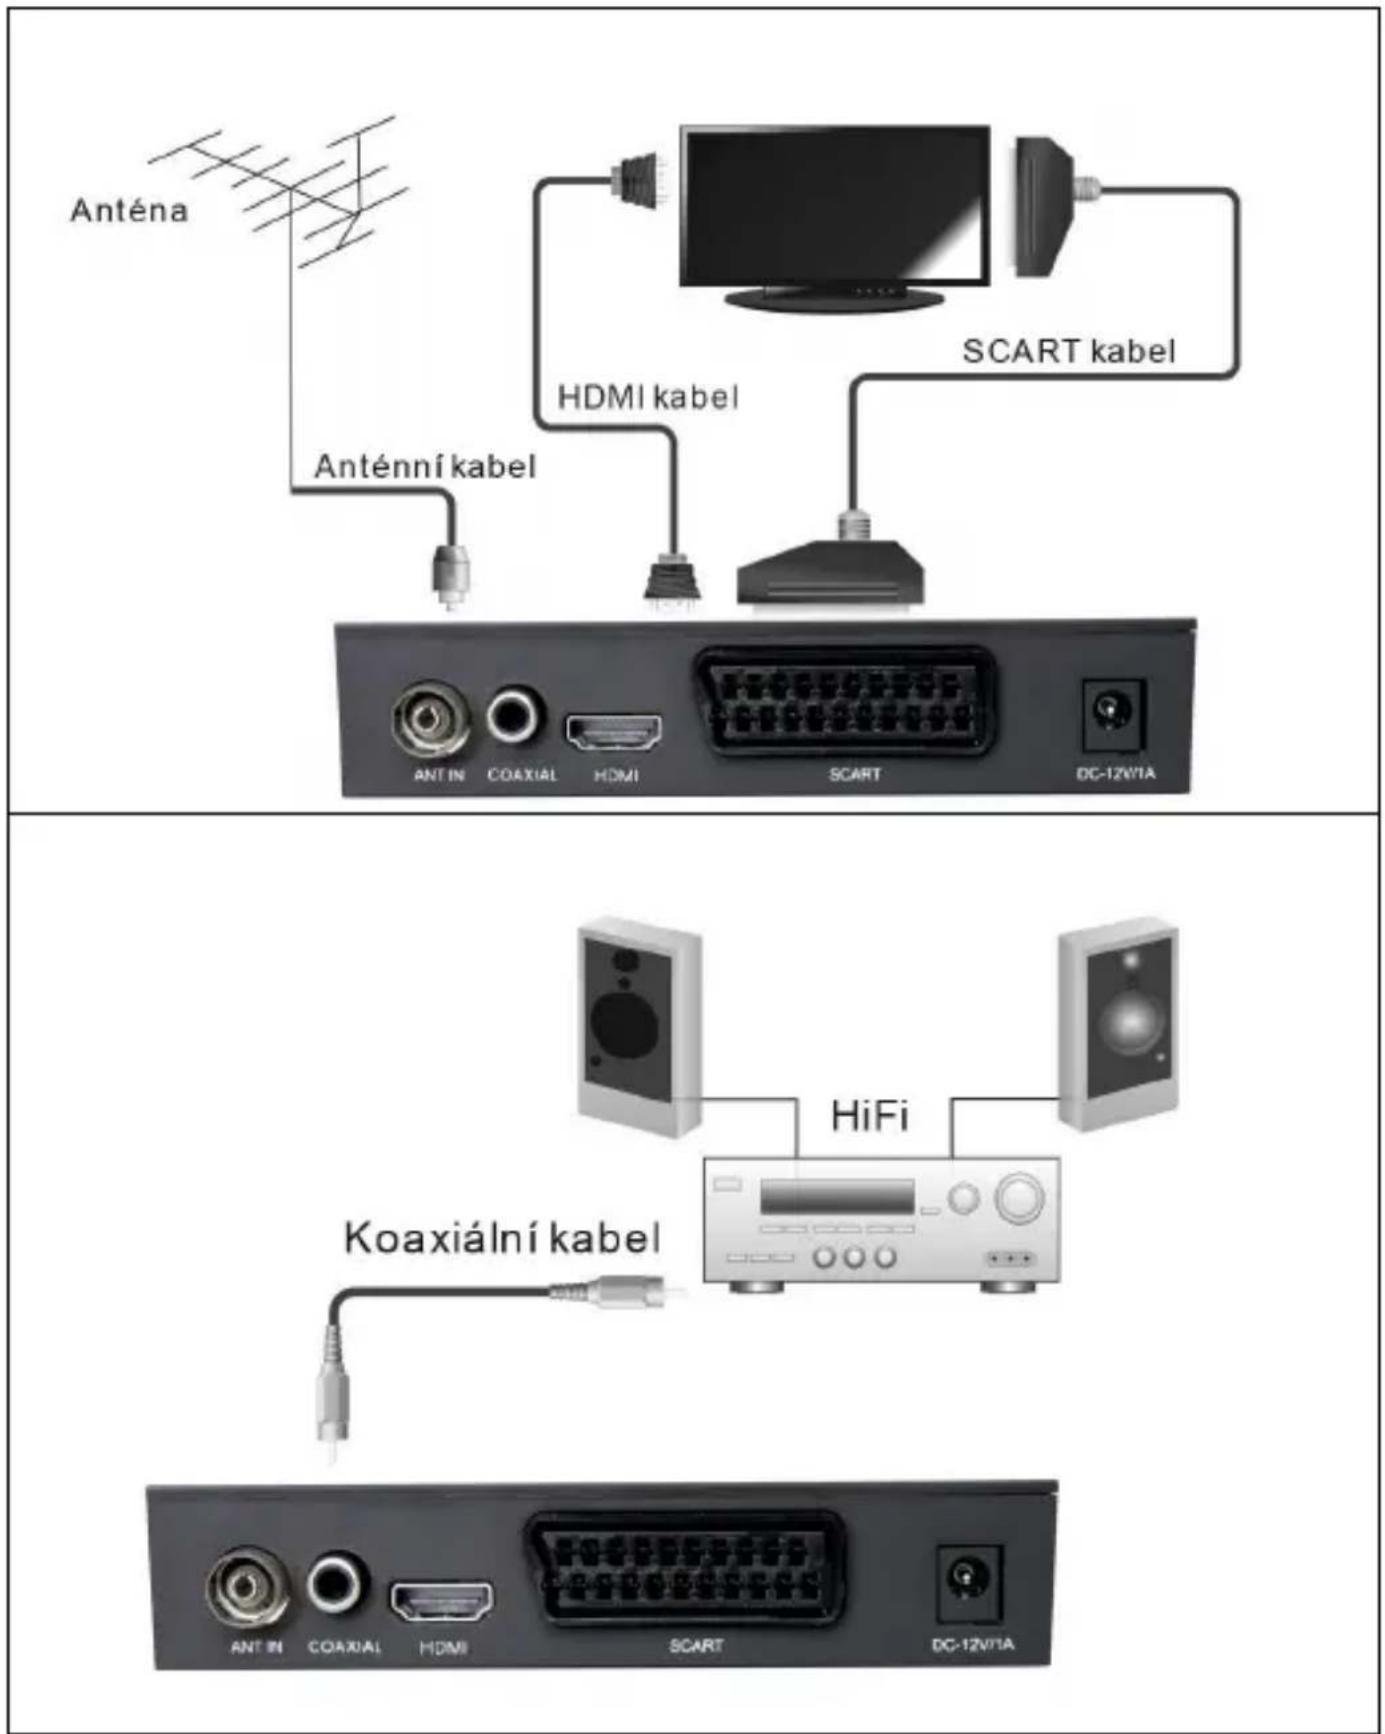
1) Antenna input
2) Antenna output
3) HDMI output
4) Digital coaxial audio output
5) TV SCART
6) LAN
7) 12V port power supply
OFF switch (red button): Standby mode (ON/OFF) Fast forward Fast forward Play/Pause Stop (Stop)
Recording (REC) a TV programme to a connected USB memory device PVR submenu entry
Subtitle: Displays subtitle options TTX: switching to Teletext AUDIO: Sound language or sound mode
EPG: Viewing the electronic program guide INFO: Display information about the current programme Cursor shift MENU: Display the EXIT main menu : Exit/Exit menu VOL-/VOL+: Volume down/up CH-/CH+: Buttons to change the program FAV: List of favorite MUTE channels : Mutes the audio output of the receiver 0-9: Numeric keys
TV/RADIO: Switch between TV and radio channels RECALL: Return to the last viewed channel
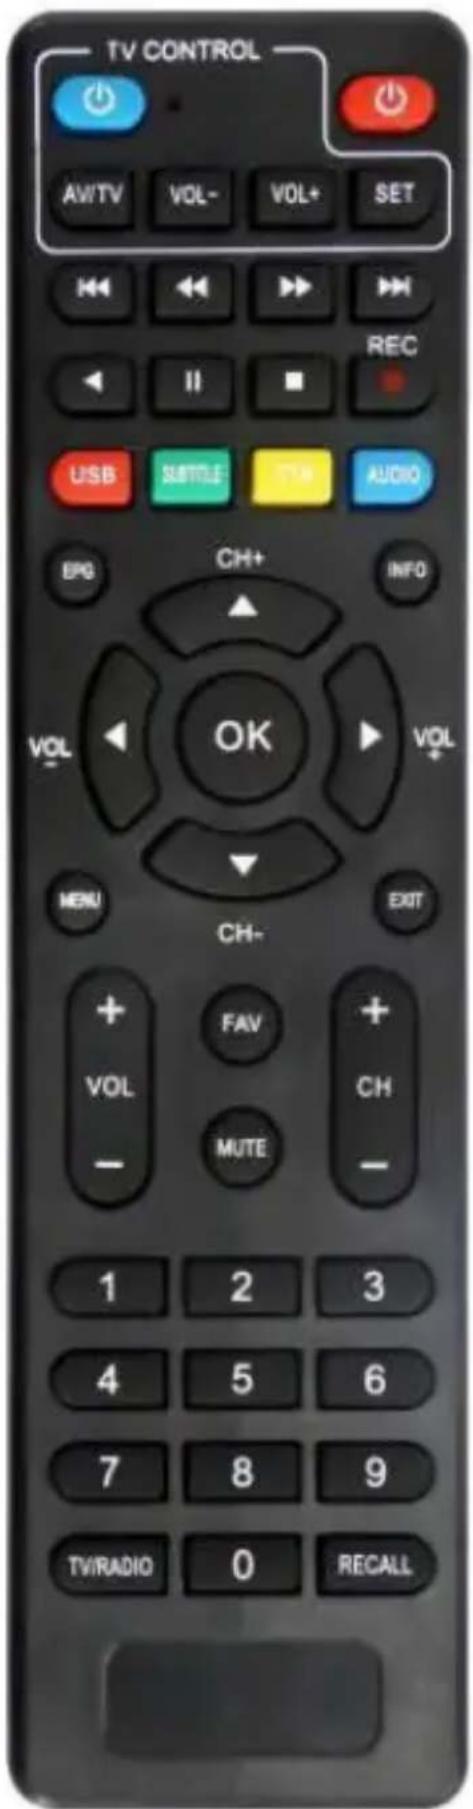
SMART REMOTE CONTROL
- There are 4 adjustable buttons on the remote control for controlling the TV: TV Power, Vol +, Vol -, TV/AV.
- Press and hold the SET button for 3 seconds until the red LED lights up gradually.
- Place the new and original TV remote controls face to face at a distance of 3-5 cm.
- Press and release the button you want to set on the new remote control, the red LED will flash.
- On the original remote control, press and hold the corresponding button until the LED light is still on after two flashes.
- When the settings are complete, press the SET button and the LED will turn off.
- Repeat the above procedure for other functions (buttons) you want to program from your TV remote.
This feature may not be compatible with all TVs. The manufacturer is not responsible for the compatibility of this feature with your TV.
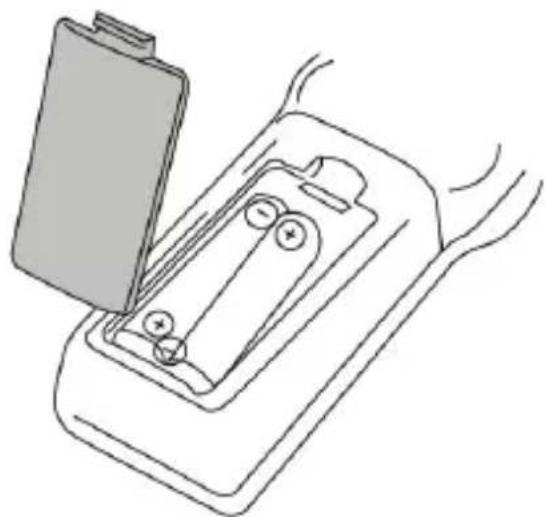
INSERTION OF BATTERIES
- Open the battery compartment cover.
- Insert 2 AAA batteries, with the poles correctly positioned.
- Close the battery compartment cover.
Notes:
- Do not use batteries with different voltages at the same time.
- Remove the batteries from the remote control if it will not be used for a long period of time.
- Do not place the remote control in direct sunlight or near sources of excessive heat. From a distance of less than 8 m, aim the remote control at the receiver.
natural_image
Line drawing of a battery pack with two batteries and a battery cover, no text or symbols presentCONNECTION TO THE TV
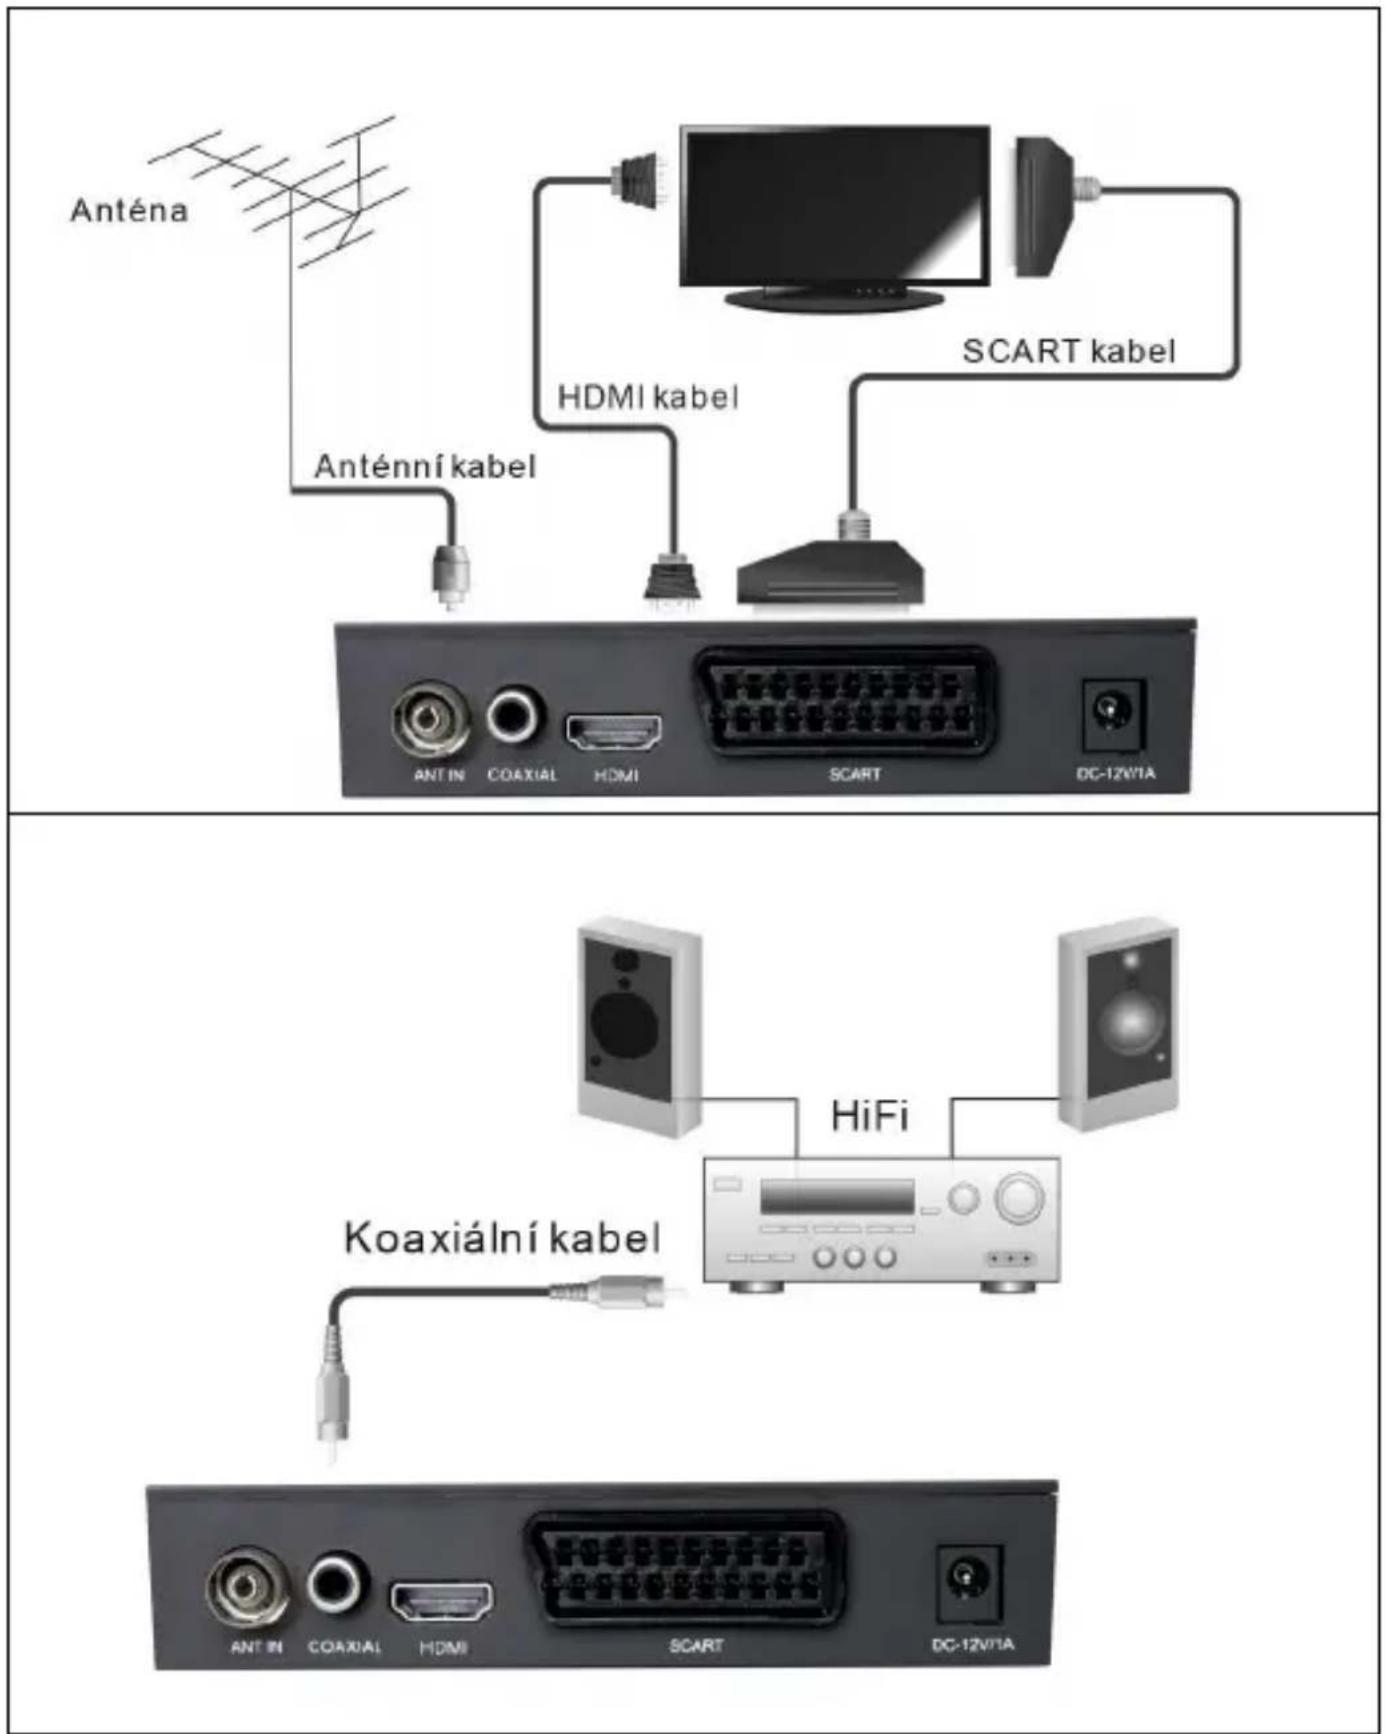
MAIN MENU
QUICK INSTALLATION
The first time you use the receiver, or after it has been rebooted to factory settings, a Welcome window will appear on your TV screen. Press the "OK" button to start the channel search
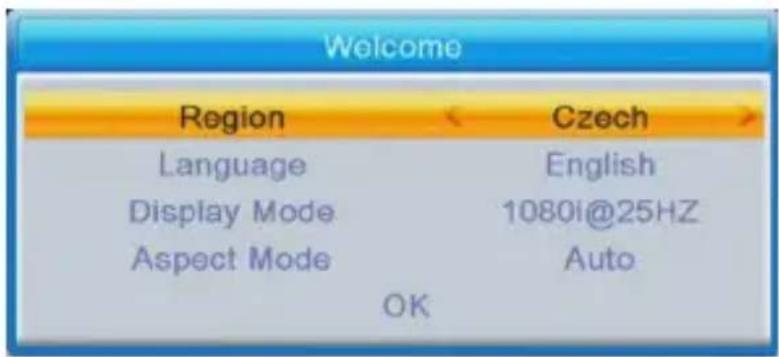
Region: Select a country.
Language (language settings): Select a language.
Display Mode: Select the screen resolution. The default value is 1080i@25.
Aspect Mode (aspect ratio): Select the aspect ratio of the image. Auto is set by default. OKAY: Press the OK button and automatic channel tuning will start
INSTALLATION
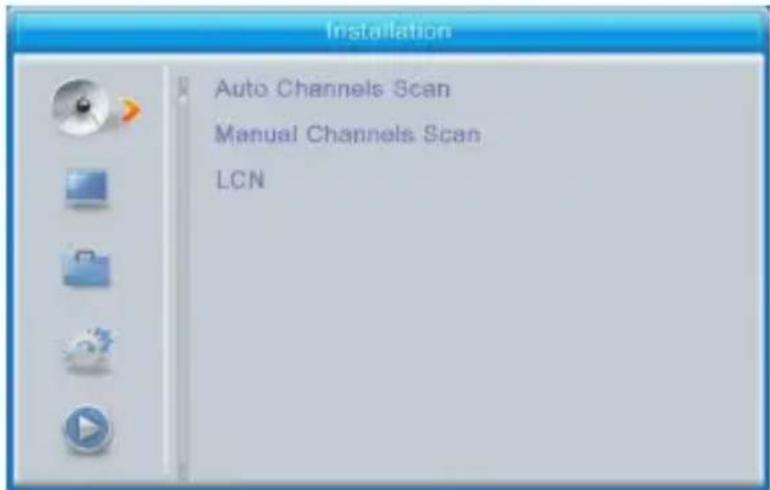
Auto Channels Scan: Automatic tuning and storage of available TV channels.
Manual Channels Scan: Manual tuning of TV channels. Channels can be searched by number or frequency. After selecting from the options, start searching by confirming "Search".
LCN (Logical Channel Numbering): To sort the
channels by their logical number, turn on this option. The default setting is "OFF".
EDITING CHANNELS
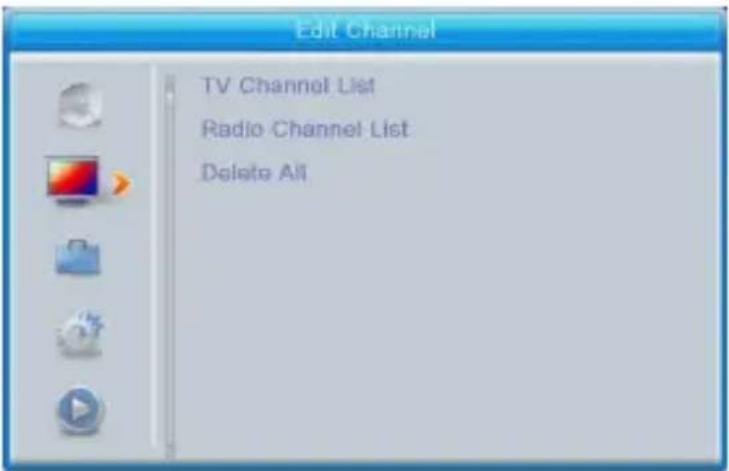
List of TV channels: In this menu, you can lock, delete, skip, reorder, and create lists of favourite channels.
To preview the program, select the program and press the "OK" button.
FAV
- Select a channel and press the FAV button on the remote control.
Then press the OK button. The favourites list will appear. - Select one of the lists and press OK. Confirm the changes by pressing the EXIT button. The selected channel will be saved in this list (now marked with an icon).
- Use the left and right buttons on the remote control to switch between the channel lists. To remove a channel from the favourites list, select it, press the FAV button, then press OK. A list of favourite channels will be displayed. Press the OK button again. Exit the menu to confirm the changes. The channel will be removed from the favourites list.
LOCK (LOCK CHANNEL)
Select a channel and press the red button on the remote control. Then press "OK" and enter the default password 0000. The channel will be marked with an icon. Confirm the changes by pressing the "EXIT"
button. The selected channel will be locked. If you want to unlock this channel, select it, press the red button and then press OK to enter the password.
SKIP (SKIP CHANNEL)
Select the channel and press the green button. Then press the "OK" button. The channel will be marked with an icon. Confirm the changes by pressing the "EXIT" button. When switching channels, this channel will be skipped. To cancel the skip option, press the green button and confirm by pressing OK.
MOVE (MOVE A CHANNEL IN THE LIST)
Select the channel and press the yellow button. Then press the "OK" button. The channel will be marked with an icon. Use the up and down buttons on the remote control to select a new position for this channel and press the
"OK." The channel moves to the selected position. Note! If you want to move channels to other positions, the LCN option must be OFF.
EDIT (EDIT CHANNEL)
Select the channel and press the blue button. New options will appear:
Sort: Press the red button on the remote control. Now you can sort the channels as follows Name (A-Z), Name (Z-A), Free/Coded, Locked.
Edit (upravit): Press the green button on the remote control and then press the "OK" button. Now you can change the channel name.
Delete: Press the blue button on the remote control, then press OK. The channel will be marked with an icon. Confirm the changes by pressing the "EXIT" button.
Radio Channel List: To edit the list of radio stations, enter the menu.
Delete All: A warning window will open. If you select "Yes", all stations will be deleted.
TOOLS
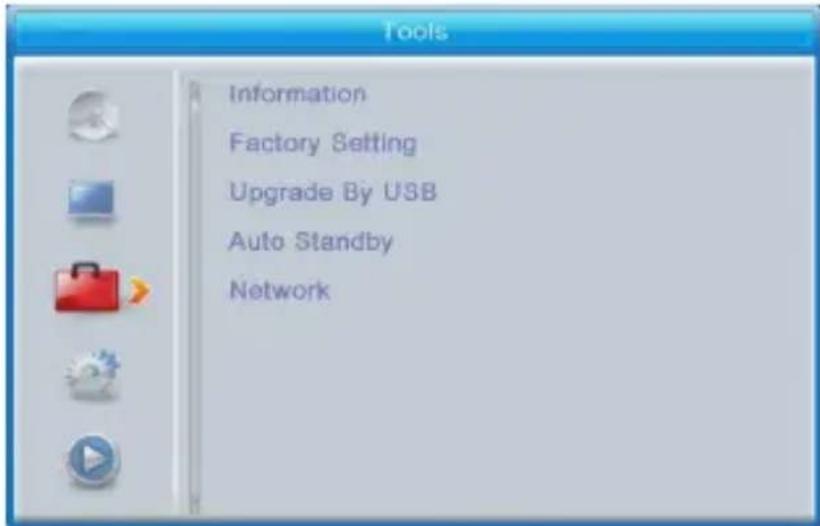
Information: Displays information about the model, video decoder, and firmware release date.
Factory setting: If you choose to return to factory settings, all channel lists and settings will be cleared.
UPGRADE BY USB (UPGRADE VIA USB)
The receiver is connected to the TV, but in standby mode. Copy the latest firmware to the USB memory device. Do not rename the firmware
file or place it in any folder. Connect the USB memory device to the USB port of the receiver and press the "Standby" button on the remote control. A message will appear on the screen: "USB Disk A Connected". Press "Menu Tools - Upgrade By USB" and press the "OK" button. In this window, select Upgrade Mode "AllCode". Below, under the "Upgrade File" option, select the latest firmware that has been copied to the USB memory device. Below is the Start menu. Press "OK" and the upgrade process will begin. In a few seconds the process will be completed and the receiver will automatically restart.
After upgrading, confirm the date of the new firmware by pressing: Menu Tools - Information.
Note!: If the upgrade process does not start, use a USB storage device in FAT32 format.
AUTO STANDBY (AUTOMATIC TRANSITION TO STANDBY MODE)
Set the time after which the receiver automatically enters standby mode. (1 hour, 2 hours, 3 hours, 4 hours, or 5 hours). By default, 3 hours are set.
SYSTEM SETUP
LANGUAGE (LANGUAGE SETTINGS)
Select the language of the menu, first and second audio, subtitles and teletext.
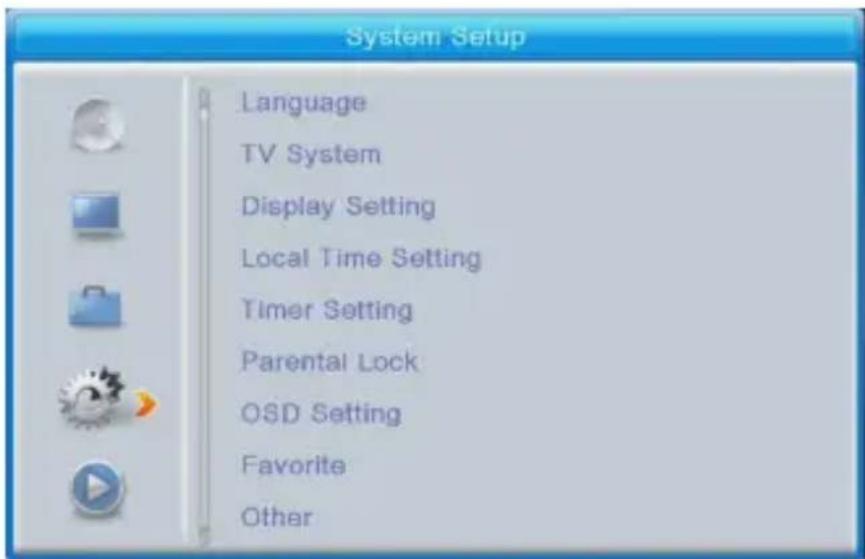
TV SYSTEM
Video Resolution: This menu offers many options. If you are using a connection via HDMI output, the default setting is 1080i@25. If you are using a SCART output connection, the default setting is 576i.
Aspect Mode (aspect ratio): Options offered: Auto, 4:3PS, 4:3LB or 16:9. Auto is set by default.
Digital audio output: Options offered: Outputs BS Out/LPCM Out The default setting is LPCM Out.
DISPLAY SETTINGS
Brightness (default setting is 50), contrast (default setting is 50), saturation (default setting is 50), color tone (default setting is 50), and sharpness (default setting is 50).
LOCAL TIME SETTING
- Region (country): Select your country.
GMT Usage (basic time zone usage): To use GMT and automatic time setting, select "By Region". To set the time zone manually, select "User Define", and to set the date and time manually, select "Off". By default, the "By Region" option is set.
- GMT Offset (replacing the GMT option): Set the time zone (only if "GMT Usage" is set to "User Define"). Date: Set the date (only if "GMT Usage" is set to "Off"). Date: Set the time (only if "GMT Usage" is set to "Off")
TIMER SETTING:
Timer Mode: Set the repeat interval: Once, Daily, Weekly, Monthly or Off. Timer Service: When setting up
in PVR mode, the receiver switches to the set channel at the set date and time and starts recording the programme.
When set in Channel mode, the receiver switches to the set channel at the set date and time. Channel at start-up: Set the channel.
Launch Date: Set the date.
On Time: Set the start time. Duration: Set the amount of time the program will be played or recorded.
Remark: The timer can also be set in the EPG menu (see EPG section).
PARENTAL LOCK
(Some firmware versions do not support this feature).
Menu Lock: If activated, access to channel management and the search menu will be password protected. The default setting is "Off".
Rating Lock: Set the age. New Password: Enter a new password Confirm Password: Confirm the new password.
Remark: The password is factory set to 0000
OSD SETTING
OSD Timeout: Select the time the information bar is displayed on the screen, from 1 to 10 seconds. The default setting is 5.
OSD Transparency: Set the OSD transparency to "Off", or from 10% to 40%. The default setting is "Off".
FAVOURITE (FAVOURITE)
Press OK in your favourite group. You can now rename the Favorites list.
OTHER
Antenna power: If you have an active antenna without a power adapter, set to "ON". If you have a passive antenna, or an active antenna with a network adapter, set to "OFF". The default setting is "OFF".
Channel Play Type: The default setting is "All".
Beeper: The default setting is "Off".
AD Service: The default setting is "Off".
Use AD as default: This option is active when AD Service is enabled. AD Volume Offset: This option is active when AD Service is enabled. After Power Stop: Allows you to choose what the receiver will do after a sudden power failure. By default, Restart to Last Channel is set.
MEDIA PLAYER PVR (MEDIA PLAYER PVR)
PVR Video Music Image
Over: Press button 1 on the remote control to switch between PVR tabs: PVR, Music, Image and Video.
Sort: Press button 2 on the remote to sort programmes by name, time, size and popularity. The sorting option is activated in the Music, Image and Video folders.
Repeat/Setup: Press button 3 on the remote control to set the picture, music and video playback modes.
MultiView (split screen): Press button 4 on the remote control to display multiple images on the TV screen at the same time. This option is activated in the Image folder.
P lay List: Press the red button on the remote control. The picture and video are added to the play list. This option is activated in the Image and Music folders.
FAV (favourites): To set your favourite media files, press OK. This option is activated in the Image and Music folders.
FAV All: Displays a list of all your favourite media. This option is activated in the Image and Music folders.
Edit (upravit): Press the blue button to edit the media name.
PVR (personal video recorder)
Rename: Press the red button to rename the PVR channels.
Lock: Press the yellow button to lock the corresponding PVR channels.
Delete: Press the green button to delete the PVR channels.
Remark: When watching subtitled video from a storage device connected via USB port, you can adjust the colour and size of the subtitles and the colour and position of the background. Press the green button on the remote control to view the subtitle settings.
PVR Storage Information (PVR storage device information)
Display information about a storage device connected via USB port.
PVR Setting
Timeshift: The default setting is "OFF".
Jump: The following options are available: 30 s/1 min/5 min/10 min/15 min/30 min. In the default setting, 30 seconds is specified.
Timeshift to Record:
When activated (ON), it allows time lapse video recording.
It is set to "ON" by default and only works if the Timeshift option is also set to "ON".
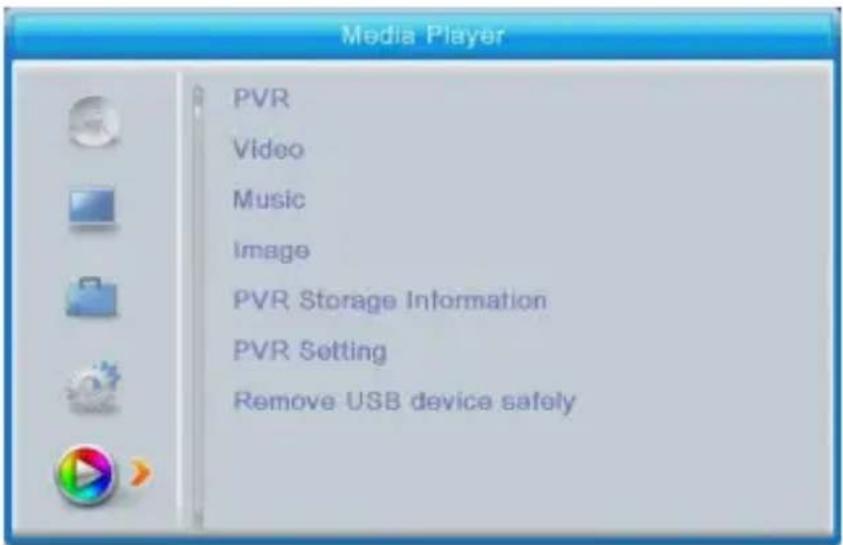
REMOVE USB DEVICE SAFELY
Select the device connected via the USB port and press OK to safely disconnect the device connected via USB.
TIMESHIFT
The time-shift function allows you to pause and rewind TV programmes using a memory device connected to the device via the USB port.
- Make sure the storage device is connected via the USB port.
- Set the PVR and switch the Timeshift function to "ON".
- Press the PAUSE button on the remote control to stop the program.
- Use the buttons on the remote control to control playback:
- Press the left and right arrow keys to select the playback start point, then press "OK" to confirm.
- Press the "PAUSE" button to pause playback.
- Press the "REV" and "FWD" buttons to advance playback.
- Press the "STOP" button to stop time-shifting and continue watching the programme.
Notes:
- We recommend using the USB 2.0 standard. USB drives with low parameters may not be compatible with the device.
- USB drives with large capacities may require an external power supply.
RECORDING
- Make sure the storage device is connected via the USB port.
- To start recording while watching a programme, press the "REC" button on the remote control (to change the default recording time setting, press the "REC" button twice).
- Press the "STOP" button on the remote control to stop recording. A confirmation window will open.
Press the [OK] button to stop recording, press the [NO] button to continue recording.
- The recordings are stored on a USB drive and are accessible via Media Player. PVR.
Remark: You can schedule your recording using the Timer or EPG functions.
EPG (ELECTRONIC PROGRAM GUIDE)
- Press the EPG button on the remote control to enter the Electronic Programme Guide menu.
- You can use the directional buttons on the remote control to navigate through the menu.
- Press the TIMER button to display the PVR schedule.
SOLVING THE PROBLEMS
| The Problem | Possible cause | Solution |
| LED indicator does not light up | The power cord is disconnected. | Check that the main power cable is plugged in. |
| No or weak signal. | The antenna is disconnected. | Check the antenna connection. |
| Antenna is damaged / incorrectly set | ||
| No signal is being transmitted. | ||
| No picture or sound | The wrong mode has been selected on the TV. | Select the correct mode on your TV |
| Alert on encrypted/unavail able channel | Encoded / unavailable channel | Select another channel. |
| The remote control is not | The device is switched off. | Switch on the device. |
| working. The remote control is not aimed at the device. | Aim the remote control at the device from a distance not exceeding 8 m from the remote control sensor and within 30° horizontally and 30° vertically to the front of the device. |
| There are obstacles between the device and the remote control. | Make sure there are no obstacles between the device and the remote control. |
| The batteries are dead. | Replace the batteries with new ones. |
| Forgotten channel password | |
| After moving the equipment to another room, you find that you are no longer receiving a digital signal. | Antenna connection in other rooms may vary (lower signal strength causing weaker channel reception, or no signal) |
Do you still need advice after reading this guide?
First, read the "Frequently Asked Questions" at www.evolveo.com or contact EVOLVEO Technical Support.
The warranty does NOT cover:
- using the equipment for purposes other than those for which it is designed,
- installing firmware other than that installed on the device by the manufacturer or that is available for download at https://ftp.evolveo.com/
- mechanical damage caused by improper use;
- damage caused by natural elements such as fire, water, static electricity, surges, etc.
- damage caused by repairs carried out by an unqualified person,
- damage to the warranty seal or an illegible serial number.
Warranty and post-warranty service
Repairs and servicing can only be carried out at an authorized service point for EVOLVEO products (more at www.evolveo.com), otherwise you may damage the product and lose the warranty.

Disposal: The crossed-out container symbol on the product, in the accompanying documentation or on the packaging means that in EU countries, all electrical and electronic equipment, batteries and accumulators must be disposed of separately at the end of their useful life as separated waste. Do not dispose of these products in unsorted municipal waste.

DECLARATION OF CONFORMITY
The company Abacus Electric, s.r.o. hereby declares that the EVOLVEO Omega S3 phone meets the requirements of the standards and regulations that are relevant for this type of equipment.
The full text of the Declaration of Conformity can be found at http://ftp.evolveo.com/ce/
Importer / Manufacturer:
Abacus Electric, s.r.o., Planá 2, 370 01, Czech Republic
Made in China
Copyright © Abacus Electric, s.r.o., www.evolveo.com
www.facebook.com/EvolveoCZ
All rights reserved. The appearance and technical specifications of the product are subject to change without notice.
Tartalomjegyzék
FONTOS BIZTONSÁGI UTASÍTÁSOK 60
VEZÉRLŐELEMEK 61
ELEMEK BEHELYEZÉSE....63
CSATLAKOZÁS A TV-HEZ 64
FÖMENÜ....65
SZERSZEREK 68
natural_image
Line drawing of a battery pack with two batteries and a partially open lid (no text or symbols)CSATLAKOZÁS A TV-HEZ
FÖMENÜ
GYORS TELEPÍTÉS
CSATORNÁK SZERKESZTÉSE
FAV
EDIT (CSATORNA SZERKESZTÉSE)
FRISSÍTÉS USB-N KERESZTÜL (FRISSÍTÉS USB-N KERESZTÜL)
RENDSZER BEÁLLÍTÁS
LANGUAGE (NYELVI BEÁLLÍTÁSOK)
PVR Video Music Image
Copyright © Abacus Electric, s.r.o.
www.evolveo.com
www.facebook.com/EvolveoCZ
natural_image
Line drawing of a battery pack with three buttons and a lid, showing internal components (no text or symbols)CONEXIUNE LA TELEVIZOR
MENIUL PRINCIPAL
INSTALARE RAPIDĂ
FAV
UPGRADE BY USB (UPGRADE PRIN USB)
TV SYSTEM
PVR Video Music Image
Copyright © Abacus Electric, s.r.o.
www.evolveo.com
www.facebook.com/EvolveoCZ
natural_image
Line drawing of a battery pack with an open lid and internal components (no text or symbols)Manual Channels Scan:
FAV
UPGRADE BY USB (UPGRADE ÜBER USB)
TV-SYSTEM
PVR Video Music Image
Copyright © Abacus Electric, s.r.o.
www.evolveo.com
www.facebook.com/EvolveoCZ
MEDIA PLAYER PVR (MEDIA PLAYER PVR)....131
REGISTRAZIONE 133
EPG (GUIDA ELETTRONICA AI PROGRAMMI)...... 134
RISOLVERE I PROBLEMI 134
IMPORTANTI ISTRUZIONI DI SICUREZZA
natural_image
Line drawing of a battery pack with an open lid and internal components (no text or symbols)FAV
TV SYSTEM
PVR Video Music Image
EPG (GUIDA ELETTRONICA AI PROGRAMMI)
Copyright © Abacus Electric, s.r.o.
www.evolveo.com
www.facebook.com/EvolveoCZ
natural_image
Line drawing of a battery pack with an open lid and internal components (no text or symbols)POVEZAVA S TELEVIZORJEM
GLAVNI MENU
HITRA NAMESTITEV
KANALI ZA UREJANJE
FAV
NADGRADNJA PREK USB (NADGRADNJA PREK USB)
TV SISTEM
Copyright © Abacus Electric, s.r.o.
www.evolveo.com
www.facebook.com/EvolveoCZ

- DÜLEŽITÉ BEZPEČNOSTNÍ INSTRUKCE
- PRIPOJENÍ K TELEVIZORU
- HLAVNÍ MENU
- RYCHLÁ INSTALACE
- FAV
- EDIT (UPRAVIT KANÁL)
- UPGRADE BY USB (MODERNIZACE PŘES USB)
- TV SYSTEM
- PVR Video Music Image
- TIMESHIFT (ČASOVÝ POSUN)
- DÔLEŽITÉ BEZPEČNOSTNÉ POKYNY
- PRIPOJENIE K TELEVÍZORU
- HLAVNÉ MENU
- RÝCHLA INŠTALÁCIA
- UPGRADE CEZ USB (UPGRADE CEZ USB)
- PREHRAVAC MEDI PVR (MEDIA PLAYER PVR)
- PVR Storage Information (informácie o úložnom zariadení PVR)
- IMPORTANT SAFETY INSTRUCTIONS
- CONTROL ELEMENTS
- FRONT PANEL
- REAR PANEL
- SMART REMOTE CONTROL
- INSERTION OF BATTERIES
- Notes:
- CONNECTION TO THE TV
- MAIN MENU
- QUICK INSTALLATION
- INSTALLATION
- EDITING CHANNELS
- LOCK (LOCK CHANNEL)
- SKIP (SKIP CHANNEL)
- MOVE (MOVE A CHANNEL IN THE LIST)
- EDIT (EDIT CHANNEL)
- TOOLS
- UPGRADE BY USB (UPGRADE VIA USB)
- AUTO STANDBY (AUTOMATIC TRANSITION TO STANDBY MODE)
- SYSTEM SETUP
- LANGUAGE (LANGUAGE SETTINGS)
- DISPLAY SETTINGS
- LOCAL TIME SETTING
- TIMER SETTING:
- PARENTAL LOCK
- OSD SETTING
- FAVOURITE (FAVOURITE)
- OTHER
- MEDIA PLAYER PVR (MEDIA PLAYER PVR)
- PVR (personal video recorder)
- PVR Storage Information (PVR storage device information)
- PVR Setting
- Timeshift to Record:
- REMOVE USB DEVICE SAFELY
- TIMESHIFT
- RECORDING
- EPG (ELECTRONIC PROGRAM GUIDE)
- Do you still need advice after reading this guide?
- The warranty does NOT cover:
- Warranty and post-warranty service
- DECLARATION OF CONFORMITY
- Tartalomjegyzék
- CSATLAKOZÁS A TV-HEZ
- FÖMENÜ
- GYORS TELEPÍTÉS
- CSATORNÁK SZERKESZTÉSE
- EDIT (CSATORNA SZERKESZTÉSE)
- FRISSÍTÉS USB-N KERESZTÜL (FRISSÍTÉS USB-N KERESZTÜL)
- RENDSZER BEÁLLÍTÁS
- LANGUAGE (NYELVI BEÁLLÍTÁSOK)
- CONEXIUNE LA TELEVIZOR
- MENIUL PRINCIPAL
- INSTALARE RAPIDĂ
- UPGRADE BY USB (UPGRADE PRIN USB)
- UPGRADE BY USB (UPGRADE ÜBER USB)
- TV-SYSTEM
- IMPORTANTI ISTRUZIONI DI SICUREZZA
- EPG (GUIDA ELETTRONICA AI PROGRAMMI)
- POVEZAVA S TELEVIZORJEM
- GLAVNI MENU
- HITRA NAMESTITEV
- KANALI ZA UREJANJE
- NADGRADNJA PREK USB (NADGRADNJA PREK USB)
- TV SISTEM
Brand : Evolveo
Model : Omega S3
Category : TV Tuner for Computer