
Alpha T2 - TV Tuner for Computer Evolveo - Free user manual and instructions
Find the device manual for free Alpha T2 Evolveo in PDF.


| Product Type | DVB-T2/HEVC TV receiver and PVR |
| Power Supply | DC 12V via included adapter |
| Video Output | HDMI (up to 1080i) and SCART (576i) |
| Audio Output | Coaxial digital (LPCM/BS Out) |
| Connectivity | ANT IN/OUT, USB 2.0 (front), Wi-Fi via supported USB dongle (chipset 7601) |
| Recording | PVR to USB drive, timer recording, timeshift |
| Electronic Program Guide | EPG with scheduling |
| Internet Features | YouTube (network required) |
| Remote Control | Learning remote with TV control buttons (Power, Vol, TV/AV) |
| Battery Requirements | 2 x AAA (not included) |
| Teletext & Subtitles | Supported |
| Parental Lock | Menu lock and rating lock with password (default 0000, super PIN 1006) |
| Firmware Update | Via USB (FAT32), file from official FTP |
| Auto Standby | Configurable 1-5 hours (default 3 hours) |
| Antenna Power | Switchable ON/OFF (for active antenna) |
| Cleaning | Use a dry cloth; do not use liquids |
| Safety | Do not expose to rain/moisture; unplug during storms; use only specified accessories |
| Manufacturer | Abacus Electric, s.r.o. (Czech Republic) – Made in China |
Frequently Asked Questions - Alpha T2 Evolveo
User questions about Alpha T2 Evolveo
0 question about this device. Answer the ones you know or ask your own.
Ask a new question about this device
Download the instructions for your TV Tuner for Computer in PDF format for free! Find your manual Alpha T2 - Evolveo and take your electronic device back in hand. On this page are published all the documents necessary for the use of your device. Alpha T2 by Evolveo.
USER MANUAL Alpha T2 Evolveo
Important Safety Instructions
- Do not use this apparatus near water.
- Clean only with dry cloth.
- Do not install near any heat sources such as radiators, heat registers, stoves, or other apparatus (including amplifiers) that produce heat.
- Operate this product only from the type of power source indicated on the label. If you are not sure of the type of power connected to your home, consult your local power company. Disconnect the unit from the mains before any maintenance or installation procedure.
- Protect the mains cord from damage and stress.
- Only use attachments/accessories specified by the manufacturer.
- Unplug this apparatus during lightning storms or when unused for long periods of time.
- Refer all servicing to qualified service personnel. Servicing is required when the apparatus has been damaged in any way, including damage to the mains cord or plug, if the unit has been exposed to liquid or moisture, has been dropped or is not operating correctly.
- Do not impede the air flow into the unit by blocking the ventilation slots.
- Attention should be drawn to the environmental aspects of battery disposal.
WARNING: To reduce the risk of fire or electric shock, do not expose this apparatus to rain or moisture.
WARNING: The batteries shall not be exposed to excessive heat such as direct sun light, fire, etc.

This symbol indicates that dangerous voltages constituting a risk of electric shock are present within this unit.

This symbol indicates that there are important operating and
maintenance instructions in the literature accompanying this unit.

This symbol indicates that this product incorporates double insulation between hazardous mains voltage and user accessible parts. When servicing use only identical replacement parts.
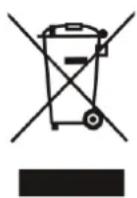
This symbol on the product or in the instructions means that your electrical and electronic equipment should be disposed at the end of life separately from your household waste. There are separate collection systems for recycling.
For more information, please contact the local authority or your retailer where you purchased the product.
1. Control Elements
Front Panel
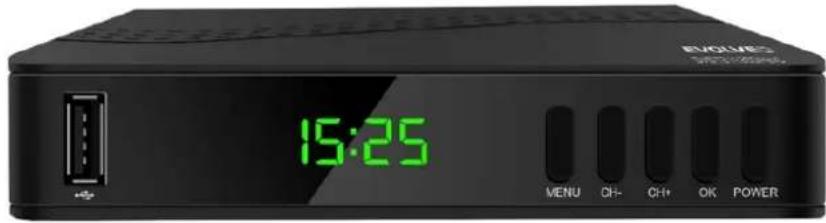
USB Port
MENU
CH+/-
OK
POWER
Rear Panel
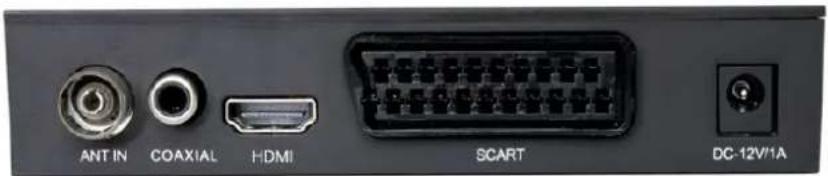
ANT OUT
COAXIAL
HDMI
TV SCART
DC IN 12V
2. Learning remote control
POWER (Red Button): Standby Mode (ON/OFF)
Fast Backward
Fast Forward
Play/Pause
Stop
REC : Records the TV program to the connected storage device
USB: Enters to the PVR sub menu
SUBTITLE : Displays subtitle options
TTX : Switches on the Teletext
AUDIO : Audio language or Audio mode
EPG : Shows the Electronic Program Guide
INFO : Displays information about the current channel
Move the cursor
MENU : Displays Main Menu
EXIT: Use this button to quit current menu
VOL-/VOL+ : Decrease/ Increase volume
CH-/CH+ : Changing program buttons
FAV : Favorite Channel List
MUTE : Mutes audio output of the receiver
0-9; Numeric buttons
TV/RADIO : Switch between Radio Channels and TV Channels
RECALL : Goes back to previous viewed channel
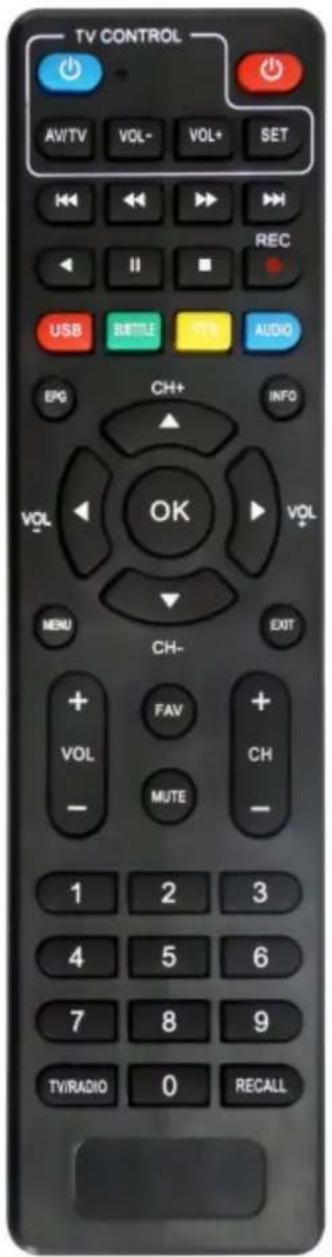
Smart remote control
• The remote control has 4 programmable buttons for controlling the TV: TV Power, Vol +, Vol-, TV/AV
- Long press the SET button for 3 seconds, the red LED will be from low light to brighter light, release the SET button.
- Place the learning and the original remote control from the TV opposite to each other at a distance of 3-5 cm.
- Press and release the learning remote control button you want to program, the red LED will light blinking.
- Press the button of the original remote control, the LED should blink 2 times and light constantly, release the button.
- When learning is completed, press the SET button, the LED will turn off.
- Repeat the procedure described above for other functions (buttons) that you want to programme from your TV control.
This function may not be compatible with all TVs. The manufacturer is not responsible for the compatibility of this feature with your TV.
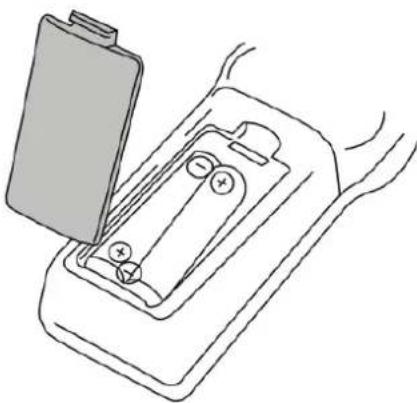
BATTERIES INSTALLATION
natural_image
Line drawing of a battery pack with three batteries and an open lid (no text or symbols)-
Open the battery compartment cover.
-
Insert 2x AAA batteries with correct polarization.
-
Close the battery compartment cover.
Notes:
Do not mix the batteries.
Remove the batteries if the remote control is not going to be used for an extended period of time.
Do not place the remote control under the direct sunlight or near sources of excessive heat.
Point the remote control to the receiver, no more than 8 meters from the remote control.
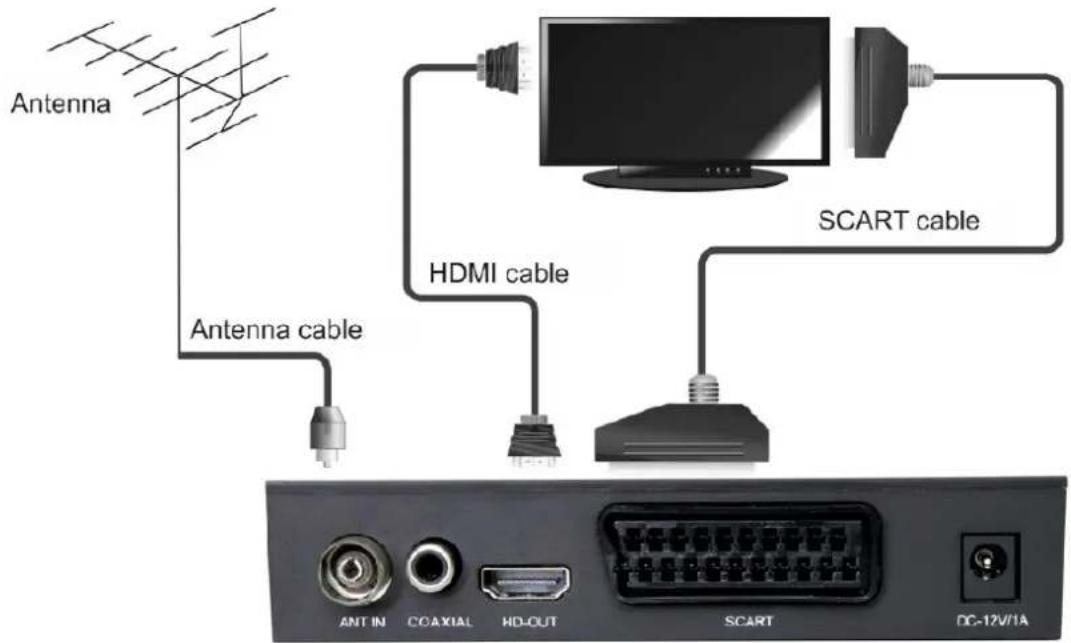
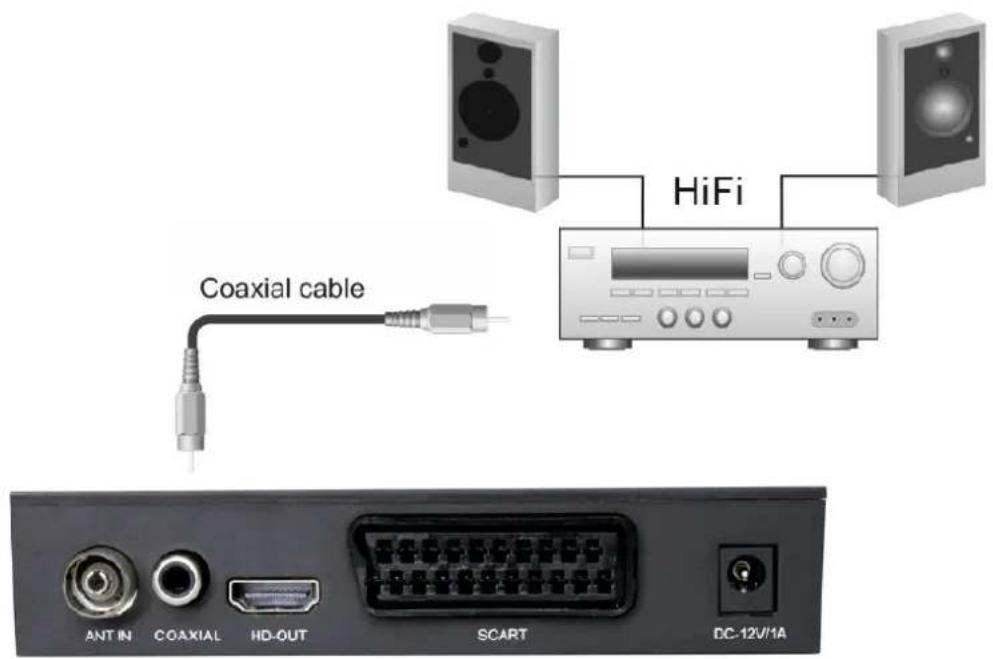
CONNECTING TO TV
MAINMENU
QUICK INSTALLATION
If you are using the receiver for-the first time or have restored the receiver to Factory Settings, the Welcome Screen will appear on your TV screen.
Press OK to start scanning channels.
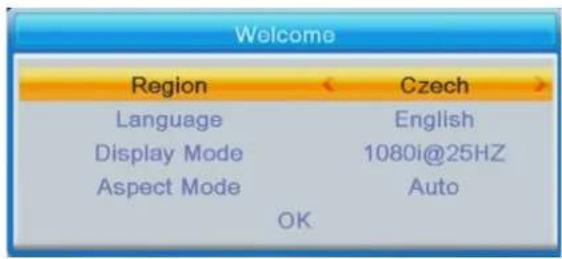
Region: Select a Country.
Language: Select a Language.
Display Mode: Select a screen resolution. The default value is 1080i_25.
Aspect Mode: Select dimensions of the screen. The default value is Auto.
OK: Press OK to start scanning channels automatically.
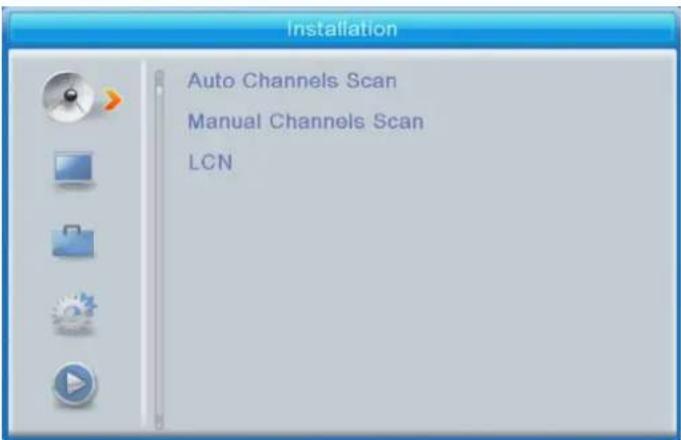
INSTALLATION
Auto Channels Scan: Automatic searching and saving available TV channels.
Manual Channels Scan: Manual searching for TV channels. You can search the channel by number or frequency. When you choose the desired options, press Search to start searching.
LCN (Logical Channel Number): Choose if you want to sort the channels according to their logical channel number. The default value is OFF.
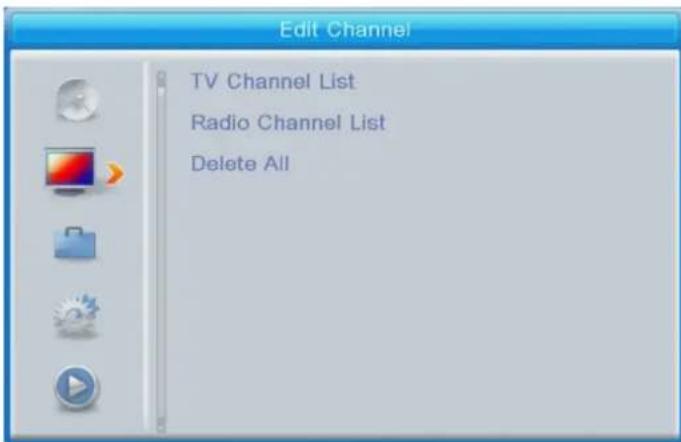
EDIT CHANNEL
TV Channel List: This menu enables you to edit channel lists by locking, deleting, skipping, moving channels and creating favorite channel lists.
If you want to preview the channel, select it and press OK.
FAV
- Select a channel and press FAV button on the remote control. Then press OK. A favorite list will be displayed.
- Choose one of the lists and press OK. Then press EXIT button to confirm changes. The selected channel will be saved in that list (it is now marked with an icon).
. Use left and right buttons on the remote control to switch between channel lists.. To delete channel from the favorite list, select the channel, press FAV button
and then press OK. Favorite channel list will be displayed. Press OK button again. Then, you can exit menu to confirm the changes. The channel will be deleted from the favorite list.
Lock
Select a channel and press Red button on the remote control. Then press OK and input the default password 0000. The channel will be marked with an icon. Press the EXIT button to confirm changes. The selected channel will be locked. If you want to unlock, select this channel, press Red button and press OK to enter the password
Skip
Select a channel and press Green button. Then press OK. The channel will be marked with an icon. Press EXIT button to confirm changes. The selected channel will be skipped when you switch channels. To unskip, select this channel, press Green button and confirm by pressing OK.
Move
Select a channel and press Yellow button. Then press OK. The channel will be marked with an icon. Use the up and down buttons on the remote control, to select new position for this channel and press OK. The channel will be moved to the selected position. Note! If you want to move channels in a new position, the LCN option should be OFF.
Edit
Select a channel and press the Blue button. New options will appear:
Sort: Press Red button on the remote control. Now you can sort the channels by Name (A-Z), Name(Z-A), Free/Scramble, Lock.
Edit: Press Green button on the remote control and then press OK. Now you can change the name of the channel.
Delete: Press Blue button on the remote control and then press OK. The channel will be marked with an icon. Press the EXIT button to confirm changes.
Radio Channel List: Enters to the menu for edit the Radio Channel List.
Delete All: Opens a warning window. If you choose Yes, all channels will be deleted.
TOOLS
Information : Displays Information
about the Model, Video Decoder and the Date of the Firmware.
Factory Setting : If you choose to restore Factory Settings, the Channel Lists and all Settings will be deleted.
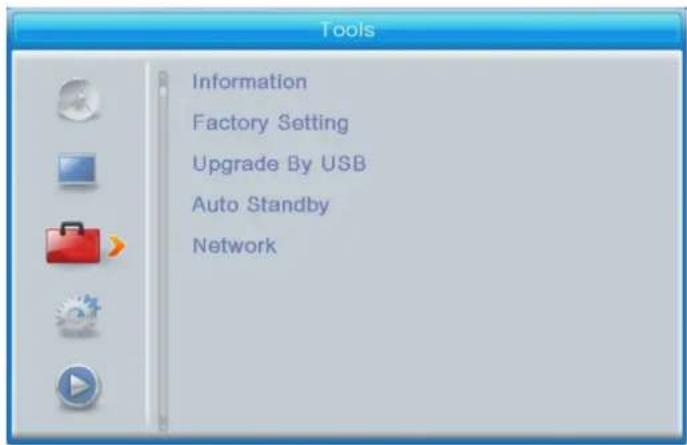
Upgrade by USB
The receiver is connected with the TV, but in Standby Mode. Copy the latest firmware into a USB stick. Do not rename the file of firmware and do not put the file into a folder. Insert the USB stick to the USB port of the receiver and press the Standby button on the remote control. The message "USB Disk A Connected will appear on the TV screen. Press Menu Tools - Upgrade By USB and press OK. In this window select Upgrade Mode : "AllCode". At the option below "Upgrade File", choose the latest firmware that is copied to the USB stick. Below, there is the option Start. Press OK and the upgrade process will start. In a few seconds, the process will be completed and the receiver will restart automatically.
After the upgrade, confirm the date of the new firmware by pressing : Menu Tools - Information.
Note! : If the upgrade process does not start, then use USB stick in FAT32 format.
Auto Standby
Set what time the receiver will automatically enter in Standby Mode. (1 hour, .2 hours, 3 hours, 4 hours or 5 hours). The default value is 3 hours.
YOUTUBE - Network:
Some videos may be licensed or contain a format incompatible with playback and therefore cannot be played.
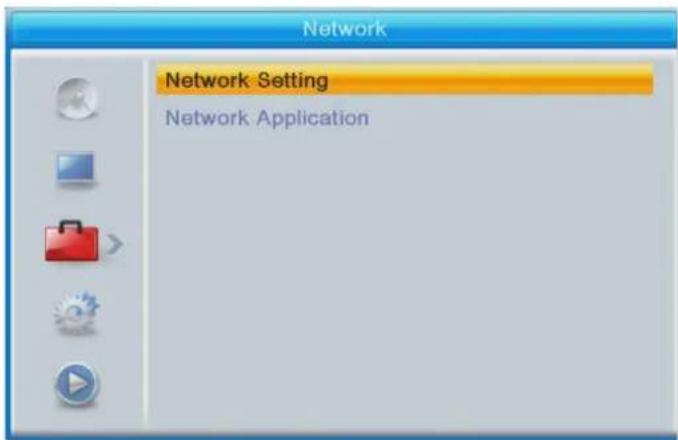
Network setting
* Choosing network: this device supports Wi-Fi connection via dongle of 7601 chip series.
* Settings: Choose Wi-Fi, if you have Wi-Fi dongle EVOLVEO inserted into USB port, go to Settings, choose your Wi-Fi here, enter your Wi-Fi password and the Wi-Fi router will assign you an IP address.
Network Application: Youtube functions - Youtube will be working correctly after choosing network connection and loading the IP address.
The Youtube function will not load - message "Network Error" appears.
When using Youtube via WiFi dongle, it is necessary to wait a few seconds in the network settings after each time the device is switched on until it shows: WiFi - AP connected (provided that you have already selected the network connection and entered the WiFi password), then you will be assigned an IP address from the WiFi router and it is possible to use Youtube.
If Youtube still will not start, it is necessary to update the firmware to a newer version. In the "Settings" of the device in the middle item you will find the "USB update" item, where you enter "Update mode - AllCode", select the file for the update - firmware and click on "Start". Before this, upload the firmware file to the USB Flash drive to the root. The file can be found here:
ftp://ftp.evolveo.com/dvb-t2/set-top-box/omega-II-DT-3065-T2-HEVC/firmware/
Youtube may also require the newest API key, which you will find in the same folder as the firmware. It is the file youtube_key.key, which you will also upload to the root of the USB flash drive. This is then uploaded directly in: Menu - Network-Network application - Youtube - Settings - Update API Key - Press OK, then select the key and Start. The key will load, you can then connect the network and Youtube will work.
Youtube app is a third-party product, the device manufacturer is not responsible for Youtube functionality.
Some videos may be licensed or contain a format incompatible with playback and therefore cannot be played.
SYSTEM SETUP
Language: Select the language of the Menu, First and Second Audio, Subtitles and Teletext.
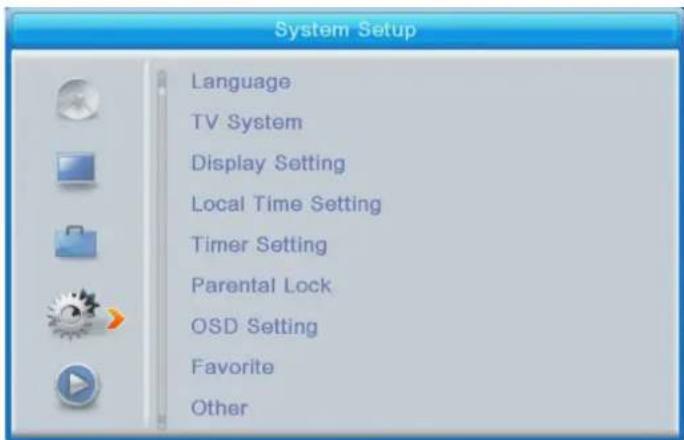
TV System
Video Resolution: There are many options in this menu. If you are using
HDMI output connection, the default is 1080i_25. If you are using SCART
output connection, the default value is 576i.
Aspect Mode: Available options: Auto,
4:3PS, 4:3LB or 16:9. The default value is Auto.
Digital Audio Output: Available options: BS Out or LPCM Out. The default value is LPCM Out.
Display settings: Brightness (default value is 50), Contrast (default value is 50), Saturation (default value is 50), Hue (default value is 50) and Sharpness (default value is 5).
Local time setting
. Region: Select your country.
.GMT Usage: Set to "By Region" if you want to use GMT and set the time automatically. Set to "User Define if you want to set the time zone manually, or set to "Off", if you want to set the date and time manually. The default value is "By Region".
. GMT Offset: Set the time zone (only if "GMT Usage" is set to "User Define"). Date: Set the date (only if "GMT Usage" is set to "Off"). Time: Set the time (only if "GMT Usage is set to "Off").
Timer Setting
Timer Mode: Set the time interval: Once, Daily, Weekly, Monthly or Off.
Timer Service: When is set to PVR, the receiver will switch to the preset channel, at preset date
and time, and start recording the program. When is set to Channel, the receiver will switch to the preset channel at preset date and time.
Wake up channel: Set the channel.
Wake up date: Set the date.
On Time: Set the start time.
Duration: Set the duration of displaying or recording a channel.
Note: It is also possible to set the Timer from EPG menu (see EPG section).
Parental lock (Some firmware versions do not support this function)
Menu Lock :When is enabled, the access to channel edition and searching menu, will be protected by a password. Default value is Off.
Rating Lock : Set the age.
New Password : Enter new password.
Confirm Password : Confirm the new password.
Note : Default Password is 0000. There is also a Power PIN, in case of forgetting the password that you were set. The SUPER PIN is 1006.
OSD Setting
OSD Timeout : Select the duration of displaying Info bar, from 1 to 10 seconds.
The default value is 5.
OSD Transparency : Set the OSD transparency to Off, or from 10% to 40%. The default value is Off.
Favorite
Press OK on a Favorite Group, Now you can rename the Favorite Channels List.
Other
Antenna power: Set to ON when having an active antenna without power adapter. Set to OFF when having passive antenna or active antenna with power adapter. The default value is OFF.
Channel Play Type : The default value is All.
Beeper : The default value is Off.
AD Service : The default value is Off.
Use AD as default: It is activated when the AD Service is On.
AD Volume Offset : It is activated when the AD Service is On.
After Power Stop : Allows you to choose the action of the receiver
at a sudden power stop. The default value is Restart to Last Channel
MEDIA PLAYERPVR
PVR Video Music Image
Switch: Press 1 on the remote control to switch between the PVR tabs: PVR, Music, Image and Video.
Sort: Press 2 on the remote control to sort the channels by name, time, size and favorite. The option Sort is activated in Music, Image and Video.
Repeat/Setup: Press 3 on the remote control to set the pictures, music and video playing modes.
MultiView: Press 4 on the remote control to display the Multiple pictures together on TV. This option is activated in Image.
Play list: Press the RED button on the remote control. The picture and video will be put into play list. This option is activated in Image and Music.
FAV: Press OK button to set the favorite media files. This option is activated in Image and Music.
FAV All: Display all favorite media list. This option is activated in Image and Music.
Edit: Press Blue button to edit the name of media.
PVR
*Rename: Press Red button to revise the PVR channels name.
*Lock: Press yellow button to lock the relative PVR channels.
*Delete: Press Green button to delete PVR channels.
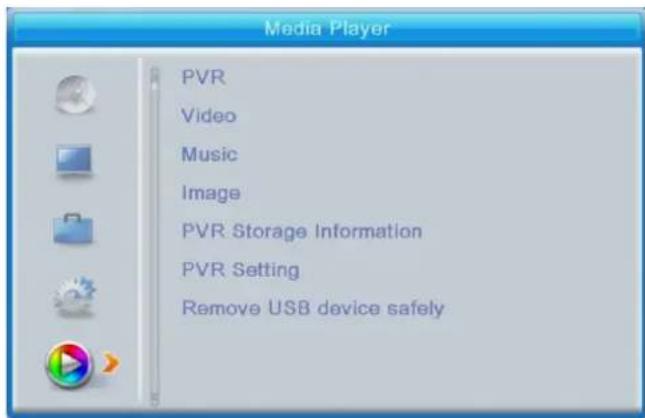
Note: When watching a video with subtitles from USB drive, it is possible to set color and size of subtitles, background color and position. Press green button on the remote control to display subtitles settings.
PVR Storage Information
Displays Information about the USB drive.
PVR Setting
. Timeshift: The default value is OFF.
. Jump: Available options are : 30 sec, 1 min, 5 min, 10 min or 30 min.
The default value is 30sec.
- Timeshift to Record : When it is ON, it allows to record timeshift video.
The default value is ON and it is working only if the option Timeshift is ON.
Remove USB device safely: Select the connected USB drive and press OK to safely remove the USB drive.
TIMESHIFT
Timeshift function allows to stop and rewind TV programs due to USB drive which is connected to the USB port of the device.
- Make sure the USB drive is connected to the device.
- Enter PVR Settings and turn ON Timeshift function
- Press PAUSE button on the remote control to stop the program.
- Control playback with the buttons on the remote control:
. Press left and right arrows to choose starting point of playback, then confirm by pressing OK button.
. Press PAUSE to pause playback.
. Press REV and FWD to rewind or fast-forward playback.
. Press STOP to stop timeshift and continue to watch the program.
Notes:
. It is recommended to use USB drive in 2.0 standard. USB drives with low parameters may not be compatible with the device.
- Large capacity USB drives may require external power supply.
RECORDING
- Make sure the USB drive is connected to the device.
- While watching a program, press REC button on the remote control to start
recording (press REC button twice to change the default recording time).
- To stop recording, press STOP button on the remote control. Confirmation
window will appear. Select[OK] to stop recording or [NO] to continue recording.4. Recordings are saved on the USB drive and are available in the Media Player. PVR.
Note: Use Timer function or EPG to schedule a recording.
EPG (Electronic Program Guide)
- Press EPG button on the remote control to enter Electronic Program Guide.
-
Use direction buttons on the remote control to navigate the menu.
-
Press "Timer" button, the menu will display the PVR schedule.
TROUBLESHOOTING
| Problem | Possible reason | Possible solution |
| LED indicator is not on | Power adapter is disconnected | Check the connection of power adapter |
| No signal | Antenna is disconnected | Check antenna connection |
| Antenna is damaged/improperly set | ||
| No signal is transmitted | ||
| No image or sound | Improper mode has been selected on the TV | Choose proper mode on the TV |
| Information that the channel is coded / unavailable | Coded / unavailable channel | Choose another channel |
| Remote control does not work | The device is turned off | Turn on the device |
| The remote control is not pointed at the device | Point the remote control at the device no more than 8 meters from the remote control sensor and within 30^ horizontally and 30^ vertically of the front of the unit | |
| There are obstacles between the remote control and the device | Make sure there are no obstacles between the remote control and the device | |
| The batteries are discharged | Replace the batteries with the new ones | |
| Forgotten channel password | Use Power PIN: 1006 | |
| When the device is moved to another room, there is no signal | Antenna connection in new place may be different (lower signal strength resulting in weaker channel reception or no signal) | Check antenna connection or connect amplifier to the antenna |
Do you still need an advice after reading this guide?
First read "Frequently Asked Questions" at www.evolveo.com or contact the EVOLVEO technical support.
The warranty DOESN'T APPLY to:
• using the device for other purposes than it was designed to
- installation of another firmware then the one that was installed as the original from the factory or that is to be downloaded at ftp://ftp.evolveo.com
• mechanical damage of caused by inappropriate using
- damage caused by the natural elements as fire, water, static electricity, overvoltage and so on
• damage caused by unauthorized repair
• damage of the guarantee seal or unreadable serial number of the device
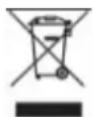
Disposal: The symbol of crossed out container on the product, in the literature or on the wrapping means that in the European Union all the electric and electronic products, batteries and accumulators must be placed into the separate salvage after finishing their lifetime. Do not throw these products into the unsorted municipal waste

CE DECLARATION OF CONFORMITY
Hereby, the company Abacus Electric, s.r.o. declares that the EVOLVEO Alpha T2 is in compliance with the requirements of the standards and regulations, relevant for the given type of device.
Find the complete text of Declaration of Conformity at ftp://ftp.evolveo.com/ce
Dovozce / Dovozca / Importer / Importör
Abacus Electric, s.r.o.
Planá 2, 370 01, Czech Republic
No.5, 17/F, Strand 50, 50 Bonham Strand, Sheung Wan, Hong Kong
Made in China
Copyright © Abacus Electric, s.r.o.
www.evolveo.com
www.facebook.com/EvolveoCZ
All rights reserved.
Design and specification may be changed without prior notice.

- Important Safety Instructions
- Control Elements
- Learning remote control
- Smart remote control
- BATTERIES INSTALLATION
- CONNECTING TO TV
- MAINMENU
- QUICK INSTALLATION
- INSTALLATION
- EDIT CHANNEL
- FAV
- Lock
- Skip
- Move
- Edit
- TOOLS
- Upgrade by USB
- Auto Standby
- YOUTUBE - Network:
- Network setting
- The Youtube function will not load - message "Network Error" appears.
- SYSTEM SETUP
- TV System
- Local time setting
- Timer Setting
- Parental lock (Some firmware versions do not support this function)
- OSD Setting
- Favorite
- Other
- MEDIA PLAYERPVR
- PVR Video Music Image
- PVR
- PVR Storage Information
- PVR Setting
- TIMESHIFT
- RECORDING
- EPG (Electronic Program Guide)
- The warranty DOESN'T APPLY to:
- CE DECLARATION OF CONFORMITY
Brand : Evolveo
Model : Alpha T2
Category : TV Tuner for Computer