T 8013 C - Tumble drier MIELE - Free user manual and instructions
Find the device manual for free T 8013 C MIELE in PDF.

User questions about T 8013 C MIELE
0 question about this device. Answer the ones you know or ask your own.
Ask a new question about this device
Download the instructions for your Tumble drier in PDF format for free! Find your manual T 8013 C - MIELE and take your electronic device back in hand. On this page are published all the documents necessary for the use of your device. T 8013 C by MIELE.
USER MANUAL T 8013 C MIELE
natural_image
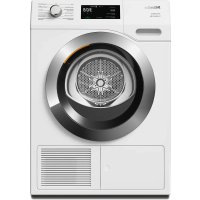
Illustration of a car wheel with a textured circular component, partially covered by fabric or cloth (no text or symbols)Operating and Installation Instructions
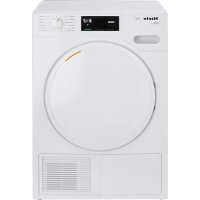
Condenser Dryer
T 8012 C
T 8013 C
To prevent accidents and machine damage read these instructions
before
installation or use.
HT21-1
HT21-2
IMPORTANT SAFETY INSTRUCTIONS....3
Control panel 5
Before loading the dryer 6
Using the dryer....7
- Turn on the dryer and load the laundry 7
- Select a program....7
- Select a drying option (if needed)....9
- Select the dryness level....10
- Select the buzzer (if desired).... 10
- Start the program....11
- At the end of a program....11
Canceling or changing a program. 12
Adding or removing laundry during a program....12
Child lock 13
Dryer care 14
Cleaning the lint filter 14
Cleaning the exterior and the control panel....15
Cleaning the drum....15
Emptying the condensed water container....16
Cleaning the condenser 17
Quick Guide 19
Dryer Care....19
Changing the light bulb 19
Frequently asked questions 20
After sales service 22
Installation instructions 23
IMPORTANT SAFETY INSTRUCTIONS 24
Caring for the environment 25
Washer / Dryer Stack 26
Electrical connection....27
Installation 28
Installation site 29
Installation beneath a counter 30
Installation tips....31
Level the dryer....31
External water drain 32
Installation requirements demanding a non-return valve 34
⚠ WARNING - To reduce the risk of fire, electric shock, or injury to persons when using your appliance, follow basic precautions, including the following:
Read all instructions before using the appliance.
Do not dry articles that have been previously cleaned, washed, soaked or spotted with gasoline, dry-cleaning solvents or other flammable or explosive substances. They may give off vapors that could ignite or explode.
Do not allow children to play on or in the appliance. Close supervision is necessary when the appliance is used near children. Always close the door after use to prevent child hazards.
Before this appliance is removed for service or discarded, remove the door to the drying compartment.
Do not reach into the dryer if the drum is moving.
Do not install or store this appliance where it will be exposed to the weather.
Do not tamper with the controls.
Do not repair or replace any part of the appliance or attempt any servicing unless specifically recommended in these operating instructions. Repairs to electrical appliances should only be performed by qualified personnel. Incorrectly repaired machines may pose a considerable risk to the user.
Do not use fabric softener sheets to eliminate static in this dryer. Best results are achieved when a liquid softener is used in the washer.
Do not use heat to dry articles containing foam rubber or similarly textured rubber-like materials, or items containing hair spray, nail polish remover or similar substances.
Clean the lint filter before or after each load.
- Keep the area around the air intake (toe kick) and adjacent surrounding areas free from lint, dust and dirt.
The interior of the machine should be cleaned periodically by qualified personnel.
Do not place items exposed to oils in your dryer. Items contaminated with oils may contribute to a chemical reaction that could cause the laundry to catch fire.
This dryer is intended for residential use only!
IMPORTANT SAFETY INSTRUCTIONS
GROUNDING INSTRUCTIONS This appliance must be grounded.
In the event of malfunction or breakdown, grounding will reduce the risk of electric shock by providing a path of least resistance for electric current.
This appliance is equipped with a cord having an equipment grounding conductor and a grounding plug. The plug must be plugged into an appropriate outlet that is properly installed and grounded in accordance with all local codes and ordinances.
WARNING – Improper connection of the equipment-grounding conductor can result in a risk of electric shock. Contact a qualified electrician if you are in doubt as to whether the appliance is properly grounded.
Do not modify the plug provided with the appliance: if it will not fit the outlet, have a proper outlet installed by a qualified electrician.
SAVE THESE INSTRUCTIONS
flowchart
graph TD
    A["Programs"] --> B["Options"]
    B --> C["Dryness"]
    C --> D["Status"]
    D --> E["Faults"]

    subgraph Program Settings
        F1["Normal ○Sturdy"]
        F2["Wrinkle-free ○Fluff"]
        F3["Woolens ○20 min"]
        F4["Smooth ○45 min"]
    end

    subgraph Dryness Settings
        G1["Turbo ○Gentle"]
        H1["Anti-crease ○"]
    end

    subgraph Status Settings
        I1["Extra Dry ○ More Dry ○ Normal ○ Less Dry ○ Hand Iron ○ Rotary Iron"]
        J1["Drying ○ Rotary Iron ○ Hand Iron ○ Normal ○ Cooling Down ○ End/Anti-crease"]
    end

    subgraph Faults
        K1["Child Lock ○ Filter/Vent ○ Container"]
        L1["Start Stop"] --> M["I-On 0-Off"]
        M --> N["Door"]
    end
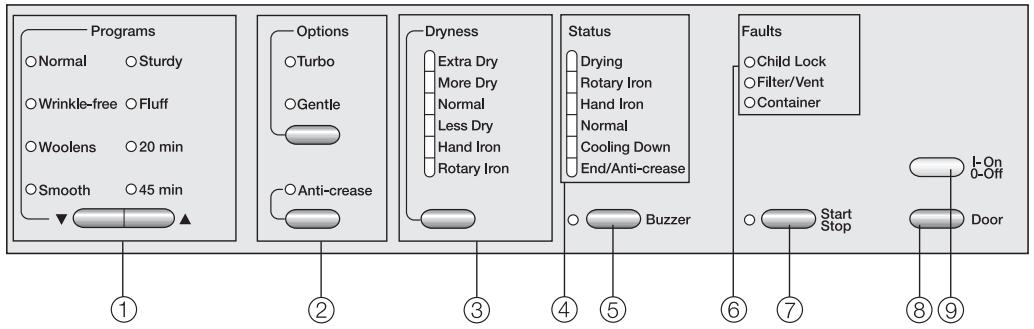
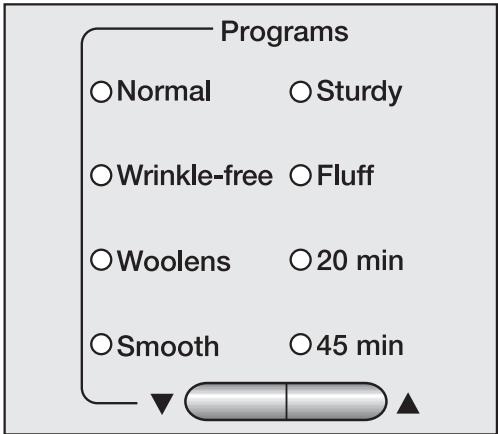
① ▼▲ "Programs" buttons
For selecting a drying program.
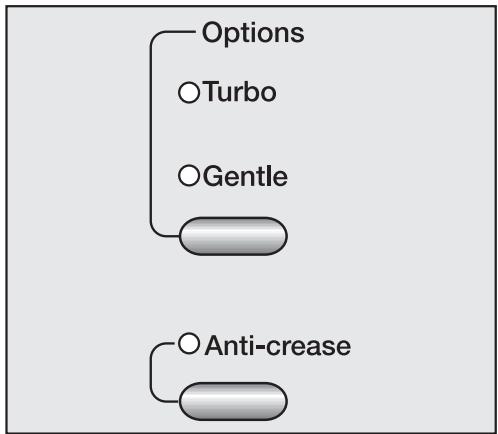
② "Options" buttons
For selecting a drying option.
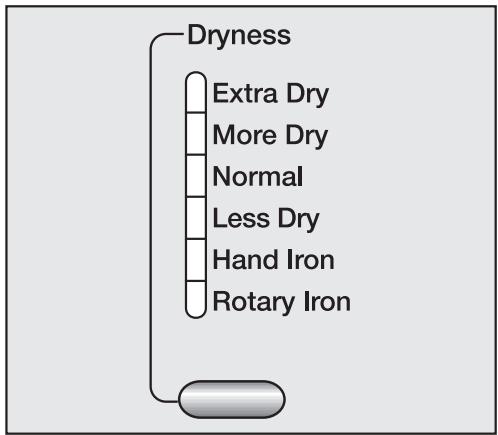
③ "Dryness" button
For selecting the dryness level of the finished laundry.
④ "Status" display
Shows the current cycle of the drying program.
⑤ "Buzzer" button
When selected, a buzzer will sound at the end of the program.
⑥ "FAULT" indicators
An illuminated indicator will alert you if the child lock has been activated or if a fault occurred.
⑦ "Start/Stop" button
Starts and stops a program.
Interrupts a program when pressed.
Flashes during program selection and lights once the program starts.
⑧ "Door" button
Opens the door when the program has finished. If the dryer is on, the drum interior will light when the door is opened. If the door is left open, the light will go off after a few minutes to save energy.
⑨ "On/Off" button
Turns power to the machine on and off.
The dryer must be correctly installed and connected before the first use. Please refer to the "Installation Instructions".
■ Before using for the first time, clean the drum with a cloth.
Before drying, check fabric care labels for special drying instructions.
Dry with normal temperature
Dry with low temperature (select "Gentle" option)
Do not dry in a tumble dryer
- Do not overload the drum! Overloading the dryer will result in poor drying results and wrinkling.
- Knitted fabrics and flannel tend to shrink when washed and dried for the first time. Do not over dry these fabrics.
- To prevent discoloration, do not dry new, dark-colored fabrics with light-colored items.
- Close zippers and tie up fabric belts and apron ties to prevent tangles and damage to clothing.
- Do not dry items that may melt or ignite in the dryer, such as plastics, rubber or sneakers.
Program recommendations
Normal
– Cottons and Permanent Press blends
Wrinkle-free
- Permanent Press: select the Hand Iron dryness level and reduce the load size for best drying results
- Delicate fabrics, such as polyester: select the Gentle option to reduce creasing
- Pure linen and down filled items
Woolens
- Wool and wool blends
Smooth
- Linen
- Permanent Press (cottons, blends and synthetics)
Sturdy
- Durable Cottons and Permanent Press
Fluff / 20 min / 45 min
- All fabric types
1. Turn on the dryer and load the laundry
■ Press the "On/Off" button to turn on the dryer.
■ Press the "Door" button to open the door.
- Load the laundry loosely into the drum.
■ Make sure the lint filters are in place.
■ Close the door with a firm swing - do not push it shut.
For best results use liquid fabric softener when washing laundry. Fabric softener sheet may clog the filters and cause the dryer to overheat.
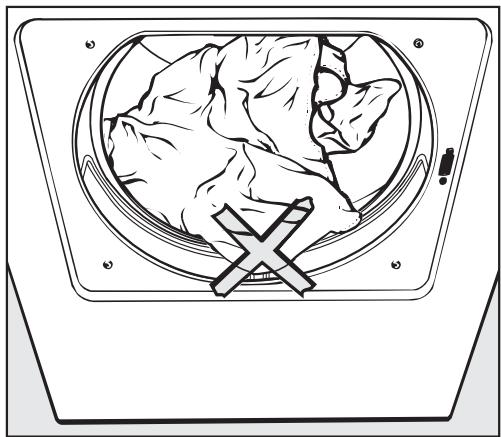
natural_image
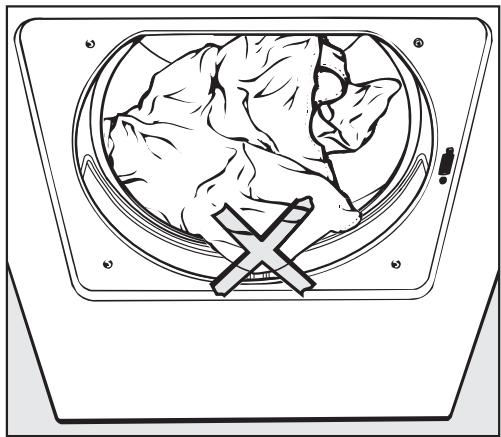
Illustration of a window with a heart-shaped object inside, marked with a cross symbol (no text or labels)To prevent fabric damage, check that laundry will not be caught in the closed door.
2. Select a program
text_image
Programs Normal ○Sturdy Wrinkle-free ○Fluff Woolens ○20 min Smooth ○45 min■ Press the ▼ or ▲ button until the desired program indicator lights.
| Program | Fabric | Note |
| Normal Available drying options: Turbo, Gentle, Anti-crease | ||
| Extra Dry | Multi-layer fabrics, mixed loads of sturdy cottons, e.g. jeans, towels. | The "Extra dry" program should not be selected for jersey materials.Items may shrink. |
| More Dry | Uniform loads of cotton, e.g. sheets, underwear, socks. | - |
| Normal | Knitted cotton fabrics that may shrink, e.g. jersey material or lightweight cottons. | If items are still damp, dry again using "More Dry". |
| Less Dry | Cotton or linen fabrics to be left damp for ironing. | - |
| Hand Iron | If fabrics are too damp for ironing, dry again using "Less Dry". | |
| Rotary Iron | Cotton or linen fabrics which will be ironed with a rotary iron. | To prevent moisture loss, roll up the laundry until ironing. |
| Wrinkle-free Available drying options: Turbo, Gentle, Anti-crease | ||
| More Dry | Synthetic permanent press items, e.g. pants and shirts. | - |
| Normal | Permanent press and blended fabrics, e.g. cotton/synthetic. | |
| Less Dry | Permanent press and blended fabrics requiring an ironed finish. | Reduce load size for fabrics that wrinkle easily. |
| Special Programs Available drying options: Anti-crease only available in Fluff, Sturdy | ||
| Woolens | Delicate items which allow machine drying. | Remove items immediately after the end of the program while still slightly damp.Allow items to air dry. |
| Smooth | Program for reducing creasing of cotton, linen or permanent press fabrics made of cotton, blends or synthetics. | - |
| Sturdy | For mixed loads of cotton and permanent press items. | - |
| Fluff | Individual items to be freshened and fluffed with cool air. | Reduce load size. |
| TIMED CYCLES Available drying options: Gentle, Anti-crease | ||
| 20 min | Individual items or very small loads, e.g. beach towels, swimsuits. | - |
| 45 min | ||
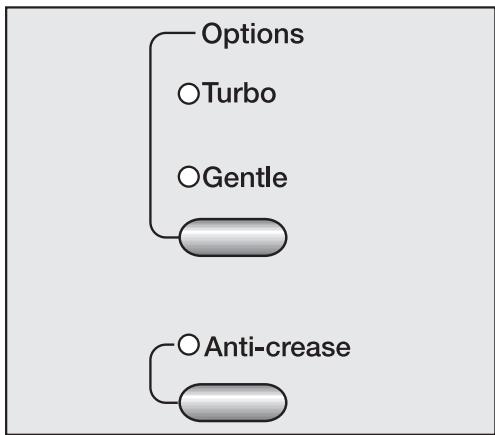
3. Select a drying option (if needed)
flowchart
graph TD
    A["Options"] --> B["Turbo"]
    A --> C["Gentle"]
    D["Anti-crease"] --> E
■ A drying option can be selected or deselected with each press of the button.
OPTIONS
Turbo
Fast drying for sturdy fabrics with increased temperature and a reduced program length.
Gentle
For drying delicate fabrics slowly at a lower temperature.
Anti-crease
Prevents wrinkles if laundry is not removed immediately after the end of a program. The drum periodically rotates for about 1 hour.
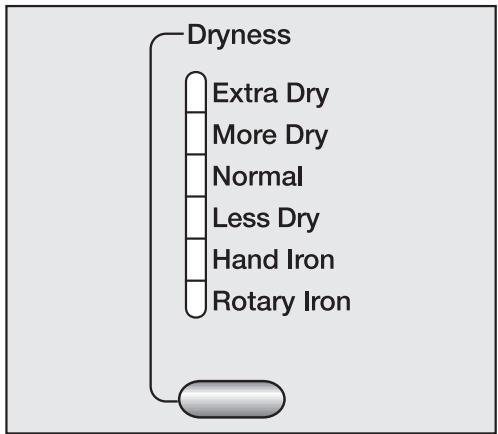
4. Select the dryness level
The dryness level can be selected in the "Normal" and "Wrinkle-free" programs. (The dryness level of the other programs cannot be adjusted.)
flowchart
graph TD
    A["Dryness"] --> B["Extra Dry"]
    A --> C["More Dry"]
    A --> D["Normal"]
    A --> E["Less Dry"]
    A --> F["Hand Iron"]
    A --> G["Rotary Iron"]
■ Press the selection button until the desired indicator illuminates.
In the "Wrinkle-free" program, only "More Dry", "Normal" and "Less Dry" can be selected.
5. Select the buzzer (if desired)
■ Press the "Buzzer" button to have a tone beep at the end of the program.
Indicator light:
on = buzzer selected off = buzzer not selected
To adjust the buzzer volume:
- turn the dryer on
- close the door
- select a program
- if the indicator is lit, press the "Buzzer" button so the indicator light goes out.
■ Press and hold the "Buzzer" button until its indicator is lit and you hear the desired volume and tone.
6. Start the program

text_image
Start Stop■ Press the "Start/Stop" button.
Once the program starts, the current cycle of the program will be indicated in the "STATUS" display.
7. At the end of a program
The "End/Anti-crease" indicator will light at the end of a program and the buzzer will sound if it was selected.
If a fault occurred, a "FAULT" indicator will light. See "Frequently asked questions" for details.

text_image
Door■ Press the "Door" button.
■ Open the door.
■ Remove the laundry.
■ Check that the drum is empty.
■ Clean the lint filter after each use (see "Dryer care").
■ Close the door.

text_image
I-On 0-Off■ Press the "On/Off" button to turn off the dryer.
■ Empty the condensed water container weekly (if not connected to a drain).
Canceling or changing a program
■ Press and release the "Start/Stop" button to stop the drying program.
To continue drying:
■ Select the new program by pressing the ▼ or ▲ button.
■ Select any desired options.
■ Select a dryness level (available in the "Normal" and "Wrinkle-free" programs).
■ Press and release the "Start/Stop" button to start the new program.
Adding or removing laundry during a program
■ Turn off the dryer using the "On/Off" button.
■ Press the "Door" button.
■ Open the door.
⚠️ CAUTION - Do not touch the rear of the drum while adding or removing items! There is a danger of burns due to high temperatures in the drum.
■ Add or remove items.
■ Close the door.
■ Turn the dryer back on with the "On/Off" button.
Child lock
When activated, the child lock prevents the dryer from being operated by locking the control panel functions.
The dryer can be turned on but not started. The "Child lock" indicator will flash.
The door can be opened.
To activate the child lock
- Make sure the dryer is turned off and the door is closed.
- Press and hold the "Anti-crease" and "DRYNESS" buttons at the same time, hold until step 5.
- Turn on the dryer with the "On/Off" button.
- Press the "OPTIONS" button 3 times.
- Release the "Anti-crease" and "DRYNESS" buttons.
The "Child lock" indicator will flash and the dryer is now locked. - Turn off the dryer using the "On/Off" button.
To deactivate the child lock
Repeat steps 1. to 5.
The "Child lock" indicator will go out.
The control panel is now unlocked.
- Turn off the dryer using the "On/Off" button.
Cleaning the lint filter
The lint filter must be cleaned after every program.
text_image
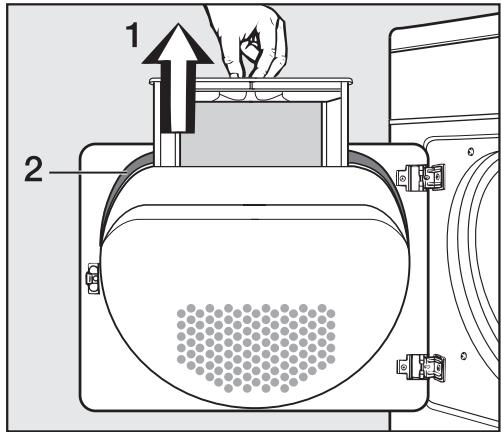
1 2■ Open the door and remove the lint filter, 1, by gently lifting it upwards.
natural_image
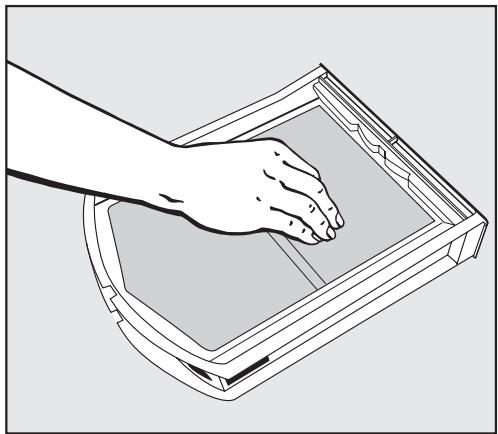
Line drawing of a hand pressing down on a rectangular tray (no text or symbols)■ Wipe the lint off the filter with your hand (do not use any sharp objects!)
natural_image
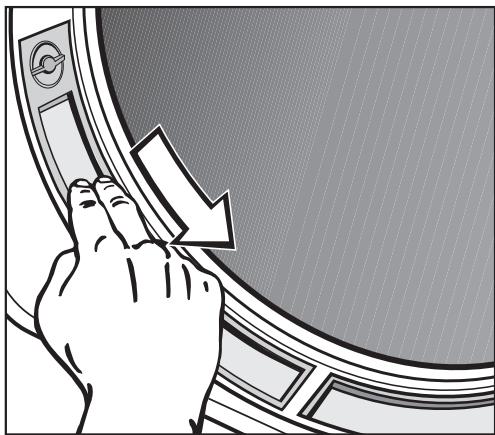
Illustration of a hand pressing down on a circular component with a downward arrow (no text or symbols)■ Remove the lint from the door frame lint filter with your fingers.
■ Any lint remaining in the hollow casing of the door can be removed through the gap at the bottom with a dust brush or vacuum.
■ Clean the gasket, 2, with a damp cloth.
■ Return the lint filter and close the door.
The lint filters can be rinsed with hot water if necessary.
text_image
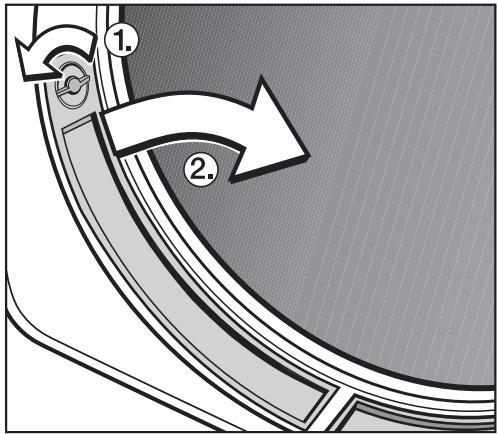
Diagram showing a curved mechanical component with numbered annotations and directional arrows indicating motion or flow.■ Take the door lint filters out by turning the knob at the filter top.
■ Rinse all lint filters with hot water and dry thoroughly.
The filters must be dry before being returned to the dryer. Wet filters might impair the dryer operation.
■ Return the lint filters. Lock the door frame filters.
Cleaning the exterior and the control panel
⚠️ To reduce the risk of electric shock, disconnect the dryer from the power supply by shutting off the power main, tripping the circuit breaker or unplugging the power cord before performing maintenance.
Never use abrasive cleaners, scouring pads, steel wool or caustic (oven) cleaners on the dryer. They will damage the surface.
■ The exterior and the control panel can be cleaned with warm water and liquid dish soap applied with a soft sponge.
■ Wipe dry.
Cleaning the drum
■ The stainless steel surfaces of the drum can be cleaned using a non-abrasive stainless steel cleaner.
■ Wipe clean with a soft cloth.
Emptying the condensed water container
Depending on the installation, the condensed water will either be pumped to a drain or collected in the condensed water container, located in the upper left corner of the machine. The container holds approximately 1 gallon of water.
The container should be emptied weekly.
Should the container be full when the tumble dryer is started, or if it becomes full during normal operation:
- The "Container" indicator will light.
- The buzzer will sound.
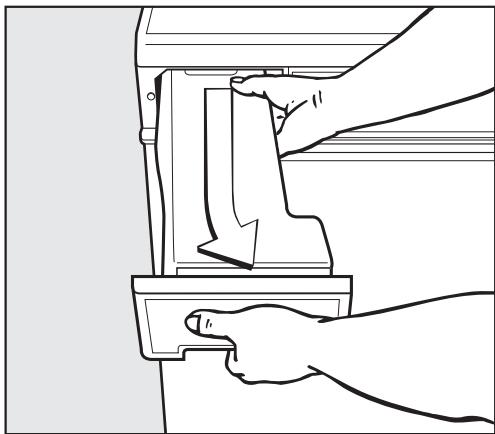
natural_image
Line drawing of a hand pressing down a mechanical component with a downward arrow (no text or symbols)■ Pull out the container slightly to the right with both hands.
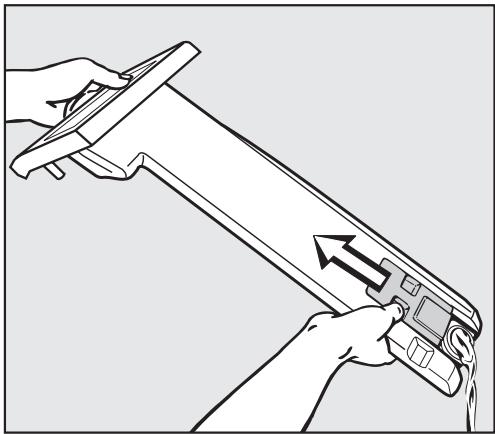
natural_image
Line drawing of hands using a caliper to lift a blade, showing motion direction (no text or symbols)■ Hold the cap open while emptying the container.
■ When the container is empty, push it back into its opening until it clicks into place.
■ Restart the drying program if needed.
Do not drink the condensed water!
Cleaning the condenser
⚠️ To reduce the risk of electric shock, disconnect the dryer from the power supply by shutting off the power main, tripping the circuit breaker or unplugging the power cord before performing maintenance.
■ Clean the condenser every 6 months and when the "Filter/Vent" indicator lights. Clean approximately every 100 uses when the dryer is used often.
Removing the condenser
The access panel to the condenser is located on the lower left corner of the dryer.
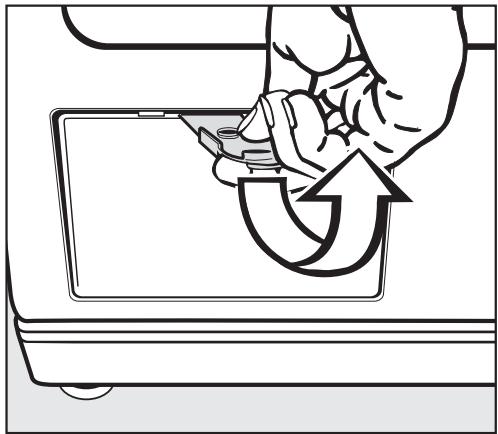
natural_image
Illustration of a hand using a tool to interact with a device, showing a curved arrow indicating rotation (no text or symbols present)■ Open the access panel with the supplied yellow tool.
■ Remove the panel up and out of the condenser access area.
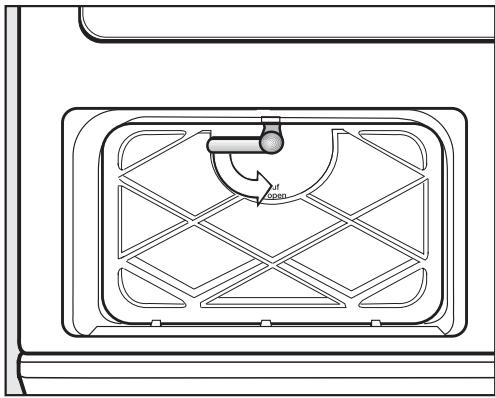
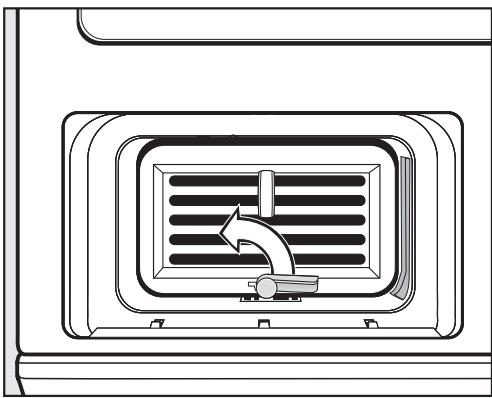
natural_image
Diagram of a window with a handle and circular arrow labeled 'open' (no text or symbols beyond the label)■ Turn the condenser door lock down and remove the door up and out.
natural_image
Diagram of a ventilation system inside a cabinet, showing airflow direction with arrows (no text or labels)■ Turn the condenser lock up.
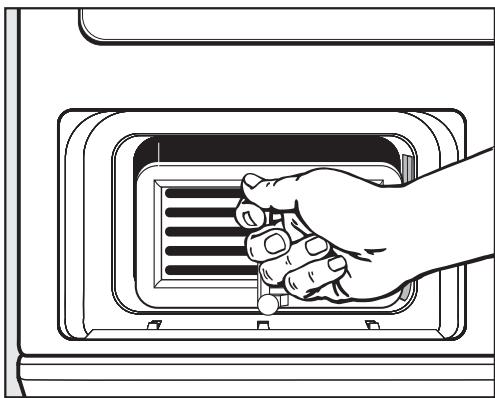
natural_image
Illustration of a hand inserting a fan into a vent with a gridded grille (no text or symbols)■ Pull out the condenser.
Rinsing the condenser
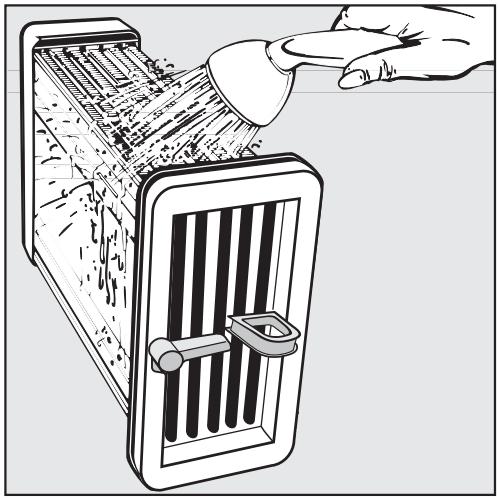
natural_image
Illustration of a hand inserting a slot into a box labeled with contents, showing internal structure and handle (no text or symbols)■ Rinse the condenser along the left side with warm water.
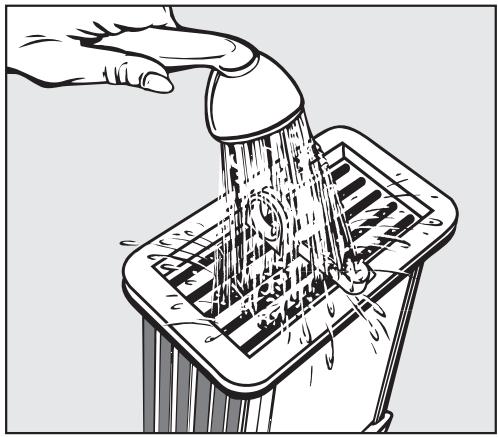
natural_image
Illustration of a hand using a tool to lift a mechanical component with liquid, no text or symbols present■ Rinse the condenser from the front with warm water.
■ Check the condenser for visible soiling. Rinse the condenser until clean.
■ Place the condenser lengthwise on a towel to air dry.
Returning the Condenser
■ Put the condenser back in place in the reverse order.
Check that the gasket around the front of the condenser is flush and not crimped.
■ To prevent leaks, make certain the condenser is pushed in all the way and locked in place.
■ Restore power.
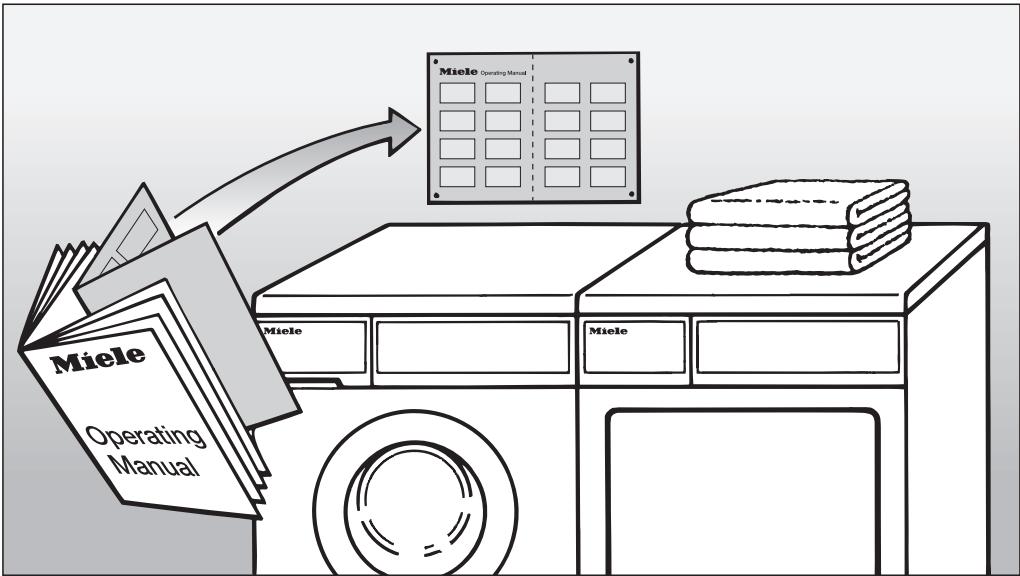
Quick Guide
text_image
Miele Operating Manual Miele Operating Manual Miele MieleRemove this guide for easy reference
1. Turn on the dryer and load the laundry

text_image
I-On 0-Off■ Press the "On/Off" button to turn on the dryer.

text_image
Door■ Press the "Door" button to open the door.
■ Load the laundry into the drum. Make sure that there is enough space in the drum for clothes to tumble freely.
natural_image
Illustration of a heart-shaped device with a cross symbol on the screen, no text or labels present.To prevent fabric damage, check that laundry will not be caught in the closed door.
■ Close the door with a firm swing - do not push it shut.
2. Select a program

text_image
Programs Normal Sturdy Wrinkle-free Fluff Woolens 20 min Smooth 45 min■ Press the ▼ or ▲ button until the desired program indicator lights.
3. Select a drying option (if needed)
flowchart
graph TD
    A["Options"] --> B["Turbo"]
    A --> C["Gentle"]
    D["Anti-crease"] --> E
■ A drying option can be selected or deselected with each press of the button.
4. Select the dryness level
flowchart
graph TD
    A["Dryness"] --> B["Extra Dry"]
    A --> C["More Dry"]
    A --> D["Normal"]
    A --> E["Less Dry"]
    A --> F["Hand Iron"]
    A --> G["Rotary Iron"]
■ Press the selection button until the desired indicator illuminates.
5. Select the buzzer (if desired)
6. Start the program

text_image
Start Stop■ Press the "Start/Stop" button.
7. At the end of a program
The "Anti-crease / End" indicator will light.
■ Press "Door" and remove the laundry.
■ Clean the lint filter.
■ Press the "On/Off" button to turn off the dryer.
| Program | When to use | Note |
| Normal Available drying options: Turbo, Gentle, Anti-crease | ||
| Extra Dry | For laundry to be folded and shelved immediately, e.g. jeans, towels. | The "Extra Dry" program should not be selected for jersey materials.Items may shrink. |
| More Dry | For uniform loads, e.g. sheets, underwear, socks. | - |
| Normal | For knitted items that may shrink, e.g. jersey material or lightweight cottons. | If items are still damp, dry again using "More Dry". |
| Less Dry | For items to be left damp for ironing. | - |
| Hand Iron | If fabrics are too damp, dry again using "Less Dry". | |
| Rotary Iron | For items to be ironed with a rotary iron. | To prevent moisture loss, roll up the laundry until ready to iron. |
| Wrinkle-free Available drying options: Turbo, Gentle, Anti-crease | ||
| More Dry | For items that do not require ironing, e.g. pants and shirts. | - |
| Normal | For items to be hung after drying. | |
| Less Dry | For items which require ironing. | Reduce load size for fabrics that wrinkle easily. |
| Special Programs Available drying options: Anti-crease only available in Fluff, Sturdy | ||
| Woolens | Delicate items which allow machine drying. | Take items out immediately after the end of the program while still slightly damp.Allow items to air dry. |
| Smooth | Program for reducing creasing in delicate items. | - |
| Sturdy | For mixed loads of durable items. | - |
| Fluff | Individual items to be freshened and fluffed with cool air. | Reduce load size. |
| TIMED CYCLES Available drying options: Gentle, Anti-crease | ||
| 20 min | Individual items or very small loads,e.g. beach towels, swimsuits. | - |
| 45 min | ||
Changing the light bulb
⚠️ To reduce the risk of electric shock, disconnect the dryer from the power supply by shutting off the power main, tripping the circuit breaker or unplugging the power cord before performing maintenance.
■ Open the door.
The bulb cover is located along the upper rim of the drum opening.
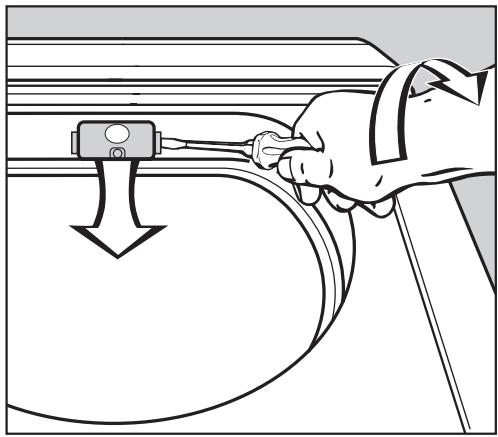
natural_image
Illustration of a hand using a tool to adjust or install a component, with no visible text or symbols.■ Slide a screwdriver with a wide head underneath the side edge of the bulb cover and twist (see illustration).
■ Flip down the bulb cover.
■ Replace the light bulb with a temperature proof bulb, available from Miele.
The light bulb must not exceed the maximum wattage listed on the data plate.
■ Flip up the light bulb cover and press it firmly until it clicks into place.
⚠️ Make sure the bulb cover is securely closed to prevent a short circuit or penetrating moisture.
■ Restore power.
Frequently asked questions
| What if the dryer will not run? | |
| Possible fault | Fix |
| The "Start/Stop" button was not pressed. | Make sure the dryer is on. Press the "Start/ Stop" button to begin the drying program. |
| The circuit breaker tripped or the dryer is unplugged. | Make sure the dryer is plugged in or reset the circuit breaker. |
| The door is not closed. | Close the door properly. |
| How do I prevent static cling? | |
| Add fabric softener to laundry when washing or select the "Less Dry" setting on the dryer.Do not use fabric softener sheets in this dryer. | |
| What if the drum light does not come on? | |
| Possible fault | Fix |
| The bulb may be bad or burned out. | See "Changing the light bulb." |
| What if the "Child Lock" indicator flashes after turning the dryer on and a program cannot be started? | |
| Possible fault | Fix |
| The child lock is activated. | Deactivate the child lock. See "Child Lock." |
| What if the program stops, the "End/Anti-crease" indicator lights and the buzzer sounds? | |
| Possible fault | Fix |
| The drum is empty. | Load laundry into the dryer. The dryer will not operate when the drum is empty. Single items should be dried with "Sturdy" or a timed program and dry items in the "Fluff" program. |
| What if the "Filter/Vent" fault indicator is lit? | |
| Possible fault | Fix |
| The lint filter is clogged. | Clean the lint filters. See "Dryer care". |
| The air supply in the room is insufficient. | Open a window or door to increase airflow. |
| What if the program runs too long or stops? | |
| Possible fault | Fix |
| The airflow is insufficient in the area of the dryer. | Open a window or door to increase airflow. |
| The lint filters are clogged. | Clean the lint filters (see "Dryer care"). |
| The laundry was not spun sufficiently in the washer. | Select a higher spin speed in the wash program. |
| The dryer is overloaded. | Reduce the load size. |
| Metal zippers interfere with the dryer's moisture sensors. | Select a timed program to avoid over drying. |
| The condenser is clogged with lint or detergent residue. | Clean the condenser periodically (see "Dryer care"). |
| The air vent below the door is blocked. | Remove any blockages. |
| What if the laundry is not dry enough? | |
| Possible fault | |
| The load contained too many dissimilar items (size and fabric.) | |
| What if water has collected around the drum opening? | |
| Possible fault | |
| This is condensed moisture from the laundry. | |
Repairs
In the event of a fault which you cannot fix yourself, please contact Miele's Technical Service Dept.
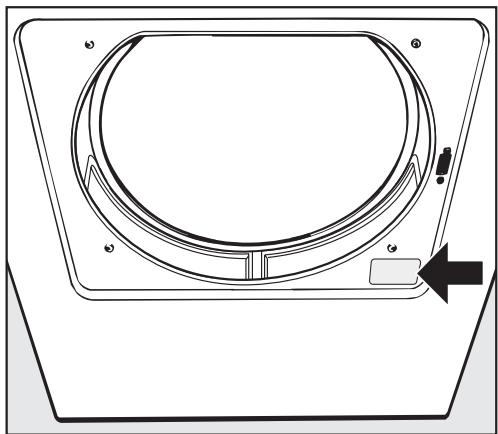
When contacting Technical Service, please quote the model and serial number of your appliance. They can be found on the data plate located below the drum opening.
natural_image
Technical line drawing of a circular mechanical component with mounting holes and a directional arrow (no text or symbols)PC Update
The indicator on the control panel marked PC allows a technician to update the dryer with new technology.
For example, if new programs or fabrics are developed, a service technician will be able to modify the existing program cycles accordingly.
MieleCare
(only US)
MieleCare, our Extended Service Contract program; gives you the assurance of knowing that your appliance investment is covered by 5 years of worry free ownership.
MieleCare is the only Extended Service Contract in the industry that guarantees repairs by a Miele Authorized Service Provider using genuine Miele parts. Only genuine Miele parts installed by factory trained professionals can guarantee the safety, reliability and longevity of your Miele appliance.
Please note that unless expressly approved in writing by the Miele Service department, Extended Service Contracts offered by other providers for Miele products will not be recognized by Miele. Our goal is to prevent unauthorized (and untrained) service personnel from working on your Miele products, possibly doing further damage to them, you and/or your home.
To learn more about MieleCare Extended Service Contracts, please contact your appliance dealer or visit us online at:
www.store.miele.com
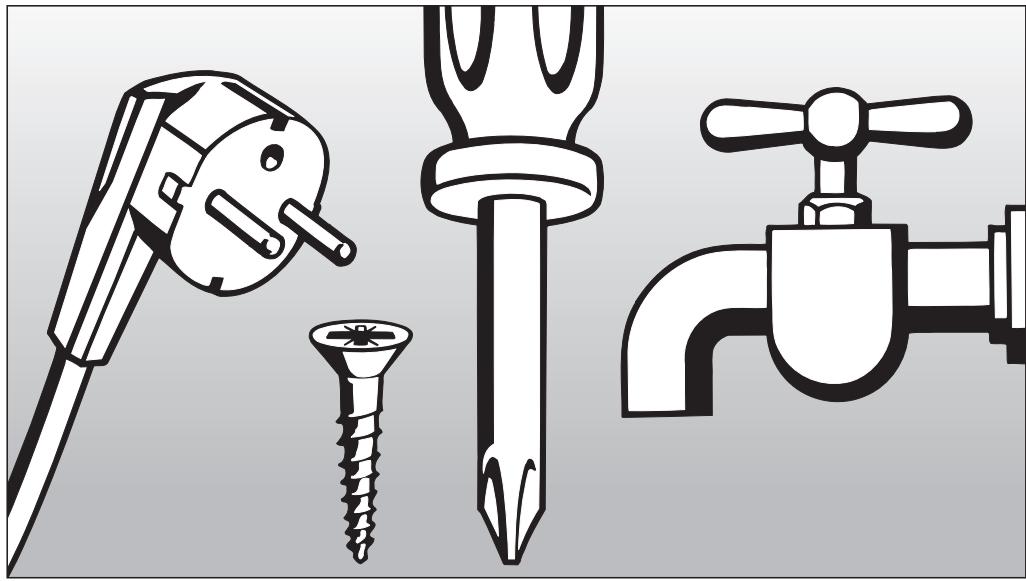
natural_image
Illustration of four different types of electrical fixtures: a plug, screwdriver, tap wrench, and a screw (no text or symbols present)Installation Instructions
To prevent accidents and machine damage read these instructions
before
installation or use.
IMPORTANT SAFETY INSTRUCTIONS
Installation, repair and maintenance work should be performed by a Miele authorized service technician. Work by unqualified persons could be dangerous and could void the warranty. Be sure to observe local building codes.
Before installation, disconnect the tumble dryer from the electrical supply by shutting off the power main, unplugging the power cord or tripping the circuit breaker. Do not restore power until the installation is complete.
GROUNDING INSTRUCTIONS This appliance must be grounded. In the event of malfunction or breakdown, grounding will reduce the risk of electric shock by providing a path of least resistance for electric current. This appliance is equipped with a cord having an equipment grounding conductor and a grounding plug. The plug must be plugged into an appropriate outlet that is properly installed and grounded in accordance with all local codes and ordinances.
WARNING – Improper connection of the equipment grounding conductor can result in a risk of electric shock. Check with a qualified electrician or service representative or personnel if you are in doubt as to whether the appliance is properly grounded.
Do not modify the plug provided with the appliance! If it will not fit the outlet, have a proper outlet installed by a qualified electrician.
If there is any doubt concerning installation, contact Miele's Technical Service Department.
Disposal of the packing materials
The packing materials protect the appliance during shipping. They have been designed to be biodegradable and recyclable.
To prevent suffocation, ensure that any plastic wrappings, bags, etc. are disposed of safely and kept out of the reach of children.
Disposal of an appliance
Old appliances may contain materials that can be recycled. Please contact your local recycling authority about the possibility of recycling these materials.
Ensure that a discarded dryer presents no danger to children. When being stored for disposal remove the door to the drying compartment.
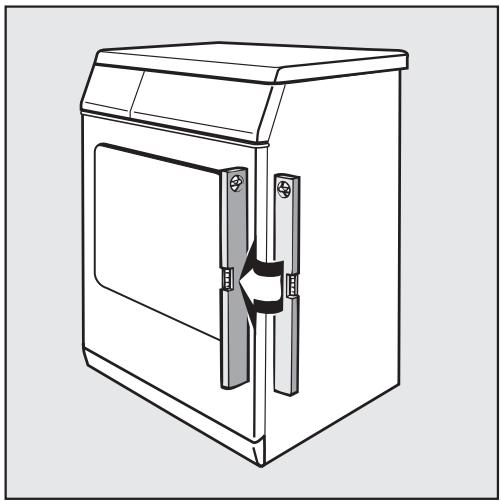
The tumble dryer can also be placed on top of a Miele washing machine for a stacked installation. An appropriate stacking kit is required. The stacking kit is available from your Miele dealer or the Miele Technical Service Department.
⚠️ Installation of the stacking kit must be performed by a Miele authorized technician.
Height of a stacked installation
5' 6 ^3 /8" (168.6 cm)
(Stacking kit with a pull out shelf)
GROUNDING INSTRUCTIONS
This appliance must be grounded. In the event of malfunction or breakdown, grounding will reduce the risk of electric shock by providing a path of least resistance for electric current. This appliance is equipped with a cord having an equipment grounding conductor and a grounding plug. The plug must be plugged into an appropriate outlet that is properly installed and grounded in accordance with all local codes and ordinances.
WARNING – Improper connection of the equipment grounding conductor can result in a risk of electric shock. Check with a qualified electrician or service representative or personnel if you are in doubt as to whether the appliance is properly grounded.
Do not modify the plug provided with the appliance! If it will not fit the outlet, have a proper outlet installed by a qualified electrician.
The dryer comes with a 5 ft long, 12/4 AWG cord and a NEMA 14-30 P plug.
It should be connected to a 120/208-240 V, 30 A, 60 Hz AC power supply. A 3 pole-4 wire grounding power outlet (NEMA type 14-30 R) is necessary.
Front view
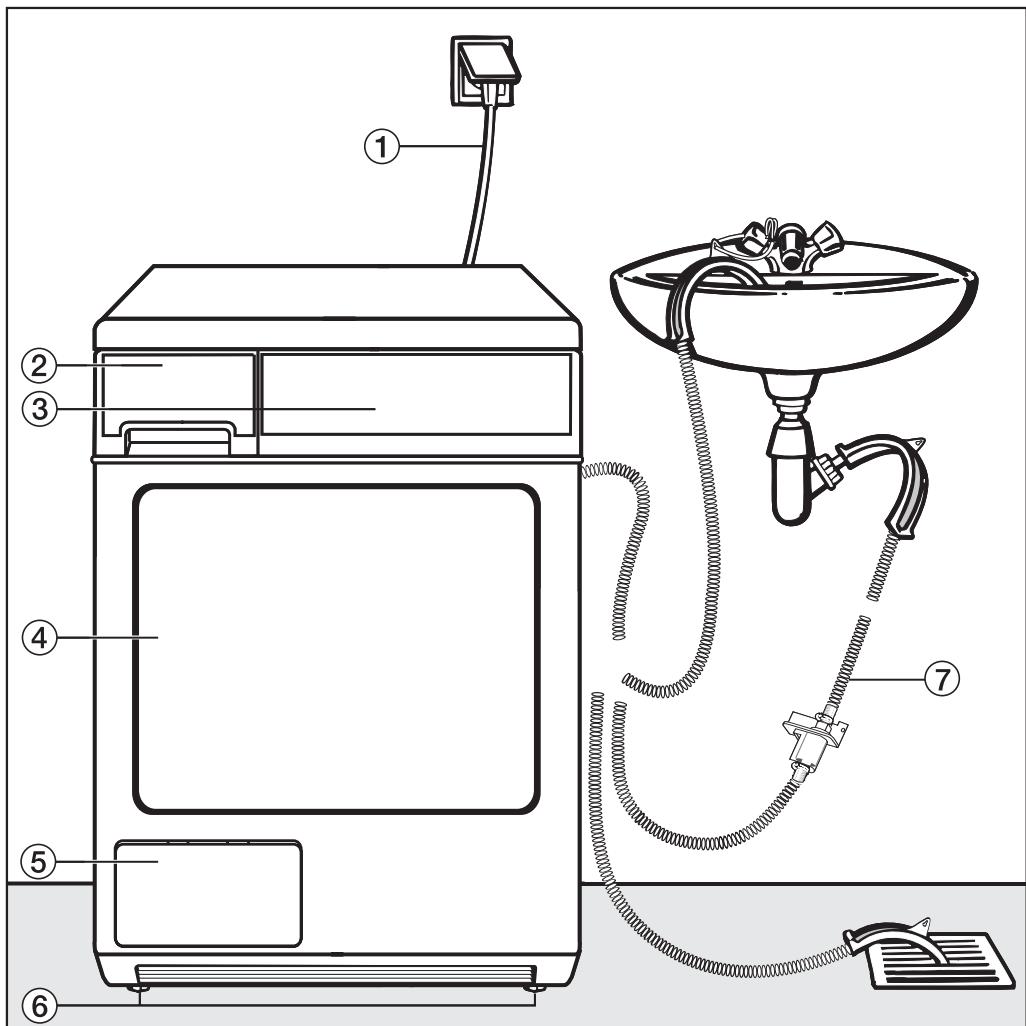
text_image
Diagram of a washing machine with numbered parts and labeled components, including a funnel and tubing.① Power cord with plug
② Condensed water container
③ Control panel
④ Door
⑤ Access panel to condenser
⑥ Four height adjustable feet
⑦ Optional drain hose:
An alternative to using the condensed water container is to drain condensed water into a sink, standpipe or gully.
Rear view
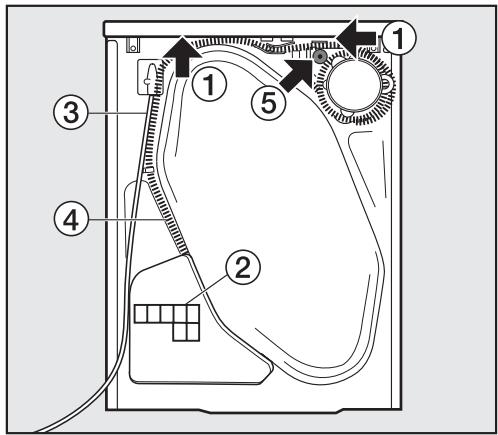
text_image
Diagram of a device interior with numbered components and labeled parts, likely for electronics or control system.① Handle for transportation (arrows)
② Air intake opening to cool the condenser
③ Power cord with plug
④ Condensate drain hose
⑤ Accessories for connection to a sink standpipe
Installation site
⚠️ Do not install the dryer in an area where it can be blocked, e.g. behind a door.
⚠ This appliance is not intended to be mounted in a wall or other vertical surface of a building or cabinet. The unit is allowed for built-in application.
Transporting the dryer to the installation site
The rear excess end of the lid has a handle box for transport.
■ Use the front dryer feet and the rear excess end to transport the dryer from the packaging base to the installation site.
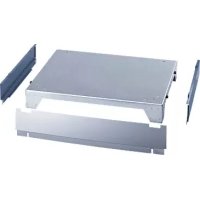
Installation beneath a counter
When the machine lid needs to be removed to reduce the height of the machine, a built-under spacer kit* is necessary.
It must be installed by a Miele Service Technician.
The cover plate of the built-under kit replaces the appliance lid and ensures electrical safety.
An installation manual is supplied with the built-under spacer kit.
The electrical connection should be near the dryer and accessible at all times.
Extended machine feet* are recommended at a built-in height of more than 33 ^1/_16 (840 mm).
■ Set the extended machine feet on a height of 1^9/_16 " (40 mm).
Remove the original machine feet and replace them with the extended ones.
One or two filler frames* are recommended at a niche height of 34^1/4 " / 34^13/16 " to 36" / 36^5/_8 " (870/885 - 915/930 mm).
* (optional accessory)
An existing continuous toe kick must be interrupted at the dryer location!
Reinstallation of the machine lid
When reinstalling the appliance lid, check the firm fit of the cover at the rear bracket for a safe transport of the dryer.
Installation tips
An airflow gap of 38 " (10 mm) must be provided between the machine and the floor. This airflow gap must not be blocked by a toe kick or thick piled carpets.
Do not install the dryer next to a refrigerator. The warm air exhausting from the dryer will affect the thermostat of the refrigerator, causing it to run continuously.
Level the dryer
natural_image
Line drawing of a simple kitchen appliance with door and side panel (no text or symbols)■ The dryer must be level to ensure safe and proper operation.
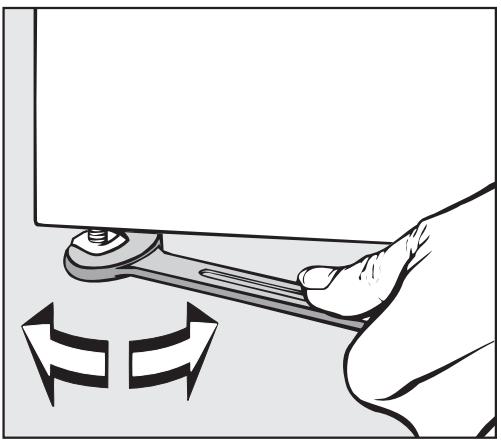
natural_image
Illustration of a hand using a wrench to adjust a component, with directional arrows indicating rotation (no text or symbols)■ The machine can be leveled by turning the legs clockwise or counterclockwise as necessary.
External water drain
When drying is in progress, condensed water is pumped into the condensed water container through the drain hose at the back of the dryer. The condensed water can also be drained directly if the machine is installed near a sink or a standpipe so that the condensed water container does not have to be emptied.
Drain hose length ..... 4' 11" (1.5 m)
Maximum delivery head .... 4' 11" (1.5 m)
Maximum drain length.....13 ft (4 m)
If the hose is not long enough, an extension hose is available as an optional accessory from the Miele.
Installing the drain hose
Do not pull or kink the drain hose, it may be damaged!
■ The drain hose holds a small amount of remaining water. Keep a container at hand.
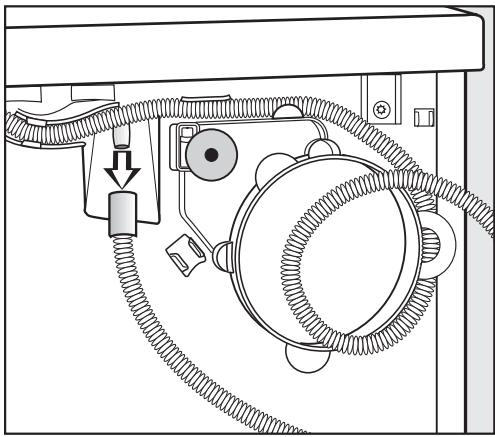
natural_image
Technical diagram of a mechanical assembly with hoses and components (no text or labels)■ Pull the drain hose off the holder.
■ Drain remaining water in the container.
■ Unwind the hose from the holder and carefully pull it from the clamps.
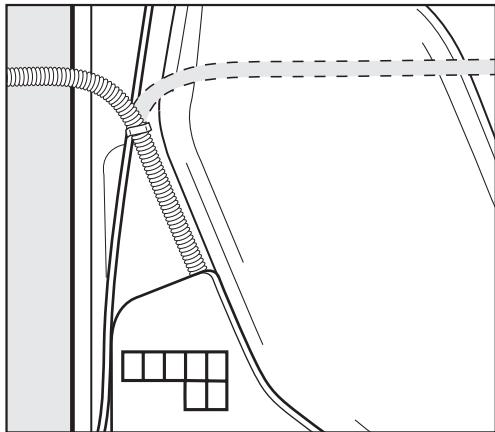
natural_image
Pure technical line drawing of a mechanical or architectural component without any text, numbers, or symbols■ Guide the hose depending on the installation to the left or right.
■ Leave the hose in the middle clamp to prevent the drain hose from becoming kinked.
Draining the condensed water into a sink
■ Secure the hose carefully, e.g. by tying the hose to the water tap, to avoid damage by overflowing water.
■ Use the curved guide to prevent the drain hose from becoming kinked (see Front view illustration).
Connection to a standpipe
■ Insert the drain hose into the Y-adapter of the sink.
Installation requirements demanding a non-return valve
⚠️ To prevent water from flowing back into the machine a non-return valve must be installed at the following installations:
- Installation to a sink standpipe
- Several installation possibilities where additionally another washer or dishwasher is connected to.
Example: Connection to a sink standpipe
Connect the drain hose with a non-return valve directly to a sink standpipe.
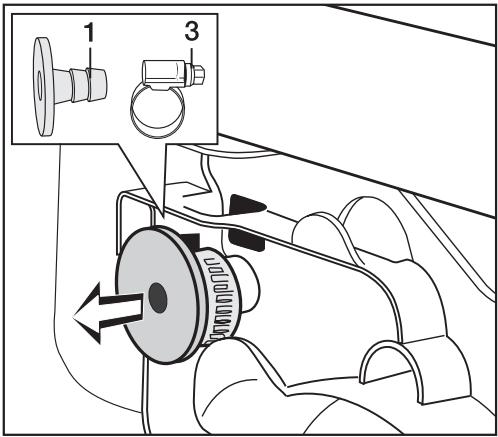
text_image
Technical diagram showing mechanical assembly with labeled parts 1 and 3, including a directional arrow indicating motion or force.■ Remove the accessories from the top rear of the dryer:
Connector 1 and the hose clamp 3 behind it.
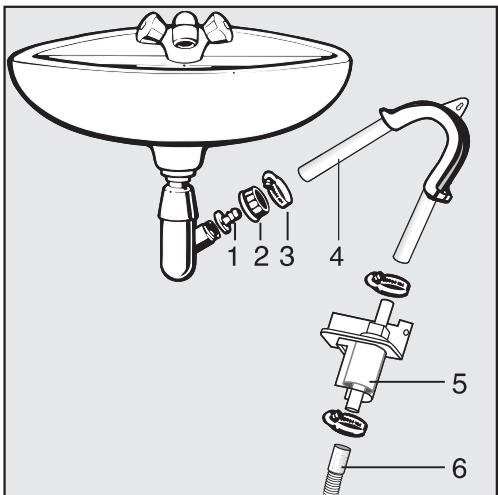
text_image
Technical diagram of a cleaning or piping assembly with numbered parts for identification1 Connector
2 Sink connecting nut
3 Hose clamp
4 Hose end
5 Non-return valve
6 Dryer drain hose
■ Install the connector 1 with the sink connecting nut 2 to the sink standpipe.
Usually the sink connection nut is equipped with a washer. Please remove the washer.
- Plug the hose end 4 to the connector 1.
■ Using a screwdriver tighten the hose clamp 3 directly behind the sink connecting nut.
⚠️ Install the non-return valve 5 vertical or slightly angled. If installed horizontal it will not operate correctly.
■ Connect the non-return valve 5 to the dryer drain hose 6. See illustration for the correct direction.
■ Fasten the non-return valve with the hose clamps.
Miele, Inc.
USA
National Headquarters
9 Independence Way
Princeton, NJ 08540
Phone: 800-843-7231
609-419-9898
Fax: 609-419-4298
www.miele.com
Technical Service & Support Nationwide
Phone: 800-999-1360
Fax: 888-586-8056
Miele Limited
CDN
Headquarters and Showroom
161 Four Valley Drive
Vaughan, ON L4K 4V8
Phone: 800-643-5381
905-660-9936
Fax: 905-532-2290
www.miele.ca
info@miele.ca (general enquiries)
professional@miele.ca (commercial
enquiries)
MieleCare National Service
Phone: 800-565-6435
905-532-2272
Fax: 905-532-2292
service@miele.ca (technical enquiries)