T 1570 C - Tumble drier MIELE - Free user manual and instructions
Find the device manual for free T 1570 C MIELE in PDF.

User questions about T 1570 C MIELE
0 question about this device. Answer the ones you know or ask your own.
Ask a new question about this device
Download the instructions for your Tumble drier in PDF format for free! Find your manual T 1570 C - MIELE and take your electronic device back in hand. On this page are published all the documents necessary for the use of your device. T 1570 C by MIELE.
USER MANUAL T 1570 C MIELE
Operations Manual for the T 1570 C Condenser Dryer
In order to protect yourself and avoid damage to your machine, it is absolutely necessary to read the operating instructions prior to installation and operation.
Contents
Guide to the machine. 3
IMPORTANT SAFETY INSTRUCTIONS 5
Your contribution to the environment 7
OPERATING INSTRUCTIONS
Loading the machine 8
Unloading the machine 8
Notes on laundry care 9
Program selection 10
Programs 12-13
USER MAINTENANCE INSTRUCTIONS
Emptying the condensed water container 14
Cleaning and care 15
Problem solving guide 18
After-sales service 21
INSTALLATION INSTRUCTIONS
Grounding and Electrical connection 22
Installation 23
Connecting to an external drain. 26
Consumption data 28
Technical data 29
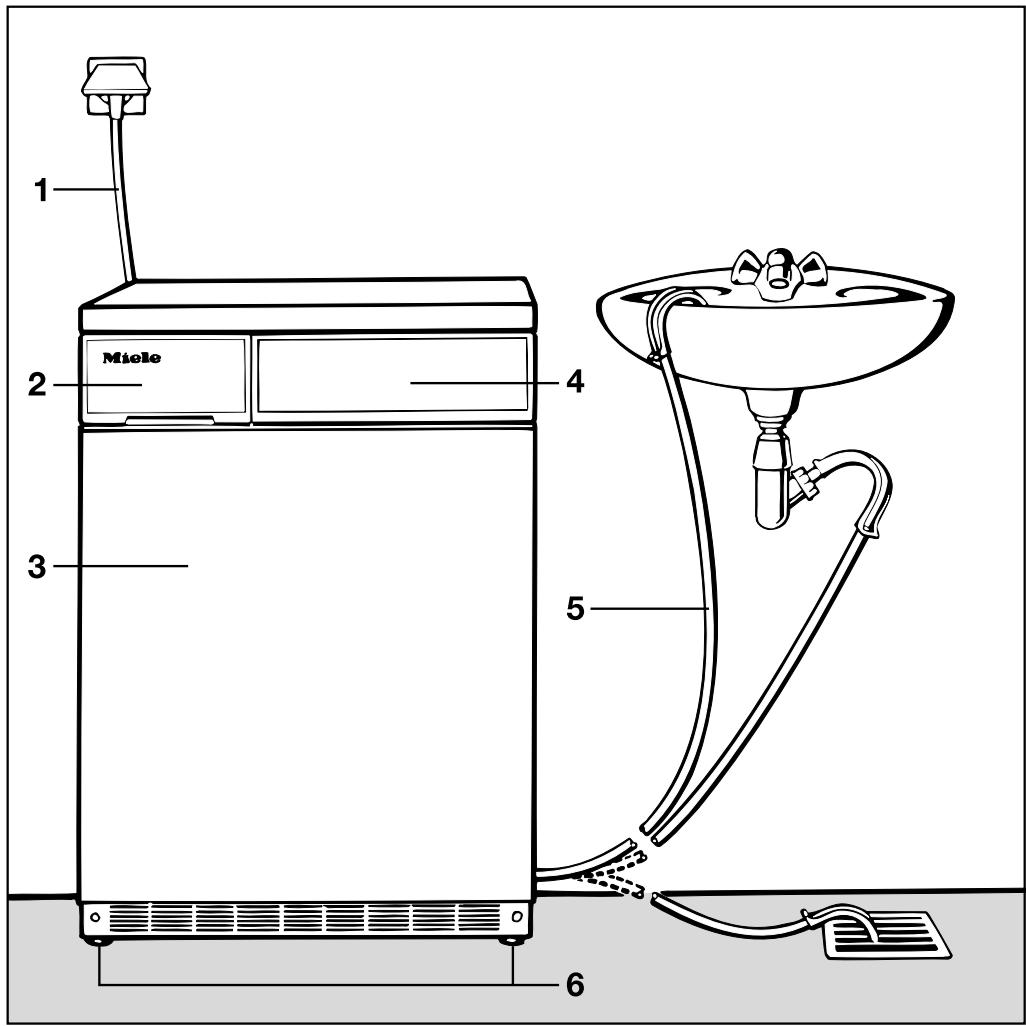
1 Supply cable with plug
2 Condensed water container
3 Drum door
4 Control panel
5 Drain hose for condensed water
6 Four height-adjustable legs

Door

Buzzer

Low temp.

Start
MADE IN GERMANY
Empty out container
PROG
SEQUENCE
-FDRYING STAGE REACHED
Machine
iron
Hand
iron
Normal
PROGRAM SETTING
Pushbuttons
- Door
This button is used to open the door (does not stay pushed in).
-ON/OFF
When the machine is turned on, the "On" indicator will light up if the door is closed. If the door is open, the drum light will be on.
- Buzzer
Allows the buzzer to sound as the drum rotates during the anti-crease cycle.
- Low temp.
Lower drying temperatures for delicate fabrics, e.g. acrylics, nylon.
- Start
Starts the selected program (it does not stay pushed in).
Indicator lamps
Empty out container
The water container should be emptied.
- PROGRAM SEQUENCE
The program sequence indicator lamps show the current status of the drying program.
- DRYING STAGE REACHED
These indicator lamps show which drying stage the program has reached. For program stages "Normal" and "Extra dry" the indicator lamp remains at the "Normal" position.
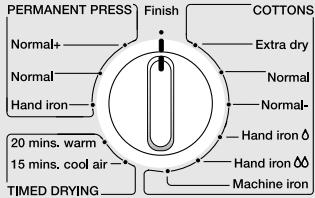
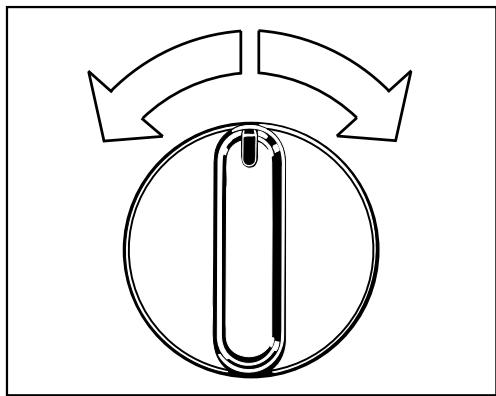
PROGRAM SETTING-SELECTOR
Set the required program by turning the knob either clockwise or counterclockwise.
- COTTONS
PERMANENT PRESS
TIMED DRYING
Items can be either dried for 20 minutes (incl. a cooling-down phase) or cool air fluffed in for 15 minutes.
WARNING - To reduce the risk of fire, electric shock, or injury to persons when using your appliance, follow basic precautions, including the following:
- For your own safety and for the protection of your machine read these operating instructions carefully before using your dryer for the first time.
- Remember to remove the door when disposing of an old machine to prevent children from accidentally locking themselves in.
- Do not install or store this appliance where it will be exposed to the weather.
- Do not install your dryer in rooms where freezing temperatures may occur. The reliability of the electronic control system may be impaired.
- This machine should only be used for drying the following fabrics:
- Items which can be machine dried as specified by the laundry care label.
-
Items which have been washed in water.
-
The following fabrics pose a fire hazard:
- Items which contain foam rubber, rubber or rubberlike components.
- Items which have been treated with flammable cleaning agents, such as gasoline or dry-cleaning solvents.
- Items containing hair lacquer, hairspray, nail polish remover or similar substances.
- Clean the lint filter before and after each load.
- Do not dry articles that have been previously cleaned, washed, soaked in, or spotted with gasoline, dry-cleaning solvents, or other flammable or explosive substances. They give off vapors that could ignite or explode.
- Do not allow children to play on or in the appliance. Close supervision of children is necessary when the appliance is used near children.
- Always close the door after use to prevent children from leaning on the door and causing the dryer to tilt.
- Do not drink the condensed water.
- Keep the area around the air intake (toekick) and surrounding areas free from lint, dust and dirt.
IMPORTANT SAFETY INSTRUCTIONS
- The interior of the machine should be cleaned periodically by qualified personnel.
- Do not reach into the dryer if the drum is moving.
- Do not tamper with the controls.
- Do not repair or replace any part of the appliance, or attempt any servicing unless specifically recommended in this operations manual. Repairs to electrical appliances should only be carried out by qualified personnel.
Incorrectly repaired machines may pose a considerable risk to the user.
- Lint is principally the result of friction caused by items being worn and washed.
Machine drying causes insignificant amounts of lint to form and, as has been established by research institutes, has no detrimental effect on the lifetime of fabrics.
- Warning - Do not use fabric softener/anti static dryer sheets.
Residues from these products block-up (clog) the lint filter causing premature failure of the dryer.
Miele dryers are designed to dry laundry without static cling. However, should fabric softener be required, use liquid fabric softener in the wash cycle.
Clean lint filter mesh monthly by washing/scrubbing with hot soap and water.
- Do not place items exposed to oils in your dryer. Items contained with oils may contribute to a chemical reaction that could cause a load to catch fire.
SAVE THESE INSTRUCTIONS
For grounding and electrical connection instructions, refer to the electrical connection section.
This dryer is only intended for residential use!
Disposal of the packing material.
The transport and protective packing is mostly manufactured from the following recycled or re-useable materials:
- corrugated paper/cardboard
- polystyrene - CFC-free
polyethylene foil (transparent) - untreated wood
- fiber board
Please check local environmental regulations before disposing of packing materials and discarding the appliance.
Disposal of your old machine.
Old machines contain materials which can be recycled. Please contact your recycling center or scrap merchant and render the machine inoperative as per the "Important Safety Instructions" before disposing of the appliance.
Loading the machine
WARNING - To reduce the risk of fire, electric shock, or injury to persons, read the IMPORT-ANT SAFETY INSTRUCTIONS before operating this appliance.
- Load the laundry loosely into the drum.
Duvet covers and pillowcases should be fastened before drying in order to prevent small items from rolling inside of them.
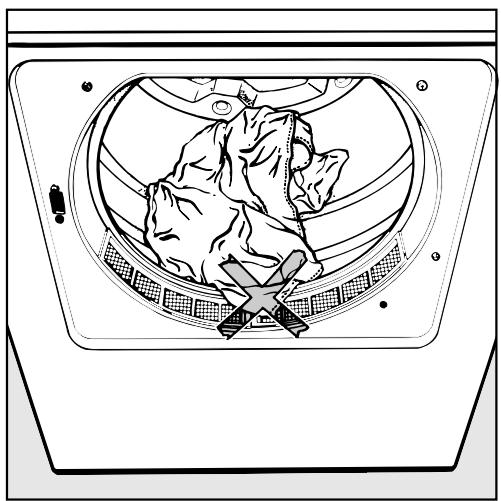
Important: Check that laundry cannot be trapped by the door as this may cause damage to the fabric.
Unloading the machine
If the wash is not removed at the end of the drying program, the machine will automatically enter the anticlease cycle for 60 minutes. This entails the drum being rotated at short intervals in order to reduce the formation of creases.
Once the laundry has been removed, check that the drum is empty. Any items left in the drum could be damaged through over-drying during the next program.
Clean the lint filter after each drying cycle to prevent excessive energy consumption, longer program times and the risk of fire.
The door should always be closed after use.
Before drying, check the instructions on the fabric care label.
The following fabrics should not be dried in a tumble dryer:
- Woollens and wool blends
These fabrics tend to become matted and shrink.
- Items filled with down
The fine fabric interior tends to shrink, depending on the quality of the item involved.
Pure linen
These items should only be machinedried if specified as suitable by the manufacturer on the textile care label. The surface of the fabric may otherwise tend to become "rough".
Miele dryers have been designed to dry laundry free of static cling, without the use of dryer softener sheets or similar products. The dryer continuously monitors the moisture content of the laundry, and automatically shuts off the heat when the selected degree of dryness is reached. Through the use of a cool down period, (where the machine operates without heat), cool, static free laundry is the end result. Dryer softener sheets perform the same function by depositing a chemical residue on both the clothes and the interior of the dryer. Over time, this coating may lead to performance reductions in the dryer.
If fabric softening is desired, it is more convenient, economical and beneficial to the clothing if a liquid softener is automatically dispensed while the clothes are in the washing machine. Please see the washing machine operating instructions for directions on how to automatically dispense a liquid softener.
Notes:
Knitted fabrics and flannel sheets tend to shrink when washed for the first time and also when dried. They should not be overdried (Extra dry)!
Starched laundry can also be dried in the tumble dryer.
Permanent press items should be briefly spun in the washing machine before drying. Items which are prone to creasing should not be dried in the "PERMANENT PRESS- Normal +" - Program.
Drip-dry shirts made of pure cotton may tend to crease, depending on the quality of their finish.
These items should be dried in a "Hand iron"program.
Permanent press fabrics tend to crease more as the size of the load increases. This is particularly true of very delicate fabrics. The load should be reduced to 1.5 kg or, if necessary, to 1 kg.
Do not dry new dark-colored fabrics together with light-colored items as they may discolor.
Functional description
An electronic sensor system monitors the moisture content of the laundry.
Once the required degree of dryness is reached, cold air then enters the drum to cool the laundry.
The drying program is then terminated.
Function of the pushbuttons
Door
ON OFF
Buzzer
Low temp.
Start
MADE IN GERMANY
- Door
This button is used to open the door.
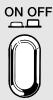
- ON/OFF
When the machine is turned on, the "On" indicator lamp illuminates when the door is closed. When the door is open, the drum is illuminated.
- Buzzer
When activated, the buzzer will sound as the drum rotates during the anticrase cycle.
- Low temp.
Uses lower drying temperatures for delicate fabrics, e.g. acrylic fibers.
To gently dry delicate fabrics, press this button before starting the cycle.
- Start
Starts the selected program.
"PROGRAM SEQUENCE indicator
The program sequence indicator lamps show the current status of the drying program.
"DRYING STAGE REACHED" indicator
This indicator shows which drying stage the program has reached.
"PROGRAM SETTING" selector
There is a range of settings for both "Cottons" and "Permanent Press". In addition, items can be either dried for 20 minutes (incl. a cooling-down phase lasting 8 mins.) or fluffed in a cool air cycle for 15 minutes.
To select a program
A program can only be selected when the machine is turned on.
- Set the desired program by turning the program selector either clockwise or counterclockwise.
Press the "Start" button.
The program status will be stored for 30 minutes in the event of a power failure.
The program is cancelled if:
- There is a power failure lasting more than 30 minutes.
- The program has already reached the "Cooling down" or "Anti-crease" stage.
To change a program during drying:
Set the program selector to the desired program.
The new program will start from the beginning.
The tables following on the next two pages list the range of applications for the different programs.
Correct procedure:
Press the "On/Off" button.
Press the "Door" button and load the drum.
3 Close the door with a firm swing - do not push it shut.
Select "Low temp." and "Buzzer" if so desired.
Select a program.
Press the "Start" button.
After the program has finished:
Set the program selector to "Finish".
Remove the laundry.
3 Clean the lint filter.
Turn off the machine.
Empty the condensed water container. (Omit this step if dryer has been set up for external drainage of condensed water)
| COTTONS | Type of laundry/fabric | Max. load | Special instructions |
| Extra dry | Multi-layer fabrics, mixed load of cotton fabrics, e.g. jeans, towels, sweat suits. | 5 kg | The “Extra dry” program should not be selected for jersey wear items. |
| Normal | Homogeneous loads of cotton fabrics e.g. flannel items, underwear, socks. | 5 kg | Should items still be damp, select the “Extra dry” program. |
| Normal- * | Knitted cotton fabrics particularly susceptible to shrinkage, e.g. jersey wear or lightweight cotton fabrics. | 5 kg | Should items still be damp, select the “Normal” program. |
| Hand iron ΔΔ* | Cotton or linen fabrics, e.g. linens, bedding, starched items left damp for easier ironing. | 5 kg | Moisture can be increased or decreased by using “Hand iron ΔΔ” or “Hand iron Δ” respectively. |
| Machine iron | Cotton or linen fabrics, including starched laundry, for the rotary iron, (B865E). | 5 kg | The laundry can be rolled up to prevent it from drying out until it can be ironed. |
- These are the programs that should be tested according to the EN 61121/A11 Standard.
| PERMANENT PRESS | Type of laundry/fabric | Max. load | Special instructions |
| Normal + | Permanent press items made of synthetic or blended fabrics, e.g. pullovers, dresses, pants, etc., which are not dried adequately in the “Normal” program. | 2.5 kg | With blended fabrics consisting of wool and synthetics, consult the manufacturer's instructions, as the wool component may cause the fabric to become matted and shrink. |
| Normal * | Permanent press shirts, table cloths, bedding etc. made of blended woven or knitted fabrics, e.g. cotton/synthetic. | 2.5 kg | |
| Hand iron | Permanent press shirts, table cloths, pillowcases etc. cotton/synthetics, which are still to pressed. | 2.5 kg |
- This is the program that should be tested according to the EN 61121/A11 Standard.
| TIMED DRYING | Type of laundry/fabric | Max. load | Special instructions |
| warm | Individual items, e.g. comforters, or very small loads. | - | This setting will run the full length of time regardless if the item is dry beforehand. |
| cool | Items which are only to be aired. | 5 kg | - |
USER MAINTENANCE INSTRUCTIONS Emptying the condensed water container
Depending on your type of installation, the condensed water will either be pumped to a drain, or collected in the condensed water container, located in the upper left corner of the machine.
The container should be emptied after each drying program.
Should the container be full when the tumble dryer is started, or if it becomes full during normal operation:
- The "Empty out container" indicator lamp will light
- The buzzer will sound
- The drying program will stop
- The machine will enter the cooling down cycle
To empty the container:
Pull out the container with both hands.
Hold the cap open while emptying the container.
- When the container is empty, push it into its recess until it clicks into place.
Do not drink the condensed water.
Note:
The water collected in the container has been distilled by evaporation and can be used in a steam iron or humidifier, for example. The following points should be remembered:
As a precautionary measure, the water should be passed through a fine sieve or coffee filter in order to strain out any small particles of lint which might otherwise cause damage.
Cleaning the lint filters
The lint is collected by the lint filter in the door.
Clean the filter after every program.
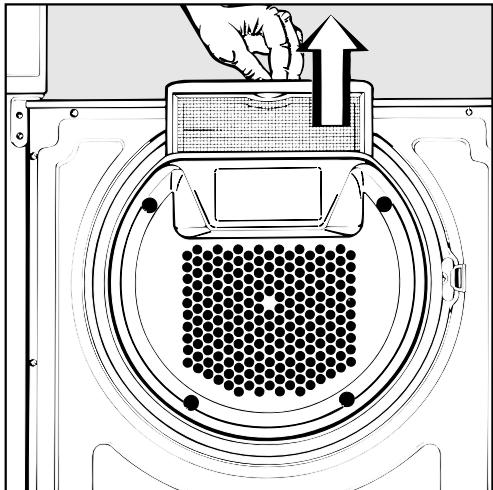
Grip the filter by the recessed handle and pull up to remove.
- Any remaining lint in the hollow part of the door can be removed through the gap at the bottom.
- Remove any accumulated lint from the filters in the door opening.
All filters can be rinsed with water if necessary.
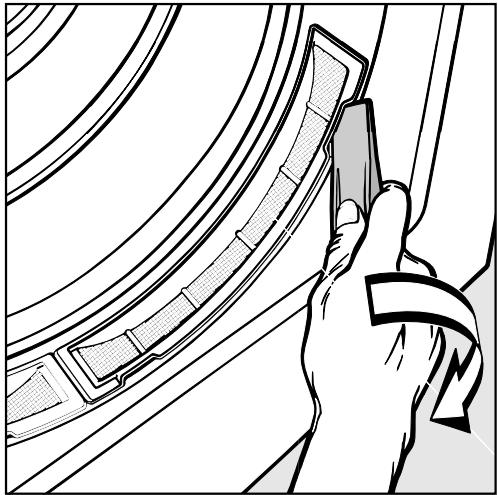
Dry the filters before putting them back in place if they were rinsed.
Before cleaning the tumble dryer; disconnect the machine from the power supply.
Cleaning the dryer
- The dryer can be cleaned using soapy water or a mild non-abrasive detergent (not scouring powder) and dried with a soft cloth.
The drum may be cleaned using a suitable stainless steel cleaner following the manufacturer's instructions.
Do not hose down the machine or use abrasive cleaners.
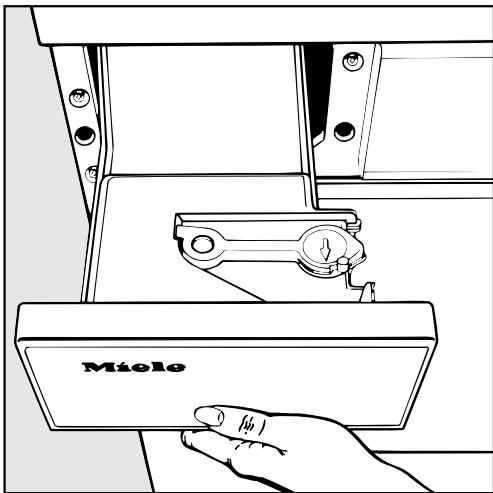
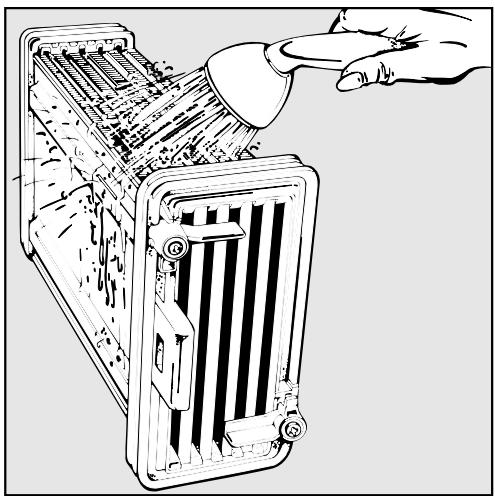
Cleaning the heat exchanger
The heat exchanger should be cleaned once or twice a year.
Open the door.

Turn the lever so that it is vertical.
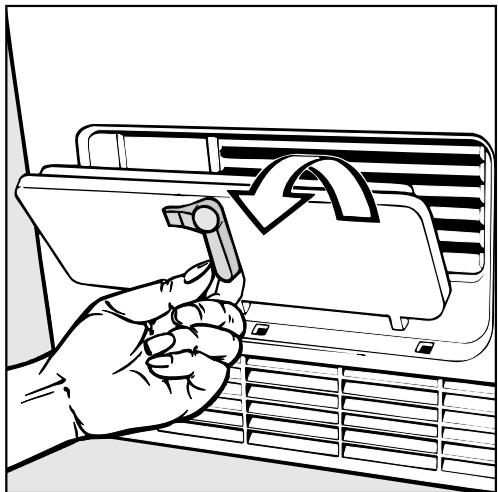
Remove the cover.
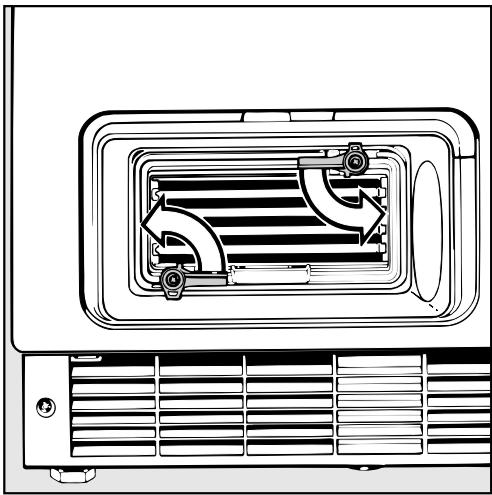
Turn both levers on the heat exchanger so that they are vertical.
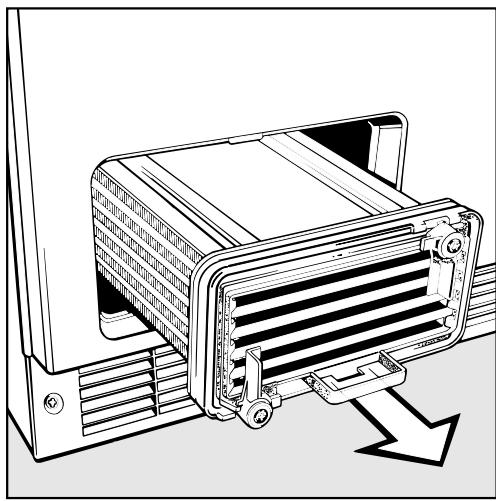
Pull out the heat exchanger.
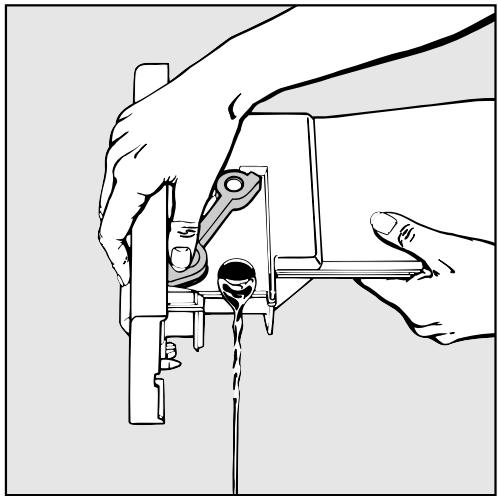
and along the two long sides.
- Stand the heat exchanger lengthwise on a towel until it dries.
- Replace the heat exchanger in the reverse order.
Make certain the heat exchanger is pushed in all the way and that the cover is firmly closed. Otherwise water may leak from the machine.
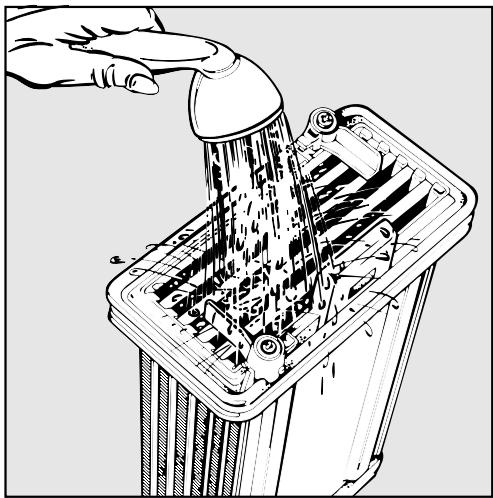
Clean the heat exchanger:
- at both ends (front and back).
Electrical appliances should only be repaired by qualified personnel. Incorrectly repaired machines may put the user at risk. There are, however, minor problems which can be corrected without contacting the Service Department.
| What to do if, . . .? | Cause ... | Remedy ... |
| ... the tumble dryer fails to start when turned on? | Check whether the "On" indicator lights up. If so, failure to start may be due to an incorrect program selection procedure. If the "On" indicator lamp does not illuminate, check that: | Repeat the switch-on procedure in the correct sequence, as outlined in the "Program Selection" section. - The "ON/OFF" button is depressed. - The door is properly closed. - The machine is plugged in and the fuse or circuit breaker has not tripped. |
| ... the laundry is not sufficiently dry? | The load consisted of dissimilar items (size and fabrics). | Select a longer drying program. |
| Small loads or individual items may cause the program to terminate prematurely. | Small loads can be time-dried. | |
| ... the drying times are too long? | The lint filter is clogged. | Clean the lint filter in the door. |
| The laundry was not spun in the water for a sufficient time. | Make sure that the laundry is thoroughly spun before drying. | |
| ... the "anti-crease" indicator lamp in the sequence indicator display starts flashing? | - Turn the program selector to "finish". - Turn the machine off and then on again. - Select a program. - Press the "Start" button. If the indicator lamp starts flashing again, this indicates a fault in the machine. Please contact the Miele Service Dept. | |
| ... the drum door opens during the drying cycle? | The machine has overheated. The temperature limiter opened the drum door and caused the machine to turn off automatically. Possible reasons for overheating: - The lint filter in the door is clogged. - The vent duct is blocked. | Before restarting the program, proceed as follows: - Release the ON/OFF button. - Clean the affected part of the machine. - Turn on the machine again. - Reselect the terminated program. - Press the "Start" button. |
| If the drum door opens again, the Miele Service Dept. should be contacted. | ||
| ... drops of the water appear along the upper edge of the drum door? | This may not be a problem. A dual filter system with two seals is used to prevent lint from becoming deposited in the heat exchanger. | These two seals may occasionally cause condensed water to form on the door. Laundry coming into contact with these drops of water will dry within in a few minutes. |
| ... after cleaning the heat exchanger, water leaks from the machine? | Check that the heat exchanger door has been replaced correctly. If necessary, remove and replace it. | |
| ... the interior drum light fails to function? | See next page. | |
| ... you have to open the door in the event of a power failure? | See next page. |
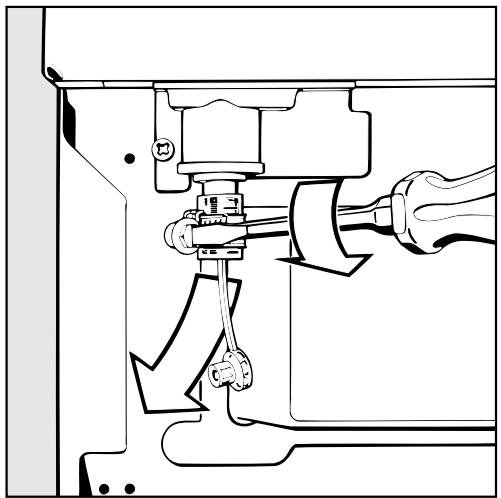
The interior drum light fails to function: The bulb may be defective.
Replace it as follows:
Turn off the machine or disconnect it from the power supply.
Open the door.
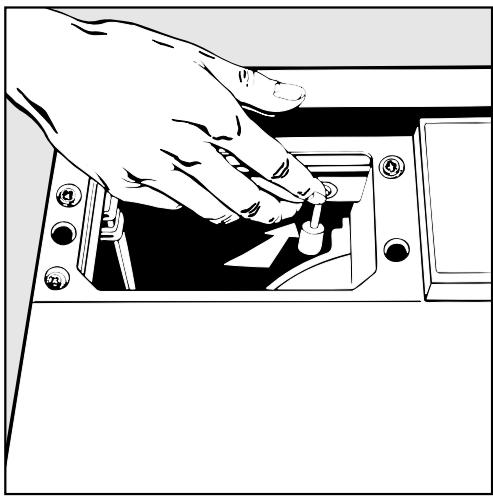
- Use a 3 / 4" wrench to unscrew the plastic bulb cover located inside the drum and above the door (see illustration).
The light bulb must not exceed the maximum wattage quoted on the data plate.
- Replace the bulb and the plastic cover.
The cover must be correctly installed and tightened, otherwise moisture may seep in and cause the socket to corrode.
This is a temperature-resistant bulb and should only be ordered from your Miele Service Dept.
To open the door in the event of a power failure
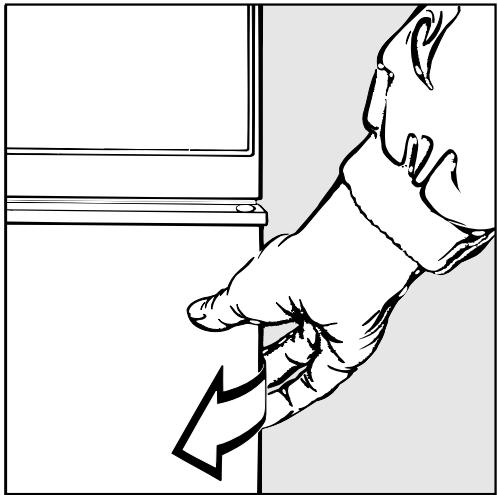
Pull forward on the un-hinged side of the door.
In the event of problems which cannot be solved, please contact:
- Your Miele Dealer
- The nearest Miele Service Department (see back cover for the adress).
When contacting the Service Department, please quote the Model and Serial numbers of your appliance, both of which can be found on the right side after the door is opened.
Specimen:
INSTALLATION INSTRUCTIONS Grounding and Electrical connection
Grounding instructions
This appliance must be grounded.
In the event of a malfunction, grounding will reduce the risk of electric shock by providing a path of least resistance for the electric current. This appliance is equipped with a cord having an equipment grounding conductor and a grounding plug. The plug must be plugged into an appropriate outlet that is properly installed and grounded in accordance with all local codes and ordinances.
Warning
Improper connection of the equipment-grounding conductor can result in a risk of electric shock.
Check with a qualified electrician or serviceman if you are in doubt as to whether the appliance is properly grounded.
Do not modify the plug provided with the appliance; if it will not fit the outlet, have a proper outlet installed by a qualified electrician.
Electrical connection
This installation should be done by an experienced and qualified person, in most cases a licensed electrician, in accordance with local codes and regulations.
This dryer is supplied with a 1.5 m power cord with a 3-pole, 4 wire grounding plug, 14-30P (regular Canadian dryer plug).
This plug has to be plugged into a 3-pole, 4 wire grounding receptacle, 14-30R (regular Canadian dryer receptacle).
The receptacle has to be connected to Line 1, Line 2, Neutral and Ground wires.
The voltage is 120/240 V AC or 120/208 V AC.
"EASY INSTALLATION KIT"
If you do not have a designated line, 4 wire, 120 / 240V - 15 or 30 Amps, for this appliance, but you have the 4 wire, 120 / (208)240V - 30 Amp Canadian dryer wall receptacle (14-30 R) you can use the Miele Double Receptacle Box. This consists of two standard receptacles 14-30 R, 4 fuses, box and plug cord, which allows you to use that single dryer wall receptacle to supply power to a Miele washer and Miele dryer. Both machines may operate at the same time because each uses maximum about 15 A current.
For more information on the electrical connection on the Miele Double Receptacle Box please contact:
- your Miele dealer
- the nearest Miele Service Department.
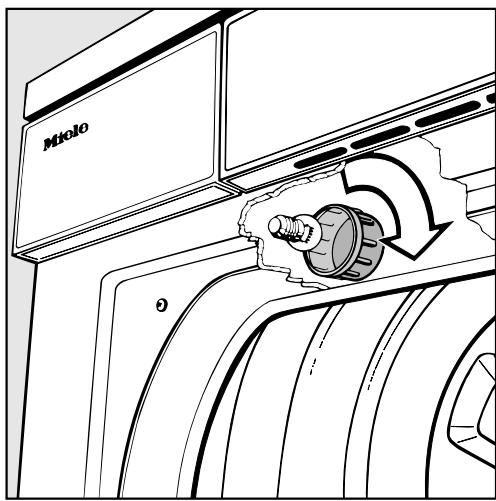
The machine should be perfectly level to ensure safe and proper operation. Minor discrepancies do not, however, have an adverse effect on operation.

The machine can be leveled by turning the legs clockwise or counterclockwise as necessary.
Turn the counternuts up and tighten against the bottom.
The grill below the drum door should never be blocked, as this will prevent a sufficient intake of cold air.
Where to install the machine
Installation
It is possible to install this appliance under a continuous countertop. The machine lid can be removed, if necessary.
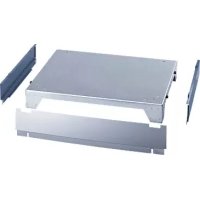
The tumble dryer can also be placed on top of a Miele washing machine for a stacked installation. An appropriate stacking kit * to match your washing machine is required.
- These items are available from the Miele Parts Dept.
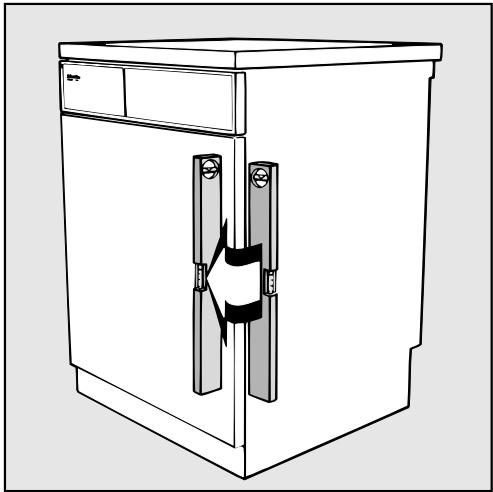
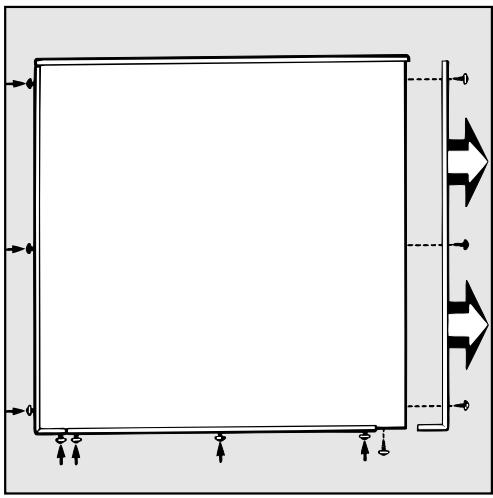
Changing the decor panel
Note: The door should be closed when installing the decor panel.
- On the door lock side remove the 4 screws (3 on the side and 1 underneath) and the door strip.
- Loosen the remaining 7 screws on the lower and side decor strips until the decor panel can be bowed slightly and taken out.
Reassemble in the reverse order and tighten the screws.
Decor panel dimensions
(Values in bracket denote tolerances in mm)
Width: 587 mm (-1)
Height: 602 mm (-1.5)
Thickness: 1 mm (+0.5)
Panels which are thicker than 1.5 mm require a 4 mm adapter strip available from Miele specialist dealers or the Miele Spares Dept.
Note:
When using the adapter strip, the height of the panel should not exceed 596.5 ~mm (- 1.5).
Fitting a toekick panel
The appliance toekick below the door can be concealed using a toekick panel.
The height and depth of the appliance toekick cannot be altered.
A cut-out must be made in the toekick panel around the ventilation slots as otherwise the airflow to the appliance will be blocked and the machine will not dry efficiently.
Connecting to an external drain
The condensed water can be drained directly if the machine is installed near a sink or drain outlet.
The machine is equipped with a non-return valve as standard to prevent water from flowing back into the machine (eg. if the machine is connected to a siphon).
Max. drain hose length: (3.0 m) 10 ft
Max. drain height: (1.0 m) 4 ft.
Accessories supplied:
- (2 m) 6 ft drain hose
- Hose clamp
- Hose elbow
- Loosen the hose clamp from the drain outlet at the lower left rear of the machine and remove the rubber plug.
Remove the clamp from the plug and place it over the drain hose.
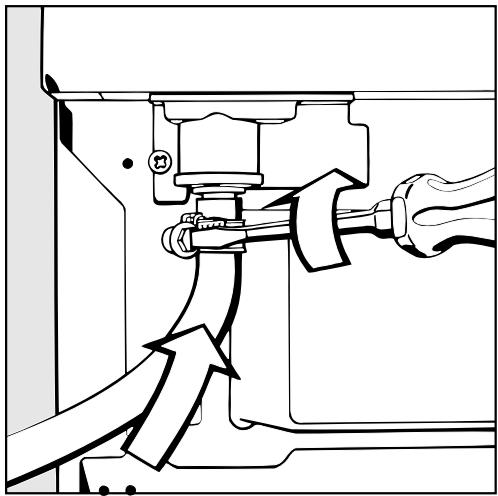
- Push the drain hose onto the drain outlet. Make sure that the hose is firmly secured by the hose clamp and not kinked.
- Close the water inlet port above the condensed water container with the bottom part of the rubber plug. The plug must face towards the interior of the machine so that the condensed water container can easily be inserted.
- Attach the elbow to the hose and secure it to the sink or drain pipe. If room is available, it can be inserted into the stamp pipe used by the washing machine.
The water will now be drained automatically and the container will not need to be emptied.
Consumption data
| load (kg) | Final spin speed in washer* (rpm) | Electrical consumption (kwh) | Drying time incl. cooling down time (mins) |
Cottons
| Extra dry | 5 | 1200 | 3.44 | 87 |
| 1400 | 3.28 | 83 | ||
| 1550 | 3.17 | 81 | ||
| Normal | 5 | 1200 | 3.17 | 81 |
| 1400 | 3.02 | 77 | ||
| 1550 | 2.91 | 75 | ||
| Normal-* | 5 | 800 | 3.60 | 92 |
| 1200 | 2.82 | 74 | ||
| 1400 | 2.68 | 71 | ||
| 1550 | 2.58 | 69 | ||
| Hand iron ΔΔ* | 5 | 800 | 2.80 | 74 |
| 1200 | 2.05 | 56 | ||
| 1400 | 1.91 | 53 | ||
| 1550 | 1.82 | 51 | ||
| Machine iron | 5 | 1200 | 1.65 | 47 |
| 1400 | 1.51 | 43 | ||
| 1550 | 1.41 | 41 |
Permanent Press
| Normal + | 2.5 | 1000 | 1.68 | 50 |
| Normal* | 2.5 | 1000 | 1.38 | 45 |
| Hand iron | 2.5 | 1000 | 1.21 | 37 |
The specified program running times and electrical consumption values were established under standard conditions (*EN 61121/A11).
Different types of fabrics, load size and residual moisture after spinning may effect the specified values.
*These values apply if the laundry is spun in a Miele washing machine before drying.
Height. 85 cm (adjustable)
Height with lid removed 82 cm
Width 59.5 cm
Depth (incl. distance from wall) without lid 56
with lid 60
Weight 55 kg
Drum volume 103
Capacity. 5 kg dry laundry
Rated load 2.85 kW
Fuse rating 15 A minimum, or 30 A
Miele Limited
Canadian Head Office
55G East Beaver Creek Road
Richmond Hill
Ontario L4B 1E5
Phone: 905-707-1171
Fax: 905-707-0177
Toll-Free: 1-800-565-6435
Internet: www.miele.ca
E-Mail: info@miele.ca (general enquiries)
E-Mail: service@miele.ca (technical service)
BC Regional Sales Office
3731 North Fraser Way
Unit 200
Burnaby
British Columbia V5J 5J2
Phone: 604-434-1300
Fax: 604-434-1309