
GZ-308DP - Vacuum Cleaner Guzzanti - Free user manual and instructions
Find the device manual for free GZ-308DP Guzzanti in PDF.


| Product Type | Food Vacuum Sealer |
| Model | GZ-308DP |
| Brand | Guzzanti |
| Main Functions | Vacuum sealing, Pulse vacuum, Manual seal, Marinate, Canister vacuum |
| Button Controls | Vac & Seal / Cancel, Pulse Vacuum, Sealing Time (Dry/Moist/Liquid), Vacuum Mode (Strong/Soft), Container, Manual Seal, Marinate |
| Sealing Time Settings | Dry (short), Moist (medium), Liquid (long) |
| Vacuum Pressure Modes | Strong (high pressure for dry food), Soft (low pressure for fragile food) |
| Vacuum Chamber | Removable liquid tray for catching overflow |
| Sealing Element | Teflon-coated heating element |
| Bag Cutter | Integrated sliding cutter for custom bag sizes |
| Hose Port | For canister, jar, wine stopper, and marinate accessories |
| Accessories Compatibility | Vacuum bags with channels, canisters with matching hose tip, marinate bowl |
| Power Supply | Standard household electrical outlet (120V/60Hz typical) |
| Cleaning and Maintenance | Wipe exterior with damp cloth; wash removable liquid tray and accessories in warm soapy water; dry thoroughly; do not immerse machine |
| Safety Features | Automatic shut-off, overload protection, hot sealing element warning |
| User Protection | Not for children under 8; supervised use; do not use damaged cord |
| Spare Parts | Heating element, sealing strip, upper/lower gaskets, liquid tray, hose tube |
| Storage | Flat surface, lid unlocked to prevent gasket deformation |
| Environmental Disposal | Do not dispose as household waste; recycle at designated WEEE collection point |
Frequently Asked Questions - GZ-308DP Guzzanti
User questions about GZ-308DP Guzzanti
0 question about this device. Answer the ones you know or ask your own.
Ask a new question about this device
Download the instructions for your Vacuum Cleaner in PDF format for free! Find your manual GZ-308DP - Guzzanti and take your electronic device back in hand. On this page are published all the documents necessary for the use of your device. GZ-308DP by Guzzanti.
USER MANUAL GZ-308DP Guzzanti
natural_image
Line drawing of a rectangular electronic device with control buttons and ports (no text or symbols)Návod k obsluze Návod na obsluhu Instrukcja obsługi Használati útmutató Navodila za uporabo Gebrauchsanleitung Instruction manual
OBSAH
KONSTRUKCE A FUNKCE ZAŘÍZENÍ......4
PROVOZNÍ POKYNY....8
ČIŠTĚNÍ A ÚDRŽBA.... 14
ODSTRANĚNÍ MOŽNÝCH PROBLÉMŮ 15
LIKVIDACE ZAŘÍZENÍ......16
DŮLEŽITÉ BEZPEČNOSTNÍ POKYNY
natural_image
Technical line drawing of a mechanical component with an upward arrow indicating motion (no text or symbols)4. Tlačítko Vacuum:
natural_image
Technical line drawing of a mechanical device with internal rollers and a directional arrow (no text or symbols)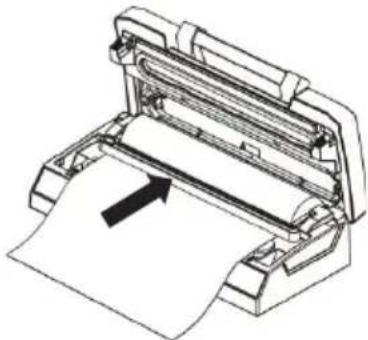
natural_image
Technical line drawing of a printer or printer with paper roll and paper sheet, no text or symbols present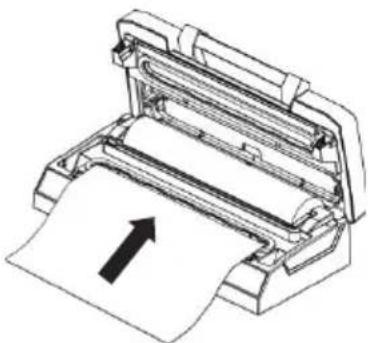
natural_image
Illustration of a printer with paper being inserted, showing paper roll and printer blade (no text or symbols)natural_image
Line drawing of a printer with paper and a paper sheet, no text or symbols present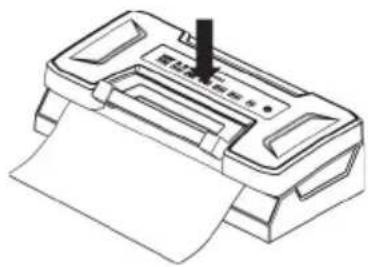
natural_image
Line drawing of a printer with paper and a small black tip inserted (no text or symbols)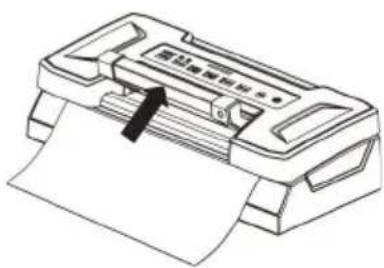
natural_image
Line drawing of a printer with paper and a paper clip, no text or symbols presentnatural_image
Line drawing of a printer or printer with paper roll and metal frame (no text or symbols)natural_image
Line drawing of a mechanical device with an upward arrow indicating motion (no text or symbols)natural_image
Line drawing of a printer with a plug inserted, showing internal components and mounting brackets (no text or symbols)ČIŠTĚNÍ A ÚDRŽBA
natural_image
Symbol of a trash bin crossed with no text or numbers, representing environmental restriction (no text present)DÔLEŽITÉ BEZPEČNOSTNÉ POKYNY
1. Tlačidlo Vac&Seal / Cancel:
natural_image
Technical line drawing of a mechanical component with an upward arrow indicating motion (no text or symbols)4. Tlačidlo Vacuum:
natural_image
Technical line drawing of a mechanical device with internal rollers and a directional arrow (no text or symbols)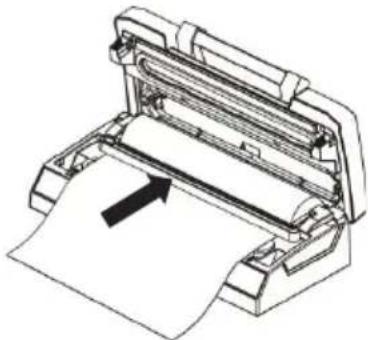
natural_image
Technical line drawing of a printer or printer with paper roll and paper sheet, no text or symbols present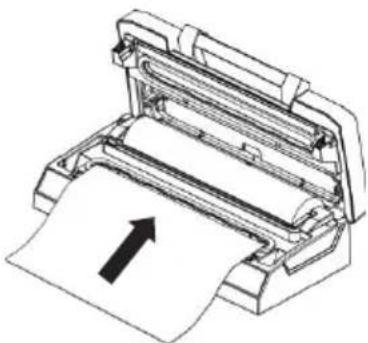
natural_image
Illustration of a printer with paper being inserted, showing paper roll and printer blade (no text or symbols)natural_image
Line drawing of a printer with paper and a paper sheet, no text or symbols present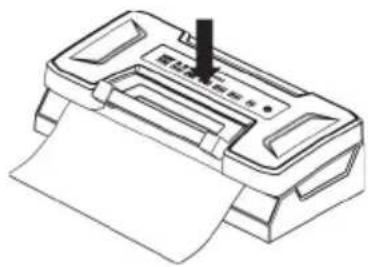
natural_image
Line drawing of a printer with paper and a small black tip inserted (no text or symbols)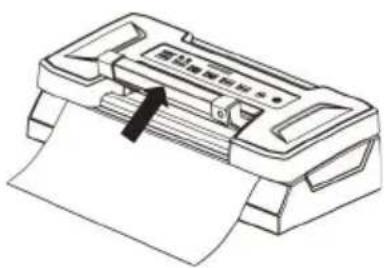
natural_image
Line drawing of a printer with paper and a paper clip, no text or symbols presentnatural_image
Line drawing of a printer or printer with paper roll and metal frame (no text or symbols)natural_image
Line drawing of a mechanical device with an upward arrow indicating motion (no text or symbols)-
Zvolte režim tesnenia „Liquid“ a potom stlačte tlačidlo „Vac&Seal / Cancel“, čím sa proces vákuovania spustí automaticky.
-
Ked'indikátor zhasne, proces odsávania vzduchu a utesnenie sa dokončí.
-
Ak do odnímatelnej misky na tekutiny vytiekla nejaká tekutina, vyberte misku za účelom jej vyčistenia.
natural_image
Line drawing of a laboratory instrument with a spherical container connected to a tube (no text or symbols)-
Spotrebič sa automaticky zastaví, ked' sa dosiahne dostatočný podtlak.
-
Po dokončení procesu odsávania vzduchu odpojte hadičku z krytu nádoby a portu pre hadičku na spotrebiči.
natural_image
Line drawing of a printer with base and clasp, no text or symbols presentČISTENIE A ÚDRŽBA
natural_image
Symbol of a trash bin crossed with no text or numbers, representing environmental restriction (no text present)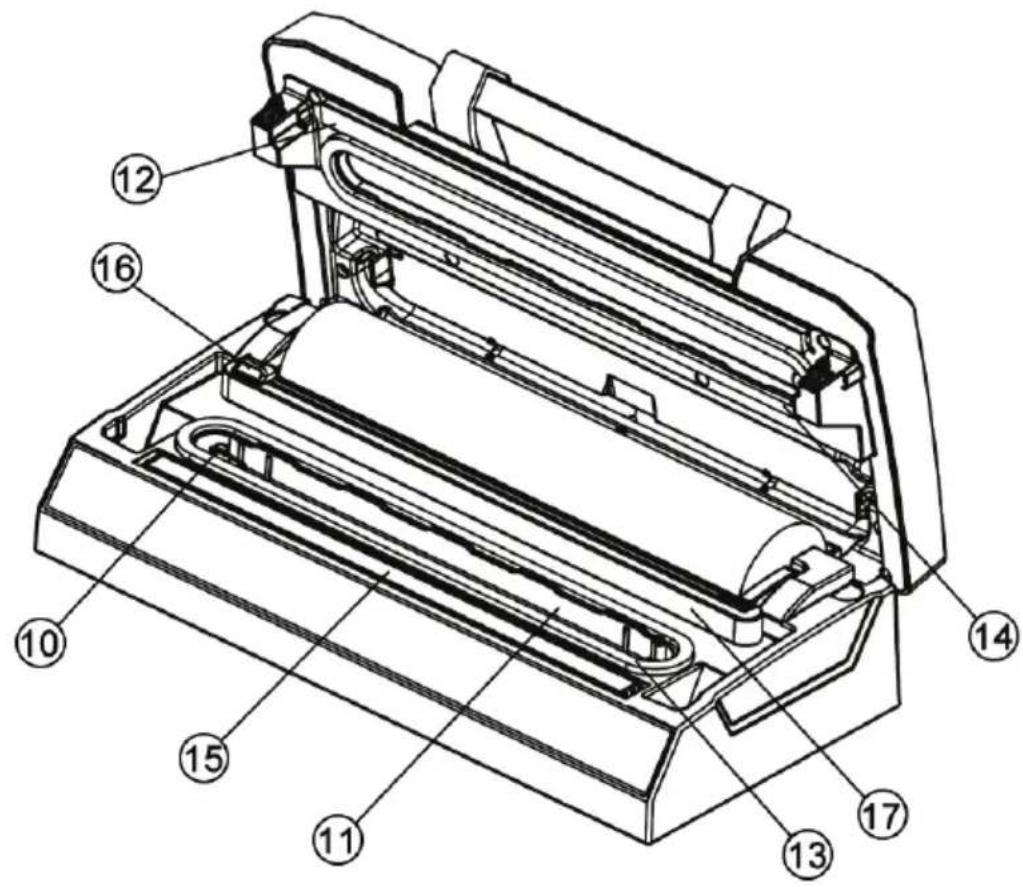
1. Przycisk Vac&Seal / Cancel:
natural_image
Technical line drawing of a mechanical component with an upward arrow indicating motion (no text or symbols)4. Przycisk Vacuum:
natural_image
Technical line drawing of a mechanical device with internal rollers and a directional arrow (no text or symbols)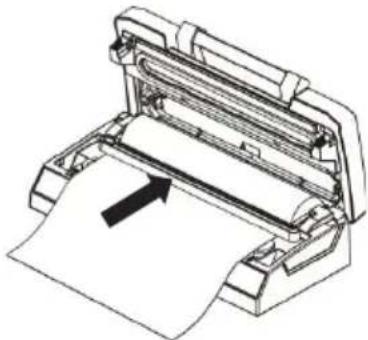
natural_image
Technical line drawing of a printer or printer with paper roll and paper sheet, no text or symbols present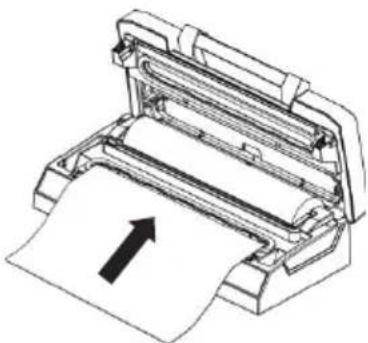
natural_image
Illustration of a printer with paper feed and an arrow indicating print direction (no text or symbols)natural_image
Line drawing of a printer with paper and a paper sheet, no text or symbols present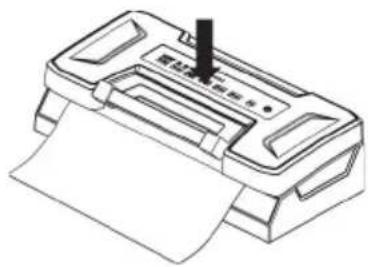
natural_image
Line drawing of a printer with paper and a small black tip inserted (no text or symbols)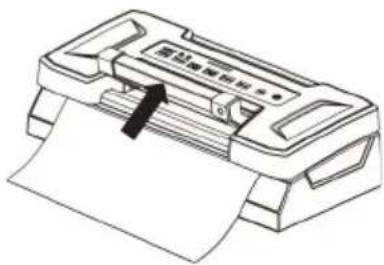
natural_image
Line drawing of a printer with paper and a paper clip, no text or symbols presentnatural_image
Technical line drawing of a mechanical printer or printer with paper roll and metal clamps (no text or symbols)natural_image
Line drawing of a mechanical device with an upward arrow indicating motion (no text or symbols)natural_image
Line drawing of a portable electronic device connected to a spherical device (no text or symbols)natural_image
Line drawing of a mechanical device with a plug and housing (no text or symbols)CZYSZCZENIE I KONSERWACJA
natural_image
Symbol of a trash bin crossed with no text or numbers, representing environmental restriction (no text present)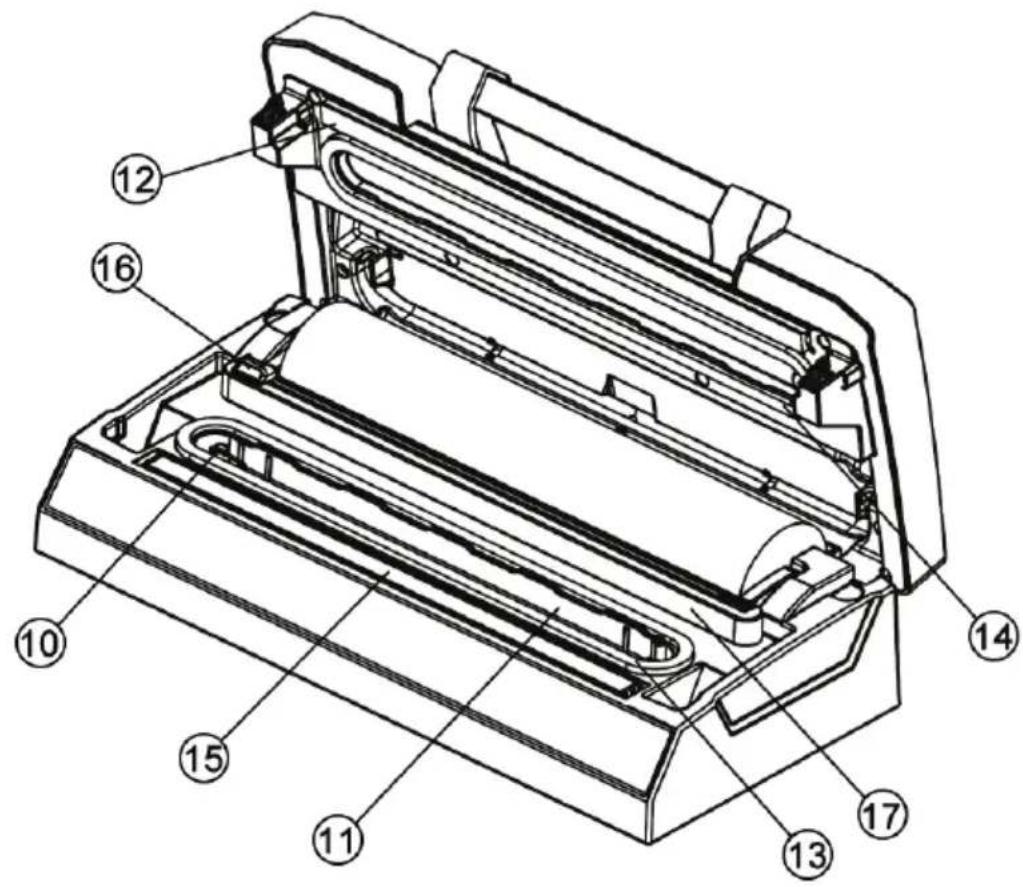
1. Vac&Seal / Cancel gomb:
2. Pulse vacuum gomb:
natural_image
Technical line drawing of a mechanical component with an upward arrow indicating motion (no text or symbols)4. Vacuum gomb:
natural_image
Technical line drawing of a mechanical device with internal rollers and a directional arrow (no text or symbols)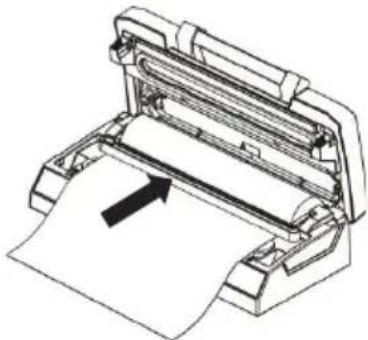
natural_image
Technical line drawing of a printer or printer with paper roll and paper sheet, no text or symbols present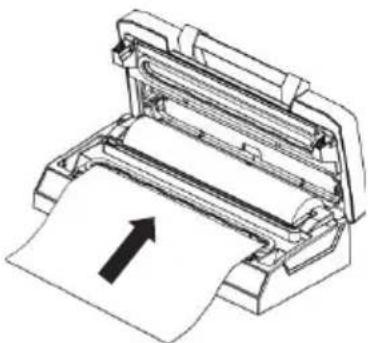
natural_image
Illustration of a printer with paper being inserted, showing paper roll and printer blade (no text or symbols)natural_image
Line drawing of a printer with paper and a paper sheet, no text or symbols present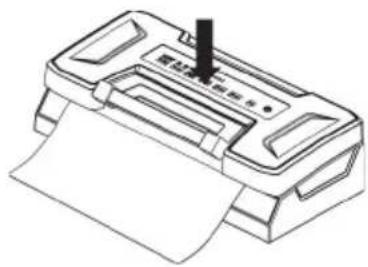
natural_image
Line drawing of a printer with paper and a paper clip, no text or symbols present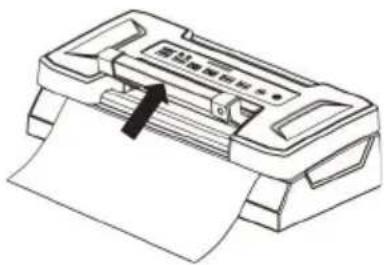
natural_image
Line drawing of a printer with paper and a paper clip, no text or symbols presentnatural_image
Line drawing of a printer or printer with paper roll and paper sheet (no text or symbols)natural_image
Line drawing of a mechanical device with an upward arrow indicating motion (no text or symbols)natural_image
Line drawing of a portable electronic device connected to a spherical device (no text or symbols)natural_image
Line drawing of a printer with a plug inserted, showing internal components and mounting brackets (no text or symbols)natural_image
Symbol of a trash bin crossed with no text or numbers, representing environmental protection (no text present)CONSTRUCTION AND FUNCTIONS....4
OPERATING INSTRUCTIONS....8
CLEANING AND MAINTENANCE....14
TROUBLESHOOTING 15
DISPOSAL OF THE DEVICE 16
POMEMBNI VARNOSTNI NAPOTKI
1. Tipka Vac&Seal / Cancel:
natural_image
Technical line drawing of a mechanical component with an upward arrow indicating motion (no text or symbols)4. Tipka Vacuum:
natural_image
Technical line drawing of a mechanical device with internal components and an arrow indicating motion (no text or symbols)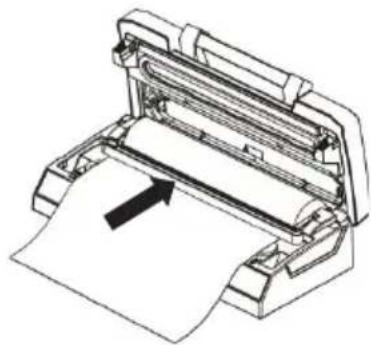
natural_image
Technical line drawing of a printer or printer with paper being inserted (no text or symbols present)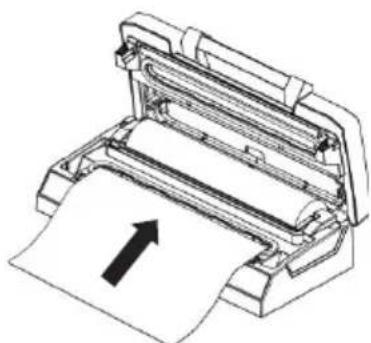
natural_image
Diagram of a printer with paper being inserted, showing paper roll and paper holder (no text or symbols)natural_image
Line drawing of a printer with paper and a paper sheet, no text or symbols present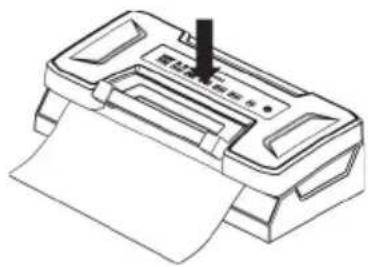
natural_image
Line drawing of a printer with paper and a small black tip inserted (no text or symbols)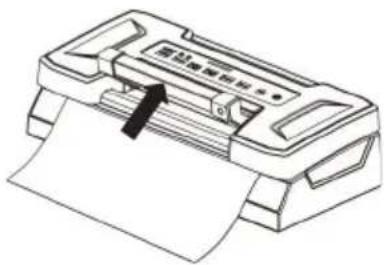
natural_image
Line drawing of a printer with paper and a paper clip, no text or symbols presentnatural_image
Line drawing of a printer or printer with paper roll and metal frame (no text or symbols)natural_image
Line drawing of a mechanical device with an upward arrow indicating motion (no text or symbols)-
Izberite možnost varjenja "Liquid" in nato pritisnite tipko "Vac&Seal / Cancel", s čimer se postopek vakuumiranja samodejno zažene.
-
Ko indikator ugasne, se postopek izsesavanja zraka in varjenje se zaključi.
-
Ko se v posodi nabere tekočina, odstranite odstranljivo posodo za tekočine, da jo očistite.
IV. Funkcija izsesavanja zraka iz posode
-
Prepričajte se, da sta posoda in pokrov posode čista in suha.
-
Dajte hrano v posodo, ne prenapolnite je, da je pokrov v dobrem stiku z robom posode. Očistite rob pokrova posode in spodnje tesnilo;
-
Vstavite en konec cevčice v odprtino za cevčico na aparatu, drugi konec cevčice pa v sredinsko luknjo pokrova posode.
-
Spremljajte LED indikator stanja "Vacuum" in prepričajte se, da je v nastavitvi "Strong"; S pritiskom na tipko "Canister" zaženete postopek izsesavanja zraka. Prepričajte se, da med pokrovom in posodo ne uhaja zrak.
-
Ko je dosežen zadosten vakuum, se aparat samodejno ustavi.
-
Po zaključku postopka izsesavanja zraka odklopite cevčico s pokrova posode in odprtine za cevčico na napravi.
natural_image
Line drawing of a portable electronic device connected to a spherical device (no text or symbols)natural_image
Line drawing of a printer with circuit board and plug (no text or symbols)ČIŠČENJE IN VZDRŽEVANJE
natural_image
Symbol of a trash bin crossed with no text or numbers, representing environmental protection (no text present)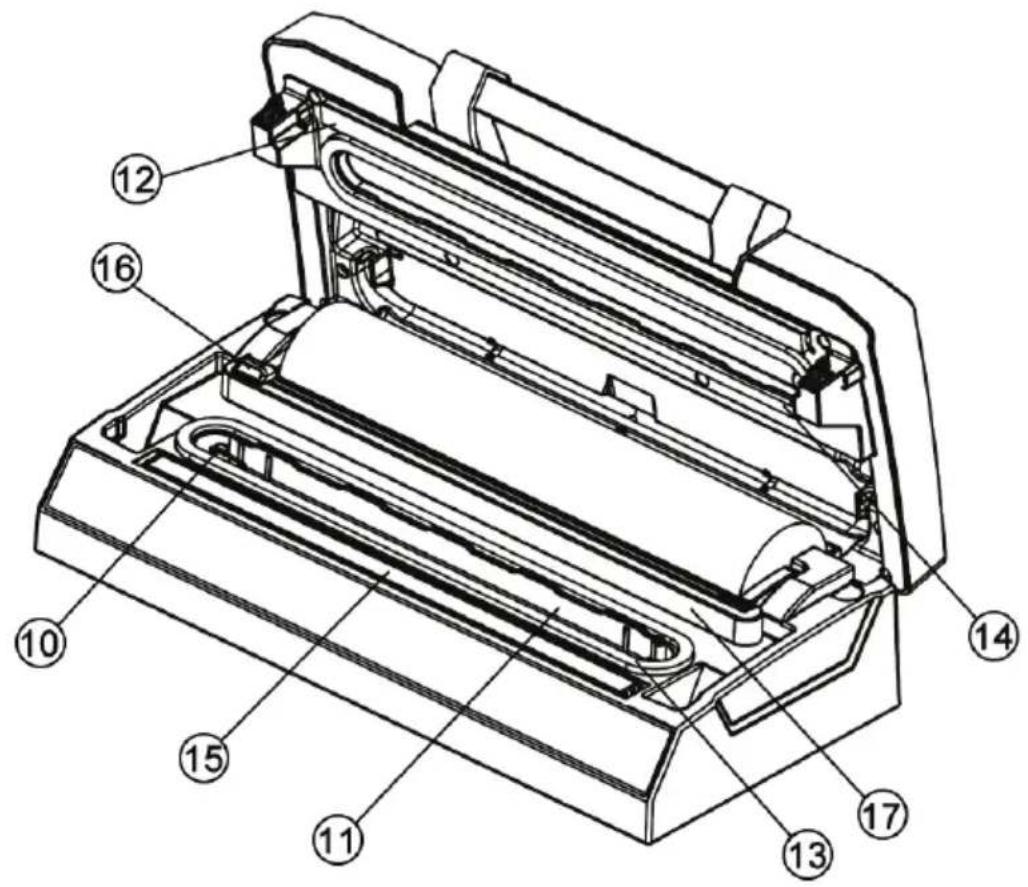
natural_image
Technical line drawing of a mechanical component with an upward arrow indicating motion (no text or symbols)This is a cutter support where the cutter slides along.
natural_image
Technical line drawing of a mechanical device with internal components and an arrow indicating motion (no text or symbols)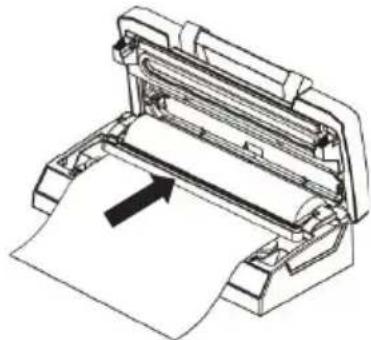
natural_image
Technical line drawing of a printer or printer with paper feed and paper roll, no text or symbols present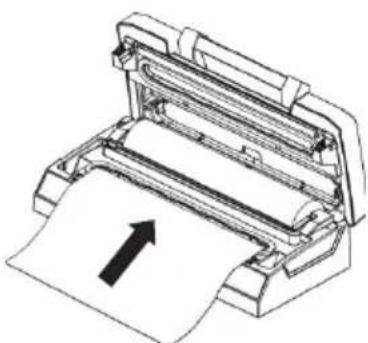
natural_image
Technical line drawing of a printer with paper and paper roll, no text or symbols presentnatural_image
Line drawing of a printer with paper and a paper sheet, no text or symbols present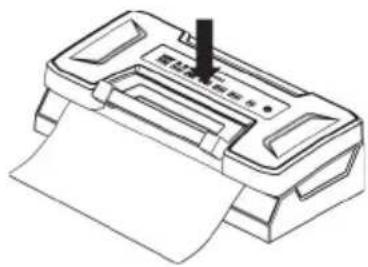
natural_image
Line drawing of a printer with paper and a small black tip inserted (no text or symbols)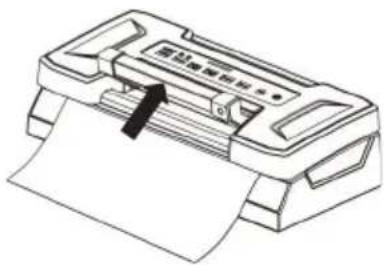
natural_image
Line drawing of a printer with paper and a paper clip, no text or symbols presentnatural_image
Line drawing of a printer or printer with paper roll and roller, no text or symbols presentnatural_image
Line drawing of a mechanical component with an upward arrow indicating motion (no text or symbols)natural_image
Line drawing of a laboratory instrument with a spherical container connected to a tube (no text or symbols)natural_image
Line drawing of a printer with circuit board and connector (no text or symbols)natural_image
Two symbolic icons: a recycling symbol and a crossed-out trash bin with no text or labels.UMWELTSCHUTZ AUF DEM ERSTEN PLATZ

natural_image
Symbol of a trash bin crossed with no text or numbers, representing environmental restriction (no text present)CONSTRUCTION AND FUNCTIONS....4
OPERATING INSTRUCTIONS....8
CLEANING AND MAINTENANCE....14
TROUBLESHOOTING 15
DISPOSAL OF THE DEVICE 16
IMPORTANT SAFEGUARDS
When using this electrical appliance, safety precautions should always be observed, including the following:
READ ALL INSTRUCTIONS
- Carefully read all of the instructions before using this appliance and save for future reference.
- Before plugging cord into wall outlet, or disconnecting, make sure that the cover of the machine is in unlocked condition, and unplug from outlet when not in use or before cleaning.
- This appliance is not a toy, when used by or near children, close attention is necessary, and store this appliance to a safe place, out of the reach of children.
- Do not use any bags or attachments not recommended or appointed, and don't use this appliance for other purpose except its intended use.
- Stop using the appliance immediately when the electrical cord is damaged and have it replaced by a professional.
- Keep away from moving parts.
- Do not contact the hot sealing element located on edge of the top housing of this appliance. It is hot and may get burn.
- Do not try to repair this appliance by yourself.
- Don't use the appliance if it has fallen or appeared to be damaged.
- Avoid to do the following: pull or carry by the cord, use cord as a handle, close a door on cord, or pull cord around sharp edges or corners. Do not operate appliance over cord or cord / plug is wet.
- Keep the unit away from hot gas, a heated oven, an electric burner or any other hot surfaces. Do not use this appliance on wet or hot surface or near a heat source.
- It's better not to use an extension cord with this unit. However, if one is used, it must have a rating equal to or exceeding the fating of this appliance.
- When disconnect, to avoid any injury, please unplug by grasp the plug, not the cord.
- Before plugging appliance in or operating, ensure your hands are dry and safe to do the actions.
-
When it is "ON" or in a working position, place the appliance on a stable surface, such as table or counter.
-
Using any lubricant like lubricating oils or water on this appliance is not necessary.
- Do not immerse any part of this appliance, power cord or plug in water or any other liquid.
- Do not use this appliance outdoors or on a wet surface, it's recommended for household and indoor use only.
- This appliance can't be used by children aged from 8 years and above and persons with reduced physical, sensory or mental capabilities or lack of experience and knowledge if they have been given supervision or instruction concerning use of the appliance in a safe way and understand the hazards involved.
- Children should be supervised to ensure that they do not play with the appliance.
- If the supply cord is damaged, it must be repaired and replaced by the manufacturer, service agent or similarly qualified persons, in order to avoid troubleshooting hazard.
- Cleaning and user maintenance shall not be made by children without supervision.
CAUTION!
CONSTRUCTION AND FUNCTIONS
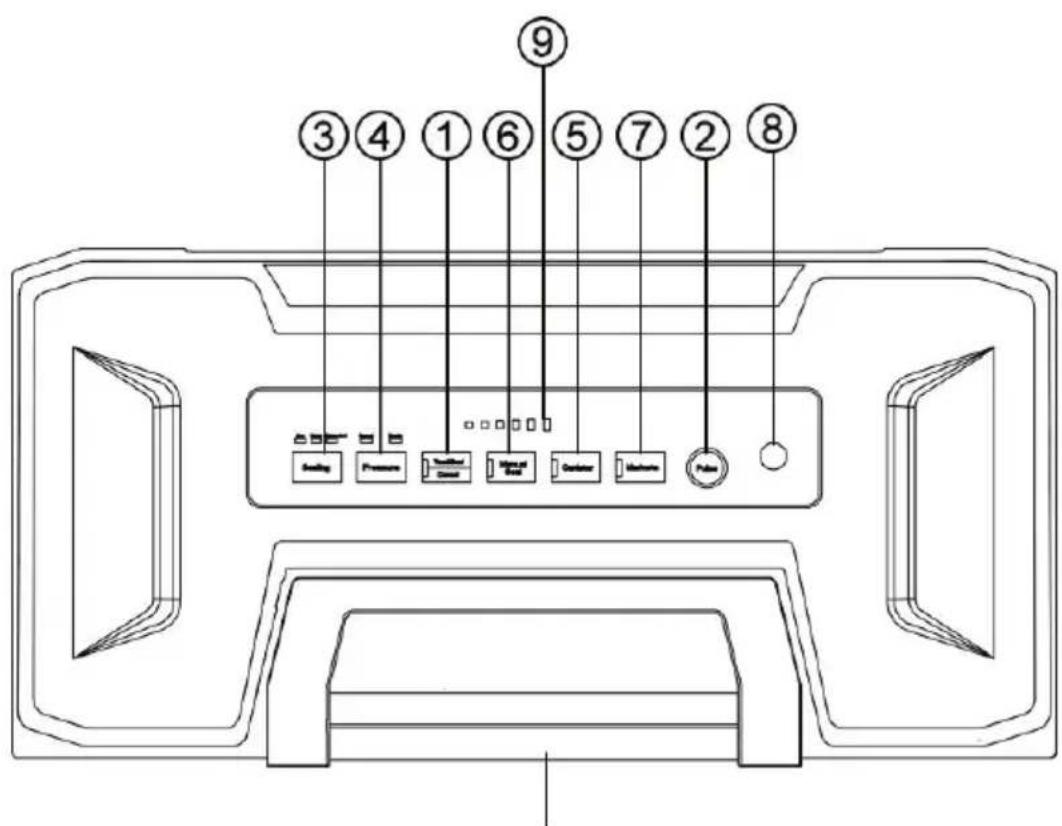
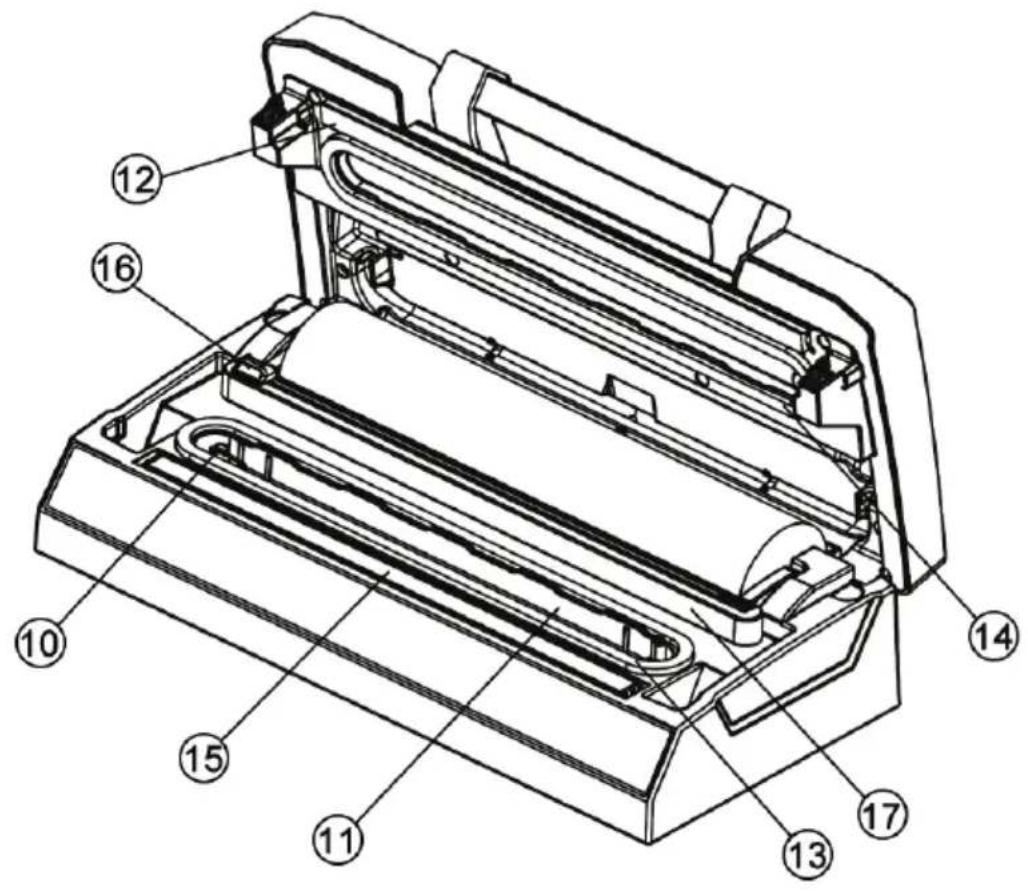
1. Vac&Seal / Cancel:
This button has two functions depending on the machine's status:
- Standby Status - it starts the automatic operation of vacuuming the bag and then seals it when the bag vacuum operation is complete;
• Working Status (Vacuuming or sealing Operations) - it cancels or stops the current operation of the machine.
2. Pulse vacuum:
This button controls the vacuum pressure manually and works best for foods with moisture, more liquid content or are softer, more delicate or fragile. Press this button to start the vacuum process and release it to stop.
Repeat pressing and releasing the button until the desired vacuum pressure is met. To seal the bags, press the "Seal" button.
3. Sealing Time:
This button has three settings with different bag sealing times.
- Dry button: It has a shorter sealing time which is suitable for dry bags and item without moisture.
- Moist button: It has a longer sealing time which is suitable for moist bags or foods with little moisture.
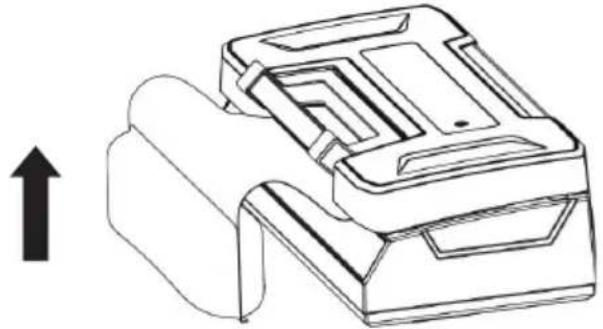
- Liquid button: It has a longer sealing time which is suitable for whole liquid bags or foods with more liquid. (The bag must stand up on the table when the bags has much liquid inside and keep the bag edge area has enough space to fold back the bag into the vacuum chamber (when fold back the bag, make sure the fold area are near to the liquid level, see below reference picture.)
* The normal default setting is for dry bags and shorter sealing time.
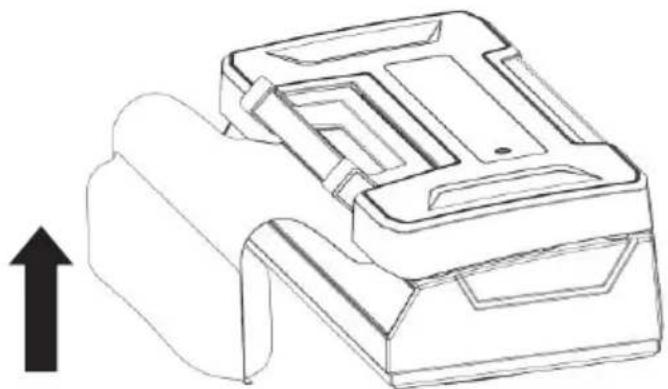
natural_image
Technical line drawing of a mechanical component with an upward arrow indicating motion (no text or symbols)4. Vacuum Mode:
This button has two settings with different vacuum pressures:
• Strong button: It has a higher vacuum pressure suitable for storing regular or dry food;
- Soft button: It has a lower vacuum pressure to avoid crushing soft, fragile, and moist food when stored.
* The default setting is "Strong" with high vacuum pressure.
5. Container:
This button controls the vacuum pressure when vacuuming container, jar lids, wine stoppers, or other accessories through a hose adaptor. Please ensure your accessories can match our hose tube or not before purchase.
6. Manual Seal:
This button has two functions:
- To seal the open end of a bag without vacuuming air suction, used to make a bag from a bag roll;
- When the "Vac & Seal" function is in operation, this button stops the motor pump and directly starts sealing the bag to limit the vacuum pressure inside the bag to avoid crushing delicate items. The operator controls vacuum pressure.
7. Marinate:
This button works by connecting the vacuum tube to a marinate bowl. Press this button to the vacuum sealing process, which helps marinate food faster. After 5 marinating cycles, the machine will automatically stop the vacuum sealing process. Please ensure that the vacuum container you have is a marinate Bowl.
8. Hose Port:
This is a port where the hose tube will be inserted to perform vacuum sealing on containers for “Marinate” or “Container” operations.*Properly insert hose tubes to avoid air leakage when vacuum sealing.
9. Progress:
This LED light have two functions:
• Indicates the progress of the vacuum sealing process.
• Indicates that the device is ON and the lid is closed.
* When the LED flickers, wait until it is steady before you can start the next operation.
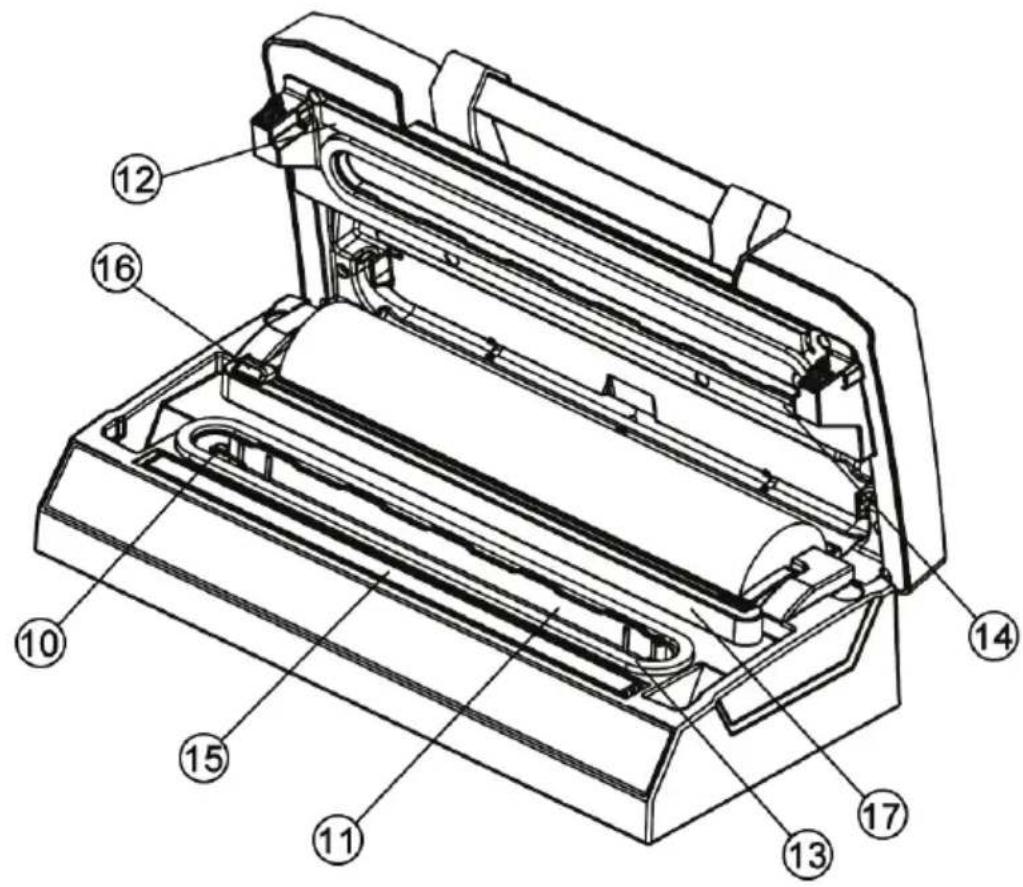
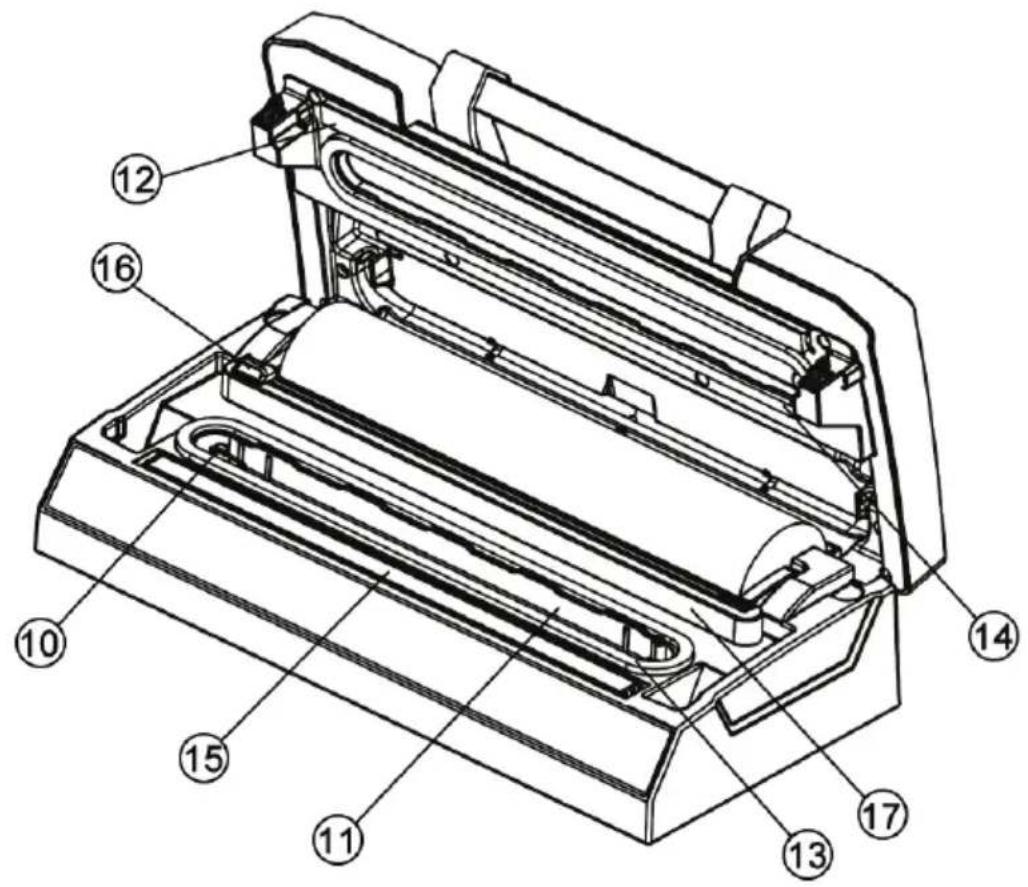
10. Air intake:
This connects with vacuum chamber and motor pump.
* Do not cover this intake when placing a bag for vacuum & Seal operations.
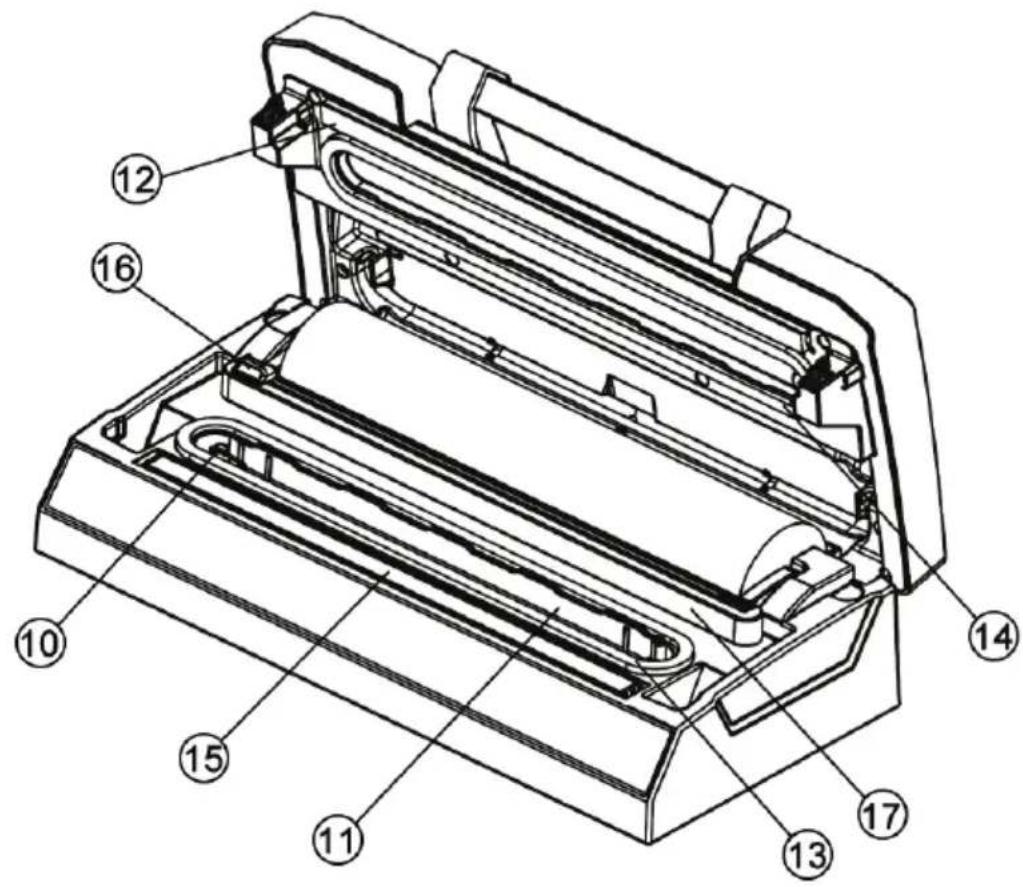
11. Vacuum chamber + removable liquid tray:
Position the open end of the bag inside the chamber, draws air out of bag and catches any liquid overflow from the bag. Take out the removable liquid tray for cleaning when there is any liquid in the tray.
12. Sealing strip:
This is a strip where the bags are sealed.*Clean, dry or replace it when distorted or broken.
13. Lower gasket:
This keeps air away by forming vacuum chamber with upper gasket in the vacuum chamber. *Clean, dry or replace it when it is distorted or broken.
14. Upper gasket:
This keeps air away by forming vacuum chamber with lower gasket. *Clean, dry or replace it when distorted or broken.
15. Sealing element:
Teflon-coated heating element which is hot and seals the bag.
16. Bag Cutter:
Press and slide in one direction or vice versa to cut bags to the desired size.
-
Cutter rack: This is a cutter support where the cutter slides along.
-
Front handle: Press the handle down to easily lock the cover into the base or lift the handle to open the cover.*Do not lock the handle when the product is not used to avoid deforming the gasket.
OPERATING INSTRUCTIONS
I. Making a bag with bag roll
- Open the machine and locate the bag roll storage area, then check if you have an available bag roll inside.
- Put out the end of the bag roll to the desired length underneath the cutter rack. Press and slide the bag cutter from one side to another to cut the bag according to the desired size.
* If you have a pre-cut bag, it can work with the machine directly. - Put one end of the bag on top of the sealing element without reaching the vacuum chamber.
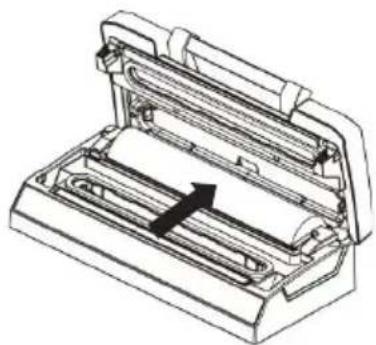
natural_image
Technical line drawing of a mechanical device with internal components and an arrow indicating motion (no text or symbols)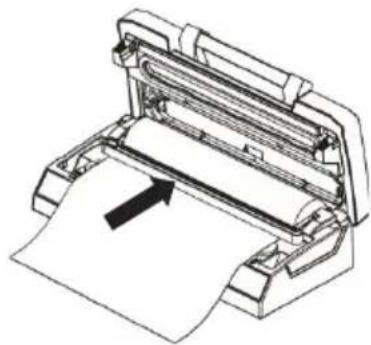
natural_image
Technical line drawing of a printer or printer with paper roll and paper sheet, no text or symbols present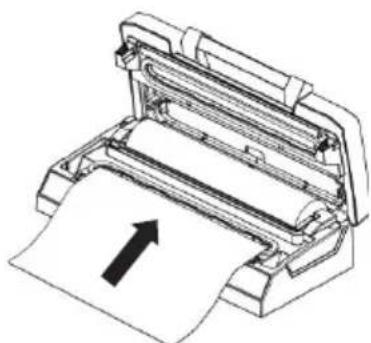
natural_image
Diagram of a printer with paper being inserted, showing paper roll and paper holder (no text or symbols)-
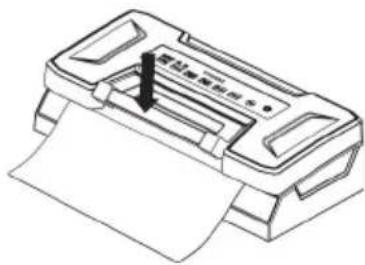
Close the cover and press the handle to lock the cover into the machine base.
-
Press the "Manual Seal" button to start sealing the bags. The indicator light indicates the sealing process is on going.
-
When the indicator light turns off, sealing is done. Lift the handle to open the cover and take the newly sealed bag out of the machine. Pack the necessary foods into the bags.
natural_image
Line drawing of a printer with paper and a paper sheet, no text or symbols present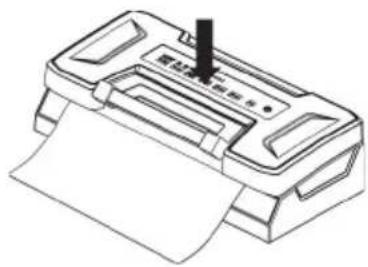
natural_image
Line drawing of a printer with paper and a small black tip inserted (no text or symbols)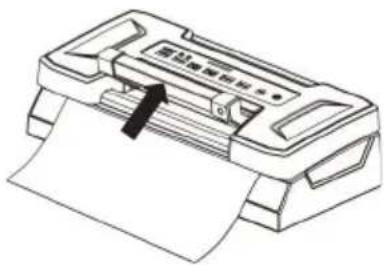
natural_image
Line drawing of a printer with paper and a paper clip, no text or symbols presentII. Vacuum packaging with a bag
- Put suitable foods inside the bag. Only use the specially designed vacuum bags supplied by us with vacuum channels.
Note:
Flat bags without air channels will not work on the machine.
-
Clean and straighten the bag's open end, ensuring no dust, wrinkle or ripples on the bag's mouth area.
-
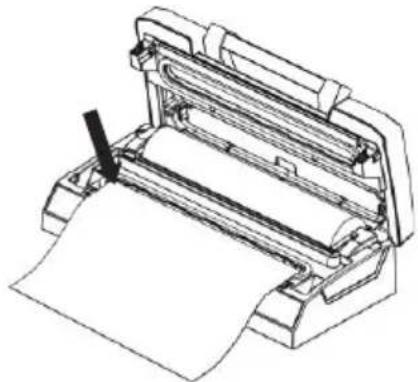
Place the open end of the bag within the vacuum chamber area. Make sure the bags do not cover the air intake.
natural_image
Line drawing of a printer or printer with paper roll and metal frame (no text or symbols)-
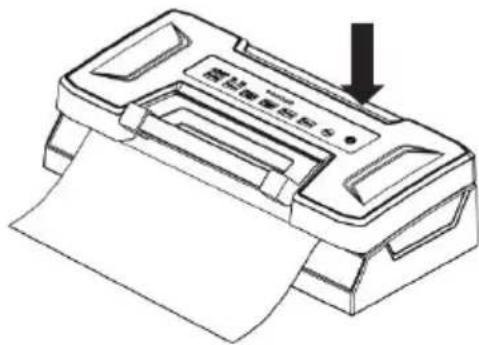
Press down the handle to lock the machine cover into the base.
-
Check the LED status of the food to confirm sealing time depending on the moisture status packed foods if either Dry, Moist or Liquid.
-
Press the "Vac&Seal / Cancel" button to start vacuuming, then seal the bag automatically.
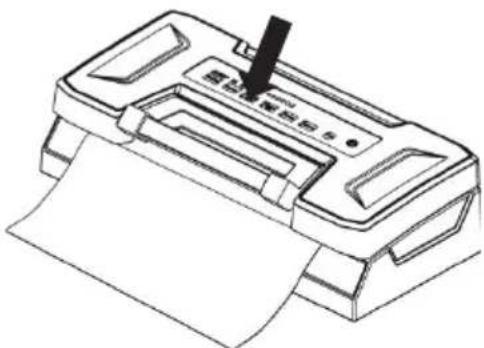
Check the indicator light to know if the vacuum and sealing process is done.
- When the indicator light turns off, the vacuum and sealing process is done. Lift the handle to open the cover and take the bag out of the machine.
Tips:
* Check if the bag is perfectly sealed or not before putting it into the refrigerator for long storage.
* To avoid crushing delicate items during packaging by the very high vacuum pressure of the machine, always observe the vacuum pressure inside the bag and immediately switch to the "Manual Seal" button when the desired vacuum pressure is achieved. The pump will stop and change to heating and sealing the bag.
NOTE:
- This unit can be vacuum and seal continuously more than 200 cycles without overheating under default setting. Wipe out any excess liquid or food residue in the vacuum chamber after each bag is packed.
- Do not seal one after another continuously to avoid overheat of the sealing element. The machine will reject if this “seal” button is activated within 15 seconds of the last activation.
- Your appliance can only work on the specific bags provided by us. Do not attempt to use other bags not intended for vacuum packaging.
• Cut the bag straight across with scissors to open a sealed bag.
III. Pulse Vacuum Functions
This function manually controls the vacuum pressure for food containing fragile, delicate food or soft food. Need to press "Manual Seal" button immediately after you release your finger of the Pulse button.
Pulse Vacuum Button
-
Long-press the "Pulse" button to start the vacuum process.
-
Release the "Pulse" button to stop the vacuum process when the desired vacuum pressure is achieved.
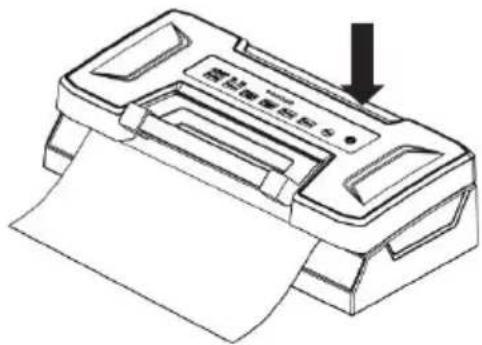
* Repeat this process until you meet the desired vacuum pressure.
- Press the "Manual Seal" button to seal the vacuumed bag.
* If the food has much liquid content, please choose the "Sealing - Liquid" option
Liquid Button
- When vacuuming the liquid bags and foods with much liquid, (The bag must stand up on the table when the bags has much liquid inside and keep the bag edge area has enough space to fold back the bag into the vacuum chamber (when fold back the bag, make sure the fold area are near to the liquid level, see below reference picture.)
natural_image
Line drawing of a printer or printer device with an upward arrow indicating orientation (no text or symbols present)-
Selecting the sealing mode "Liquid", and then press "Vac&Seal / Cancel" button to start the vacuum process automatically.
-
When the indicator light turns off, the vacuum process and sealing is done.
-
If there is some liquid been draw out into the removable liquid tray, please take out the dray for cleaning purpose.
IV. Canister & Bowl Vacuum Function
-
Ensure the canister or bowl's body and cover are clean and dry.
-
Put the foods into the canister but do not fill it up so the cover will be in good contact with the canister rim. Clean the canister's cover rim and its bottom seal gasket;
-
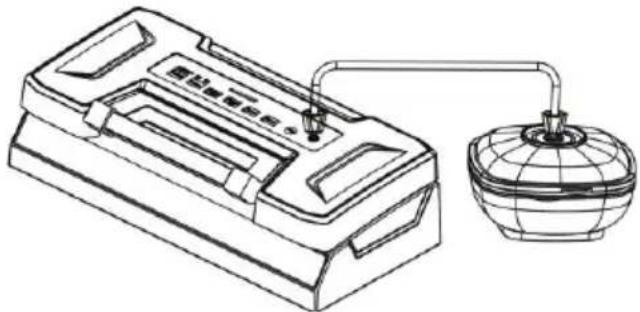
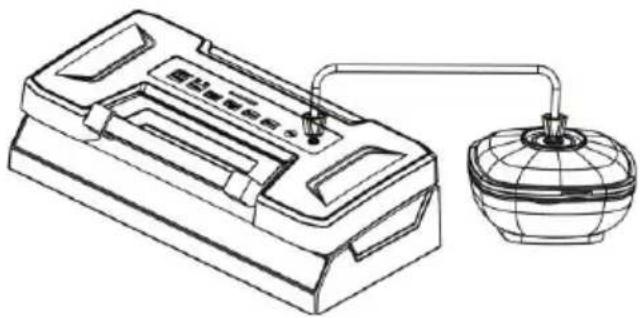
Insert one end of the hose tip into the machine's hose port and the other end of the hose tube on the canister cover.
-
Check the LED status of "Vacuum" and make sure if it is in "Strong" setting; Press the "Canister" button to start the vacuum process. Ensure that there is no air leaking between the cover and the canister.
natural_image
Line drawing of a laboratory instrument with a spherical container connected to a tube (no text or symbols)-
The machine will automatically stop when enough vacuum pressure is achieved.
-
After completing the vacuum process, remove the hose tube from the canister cover and the machine's hose port.
Note: When moist food are under vacuuming, moisture will be stored in the hose tube. Remember to clean up the hose tube if there is water before vacuuming.
V. Marinate food with a marinate Bowl
1) Fill the container and connect it to the machine as described above.
2) Set the machine vacuum power according to the food being marinated.
3) Push down the handle to lock the machine cover.
4) Press the "Marinate" button to start the marinating process. The machine will begin the vacuum process and release air automatically within 5 cycles. It takes around 6 minutes to complete a marinating process.
* To manually stop the marinating process, press the "Vac&Seal / Cancel" Button.
5) After completing the vacuum process, remove the hose tube from the machine's hose port and the marinate bowl's cover.
* If the marinate process needs to be repeated, the air will need to be released from the container before reconnecting it to the machine.
Opening a vacuumed package or Canister
To open a vacuumed canister or package, you need to release the air first, then remove the canister cover.
Note:
- Before the vacuum process, slightly press the cover or the hose tube to ensure the hose is not loose and no air leakage between the canister cover and rim gap.
- To know if the hose is tight, simply tug the canister cover, and if it doesn't move, you can start the vacuum process.
- Different canisters are available in the market. Refer to the individual manual for each brand's specific operating procedures.
- Ensure that the vacuum canister hose tip matches the vacuum machine before purchase.
VI.Cord storage
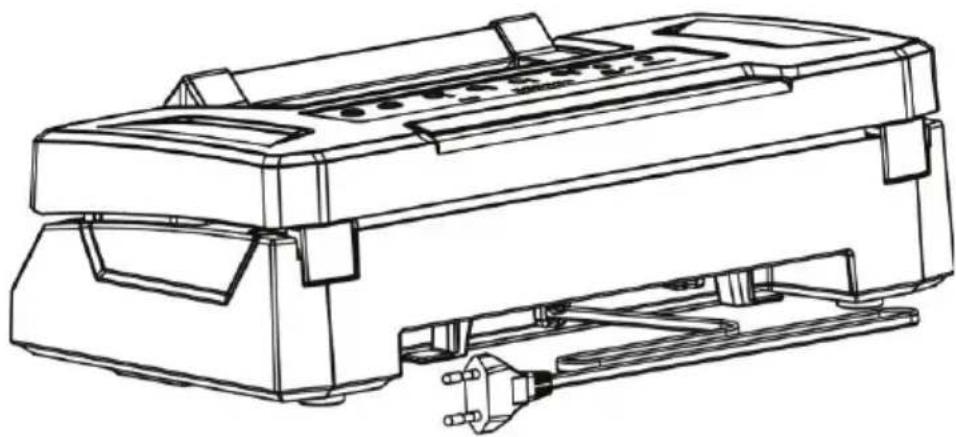
Put the power cord at the cord storage, found at the back of the machine. Please do not wrap the cord around the appliance when not in use.
natural_image
Line drawing of a portable printer with attached electrical plug (no text or symbols)CLEANING AND MAINTENANCE
Vacuum sealer
- Always unplug the unit before cleaning.
- Do not immerse the machine in water or any other liquid.
- Avoid using abrasive products or material to clean the unit, for they will scratch the surface.
- Use mild dish washing soap and a warm, damp cloth to remove food and dirt residues.
- Dry thoroughly before using again.
Note:
The foam gaskets around the vacuum chamber should be dried thoroughly before reassembling. When reassembling, be careful to prevent damage and assemble in the original position to ensure no vacuum leaks.
Vacuum bags
- Wash bags with warm water and mild dish washing soap
- Turn the bags inside out and spread them over the top rack when washing the bags in the dishwasher to expose the entire surface to the washing water.
- Dry the bags thoroughly before reusing them.
IMPORTANT:
To avoid possible health issues, do not reuse bags after storing raw meats, fish or greasy foods. Do not reuse bags that have been microwaved, boiled or cooked Sous vide.
Accessories
Washing all vacuum accessories in warm water with a mild dish washing soap, but do not immerse cover in water.
- Canister bases (not lids) are top rack dishwasher safe. But canister cover should be wiping down with a damp cloth.
- Ensure the accessories to be dry thoroughly before reusing.
- Canister's cover is not allowed to use in microwave or freezer.
Storing Your Vacuum Sealer:
- Keep the unit in a flat and safe place, out of the reach of children.
- Remember to ensure the appliance's lid is unlocked when not in use and in storage. Keeping the cover locked will distort the foam gaskets which can cause leakage.
TROUBLESHOOTING
| Problem Solution | |
| Vacuuming but seal function is not good | Check if the edge of the bags has liquid, oil stain or any chippings?If yes, please clean the edge of bags and try again |
| Check if the heating element damage and good setting or not?If damaged, please exchange the heating element and make sure it is installed properly. | |
| Check if the sealing strip damage or well installed?If damaged, please exchange the sealing strip and make sure it is installed properly. | |
| Check if the edge of the bag has wrinkles?If yes, please remove some foods out of the bag to have enough space for sealing and smooth the bag's mouth and try again. | |
| Seal function is good but can not vacuuming | Check if the gasket is deformed?If deformed, replace it and try again. |
| Check if the bags is placed into the vacuum chamber?If not, please put the edge of bags into the vacuum chamber. | |
| Check if the food with sharp edges?If yes, please erase the sharp items with safe paper before vacuuming the bag | |
| Check if the edge of bag covered the suction hole?If yes, please put the bag into the correct position. | |
| Bag inflation after vacuuming | Check if the good is easily perishable foods?All the easily perishable goods are need to be frozen or refrigerated after vacuuming prolong shelf life.*Vacuuming doesn't guarantee the foods will never spoil. |
| Check if you packed the fresh vegetables or fruit and seed food?All fresh vegetables, fruits and seeds are not suitable for room temperature storage after vacuuming.*Vacuumed packages should be refrigerated because they will perspire at room temperature and cause the seeds to grow. | |
| Bag melts | Check if the sealing time is too long?If yes, please reset the sealing time. |
| The canister is not vacuumed | 1 Ensure adaptor was connected properly to the canister firmly.2 Check if the knob of the canister was on the position of “seal”.3 Press the lids or on the hose adaptor before vacuum process to avoid cover lid from leaking.4 Check if there are significant damages or smashes, if yes, change it.5 Check the function of the vacuum sealer.6 Ensure the canister's rim is clean enough.7 If all the above situations are excluded, please contact with the appointed service agency. |
DISPOSAL OF THE DEVICE
PROTECTION OF THE ENVIRONMENT
At the end of the life of your product, it should go to a specially adapted waste-recycling centre.

ENVIRONMENT PROTECTION FIRST

-
The symbol on the product or on its packaging indicates that this product may not be treated as household waste. Instead it should be handed over to the applicable. Collection point for the recycling of electrical and electronic equipment.
-
By ensuring this product is disposed of correctly, you will help prevent potential negative consequences for the environment and human health, which could otherwise be caused by inappropriate waste handling of this product. For more detailed information about the recycling of this product, Please contact your local council office or your household waste disposal service.
DISPOSAL OF USED ELECTRICAL AND ELECTRONIC EQUIPMENT

natural_image
Symbol of a trash bin crossed with no text or numbers, representing environmental restriction (no text present)This symbol on products or original documents means that used electric or electronic products must not be added to ordinary municipal waste. For proper disposal, renewal and recycling hand over these appliances to determined collection points. Alternatively, in some European Union states or other European countries you may return your appliances to the local retailer when buying an equivalent new appliance. Correct disposal of this product helps save valuable natural resources and prevents potential negative effects on the environment and human health, which could result from improper waste disposal. Ask your local authorities or collection facility for more details. In accordance with national regulations penalties may be imposed for the incorrect disposal of this type of waste.
For business entities in European Union states
If you want to dispose of electric or electronic appliances, ask your retailer or supplier for the necessary information.
Disposal in other countries outside the European Union.
This symbol is valid in the European Union. If you wish to dispose of this product, request the necessary information about the correct disposal method from the local council or from your retailer.
- OBSAH
- DŮLEŽITÉ BEZPEČNOSTNÍ POKYNY
- Tlačítko Vacuum:
- ČIŠTĚNÍ A ÚDRŽBA
- DÔLEŽITÉ BEZPEČNOSTNÉ POKYNY
- Tlačidlo Vac&Seal / Cancel:
- Tlačidlo Vacuum:
- ČISTENIE A ÚDRŽBA
- Przycisk Vac&Seal / Cancel:
- Przycisk Vacuum:
- CZYSZCZENIE I KONSERWACJA
- Vac&Seal / Cancel gomb:
- Pulse vacuum gomb:
- Vacuum gomb:
- POMEMBNI VARNOSTNI NAPOTKI
- Tipka Vac&Seal / Cancel:
- Tipka Vacuum:
- Funkcija izsesavanja zraka iz posode
- ČIŠČENJE IN VZDRŽEVANJE
- UMWELTSCHUTZ AUF DEM ERSTEN PLATZ
- IMPORTANT SAFEGUARDS
- READ ALL INSTRUCTIONS
- CAUTION!
- CONSTRUCTION AND FUNCTIONS
- Vac&Seal / Cancel:
- Pulse vacuum:
- Sealing Time:
- Vacuum Mode:
- Container:
- Manual Seal:
- Marinate:
- Hose Port:
- Progress:
- Air intake:
- Vacuum chamber + removable liquid tray:
- Sealing strip:
- Lower gasket:
- Upper gasket:
- Sealing element:
- Bag Cutter:
- OPERATING INSTRUCTIONS
- Making a bag with bag roll
- Vacuum packaging with a bag
- Note:
- Tips:
- Pulse Vacuum Functions
- Pulse Vacuum Button
- Liquid Button
- Canister & Bowl Vacuum Function
- Marinate food with a marinate Bowl
- Opening a vacuumed package or Canister
- VI.Cord storage
- CLEANING AND MAINTENANCE
- Vacuum sealer
- Vacuum bags
- IMPORTANT:
- Accessories
- Storing Your Vacuum Sealer:
- TROUBLESHOOTING
- DISPOSAL OF THE DEVICE
- PROTECTION OF THE ENVIRONMENT
- ENVIRONMENT PROTECTION FIRST
- DISPOSAL OF USED ELECTRICAL AND ELECTRONIC EQUIPMENT
- For business entities in European Union states
- Disposal in other countries outside the European Union.
Brand : Guzzanti
Model : GZ-308DP
Category : Vacuum Cleaner