
WS 8446 - Weather Station HYUNDAI - Free user manual and instructions
Find the device manual for free WS 8446 HYUNDAI in PDF.

| Product Type | Weather Station |
| Brand | Hyundai |
| Model | WS 8446 |
| Power Supply (Main Unit) | 3 x AAA batteries (not included) or 230 V AC adapter (included) |
| Power Supply (External Sensor) | 2 x AA batteries (not included) |
| Indoor Temperature Range | 0°C to +50°C |
| Outdoor Temperature Range | -40°C to +70°C |
| Indoor Humidity Range | 20% to 90% RH |
| Number of Sensor Channels | Up to 3 (1 included) |
| Radio Control Frequency | 77.5 KHz |
| Wireless Sensor Frequency | 433.92 MHz |
| Weather Forecast | 12-24 hour prediction based on barometric pressure |
| Display | Time, calendar, temperature, humidity, weather icons |
| Alarm | Dual alarms with snooze (5-60 min adjustable) |
| Memory Function | Min/Max daily temperature and humidity |
| Barometric Pressure Display | hPa |
| Temperature Units | °C/°F selectable |
| Time Format | 12/24 hour selectable |
| Time Zone Setting | -1, 0, +1 UTC |
| Included Accessories | Weather station, external sensor, power adapter (Model HX075-0450600-AG-001) |
| Cleaning | Wipe with dry soft cloth; avoid water and chemicals |
| Safety | Keep plastic bag away from children; dispose according to local regulations |
| Compliance | EU Directive 2014/53/EU; CE |
| Manufacturer | ETA a.s., licensed by Hyundai Corporation Holdings, Korea |
Frequently Asked Questions - WS 8446 HYUNDAI
User questions about WS 8446 HYUNDAI
0 question about this device. Answer the ones you know or ask your own.
Ask a new question about this device
Download the instructions for your Weather Station in PDF format for free! Find your manual WS 8446 - HYUNDAI and take your electronic device back in hand. On this page are published all the documents necessary for the use of your device. WS 8446 by HYUNDAI.
USER MANUAL WS 8446 HYUNDAI
TREND VENKOVNÍ TEPLOTY – VENKOVNÍ TEPLOTA NIŽŠÍ NEŽ 0 °C
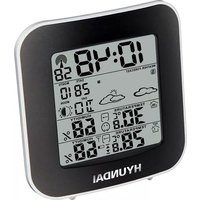
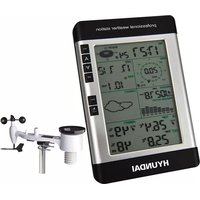
1) Icons weather forecast
2) Outdoor temperature / humidity external sensor
3) Indoor temperature / humidity
4) Time display
5) Calendar
6) Tendency temperature
7) Channel external sensor
8) Alarm Clock icons 1 and 2
9) Symbol Radio Control RCC
10) Snooze/light button
11) ALARM button
12) MEM button
13) SET button
14) UP button
15) DOWN button
16) Battery Compartment 3 x AAA (batteries not included)
17) External power supply socket
18) Pedestal
19) TX button
20) TX channel selector, select external sensor channel
21) Compartment 2xAA batteries (batteries not included)
POWER METEO STATION
Open the battery compartment (16) on the back of the unit and insert three “AAA” cell batteries according to polarity. Insert the external power in the socket (17), insert the adapter into a wall outlet.
POWER SENSOR EXTERNAL
Open the battery compartment (21) on the rear, and insert two “AA” size batteries matching the polarities.
SETTING THE EXTERNAL SENSOR
This weather station is arranged to communicate with three external sensors. One of these comes with the unit, the remaining two are optional.
1) Power the weather station as described in POWER METEO STATION.
2) Insert the batteries in the external sensor, set the selector (20) to the desired transmission channel (1, 2 or 3). Automatic weather station data to be transmitted.
3) Press the UP button (14) more times to select the channel set on the external sensor. Sequentially selects the channel 1, channel 2, channel 3 or sequential display of 3 channels (icon flashing channel). In case of non receipt of the display signal it is shown the character “-”.
Notes:
Place the weather station away from equipment that generates magnetic fields such as mobile phones, televisions etc ....
TIME DISPLAY THROUGH RADIO CONTROL
This device is equipped with a receiver able to receive the time signal of the Physikalisch Technische Bundesanstalt Braunschweig (central Germany) admissible in a 1500 km radius.
Press and hold the DOWN button (15) of the weather station, the symbol (9) will flash radio control and within 24 hours will be displayed on the control radio time signal.
Note 1: When the symbol of the blinking control radio is displayed you can not make any manual adjustments.
Note 2: When the symbol is steady it means that the signal 'was properly received.
Note 3: The time is transmitted from the central Germany, so if we are in a country with different time than the Germany is necessary to set the time zone.
Note 4: Place the weather station away from equipment that generates magnetic fields such as mobile phones, televisions etc ....
It not in all areas of Europe may be able to receive the signal of the radio control. In this case you must set the time manually.
SETTING THE CLOCK MANUAL
1) Press and hold the SET button (13) to enter the manual clock setting.
2) Set the time zone of your region through the UP (14) or DOWN (15). You can choose between -1, 0, +1 (UTC correction)
3) Press the SET button (13), the display will start flashing in the time display 12/24 hours.
4) Set the time display in 12/24 hours via the UP (14) or DOWN (15).
5) Press the SET button (13), the display will begin to flash hours.
6) Set the hours with UP (14) or DOWN (15).
7) Press the SET button (13), the display will begin to flash the minutes.
8) Set the minutes using the UP (14) or DOWN (15).
9) Press the SET button (13), the display will start flashing year.
10) Set the year using the UP (14) or DOWN (15).
11) Press the SET button (13), the display will begin to flash the month.
12) Set the month using the UP (14) or DOWN (15).
13) Press the SET button (13), the display will start flashing on the day.
14) Set the day using the UP (14) or DOWN (15).
15) Press the SET button (13), the display will start flashing the date format.
16) Set the date format via the UP (14) or DOWN (15).
17) Press the SET button (13), the display will begin to flash duration in minutes of the Snooze function.
18) Set the duration of the snooze function (5 min - 60 minutes) through the UP (14) or DOWN (15).
19) Press the SET button (13) to finish the manual clock setting.
SETTING THE ALARM
1) Press the SET button (13) to display the Alarm 1 (A1). Press it again to view the Alarm 2 (A2). Press it again to return to display the current time.
2) While viewing A1 or A2 hold the SET button (13), on the display the alarm time starts to flash.
3) Press the UP (14) or DOWN (15) to adjust the hour.
4) Press the SET button (13), on the display the alarm minutes star t flashing.
5) Press the UP (14) or DOWN (15) to adjust the minutes.
6) Press the SET button (13) to end the alarm setting.
7) To activate the alarm 1 or 2 press the ALARM button (11); press it once to activate the alarm 1 (appears the alarm 1) icon, then press it again to activate the alarm 2 (the alarm icon appears 2), press it a third time to activate both alarms (both icons appear ), press it again to deactivate both alarms.
8) Press the button SNOOZE (10) To temporarily disable the alarm,. The alarm will sound again after the set minutes nela time manually (default 5 minutes).
9) To turn off the alarm, press the ALARM button (11) until the corresponding icon disappeared.
WEATHER FORECAST
The digital barometer automatically detects the atmospheric pressure changes accordingly to display the symbol to forecast weather (1). This forecast concerns the 12/24 hours.
For example: If the barometer detects high pressure, the display will show the symbol of the sun, but externally it could rain, because the provision relates to the 12/24 hours.
N.B.: The weather forecast symbols may not reflect current weather conditions.
They relate only to future conditions.
Predictions can not be 100 % secure due to various factors.
The manufacturer is not liable for any damages or situations caused by an incorrect forecast.
TEMPERATURE AND HUMIDITY INSIDE / OUTSIDE - MIN / MAX VALUES - BAROMETRIC PRESSURE
The indication of the temperature is to the right of the display, while the humidity value is indicated at the right temperature in the small box.
In the box INDOOR are indicates the temperature and humidity interior, and the box OUTDOOR indicates the temperature and humidity detected by the external sensor. Press the DOWN (15) button to select the temperature units in °C or °F.
Minimum / maximum values of the day: press MEM (12), the display shows the maximum value of temperature / humidity recorded during the day; press the MEM button (12), it shows the minimum temperature / humidity.
During the display of minimum / maximum values, by holding down the MEM button (12) the recorded data are deleted and you start a new calculation of daily mean values.
Atmospheric pressure: Press and hold the MEM button (12), in the CALENDAR box will be displays the current pressure value hPa. Press and hold the MEM button (12) to return to display the date.
TREND OF OUTDOOR TEMPERATURE - OUTDOOR TEMPERATURE LESS THAN 0 °C
Along with the outdoor temperature it is shown the prediction of the temperature through the icons(6):
- temperature decreases, the icon is displayed when a change is registered lower temperature of -1 °C.
- stationary temperature, the icon is displayed when a change is registered in temperature between +/- 1 °C.
- temperature rising, the icon is displayed when you record a higher temperature change of +1 °C.
When the external sensor detects a temperature below 0 °C on the weather forecast display lights up the sleet symbol to indicate the possible formation of ice; in the presence of more sensors, the symbol lights up only when it receives the sensor that detects the temperature value below 0 °C .
TECHNICAL DATA
Weather Station: 0 °C to +50 °C
Indoor humidity: from 20 % to 90 % RV (relative humidity)
External sensor: from -40 °C to +70 °C
Channels: max. 3 external sensors
Receiving radio control signal: 77,5 KHz
Wireless Outdoor Sensor: 433,92 MHz RF transmitting frequency; ERP 0,04 mW
Feed unit: 0,1 °C for the temperature - 1% for moisture
Main Unit Power: 3 x AAA batteries (not included)
Power supply 230 V 50 Hz / 4.5 V 0,15 A supplied
External sensor supply: 2x AA batteries (not supplied)
We reserve the right to change technical specifications.


TO AVOID DANGER OF SUFFOCATION, KEEP THE PLASTIC BAG AWAY FROM BABIES AND CHILDREN. DO NOT USE THIS BAG IN CRIBS, BEDS, CARRIAGES OR PLAYPENS. THIS BAG IS NOT A TOY
DISPOSAL OF OLD ELECTRICAL & ELECTRONIC EQUIPMENT (APPLICABLE IN THE EUROPEAN UNION AND OTHER EUROPEAN COUNTRIES WITH SEPARATE COLLECTION SYSTEMS)

This symbol on the product or on its packaging indicates that this product shall not be treated as household waste. Instead it shall be handed over to the applicable collection point for the recycling of electrical and electronic equipment. By ensuring this product is disposed of correctly, you will help prevent potential negative consequences for the environment and human health, which could otherwise be caused by inappropriate waste handling of this product. The recycling of materials will help to conserve natural resources. For more detailed information about recycling of this product, please contact your local Civic Office, your household waste disposal service or the shop where you purchased the product.
Hereby, ETA a.s. declares that the radio equipment type WS8446 is in compliance with Directive 2014/53/EU. The full text of the EU declaration of conformity is available at the following internet address: http://www.hyundai-electronics.cz/declaration_of_conformity
KÉSZÜLÉK LEÍRÁSA

HU - 21
| EN - English | ||
| Charging adapter | ||
| A | Manufacturer's name or trademark, business registration number and address | HUAXU ELECTRONICSFACTORY, No. 1 Shi Tang Bei Street 2, Shi Jie Town, Dong Guan City, 523290, Guangdong, China |
| B | Model identifier HX075-0450600-AG-001 | |
| C | Input voltage 100-240 V | |
| D | Input frequency 50/60 Hz | |
| E | Output voltage 4,5 V | |
| F | Output current 0,6 A | |
| G | Output power 2,7 W | |
| H | Average efficiency in active mode 73,64% | |
| I | Low load efficiency (10%) | |
| J | Power consumption without load | 0,073 W |
Licensed by Hyundai Corporation Holdings, Korea


- TREND VENKOVNÍ TEPLOTY – VENKOVNÍ TEPLOTA NIŽŠÍ NEŽ 0 °C
- POWER METEO STATION
- POWER SENSOR EXTERNAL
- SETTING THE EXTERNAL SENSOR
- Notes:
- TIME DISPLAY THROUGH RADIO CONTROL
- SETTING THE CLOCK MANUAL
- SETTING THE ALARM
- WEATHER FORECAST
- TEMPERATURE AND HUMIDITY INSIDE / OUTSIDE - MIN / MAX VALUES - BAROMETRIC PRESSURE
- TREND OF OUTDOOR TEMPERATURE - OUTDOOR TEMPERATURE LESS THAN 0 °C
- TECHNICAL DATA
- DISPOSAL OF OLD ELECTRICAL & ELECTRONIC EQUIPMENT (APPLICABLE IN THE EUROPEAN UNION AND OTHER EUROPEAN COUNTRIES WITH SEPARATE COLLECTION SYSTEMS)
Brand : HYUNDAI
Model : WS 8446
Category : Weather Station