HC 103 - Beard trimmer HYUNDAI - Free user manual and instructions
Find the device manual for free HC 103 HYUNDAI in PDF.

| Product Type | Beard and hair trimmer |
| Brand | Hyundai |
| Model | HC 103 |
| Dimensions | 5.5 x 16.5 x 4.3 cm |
| Weight | 0.2 kg |
| Power Supply | Rechargeable NiMH battery |
| Charging Time | 8 hours |
| Operating Time | Up to 45 minutes |
| Adapter Input | 100-240 V AC, 50/60 Hz |
| Adapter Output | 5.0 V DC, 1.0 A |
| Cutting Length Settings | 22 settings: 3-18 mm and 21-36 mm (1.5 mm steps); precision guide 0.5-2.5 mm |
| Blade Type | 100% stainless steel, sharpened moving blade, fixed blade for longer life |
| Thinning System | Yes, with dedicated button |
| Accessories Included | Charging stand, cleaning brush, oil, comb |
| Noise Level | 67 dB(A) re 1pW |
| Safety Features | Overheat protection, waterproof? (Do not immerse), child safety? (Not for children under 8 without supervision) |
| Maintenance | Removable blades for cleaning; oil blades when performance drops |
| Battery Disposal | NiMH batteries must be removed and recycled separately (instructions in manual) |
| Intended Use | Household only, not for commercial use or animal hair |
| Warranty | 24 months (excluding battery capacity loss due to use/age) |
| Compliance | Class II appliance, RCD recommended |
Frequently Asked Questions - HC 103 HYUNDAI
User questions about HC 103 HYUNDAI
0 question about this device. Answer the ones you know or ask your own.
Ask a new question about this device
Download the instructions for your Beard trimmer in PDF format for free! Find your manual HC 103 - HYUNDAI and take your electronic device back in hand. On this page are published all the documents necessary for the use of your device. HC 103 by HYUNDAI.
USER MANUAL HC 103 HYUNDAI
natural_image
Hyundai 4000 electric toothbrush with black and white body, no visible text or symbols on the device itself.NÁVOD K POUŽITÍ / NÁVOD NA POUŽITIE INSTRUKCJA OBSŁUGI / INSTRUCTION MANUAL HASZNÁLATÍ ÚTMUTATÓ
ZASTŘIHOVAČ VLASŮ A VOUSŮ
ZASTRIHÁVAČ VLASOV A FÚZOV
NABÍJANIE ZASTRIHOVAČA
Dear customer, thank you for purchasing our product. Please read the operating instructions carefully before putting the appliance into operation and keep these instructions including the warranty, the receipt and, if possible, the box with the internal packing.
GENERAL SAFETY INSTRUCTIONS

- Check whether the data on the type label correspond with the voltage in your socket.
- This appliance can be used by children aged from 8 years and above and persons with reduced physical, sensory or mental capabilities or lack of experience and knowledge if they have been given supervision or instruction concerning use of the appliance in a safe way and understand the hazards involved. Children shall not play with the appliance. Cleaning and user maintenance shall not be made by children without supervision.
- Before replacing accessories or accessible parts, which move during operation, before assembly and disassembly, before cleaning or maintenance, turn off the appliance and disconnect it from the mains by pulling the power cord from the power socket!
- Do not leave the iron plugged in power supply without supervision!
- If the power cord of the charger is corrupted, it has to be replaced by the manufacturer, its service technician or a similarly qualified person so as to prevent dangerous situations.
- Never use the appliance if its power cord or plug is damaged, if it does not work properly, if it fell down and was damaged and it is leaking. In this case take the appliance to a special service to check its safety and proper function.
- Never use the appliance if it does not work properly, if it fell down and was damaged or if it fell to water.
- For additional protection we recommend installation of current protection (RCD) with the nominal release current not exceeding 30 mA. Ask a control technician or an electrician for advice.
- The appliance is intended for use in households only and for similar use! It is not designed for use in hair salons or for other commercial use!
- Do not put or take out the plug to or from a socket with wet hands!
- Do not let the appliance in operation without supervision!
- Never immerse the appliance in water or other liquids (even partially) and do not clean it in running water!
- Use only the accessories designed for this type. Do not use damaged adapters.
- Never tuck the appliance or the accessories into any body holes.
- Be careful in using the appliance without a set adapter, the blades are sharp.
- Do not use the appliance while having a bath, having a shower or taking a sauna and for trimming wet or artificial hair.
- The appliance is not intended for styling animal hairs.
- Never charge the appliance in direct sunlight or close to heat sources and if the temperature is below 10 °C or above 40 °C. If the appliance is fully loaded (all the control lights are permanently on), unplug the charging device.
- Do not put the trimmer on hot heat sources (e. g. oven, stove, radiator, etc.)
- The trimmer and the stand with the plugged adapter must not be used at places where it could fall into a bath tub, a wash basin or a swimming pool. If the dryer fell to water anyway, do not take it out! First of all, unplug the adapter from the socket and only then remove the trimmer. In this case take the appliance to a special service to check its safety and proper function.
- If the dryer was stored at lower temperatures, acclimatize it first, by which you remove stiffness of the lubricating fat in bearings and mechanical resistance of the plastic parts will be maintained.
- Also, do not put the trimmer in the position on soft surfaces (e.g. bed, towels, sheets, carpet); the surfaces or the appliance could get damaged.
- The power cord of the adapter must not be damaged with sharp or hot objects, open fire and it must not be sunk into water.
- If you need to use the extension cord, it has to be uncorrupted and it has to comply with the valid standards.
- The adaptor supplied with this appliance is intended for this appliance only, do not use it for other purposes. Also, use only the supplied adaptor with this appliance, do not use any other adaptor for charging (e.g. from another appliance).
- During normal operation, the accumulator batteries are not taken out. Take out the batteries only if the appliance is to be disposed.
- Never use the appliance for any other purpose than for the intended purpose described in these instructions for use!
- The producer is not responsible for any loss caused by improper handling of the appliance and its accessories (e.g. injury, appliance damage, fire, etc.) and its guarantee for the appliance does not apply in the case of non-compliance with the safety instructions above.
- Oil: Warning, Avoid contact with eyes, Do not drink, Keep away from children.
- All text in other languages and pictures shown on the packaging, or the product itself, are translated and explained at the end of this language mutation.
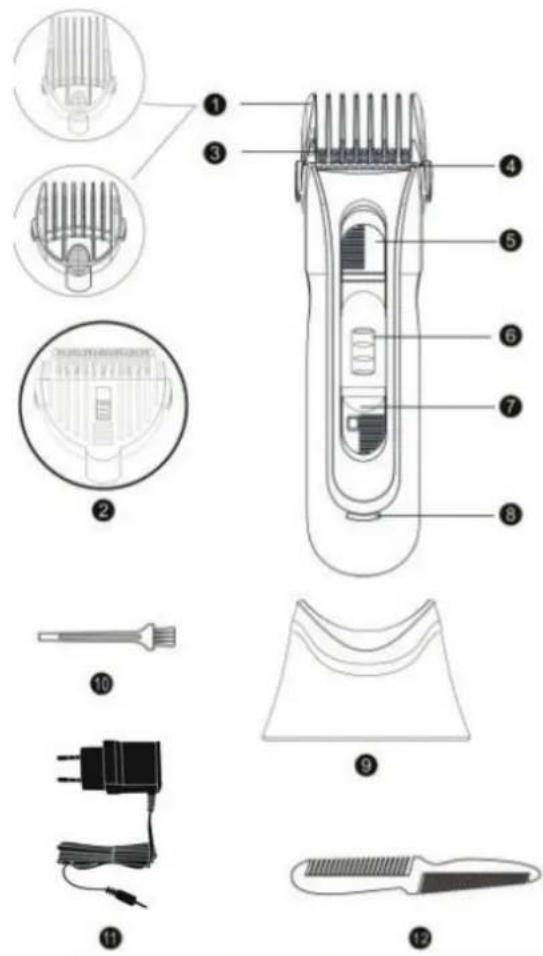
DESCRIPTION OF THE CONTROLS
1) 2 cutting guide for 22 lengthhs(from 3 - 18 mm and from 21 to 36 mm, in 1.5 mm steps)
2) 1 precision guide (0.5 - 2.5 mm)
3) blades:
moving blade:
- sharpened process: for an exceptional cutting edge.
- long lasting: ultra hard-wearing and 100 % stainless steel blade.
Faxed blade:
For longer life:
Combining these technologies perfects the condition of the blade surface, thereby reducing their friction coefficient.
4) thinning system
5) thinning system button
6) adjust length wheel
7) ON/OFF button
8) charging indicator light
9) charging stand
10) cleaning brush
11) charging transformer
12) comb
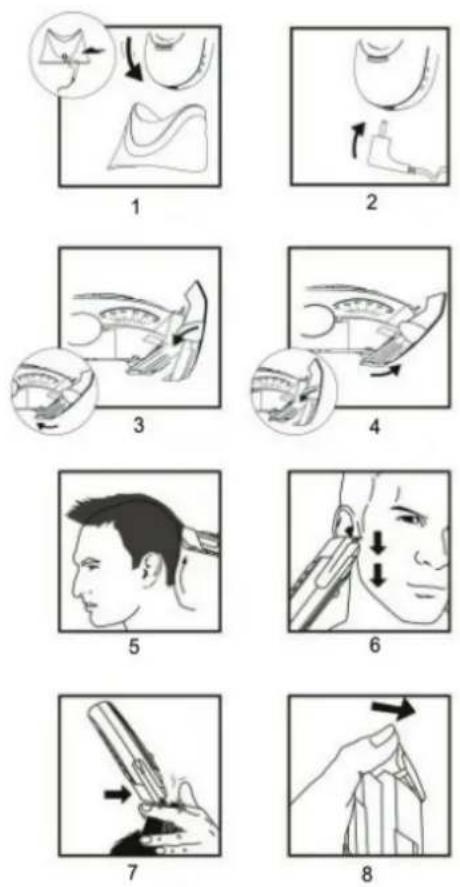
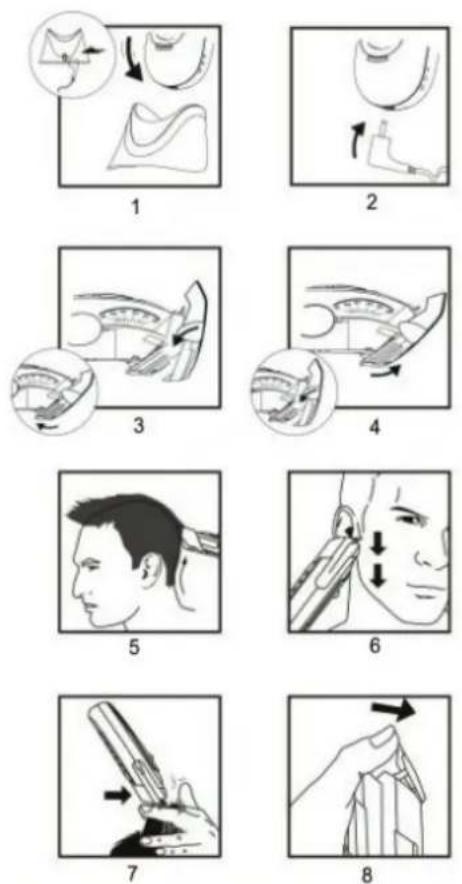
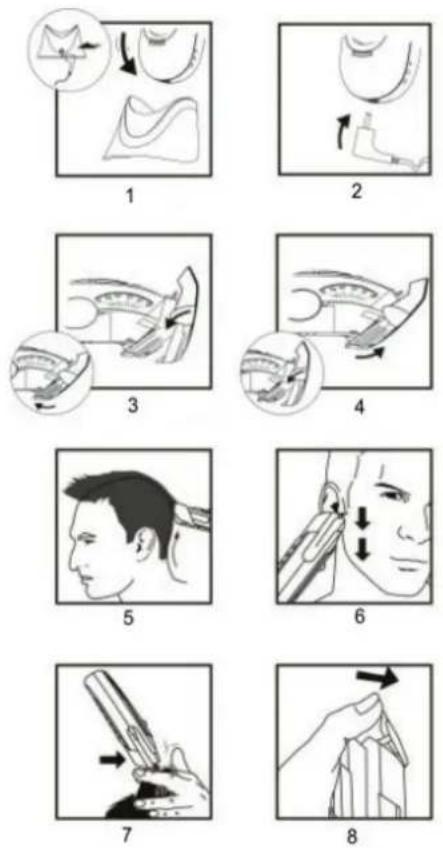
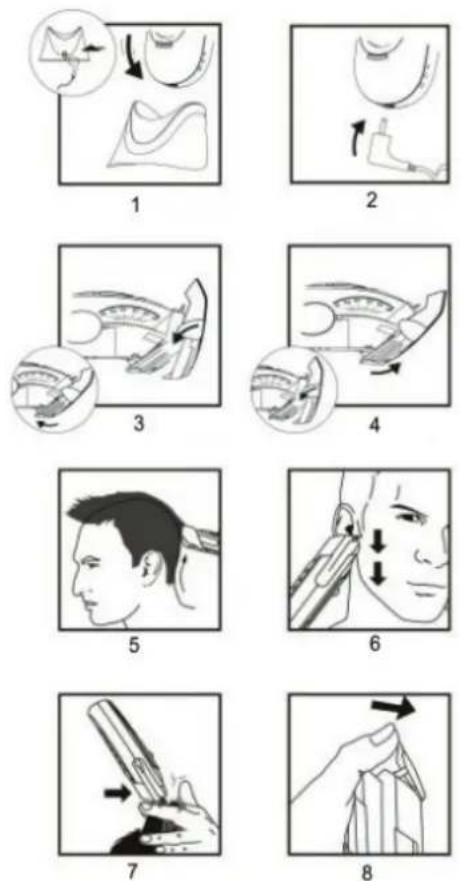
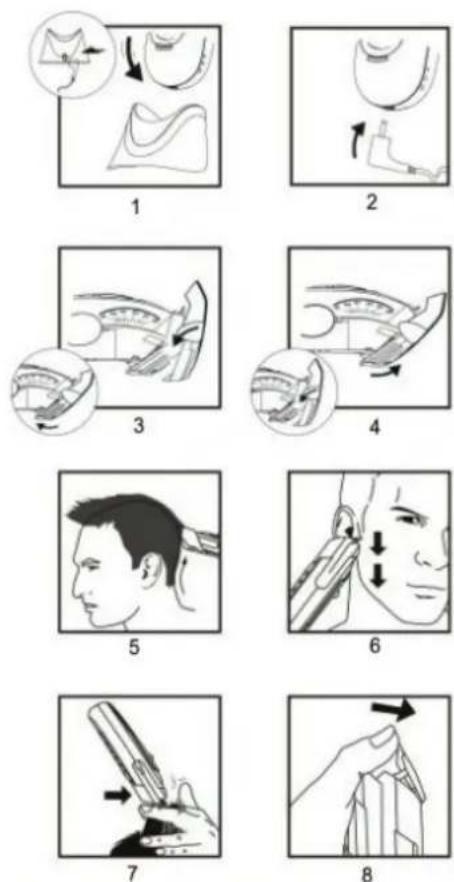
CHARGING THE CLIPPER
Before using the clippers for the first time,charge for 16 hours.
The charging cord can be put in the stand (Fig. 1)
1) Plug the transformer into the mains.
2) Place the clipper in the stand. Always check that the indicator light is on when the clipper is in the stand.
3) When fully charged, you will be able to use the clipper for up to 45 min.
The charging cord also can put into the mains for charging .(Fig. 2)
USING THE CUTTING GUIDES
IMPORTANT: Always attach the cutting guide BEFORE turning the clipper on and turn the clipper off to change guides.
The cutting guide is very pratical and guarantees an even cut. To attach a cutting guide, first adjust the cutting length to 3 mm or 21 mm and place it on the support guide adjusting first both sides and pushing on the bottom of the guide until you hear a "click". (Fig. 3)
NOTE: The precision guide must be placed like the cutting guides but it is adjusted manually and independently of the grooved wheel.
STARTING AND USING
To adjust the clipper's cutting length, turn the grooved wheel up or down.
The selected length is displayed on the right or left side of the clipper.
Press the ON/OFF button.
You can change the cutting length at any time.
Thanks to the smart adjusting system, the length of the cut is maintained even if the angle of the clipper varied, so it guarantees precise result.
TO TURN THE CLIPPER OFF
Either: press the ON/OFF button, the unit will shut down completely and adjust the wheel to make sure the cutting guide return to its original position.
To remove the cutting guide, first adjust the cutting length to 3 mm or 21 mm and push the guide out of the support lifting it up with your thumb (Fig. 4).
CUTTING TECHNIQUES AND ADVICE FROM THE EXPERTS
- Use the clipper on clean,dry hair.
- To familiarize yourself with the clipper, begin with the cutting guide for a longer cut, adjust it by sliding the wheel. You will soon know the lengths of each guide and each position.
• Always move the clipper against the direction of hair growth. - Begin at the nape. Place the guide on the scalp and move the clipper toward the crown of your head. Move your clipper slowly, pointing the teeth of the guide slightly upward. Keep the clipper in contact with your head at all times (Fig. 5).
- For the crown of the head, move from front to back, that is, from your forehead to the crown of your head.
- For the finishing touches, that is, around the nape and sideburns, use the clipper without a cutting guide. Turn your clipper over and move it from top to bottom. (Fig. 6)
- If you want a length greater than 30 mm, or if you are experienced, you can create “comb” or “finger” cuts:
- Work without a cutting guide.
- Take up a small section of hair with a comb or in your fingers.
- Move the comb or your fingers along the section of hair to the desired length.
- Cut your hair along the coomb or your fingers.
- Remove the cut hair using a comb and check the evenness of the cut regularly (Fig.7).
USING THE THINNING GUIDE
Switch the clipper to the "THIN" position. The thinning guide is in front of the blades. This technique allows you to thin out hair to make styling easier. The technique is particularly good for the crown of the head where hair is usually thicker. To thin your hair, take a section of hair (rest your little and ring finers on your scalp, using the middle and index fingersto set the length), hold 1 to 2cm below the cutting length. Then, using the clipper, cut the section of hair steeply and at an angle to create a sawtoothed "edge".
MAINTENANCE
- Remove the cutting guide after each use.
- Cleaning the clipper blades regularly will maintain their optimal performance.
- Removable blades
- To make cleaning easier, the clipper blades can be removed. Make sure the clipper is turned off. Hold the clipper with the blades pointing up and remove them by pressing the top of the blade (Fig. 8).
- Brush the blades using the cleaning brush to remove any hair.
- It is nevertheless recommended that your put oil to blade, when you notice the clipper isn't performing as well.
- Remove the blades as described above.
- Carefully squeeze a few drops of oil onto the pad.
- Then put the blades back on the clipper.
- Oil is specially formulated for clippers, it will not evaporate or slow the blades down.
- You can get new blades when these are worn or damaged.
NI-MH BATTERIES
This clipper has nickel-metal hydride batteries.
In an effort to protech the environment, these batteries should be removed and properly disposed of when the unit is no longer operating. To remove the battery block for disposal or recovery, follow these instructions:
1) First, unplug the clipper. Remove the 3 screws on the back, 2 at the top and 1 at the bottom.
2) Open the clipper and remove the batteries using wire cutters.
3) To protect the environment, do not dispose of your batteries with your ordinary household waste. For more details on recovery of materials and waste treatment facilities, please contact the waste disposal services in your region.
TECHNICAL SPECIFICATIONS
- Hair trimmer
- Rechargeable hair and beard trimmer with charge stand
- 2 cutting attachments for hair lenght settings (3 – 36 mm)
- 1 cutting attachments for beard lenght settings (0.5 – 2.5 mm)
-
Battery operation - NiMH battery
-
Operating time up to 45 minutes
- Charging time 8 hours
- Accessories: charging adaptor, charging stand, cleaning brush, oil, comb
- Noise level: 67 dB(A) re 1pW
• Size: 5.5 x 16.5 x 4.3 cm - Weight: 0.2 kg
| Charging adapter | |
| Manufacturer's name or trademark, business registration number and address | Hyundai |
| Model identifier KH6-050100EU | |
| Input voltage 100-240 V (AC) | |
| Input frequency 50/60 Hz | |
| Output voltage 5.0 V (DC) | |
| Output current 1.0 A | |
| Output power 5.0 W | |
| Average efficiency in active mode | 115 V / 60 Hz: 74.52 %230 V / 50 Hz: 75.11 % |
| Low load efficiency (10%) - | |
| Power consumption without load | 115 V: 0.04 W230 V: 0.07 W |
| Appliance protection class II. | |
We reserve the right to change technical specifications. We reserve the right to change technical specifications. Replacement of parts that require intervention in the electric part of the appliance must be carried out by a specialized service! Failure to comply with the instructions of the manufacturer will lead to expiration of the right to guarantee repair!
Guarantee of 24 months does not apply to decrease in the accumulator's effective capacity caused by its use or age. Effective capacity gradually decreases depending on the method of use of the accumulator.
WARNING: Do not use this product near water, in wet areas to avoid fire or injury of electric current. Always turn off the product when you don't use it or before a revision. There aren't any parts in this appliance which are reparable by consumer. Always appeal to a qualified authorized service. The product is under a dangerous tension.
Old electrical appliances, used batteries and accumulators disposal
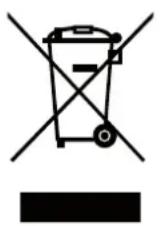
This symbol on the product or on its packaging indicates that this product (or battery/accumulator) shall not be treated as household waste. Instead it shall be handed over to the applicable collection point for the recycling of electrical and electronic equipment. By ensuring this product is disposed of correctly, you will help prevent potential negative consequences for the environment and human health, which could otherwise be caused by inappropriate waste handling of this product. The recycling of materials will help to conserve natural resources. For more detailed information about recycling of this product, please contact your local Civic Office, your household waste disposal service or the shop where you purchased the product.
WARNINGS AND SYMBOLS USED ON THE APPLIANCE, PACKAGING OR IN THE INSTRUCTIONS MANUAL:
HOUSEHOLD USE ONLY; DO NOT IMMERSE IN WATER OR OTHER LIQUIDS;

TO AVOID DANGER OF SUFFOCATION, KEEP THIS PLASTIC BAG AWAY FROM BABIES AND CHILDREN. DO NOT USE THIS BAG IN CRIBS, BEDS, CARRIAGES OR PLAYPENS. THIS BAG IS NOT A TOY.
Oil: Warning, Avoid contact with eyes, Do not drink, Keep away from children or mental capabilities.
The ⚠ symbol indicates a WARNING.

Do not use the appliance close to bath tubs, showers, bash basins or other water containers.