
WKC10 - Household Fan Eldom - Free user manual and instructions
Find the device manual for free WKC10 Eldom in PDF.


| Product Type | Column Fan (Tower Fan) |
| Model | WKC10 |
| Brand | Eldom |
| Power Consumption | 50 W |
| Supply Voltage | 230 V ~ 50 Hz |
| Speed Settings | 2 speeds (low and high) |
| Oscillation | Yes, selectable via rotary knob |
| Control Type | Rotary knob for on/off, speed, and oscillation |
| Handle | Yes, integrated for carrying |
| Base Assembly | Required; base attaches with a nut |
| Safety Features | Protective mesh; do not use near water; automatic supervision recommended |
| Cleaning | Soft dry or slightly damp cloth for casing; soft brush for air inlet/outlet grilles |
| Warranty | For private household use only; full terms in annex |
| Repairability | Only by authorized service centers; use of non-original parts prohibited |
| Environmental Protection | Device made of recyclable materials; dispose at collection point |
| Intended Use | Indoor household use only |
| Maximum Ambient Temperature | 40°C |
| Color | Black |
Frequently Asked Questions - WKC10 Eldom
User questions about WKC10 Eldom
0 question about this device. Answer the ones you know or ask your own.
Ask a new question about this device
Download the instructions for your Household Fan in PDF format for free! Find your manual WKC10 - Eldom and take your electronic device back in hand. On this page are published all the documents necessary for the use of your device. WKC10 by Eldom.
USER MANUAL WKC10 Eldom
natural_image
Black vertical cylindrical air conditioner with ventilation slots and a small logo on the base (no text or symbols visible)
model: WKC10
Eldom Sp. z o.o.
natural_image
Circular mechanical component with arrows indicating direction, labeled '6' and 'fot. 3' (no readable text or symbols beyond labels)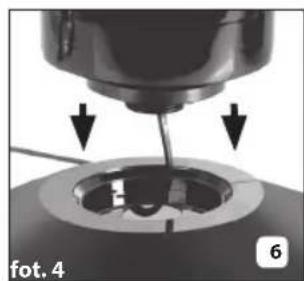
natural_image
Close-up of a mechanical component with arrows indicating motion or force direction, no visible text or symbols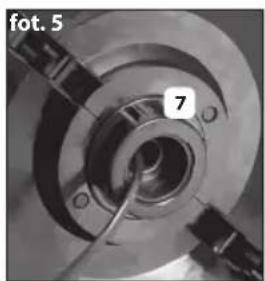
natural_image
Close-up of a mechanical component with labeled parts (7), no readable text or symbols beyond labelsMONTAŻ
Before the first use, please read all these instructions carefully:
- The cord should be plugged into the power supply of parameters indicated in the data plate.
- Please, do not plug too many appliances to a single elec tric circuit.
- WARNING: do not use close to bathtubs, showers, swimming pools and other water containers.
- The unit is designed to operate at a household.
- Place the unit on a flat and dry surface.
- Do not inert fingers or any other objects into the inlet and outlet holes.
- Do not place the unit near cushions or curtains.
- Working fan must be always supervised, especially, when there are children nearby.
- Leaving a room where a fan operates, switch it off.
- Do not spray any insect killers or similar agents near the operating fan.
- Do not use the appliance under high temperature (exceeding 40^ C), in localizations where the humidity rate is high (e.g. bathroom) and localizations where explosive atmosphere occurs.
- Before switching the unit on make sure all its elements are correctly fixed. Under no circumstances one may switch the unit on before it has been completely assembled!
- Do not cover the protective mesh.
- Do not use the appliance as a hanger.
- In case the power cord is damaged it must be replaced by the manufacturer's authorized service center.
- The device can be used by children aged 8 and older and by persons with limited physical, sensory or mental capabilities, or persons without sufficient experience and knowledge only under supervision or if previously instructed on the safe use of the appliance and the possible risks. Children shall not play with the appliance. Cleaning and maintenance that are the responsibility of
the user shall not be carried out by children without supervision. Protect the appliance and the power cord against children under 8 years old.
- The unit may be repaired by a manufacturer's authorized service center only (list of the centers attached and available on the website: www.eldom.eu). All modifications or use of non-original spare parts or any other elements is prohibited and makes use of the unit hazardous.
- The device can be repaired only by authorized service center. Any upgrades or any use of non-original spare parts or equipment components is prohibited and endanger the safety of use.
- Eldom Sp. z o.o. shall not be held liable for any damage caused by any improper use of the device.
ENVIRONMENTAL PROTECTION
- the device is made of materials that can be reused or recycled
- it should be handed to the special collection point, that deals with collection and recycling of electronic and electric devices.
WARRANTY
- the device is intended for private use in a household,
- it cannot be used for professional purposes,
- the guarantee does not cover damage caused by improper operation. The guarantee terms are provided in the annex.
CLEANING AND MAINTENANCE
- before cleaning unplug the hair-dryer and wait until it cools down com pletely
- never immerse the hair-dryer in water
- casing and power cord can be cleaned with soft dry or slightly damp cloth
- the air inlet and outlet should be cleaned with soft brush
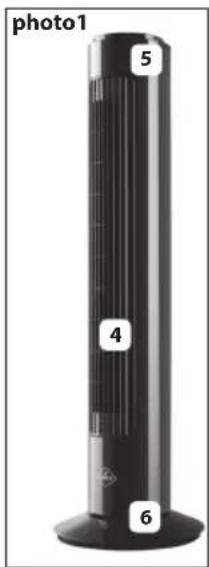
GENERAL DESCRIPTION
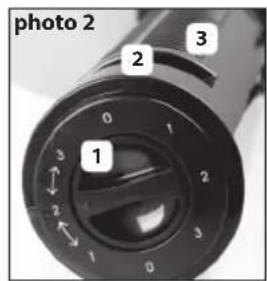
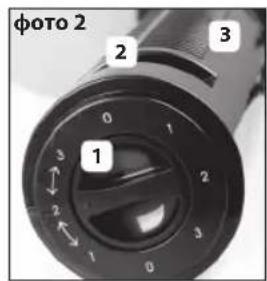
- On/off switch (speed, operation modes)
- Handle
- Air inlet grille
- Air outlet grille
- Body
- Base
- Fixing nut
TECHNICAL DATA
power: 50W
supply voltage:
230V \~ 50Hz
natural_image
Circular mechanical component with arrows indicating direction, labeled 'photo 3' and number '6' (no readable text or symbols beyond labels)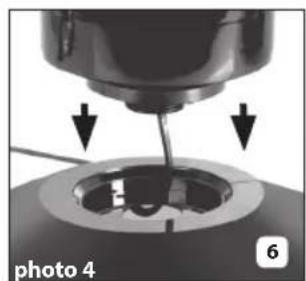
natural_image
Close-up of a mechanical device with arrows indicating motion or force direction, labeled 'photo 4' and number '6' (no readable text or symbols on the device itself)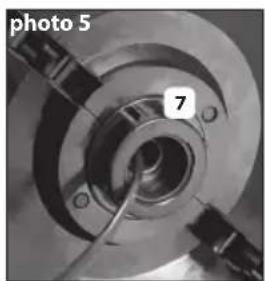
natural_image
Close-up of a mechanical component with labeled parts (7), no readable text or symbols beyond labelsINSTALLATION
After unpacking the device, make sure that it has not suffered any damage during transport. In the case of any doubt, do not use the device and contact a servicing centre. Before first use, unpack the device and assemble its components.
- loosen the nut (7)
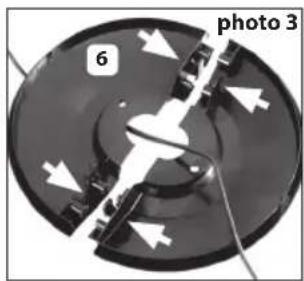
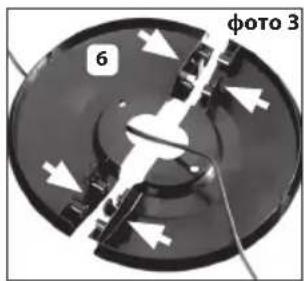
- lead the cable between the base (6) parts and connect them photo 3
- attach the base (6) to the fasteners in the body and tighten the nut (7) photo 2
- lead the cable out of the base (6) through the groove to make the device stable.
- place the device on a flat and stable surface,
- set the switch (1) to "0"
- connect the fan to the mains with parameters compliant with those provided in the instruction,
- to turn the device on, select the mode and speed of operation by rotating the knob (1):
1<with 2<illations
1 - without oscillations
- to turn off, rotate the knob back to "0"
BEZPEČNOSTNÍ DOPORUČENÍ
natural_image
Circular mechanical component with arrows indicating direction, labeled 'foto 3' and number '6' (no readable text or symbols beyond labels)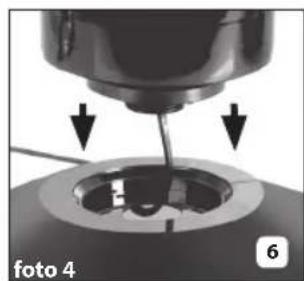
natural_image
Close-up of a mechanical device with arrows indicating motion or force direction, no visible text or symbols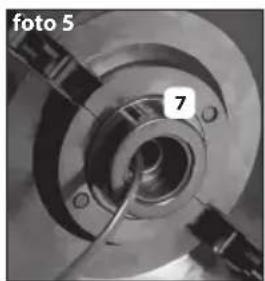
natural_image
Close-up of a mechanical component with labeled parts (7), no readable text or symbols beyond the labelMONTÁŽ
natural_image
Circular mechanical component with arrows indicating direction, labeled Abb. 3 (no text or symbols on the object itself)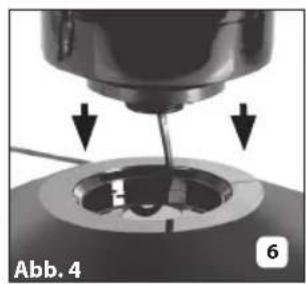
natural_image
Close-up of a mechanical component with arrows indicating motion or force direction, labeled Abb. 4 and 6 (no readable text or symbols)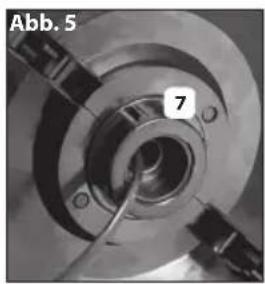
natural_image
Close-up of a mechanical component with labeled parts (7), no readable text or symbols beyond labelsMONTAGE
natural_image
Circular mechanical component with arrows indicating direction, labeled '6' and 'фото 3' (no readable text or symbols beyond labels)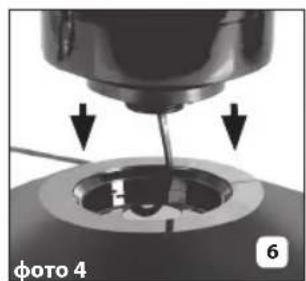
natural_image
Close-up of a mechanical device with arrows indicating motion or force direction, no visible text or symbols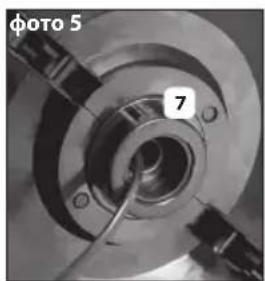
natural_image
Close-up of a mechanical component with labeled parts (7) and a photo marker 'photo 5' in the corner, no readable text or symbols beyond labels.МОНТАЖ
natural_image
Circular mechanical component with arrows indicating direction, labeled '6' and 'fot 3' (no readable text or symbols beyond labels)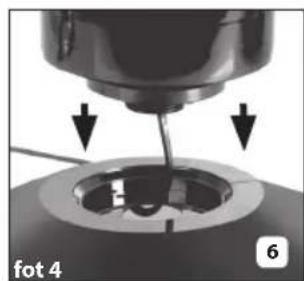
natural_image
Close-up of a mechanical component with arrows indicating motion direction, labeled 'fot 4' and '6' (no readable text or symbols)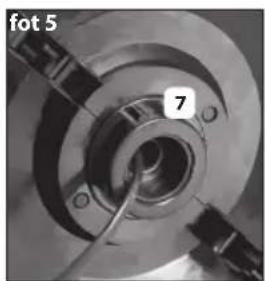
natural_image
Close-up of a mechanical component with labeled parts (7) and 'fot 5' annotation, no readable text or symbols beyond labelsMONTÁŽ
natural_image
Circular mechanical component with arrows indicating direction, labeled 'ábra 3' and number '6' (no readable text or symbols beyond labels)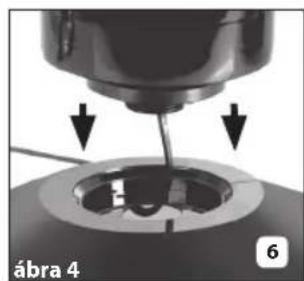
natural_image
Close-up of a mechanical device with arrows indicating motion or force direction, labeled 'ábra 4' and number '6' (no readable text or symbols on the device itself)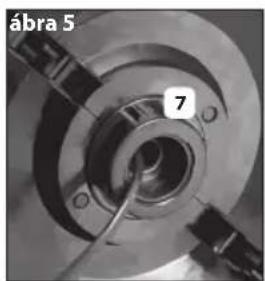
natural_image
Close-up of a mechanical component with labeled parts (7), no readable text or symbols beyond label and numberÖSSZESZERELÉS
natural_image
Circular mechanical component with arrows indicating direction, labeled 'foto 3' and number '6' (no readable text or symbols beyond labels)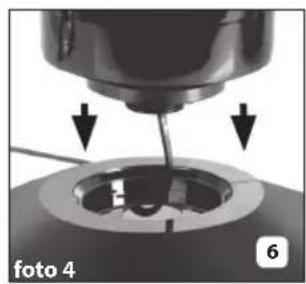
natural_image
Close-up of a mechanical device with arrows indicating motion or force direction, labeled 'foto 4' and '6' (no readable text or symbols on the device itself)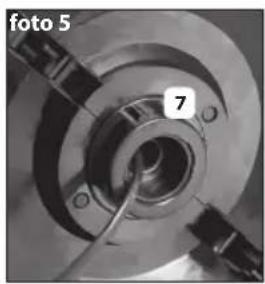
natural_image
Close-up of a mechanical component with labeled parts (7) and 'foto 5' in the corner, no readable text or symbols beyond labelsMONTAJE
KARTA GWARANCYJNA
WAŻNA Z DOWODEM ZAKUPU
WENTYLATOR KOLUMNOWY WKC10


Brand : Eldom
Model : WKC10
Category : Household Fan