
177V - Screen FUJITSU - Free user manual and instructions
Find the device manual for free 177V FUJITSU in PDF.

| Product Type | CRT Colour Monitor |
| Brand | Fujitsu Siemens |
| Model | 177V |
| Category | Screen / Monitor |
| Display Size (CRT) | 17 inches (43 cm) |
| Visible Diagonal | 40.6 cm |
| Dot Pitch | 0.27 mm |
| Maximal Resolution | 1280 x 1024 pixels |
| Horizontal Frequency | 30 kHz - 72 kHz |
| Refresh Rate (Vertical) | 50 Hz - 160 Hz |
| Maximum Pixel Rate | 110 MHz |
| Power Supply | 220 V - 240 V ±10%, 60/50 Hz ±3 Hz, <1.5 A |
| Power Consumption (Normal) | < 74 W |
| Power Consumption (Standby) | < 8 W |
| Power Consumption (Suspend) | < 8 W |
| Power Consumption (OFF) | < 5 W |
| Dimensions (W x H x D) | 400 mm x 395 mm x 420 mm |
| Weight | 14.4 kg |
| Video Input | Analogue, positive, 0.7 Vpp, 75 Ohm |
| Sync | TTL |
| Display Modes Storable | 25 (10 preset) |
| Connectivity | VESA-DDC compatible VGA interface (15-pin D-SUB) |
| Power Management | Energy Star compliant, reduces power to <5 W in OFF mode |
| Ergonomic Standards | ISO 9241-3, TCO '99 |
| OSD Functions | Brightness, contrast, size, position, shape, color temperature, degauss, moire reduction, language selection |
| Environmental Conditions | Operation: 10°C - 40°C, 10% - 90% humidity; Non-condensing |
| Accessories Included | Power cable (1.5 m), data cable, monitor base, warranty booklet, operating manual |
Frequently Asked Questions - 177V FUJITSU
User questions about 177V FUJITSU
0 question about this device. Answer the ones you know or ask your own.
Ask a new question about this device
Download the instructions for your Screen in PDF format for free! Find your manual 177V - FUJITSU and take your electronic device back in hand. On this page are published all the documents necessary for the use of your device. 177V by FUJITSU.
USER MANUAL 177V FUJITSU
natural_image
Man in work uniform working at a desk with multiple computer monitors displaying maps and data dashboards (no visible text or symbols)Sie haben ...
... any technical problems or other questions you need clarified?
Please contact
our Help Desk (see Warranty Booklet).
The latest information on our products, tips, updates, etc., can be found on the Internet under: http://www.fujitsu-siemens.com
A26361-K856-Z100-1-5E19
177V
Farbbildschirm
Colour monitor
Moniteur couleur
Monitor de color
Monitor a colori
Färgskärm
Kleurenbeeldscherm
Farvebilledskærm
Betriebsanleitung
Operating Manual
Deutsch
English
Français
Español
Italiano
Svenska
Nederlands
Dansk
TCO'99
Copyright © Fujitsu Siemens Computers GmbH 2002
VESA, DDC and DPMS are registered trademarks of Video Electronics Standards Association.
All rights, including rights of translation, reproduction by printing, copying or similar methods, even of parts are reserved.
Offenders will be liable for damages.
All rights, including rights created by patent grant or registration of a utility model or design, are reserved.
Delivery subject to availability. Right of technical modification reserved.
This manual was produced by cognitas. Gesellschaft für Technik-Dokumentation mbH www.cognitas.de
Contents
introduction......
Notational conventions ....
Important notes....2
Safety 2
Cleaning 3
Transport....3
X-ray radiation ....3
Energy Star Guidelines....3
CE marking....4
FCC Class B Compliance Statement....4
Power cable....4
Disposal and recycling....5
Checking the contents of the consignment ....5
Installing an ergonomic video workstation......6
Assembling the monitor base....
Connecting the monitor....8
Operation of the monitor 9
Switching the monitor on....9
Switching the monitor off 9
Notes on power management 10
Changing the monitor settings using the OSD menu....10
Notes on ergonomic colour adjustment....15
Technical data....15
VESA-DDC-compatible VGA interface....16
Preset operating modes....17
Pin assignment D-SUB....17
Tilting and turning area....18
Trouble shooting....18
Error messages on the screen....19
Introduction
Your new 177V monitor supplies you with a high-quality colour image with high resolution and ergonomic refresh rates. It possesses a whole range of useful features and functions, e.g.:
• 17" (43 cm) high-resolution CRT (0.27 mm dot pitch)
- automatic scanning of all horizontal frequencies from 30 to 72 kHz and all refresh rates (vertical frequencies) from 50 to 160 Hz
- digital screen controller with microprocessor for storing 25 different display modes
- freely adjustable colour alignment for matching the screen colours to the colours of various input and output devices
- convenient operation via integrated OSD (On-Screen-Display) menu
• VESA-DDC compatibility
- power management for reducing power consumption by up to 95 % when the computer system is not in use
• compliance with the latest ergonomic standards (ISO 9241-3)
• compliance with the recommendations in accordance with TCO '99
This Operating Manual contains important information you require to start up and run your monitor. The monitor interacts closely with the graphics card (screen controller) of your computer. The monitor processes the data supplied to it by the screen controller. The screen controller/the associated driver software is responsible for setting the modes (resolution and refresh rate).
Target group
You don't need to be an "expert" to perform the operations described here. Do, however, read the chapter "important notes" in the Operating Manual of the computer and in this Operating Manual.
In the event of any problems occurring, please contact your sales outlet or our Help Desk.
Further information
Details of how you set the resolution and refresh rate are provided in the documentation on your screen controller/the associated driver software.
Notational conventions
The meanings of the symbols and fonts used in this manual are as follows:
Pay particular attention to text marked with this symbol. Failure to observe this warning endangers your life, destroys the device, or may lead to loss of data.
Supplementary information, remarks, and tips follow this symbol.
▶ Text which follows this symbol describes activities that must be performed in the order shown. "Quotation marks" indicate names of chapters or terms.

Important notes

In this chapter you will find information regarding safety which is essential to take note of with your monitor.
Safety
This device complies with the relevant safety regulations for data processing equipment, including electronic office machines for use in an office environment. If you have any questions, contact your sales outlet or our Help Desk.
- If the device is brought into the installation site from a cold environment, condensation can form. Before operating the device, wait until it is absolutely dry and has reached approximately the same temperature as the installation site.
- During installation and before operating the device, please observe the instructions on environmental conditions in the chapter entitled "technical data" as well as the instructions in the chapter "nstalling an ergonomic video workstation".
- To ensure adequate ventilation the monitor may only be operated with the monitor foot installed.
- The colour monitor must not be exposed to strong magnetic fields (e.g. caused by magnetic paper clip holders or loudspeakers). Strong magnetic fields could result in a permanent blotchy image.
- The monitor is automatically degaussed when switched on. This results in a magnetic field around the metal edge of the picture tube, which may damage the data on data carriers nearby. Therefore, never keep magnetic data carriers near the monitor.
- The device automatically sets itself to the correct voltage within the range from 220 V to 240 V. Ensure that the local mains voltage lies within these limits.
- The device must be installed in such a way that the user has good access to the appliance socket.
- The ON/OFF switch does not disconnect the device from the mains voltage. To completely disconnect the mains voltage, remove the power plug from the socket.
- Lay all cables so that nobody can stand on them or trip over them. When attaching the device, observe the relevant notes in the chapter "Connecting the monitor".
- No data transmission cable should be connected or disconnected during a thunderstorm.
- Please ensure that no objects (e.g. necklaces, paperclips etc.) or liquids can get into the interior of the device (this may cause an electrical shock or short circuit).
- In emergencies (e.g. damaged casing, elements or cables, penetration of liquids or foreign matter), switch off the unit, disconnect the power plug and contact your sales outlet or our Help Desk.
- Only qualified technicians should repair the device. Unauthorised opening and incorrect repair may greatly endanger the user (electric shock, fire risk).
- Tampering with the device, in particular adjusting the high voltage or installing a different type of CRT tube, may result in a large amount of X-ray radiation being emitted. Devices modified in this way no longer comply with their licence and may not be used.
- You may set only those resolutions and refresh rates specified in the "Technical data" chapter. Otherwise you may damage your monitor. If you are in any doubt, contact your sales outlet or our Help Desk.
- Keep this operating manual together with your device. If you pass on the device to third parties, you should include this manual.
Cleaning
• Always pull out the power plug before you clean the monitor.
- Do not clean any interior parts yourself, leave this job to a service technician.
- Do not use any cleaning agents that contain abrasives or may corrode plastic.
- Ensure that no liquid will run into the system.
- Ensure that the ventilation areas of the monitor are free.
- When cleaning the surface of the screen, always use a soft, slightly damp cloth in order to avoid scratching the glass.
Wipe the monitor casing with a dry cloth. If the monitor is particularly dirty, use a cloth which has been moistened in mild domestic detergent and then carefully wrung out.
Transport
- When transporting the monitor ensure that it is not exposed to strong magnetic fields.
- Transport the monitor with care and only in its original packaging or another corresponding packaging fit to protect it against knocks and jolts.
- Above all, never drop the monitor. If the CRT is damaged, there is a risk of implosion!
X-ray radiation
This device complies with the German X-ray regulations (Röntgenverordnung - RöV). The local dosage emitted is less than 1 Sv/h (micro-Sievert per hour) at a distance of 0.1m.
Energy Star Guidelines

The Fujitsu Siemens colour monitor 177V is designed to conserve electricity by dropping to less than 8 W when it goes into suspend mode and to less than 5 W when it goes into OFF mode. With this new power management the 177V qualifies for the U.S. Environmental Protection Agency's (EPA) Energy Star Computers award.
The EPA estimates that computer equipment uses 5 percent of all business electricity and that this is growing rapidly. If all desktop computers and peripherals enter a low-power mode when not in use, the overall savings in electricity could amount to \$2 thousand million annually. These savings could also prevent the emission of 20 million tons of carbon dioxide into the atmosphere - the equivalent of 5 million automobiles.
As an Energy Star Partner, Fujitsu Siemens Computers GmbH has determined that this product meets the Energy Star guidelines for energy efficiency.
CE marking

The shipped version of this device complies with the requirements of the EEC directives 89/336/EEC "Electromagnetic compatibility" and 73/23/EEC "Low voltage directive".
FCC Class B Compliance Statement
The following statement applies to the products covered in this manual, unless otherwise specified herein. The statement for other products will appear in the accompanying documentation.
NOTE:
This equipment has been tested and found to comply with the limits for a "Class B" digital device, pursuant to Part 15 of the FCC rules and meets all requirements of the Canadian Interference-Causing Equipment Regulations. These limits are designed to provide reasonable protection against harmful interference in a residential installation. This equipment generates, uses and can radiate radio frequency energy and, if not installed and used in strict accordance with the instructions, may cause harmful interference to radio communications. However, there is no guarantee that interference will not occur in a particular installation.
If this equipment does cause harmful interference to radio or television reception, which can be determined by turning the equipment off and on, the user is encouraged to try to correct the interference by one or more of the following measures:
- Reorient or relocate the receiving antenna.
- Increase the separation between equipment and the receiver.
- Connect the equipment into an outlet on a circuit different from that to which the receiver is connected.
- Consult the dealer or an experienced radio/TV technician for help.
Fujitsu Siemens Computers GmbH is not responsible for any radio or television interference caused by unauthorised modifications of this equipment or the substitution or attachment of connecting cables and equipment other than those specified by Fujitsu Siemens Computers GmbH The correction of interference caused by such unauthorised modification, substitution or attachment will be the responsibility of the user.
The use of shielded I/O cables is required when connecting this equipment to any and all optional peripheral or host devices. Failure to do so may violate FCC rules.
Power cable
To guarantee safe operation, use the cable supplied. Use the following guidelines if it is necessary to replace the original cable set.
• The female/male receptacles of the cord set must meet CEE-22 requirements.
- The cable has to be HAR-certified or VDE-certified. The mark HAR or VDE will appear on the outer sheath or on the insulation of one of the inner conductors.
- For devices which are mounted on a desk or table, type SVT or SJT cable sets may be used. For devices which sit on the floor, only SJT type cable sets may be used.
- The cable set must be selected according to the rated current for your device.
Disposal and recycling
This device has been manufactured to the highest possible degree from materials which can be recycled or disposed of in a manner that is not environmentally damaging. The CRT contains no cadmium
The device may be taken back after use to be recycled, provided that it is returned in a condition that is the result of normal use. Any components not reclaimed will be disposed of in an environmentally acceptable manner.

We herewith declare that it will be possible to repair any device marked with the eco-label for at least 5 years after production of that device has discontinued.
If you have any questions on disposal, please contact your local office, our Help Desk, or:
Fujitsu Siemens Computers GmbH
Recyclingcenter
D-33106 Paderborn
Tel.: ++ 49 5251 - 818 010/ Fax: ++ 49 5251 - 818 015
Checking the contents of the consignment
▶ Unpack all the individual parts.
Remove any plastic caps from the plugs for the cables in the consignment.
▶ Check the delivery for damage incurred during transportation.
▶ Check whether the delivery agrees with the details in the delivery note.
The complete shipment comprises:
- one monitor with data cable
- one power cable
- one monitor base
- one Warranty Booklet
- this Operating Manual
Should you discover that the delivery does not correspond to the delivery note, notify your local sales outlet immediately.
It is recommended not to throw away the original packaging material. Keep it for future transportation.
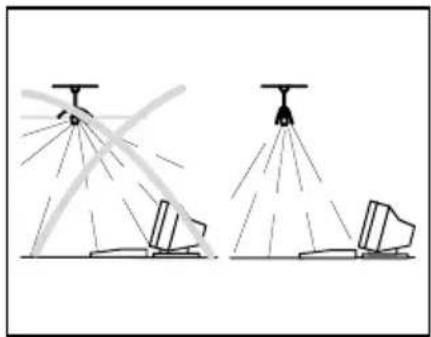
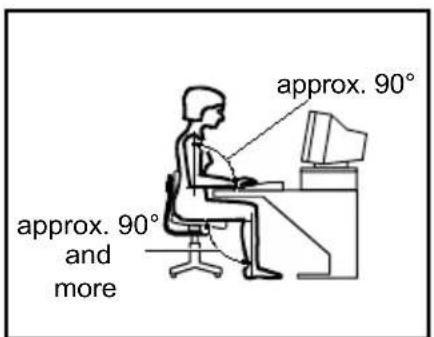
Installing an ergonomic video workstation
Before you set up your equipment, you should select a suitable position for working at the monitor. Please observe the following advice when installing a video workstation.

flowchart
graph TD
    A["Window"] --> B["1"]
    A --> C["2"]
    A --> D["3"]
    B --> E["4"]
    C --> F["5"]
    D --> G["6"]
    style A fill:#f9f,stroke:#333
    style B fill:#ccf,stroke:#333
    style C fill:#ccf,stroke:#333
    style D fill:#ccf,stroke:#333
Avoid direct and reflected glare. Avoid glare from electric lighting.
natural_image
Diagram showing two scenarios of spray sprinklers spraying water onto a surface, with no text or symbols present.void glare from electric lighting.
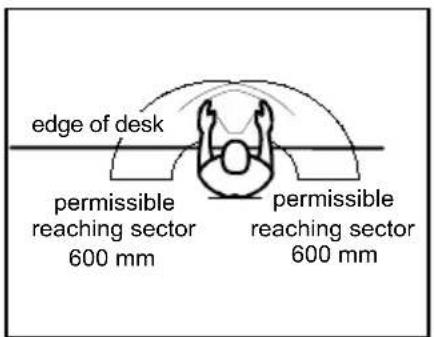
Position the keyboard where it is easiest to reach.
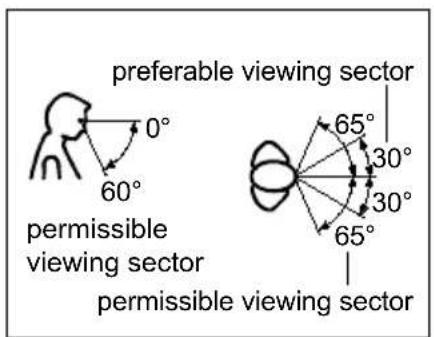
Position the monitor for optimum viewing. The viewing distance to the monitor should be approximately 50 cm.
natural_image
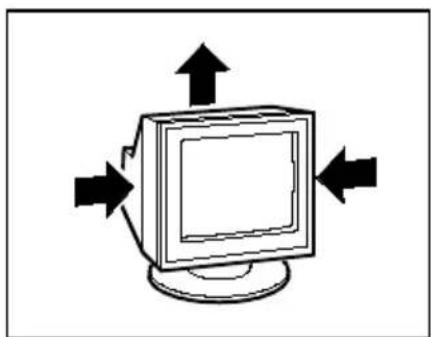
Simple line drawing of a computer monitor with directional arrows indicating orientation (no text or symbols)Keep ventilated areas clear. Remember to maintain correct posture.
Assembling the monitor base
Your monitor is shipped with a base which allows you to rotate and tilt the monitor to the best position.
Attach the base as follows:
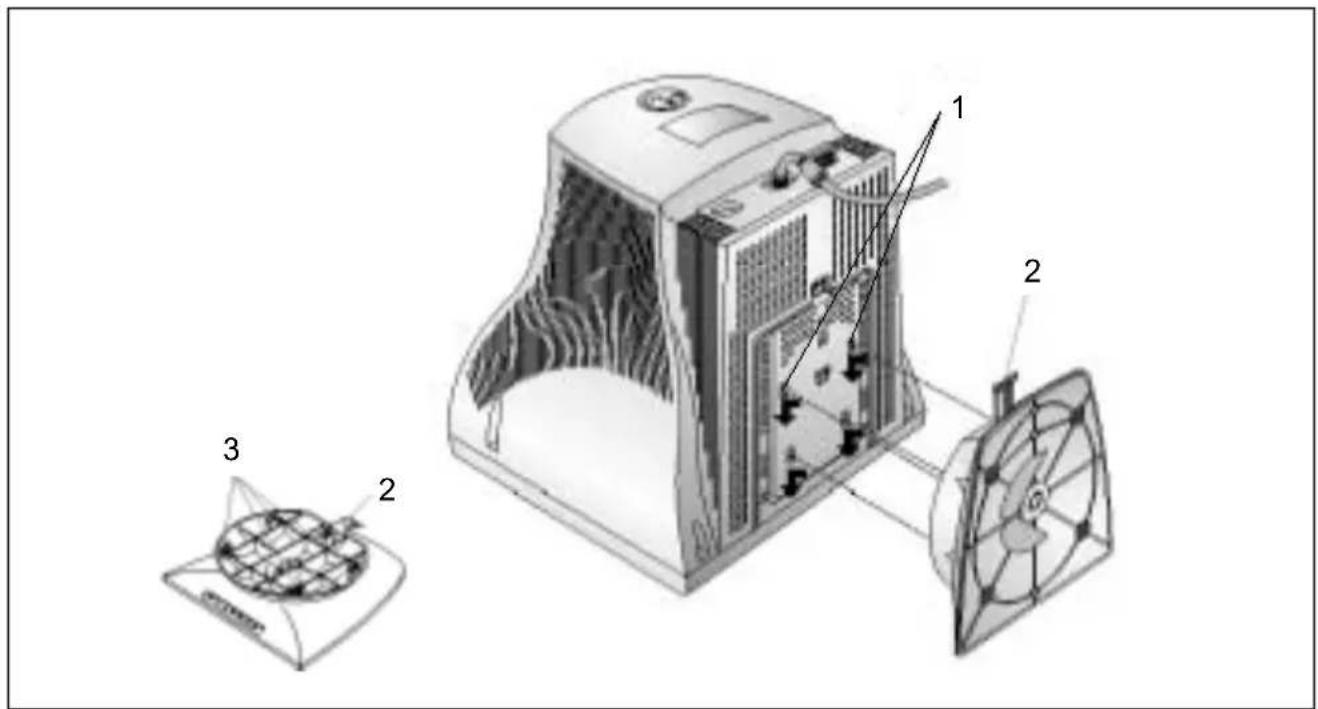
1 = Recesses
3 = Hooks
2 = Latch
▶ Lay the monitor with the display downwards on a soft surface.
▶ Fit the base so that its hooks (3) slot into the recesses on the monitor (1).
▶ Slide the base forward in the direction of the arrow until it clicks into position.
▶ Place the monitor in an upright position.
To ensure adequate ventilation the monitor may only be operated with the monitor foot installed.
Connecting the monitor
Information on the computer connections is contained in the operating manual for your computer.
Please note the information provided in the "Safety" section in the chapter "Important notes" at the beginning of this manual.
Do not cover the ventilation openings of the monitor.
If you are assembling monitors beside each other, there must be a minimum distance of 30 cm between monitors of the same constructional type, to avoid image distortion. With different monitors, the distance must be increased, if necessary.
natural_image
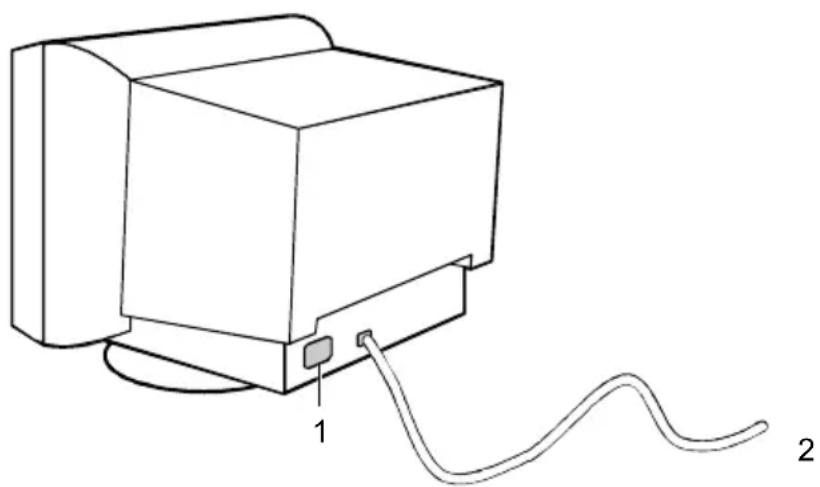
Line drawing of a computer monitor with a cable, labeled with components 1 and 2 (no text or symbols on the device itself)1 = Power connector
2 = Data cable
▶ Be sure that the monitor and the computer are switched off.
The computer power plug must be pulled out!
The data cable is permanently attached to the monitor. It has a 15-pin D-SUB connector for the monitor port of the computer.
Connect the 15-pin connector of the data cable to the (active) monitor port on the computer and secure the plug-in connection by tightening the safety screws.
If your computer has two monitor ports ("onboard" screen controller and separate graphics card), the monitor port for the separate graphics card is usually active.
▶ Plug the power cable supplied into the power connector of the monitor.
▶ Plug the power cable into the monitor connector at the rear of the computer.
▶ Plug the power connector of the computer into a properly grounded mains outlet.
When you start working with your monitor for the first time you should install the appropriate graphics drivers for your application software. Details of how to do this are provided in the documentation on your graphics card/the associated driver software.
Operation of the monitor
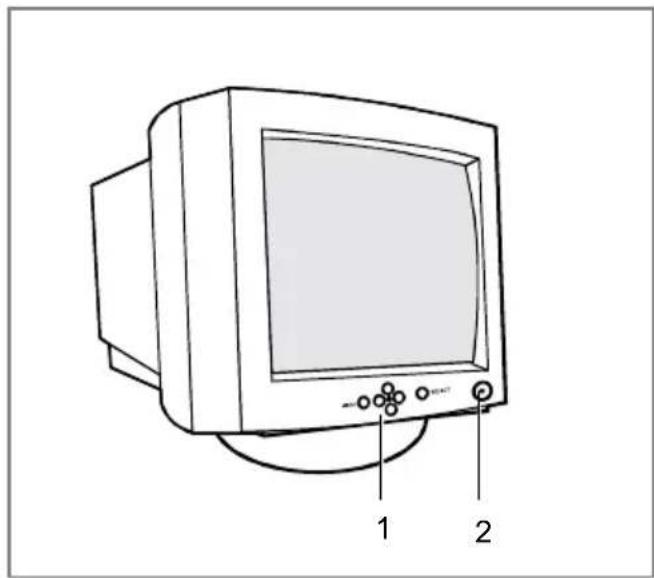
1 = Buttons for the OSD menu
(On-Screen-Display)
2 = ON/OFF switch with power indicator
Switching the monitor on
▶ Press the ON/OFF switch (2).
The power indicator lights up green when the computer is turned on.
If your computer has a power management function (energy-saving mode), you should read the "Notes on power management" of the monitor in this chapter.
When you start your system, several mode changes will usually be carried out when various programmes are called automatically (different settings for resolution and image refresh rate). Do not be confused by the unusual displays. They are not error messages.
Switching the monitor off
▶ Press the ON/OFF switch (2).
The power indicator is dark.
Notes on power management
If your computer is equipped with power management, the monitor can support this function fully. The monitor has a four-stage power management system.
| Stage ON STANDBY | MODE | SUSPEND MODE | OFF MODE | |
| Power indicator lights green glows amber | amber glows amber | glows amber | ||
| Function Monitor operating normally | Monitor is dark | Monitor is dark | Monitor is dark | |
| Power consumption | normal 74 W reduced to < 8 W reduced to < 8 W reduced to < 5 W | |||
If your computer detects inactivity (no input) it sends an appropriate signal to the monitor to reduce the power consumption. The power indicator of the monitor changes colour to indicate the status change.
If there is still no input, power consumption is further reduced (OFF mode).
Once an input is made at the computer the screen contents are redrawn and full power is restored.
The length of the individual stages is determined by the power management system of the computer. For detailed information on how energy-saving mode operates refer to the Operating Manual or Technical Manual of the computer.
The service life of your monitor will be extended if the OFF mode is switched to after 30 minutes at the earliest (setting in screen saver or in your computer's BIOS setup).
When the monitor is switched to OFF mode by the power management system a power consumption of up to 5 W is maintained to feed the circuit for redrawing the screen contents.
Changing the monitor settings using the OSD menu
You can use the buttons on the control panel to set the screen display via an integrated OSD menu (On-Screen-Display).
The OSD menu is available in different languages. The English menu names are used in the following description (default setting). The language can be set in the OSD menu (LANGUAGE).
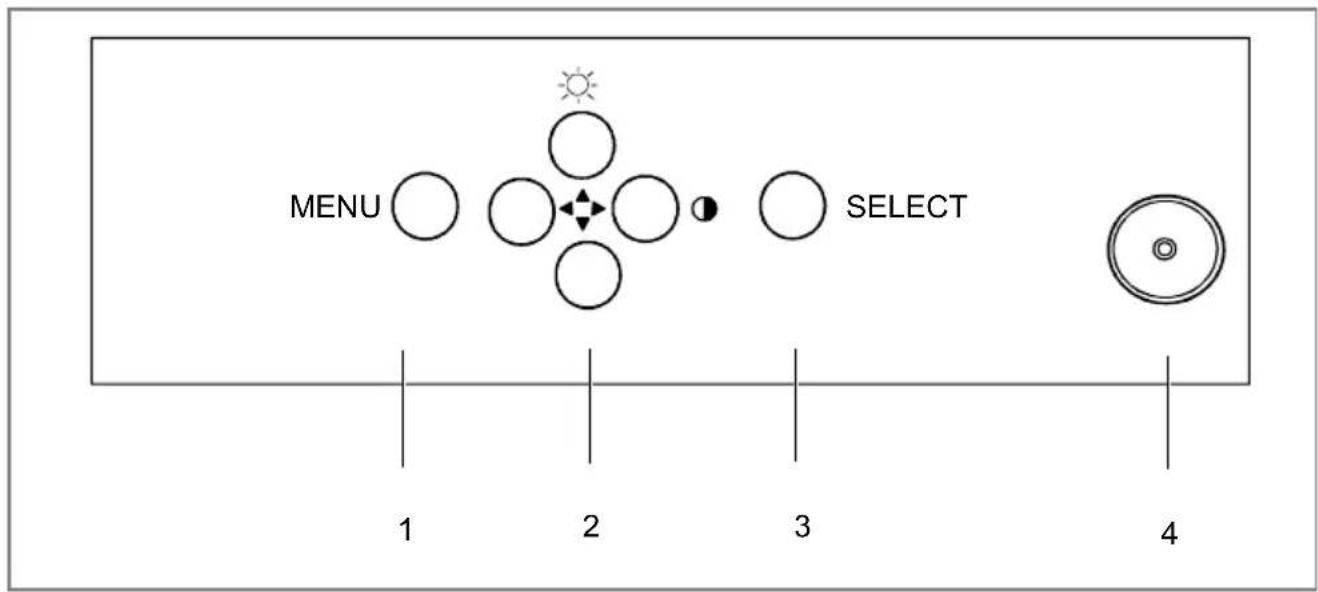
1 = MENU button
3 = SELECT button
2 = Arrow buttons
4 = ON/OFF switch with power indicator
MENU button The MENU button switches the OSD menu on and off.
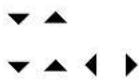
With the buttons ▼ or ▲ you mark the icon for a function. You make the settings for the selected function with the arrow keys ▼, ▲, ◀ or ▶ respectively shown in the OSD menu.
If the OSD menu is not displayed, you can use the ▲ and ▶ keys to directly call the setting windows for making brightness and contrast settings, and then use the ◀ or ▶ keys to make the actual settings.
SELECT button The SELECT button activates the selected function and adopts the settings.
To make a setting, perform the following steps:
▶ Press the MENU button to activate the OSD menu.
The main menu appears on the screen with icons for the setting functions. The last icon set is marked (in this case BRIGHTNESS CONTRAST).
▶ If necessary, use the ▼ or ▲ button to mark another icon, e.g. SHAP.
▶ Press the SELECT button to activate the selected function.
Depending on what function is involved (here: SHAPE), further icons are offered.
▶ If necessary, press the ▼ or ▲ button to mark another icon.
▶ Use the ◀ or ▶ button to make the desired setting.
▶ Press the SELECT button to keep the settings.
All modifications are automatically stored if no button is pressed for several seconds or if the OSD menu is switched off using the MENU button.
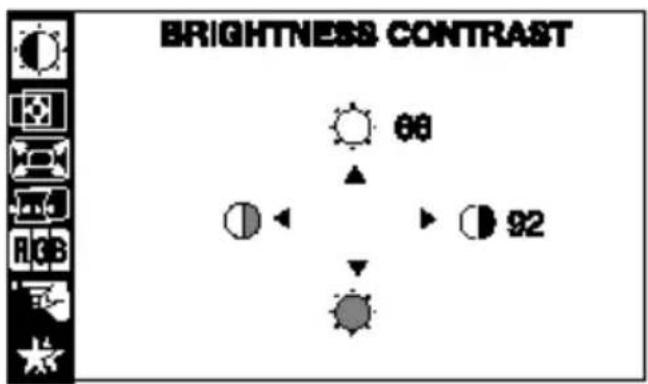
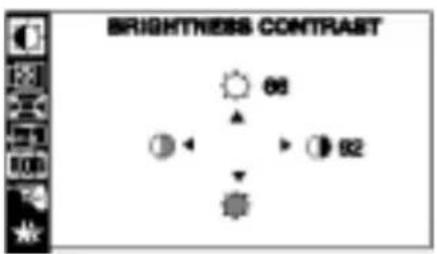
Adjusting the brightness and contrast
You will increase the life of your screen if you adjust the contrast and brightness to medium.
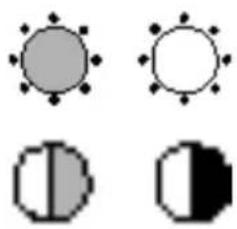
natural_image
Four pixelated icons: sun, sun with rays, half shaded circle, and half solid black circle (no text or symbols)Setting the brightness of the background
Setting the contrast between the foreground and background
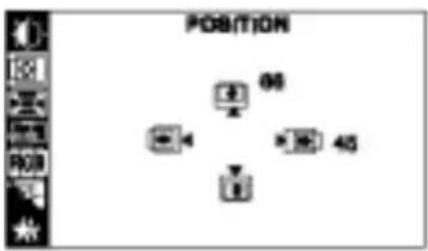
Adjusting size and position
flowchart
graph TD
    A["Down Arrow"] --> B["Up Arrow"]
    C["Left Arrow"] --> D["Right Arrow"]
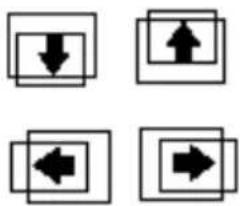
Shifting the picture down or up
Shifting the picture to the left or to the right
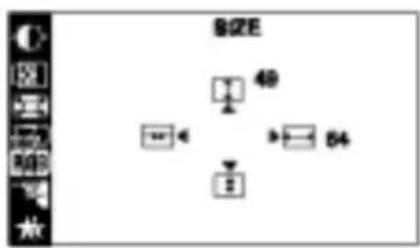
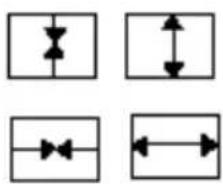
natural_image
Four identical rectangular diagrams with arrow symbols, no text or labels presentMaking the picture shorter or longer
Making the picture narrower or wider
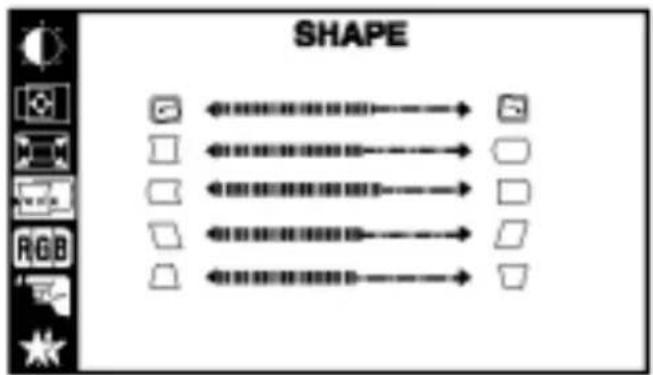
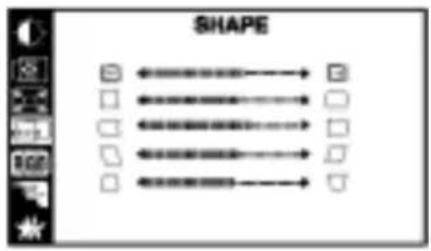
Making picture corrections
Pincushion distortion is when the sides of the screen display are bent inward or outward. Unsymmetrical pin balance is when the sides of the screen displays are bent inward or outward on one side.
Trapezoid distortion is when the top or bottom of the screen display is too wide or too narrow. Parallelogram distortion means that the sides of the picture bend to the left or right. Tilt distortion must be set when the screen display is not axially symmetrical.
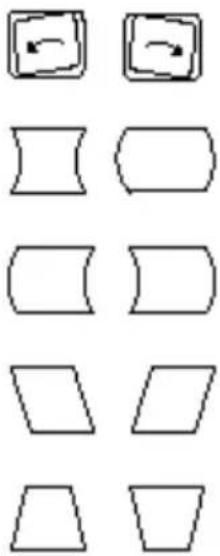
natural_image
Grid of geometric shapes including rectangles, curved polygons, and trapezoids with no text or symbolsPicture rotation: Rotating the picture in a clockwise or counter-clockwise direction
Pincushion distortion: Bending the right and left side inward or outward
Non-symmetrical pincushion distortion: Setting the sides so that they are symmetrical
Parallelogram distortion: Reducing the angle of the left and right sides
Trapezoid distortion: Making the bottom edge narrower and the top edge wider or making the top edge narrower and the bottom edge wider
Adjusting the colours
The "warmth" of the screen colours is set using the colour temperature. The monitor has two fixed colour temperatures (K = Kelvin).
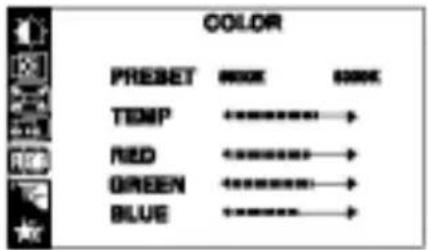
PRESET Select one of the preset colour temperatures (6500K = more red, 9300K = more blue)
TEMP Use the setting scale to set a different colour temperature
RED Use the setting scale to set different amounts for red, green and blue.
GREEN BLUE
Setting advanced options
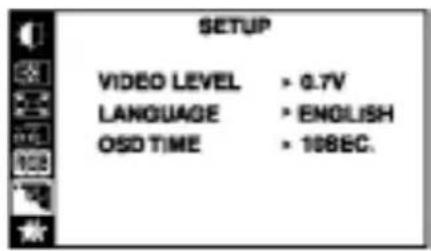
VIDEO LEVEL Setting the video signal
If required, the entry level of the video signal can be changed from 0.7 V (default) to 1 V. If the monitor is operated on a PC, use the default setting.
LANGUAGE Setting language for the OSD menu
OSD TIME Setting display time for the OSD menu
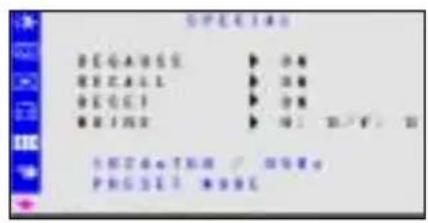
DEGAUSS Degaussing the screen
When colour shifts occur in the screen display due to the influence of magnetic fields (e.g. after transporting or turning the screen), the screen must be degaussed.
Do not use the feature more than once within a 30-minute period.
RECALL Activating the factory settings for picture geometry
RESET Activating the factory settings for colours
MOIRE Setting or disabling the vertical moiré reduction (0 = disabled).
If the picture you see on screen has light and dark stripes or appears dull and blurred, this may be due to what is known as the moiré effect. This effect usually has physical causes, being triggered by interference between the pixels in the matrix and the video signal. The intensity of the moiré effect is dependent on the screen resolution and horizontal frequency.
Notes on ergonomic colour adjustment
If you select colours for the display in your application programmes, take note of the information below.
The primary colours blue and red on a dark background do not produce the minimum required contrast of 3:1 and are therefore not suitable for continuous text and data entry.
When using several colours for characters and background and giving the primary colours full modulation, you can obtain very suitable colour combinations (see the following table):
| Background | Characters | |||||||
| black white purple blue cyan green yellow red | ||||||||
| black++ | - + + + - | |||||||
| w | h i | t | e | + | + | + | ||
| p | u r | p | l | e | + | + | - | |
| blue-+ | - | + | -+- | |||||
| cyan | +--+ | -- -- | ||||||
| green | +-- | +- | -- | |||||
| yellow+ | -+ | +- | - | + | ||||
| r | e d | - | + | - | - | - | - | |
+ Colour combination very suitable; light background colours are only suitable for devices which are operated with a refresh rate of at least 75 Hz.
- Colour combination not suitable because colour locations are too close together, thin characters are not identifiable or rigorous focusing is demanded of the human eye.
Technical data
Dimensions and weight
| CRT: | 43 cm (17") |
| Visible diagonals: | 40.6 cm |
| Dot pitch: | 0.27 mm |
| Maximal resolution: | 1280 x 1024 pixels |
| Dimensions (W x H x D): | 400 mm x 395 mm x 420 mm |
| Weight: | 14.4 kg |
| Accessories: | Power cable (1.5 m) |
| Storable display modes: | 25 (10 of which are preset) |
Electrical data
| Video: | analogue, positive, 0.7 Vpp, 75 Ohm |
| Synchronisation: | TTL |
| Horizontal frequency: | 30 kHz .... 72 kHz (multi-scanning) |
| Refresh rate: | 50 Hz .... 160 Hz |
| Maximum pixel rate: | 110 MHz |
| Power supply: | 220 V - 240 V ±10 %, 60 Hz/50 Hz ±3 Hz,<1.5 A |
| Power consumption (see power management): | < 74 W (ON, Normal mode)< 8 W (Standby mode)< 8 W (Suspend mode)< 5 W (OFF mode) |
Environmental conditions
| Environment class 3K2, IEC 721 | |
| Rated range of operation: | 10 °C .... 40 °C |
| Humidity: | 10 % .... 90 % |
| Limit range of operation: | 0 °C .... 60 °C |
| Humidity: | 5 % .... 90 % |
Condensation must be avoided.
VESA-DDC-compatible VGA interface
Your monitor is equipped with a VESA-DDC-compatible VGA interface. VESA-DDC (Video Electronics Standard Association, Display Data Channel) is used as the communications interface between the monitor and the computer. If your computer is equipped with a VESA-DDC-compatible VGA interface, it can automatically read the data for ensuring optimum operation from your monitor and select the appropriate settings.
If the monitor 177V is not yet displayed in the list of monitors, you can select one of the following monitors instead:
Fujitsu Siemens, Siemens or Siemens Nixdorf MCM 1753, MCM 1755, 171V, 173V, 174V, 175V, 176V, 17F1, 171E
Preset operating modes
i
The picture position and size have been set to optimum values at the factory for the operating modes listed above. Depending on the screen controller used, it may be necessary to adjust the display position and size. In this case, you can change and save the settings (see "Changing the monitor settings using the OSD menu").
| Horizontal frequency Refresh rate Screen resolution | ||
| 31.47 kHz ±0.5 kHz | 70 Hz ± 2 Hz | 720 x 400 |
| 31.47 kHz ±0.5 kHz | 60 Hz ± 2 Hz | 640 x 480 |
| 37.50 kHz ±0.5 kHz | 75 Hz ± 2 Hz | 640 x 480 |
| 43.27 kHz ±0.5 kHz | 85 Hz ± 2 Hz | 640 x 480 |
| 46.88 kHz ±0.5 kHz | 75 Hz ± 2 Hz | 800 x 600 |
| 53.68 kHz ±0.5 kHz | 85 Hz ± 2 Hz | 800 x 600 |
| 60.02 kHz ±0.5 kHz | 75 Hz ± 2 Hz | 1024 x 768 |
| 63.98 kHz ±0.5 kHz | 60 Hz ± 2 Hz | 1280 x 1024 |
| 68.68 kHz ±0.5 kHz | 85 Hz ± 2 Hz | 1024 x 768 |
For ergonomic reasons we recommend a refresh rate of at least 75 Hz and a maximum resolution of 1024 x 768 pixels.
Pin assignment D-SUB
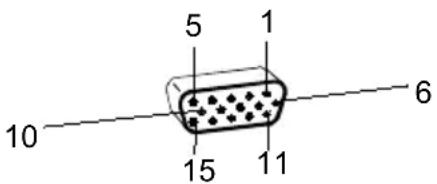
| Pin Meaning Pin Meaning | |
| 1 Video input red 9 not assigned | |
| 2 Video input green 10 Logic ground | |
| 3 Video input blue 11 not assigned | |
| 4 | not assigned |
| 5 | DDC Return |
| 6 Red video ground 14 | |
| 7 | Green video ground |
| 8 | Blue video ground |
| 12 | DDC data (SDA) |
| 13 | H. sync |
| ync | |
| 15 | DDC Clock(SCL) |
Tilting and turning area
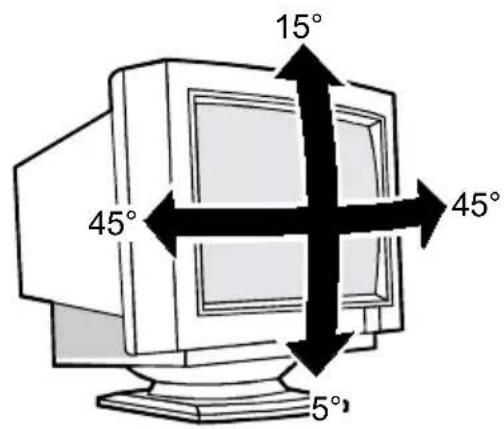
The specified tilting area refers to the zero position of the monitor foot marked with an arrow.
Trouble shooting
Should an error occur, first check the following points. If the distortion is still not eliminated, the monitor should, if possible, be checked on another computer.
If you are unable to solve the problem, please inform our Help Desk.
The display is too small or not centred
The monitor recognises an undefined mode.
Adjust the picture size, position and edges (see "Operation of the monitor").
Colour displacements
▶ Degauss the monitor (see "Operation of the monitor").
▶ Ensure that there are no devices or objects near the monitor which generate magnetic fields (e.g. loudspeakers, plug-in power supply units).
Flickering picture
Set an ergonomic refresh rate ( ≥ 75 Hz) using the computer software (see documentation for your computer or your graphics card).
▶ Ensure that the monitor is kept at a distance of at least 30 cm from other monitors of the same construction type. With different monitors, the distance must be increased, if necessary.
No display (power indicator does not light)
▶ Check whether the monitor is switched on.
▶ Check whether the power cable on the monitor is connected correctly.
▶ Check whether the computer is switched on.
No display (power indicator lights)
▶ Check whether the computer is switched on.
▶ Check whether the data cable for the monitor is correctly attached to the monitor port on the computer.
▶ Check whether the monitor connection of the computer used is active.
▶ Press any key on the computer keyboard – the computer may be in energy saving mode.
▶ Change the brightness and/or the contrast; the monitor may be adjusted to the maximum dark setting.
Error messages on the screen
OUT OF FREQUENCY
The input signal (horizontal frequency and refresh rate) does not correspond to the technical monitor data.
▶ Adjust the video frequency range using the computer software (see documentation for your computer or your graphics card).
SELF DIAGNOSTICS
CHECK SIGNAL CABLE
The monitor does not recognise an input signal.
▶ Check whether the computer is switched on.
▶ Check whether the power cable on the computer is connected to a mains outlet with earthing contact.

- Sie haben ...
- 177V
- Farbbildschirm
- Colour monitor
- Moniteur couleur
- Monitor de color
- Monitor a colori
- Färgskärm
- Kleurenbeeldscherm
- Farvebilledskærm
- Contents
- Introduction
- Target group
- Further information
- Notational conventions
- Important notes
- Safety
- Cleaning
- Transport
- X-ray radiation
- Energy Star Guidelines
- CE marking
- FCC Class B Compliance Statement
- NOTE:
- Power cable
- Disposal and recycling
- Checking the contents of the consignment
- Installing an ergonomic video workstation
- Assembling the monitor base
- Connecting the monitor
- Operation of the monitor
- Switching the monitor on
- Switching the monitor off
- Notes on power management
- Changing the monitor settings using the OSD menu
- Adjusting the brightness and contrast
- Adjusting size and position
- Making picture corrections
- Adjusting the colours
- Setting advanced options
- VIDEO LEVEL Setting the video signal
- LANGUAGE Setting language for the OSD menu
- DEGAUSS Degaussing the screen
- Notes on ergonomic colour adjustment
- Technical data
- VESA-DDC-compatible VGA interface
- Preset operating modes
- Pin assignment D-SUB
- Tilting and turning area
- Trouble shooting
- The display is too small or not centred
- Colour displacements
- Flickering picture
- No display (power indicator does not light)
- No display (power indicator lights)
- Error messages on the screen
- OUT OF FREQUENCY
- SELF DIAGNOSTICS
- CHECK SIGNAL CABLE
Brand : FUJITSU
Model : 177V
Category : Screen