CAMEDIA E-1 - Digital Camera OLYMPUS - Free user manual and instructions
Find the device manual for free CAMEDIA E-1 OLYMPUS in PDF.

| Product type | Digital single-lens reflex camera |
| Brand | Olympus |
| Model | CAMEDIA E-1 |
| Image sensor | Primary color transfer CCD type 4/3, 5.5 million total pixels, 5.0 million effective pixels, size 17.3 x 13.0 mm |
| Lens | Four Thirds mount, interchangeable Zuiko Digital lenses |
| Viewfinder | Single-lens reflex viewfinder, 100% coverage, 0.96x magnification, diopter adjustment -3 to +1 m^-1 |
| LCD screen | 1.8" TFT color LCD, 134,000 pixels |
| Shutter | Focal plane, 1/4000 to 60 s, bulb up to 8 min |
| Focus | Automatic (AF) by contrast/phase detection, 3 points (left, center, right), manual (MF) |
| Exposure modes | Program (P), Aperture priority (A), Shutter priority (S), Manual (M) |
| ISO sensitivity | 100 to 800, expandable to 1600 and 3200 (ISO Boost) |
| White balance | Auto, 12 presets, 4 custom memories |
| Recording media | CompactFlash card (Type I/II) or Microdrive, FAT 32 compatible |
| Image formats | RAW (12-bit), TIFF, JPEG (SHQ, HQ, SQ) |
| Connectivity | USB (mini-B), IEEE 1394, video out, DC input, remote connector, external flash |
| Power source | Lithium-ion battery BLM-1 (rechargeable with BCM-1 charger), optional AC adapter AC-1 |
| Dimensions (W x H x D) | 141 x 104 x 81 mm (without protruding parts) |
| Weight | Approx. 660 g (without battery and card) |
| Protection | Dustproof and splashproof system, ultrasonic dust reduction filter |
| Maintenance | Built-in Pixel Mapping and dust reduction, CCD cleaning mode |
| Operating temperature | 0 to 40°C (operation), -20 to 60°C (storage) |
Frequently Asked Questions - CAMEDIA E-1 OLYMPUS
User questions about CAMEDIA E-1 OLYMPUS
0 question about this device. Answer the ones you know or ask your own.
Ask a new question about this device
Download the instructions for your Digital Camera in PDF format for free! Find your manual CAMEDIA E-1 - OLYMPUS and take your electronic device back in hand. On this page are published all the documents necessary for the use of your device. CAMEDIA E-1 by OLYMPUS.
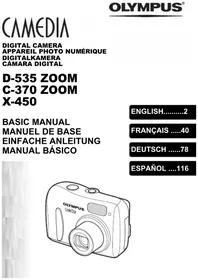
USER MANUAL CAMEDIA E-1 OLYMPUS
DIGITAL CAMERA APPAREIL PHOTO NUMÉIQUE DIGITALKAMERA CÁMARA DIGITAL
3-1
natural_image
Line drawing of a Olympus DSLR camera with lens and control buttons (no text or symbols on body)OLYMPUS
ENGLISH
FRANÇAIS
DEUTSCH
ESPAÑOL
BASIC MANUAL 2-45
■ For more details on connecting the camera to a PC and installing the provided software, refer to the camera “Reference Manual” on the CD-ROM enclosed in the camera package.
MANUEL DE BASE.... 46 – 89
■ Before using your camera, read this manual carefully to ensure correct use.
■ We recommend that you take test shots to get accustomed to your camera before taking important photographs.
■ In the interest of continually improving products, Olympus reserves the right to update or modify information contained in this manual.
CONTENTS
Getting started 4
Buttons & menus 14
How to operate the buttons and dials ....14
Types of buttons....5
How to use the menus 19
List of menu functions....21
Shooting 24
Auto focus (AF) 24
AF frame selection 24
Focus mode....25
Exposure mode 26
Preview function 28
Exposure compensation 28
Metering mode 28
AE lock....29
AE bracketing 29
Drive mode 29
Record mode....30
ISO sensitivity 30
Setting the white balance 30
Setting the one-touch white balance 31
Optional electronic flashes 31
Playback 32
Single-frame playback....32
Close-up playback/Index display 33
Protecting pictures 34
Single-frame erase 34
Erasing selected frames 34
All-frame erase 35
Formatting cards 35
Print reservation 36
Transferring images to a computer 37
Error codes 39
Maintenance 41
Specifications 42
These instructions are only for quick reference. For more details on the camera functions described in this manual, refer to the camera Reference Manual on the CD-ROM enclosed in the camera package.
For customers in North and South America
For customers in USA
Declaration of Conformity
Model Number : E-1
Trade Name : OLYMPUS
Responsible Party : Olympus America Inc.
Address : 2 Corporate Center Drive, Melville, New York 11747-3157 U.S.A.
Telephone Number : 631-844-5000
Tested To Comply With FCC Standards
FOR HOME OR OFFICE USE
This device complies with Part 15 of the FCC rules. Operation is subject to the following two conditions:
(1) This device may not cause harmful interference.
(2) This device must accept any interference received, including interference that may cause undesired operation.
For customers in Canada
This Class B digital apparatus meets all requirements of the Canadian Interference-Causing Equipment Regulations.
For customers in Europe

“CE” mark indicates that this product complies with the European requirements for safety, health, environment and customer protection. “CE” mark cameras are intended for sales in Europe.
Trademarks
- IBM is a registered trademark of International Business Machines Corporation.
- Microsoft and Windows are registered trademarks of Microsoft Corporation.
• Macintosh is a trademark of Apple Computer Inc. - CompactFlash and CF are trademark of San Disk Inc.
- All other company and product names are registered trademarks and/or trademarks of their respective owners.
- The standards for camera file systems referred to in this manual are the “Design Rule for Camera File System/DCF” standards stipulated by the Japan Electronics and Information Technology Industries Association (JEITA).
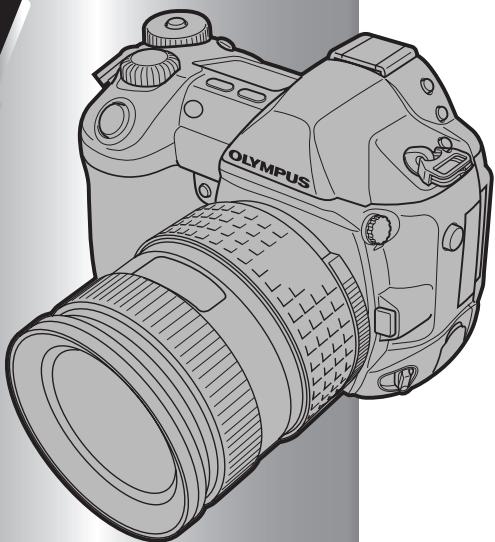
Getting Started
En
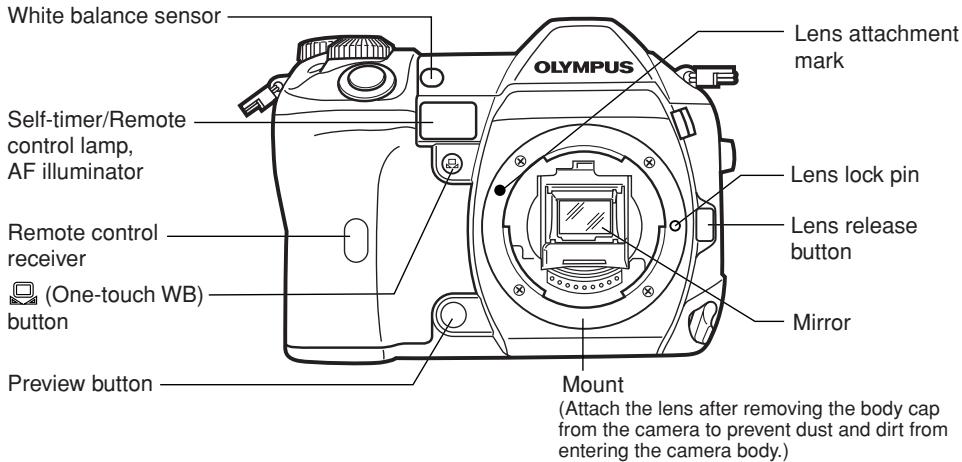
Names of parts
Camera
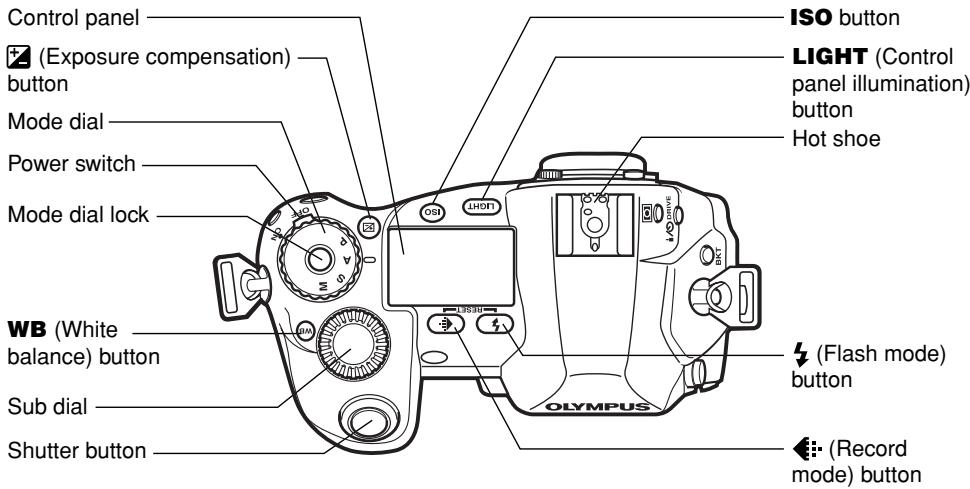
![Diopter adjustment dial Eyepiece shutter lever Strap eyelet Viewfinder Monitor (A monitor cover is attached.) INFO (Information display) button (Protect) button (Erase) button Main dial AEL button Card access lamp [...] (AF frame selection) button ▶ (Playback mode) button Menu) button Card cover lock OK button Arrow pad](/content/2019/11/84648/images/526274a2befdf8ee6f993a088de94e0a9d1c582beb820ea5e95af413ff1ee725.jpg)
En
En
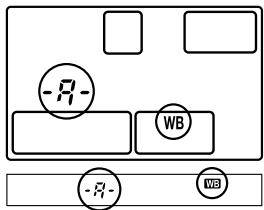
Control panel indications
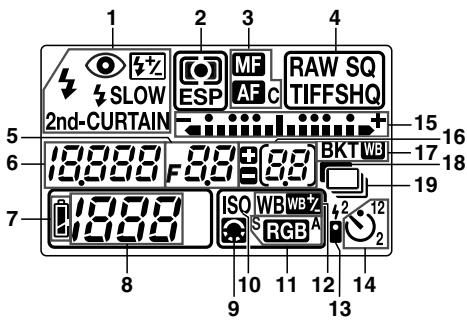
1 Flash mode
2 Metering mode
3 Focus mode
4 Record mode
5 Aperture value
6 Shutter speed
Viewfinder indications
7 Battery check
8 Number of storable still pictures
9 Image quality adjustment
10 ISO
11 Color space
12 White balance
13 Remote control
14 Self-timer
15 Exposure level indicator
Exposure compensation indicator
AF frame
16 Number of storable sequential pictures
Exposure compensation value indication [appears only when the ☑ (exposure compensation) button has been pressed]
17 Auto bracket
18 Noise reduction
19 Sequential shooting
1 AF frame
2 Super FP flash
3 AF lock
4 AE lock
5 Shutter speed
6 Aperture value
7 Exposure mode
8 Auto bracket
9 White balance
10 Flash
11 AF confirmation mark
12 AF frame
13 Metering mode
14 Exposure level indicator
Exposure compensation indicator
15 Number of storable sequential pictures
Exposure compensation value indication [appears only when the ☑ (exposure compensation) button has been pressed]
Monitor indications (only for playback)
En
You can switch the monitor display using the INFO (information display) button and dials.
![1 2 3 4 -SQ [10.24x768 , 1/8] 5 -'03.01.01 00:00 6 FILE:123-3456](/content/2019/11/84648/images/9173324e05e130c9501892ff11ca57d5591dda255c2ee024beddc7152f0d8def.jpg)
Single-frame playback information
Shooting information
1 Battery check
2 Print reservation
Number of prints
3 Protect
4 Record mode
5 Date and time
6 File number
7 Exposure mode
8 Metering mode
9 ISO sensitivity
10 Color space/Saturation
11 Focal length
12 Shutter speed
13 Aperture value
14 Exposure compensation
15 Flash intensity control
16 White balance
17 White balance compensation
18 Contrast
19 Sharpness
Battery check indication
When the camera is turned on or if the battery runs out while the camera is being operated, the battery check indication changes on the monitor and control panel as follows:
| Battery check | Control panel | Monitor | Viewfinder indications | Remaining power level* |
| Lights | Lights (green) | — | High | |
| Blinks | Lights (red) | Number of storable sequential pictures blinks | Low. Re-charge the battery at once. | |
| No indication | Turns off | Turns off | Turns off | Depleted. Replace the battery with a charged battery. |
* The digital camera's power consumption varies greatly depending on usage and operating conditions. Under some operating conditions, the camera may turn off without warning that battery power is low. If this occurs, re-charge the battery.
En
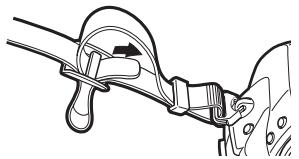
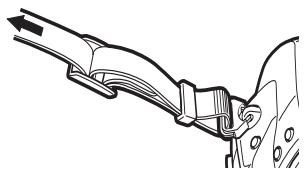
Attaching the strap
1
Strap eyelet
2
3
natural_image
Diagram of a car suspension system with rope and belt (no text or labels)4
natural_image
Technical line drawing of a mechanical assembly with no visible text or symbolsCharging the battery
This camera uses an Olympus lithium ion battery (BLM-1). Never use any other type of battery.
The battery is not fully charged when purchased. Before use, be sure to charge the battery with the specified provided charger (BCM-1).
Note
- Never use a charger other than the one specified. (For details, refer to the charger's manual.)
1
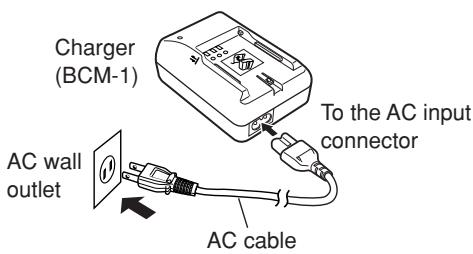
2
Lithium ion battery
3
Hold the battery with its terminals facing the charger and align the battery with the guideline ( | ) on the charger as shown in the illustration. Slide the battery into the charger.
- Charging starts. The battery will be fully recharged in about 2 hours.
- Charging indicator
Red: Charging, Green: Charging completed, Blinking red: Charging error (time-out, temperature error)
Charging indicator
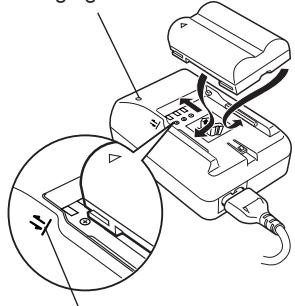
Align the battery with this guideline.
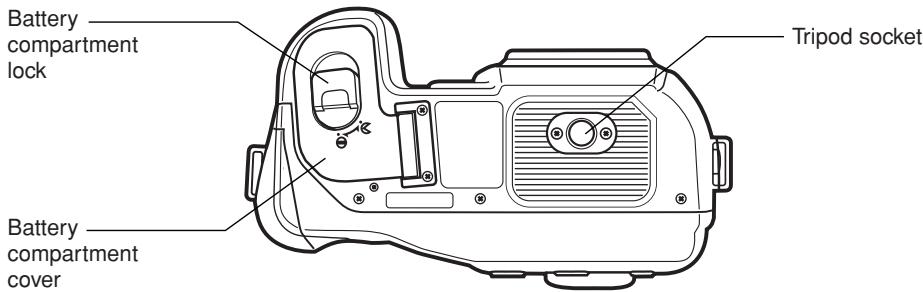
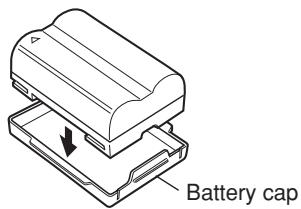
Loading the battery
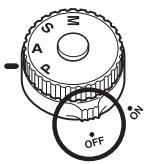
1 Make sure that the camera's power switch is set to OFF.
3 Load the battery as shown in the illustration.
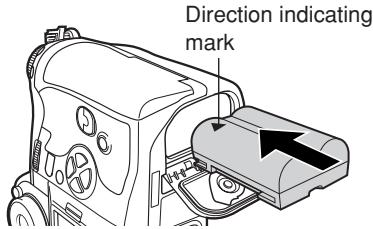
2 Turn the battery compartment lock to and open the battery compartment cover.
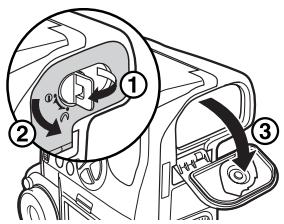
4 Close the battery compartment cover and turn the battery compartment lock to ⊖.
Battery compartment cover
When using the optional power battery holder, remove the battery compartment cover by sliding the pin in the direction of the arrow.
Battery compartment cover detaching pin
AC adapter
The optional AC adapter (AC-1) lets you use the camera without worrying about remaining battery power. The AC adapter is useful for time-consuming tasks such as shooting for a long period or downloading images to a personal computer.
Power Battery Holder Set
The optional Power Battery Holder Set (SHLD-2) allows you to use the camera for a long period. For details about attaching the battery holder to the camera, refer to the power battery holder manual.
En
Attaching a lens to the camera
Select the lens that you want to shoot with.
Use a specified Four Thirds lens. When a non-specified lens is used, AF (auto focus) and light metering will not function correctly. In some cases, other functions may not work either.
Note
- When you attach or remove the body cap and lens from the camera, keep the lens mount on the camera pointed downward. This helps prevent dust and other foreign matter from getting inside the camera.
- Do not point the lens attached to the camera toward the sun. This may cause the camera to malfunction or even ignite due to the magnifying effect of sunlight focusing through the lens.
- Do not remove the body cap or attach the lens in dusty places.
- Be careful not to lose the body cap and lens cap.
- Attach the body cap to the camera to prevent dust from getting inside when no lens is attached.
■ Attaching the lens to the camera
1 Make sure the power switch is set to OFF.
2 Remove the body cap from the camera.

3 Remove the rear cap from the lens.
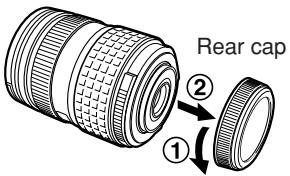
4 Align the lens attachment mark (red) on the camera with the alignment mark (red) on the lens, then insert the lens into the camera's body. Rotate the lens clockwise until you hear it click.
5 Remove the lens cap.
■ Removing the lens from the camera
1 Make sure the power switch is set to OFF.
2 While pressing the lens release button, remove the lens from the camera by rotating it counterclockwise.
Lens attachment mark (Red)
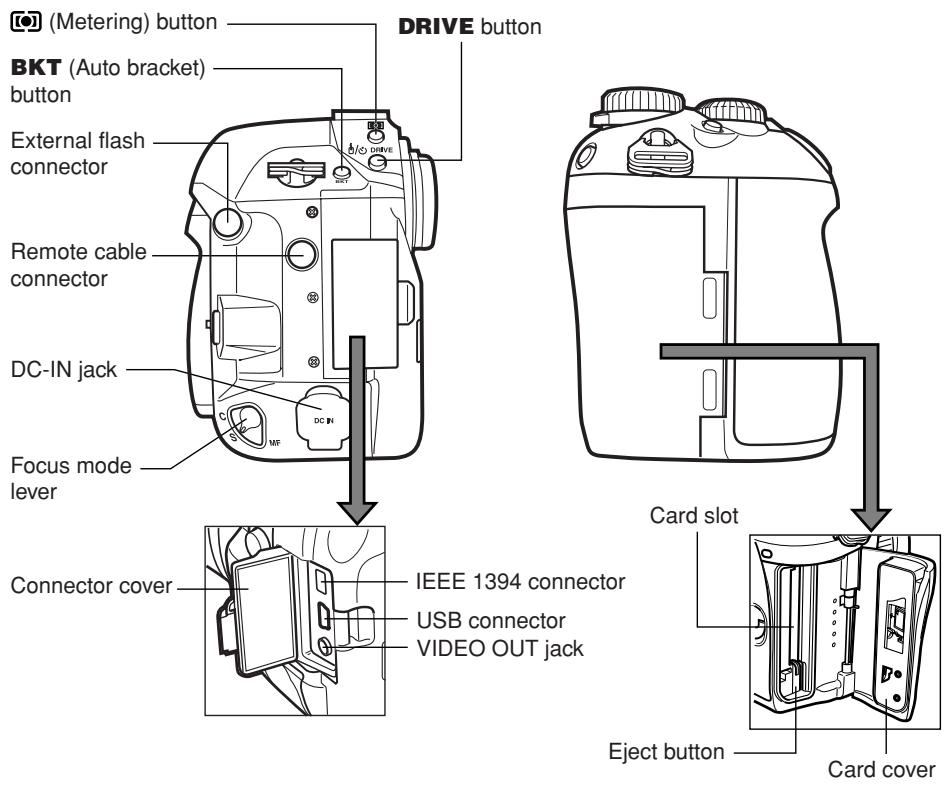
How to insert/remove the card
“Card” in this manual refers to a recording medium. This camera can use a Compact Flash or Microdrive (optional). You can also use xD-Picture Card with a card adapter (optional).
Compact Flash
A Compact Flash is a large-capacity solid state flash memory card. You can use commercially available cards.
Microdrive
A Microdrive is a medium that uses a large-capacity compact hard disk drive. You can use a Microdrive that supports CF+Type II (Compact Flash extension standard).
natural_image
Isometric line drawing of a rectangular electronic device with a central screen and a small slot, no text or symbols present.
natural_image
Isometric line drawing of a square mechanical component with mounting holes and a triangular feature (no text or symbols)■ Inserting the card
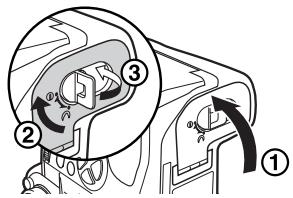
1 Turn the card cover lock in the direction of the arrow and open the card cover.
Card cover lock
2 Insert the card fully with the ◀ mark side facing toward the monitor side (the camera's rear side) as illustrated.
Getting Started
En
3 Close the card cover.
- When the eject button is projecting, push it back in.
Eject button
natural_image
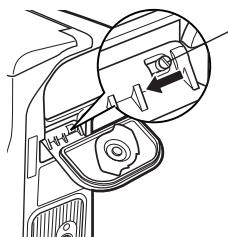
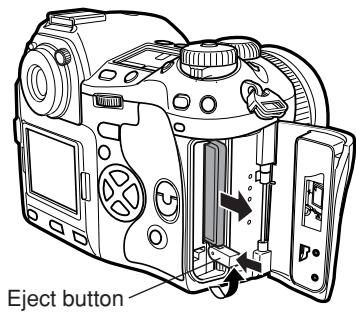
Line drawing of a DSLR camera with internal components and a close-up inset showing the lens (no text or symbols)■ Removing the card
1 Make sure that the card access lamp is not illuminated.
2 Open the card cover.
3 Raise the eject button.
4 Press the eject button gently.
- The card comes out.
- If you press the eject button too hard, the card may jump out of the camera.
- Pull out the card.
5 Place the eject button on its side.

natural_image
Line drawing of a DSLR camera with external adjustment knobs and control buttons (no text or symbols)6 Close the card cover.
natural_image
Line drawing of a DSLR camera with control panel and display (no text or symbols)En
Power ON/OFF
Power ON : Set the power switch to ON.
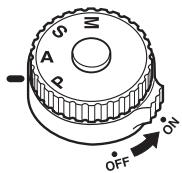
Power OFF : Set the power switch to OFF.

Date/time setting
Images will be stored with date/time data. 📋 "Buttons and menus"
Selecting a language
You can select the language for on-screen displays. This reference manual shows the English on-screen displays in illustrations and explanations. Available languages vary depending on the area where you purchased the camera. “Buttons and menus”
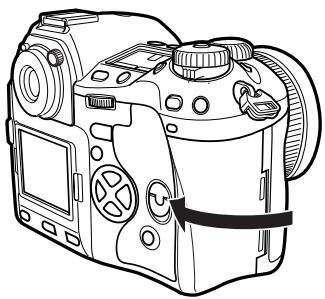
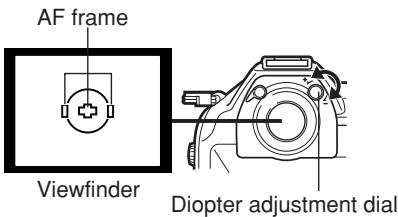
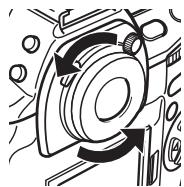
Adjusting the viewfinder's diopter
While looking though the viewfinder, rotate the diopter adjustment dial little by little to the right or the left.
When you can see the AF frame clearly, adjustment is complete.
Eyecup
You can also use the optional eyecup to see the viewfinder clearly. The camera is equipped with a standard eyecup. Remove this eyecup from the camera to attach the optional eyecup. To remove the eyecup, turn it as illustrated.
natural_image
Mechanical component diagram showing rotational arrows and circular components (no text or symbols)Removing the eyecup
Buttons and menus
En
This camera has a variety of functions to make optimal settings for various shooting conditions. You can set the function settings using the buttons, dials, or menu.
Functions available using the : Change camera settings with the buttons and main buttons dial or sub dial, while referring to the control panel. This allows for fast camera setting changes without having to use the monitor menus.
Functions available using the : Change camera settings with the monitor menus monitor menus while referring to the monitor.
These instructions are only for quick reference. For more details on the camera functions described in this manual, refer to the camera Reference Manual on the CD-ROM enclosed in the camera package.
How to operate the buttons and dials
1 Press the button for the function you want to set.
- The control panel indications vary depending on the function.
Control panel
![Record mode ESP AF SHQ 250 F 5.6 [12] 38 s RGB When pressing the ← (record mode) button](/content/2019/11/84648/images/d1a8db154546918683f80edb9f6819f68bdc5834f71b20f885b2f30186004a04.jpg)
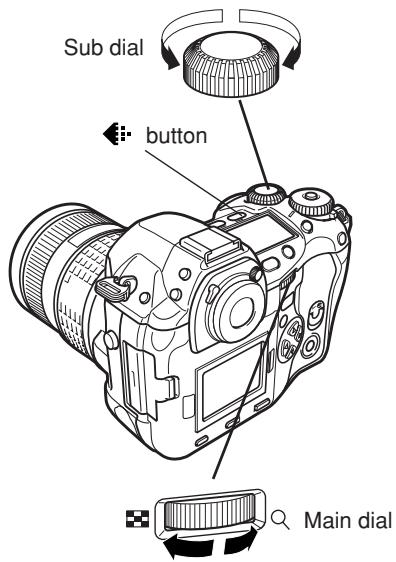
2 While holding down the button, turn the main dial or sub dial.
- The settings will change.
Control panel
![ESP AF HQ 250 F5.6 [12] 113 s RGB](/content/2019/11/84648/images/71330268b8fac854210307c2ed48b1b8c25086aea9662d790cad60c25ae26895.jpg)
When changing image quality
Types of buttons
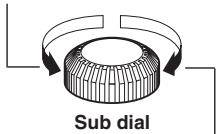
Make function settings by turning the main dial or sub dial while holding down the button.
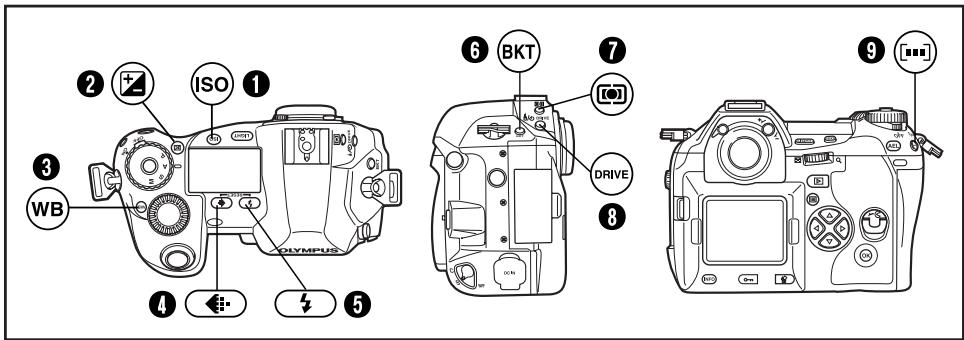
① ISO button
Sets the ISO sensitivity.
- Setting ISO BOOST allows you to add 1600 and 3200 to the ISO value options.
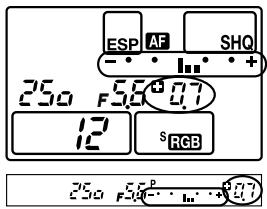
② (+) (Exposure compensation) button
Sets the exposure compensation value.
Exposure compensation value:
-1.0 -0.7 -0.3 0.0 0.3 0.7 1.0
- The exposure can be adjusted within a range of ± 5.0 EV. Available EV steps are: 1/3EV, 1/2EV, 1EV. Changing the EV value changes the amount of exposure compensation.
Buttons and menus
En
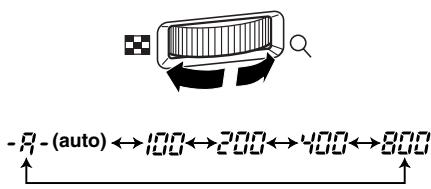
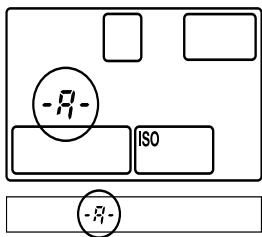
③ WB (White balance) button
Selects the white balance appropriate to the light source from the following options: Auto, preset white balance settings, registered white balance.
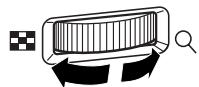
$$ \begin{array}{c} - R - (\mathrm{auto}) \leftrightarrow 3000 \leftrightarrow 3300 \leftrightarrow 3600 \leftrightarrow 3900 \leftrightarrow 4000 \leftrightarrow 4300 \ \updownarrow \ - O - I - -O - Y \leftrightarrow 7500 \leftrightarrow 6600 \leftrightarrow 6000 \leftrightarrow 5300 \leftrightarrow 4800 \leftrightarrow 4500 \end{array} $$
4 (Record mode) button
Selects image quality.
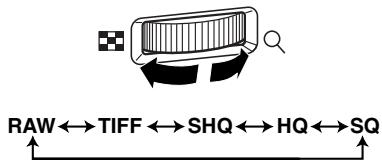
flowchart
graph LR
    A["RAW"] --> B["TIFF"]
    B --> C["SHQ"]
    C --> D["HQ"]
    D --> E["SQ"]
![ESP AF SHQ 250 F 5.6 [12] 12 s RGB](/content/2019/11/84648/images/e2d27d20cefe5862f9c3134bb847def865d71adf4f73ceb9a1ecf5d119bb5832.jpg)
You can select the compression and number of pixels in the SQ mode.
⑤ ↓ (Flash mode) button
Selects a flash mode from auto-flash, red-eye reduction flash, slow synchronization, or fill-in flash.
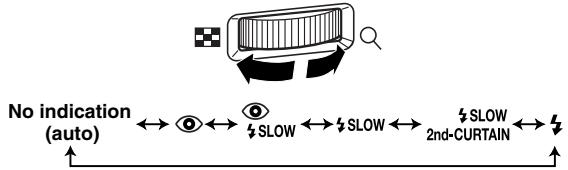
flowchart
graph LR
    A["No indication (auto)"] --> B["Eye icon"]
    B --> C["SLOW"]
    C --> D["SLOW"]
    D --> E["SLOW 2nd-CURTAIN"]
    E --> F["Down arrow"]
![ESP AF SHQ 250 F56 [12] 12 s RGB](/content/2019/11/84648/images/114e40f32edb7a601a0aafc6e3da1c04e51d5a8d0b8a94c96620d3954e0fd4ec.jpg)
6 BKT (Auto bracket) button
Selects the number of sequential shooting frames and the exposure compensation value during auto bracketing.
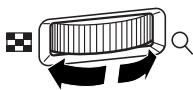
Number of storable pictures/Exposure compensation value:

flowchart
graph LR
    A["OFF"] --> B["3F/0.3"]
    B --> C["3F/0.7"]
    C --> D["3F/1.0"]
    D --> E["5F/0.3"]
    E --> F["5F/0.7"]
    F --> G["5F/1.0"]
    G --> H["↑"]
    H --> I["↑"]
- Changing the EV step changes the compensation level.
7 (Metering) button
En
Selects the metering mode.
![Control panel ESP←→[●]←→[●] Viewfinder No indication←→[●]←→[●] AF SHQ 25.0 F5.6 [12] 12 sRGB 25.0 F5.6 [12]](/content/2019/11/84648/images/e49b7258e9c71412d519e6c44106414d01af29910b812425823d6a6568876de9.jpg)
8 DRIVE button
Selects the drive mode.
flowchart
graph LR
    A["No indication (single-frame shooting)"] --> B["←"]
    B --> C["↔"]
    C --> D["12"]
    D --> E["↔"]
    E --> F["42"]
    F --> G["4"]
    G --> H["↑"]
    I["ESP"] --> J["AF"] --> K["SHQ"]
    L["25Ω"] --> M["F 5.6 (12)"]
    N["38"] --> O["S RGB"]
9 [...] (AF frame selection) button
Selects the AF frame, allowing you to perform multiple AF or to perform AF using one of the 3 frames.
![OLYMPUS CAMEDIA E-1 - [...] (AF frame selection) button - 1](/content/2019/11/84648/images/34b02aed7b52598d1b9e1eb9673d9e4f3539735fb134ca58ffaf331ff205a176.jpg)
flowchart
graph TD
    A["Control panel/Viewfinder"] --> B["Signal Flow"]
    B --> C["Viewfinder"]
    C --> D["Control Interface"]
    D --> E["Output Interface"]
Buttons and menus
En
Other buttons

(One-touch WB) button
Used for registration of one-touch WB settings.
AEL button
Locks the exposure.
LIGHT (Control panel illumination) button
Sets the illumination on the control panel to ON/OFF.

(Playback mode) button
Plays back images on the monitor.

(Erase) button
Erases unwanted pictures. Pressing this button also allows you to playback pictures even while the camera is in the shooting mode.

(Protect) button
Protects important pictures from being accidentally erased.
INFO (Information display) button
Displays shooting information.
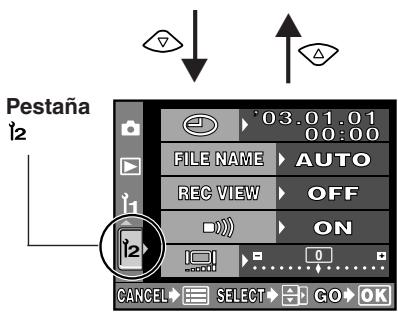
How to use the menus
En
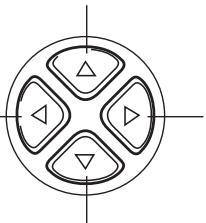
While viewing the menu screen in the monitor, you can select the function to set using the arrow pad.
1 Press the ☐ (menu) button to display the menu on the monitor.
2 Press △ ▽ to select a tab, then press ◇.
Buttons required for function settings are displayed in the menu screen.

Press ◇ to return to the tab selection screen.

Buttons and menus
En
3 Press △▽ to select an item, then press ▶.
The sliding bar is displayed when a menu continues on additional screens.


The green frame moves to the selected item.
Confirm with the OK button.
Cancel with or the button.
4 Press △▽ to change a setting. Press the OK button to complete your setting. Press OK again to exit the menu and return to shooting.
To cancel the selection, press 📄.
- If you return to the previous screen by pressing ◇ or ≡ instead of OK, your setting is not saved.


Note
- Some settings may not be effective depending on the status of the camera and other current settings.
- Saved settings will be retained even after the camera is turned off.
List of menu functions
En

Shooting menu
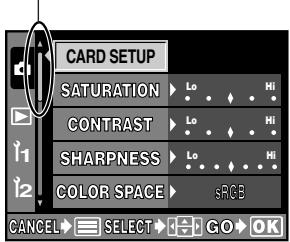
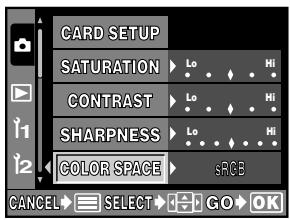
| CARD SETUP | Formats the card or erases all pictures. |
| SATURATION | Sets the color tint of images. CS0 - CS4 set the saturation level, while CM1 - CM4 emphasize certain colors. Saturation can be set to 5 levels. With the tint, CM1 stresses red, CM2 - green, CM3 - blue, and CM4 - softer red than CM1. The saturation level and tint cannot be set at the same time. |
| CONTRAST | Sets the contrast (distinction between light and dark) of images. The contrast can be set to 5 levels. |
| SHARPNESS | Sets the sharpness of images. The sharpness can be set to 7 levels. |
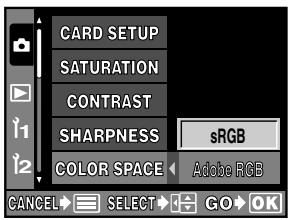
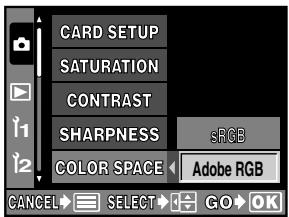
| COLOR SPACE | Sets the system that correctly reproduces the color of recorded images on the monitor or printer. |
| WB BKT | Performs WB bracketing. The compensation level can be selected from 3 levels. |
| RAW • JPEG | Records images in both the RAW data format and JPEG format when using the SHQ, HQ, or SQ mode. |
| NOISE FILTER | Eliminates the random noise that is generated during normal shooting. This process may take some time. |
| NOISE REDUCTION | Reduces the noise in images that is generated by long exposures when shooting under low-light conditions. |
| SHADING COMP. | Allows you to compensate for the dark areas at image edges caused by the lens's properties. |
| AF ILLUMINATOR | Emits a supplementary light to enable easy AF performance under low light conditions. |
| ANTI-SHOCK | Diminishes camera shake caused by vibrations when the mirror moves. You can select the interval from the time the mirror is raised until the shutter is released. |
| PIXEL MAPPING | Checks and adjusts the CCD and image processing functions. Dust and dirt are also blown off at the same time. |
| +2 | Adjusts the amount of light emitted when using the flash unit specified for use with this camera. You can set the intensity within a range of ± 2.0 . |
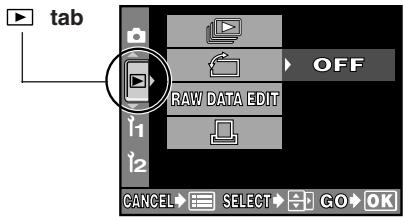
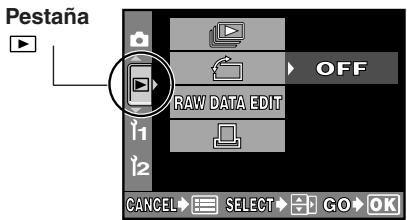
▶ Playback menu
| Displays still pictures stored in the card as a slideshow. Slideshow capability is also available using the index display. | |
| Changes picture orientation to portrait or landscape. You can rotate pictures with the sub dial. | |
| RAW DATA EDIT | Performs image processing (such as white balance and sharpness adjustment) on images in the RAW data format, then converts the data to the TIFF or JPEG format for saving to the card. |
| Stores print reservation data on the card. You can store print information such as the number of images, date/time data and index prints. |
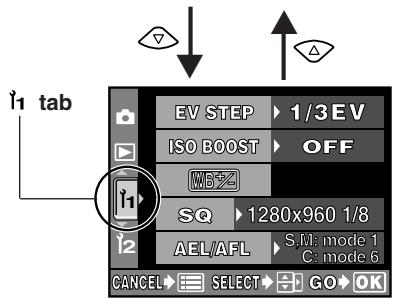
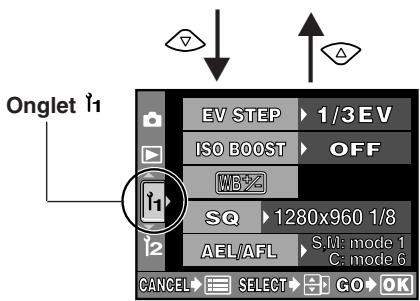
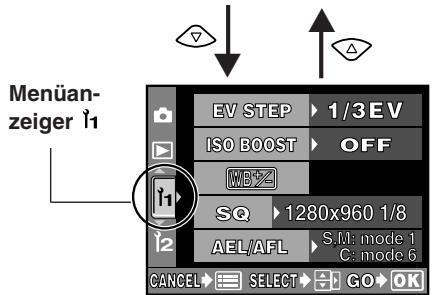
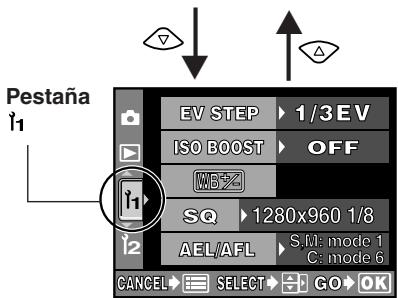
1 Custom menu
| EV STEP | Sets the degree of change for one click of the dial when changing the shutter speed, aperture value, exposure compensation value, etc. |
| ISO BOOST | Allows the use of ISO 1600 and 3200. |
| WB+ | Compensates the auto and preset white balance (3000K - 7500K) respectively within a range of ± 7 . |
| SQ | Sets the number of pixels and compression for the SQ record mode. |
| AEL/AFL | Allows you to select the AE or AF function that you want performed when you press the AEL (AE lock) button. |
| DIAL | Allows you to select a combination of functions (Program shift (Ps), exposure compensation, aperture setting, or shutter speed setting) to be assigned to the main dial and/or sub dial for each mode (P, A, S). |
| FOCUS RING | You can choose the rotational direction of the focus ring to suit your preference of how the lens adjusts to the focusing point. |
| S-AF+MF | Allows you to finely adjust the focus using the focus ring, after the camera has already adjusted the focus in the S-AF mode. |
| RELEASE PRIORITY S | Allows you to release the shutter in the S-AF mode without waiting until focusing or flash charging finishes. |
| RELEASE PRIORITY C | Allows you to release the shutter in the C-AF mode by pressing the shutter button all the way, even while adjusting the focus. |
| RESET LENS | Resets the focus of the lens when the power is turned off. |
| PC MODE | Selects how the camera is to be operated when it is connected to a PC. You can choose whether to transfer images from the camera to the PC (STORAGE), or control the camera with the dedicated software (CONTROL). |
| ERASE SETTING | Selects the initial cursor position on the YES/NO selection screen for erasing pictures, canceling recording or formatting. |
| CLEANING MODE | When the shutter button is pressed all the way in the cleaning mode, the mirror rises and the shutter curtain opens. |
| CUSTOM RESET SETTING | Up to 4 reset settings can be saved for when the camera is turned off. |
En
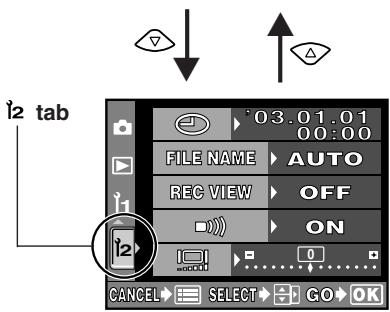
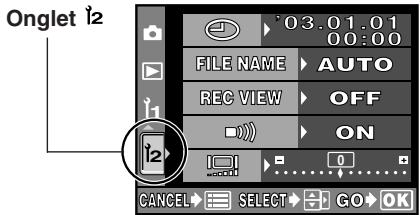
12 Setup menu
| ➊ | Sets the date and time on the camera. The date/time data is stored together with the corresponding recorded image. File numbers are also assigned to recorded images using date/time information. |
| FILE NAME | Changes how image files are numbered. You can choose whether to retain the file number even if a new card is inserted, or reset it. |
| REC VIEW | Displays the picture you have just taken on the monitor while it is being recorded to the card. |
| ➌➌ | Turns off the beep used for warnings. |
| ➌➌ | Adjusts the brightness of the monitor. |
| SLEEP | Sets the time before the sleep mode (idle mode) begins. When OFF is selected, the camera does not enter the sleep mode. |
| ➌➌ | Selects the language for on-screen displays. |
| VIDEO OUT | Selects NTSC or PAL according to your TV’s video signal. TV video signal types depending on the region. |
Shooting
En
Auto focus (AF)
The camera automatically focuses on the subject.
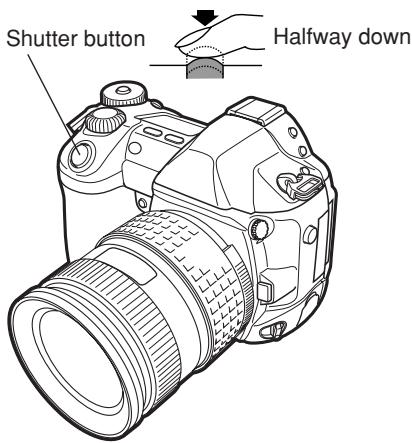
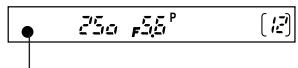
1 Position the AF target mark on the subject you want to focus on. Press the shutter button halfway.
- The focus is locked and the AF confirmation mark lights up (focus lock).
- A beep sound is output when the subject is in focus.
![AF frame Viewfinder 250 55° [12] AF confirmation mark](/content/2019/11/84648/images/0e0ca2dffe6dae6df721a5a93f88aad072c3c01d8c44a120e7a9e3638ed7269a.jpg)
All the way down
2 Press the shutter button all the way (fully).
- A picture is taken.
- The card access lamp blinks while the picture is being stored on the card.
How to lock the focus
When shooting a hard-to-focus subject, point the camera at an object about the same distance away as the subject. Press the shutter button halfway. Keeping the shutter button pressed halfway, recompose your shot. Press the shutter button fully.
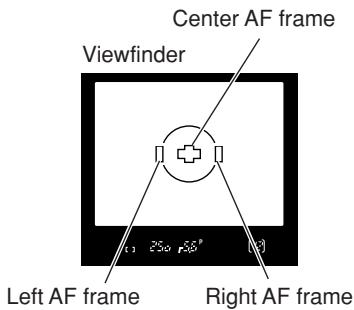
AF frame selection [...]
![OLYMPUS CAMEDIA E-1 - AF frame selection [...] - 1](/content/2019/11/84648/images/722aaab75ffa783f25cb1b7d38aba49ccc96e9788cc0b53015da1bb97fe90c7d.jpg)
Normally, the camera measures the distance to the subject using the 3 AF frames in the viewfinder and selects the most appropriate point. This function allows you to select only one AF frame.
No indication : Focuses using the 3 AF frames. (Factory default setting)
[▪ ] : Focuses using the left AF frame.
[▪] : Focuses using the center AF frame.
[▪] : Focuses using the right AF frame.
Focus mode
En
Three focus modes are available with this camera: S-AF (single AF), C-AF (continuous AF) and MF (manual focus). You can switch focus modes using the focus mode lever.
![Control panel ESP AF SHQ 250 F5.6 [12] 12 sRGB AF C ↔ AF ↔ MF AF mode Focus ring Focus mode lever Set to C-AF Set to S-AF Set to MF](/content/2019/11/84648/images/6501c89ae76811a7771fb4d365d54800a5d238a82e0db87cdda8a73940a40146.jpg)
AF (single AF) shooting:
Focusing is performed one time when the shutter button is pressed halfway. If focusing fails, remove your finger from the shutter button and press it halfway again. This mode is suitable for taking pictures of non-moving subjects or subjects with limited movement.
C-AF (continuous AF) shooting:
The camera repeats focusing. Even if the subject moves or you change the composition of the picture, the camera continues trying to focus.
Manual focus (MF):
This function allows you to manually focus on any subject while looking through the viewfinder.
1 Adjust the focus using the focus ring.
2 Take a picture.
Shooting
En
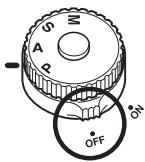
Exposure mode
This camera has different exposure modes, which can be switched using the mode dial. Rotate the mode dial while holding down the mode dial lock to change the setting.
P : Program shooting
The camera sets the optimum aperture value and shutter speed automatically according to the subject brightness.
You can also perform program shift as needed to change the combination of aperture and shutter speed while keeping the correct EV (exposure value).
A : Aperture priority shooting
The camera sets the optimum shutter speed automatically for the aperture value you have selected. When you decrease the aperture value (F-number), the camera will focus within a shorter range (shallow depth of field) and produce a picture with a blurred background. Conversely, when you increase the aperture value, the camera will focus over a wider range in the forward and backward directions (more depth of field), producing a picture with clear focus throughout the image area. Before shooting, you can use the preview function to check how the background will look in your picture.
Rotate the main dial or sub dial to set the aperture value.
Large aperture (F-number is decreased)
Small aperture (F-number is increased)
S : Shutter priority shooting
The camera sets the optimum aperture value automatically for the shutter speed you have selected. Set the shutter speed depending on the type of effect you want: a higher speed shutter allows you to capture a fast-moving subject without blur, and a slower shutter speed blurs a moving subject, creating a feeling of speed or motion.
Rotate the main dial or sub dial to set the shutter speed.
flowchart
graph TD
    A["Main dial"] --> B["Sub dial"]
    B --> C["Faster shutter speed"]
    style A fill:#f9f,stroke:#333
    style B fill:#ccf,stroke:#333
    style C fill:#cfc,stroke:#333
En
M : Manual shooting
You can set both aperture value and shutter speed manually, while referring to the exposure level indicator. This mode gives you more creative control, allowing you to make whatever settings you like, regardless of the correct exposure. Bulb shooting is also possible, allowing you to take astronomical or fireworks pictures.
Rotate the main dial to set the aperture value, and the sub dial to set the shutter speed (60 sec. - 1/4000 sec.).
- The aperture value and shutter speed change in 1/3 EV increments as the dial is rotated.
- The exposure level indicator appears on the control panel and viewfinder, showing the difference (ranging from -2 EV to +2 EV) between the exposure value calculated by the currently selected aperture and shutter speed compared to the exposure value considered optimum by the camera.
Decrease the aperture value (F-number)
Increase the aperture value (F-number)
Slow shutter speed
Fast shutter speed
Shooting
En
Preview function
When you press the preview button, the viewfinder shows the actual depth of field (the distance from the nearest to the furthest point of perceived “sharp” focus) in a picture, with the selected aperture value.
Exposure compensation

In some situations, you may get better results if you manually compensate (adjust) the exposure value set automatically by the camera. In many cases, bright subjects (such as snow) will turn out darker than their natural colors. Adjusting toward + makes these subjects closer to their real shades. For the same reason, adjust toward – when shooting dark subjects. The exposure can be adjusted in range of ±5.0 EV. Center weighted averaging metering (☐) or spot metering (☐) is recommended for exposure compensation. The EV step interval can be selected from 1/3EV, 1/2EV or 1EV.
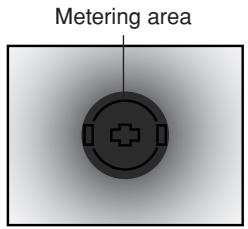
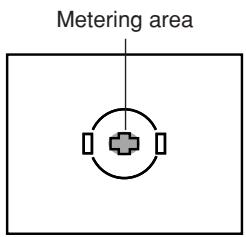
Metering mode ESP [●] [●]
![OLYMPUS CAMEDIA E-1 - Metering mode ESP [●] [●] - 1](/content/2019/11/84648/images/db6402136525a5e2e16ceede1f6f9a75f227060edc9814643c36d3998aecc3fd.jpg)
There are 3 ways of measuring the subject brightness: Digital ESP metering, Center weighted averaging metering and spot metering. Select the most suitable mode depending on the shooting condition.
Digital ESP metering ESP: The camera meters and calculates the light levels or light level differences in the center and other areas of the image separately.
Recommended for shooting under conditions where there is high contrast between the center of the screen and the area around it, such as when shooting backlit subjects or under excessively bright light.
Center weighted averaging metering Ⓞ: This metering mode provides the average metering between the subject and the background lighting, placing more weight on the subject at the center. Use this mode when you do not want the light level of background to affect the exposure value.
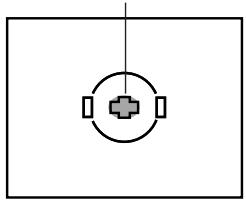
Spot metering ☐: The camera meters a very small area around the center of the subject, defined by the spot metering area mark in the viewfinder. Use this mode for intensively backlit subjects, etc.
AE lock AEL
AEL
En
The metered exposure value can be locked with the AEL button (AE lock). Use AE lock when you want a different exposure setting from the one that would normally apply under the current shooting conditions.
Normally, pressing the shutter button halfway locks both AF (auto focus) and AE (automatic exposure), but you can lock the exposure alone by pressing AEL. The AE and AF lock functions can be customized on this camera.
AE bracketing BKT
BKT
The camera automatically shoots a number of pictures at different exposure values for each frame. Even in conditions where correct exposure is difficult to obtain (such as a backlit subject or a scene at dusk), you can pick the picture you prefer from a selected number of frames with a variety of different exposure settings (exposure and compensation values). The pictures are taken in the following order: Picture with optimum exposure, picture adjusted in – direction, and picture adjusted in + direction.
Compensation value : 0.3, 0.7 or 1.0
The exposure compensation values depend on the EV step interval setting that can be changed in the menu.
Number of frames : 3 or 5
Drive mode DRIVE
DRIVE
The following drive modes are available with this camera.
Single-frame shooting (no indication)
: Shoots 1 frame at a time when the shutter button is pressed. (Normal shooting mode, single-frame shooting)
Sequential shooting
: Shoots 12 frames at 3 frames/sec. for as long as the shutter button pressed.Focus and exposure are locked at the first frame.
Self-timer shooting 😊
: Triggers the shutter after a set time, either 12 sec. or 2 sec.
Remote control shooting
: Shoots using the optional remote control. The camera can be set to trigger the shutter either right away or 2 seconds after the shutter button on the remote control is pressed.
Shooting
En
Record mode

You can select a record mode in which to take pictures. Choose the record mode that's best for your purpose (printing, editing on a PC, website editing, etc.).
Record mode and the number of storable pictures
The approximate number of pictures that can be stored is determined by dividing the memory capacity of the card by the file size of the pictures. When a card is inserted into the camera, the number of storable pictures is displayed on the control panel. If the number of storable pictures exceeds 1999, 1999 is displayed on the control panel.
Control panel
![ESP AF SHQ 250 F 5.6 [12] 38 s RGB](/content/2019/11/84648/images/d7fc76973496730454d8d962a8838372fd00b630e25d0109f79f90e704794bf7.jpg)
Number of storable still pictures
Record mode
| Record mode | Number of pixels (PIXEL COUNT) | Compression | File format | File size (MB) |
| RAW | 2560 x 1920 | Uncompressed | ORF | 10.2 |
| TIFF | 2560 x 1920 | Uncompressed | TIFF | 14.4 |
| SHQ | 2560 x 1920 | 1/2.7 | JPEG | 3.8 |
| HQ | 2560 x 1920 | 1/8 | 1.2 | |
| SQ | 1600 x 1200 | 1/2.7 | 1.4 | |
| 1/8 | 0.5 | |||
| 1280 x 960 | 1/2.7 | 0.9 | ||
| 1/8 | 0.3 | |||
| 1024 x 768 | 1/2.7 | 0.6 | ||
| 1/8 | 0.2 | |||
| 640 x 480 | 1/2.7 | 0.3 | ||
| 1/8 | 0.1 |
The file size in the table is approximate.
ISO sensitivity

The higher the ISO value, the greater the camera's light sensitivity and the better its ability to shoot in low light conditions. However, higher values may give pictures a grainy appearance.
Setting the ISO sensitivity to ISO BOOST using the menu beforehand allows you to select the high ISO sensitivity (1600 or 3200).
Setting the white balance

En
You can adjust the white balance by selecting the appropriate color temperature for the light conditions.
Setting the one-touch white balance

This function is useful when you need a more precise white balance than preset WB can provide. Point the camera at a white object under the light source you want to use to determine the white balance. The optimum white balance for the current shooting conditions can be saved in the camera. Up to 4 settings can be registered as one-touch WB settings.
Optional electronic flashes
You can take advantage of a variety of flash shooting techniques to suit different shooting conditions with the flash units specified for use with this camera — the Olympus FL-50, FL-40, and FL-20 electronic flashes.
Flash mode ⏚ :
The camera sets the flash mode according to various factors such as firing pattern and flash timing. Available flash modes depend on the exposure mode.
You can set the flash mode even when no flash is attached to the camera.
Flash modes available in the exposure mode
| Exposure mode | Control panel indication | Flash mode | Flash timing | Conditions to fire the flash | Shutter speed restrictions |
P·A  | (No indication) | Auto-flash | 1st curtain | Fires automatically in dark/backlit * conditions | 1/30 - 1/180 with auto/◇ |
| ◇ | Auto-flash (Red-eye reduction) | ||||
| ◇ SLOW | Slow synchronization (Red-eye reduction) | Restricted to 2 - 1/180 sec. | |||
| ◇ SLOW | Slow synchronization | ||||
| ◇ SLOW 2nd-CURTAIN | Slow synchronization (2nd curtain) | 2nd curtain | |||
| ◇ | Fill-in flash | 1st curtain | Always fires | ||
S·M  | ◇ | Fill-in flash | 1st curtain | Always fires | Restricted to 60 -1/180 sec. |
| ◇ | Fill-in flash (Red-eye reduction) | 1st curtain | |||
| ◇ 2nd-CURTAIN | Fill-in flash (2nd curtain) | 2nd curtain |
* When the flash is set to the Super FP mode, it detects backlight before emitting light.
En
Single-frame playback

One frame is displayed on the monitor.
1 Press the ▶ ( playback mode) button.
- The monitor blinks and displays the last picture taken.
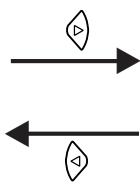
2 Use the arrow pad 🐘️ to select the picture you want to display.
- Detailed information about the picture and histogram can be displayed.
△ : Displays the frame that is stored 10 frames back.
: Displays the previous frame.
natural_image
Symmetrical geometric diagram with four quadrants and triangles, no text or symbols present: Displays the next frame.
▽ : Displays the frame that is stored 10 frames ahead.
Note
- The maximum number of pictures that can be played back on this camera is "2000".
Close-up playback

/Index display

En
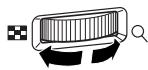
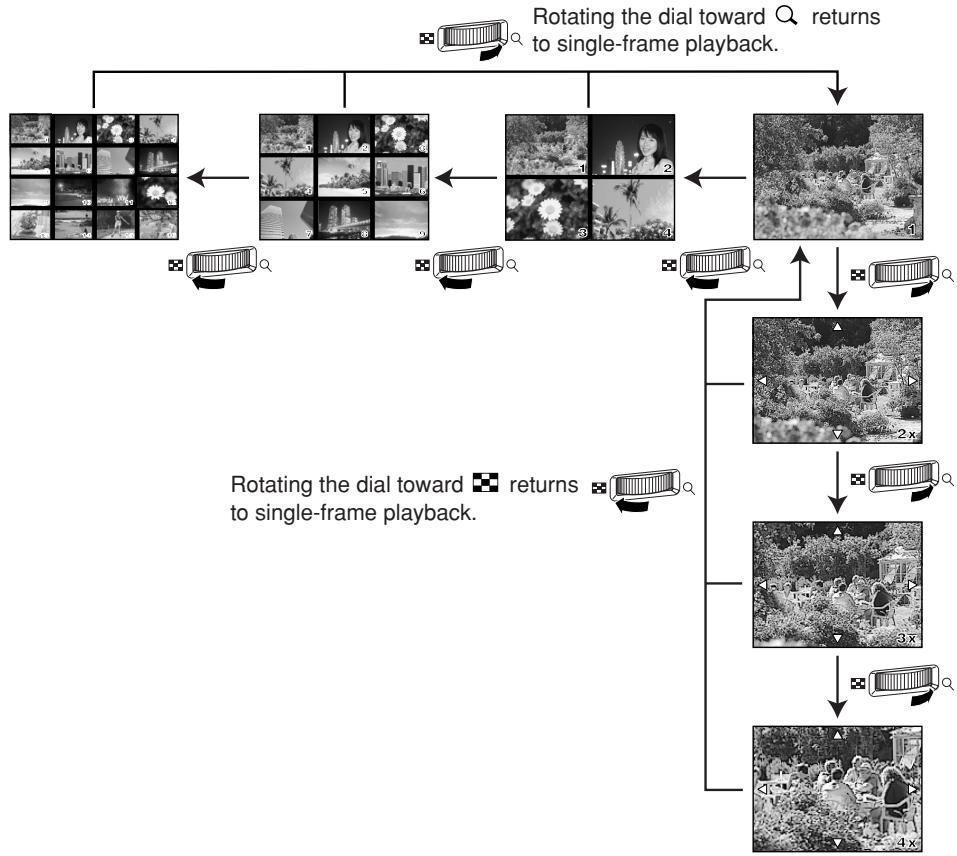
Index display :
Each time you rotate the main dial toward ☐, the number of pictures shown changes from 4 to 9 to 16.
: Moves to the previous frame.
: Moves to the next frame.
: Displays the index previous to the top-left image in the currently displayed index.
: Displays the index proceeding the lower-right image in the currently displayed index.
flowchart
graph TD
    A["Rotating the dial toward single-frame playback"] --> B["1"]
    A --> C["2"]
    A --> D["3"]
    A --> E["4"]
    B --> F["Q"]
    C --> G["Q"]
    D --> H["Q"]
    E --> I["Q"]
    F --> J["2x"]
    G --> K["3x"]
    H --> L["4x"]
    I --> M["Q"]
    J --> N["Q"]
    K --> O["Q"]
    L --> P["Q"]
    M --> Q["Q"]
    N --> R["Q"]
    O --> S["Q"]
    P --> T["Q"]
    Q --> U["Q"]
    R --> V["Q"]
    S --> W["Q"]
    T --> X["Q"]
    U --> Y["Q"]
Close-up playback 🔒 :
Each time you rotate the main dial toward Q, the picture is enlarged in steps of 2x, 3x, and 4x.
- When you press the arrow pad during close-up playback, the displayed picture will be displaced in the direction of the arrow.
Playback
En
Protecting pictures
This function protects pictures from being accidentally erased.
1 Display the picture you want to protect.
2 Press the 0π (protect) button.
- is displayed on the screen.
To cancel the protection:
Display the pictures that are protected and press ON.
Single-frame erase

This function erases only the picture that is displayed on the monitor.
1 Display the picture you want to erase.
2 Press the 🎨 button.
- The ERASE screen is displayed.
3 Press △▽ to select YES, then press the OK button.
Erasing selected frames
This function lets you erase selected pictures at one time. You can select and erase several pictures from the index display screen.
1 Bring up the index display.
2 Press 🔊 to select the pictures you want to erase, and the press the OK button.
- The selected pictures will be shown with red frames.
- Press OK again to cancel your selection.
3 After you have selected the frame to erase, press the ⏻ (erase) button.
- The ERASE SELECTED screen is displayed.
4 Press △▽ to select YES, then press OK.
All-frame erase
En
This function erases all the pictures on the card.
In the menu, select → CARD SETUP, then press
- The CARD SETUP screen is displayed.
2 Press △▽ to select ALL ERASE, then press the OK button.
- The ALL ERASE screen is displayed.
3 Press △▽ to select YES, then press OK.
- All frames will be erased.
Formatting cards
This function lets you format a card. Formatting prepares cards to receive data. Before using cards to be used for the first time with this camera or cards which have been formatted on a PC, you must format them with this camera.
Note
- All existing data, including protected pictures, are erased when the card is formatted. Make sure that you save or transfer important data to a PC before formatting a card.
1 In the menu, select → CARD SETUP. Press
- The CARD SETUP screen is displayed.
2 Press △▽ to select FORMAT. Press the OK button.
- The FORMAT screen is displayed.
3 Press △ to select YES. Press OK.
- FORMAT is performed.
Print reservation
En
Print reservation means saving the desired printing data (number of prints, date/time information) with the pictures stored on the card. This enables printing pictures on a DPOF-compatible printer or at a photo lab that supports DPOF. Print reservation allows you to save printing data with the pictures.
DPOF refers to the print data recording standard used on digital cameras. This enables desired print settings (number of prints, etc.) to be saved along with the pictures to facilitate automatic printing of pictures at a photo lab or on a home printer. Pictures with print reservation data can be printed as follows:
■ Printing at a photo lab that supports DPOF
Pictures are printed according to the saved printing data.
■ Printing on a DPOF-compatible printer
Pictures are printed directly from the card without using a PC. For more details, refer to the printer's manual. A PC card adapter is required depending on the printer.
Single-frame reservation

Use this feature to print only the pictures you want. You can set the number of prints and whether or not to include the shooting date and time.
All-frame reservation

Use this feature to print all the pictures stored on the card. You can select whether or not to include the shooting date and time.
Index-printing reservation

You can select pictures stored on a card as index pictures and print them all on one sheet. The number of possible images per sheet varies depending on the printer.
Resetting print reservation data
This function allows you to reset the print reservation data for pictures stored on the card. There are three ways to reset print reservation: you can reset all print reservation data including index-printing reservation data or you can reset the print reservation data for only the frames you do not need, or you can reset only index-printing reservation data.
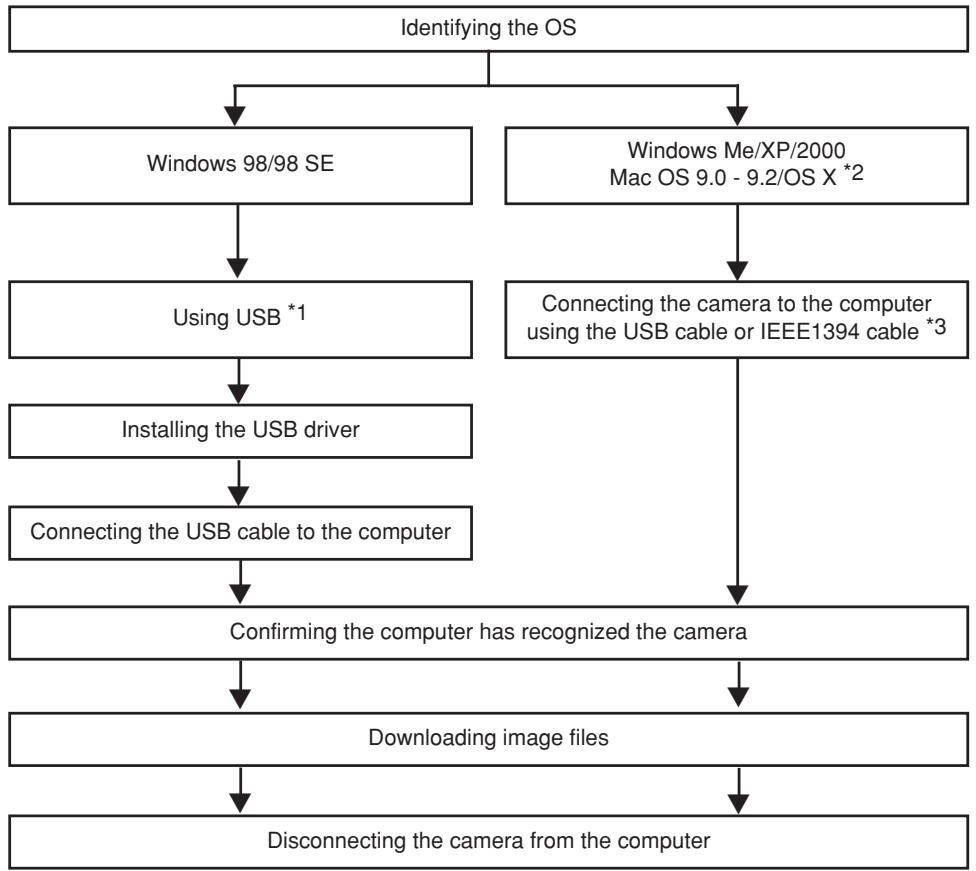
Transferring images to a computer
By connecting the camera to a computer with the specified USB cable or IEEE1394 cable, images stored on a card can be transferred to the computer.
If you have graphics applications that support the JPEG file format (such as the software provided or photo-retouching software), you can process images or print them from your computer. When you print images, be sure to check beforehand whether printing is possible with your software. For details on printing images with the software, refer to your software's manual.
Some operating systems (OS) may need to install a driver before connecting to the camera for the first time. Follow the procedure in the chart on next page.
For details on the procedures in the chart, refer to the Reference Manual on the CD-ROM.
The camera's PC MODE should be set beforehand to STORAGE.
“List of menu functions”
Images files downloaded to your computer
- You can view images using: the software provided; graphics applications that support the JPEG file format (Paint Shop Pro, Photoshop, etc.); Internet browsers (Netscape Communicator, Microsoft Internet Explorer, etc.). For details on using graphics applications, refer to their manuals.
- If you want to process images, be sure to download them to your computer first. Depending on the software, image files may be destroyed if the images are processed (rotated, etc.) while they are on the card.
Transferring images to a computer
En
flowchart
graph TD
    A["Identifying the OS"] --> B["Windows 98/98 SE"]
    A --> C["Windows Me/XP/2000 Mac OS 9.0 - 9.2/OS X *2"]
    B --> D["Using USB *1"]
    C --> E["Connecting the camera to the computer using the USB cable or IEEE1394 cable *3"]
    D --> F["Installing the USB driver"]
    F --> G["Connecting the USB cable to the computer"]
    G --> H["Confirming the computer has recognized the camera"]
    H --> I["Downloading image files"]
    I --> J["Disconnecting the camera from the computer"]
*1 Even if your computer has a USB connector or IEEE1394 connector, data transfer may not function correctly if you are using one of the operating systems listed below or if you have an add-on USB connector or IEEE1394 connector (extension card, etc.).
- Windows 95/NT 4.0
● Windows 98/98 SE upgrade from Windows 95
- Mac OS 8.6 or lower
● Data transfer is not guaranteed on a home-built PC system or PCs with no factory installed OS.
*2 IEEE1394 functionality is assured on Macintosh computers using Mac OS 9.1 - 9.2 or Mac OS X.
*3 The provided IEEE1394 cable has one end with 4 pins to be connected to the camera and the other end with 6 pins to be connected to the port on the computer.
Error codes
| Viewfinder indications | Control panel indications (blinking) | Monitor indications | Possible cause | Corrective action |
| Normal indication | --- | !NO CARD | The card is not inserted, or it cannot be recognized. | Insert a card or insert a different card. |
| Card E | -E- | !CARD ERROR | There is a problem with the card. | Insert the card again. If the problem persists, format the card. If the card cannot be formatted, it cannot be used. |
| Card P | -P- | !WRITE PROTECT | Writing to the card is prohibited. | The card has been set to read-only setting with the computer. Reset the card with the computer. |
| No indication | ? | !CARD FULL | The card is full and you cannot continue shooting. | Replace the card or erase unwanted pictures. Before erasing, download important images to a PC. |
| No indication | No indication | !CARD FULL | The card is full. No more pictures can be taken or no more information such as print reservation can be recorded. | Replace the card or erase unwanted pictures. Before erasing, download important images to a PC. |
| No indication | No indication | NO PICTURE | There are no pictures on the card. | The card contains no pictures. Record pictures. |
En
Error codes
En
| Viewfinder indications | Control panel indications (blinking) | Monitor indications | Possible cause | Corrective action |
| No indication | No indication |  PICTURE ERROR PICTURE ERROR | The selected picture cannot be displayed for playback due to a problem with this picture. Or the picture cannot be used for playback on this camera. | Use image processing software to view the picture on a PC. If that cannot be done, the image file is damaged. |
| Card-op | -0- |  CARD-COVER OPEN CARD-COVER OPEN | The card cover is open. | Close the card cover. |
| Card-F | -F- | !CARD ERROR | The card is not formatted. | Format the card. |
| No indication | -H- | No indication | Camera interior has overheated. | Switch the camera off and allow it to cool, and then switch the camera on again. |
Maintenance
PIXEL MAPPING and dust reduction
The PIXEL MAPPING feature allows the camera to check and adjust the CCD and image processing functions. It is not necessary to operate this function frequently. Approximately once a year is recommended. After using the monitor or taking continuous shots, wait for at least one minute before using the PIXEL MAPPING function to ensure that it operates correctly. Dust reduction also works at the same time to remove dust on the CCD.
Cleaning and Checking the CCD
This camera incorporates a dust reduction function to keep dust from getting on the CCD and to remove any dust or dirt from the CCD surface with ultrasonic vibrations. Dust reduction works when the power switch is set to ON. This function also operates whenever PIXEL MAPPING is activated.
Since dust reduction is activated every time the camera's power is turned on, the camera should be held upright for the dust reduction function to be effective.
Note
- The following matter is not removed with the dust reduction function:
- Sticky matter (solvent, etc.)
– Lightweight particles such as cotton dust - Microscopic dust particles not visible to the naked eye
CLEANING MODE
The dust reduction function will remove most dirt or dust on the CCD. However, when dust or dirt is not removed completely, black dots may appear in the picture. If this happens, contact your Olympus Authorized Service Center to have the CCD physical cleaned. The CCD is a precision device and is easily damaged. When cleaning the CCD on your own, be sure to follow the instructions below.
When cleaning the CCD, the specified AC adapter should be used. If a battery is used and power runs out during cleaning, the shutter will close, which may cause the shutter curtain and mirror to break.
Note
- Be careful to not let the mechanical blower (commercially available) touch the CCD. If the blower touches the CCD, the CCD will be damaged.
- Never put the mechanical blower behind the lens mount. If the power turns off, the shutter closes, breaking the shutter curtain.
- Do not use anything other than the mechanical blower. If high-pressure gas is sprayed onto the CCD, it will freeze on the CCD's surface, damaging the CCD.
Specification
En
Product type
Product type : Single-lens reflex digital camera with interchangeable lens system
Lens : Zuiko Digital, Four Thirds System Lens
Lens mount : Four Thirds Mount
Equivalent focal length
on 35 mm film camera : Approx. twice the focal length of the lens
■ Image pickup element
Product type : 4/3 type full frame transfer primary color CCD
Total no. of pixels : Approx. 5,500,000 pixels
No. of effective pixels : Approx. 5,000,000 pixels
Screen size : 17.3 mm (H) x 13.0 mm (V) (0.9" x 0.5")
Aspect ratio : 1.33 (4 : 3)
Viewfinder
Product type : Eye-level single-lens reflex viewfinder
Field of view : Approx. 100% (for field of view on recorded images)
Viewfinder magnification: 0.96x ( -1 m^-1 , 50mm lens, infinity)
Eye point : 20 mm (0.8") (-1 m ^-1 )
Diopter adjustment
range : -3.0 - +1.0 m ^-1
Optical path fraction : Quick return half mirror
Depth of field : To be checked with the preview button
Focusing screen : Interchangeable
Eye cup : Interchangeable
Monitor
Product type : 1.8" TFT color LCD
Total no. of pixels : Approx. 134,000 pixels
Shutter
Product type : Computerized focal-plane shutter
Shutter : 1/4000 - 60 sec. (1/3, 1/2, or 1 EV step)
Manual mode: Bulb (Limit: 8 min.)
Autofocus
Product type : TTL phase-contrast detection system
Focusing point : 3-point multiple AF (left, center, right)
AF luminance range : EV 0 - EV 19 (at ISO 100, 20°C)
Selection of
focusing point : Auto, Optional
AF illuminator : Built-in
Effective distance for AF illuminator: Approx. 0.7 - 6.0 m (2.3 - 19.7 ft.)
(ED 50 mm F2.0 Macro)
■ Exposure control
| Metering system | : TTL full-aperture metering system(1) Digital ESP metering(2) Center weighted average metering(3) Spot metering (approx. 2% for the viewfinder screen) |
| Metering range | :(1) EV 1 - 20 (Digital ESP metering, Center weighted average metering)(2) EV 3 - 17 (Spot metering)(At normal temperature, 50 mm F2, ISO 100) |
| Exposure mode | :(1) P: Program AE (Program shift can be performed)(2) A: Aperture priority AE(3) S: Shutter priority AE(4) M: Manual |
| ISO sensitivity | : 100 - 800 (High ISO values (1600 and 3200) are available) |
| Exposure compensation | : Exposure can be adjusted in 1/3, 1/2 or 1 EV step within a range of ± 5 EV. |
En
■ White balance
| Product type | : CCD and white balance sensor |
| Mode setting | : Auto, Preset WB (12 settings), One-touch WB(4 settings can be registered) |
Recording
| Memory | : CF card (Compatible with Type I and II)Microdrive compatible (Compatible with FAT 32) |
| Recording format | : DCF, DPOF compatible/Exif 2.2 compatible, PRINT Image Matching II compatible |
| Recording mode | : RAW (12 bits), TIFF (RGB), JPEG |
■ Playback
| Playback mode | : Single-frame playback, Close-up playback, Index display, Picture rotation |
| Information display | : Information display, Histogram display, Highlight display |
Drive
| Drive mode | : Single-frame shooting, Sequential shooting, Self-timer, Remote control |
| Sequential shooting | : 3 frames/sec. (Max. no. of storable sequential pictures: 12 frames) *Applied to all record modes. |
| Self-timer | : Operation time: 12 sec., 2 sec. |
| Optical remote control | : Operation time: 2 sec., 0 sec. (instantaneous shooting) |
Flash
| Synchronization | : Synchronized with the camera at 1/180 sec. or less |
| Flash control mode | : TTL-AUTO (TTL pre-flash mode), AUTO, MANUAL |
| Flash attachment | : Hot shoe, External flash connector (x attachment) |
Specifications
En
■ External connector
USB connector (mini-B), IEEE1394 connector, DC-IN jack, VIDEO OUT jack, Remote cable connector
■ Dust/drip proof system
Dust/drip proof sealing use, Supersonic wave filter (dust reduction function included as standard)
Power supply
Battery : BLM-1 Lithium-ion Battery Pack
AC power supply : AC-1 AC adapter (optional)
Others : BLL-1 Lithium-ion Battery for Power Battery Holder Set (optional)
■ Dimensions/weight
Dimensions : 141 mm (W) x 104 mm (H) x 81 mm (D) (5.6" x 4.1" x 3.2") (excluding protrusions)
Weight : Approx. 660 g (1.6 lb.)
■ Operating environment
Temperature : 0 - 40°C (operation)/-20 - 60°C (storage)
Humidity : 30 - 90 % (operation)/10 - 90 % (storage)
En
FRANÇAIS
natural_image
Mechanical diagram showing a clamp or bracket assembly with a handle and spring (no text or symbols)4

natural_image
Technical line drawing of a mechanical clamp or bracket assembly (no text or symbols)natural_image
Diagram of a device with a downward arrow indicating compression or disassembly (no text or symbols present)natural_image
Diagram of a car interior showing a hand valve and handle mechanism (no text or symbols)natural_image
Isometric line drawing of a square electronic device with a small triangular button on the cover (no text or symbols)natural_image
Isometric line drawing of a square mechanical component with mounting holes and a central arrow (no text or symbols)natural_image
Technical line drawing of a DSLR camera showing internal components and a close-up view of the lens (no text or symbols present)natural_image
Diagram of a DSLR camera showing internal components and a close-up view of the door (no text or labels)Touche d'éjection
natural_image
Line drawing of a DSLR camera with external adjustment knobs and control buttons (no text or symbols)natural_image
Line drawing of a DSLR camera with control panel and buttons (no text or symbols)Fr
natural_image
Mechanical diagram showing a rotating component with directional arrows indicating motion (no text or symbols)Touche ♦ (effacement)
Touche ON (protection)

Touches et menus
Fr
natural_image
Simple line drawing of a medical cross symbol inside a circle, enclosed in a rectangle (no text or labels)Viseur
natural_image
Line drawing of a DSLR camera with no visible text or symbolsnatural_image
Simple circular target symbol with cross and rectangular elements, no text or labels presentZone de mesure
natural_image
Simple geometric diagram with a central crosshair and two rectangular blocks inside a rectangle (no text or symbols)natural_image
Symmetrical geometric diagram with four quadrants and directional arrows, no text or symbols presentnatural_image
Mechanical diagram showing a clamp or bracket assembly with a handle and spring (no text or symbols)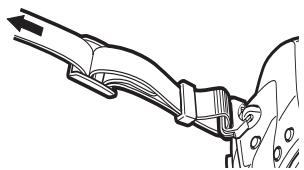
natural_image
Technical line drawing of a mechanical clamp or bracket assembly (no text or symbols)Laden des Akkus
natural_image
Diagram of a car interior showing a hand valve and handle mechanism, with an inset close-up highlighting the lever (no text or symbols present)natural_image
Isometric line drawing of a square electronic device with a small rectangular body and a black arrow pointing to the top surface (no text or symbols)natural_image
Isometric line drawing of a square mechanical component with mounting holes and a central arrow (no text or symbols)Kartenfachdeckel
natural_image
Line drawing of a DSLR camera with internal components and a close-up inset showing the lens (no text or symbols)
natural_image
Line drawing of a DSLR camera with external adjustment knobs and control buttons (no text or symbols)natural_image
Line drawing of a DSLR camera with control panel and buttons (no text or symbols)De
natural_image
Mechanical diagram showing a rotating component with directional arrows indicating motion (no text or symbols)

AEL-Taste (AE-Speicher)

natural_image
Simple circular icon with a cross and two rectangular buttons, no text or symbols present.Messbereich
natural_image
Simple geometric diagram with a central cross and two rectangular blocks, no text or symbols present.natural_image
Symmetrical geometric diagram with four triangles and a central circle, no text or symbols presentREINIG. MOD (CLEANING MODE)
natural_image
Mechanical diagram showing a clamp or bracket assembly with a handle and spring (no text or symbols)4

natural_image
Technical line drawing of a mechanical assembly with no visible text or symbolsCarga de la batería
natural_image
Diagram of a device being placed on top of a tray, showing internal structure and a downward arrow (no text or symbols)natural_image
Diagram of a car interior showing a valve mechanism and a magnified inset (no text or symbols)natural_image
Isometric line drawing of a rectangular electronic device with a central square and a small protrusion (no text or symbols)natural_image
Isometric line drawing of a square mechanical component with mounting holes and a central arrow (no text or symbols)natural_image
Technical line drawing of a DSLR camera showing internal components and a close-up view of the lens (no text or symbols present)Botón de expulsión
natural_image
Line drawing of a DSLR camera with external adjustment knobs and control buttons (no text or symbols)natural_image
Line drawing of a DSLR camera with control panel and buttons (no text or symbols)Es
natural_image
Mechanical diagram showing a rotating component with directional arrows indicating motion (no text or symbols)Retiro del ocular
Botones y menús
Botones y menús
natural_image
Simple line drawing of a medical or anatomical symbol resembling a cross within a circle, with no readable text or labels.Visor

natural_image
Simple circular diagram with a cross and two rectangular elements, no text or symbols present.Metering area
natural_image
Simple geometric diagram with a central crosshair and two rectangular elements inside a rectangle (no text or symbols)natural_image
Symmetrical geometric diagram with four quadrants and directional arrows, no text or symbols presentShinjuku Monolith, 3-1 Nishi-Shinjuku 2-chome, Shinjuku-ku, Tokyo 163-0914
OLYMPUS AMERICA INC.
Two Corporate Center Drive, Melville, NY 11747-3157, U.S.A. Tel. 1-631-844-5000