
32HYC01 - TV HITACHI - Free user manual and instructions
Find the device manual for free 32HYC01 HITACHI in PDF.

| Product Type | LED-backlit LCD TV |
| Screen Size | 32 inches (81 cm) |
| Resolution | 1366 x 768 (HD Ready) |
| Operating Voltage | 220-240V AC, 50 Hz |
| Power Consumption | Approx. 50 W (typical) |
| TV Broadcasting | PAL/SECAM B/G D/K, DVB-T/C/S |
| Number of Preset Channels | 1000 |
| Audio Output | 2 x 5 W (stereo) |
| Connectivity | 2x HDMI, 1x SCART, 1x Component (YPbPr), 1x PC Input, 1x USB, 1x CI Slot, RF Input, SPDIF Out, Headphone Jack |
| USB Recording | FAT32 format, timeshift, instant recording (up to 10 hours) |
| Media Playback | MPEG, MP3, JPEG, subtitle files (SRT, SUB) |
| Remote Control | RC4862 with MY BUTTON programmable function |
| Weight (approx.) | 5 kg (with stand) |
| Dimensions (W x H x D, approx.) | 735 x 435 x 80 mm (without stand) |
| Ventilation | Keep at least 10 cm free space around the set |
| Safety | Do not remove cover; no user-serviceable parts; disconnect during storms |
| Environmental | Energy-saving mode (Eco), auto power-off, WEEE compliant |
| Cleaning | Unplug before cleaning; use soft dry cloth; no liquid cleaners |
Frequently Asked Questions - 32HYC01 HITACHI
User questions about 32HYC01 HITACHI
0 question about this device. Answer the ones you know or ask your own.
Ask a new question about this device
Download the instructions for your TV in PDF format for free! Find your manual 32HYC01 - HITACHI and take your electronic device back in hand. On this page are published all the documents necessary for the use of your device. 32HYC01 by HITACHI.
USER MANUAL 32HYC01 HITACHI
natural_image
Black-and-white illustration of a Hitachi TV displaying two human eyes with detailed eyelashes (no text or symbols on the image itself)Quick Start Guide
ENGLISH
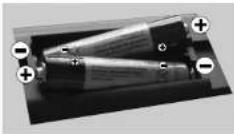
1 Insert the batteries into the handset
Insert two AAA/R3 or equivalent type batteries inside. Observe the correct polarity (+/-) when inserting batteries and replace the battery cover.
RC4862
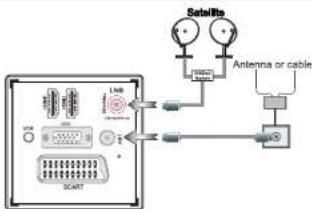
2 Connect antenna/cable/satellite to your TV
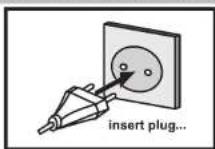
3 Connect the TV to the mains socket
4 To switch the TV on (Depending on the model)
- Connect the power cord to the 220-240V AC 50 Hz - Press STANDBY touch button. Then the standby LED lights up.
- To switch on the TV from standby mode either: - Press the "O" button, P+/P- or a numeric button on the remote control.
- Press the -P/CH or P/CH+ touch button on the TV. The TV will then switch on.
By either method the TV will switch on.
-or-
- Connect the power cord to the 220-240V AC 50 Hz. • Then the standby LED lights up (The led will blink during the standby On/Off).
• To switch on the TV from standby mode either: - Press the "O" button, P+ or P- or a numeric button on the remote control.
- Press the middle of the control switch, located on the right side of the TV. The TV will then switch on.
5 Starting Auto Setup Procedure
IMPORTANT: Ensure that the signal is connected and a Common Interface module is not inserted before switching on the TV for the first time installation. Do not insert a common interface module during the search process.
- When the TV is turned on for the first time the language screen will be displayed. Select the desired language using Up or Down button and press OK to save and continue.
- After setting the language, First Time Installation screen will be displayed. Use Up/Down and Left/Right buttons to set the desired options.
- Press OK button on the on the remote control to continue and "Please select digital search type" screen will be displayed. You must select a search type to search and store broadcasts from the desired source.
Aerial Installation: If you select AERIAL option from the Search Type screen, the television will search for digital terrestrial TV broadcasts. After all the available stations are stored, Channel List will be displayed on the screen. If you like to sort channels, according to the LCN(*), please select "Yes" and then press OK. (*) LCN is the Logical Channel Number system that organizes available broadcasts in accordance with a recognizable channel sequence.
Cable Installation: If you select CABLE option and press OK button on the remote control to continue, a confirmation message will be displayed on the screen. Select YES to continue.
You can select frequency ranges from this screen. You can enter the frequency range manually by using the numeric buttons on the remote control. Set Start and Stop Frequency as desired by using numeric buttons on the remote control. After this operation, you can set Search Step as 8000 KHz or 1000 KHz. If you select 1000 KHz, the TV will perform search process in a detailed way. Searching duration will thus increase accordingly. When finished, press OK button to start automatic search. The TV will search and store available broadcasts.
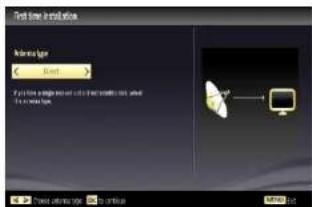
Satellite Installation: If you select Satellite option from the Search Type screen, you can set a satellite and watch satellite channels. When you select Satellite installation, Antenna Type menu will be displayed. There are three types of antenna selection. You can select Antenna type as Direct, Unicable or DiSEqC switch by using Left or Right button.

Direct: If you have a single receiver and a direct satellite dish, select this antenna type. After selecting Direct, another menu screen will be displayed. Select an available satellite and press OK to scan for services.
Unicable: If you have multiple receivers and a unicable system, select this antenna type. Press OK to continue. Configure settings by following instructions on the screen. Press OK to scan for services.
DiSEqC switch: If you have multiple satellite dishes and a DiSEqC switch, select this antenna type. After selecting DiSEqC switch, another menu screen will be displayed. You can set four DiSEqC options (if available). Press GREEN button to scan all satellites or press YELLOW button to scan only the highlighted satellite. To save and exit press OK button.
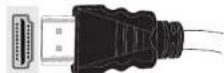
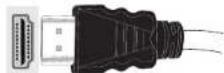
6 HDMI to HDMI Cable Connection
To HDMI connection on the device
7 HDMI input
To select the HDMI input, press the "SOURCE" button on the remote control. Each time it is pressed the on-screen menu confirms your selection.

RC4862
Programme Recording & Playback
ENGLISH
8
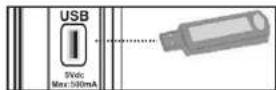
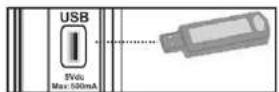
Connect a USB memory stick to your TV

IMPORTANT: To record a programme, you should first connect a USB memory stick to your TV while the TV is switched off. You should then switch on the TV to enable recording feature. Otherwise, recording feature will not be available.
You should back up your files before making any connections to the TV set in order to avoid any possible data loss. Note that manufacturer will not be responsible for any file damage or data loss.
CAUTION!
- Quickly plugging and unplugging USB devices, is a very hazardous operation. Especially, do not repeatedly quickly plug and unplug the drive. This may cause physical damage to the USB player and especially the USB device itself. - Do not pull out USB module while playing or recording a file.
For more information on USB memory stick connection, recording types and programme playback, please refer to the instruction book.
IMPORTANT: The TV can record only to FAT32 disk formatting. NTFS format is not available for recording. If you connect a USB disk with NTFS format, the TV will ask you to format the content. See the section, "Format Disk" in the instruction book for more information on disk formatting.
Note that ALL the data stored on the USB disk will be lost and then the disk format will be converted to FAT32 in such a case.
9
Instant Recording

Press ■(RECORD) button to start recording an event instantly while watching a programme. The following OSD appears on the screen:
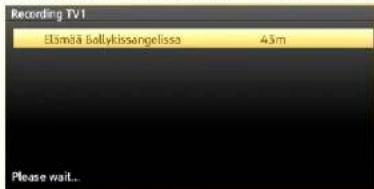
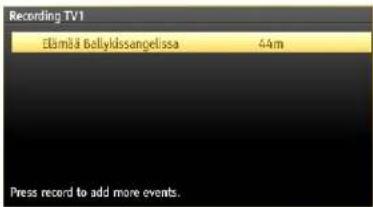
Record OSD will then be displayed for a short time and the current event will be recorded. You can press ■ (RECORD) button on the remote control again to record the next event on the EPG. In this case, OSD will display the programmed events for recording.
Press ■ (STOP) button to cancel instant recording. The following OSD will be displayed. Select Yes by using Left or Right and OK buttons to cancel instant recording.

10
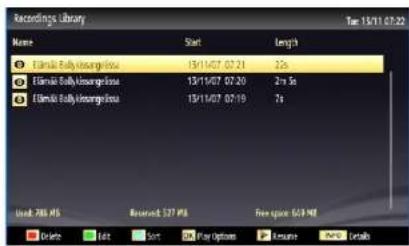
Programme Playback

In the main menu, use Left or Right buttons to select Media Browser. Highlight Recordings Library item by using Left or Right button and press OK button to enter. Recordings Library will then be displayed.

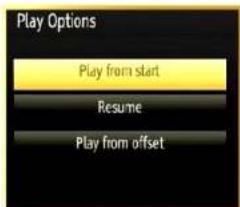
Select a recorded item from the list (if previously recorded) by using Up or Down button. Press OK button to view Play Options. Select an option by using Up or Down and OK buttons.
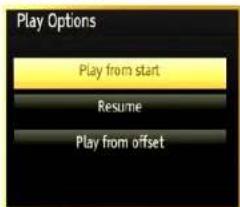
Available playback options:
- Play from start: Plays the recording from the beginning.
- Resume: Recommences the recordings.
- Play from offset: Specifies a playing point.
Note: Viewing main menu and menu items will not be available during the playback.
Press ■(STOP) button to stop a playback and return to Recordings Library
Contents
Preparation & Safety Precautions ...... 2
Preparation....4
DVD Mode Important Information....4
Specifications 5
PC Typical Display Modes....5
Remote Control RC 4862....6
General DVD Operation 7
Viewing the Connections 8
Viewing the Connections - continued 9
TV and Operating Buttons 10
Environmental Information 10
Step 1 - Checking the TV and Accessories ......11
Step 2 - Installing the Batteries to the Remote......11
Step 3 - Connect Power and Antenna/Cable......11
Step 4 - Switching On/Off....11
Step 5 - First Time Installation....12
USB Connection....12
Side View Usb Memory 12
Media Playback via USB Input 13
Timeshift Recording 13
Instant Recording 13
TV Menu Features and Functions 14
General TV Operation 17
Configuring Parental Settings....17
Electronic Programme Guide (EPG) 17
Software Upgrade.... 17
Troubleshooting & Tips 18
Definition of important terms - TV....19
AV and HDMI Signal Compatibility 19
Supported File Formats for USB Mode 20
To operate your TV in extreme ambient conditions may cause the damage of the device.

Before lightning or storms, or if the TV is not going to be used for a while (e.g. if going away on holiday), disconnect the TV set from the mains. The mains plug is used to disconnect TV set from the mains and therefore it must remain readily operable.

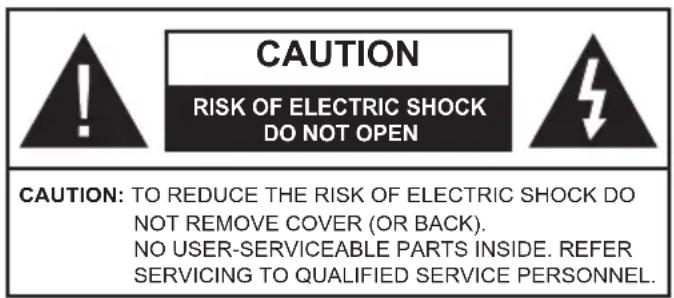
The exclamation point within an equilateral triangle is intended to alert the user to the presence of important operating and maintenance (servicing) instructions in the literature accompanying the appliance.
Note : Follow the on screen instructions for operating the related features.

IMPORTANT - Please read these instructions fully before installing or operating
For ventilation, leave a free space of at least 10 cm all around the set. To prevent any fault and unsafe situations, please do not place any objects on top of the set. Use this device in moderate climates. Read the following recommended safety precautions carefully for your safety.
Power Source: The TV set should be operated only from a 220-240 V AC, 50 Hz outlet. Ensure that you select the correct voltage setting for your convenience.
Power Cord: Do not place the set, a piece of furniture, etc. on the power cord (mains lead) or pinch the cord. Handle the power cord by the plug. Do not unplug the appliance by pulling from the power cord and never touch the power cord with wet hands as this could cause a short circuit or electric shock. Never make a knot in the cord or tie it with other cords. The power cords should be placed in such a way that they are not likely to be stepped on. A damaged power cord can cause fire or give you an electric shock. When it is damaged and needs to be replaced, it should be done by qualified personnel.
This TV receiver is supplied with a moulded mains plug. The mains plug must not be cut off, as it may contain a special radio interference filter, the removal of which could lead to impaired performance. If you wish to extend the lead, obtain an appropriate safety approved extension lead or consult your dealer.
Observe the manufacturers instructions when connecting extension leads to the set.
Moisture and Water: Do not use this device in a humid and damp place (avoid the bathroom, the sink in the kitchen, and near the washing machine). Do not expose this device to rain or water, as this may be dangerous and do not place objects filled with liquids, such as flower vases, on top. Avoid from dripping or splashing. If any solid object or liquid falls into the cabinet, unplug the TV and have it checked by qualified personnel before operating it any further.
Cleaning: Before cleaning, unplug the TV set from the wall outlet. Do not use liquid or aerosol cleaners. Use soft and dry cloth.
Ventilation: The slots and openings on the TV set are intended for ventilation and to ensure reliable operation. To prevent overheating, these openings must not be blocked or covered in anyway.
Heat and Flames: The set should not be placed near to open flames and sources of intense heat such as an electric heater. Ensure that no open flame sources, such as lighted candles, are placed on top of the TV. Batteries should not be exposed to excessive heat such as sunshine, fire or the like.

Lightning: Before a storm and lightning or when going on holiday, disconnect the power cord from the wall outlet.
Replacement Parts: When replacement parts are required, make sure that the service technician has used replacement parts, which are specified by the manufacturer or have the same specifications as the original one. Unauthorized substitutions may result in fire, electrical shock or other hazards.
Servicing: Please refer all servicing to qualified personnel. Do not remove the cover yourself as this may result in an electric shock.
CAUTION
- Do not put your fingers in the middle between the TV and stand, especially when you carry the TV, as they may be injured.
- Occasionally, a few non-active pixels may appear on the screen as a fixed blue, green or red point. Please note that this does not affect the performance of your product. Take care not to scratch the screen with fingernails or other hard objects.
- Do not put your finger into the speaker hole on the backcover of the TV, as it may be injured.
Waste Disposal:
Packaging and packaging aids are recyclable and should principally be recycled. Packaging materials, such as foil bag, must be kept away from children. Batteries, including those which are heavy metal-free, should not be disposed of with household waste. Please dispose of used batteries in an environmentally friendly manner. Find out about the legal regulations which apply in your area.
- Don't try to recharge batteries. Danger of explosion. Replace batteries only with the same or equivalent type.


• The above mark is in compliance with the Waste Electrical and Electronic Equipment Directive 2002/96/EC (WEEE). The mark indicates the requirement NOT to dispose the equipment including any spent or discarded batteries as unsorted municipal waste, but use the return and collection systems available. If the batteries or accumulators included with this equipment display the chemical symbol Hg, Cd, or Pb, then it means that the battery has a heavy metal content of more than 0.0005% Mercury, or more than 0.002% Cadmium or more than, 0.004% Lead.
Disconnecting the Device: The mains plug is used to disconnect TV set from the mains and therefore it must remain readily operable.
Headphone Volume: Excessive sound pressure from earphones and headphones can cause hearing loss.

Installation: To prevent injury, this device must be securely attached to the wall in accordance with the installation instructions when mounted to the wall (if the option is available).
Connection to a Television Distribution System (Cable TV etc.) from Tuner: Device connected to the protective earthing of the building installation through the mains connection or through other apparatus with a connection to protective earthing-and to a television distribution system using coaxial cable, may in some circumstances create a fire hazard. Connection to a cable distribution system has therefore to be provided through a device providing electrical isolation below a certain frequency range (galvanic isolator, see EN 60728-11).
Electrical device not in the hands of children
Never let children use electrical device unsupervised. Children can't always recognize properly the possible dangers. Batteries / accumulators can be life threatening when swallowed. Store batteries out of reach of small children. In case of swallowing a battery, medical aid has to be sought immediately. Also keep the packaging foils away from children. There is danger of suffocation.
Specification and operation may vary according to which TV you have purchased.
Preparation
For ventilation, leave a free space of at least 10 cm all around the set. To prevent any fault and unsafe situations, please do not place any objects on top of the set. Use this device in moderate climates.
DVD Mode Important Information
(*) Available for TV-DVD models.
Safety Precautions
CAUTION
DVD Player is a class 1 laser product. However this product uses a visible laser beam which could cause hazardous radiation exposure. Be sure to operate the player correctly as instructed.
THE FOLLOWING CAUTION LABEL IS LOCATED ON THE REAR PANEL OF THE UNIT.
CLASS 1 LASER PRODUCT
WHEN THIS UNIT IS PLUGGED INTO THE WALL OUTLET, DO NOT PLACE YOUR EYES CLOSE TO THE OPENINGS TO LOOK INTO THE INSIDE OF THIS UNIT.
USE OF CONTROLS OR ADJUSTMENTS OR PERFORMANCE OF PROCEDURES OTHER THAN THOSE SPECIFIED HEREIN MAY RESULT IN HAZARDOUS RADIATION EXPOSURE.
DO NOT OPEN COVERS AND DO NOT REPAIR YOURSELF. REFER SERVICING TO QUALIFIED PERSONNEL.
Notes on Discs
On handling discs
- To keep the disc clean, handle the disc by its edge. Do not touch the surface.
- Do not stick paper or tape on the disc.
- If the disc is contaminated with any substance like glue remove before using it.

natural_image
Illustration of a hand holding a circular object and a cross-shaped object on a ring (no text or symbols)- Do not expose the disc to direct sunlight or heat sources such as hot air ducts, or leave it in a car parked in direct sunlight as the temperature can rise quickly and damage the disc.
• After playing, store the disc in its case.
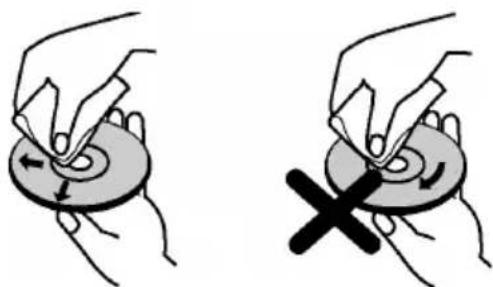
On cleaning
- Before playing, clean the disc with a cleaning cloth. Wipe the disc from the center out.
natural_image
Illustration of two hands performing a circular motion or maneuvering operation, one with an arrow indicating leftward movement and the other with a cross symbol (no text or symbols present)- Do not use solvents such as benzine, thinner, commercially available cleaners or anti-static spray intended for vinyl LPs.
Licence Notification
This product incorporates copyright protection technology that is protected by U.S. patents and other intellectual property rights. Use of this copyright protection technology must be authorized by Rovi Corporation, and is intended for home and other limited viewing uses only unless otherwise authorized by Rovi Corporation. Reverse engineering and disassembly are prohibited.
How to Watch a DVD
When placing a disc into the loader, labelled side of the disc should be on the front:
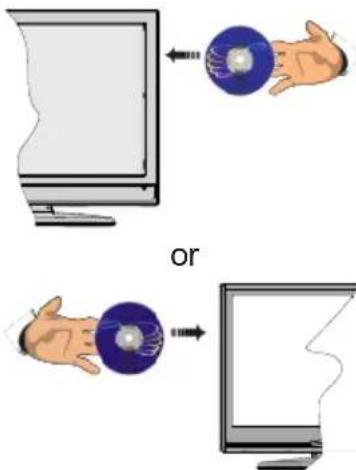
When TV set is turned on, first switch to DVD source by using the Source button on the remote control. Press play on the remote control, or directly press play button at the side panel. If there is no disc inside the loader, place a DVD first and press play.
Specifications
TV BROADCASTING
PAL/SECAM B/G D/K
RECEIVING CHANNELS
VHF (BAND I/III), UHF (BAND U), HYPERBAND
NUMBER OF PRESET CHANNELS
1000
CHANNEL INDICATOR
On Screen Display
RF AERIAL INPUT
75 Ohm (unbalanced)
OPERATING VOLTAGE
220-240V AC, 50 Hz.
AUDIO
Refer to additional sheet
POWER CONSUMPTION (W)
Refer to back cover label
DVB-T functionality information
This DVB receiver is only suitable for use in the country which it was designed to be used in.
Although this DVB receiver conforms to the latest DVB specifications at the time of manufacture, we cannot guarantee compatibility with future DVB transmissions due to changes that may be implemented in broadcast signals and technologies.
Some digital television functions may not be available in all countries.
We continually strive to improve our products; therefore, specifications may change without prior notice.
For advice on where to purchase accessories, please contact the store where you purchased your equipment.
PC Typical Display Modes
The following table is an illustration of some of the typical video display modes. Your TV may not support all resolutions. Your TV supports up to 1360x768 (for WXGA displays) or 1920x1080-1200 (for Full HD displays)
| Index | Resolution Frequency | |
| 1 | 640x350 85 Hz | |
| 2 | 640x400 70 Hz | |
| 3 | 640x480 60Hz-66Hz-72Hz -75Hz-85Hz | |
| 4 | 800x600 56Hz-60Hz-70Hz-72Hz -75Hz-85Hz | |
| 5 | 832x624 75 Hz | |
| 6 | 1024x768 60Hz-66Hz-70Hz-72Hz -75Hz | |
| 7 | 1152x864 60Hz-70Hz-75Hz -85 Hz | |
| 8 | 1280x768 60 HzA - 60 HzB-75Hz-85Hz | |
| 9 | 1280x960 | 60Hz-75Hz-85Hz |
| 10 | 1280x1024 | 60Hz-75Hz-85Hz |
| 11 | 1360x768 | 60 Hz |
| 12 | 1400x1050 | 60 HzA-60 HzB |
| 13 | 1400x1050 | 75Hz-85Hz |
| 14 | 1400x900 | 65Hz - 75Hz |
| 15 | 1600x1200 | 60 Hz |
| 16 | 1680x1050 | 60 Hz |
| 17 | 1920x1080 | 60 HzA - 60 HzB |
| 18 | 1920x1200 | 60Hz - 60HzA |
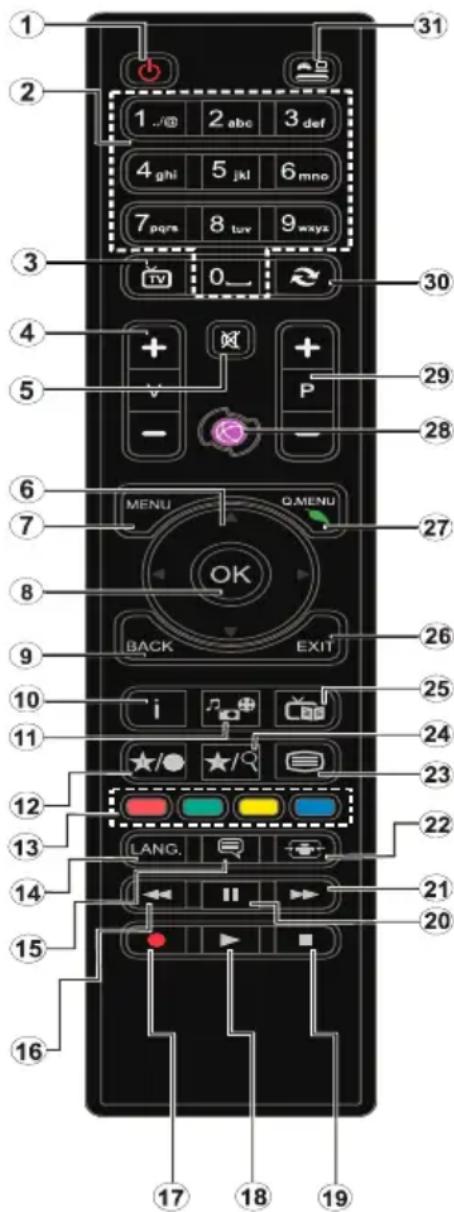
Remote Control RC 4862
- Standby: On / Off switch of the TV
- Numeric buttons: Used to navigate channels and enter passwords, text etc.
- TV: Displays channel list
- Volume +/-
- Mute: Completely turns off the volume of the TV
- Navigation buttons: Helps navigate menus, content etc. and displays the subpages in TXT mode when pressed Right
- Menu: Displays TV menu
- OK: Confirms user selections, holds the page (in TXT mode), views channel list (DTV mode)
- Back: Returns to previous screen, opens index page (in TXT mode)
- No function
- Media browser: Opens the media browsing screen
- My button 1 (*)
- Coloured Buttons
- Language: Switches between sound modes, displays and changes audio/subtitle language (where available)
- Subtitles: Turns subtitles on and off (where available)
- Rapid reverse: Moves frames backwards in media such as movies
- Record: Records programmes
- Play: Starts to play selected media
- Stop: Stops the media being played
- Pause: Pauses the media being played, starts timeshift recording
- Rapid advance: Moves frames forward in media such as movies
- Screen: Changes the aspect ratio of the screen
- Text: Displays teletext (where available), press again to superimpose the teletext over a normal broadcast picture (mix)
- My button 2 (**)
- EPG (Electronic programme guide): Displays the electronic programme guide
- Exit: Closes and exits from displayed menus or returns to previous screen
- Quick Menu: Displays a list of menus for quick access
- Info: Displays information about on-screen content, shows hidden information (reveal - in TXT mode)
- Programme +/-
- Swap: Quickly cycles between two channels
- Source: Shows all available broadcast and content sources
(*) MY BUTTON (1-2):
This button may have a default function depending on the model. However you can set a special function to this button by pressing on it for five seconds when on a desired source, channel or link. A confirmation message will be displayed on the screen. Now the MY BUTTON is associated with the selected function.
Note that if you perform First Time Installation, MY BUTTON will return to its default function.
Note: Functional button indications on some menu screens may vary in accordance with the remote control of your TV. Follow the button functions located at the bottom of the screen.
General DVD Operation
You can operate DVD, movie CD, music or picture CD's content by using the proper buttons on your remote control. Below are main functions of commonly used remote control buttons.
| Buttons DVD | Playback Movie Playback Picture Playback | Music Playback | ||
| ▶ | Play Play Play Play | |||
| II | Pause Pause | Pause Pause | ||
| ■ | Stop Stop Stop Stop | |||
| ◀/▶ | Skip backward/forward | Skip backward/forward | Rotate Skip backward/forward | |
| ▼/▲ | Highlights a menu item / Shifts the zoomed picture up or down (if available). | |||
| ◀◀/▶▶ | Rapid advance / Rapid reverse | |||
| MEDIA BROWSER | Views the scene from different angles(if available) | Changes slide effect(depends on the content) | X | |
| MY BUTTON 1 | Displays time / Views main setup menu | |||
| INFO | Time counter mode selection (during playback). Press repeatedly to switch between modes. | |||
| LANGUAGE | Auto language | X | X | |
| MENU | Displays TV menu. | |||
| OK | Enter / View / Play | |||
| GREEN BUTTON | Displays repeat options. | |||
| BACK | Returns back to the previous menu (if available). | |||
| YELLOW BUTTON | Goes back to the root folder (if available). | |||
| MY BUTTON 2 | Direct selection of scenes or time. | Selects the desired file. | Selects the desired file. | |
| SUBTITLES | Subtitle on-off. Press repeatedly to switch between subtitle options. | X | X | |
| BLUE BUTTON | Displays disc menu(if available). | Displays disc menu(if available). | X | X |
| RED BUTTON | Zooms picture. Press repeatedly to switch between zoom options. | |||
| Other Functions – Button Combinations (During playback) | |
| + | Slow forward |
| ( + ) + | Sets slow forward speed |
| + | Sets rapid advance speed |
| + | Sets rapid reverse speed |
| + | Confirms stop command |
(*) You can switch to title by pressing numeric keys directly. You need to press 0 and then digit key to switch one digit titles (example: to select 5, press 0 and 5).
Note: Connections may vary depending on your model.
| Connection Description Other Details | ||
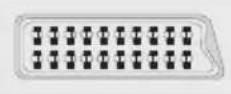 | Scart socket inputs or outputs for external devices.Note: If an external device is connected via the SCART socket, the TV will automatically switch to AV mode. | |
 | Component Video Inputs (YPbPr) are used for connecting component video. | Green, Blue, Red; Rear side, Optional |
 | PC/YPbPr Audio Inputs are used for connecting audio signals of a PC or a device that connects to the TV via YPbPr. | White, Red; Rear side, Optional |
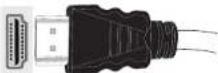
 | HDMI Inputs are for connecting a device that has an HDMI socket (DVD Player, Set-Top-Box vb). Your LCD TV is capable of displaying High Definition pictures from the connected devices. You can use side HDMI input of the TV to connect to an external HDMI device. Use an HDMI cable to connect.HDMI DEVICE SIDE VIEW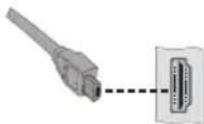 | Rear and/or Side |
 | PC Input is for connecting a personal computer to the TV set. For displaying your computer's screen image on your LCD TV, you can connect your computer to the TV set. Resolution information can be found at the end of this booklet.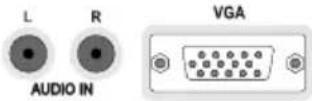 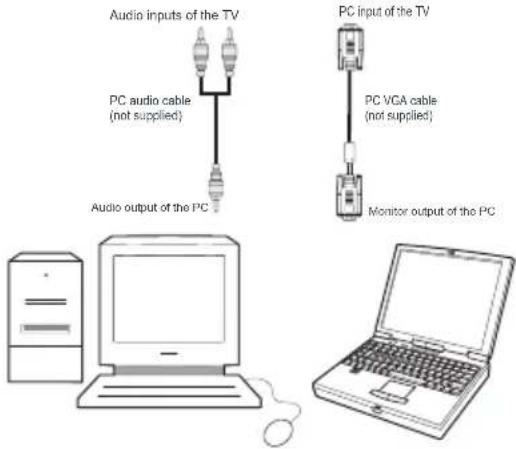 Note: If your TV does not have YPbPr inputs, you can connect a YPbPr device to your TV by using the PC Input with a YPbPr to PC cable (availability is dependent on the model). Use Side AV audio connectors to enable sound connection in such a case.Headphone jack is used for connecting an external headphone to the system. Note: If your TV does not have YPbPr inputs, you can connect a YPbPr device to your TV by using the PC Input with a YPbPr to PC cable (availability is dependent on the model). Use Side AV audio connectors to enable sound connection in such a case.Headphone jack is used for connecting an external headphone to the system. | YPbPr to PC connection is optional, depends on the model. |
 | Side Video input is used for connecting video signals of a camcorder or any other video device. Use Side Audio inputs to enable sound connection. | Side, Yellow RCA jack, optional. |
 | Side Audio inputs are used for connecting audio signals of an AV device. | Side, Red and White RCA jacks, optional. |
 | Side audio-video connection input is used for connecting video and audio signals of external devices. Use the supplied AV connection cable to enable Side AV connection. (depending on the model) Use the YELLOW input to connect a video cable, use RED and WHITE inputs to connect an audio cable (depending on the model). | Side, AV Phono jack, optional. 1 X Video & Audio Connection Cable will be supplied if this connector is available in your model. |
 | SPDIF Coaxial Out outputs digital audio signals of the currently watched source. Use an appropriate SPDIF cable to enable sound connection via SPDIF output of the TV. | Black, Rear side |
 | RF Input connects to an aerial antenna system or a cable. | |
 | CI card allows you to view all the channels that you subscribe to. | |
 | USB input(s) Side | |
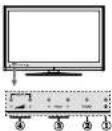
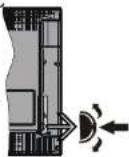
TV and Operating Buttons
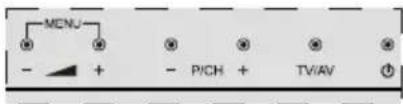

Standby/On
TV/AV
Source
-P/CH+
Programme +/-
-
Volume +/-
Note: Press "an" button at the same time to view main menu.
-or-
- Up direction
- Down direction
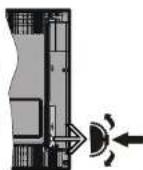
- Programme/Volume / AV / Standby-On selection switch
Note: You can move the switch, upward or downward to change the volume. If you want to change channels,
natural_image
Architectural floor plan showing room layouts and structural elements (no text or labels)
press the middle of the switch once (Position 3) and then move upward or downward. If you press the middle of the switch once more, source OSD will be displayed. If you press the middle of the switch and hold about a few seconds, the TV will switch to standby mode. Main menu OSD cannot be displayed via control buttons.
Environmental Information
This television is designed to consume less energy to help save the environment. To reduce energy consumption, you should take the following steps:
If you set the Power Save Mode as Eco, the TV will switch to energy-saving mode. The Power Save Mode settings can be found In the 'Picture' section of the Main Menu. Note that some picture settings will be unavailable to be changed.
If Picture Off is selected, "Screen will be off in 3 seconds." message will be displayed. Select PROCEED and press OK to continue. The screen will be off immediately.
When the TV is not in use, please switch off or disconnect the TV from the mains plug. This will also reduce energy consumption.
Step 1 - Checking the TV and Accessories
Note: You should check the accessories after purchasing. Make sure that each accessory is included.
All models are supplied with the following items: Instruction Book, Remote Control, 2 X AAA Batteries and depending on which model you purchased, AV connection Leads.
Step 2 - Installing the Batteries to the Remote
- Lift the cover on the back of the remote gently.
- Install two AAA/R3 batteries. Make sure the (+) and (-) signs match (observe correct polarity).
- Put the cover back on.
Note: Remove the batteries from remote control handset when it is not going to be used for a long period of time. Otherwise possible leakage from the batteries can damage it. Operation range is approximately 7m/23ft.
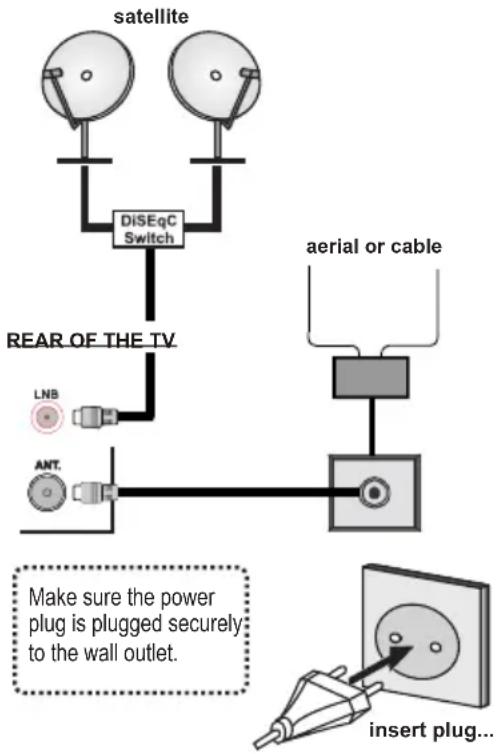
Step 3 - Connect Power and Antenna/Cable
After unpacking, allow the TV set to reach the ambient room temperature before you connect the set to the mains.
Power Cable Connection:
IMPORTANT: The TV set is designed to operate on 220-240V AC, 50 Hz.
Plug the power cable to the mains socket outlet. Leave at least 10mm space around the TV set.
Power off both the TV and the device before making any connections.
Antenna Connection:
Connect the aerial/cable or satellite TV plug to the Aerial, Cable or Satellite INPUT socket located at the rear of the TV.
Satellite and Cable connection are dependent on the model.
flowchart
graph TD
    A["satellite"] --> B["DiSEqC Switch"]
    B --> C["REAR OF THE TV"]
    C --> D["LNB"]
    C --> E["ANT."]
    F["aerial or cable"] --> G
    G --> H["Insert Plug..."]
    style A fill:#f9f,stroke:#333
    style B fill:#ccf,stroke:#333
    style C fill:#cfc,stroke:#333
    style D fill:#fcc,stroke:#333
    style E fill:#cff,stroke:#333
    style F fill:#ffc,stroke:#333
    note1["Make sure the power plug is plugged securely to the wall outlet."] -.-> note2
Step 4 - Switching On/Off
To Switch the TV On
- Connect the power cord to the 220-240V AC, 50 Hz.
- Press Standby button. Then the standby LED lights up.
To switch on the TV from standby mode either:
- Press the Standby button, Programme +/- or a numeric button on the remote control.
Control buttons on the TV
- Press the Programme +/- button on the TV. The TV will then switch on.
-or- - Press the middle of the control switch on the left side of the TV. The TV will then switch on.
To Switch the TV Off(Optional)
- Press the Standby button on the remote control or press the Standby button on the TV or press and hold the control switch on the TV until shut down, so the TV will switch to standby mode.
- To power down the TV completely, unplug the power cord from the mains socket.
Note: When the TV is switched to standby mode, standby LED can blink to indicate that features such as Standby Search, Over Air Download or Timer is active. The LED can also blink when you switch on the TV from standby mode.
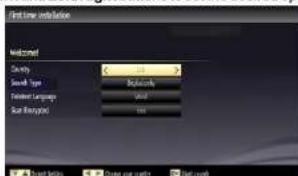
Step 5 - First Time Installation
When turned on for the first time, the language selection screen is displayed. Select the desired language and press OK.
First Time Installation (FTI) screen will be displayed next. Set your preferences using the navigation buttons and when finished, press OK to continue.
You can activate Store mode option to be available in "Other settings" menu and your TV's features will be illustrated on the top of the screen. A confirmation screen will be displayed. Select YES to proceed.
If Home Mode is selected, Store mode will not be available after the First Time Installation. Press OK button to continue.
Note: Deafult PIN code can change depending on the selected country. If you are asked to enter a PIN code for viewing a menu option, use one of the following codes: 4725, 0000 or 1234.
Aerial Installation
If you select AERIAL option from the Search Type screen, the television will search for digital terrestrial TV broadcasts.

NOTE: You can press Menu button to cancel.
After all the available stations are stored, the Channel List will be displayed on the screen. If you like how the channels are sorted according to the LCN (*), please select "Yes" and then press OK.
Press Menu button to quit channel list and watch TV. (*) LCN is the Logical Channel Number system that organizes available broadcasts in accordance with a recognizable channel sequence (if available).
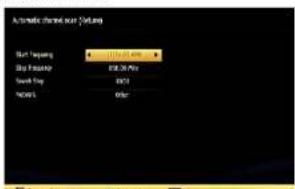
Cable Installation
If you select CABLE option and press OK button on the remote control a confirmation massage will appear on the screen. To continue, please select YES and press OK. To cancel operation, select NO and press OK. You can select frequency ranges from this screen.
Enter the frequency range manually by using the numeric button.
Note: Searching duration will change depending on the selected search step.
Satellite Installation
If you select Satellite option from the Search Type screen, you can set a satellite and watch satellite channels. When you select Satellite installation, Antenna Type menu will be displayed.
There are three types of antenna selection. You can select Antenna type as Direct, Unicable or DiSEqC switch by using “◀or” ”buttons.
Direct: If you have a single receiver and a direct satellite dish, select this antenna type. After selecting
Direct, another menu screen will be displayed. Select an available satellite and press OK to scan for services.
Unicable: If you have multiple receivers and a unicable system, select this antenna type. Press OK to continue. Configure settings by following instructions on the screen. Press OK to scan for services.
DiSEqC switch: If you have multiple satellite dishes and a DiSEqC switch, select this antenna type. After selecting DiSEqC switch, another menu screen will be displayed. You can set four DiSEqC options (if available). Press GREEN button to scan all satellites or press YELLOW button to scan only the highlighted satellite. To save and exit press OK button.
USB Connection
You can connect USB devices to your TV by using the USB inputs of the TV. This feature allows you to display/play JPG, MP3 and video files stored in a USB stick. It is possible that certain types of USB devices (e.g. MP3 Players) may not be compatible with this TV. You should back up your files before making any connections to the TV set in order to avoid any possible data loss. Note that manufacturer will not be responsible for any file damage or data loss. Do not pull out USB module while playing a file.
CAUTION: Quickly plugging and unplugging USB devices, is a very hazardous operation. Especially, do not repeatedly quickly plug and unplug the drive. This may cause physical damage to the USB player and especially the USB device itself.
Side View Usb Memory
Second USB is optional, depending on the model.
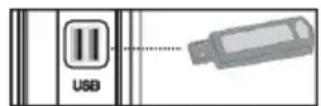
IMPORTANT: The TV should be switched off while plugging or unplugging a USB device. Plug your USB devices to the USB input of the TV. You can connect a usb device to your TV by using the USB input of the TV.
Note: It is possible certain types of hard disk drives are not supported.
- Do not plug out the USB/HDD during the recording. This may harm the connected USB/HDD.
- Radio record is not supported.
- The TV can record programmes up to ten hours.
- An hour of the recordings stored occupies approximately 2 GB of space.
-
Timeshifting may be stopped according to USB device write speed. If the USB device speed is not enough for video stream bitrate, timeshifting may be stopped and recording may fail. If HD service bitrate is greater than 13 Mbp/sec. some freeze can be seen during timeshifting on both USB disk and on external HDD.
-
Some stream packets may not be recorded because of signal problems, so sometimes video may freeze during playback.
- You can use USB hubs with your TV's USB inputs. External power supplied USB hubs are recommended in such a case. It is recommended to use the TV's USB input(s) directly, if you are going to connect a USB hard disk.
Media Playback via USB Input
You can connect a 2.5" and 3.5" inch (hdd with external power supply) external hard disk drives or USB memory stick to your TV by using the USB inputs of the TV.
IMPORTANT! Back up your files before making any connections to the TV. Manufacturer will not be responsible for any file damage or data loss Certain types of USB devices (e.g. MP3 Players) or USB hard disk drives/memory sticks may not be compatible with this TV. The TV supports FAT32 and NTFS disk formatting but recording will not be available with NTFS formatted disks.
While formatting a USB hard disk that has 1TB (Tera Byte) or more file capacity, you can experience problems with the formatting process.
Media Browser Menu
You can play photo, music, and movie files stored on a USB disk by connecting it to your TV. Connect a USB disk to one of the USB inputs located on the side of the TV. Pressing the Menu button while in the Media Browser mode will access the Picture, Sound and Settings menu options. Pressing the Menu button again will exit from this screen. You can set your Media Browser preferences by using the Settings Menu.
| Loop/Shuffle Mode Operation | |
| Start playback with Play button and activate | TV plays next file and loop the list. |
| Start playback with OK and activate | The same file will be played in a loop (repeat). |
| Start playback with OK/Play button and activate | The file will be played in a shuffle. |
Note: Recording feature is optional, depending on the model.
Note: Do not repeatedly quickly plug and unplug the drive. This may cause physical damage to the USB player and USB device itself. Do not pull out USB module while playing a file.
Timeshift Recording
Press Pause button while watching a broadcast to activate timeshifting mode. In timeshifting mode, the programme is paused and simultaneously recorded to the connected USB disk. Press Play button again to resume the paused programme from where you stopped. Press the STOP button to stop timeshift recording and return to the live broadcast.
Note: Timeshift cannot be used while in radio mode.
Note: You cannot use the timeshift fast reverse feature before advancing the playback with the fast forward option.
Instant Recording
Press Record button to start recording an event instantly while watching a programme. You can press Record button on the remote control again to record the next event on the EPG. In this case, an OSD will be displayed, indicating the programmed events for recording. Press Stop button to cancel instant recording.
Note: You can not switch broadcasts or view the Media Browser during the recording mode. While recording a programme or during the timeshifting, a warning message appears on the screen if your USB device speed is not sufficient.
TV Menu Features and Functions
| Picture Menu Contents | |
| Mode | You can change the picture mode to suit your preference or requirements. Picture mode can be set to one of these options: Cinema, Game, Dynamic and Natural. |
| Contrast Sets the lightness and darkness values of the screen. | |
| Brightness | Sets the brightness value for the screen. |
| Sharpness Sets the sharpness value for the objects displayed on the screen. | |
| Colour Sets the colour value, adjusting the colors. | |
| Power Save Mode | To set the Power Save Mode as Eco, Picture Off and Disabled.(When the Mode is Dynamic, Power Save mode is automatically set as disabled.) |
| Backlight (Optional) | This setting controls the backlight level. The backlight function will be inactive if the Power Save Mode is set to Eco. The backlight cannot be activated in VGA, Media Browser mode or while the picture mode is set to Game. |
| Noise Reduction | If the broadcast signal is weak and the picture is noisy, use the Noise Reduction setting to reduce the amount of noise. |
| Advanced Settings | |
| Dynamic Contrast You can change the Dynamic Contrast ratio to desired value. | |
| Colour Temp | Sets the desired colour tone. |
| Picture Zoom | Sets the desired picture size from picture zoom menu.Note: Auto (Only available in Scart mode with SCART PIN8 high voltage/low voltage switching) |
| Film Mode | Films are recorded at a different number of frames per second to normal television programmes. Turn this feature on when you are watching films to see the fast motion scenes clearly. |
| Skin Tone | Skin tone can be changed between -5 and 5. |
| Colour Shift Adjust the desired colour tone. | |
| RGB Gain | You can configure the colour temperature values using the RGB Gain feature. |
| Reset | Resets the picture settings to factory default settings.(Except Game Mode) |
| Autoposition (in PC mode) | Automatically optimizes the display. Press OK to optimize. |
| H Position (in PC mode) | This item shifts the image horizontally to the right hand side or left hand side of the screen. |
| V Position (in PC mode) | This item shifts the image vertically towards the top or bottom of the screen. |
| Dot Clock (in PC mode) | Dot Clock adjustments correct the interference that appear as vertical banding in dot intensive presentations like spreadsheets or paragraphs or text in smaller fonts. |
| Phase (in PC mode) | Depending on the resolution and scan frequency that you input to the TV set, you may see a hazy or noisy picture on the screen. In such a case you can use this item to get a clear picture by trial and error method. |
| While in VGA (PC) mode, some items in Picture menu will be unavailable. Instead, VGA mode settings will be added to the Picture Settings while in PC mode. | |
| Sound Menu Contents | |
| Volume Adjusts the volume level. | |
| Equalizer | Selects the equalizer mode. Custom settings can be made only when in user mode. |
| Balance This setting is | used for emphasizing left or right speaker balance. |
| Headphone Sets headphone | volume. |
| Sound Mode You can | select a sound mode. (If the selected channel supports). |
| AVL (Automatic Volume Limiting) | Function sets the sound to obtain fixed output level between programmes. |
| Digital Out Sets digital | out audio type. |
| Settings Menu Contents | |
| Conditional Access | controls conditional access modules when available. |
| Language | Configures language settings (may change depending on the country selected) Preferred and current settings will be available. Current settings can be changed only if the broadcaster supports. |
| Parental | Enter correct password to change parental settings. You can easily adjust menu lock, maturity lock(may change depending on the country selected) and child lock in this menu. You can also set new pin number. |
| Timers | Sets sleep timer to turn off the TV after a certain time. Sets timers for selected programmes. (USB Record) |
| Recording Configuration | Displays the recording configuration menu (Usb connection required) |
| Date/Time Sets date and time. | |
| Sources Enables or disables | selected source options. |
| Satellite Settings Displays satellite settings. | |
| Other Settings: Displays other setting options of the TV set | |
| Menu Timeout Changes | timeout duration for menu screens. |
| Scan Encrypted Channels | When this setting is on, the search process will locate the encrypted channels as well. |
| Blue Background | Activates or deactivates the blue background system when the signal is weak or absent. |
| Software Upgrade | To ensure that your TV always has the most up to date firmware. |
| Application Version | Displays application version. |
| Hard of Hearing | Enables any special feature sent from the broadcaster. |
| Audio Description | Audio description refers to an additional narration track for blind and visually impaired viewers of visual media, including television and movies. You can use this feature, only if the broadcaster supports that additional narration track.Note: Audio description sound feature cannot be available in recording or time shifting mode. |
| Auto TV Off | You can set the timeout value of auto off feature. When the timeout value is reached and the TV has not been operated for a selected time, the TV will go into standby mode. |
| Biss Key | Biss is a satellite signal scrambling system that is used for some broadcasts. If you need to enter BISS key on a broadcast, you can use Biss Key setting located in the Other Settings menu. Highlight Biss Key and press OK to enter keys on the desired broadcast. |
| Standby Search (Optional) | If the Standby Search is set to On, when the TV is in standby mode, available broadcasts will be searched. If the TV locates any new or missing broadcasts, a menu screen will be displayed, asking you whether or not to execute these changes. Channel list will be updated and changed after this process. |
| Store Mode | If you are displaying the TV in a store, you can activate this mode. Whilst Store Mode is enabled, some items in the TV menu may not be available. |
| Power Up Mode This setting confrigures the power up mode preference. | |
| Install and Retune Menu Contents | |
| Automatic Channel Scan (Retune)(If available) | Displays automatic tuning options. Digital Aerial: Searches and stores aerial DVB stations. Digital Cable: Searches and stores cable DVB stations. Analogue: Searches and stores analogue stations. Digital Aerial & Analogue: Searches and stores aerial DVB and analogue stations. Digital Cable & Analogue: Searches and stores cable DVB and analogue stations. Satellite: Searches and stores satellite stations. |
| Manual Channel Scan | This feature can be used for direct broadcast entry. |
| Network Channel Scan | Searches for the linked channels in the broadcast system. |
| Analogue Fine Tune | You can use this setting for fine tuning analogue channels. This feature is not available if no analogue channels are stored. |
| First Time Installation | Deletes all stored channels and settings, resets TV to factory settings. |
General TV Operation
Using the Channel List
The TV sorts all stored stations in the Channel List. You can edit this channel list, set favourites or set active stations to be listed by using the Channel List options.
Configuring Parental Settings
To prohibit viewing of certain programmes, channels and menus can be locked by using the parental control system.
To display parental lock menu options, the PIN number should be entered. The factory default PIN number is 0000. After coding the correct PIN number, parental settings menu will be displayed.
Menu Lock: Menu lock setting enables or disables the menu access.
Maturity Lock: When set, this option gets the maturity information from the broadcast and if this maturity level is disabled, disables access to the broadcast.
Child Lock: When Child Lock is set, the TV can only be controlled by the remote control. In this case the control panel buttons will not work.
Set PIN: Defines a new PIN number.
Electronic Programme Guide (EPG)
Some, but not all channels send information about the current and next programmes. Press the Epg button to view the EPG menu.
Red button (Prev Day): Displays the programmes of previous day.
Green button (Next day): Displays the programmes of the next day.
Yellow button (Zoom): Expands programme information.
Blue button (Filter): Views filtering options.
Subttl.: Press Subtitles button to view Select Genre menu. Using this feature, you can search the programme guide database in accordance with the genre. Info available in the programme guide will be searched and results matching your criteria will be listed.
Info: Displays, in detailed, information on the programme selected.
Numeric Buttons (Jump): Jumps to the preferred channel directly via numeric buttons.
OK: Displays programme options.
Text (Search): Displays "Guide Search" menu.
Swap (Now): Shows the current programme.
Record: The TV will start to record the selected programme. You can press again to stop the recording.
Programme +/-: More event info.
IMPORTANT: Connect a USB disk to your TV while the TV is switched off. You should then switch on the TV to enable the recording feature.
Note: Switching to a different broadcast or source is not available during a recording.
Record / Delete Record Timer
After you have selected a programme in the EPG menu, press the OK button. Select the Record option and press the OK button. After this operation, a recording will be scheduled for the selected programme.
To cancel an already set recording, highlight that programme and press the OK button and select the option Delete Rec. Timer. The recording will be cancelled.
Set Timer / Delete Timer
After you have selected a programme in the EPG menu, press the OK button. Select the Set Timer on Event option and press the OK button. You can set a timer for future programmes. To cancel an already set timer, highlight that programme and press the OK button. Then select "Delete Timer" option. The timer will be cancelled.
Note: It is not possible to record two channels at the same time.
Software Upgrade
Your TV is capable of finding and updating automatically via the Aerial/Cable/Satellite signal or over the Internet.
Software upgrade search via user interface
Simply navigate on your main menu. Choose Settings and select Other Settings menu. In Other Settings menu navigate on to the Software for Upgrade item and press OK button to check for a new software upgrade.
Note : Internet connection is needed. If an internet connection is not available, try to upgrade via broadcast. If a new upgrade is found, it starts to download the upgrade. Press OK to continue with the reboot operation.
3 AM search and upgrade mode
While the TV is connected to an aerial signal. If Automatic scanning in the Upgrade Options menu is enabled, the TV wakes up at 03:00 and searches broadcast channels for new software upgrades. If new software is found and downloaded successfully, the next time the TV powers up, it will have the new software version.
Note: If the TV fails to come on after the upgrade unplug the TV for 2 minutes and plug in again.
Troubleshooting & Tips
Tv will not turn on
Make sure the power cord is plugged in securely to wall outlet. The batteries in the remote control may be exhausted. Press the Power button on the TV.
Poor picture
- Have you selected the correct TV system?
- Low signal level can cause picture distortion. Please check antenna access.
- Check if you have entered the correct channel frequency if you have done manual tuning.
- The picture quality may degrade when two devices are connected to the TV at the same time. In such a case, disconnect one of the devices.
No picture
- No Picture means that your TV is not receiving a transmission. Have you selected the correct button on the remote control? Try once more. Also make sure the correct input source has been selected.
• Is the antenna connected properly?
• Is the antenna cable damaged? - Are suitable plugs used to connect the antenna?
- If you are in doubt, consult your dealer.
No sound
- Has the TV been set to mute? To cancel mute, press the Mute button, or increase the volume level.
- Sound is coming from only one speaker. Is the balance set to one extreme? See Sound Menu section.
Remote control - does not operate
- The batteries may be exhausted. Replace the batteries.
Input sources - can not be selected
- If you cannot select an input source, it is possible that no device is connected. if not
- Check the AV cables and connections if you have tried to connect a device.
Recording unavailable
To record a programme, you should first connect a USB disk to your TV while the TV is switched off. You should then switch on the TV to enable recording feature. If you cannot record, try switching off the TV and then re-inserting the USB device.
USB is too slow
If a “USB is too slow” message is displayed on the screen while starting a recording, try restarting the recording. If you still get the same error, it is possible that your USB disk does not meet the speed requirements. Try connecting another USB disk.
Notes:
- Recorded programmes are saved into the connected USB disk. If desired, you can store/copy recordings onto a computer; however, these files will not be available to be played on a computer. You can play the recordings only via your TV.
- Lip Sync delay may occur during the timeshifting. Radio record is supported. The TV can record programmes up to ten hours.
- Recorded programmes are split into 4GB partitions.
- Do not plug out the USB/HDD during a recording. This may harm the connected USB/HDD.
- Multipartition support is available. The maximum of two different partitions are supported. The first partition of the USB disk is used for PVR ready features. It also must be formatted as the primary partition to be used for the PVR ready features.
- Some stream packets may not be recorded because of signal problems, so sometimes video may freeze during playback.
- Record, Play, Pause, Display (for PlayListDialog) keys can not be used when teletext is ON. If a recording starts from timer when teletext is ON, teletext is automatically turned off. Also teletext usage is disabled when there is an ongoing recording or playback.
Definition of important terms - TV
Aspect Ratio
This refers to the ratio of the width to the height of a picture.
AVL
Automatic volume limiter.
Brightness
This defines the overall light level of the entire image.
Contrast
This will adjust the range of optical density and tone of the complete picture.
Component Audio Inputs
Used for the standard analog audio for interconnection of components.
Component Video Inputs (Y/Pb/Pr)
This video signal consists of colour differences and a luminance signal.
DTV
Digital television broadcasts.
HDMI
High Definition Multimedia Interface. This connection provides high-quality, uncompressed digital video and audio, combining both audio and video signals via a single connection.
Multichannel audio
Means that the TV program is aired in several audio versions, for example, in two different languages. This is possible if on an analogue TV each of the two channels of the stereo tracks for left and right channels are occupied with one audio track in mono (single channel). In digital TV multiple audio streams can be broadcasted and selected on the receiver side.
NTSC
United States' standard for scanning television signals that has been adopted by some other countries.
LCN
LCN is the Logical Channel Number system that organizes available broadcasts in accordance with a recognizable channel sequence.
OSD
On Screen Display. Information, like channel number and volume on the screen of a TV.
Notification
TRADEMARK ACKNOWLEDGMENT
Manufactured under license from Dolby Laboratories. Dolby and the double-D symbol are trademarks of Dolby Laboratories.

DOLBY. DIGITAL PLUS
The terms HDMI and High-Definition Multimedia Interface, and the HDMI Logo are trademarks or registered trademarks of HDMI Licensing LLC in the United States and other countries.

HIGH-DEFINITION MULTIMEDIA INTERFACE
AV and HDMI Signal Compatibility
| Source S | Supported Signals Available | ||
| EXT(SCART) | PAL 50/60 O | ||
| NTSC 60 O | |||
| RGB 50 O | |||
| RGB 60 O | |||
| Side AV | PAL 50/60 O | ||
| NTSC 60 O | |||
| PC/YPbPr | 480I, 480P 60Hz O | ||
| 576I, 576P 50Hz O | |||
| 720P 50Hz,60Hz O | |||
| 1080I 50Hz,60Hz O | |||
| 1080P 50Hz,60Hz O | |||
| HDMI | 480I 60Hz O | ||
| 480P 60Hz O | |||
| 576I, 576P 50Hz O | |||
| 720P 50Hz,60Hz O | |||
| 1080I 50Hz,60Hz O | |||
| 1080P | 24Hz, 25Hz30Hz, 50Hz,60Hz | O | |
(X: Not Available, O: Available)
In some cases a signal on the TV may not be displayed properly. The problem may be an inconsistency with standards from the source equipment (DVD, Set-top box, etc.). If you do experience such a problem please contact your dealer and also the manufacturer of the source equipment.
Supported File Formats for USB Mode
| Media | File Extension | Format | Remarks | |
| Video | Audio | (Maximum resolution/Bit rate etc.) | ||
| Movie | .mpg .mpeg M | PEG1,2 | MPEG Layer 1/2/3 | MAX 1920x1080 @ 30P 20Mbit/sec |
| .dat MPEG1,2 | MPEG2 | |||
| .vob MPEG2 | ||||
| .mkv H.264, MPEG1,2,4 EAC3/ AC3 | ||||
| .mp4 | MPEG4, Xvid 1.00, Xvid 1.01, Xvid 1.02, Xvid 1.03, Xvid 1.10-beta1/2, H.264 | PCM/MP3 | ||
| .avi | MPEG2, MPEG4 | |||
| Xvid 1.00, Xvid 1.01, Xvid 1.02, Xvid 1.03, Xvid 1.10-beta1/2, H.264 | PCM | |||
| Music | .mp3 - | MPEG 1 Layer 1 / 2 (MP3) | 32Kbps ~ 320Kbps(Bit rate)32KHz ~ 48KHz(Sampling rate) | |
| Photo | .jpg .jpeg Baseline JPEG - max WxH = 15360x8640 4 | 147200bytes | ||
| . | Progressive JPEG | - | max WxH = 9600x6400 3840000bytes | |
| .bmp - - max WxH = 5760x4096 3840000bytes | ||||
| Subtitle | .sub .srt | - | - | - |
natural_image
Two diagrams showing a hand pressing a circular component and a cross-shaped object on a ring (no text or symbols)natural_image
Two hand-drawn diagrams showing a circular object being cut with arrows, one marked with a cross and arrow, the other with a plus sign (no text or symbols)Ghid programe electronic (GPE) 17
Actualizare software 17
Depanare & Sfaturi....18
Definirea termenilor importanti - TV....19
natural_image
Illustration of two hands performing a circular motion or maneuvering operation, one with an arrow indicating leftward movement and the other with a cross symbol (no text or symbols present)Ghid programe electronic (GPE)
natural_image
Two diagrams showing a hand pressing on a circular object and a cross symbol on a ring (no text or symbols present)natural_image
Two hand-drawn diagrams showing a circular object being cut with arrows, one marked with a cross and arrow, the other with a plus sign (no text or symbols)Izravan: Ako imate jedan prijemnik koji je izravno spojen sa satelitskom antenom, odaberite ovaj tip antene. Nakon odabira Izravan, pojavit će se novi zasion. Odaberite dostupni satelit i pritisnite OK za pretraživanje usluga.
Unikabel: Ako imate više prijemnika i unicable sustav, odaberite ovaj tip antene. Za nastavak pritisnite OK. Konfigurirajte postavke slijedeći upute na zaslonu. Pritisnite OK za pretraživanje usluga.
DiSEqC sklopka: Ako imate više prijemnika i DiSEqC sklopku, odaberite ovaj tip antene. Nakon odabira DiSEqC sklopke, pojavit će se novi zaslon. Možete postaviti četiri DiSEqC opcije (ako su dostupne). Pritisnite ZELENI gumb za pretraživanje svih satelita ili pritisnite ŽUTI gumb za odabir samo označenih satelita. Za spremanje i izlaz pritisnite gumb OK.
6 HDMI na HDMI kabelski priključak
natural_image
Two diagrams showing a hand holding a circular object and a cross-shaped object on a ring (no text or symbols)- Ne izlažite disk direktno sunčevoj svjetlosti ili nekom toplinskom izvoru (vrući zrak), odnosno ne ostavljajte ga u automobilu parkiranom direktno na suncu zbog brzog nastanka visoke temperature koja oštećuje disk.
- Nakon korištenja, disk uvijek spremite u njegovo pakiranje odnosno u kutiju.
O čišćenju:
- Prije uporabe disk očistite krpicom za čišćenje. Brišite ga od sredine prema van.

natural_image
Illustration of two hands performing a circular motion or maneuvering operation, one with an arrow indicating leftward movement and the other with a cross symbol (no text or symbols present)- Ne koristite preparate kao što su benzin i druga komercijalna sredstva za čišćenje, kao ni antistatički sprej koji se koristi za ploče od vinila.
VHF (POJAS I/III) UHF (POJAS U), HIPERPOJAS
BROJ PODEŠENIH KANALA
1000
INDIKATOR KANALA
Zaslonski prikaz (OSD)
RF ANTENSKI ULAZ
75 Ohma (nebalansirani)
RADNI NAPON
220-240V AC, 50 Hz.
AUDIO
promijeniti kanale, pritisnite sredinu gumba jednom (položaj 3) te se zatim pomičite gore ili dolje. Ako pritisnite sredinu gumba više od jednom, pojavit će se zaslonska (OSD) poruka izvora. Ako pritisnete sredinu gumba i držite je nekoliko sekundi, televizor će se prebaciti u mod pripravnosti. OSD glavnog izbornika ne može se prikazati pomoću kontrolnih gumbi.
Direktan: Ukoliko imate jedan prijemnik i direktnu činiju, izaberite ovaj tip antene. Nakon izbora Direkt, na ekranu æe se pojaviti drugi meni. Izaberite dostupan satelit i pritisnite OK da skenirate za usluge.
Jedinečan kabi: Ukoliko imate višestruke prijemnike i unikabi sistem, izaberite ovaj tip antene. Pritisnite OK za nastavak. Podesite postavke sledeći instrukcije na ekranu. Pritisnite OK da biste skenirali za usluge.
DiSEqC skretnica: Ukoliko imate višestruke prijemnike i DiSEqC skretnicu, izabenite ovaj tip antene Nakon izbora DiSEqC skretnica, na ekranu će se pojaviti drugi meni. Možete podesiti četiri DiSEqC opcije (ukoliko su dostupne) Pritisnite ZELENO dugme da biste skenirali sve satelite ili pritisnite ŽUTO da biste skenirali samo označene satelite. DA biste sačuvali i izašli pritisnite OK
6 Povezivanje HDMI sa HDMI kablom
Za HDMI povezivanje uređaja
7 HDMI ulaz
Da biste izabrali HDMI ulaz, pritisnite dugme SOURCE na daljinskom upravljaču. Svaki put kad se pritisne, vaš izbor se potvrđuje na ekranskom meniju.

RC4862
Snimanje programa i reprodukcija
SRPSKI
8
Povežite USB memorijski štapić na vašem TV-u.

IVAŽNO: Da biste snimili program, morate prvo povezati USB disk na vašem TV-u dok je TV isključan. Zatim trebali bi uključiti TV da biste omogućili odliku snimanja. U suprotnom, odlika snimanja neće biti dostupna.
Trebalo bi napraviti rezervnu kopiju vaših datoteka pre nego što izvršite bilo kakvo povezivanje na TV aparat kao biste izbegli mogućnost gubitka podataka. Primetite da proizvođač neće biti odgovoran ni za kakvo oštećivanje datoteka ili gubitak podataka.
PAŽNJA!
natural_image
Illustration of two hand positions on a circular object, one with a cross mark and the other with a black X (no text or symbols)- Nemojte izlagati disk direktnom suncu ili izvorima topline, kao vodovima toplog vazduha, ili ga ostaviti u automobilu, parkiranom na direktnom suncu, jer se temperatura mohe veoma brzo povежati i oltetiti disk
- Nakon reprodukcije, nuvajte disk u njegovom omotu.
O čišćenju
- Pre reprodukovanja, očistite disk krpom za čišćenje. Brišite disk od centra prema spolja.

natural_image
Illustration of two hands performing a circular motion or maneuvering operation, one with an arrow indicating leftward movement and the other with a cross symbol (no text or symbols present)- Nemojte koristiti rastvarače, kao benzin, razređivač, sredstva za čišćenje dostupna u prodaji ili anti-statičke sprejeve, namenjene vinilnim LP pločama.
(\*) MOJE DUGME (1-2)
zvuka. Ako želite promeniti kanal, pritisnite sredinu prekidača jednom (pozicija 3) i zatim pridvižite naviše ili nadole. Ukoliko pritisnite sredinu prekidača još jednom, prikazaće se OSD izvora. Ukoliko pritisnite sredinu prekidača i zadržite nekoliko sekundi, TV će preći u režimu pripravnosti. Glavni OSD meni se ne može prikazati putem komandnih tastera.
Informacije o zaštiti okoline
- Pritisnite dugme OK na daljinskom da nastavite i na ekranu prikazaće se poruka „Izaberite tip digitalne pretrage“. Morate izabrati tip traženja da biste tražili i sačuvali kanale iz željenog izvora.
Instalacija antene: Ukoliko u meniju za tip traženja izaberete opciju ANTENA, digitalni televizor traziće digitalne zemaljske TV emisije: Kada se memorišu sve stanice, na ekranu æe se prikazati lista kanala. Ako želite sortirati kanale prema LCN-u (*), izaberite Da a zatim pritisnite OK (*) LCN je sistem Logičkog broja kanala koji organizuje dostupne signale u skladu sa prepoznativljivim sekyvencama kanala.
Instalacija kabela: Ako izaberete opciju KABEL i pritisnite ključ OK na daijinskim za nastaviti; na ekranu prikazaće se slijedeća poruka: Odaberite DA za nastavak.
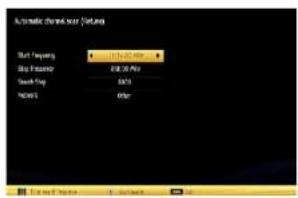
Možete izabrati domašaj frekfencija sa ovog ekrana. Možete ručno uneti domašaj frekfencija pomoći numeričkih dugmad daljinskog upravljača. Unesete početnu i krajnju frekvenciju po želij putem numeričkih kluječeva na dajinskim. Nakon toga, možete postaviti korak pretraživanja kao 8000 kHz ili 1000 kHz. Ukoliko izaberete 1000 kHz, televizor vršiće pretraživanje detaljnije. Zbog toga će trajanje pretrage porasti. Kada završite, pritisnite dugme OK da biste započeli automatsku pretragu. TV će tražiti i sačuvati dostupne signale.
Instalacija satelita: Ako izaberete opciju Satelit od ekrana Tip traženja, možete postaviti satelit i gledati satelitske kanale. Kad izaberete Instalacija satelita, meni Tip antene pokazaće se . Postoje tri tipa izbora antene. Možete izabrati Tip antene kao Direktan, Unikabli ili DiSEqC prekidač koristeći tastere za lijevo i desno.
Direktan: U slučaju da imate jedan prijemnik i direktnu uiniju, izaberite ovaj tip antene. Nakon izbora Direktnog, na ekranu pojavi će se drugi meni. Izaberite dostupni satelit i pritisnite OK za skeniranje za usluge.
Jedinečan kabl: Ako imate višestruke prijemnike i sistem unikabl, izaberite ovaj tip antene. Pritisnite OK za nastavak. Postavite postavke sljedeći instrukcije na ekranu. Pritisnite OK za sken za usluge.
DiSEqC skretnica: U slučaju da imate višestruke prijemnike i DiSEqC skretnicu, izaberite ovaj tip antene. Nakon izbora DiSEqC skretnice, na ekranu pojaviaei se drugi meni. Možete podesiti četiri DiSEqC opcije (ukoliko su dostupne) Pritisnite ZELENI ključ da skenirate sve satelite ili pritisnite ŽUTI da skenirale jedino označene satelite. Pritisnite OK da biste sačuvali i zašli.
6 Povezivanje kablom HDMI do HDMI
Ka HDMI vezu na uređaju
7 HDMI ulaz
Da biste izabrali HDMI ulaz, pritisnite gumb SOURCE na daljinskim. Svaki put kada ga pritisnite, meni na ekranu potvrđuje vaš izbor.

RC4862
Snimanje programa i njihovo puštanje.
BOSANSKI
8
Pritisnite dugme ■ (STOP) da biste otkazali instant snimanje. Prikazat će se sledeći OSD: Izaberite Da sa lijevog ili desnog i OK gumba da biste poništili instant snimanje.

10
Pustanje snimljenih programa

U glavni meni, izaberite Pretraživača pomoču levo ili desno dugmad. Označite Biblioteku sniamnja pomoću levo ili desno i pritisnite OK da uđete. Prikazaće se Biblioteka snimaka.
Odaberite snimku sa liste (ukoliko je neka ranije snimljena) pomoći gore ili dole dugmeta. Pritisnite dugme OK da prikažete opcije reprodukcije.
Možete izabrati opcije koristeći gore ili dole i OK.
natural_image
Illustration of two hands performing a circular motion or maneuvering operation, one with an arrow indicating leftward movement and the other with a cross symbol (no text or symbols present)- Ne koristiti otapala kao benzin, razređivać, komrecijalno dostupne čistače ili anti-statičke sprejove namjenjene za vinil ploče.
(\*) MOJE DUGME (1-2):
Ovo dugme može imati zadanu funkciju u zavisnosti od modela. Međutim, vi možete postaviti specijalnu funkciju za ovo dugme pritiskom na njega tokom pet sekunda kada ste na željenom izvoru, kanalu ili vezi. Poruka o potvrdi prikazat će se na ekranu. Sada je MOJE DUGME povezano sa odabranom funkcijom.
zvuka. Ako želite promeniti kanal, pritisnite sredinu prekidača jednom (pozicija 3) i zatim pridvižite naviše ili nadole. Ukoliko pritisnite sredinu prekidača još jednom, prikazaće se OSD izvora. Ukoliko pritisnite sredinu prekidača i zadržite je nekoliko sekundi, TV prelazi u režim pripravnosti. Pomoću kontrolne dugmadi nije moguće prikazati OSD
Podaci o okolini
Ovaj televizor je projektovan tako da troši manje energije da bi očuvao okolinu. Za smanjenje potrošnje energije, preduzmite sljedeče korake:
Ako ste postavili režim Uštede energije na Eko, TV relazi na mod uštede energije. Postavke režima Ušteda energije se mogu pronaći u odjeljku "Slika" u glavnom meniju. Primjetite da neke postavke slike neće biti moguće promeniti.