
OV-CR-422 - Gps Overmax - Free user manual and instructions
Find the device manual for free OV-CR-422 Overmax in PDF.


| Product Type | Car Stereo / MP3 Player with USB, SD, and FM Radio |
| Power Supply | 12V DC (negative ground) |
| Output Power | 4 x 45 Watts (max) |
| FM Tuning Range | 87.5 - 108 MHz |
| FM Sensitivity (Residual Noise) | 16 dB |
| FM Signal-to-Noise Ratio | 60 dB |
| FM Stereo Separation | 39 dB |
| MP3 Signal-to-Noise Ratio | 76 dB (A) |
| MP3 Frequency Response | 20 Hz - 20 kHz |
| Preset Stations (FM) | 18 stations (6 per band FM1, FM2, FM3) |
| Playback Media | USB, SD/MMC, AUX input |
| Audio Adjustments | Bass, Treble, Balance, Fader, Loudness |
| Display | Large LCD with backlight |
| Remote Control | Included (IR) |
| Front Panel | Detachable, auto-flip down |
| RDS Functions | AF, TA, PTY |
| Equalizer Presets | Pop, Classic, Rock |
| Safety | Use only with 12V DC; replace fuse with same type and rating |
| Maintenance | Clean with soft dry cloth; avoid liquids |
Frequently Asked Questions - OV-CR-422 Overmax
User questions about OV-CR-422 Overmax
0 question about this device. Answer the ones you know or ask your own.
Ask a new question about this device
Download the instructions for your Gps in PDF format for free! Find your manual OV-CR-422 - Overmax and take your electronic device back in hand. On this page are published all the documents necessary for the use of your device. OV-CR-422 by Overmax.
USER MANUAL OV-CR-422 Overmax
Your electronic world
RADIO SAMOCHODOWE - INSTRUKCJA OBSŁUGI
RADIO SAMOCHODOWE / ODTWARZACZ MP3 (Z PORTEM USB ORAZ SD)
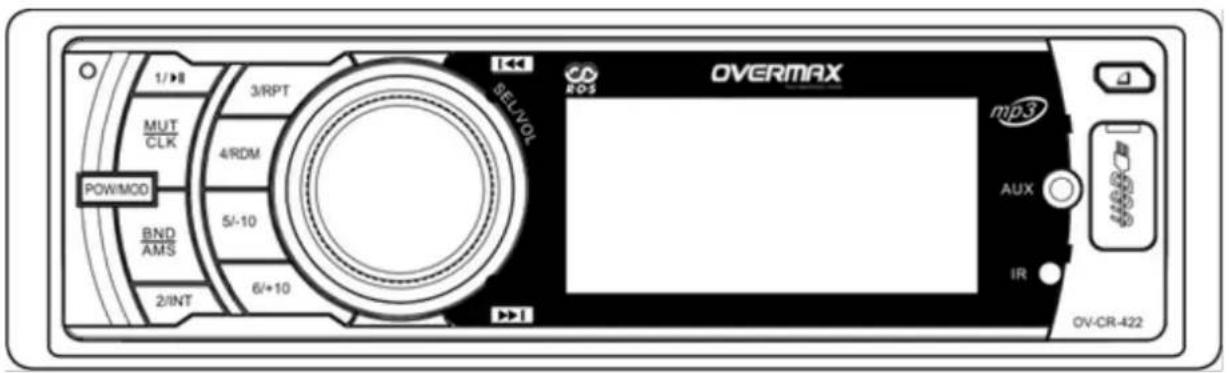
OV-CR-422(Z)
Uwaga
1.1 OBSŁUGA SD/MMC/USB
1.2 FUNKCJA ELEKTRONICZNEGO WYSZUKIWANIA STACJI FM.
1.3 FUNKCJA PROGRAMOWANIA STACJI.
W PRZYPADKU GDY URZĄDZENIE POSIADA FUNKCJĘ FM, MOŻLIWE JEST ZAPROGRAMOWANIE DO 18 STACJI. (FM: 18)
1.4 ELEKTRONICZNA KONTROLA GŁOŚNOŚCI.
1.5 WEJŚCIE AUX.
1.6 NAPIĘCIE NA WEJŚCIU 12V.
1.7 PROGRAMOWALNY ZEGAR CYFROWY.
1.8 PILOT.
1.9 DUŻY WYŚWIETLACZ LCD.
2.0 MOC WYJŚCIOWA 4X45W.
CZEŚĆ 2. OPERACJE
2.1 GŁÓWNE OPERACJE.
2.1.1 WŁĄCZANIE I WYŁĄCZANIE
*This unit is just available for 12V/DC device.
* Please install the unit in the right way according to this instruction to avoid short circuit which damages maybe resulted.
*Changed fuze must be with the same type and current in density.
*Don't let the non-insulator stay in the unite to avoid short circuit or electronic shock.
*Volume should be reasonable level to make sure the safe driving.
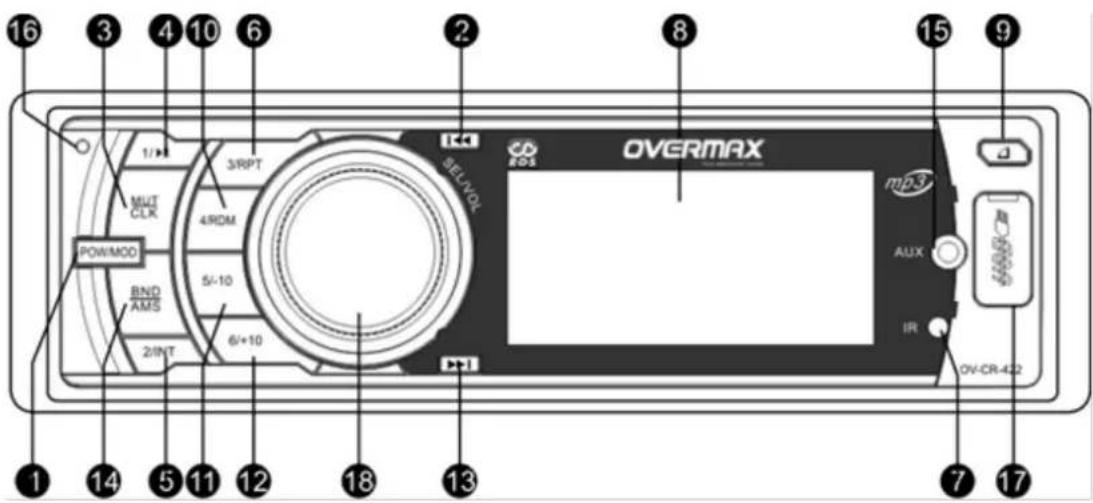
PANEL FUNCTION DIAGRAM:
-
Power Button and Power mode button: Mode Change / Phone Cancel.
-
Button: Previous / Automatic Up scanning.
-
CLK/MUT Button: Digital Clock Display and Mute.
-
Button: Preset station / Pause / Play.
-
2/INT Button: Preset Station /Songs Display.
-
3/RPT Button: Preset Station / Repeat playing.
-
Remote Control Receiver.
-
LCD Display.
-
Release Button: Open The Front Panel or Panel Release.
-
4/RDM Button: Preset Station / Random Player.
-
5/-10 Button: Preset Station / Previous Ten song items, Press This Button a while, will be back last file.
-
6/+10 Button: Preset Station / Next ten song items, Press This Button a while, will go to
next file.
- Button: Next / Automatic Down Scanning.
- BAND/AMS Button: Band switching / Phone connect, AMS: Preset Station Memory.
- AUX input slot
- MIC Hole: Microphone slot. (If have Bluetooth Function).
- USB slot: Connect USB hardware.
- VOL/SEL Knob: BAS-TRE-BAS-FAD (AF TA WITH RDS FUNCTION)
-LOUD-DSP-DX-ST
PART 1. MAIN FUNCTIONS
1.1 SD/MMC/USB PLAYING FUNCTION.
1.2 FM ELECTRONIC TUNING SYSTEM.
1.3 PRESE STATION MEMORIZE.
IF THIS EQUIPMENT OWN FM FUNCTION, TOTAL CAN MEMORIZE 18 PRESET SATIONS.(FM: 18)
1.4 ELECTRONIC VOLUME CONTROL.
1.5 AUX INPUT.
1.6 INPUT VOLTAGE 12V.
1.7 PRESET DIGITAL CLOCK DISPLAY.
1.8 REMOTE CONTROL.
1.9 LARGE LCD DISPLAY.
2.0 4X45W BIG POWER OUTPUT.
PART 2. OPERATION
2.1 MAIN OPERATION.
2.1.1 POWER ON/OFF
FM Position will be considered as default setting for the first time using: Next Time will automatic go to the memorize position (USB, SD/MMC, FM position) unless AC off.
(1) Power On: Press and hold the "Power" button
(2) Power Off: Press and hold the "Power" button during playing Position.
2.12 VOLUME CONTROL
When power on, the unit will be in memorizing volume level. When adjusting the volume, "VOL" and volume level mark will display on the screen. Press any button to escape from current position.
(5) Increase Volume: Revolve the volume button deasil and the volume increases gradually till reach level 40.
(6) Reduce Volume: Revolve the volume button to left position and the volume reduce gradually till reach zero level.
(7) Mute: On Playing Position (USB, SD/MMC, AUX/FM), Press "MUTE" button, "MUTE" will display on the screen: Again Press disappear from the screen.
(8) BASS, TREBLE, BALANCE adjusting; Press "VOL" to adjust by following order: BAS-TRE-BAL-FAD.
① BASS, Press "VOL" till display "BAS" on the screen, revolve ""VOL Button deasil for increase, revolve "VOL" button widdershins for decrease. "BAS" level can be adjusted from "-7" to "7".
② TREBLE: Press "VOL" button deasil for increase, revolve "VOL" button widdershins for decrease, "TRE" level can adjusted from "-7" to "7".
③ LEFT/RIGHT BALANCE: Press "VOL" till "BAL" display on the screen, revolve button deasil or widdershins for volume balance, "BALANCE" level can be adjust from "-15" to "15".
④FORWARD/REAR BALANCE: Press "VOL" till "FAD" display on the screen, revolve "VOL" deasil or widdershins for FAD balance. "FAD" level can adjust from "-15" to "15".
⑤LOUD ADJUST:
Press volume button till "LOUD OFF" display on the screen, revolve the volume button till "LOUD ON" display on the screen.
2.1.3 PLAY / PAUSE
(1) Pause: Press "▶Button to Pause and and "Pause" show on the display.
(2) Play: Press "button again and back to playing.
2.1.4 TIME SETTING & DISPLAY
Short Press "CLK" in the Remote control first and long press ir then to enter into time adjusting position. Press "VOL+" for increase and "VOL-"for decrease the hours or minutes. Short press "CLK" again for confirmation. After finishing setting, wait for 10 seconds and the equipment will save setting and escape from Current Position.
2.1.5 MODEL CONVERSION.
(4) When USB, SD/MMC both available, press "MODE" to change the playing mode in the following order. USB-SD-AUX-RADIO, and the relevant marking will display on the screen, USB and SD/MMC inserting have precedence for playing.
(5) Insert the USB, SD/MMC to play the relevant mode.
(6) Take out the USB, SD/MMC and the unit will enter into FM playing mode.
2.2 FM RECEIVER.
18 FM stations for maximum setting (6 station for FM1, FM2, FM3 each)
(1) Band change: on the radio position, press "BAND" to change bands in the following order; FM1, FM2, FM3 and these markings will display on the screen in tums.
(2) Automatic scanning: On the radio position, press and hold "AMS" button to scan the stations from lowest frequency and the stations will be presented and memorized till full memory or each highest frequency, the unit will play the first preset station. During scanning, "SCAN" will display on the screen, press any button to escape.
(6) Manual Scanning: On the radio position, press">>I" or "I<<" to adjust the frequency to select the desired station.
On the radio Position, press and hold ">>I" or "I<<" for manual, press and hold ">>I" or "I<<" for fast scanning and start to play the current station. Press any button to escape (Except "MUTE" button) and the unit will stay in the current frequency and play.
(7) Preset station select: Press ""BAND" select the band. Press number"1-6" to select preset station.
(8) RDS Function.
You can operate AF, TA, PTY functins to search RDS radio short press "VOL" to choose AF on or RDS display on the screen, revolve "VOL" to choose AF ON for RDS frequency change or AF OFF on the screen, and revolve "VOL" to choose TA ON for automatic radio scanning or TA OFF for Taking off TA function.
2.3 MP3/WMA OPERATIONS.
On the radio position, press "MODE" to adjust playing modes from USB, SD/MMC, and AUX IN, MP3 and WMA marks will display on the screen in different playing modes.
(5) Select: Press ">>1" or "I<<" for the next playing or orevious playing, press "5" or "6" for previous 10 playing or next playing songs.
(6) Fast select: on USB/SD/MMC playing, press and hold ">>I" or "I<<" for fast select.
(7) Playing mode: Brows (INT), repeat, random functions, on the USB or SD/MMC playing. Press and hold "2" enter into browsing function, press "3" for repeat playing and "4" for random playing. In browsing mode, unit will go for next browsing upon 10 seconds for each playing, any button for escape (Except "MUTE" button) and unit will play the current list, "TNT", "RPT", "RDM" will display on the screen when browsing, random and single repeat functions are available.
(8) EQ Function: On USB/SD/MMC playing, press "EQ" in the remote control to adjust effect by following order. POP-CLASSIC-ROCK and screen will display relative marks in turns.
2.4 AUX OPERATION
Press "MODE" button and enter into AUX playing node, and "AUX" display on the screen, insert extra audio equipment into "AUX" slot to play, on AUX position, you can press "MODE" button to change playing mode, or insert/put out USB/SD/MMC cards to change the playing mode.
2.5 AUTO-FLIP DOWN FRONT PANEL
DETACHABLE PANEL (Button)

Press the release Button "”, the panel will come out automatically.
PART 3. FAULTS AND SOLUTIONS
If any faults happen, please read the manual carefully and refer below table for inspection, or please contact the close dealer directly if faults or problems are not mentioned, this will help you to solve the problems:
| FAULTS | CAUSE AND SOLUTION |
| POWER OFF | 1. Check if the voltage is working normally, equipment can not work with unstable voltage |
| NO VOICE | 1. Check if the volume is on the normal position, refer to manual. |
| NOISE | 1. Check if the antenna connects to the unit tightly; 2. Car us far away from radio station, no signal received; 3. Wrong Frequency, adjust frequency manually or automatically; 4. The car is in disturbed position. |
| LOW VOLUME | 1. Check speakers and if they are short-circuit. 2. Environment temperature too high, let it down and retry. |
| USB/SD/MMC POSITION UNAVAILABLE | 1. Re-insert USB/SD/MMC cards; 2. Check USB/SD/MMC cards and if they are managed. |
PART 4. MAIN CHARACTERS
4.1 TUNING
| MODE | STANDARD | FM POSITION |
| SI4703 | TUNING RANGE | 87.5MHZ 108HMZ |
| ANTENNA | ANTENNA CONNECTOR | |
| RESIDUAL NOISE SENSITIVITY | 16 DB | |
| SIGNAL NOISE RATIO | 60 DB | |
| STEREO SEPARATION | 39 DB |
4.2 MP3 PLAYING
Signal Noise Ration: 76 Db (A)
Frequency: 20Hz-20KHz
PART 5. REMOTE CONTROL
| 1 | MUTE | 10 | Fast Forward / FM Preset Station Chose |
| 2 | PAUSE/PLAY | 11 | Band Switching |
| 3 | RDS performance Selecting | 12 | Clock |
| 4 | Volume Adjusting + | 13 | Power |
| 5 | Previous / Automatic up scanning | 14 | Preset Station memorized |
| 6 | Performance Selecting | 15 | Next/Automatic Down Scanning |
| 7 | RDS auto scanning | 16 | RDS frequency exchange |
| 8 | Volume Adjusting - | 17 | Effect select |
| 9 | Fast Reverse / FM preset station chose | 18 | Mode Change |
This Picture just for consulting, please see the physicals for details.
Český
2.0 4X45W VÝSTUP S VELKOU SILOU.
ČÁST 2. PROVOZ
2.1 HLAVNÍ PROVOZ.
2.1.1 VYPNUTÍ / ZAPNUTÍ
Your electronic world
- Uwaga
- CZEŚĆ 2. OPERACJE
- PANEL FUNCTION DIAGRAM:
- PART 1. MAIN FUNCTIONS
- PART 2. OPERATION
- ⑤LOUD ADJUST:
- PLAY / PAUSE
- TIME SETTING & DISPLAY
- MODEL CONVERSION.
- FM RECEIVER.
- MP3/WMA OPERATIONS.
- AUX OPERATION
- AUTO-FLIP DOWN FRONT PANEL
- PART 3. FAULTS AND SOLUTIONS
- PART 4. MAIN CHARACTERS
- TUNING
- MP3 PLAYING
- PART 5. REMOTE CONTROL
- Český
- ČÁST 2. PROVOZ
Brand : Overmax
Model : OV-CR-422
Category : Gps