
FZS 4003 B - Corded Lawn Mower Fieldmann - Free user manual and instructions
Find the device manual for free FZS 4003 B Fieldmann in PDF.


| Product type | Gasoline brush cutter (string trimmer) |
| Brand | Fieldmann |
| Model | FZS 4003 B |
| Engine displacement | 42.7 cm³ |
| Maximum engine power | 1.25 kW |
| Shaft length | 1500 mm |
| Engine type | Two-stroke, air-cooled |
| Idle speed | 3000 rpm |
| Recommended maximum speed | 9000 rpm |
| Spark plug | L6 (LD) |
| Fuel tank capacity | 1200 ml |
| Fuel mixture | Unleaded gasoline (95 octane) + 2-stroke oil, ratio 1:25 |
| Weight (without fuel and cutting tool) | 7.5 kg |
| Sound power level (LWA) | 110 dB(A) |
| Cutting tools | 3-teeth blade, cord head (2.5 m cord, 2.4 mm diameter), disc head |
| Safety features | Protective cover, main switch, gas lock, automatic centrifugal clutch |
| Maintenance intervals | Clean air filter every 20 h, clean fuel filter every 20 h, lubricate shaft every 50 h, clean spark plug every 50 h |
| Warranty | 24 months |
| Included accessories | Shoulder strap, tubular spanner, operation manual |
Frequently Asked Questions - FZS 4003 B Fieldmann
User questions about FZS 4003 B Fieldmann
0 question about this device. Answer the ones you know or ask your own.
Ask a new question about this device
Download the instructions for your Corded Lawn Mower in PDF format for free! Find your manual FZS 4003 B - Fieldmann and take your electronic device back in hand. On this page are published all the documents necessary for the use of your device. FZS 4003 B by Fieldmann.
USER MANUAL FZS 4003 B Fieldmann
natural_image
Abstract black-and-white spiral pattern with no text or symbolsFIELDMANN®
Home & Garden Performance

natural_image
Black metal tool with tripod base and tripod handle, no visible text or symbolsFZS 4003-B
English 7 - 19
Čeština 21 - 33
Slovenčina 35 - 47
Polski 49 - 62
natural_image
Technical line drawing of a mechanical assembly with two rods and a central bracket (no text or symbols)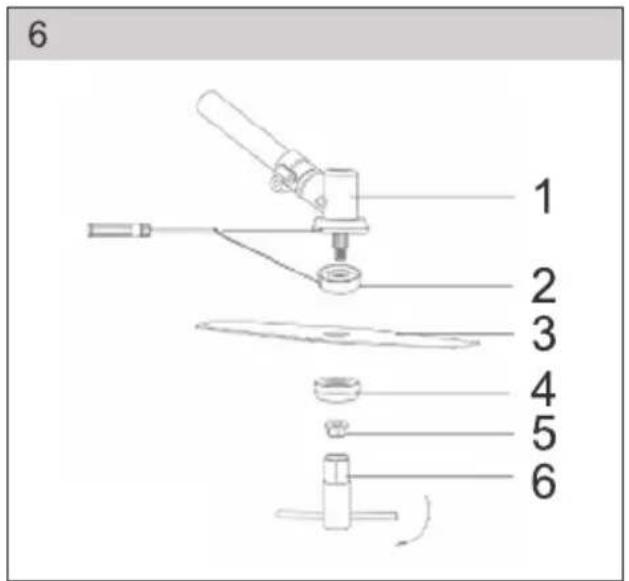
natural_image
Line drawing of a standing human figure with hands on hips, no text or symbols present11
natural_image
Technical line drawing of a mechanical component with internal parts and a circular inset (no text or symbols)12
13
natural_image
Two white cable connectors with attached wires, one wrapped in a circular opening and the other in a square (no text or symbols visible)14
natural_image
Close-up of a white plastic electronic component with a central cross-shaped recess and surrounding wires (no visible text or symbols)15
natural_image
Close-up of hands holding a small mechanical component with a wire, no visible text or symbols16
natural_image
Top-down view of a circular mechanical component with internal cavities and mounting holes (no text or symbols visible)Gasoline brush cutter
OPERATION MANUAL
Thank you for your purchase of our gasoline brush cutter. Before beginning to use it, please, read this operation manual carefully and keep it for the case of a further use.
TABLE OF CONTENTS
APPENDIX OF FIGURES 3
- GENERAL SAFETY INSTRUCTIONS 8
Important safety warnings
Packaging
Instructions for use
-
EXPLANATION FOR INSTRUCTION PLATES ON THE MACHINE 9
-
MACHINE DESCRIPTION AND DELIVERY CONTENT 10
-
MACHINE ASSEMBLY 11
-
PUTTING INTO OPERATION 12
Before starting
Fuel filling
Gas lever and main switch (STOP)
Starting
Idle speed setup
- INSTRUCTIONS FOR USE 13
Safety instructions
Safety instructions - fuel
Safety instructions – cutting tools
- MAINTENANCE AND STORAGE 14
Machine maintenance
Service
Storage
-
TECHNICAL DATA 16
-
WHAT TO DO "IF..." 16
-
DECLARATION OF CONFORMITY 18
-
DISPOSAL 19
WARRANTY CERTIFICATE 64
CONDITION OF GUARANTEE 65
1. GENERAL SAFETY INSTRUCTIONS
Important safety warnings
* Unpack the product carefully and be sure not to throw away any part of the package before having found all components of the product.
- Keep the product in a dry place out of reach of children.
Read all cautions and instructions. The failure to adhere to warning cautions and instructions may result in an accident, fire and/or a serious injury.
Packaging
The product is placed in a package preventing damage during transport. This package is a raw material therefore it can be handed-over for recycling.
Instructions for use
Before beginning to work with the machine, read the following safety rules and instructions for use. Familiarize with operating elements and the proper use of the device. Keep the manual in a safe place for future reference. We recommend keeping the original package including the inner packaging materials, cash voucher and guarantee card for a period of warranty at minimum. For a case of transportation, pack the machine into the original box from the manufacturer, thus ensuring a maximum protection of the product during a possible transport (e.g. moving or sending into a service station).

Note: If you hand the machine over to next persons, hand it over together with the manual. Adherence to the attached instructions for use is a precondition for the proper use of the machine. The operation manual includes also instructions for operation, maintenance and repairs.
The manufacturer does not take any responsibility for accidents or damages resulting from the failure to adhere to this manual.
2. EXPLANATION FOR INSTRUCTION PLATES ON THE MACHINE

Read the manual carefully before the use

Use protective equipment when working



General warning of danger!

Watch out, recoil!

Keep other persons (especially children) and animals min. 15 m out of the working area.
3. MACHINE DESCRIPTION AND DELIVERY CONTENT
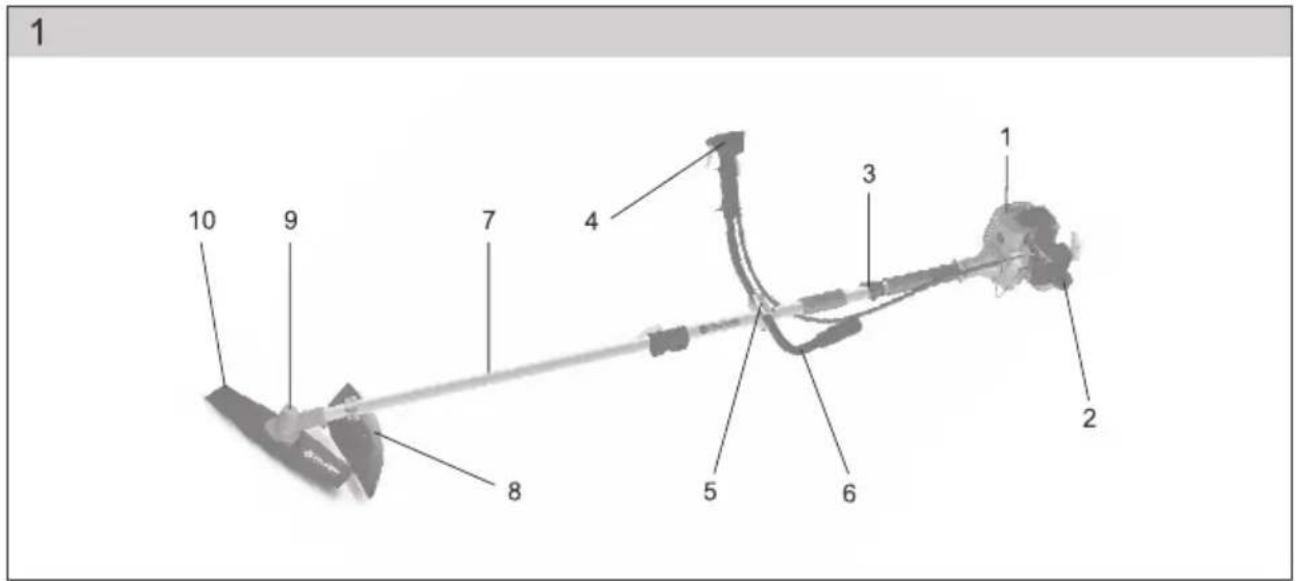
Machine description (see Fig.1)
1 - Motor
2 - Air cleaner
3 - Suspension
4 - Main switch + gas activator
5 - Handle bar grip holder
6 - Handle bar
7 - Shaft
8 - Housing
9 - Gearbox body
10 - Cutting tool
Use of the product
The brush cutter is only intended for cutting of grass, weed, bush or underbrush. It must not be used for other purposes, e.g. trimming of lawns or hedges because an injury may occur in this case.
Machine characteristic
Electronic ignition system
* Automatic centrifugal clutch
* Spiral transmission
Cardan shaft
WARNING! Sharp blades.
Delivery content
Take the machine carefully out of the package and check whether there are all following components:
Garden brush cutter
* Cord head with a cord of 2.5m length and 2.4mm diameter
Disc head
3-teeth blade
* Tubular spanner
Operation manual
In the case of some parts missing or damaged, please, contact the dealer where you've bought the machine.
4. MACHINE ASSEMBLY
Drive shaft parts
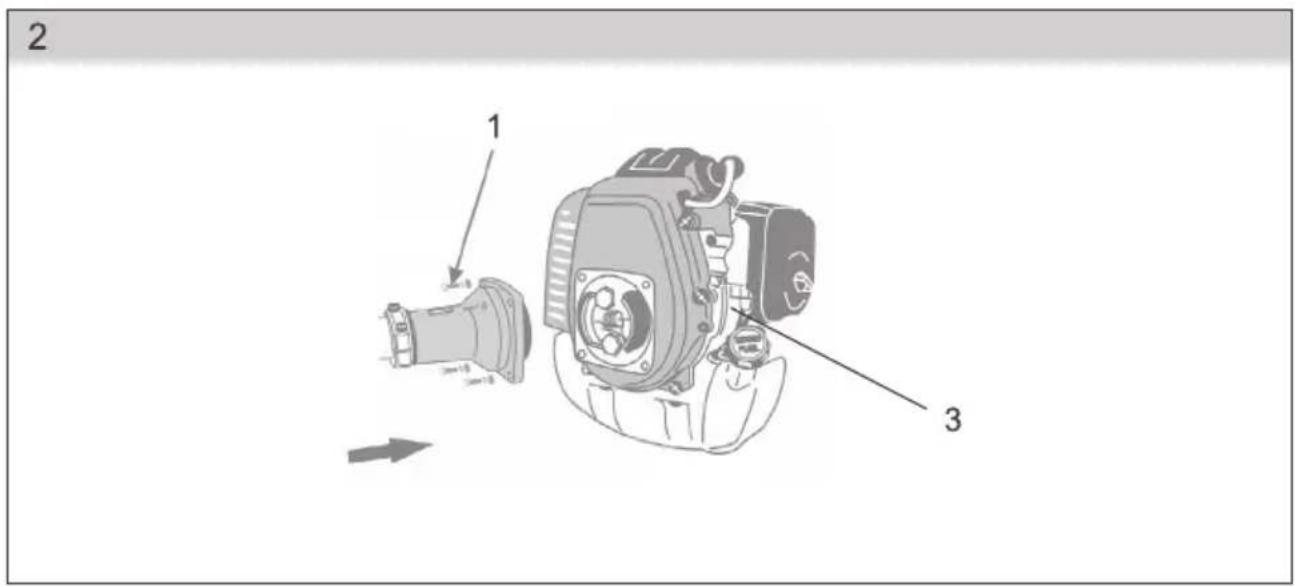
Drive shaft assembly (see Fig.2)
* Unscrew hexagonal screws (M6 x 10; Figs. 2, 1).
Fasten the drive shaft to the engine housing with the help of 4 screws, tighten thoroughly.
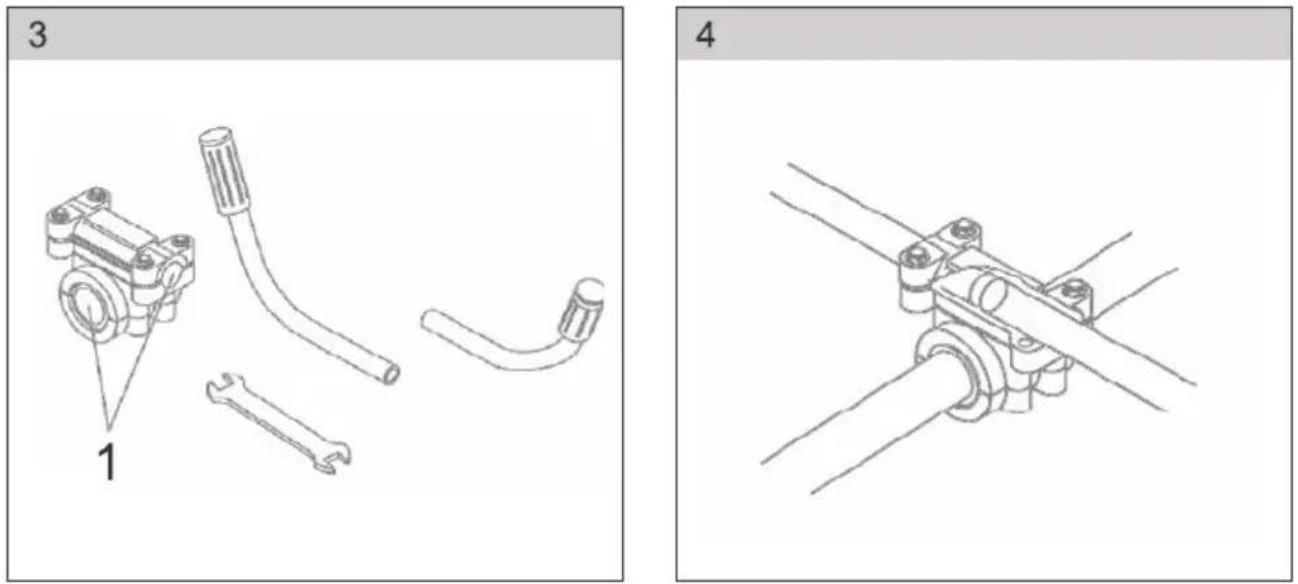
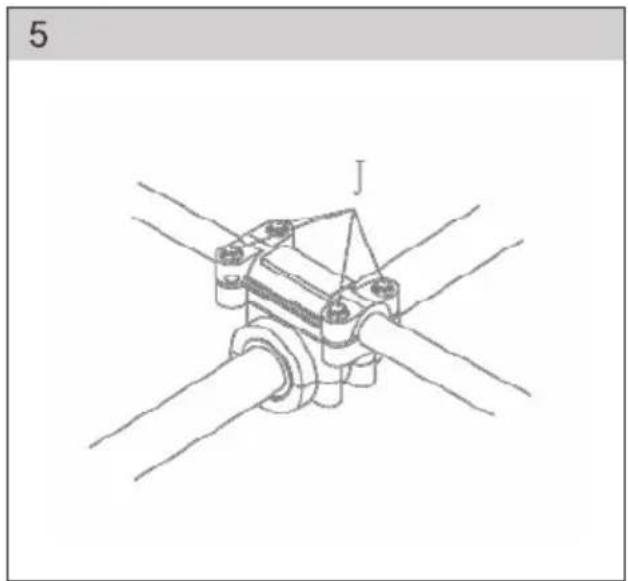
Handle assembly (see Figs. 3, 4, 5)
* Unscrew screws (2), put the handle bars to the grip holder (1), select the position according to your working style (right-handed – the switch on the right side when viewing from the engine). Pre-screw the upper parts of the grip holder (4 screws) (2), adjust the position of the handle bars and tighten the screws (2) thoroughly.
Gearbox parts (see Figs. 6, 7)
Unscrew the locking bolt, mount the cutting tool respectively (see Fig. 6): Gearbox (1) – Cutting head carrier (2) – Cutting blade (3) – Cover (4) – Fixing nut (5). Insert a screwdriver to align the gearbox body groove with a hole of the cutting head carrier. Tighten the nut with the aid of the tubular spanner (6) delivered within the packaging.

Note: Instead of the cutting blade, you can wind the head with the cord on the screw of the carrier.
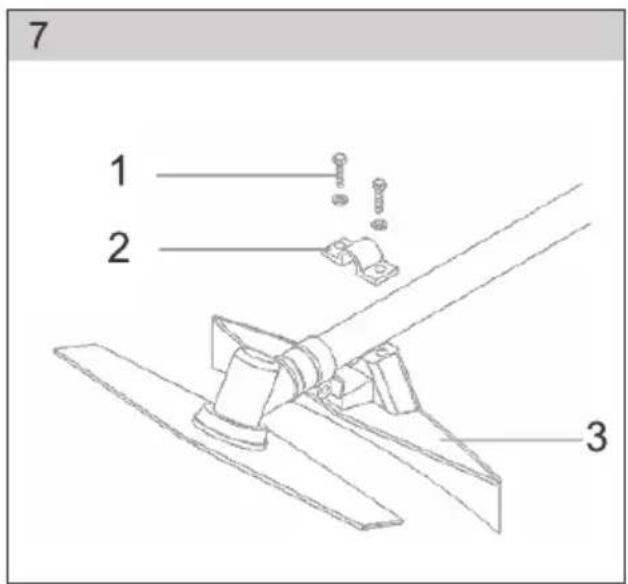
* Mount the safety cover (3) on the shaft rod with the help of a clamp (2) and screws (1). Be particular about the proper position (see Fig. 7
Cord replacement (see Figs. 13, 14, 15, 16)
* Demount the cord head, take-out the coil with the cord and remove the rest of the cord.
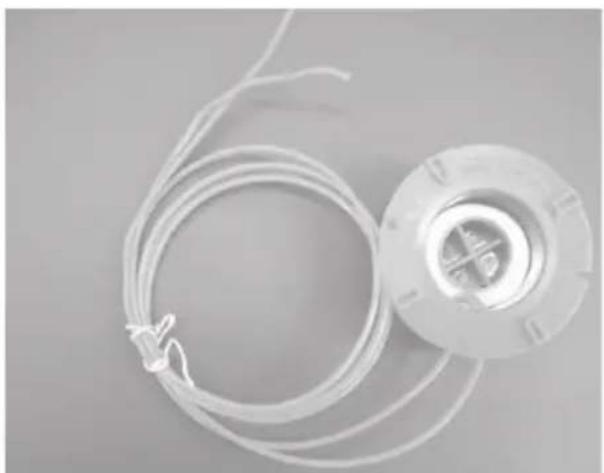
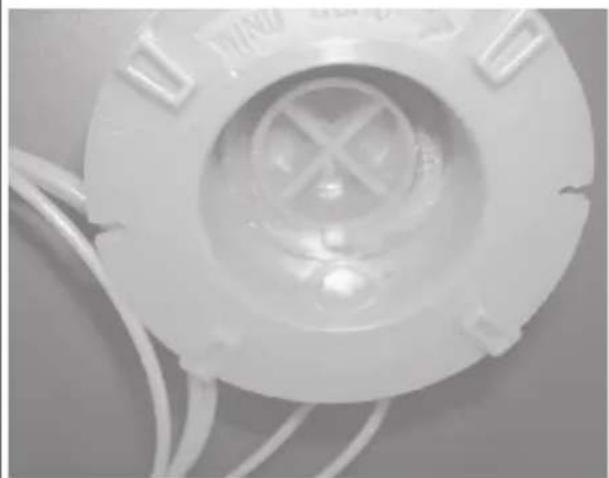
* Pull a new cord of the total length c. 2 m through both openings in the inner part of the cord head (see Fig. 14) so that both ends are of the same length (see Fig. 13).
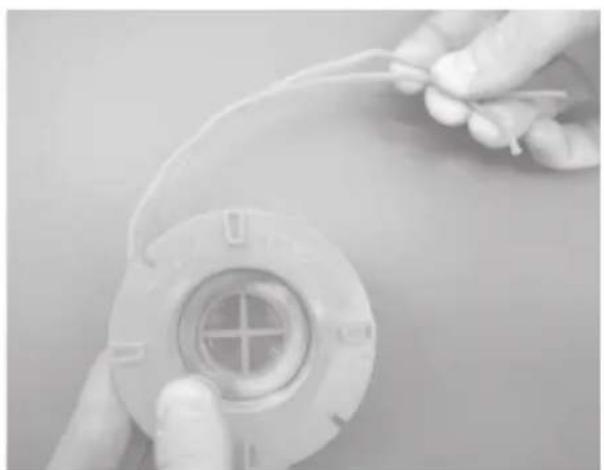
Wind both ends onto the coil in the direction of the WIND CORD marked arrow (see Fig. 15).
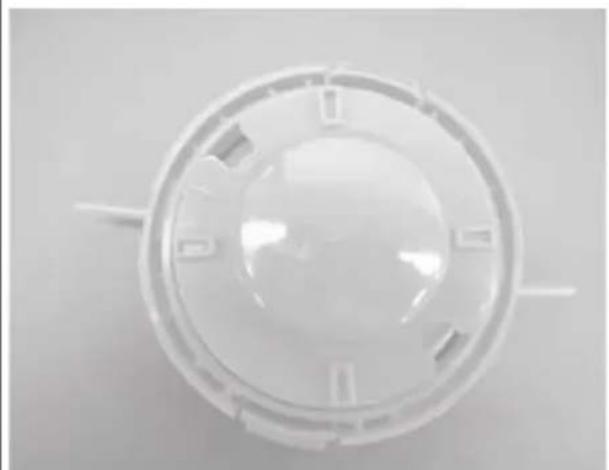
* Place the coil with the cord into the head (see Fig. 16), pull both ends of the cord through the opposite openings in the head and finish the assembly (close up).
Adjust the shoulder strap length and handle position so that you feel comfortably when working. Recheck tightening of all screws, bolts and nuts.
Fuel filling
Gasoline – use only unleaded motor gasoline with octane number 95 (NATURAL 95).
Oil – use only high-quality two-cycle engine oil intended for high speed engines. Mix with gasoline in 1:25 ratio and pour into the tank.
Gas lever and main switch (STOP) (see Fig. 8)
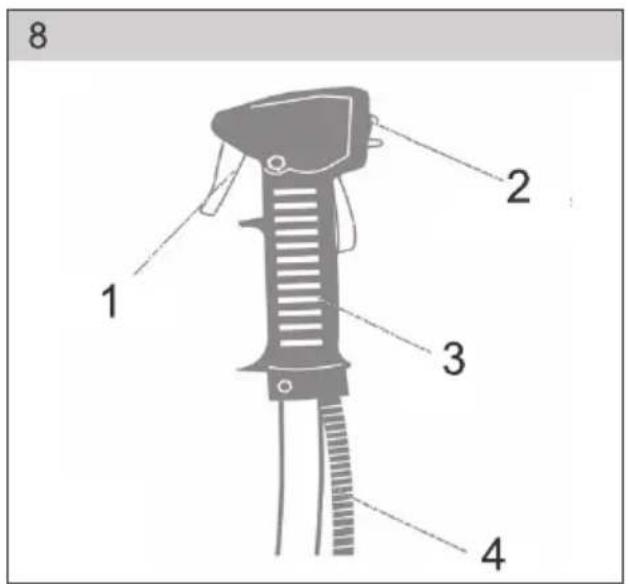
The gas lever (1) with the electrical switch (2) are only partly mounted. Insert the gas cable (47) into the carburetor drawbar groove and connect the electrical switch wires. The gas lever is preassembled on the handle from the factory (3).
⚠ WARNING! When adjusting the gas lever, be sure not to let the cutting tool rotate while starting. The cutting tool would start turning at high speed abruptly and could be dangerous. The gas cable must be adjusted so that the engine is running at idle thrust when releasing the gas lever (the cutting tool is not rotating).
Starting (see Fig. 9)
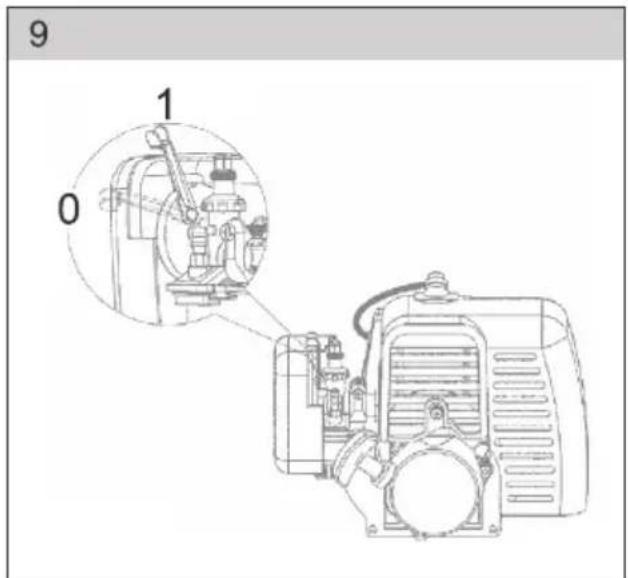
* Press the gas lever to the 14 of the gas lock and cage it.
Turn the main switch on.
Set the primer lever to the OFF (0) position.
* Pull the starter quickly. If the engine started-up, move the primer lever into the ON (1) position again. Repeat this procedure, until the engine starts-up and begins to run.
After having started-up, let the engine warm at idle speed 2,500-2,800 rpm for c. 2-3 min before the load of the machine.
⚠ WARNING! The cutting blade may begin rotating just when starting. When starting the engine, the blade must not be touching anything.
Idle speed setup (see Fig. 2)
If idle speed is too high or low, adjust the idle speed with the aid of the adjusting screw (3).
If the speed is too high, turn the adjusting screw counterclockwise.
If the speed is too low, turn the adjusting screw clockwise.
6. INSTRUCTIONS FOR USE
Safety instructions
Read carefully!
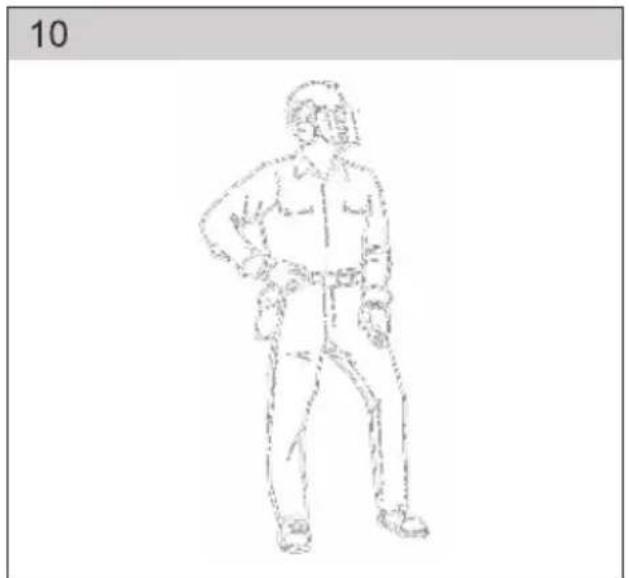
* Always wear safety helmet, safety gloves, protective clothing (trouser-legs against cutting through), protective gloves and safety shoes (see Fig. 10).
Keep the machine out of the reach of children.
* Never work with the engine if there is only gasoline in the fuel tank.
Never fill up fuel while the engine is running or still hot. Fill the service liquids into the engine only while the engine is cold.
Store fuels in a closed container in a dry and cool place.
Follow safety rules.
Recheck the workspace before each use. Remove objects which may be flung away or get stuck into the machine.
When working, all other persons have to be out of a range of 15 meters at minimum.
* Never use the machine without the protective safety cover (of the cutting blade) on.
Never fill the fuel tank so that it is full up to the top completely.
The fuel tank closing cover must be tightened thoroughly in order to avoid the fuel overflow.
Do not let the machine run at full throttle if the fuel tank is empty.
* Never switch-off the machine abruptly if it runs at full throttle.
Do not use the machine if it is damaged in any way. Contact an authorized service station.
When carrying over, grasp the whole device; grasping the fuel tank only is dangerous, the fuel tank damage and fire may be a result.
* Always hold the brush cutter in both hands.
* Never put the warm brush cutter on dry grass.
Do not smoke while working with the machine.
Safety instructions
Fuel
The fuel tank has to be empty during transportation of the brush cutter.
* Transport fuels in approved jerry cans.
* Check the fuel tank lid regularly. It must be tightened thoroughly and fuel leak must not occur.
* Protect the living environment: take care to avoid fuel leakage and soil contamination.
* Start-up the machine minimally 3 meters away from the place where you filled fuel.
* Never fill up fuel in enclosed areas. Adequate ventilation must be ensured in the room; explosion hazard.
Do not inhale fuel vapours. Fill up fuel while wearing protective gloves.
Change and clean the protective clothing regularly.
Safety instructions
Cutting tools
When mounting the cutting tool, check the blade condition. If it is damaged (cracked, bent, abrupt etc.), eplace it.
After having installed the blade, check whether the hole in the blade is aligned with the arm of the blade carrier.
Rotate the blade, check whether the blade does not tend to rotate irregularly.
Be sure to install the blade with its cutting edge in the direction of rotation. Never mount it the other way around.
* Check whether the cutting tool has been assembled properly, rotate it without a load (1 minute is enough).
The blade has to be chosen appropriately for the given material.
* Never push the blade against objects while working. Objects must be cut at mild speed.
If you hear an unusual sound or the machine vibrates unusually while working, stop working and find-out the cause.
Do not stop the machine while the blade is going through the cut object. There is an injury and machine damage danger.
The cutting tool must be fitted with an appropriate protective cover.
⚠ WARNING! The failure to follow instructions may result in serious or fatal injury of persons!!
Give all persons working with this machine information on the machine operation and safety instructions.
7. MAINTENANCE AND STORAGE
Machine maintenance
Before each use:
- Recheck tightening of all screws, bolts and nuts.
- Check whether fuel is not escaping from the fuel tank.
After every 20 hours of operation:
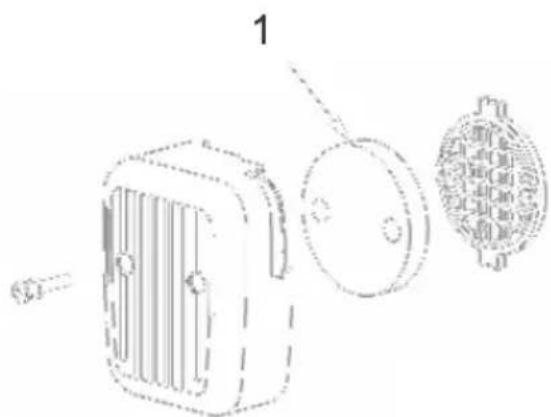
- Clean the air cleaner (1) (see Fig. 11).
- Clean the fuel filter.
After every 50 hours of operation:
- Clean deposits from the exhaust pipe and the muffler.
- Dismount the shaft and lubricate with quality lubricant.
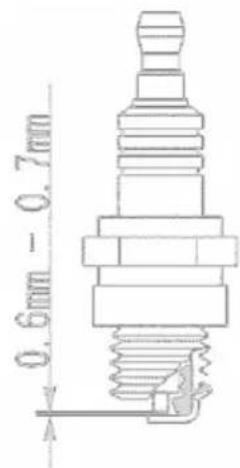
- Clean the spark plug and adjust a gap between electrodes to 0.6 - 0.7 mm distance (see Fig.12).
Lubricate the gearbox.
Recheck the assembly after maintenance and recheck tightening of all screws, bolts and nuts.
* Check carefully whether fuel liquid is not leaking.
Service
In the case you find-out any defect after having purchased the product, contact the service department. When using the product, follow instructions given in the operation manual.
Your claim will not be taken into consideration if you have modified the product or have not adhered to instructions given in this operation manual.
Warranty does not cover
Natural wear of functional parts of the machine in consequence of its use
Service interventions relating to the standard maintenance of the machine (e.g. cleaning, lubricating, adjusting, etc.)
* Faults caused by outer influences (e.g. climatic conditions, dustiness, unsuitable use, etc.)
* Mechanical damage resulting from a fall of the machine, shock, impact, etc.
Damages resulting from unskilled handling, overloading, the use of improper parts, unsuitable tools etc. The risk of possible damage of claimed products which have not been secured against mechanical damage during the transport properly is born exclusively by the owner.
Storage
⚠ WARNING! If not using the machine for a longer time, store it according to the following instructions. Thus you will prolong the service life of your machine.
Drain fuel from the fuel tank and carburetor completely. Close the primer and pull the starter 3 – 5 times.
* Unscrew the spark plug and put a small amount of engine oil into the hole. Pull the starter 2 – 3 times gently.
Clean outer surfaces by a clean cloth. Store the machine in a clean and dry place.
8. TECHNICAL DATA
Model: FZS 4003-B
Cylinder capacity: 42.7 cm3
Maximum engine power: 1.25 kW
Shaft length: 1,500 mm
Engine type: two stroke, air-cooled
Idling speed: 3,000 rev/min
Recommended maximum idling speed: 9,000 rev/min
Spark plug: L6 (LD)
Fuel tank capacity: 1,200 ml
Weight without fuel and sawing tools: 7.5 kg
Sound power level, guaranteed LWA 110 dB(A)
Instructions Manual - language version only.
9. WHAT TO DO "IF..."
| Engine does not start | Possible cause Remedy | |
| 1. Check fuel No fuel in | the carburettor or tank. Fill up fuel | |
| Fuel contains water. | ||
| Improper fuel mixture ratio. Drain the fuel tank and the carburettor. Fill new fuel into the tank.. | ||
| 2. Take the spark plug out . | Defective or dirty spark plug. Replace the spark plug. | |
| Wrong gap between electrodes. | ||
| Spark plug is damp, affected by gasoline (flooded engine).. | Dry the spark plug and reinstall. | |
| 3. Bring the engine to the authorized service or to the dealer. | Clogged fuel filter, carburettor fault, ignition fault, clogged valves etc. | Replace or repair defected parts. |
| Unsufficiently functional engine | Possible cause Remedy | |
| 1. Check the air filter. Dirty air filter | Clean or replace the air filter | element. |
| 2. Check fuel. Fuel contains water | Drain the fuel tank and the | carburettor. Fill new fuel into the tank. |
| Improper fuel mixture ratio. | ||
| 3. Check the primer setup and gas control. | The primer not fully open. Adjust | the setup. |
| Wrongly adjusted gas cable. | ||
| 4. Bring the engine to the authorized service or to the dealer. | Clogged fuel filter, carburettor fault, ignition fault, clogged valves etc. | Replace or repair defective parts. |
| Engine starts-up,conks out immediately | Possible cause Remedy | |
| 1. Check fuel. Fuel has run | out. Fill up fuel | |
| Fuel contains water. Drain the fuel tank | carburettor. Fill new fuel into the tank. | |
| Improper fuel mixture ratio. | ||
| 2. Take the spark plug out and check. | Defective or dirty spark plug. Replace | the spark plug. |
| Wrong gap between electrodes. | ||
| 3. Check the air filter. Dirty | air filter. Clogged air filter Clean | or replace the air filter element. |
| 4. Bring the engine to the authorized service or to the dealer. | Clogged bleeder valve. | Replace or repair defective parts. |
| Clogged fuel filter, carburettor fault, ignition fault, clogged valves etc. |
10. DECLARATION OF CONFORMITY
EC Declaration of Conformity
Fast ČR, a.s., Černokostelecká 251 01 Říčany u Prahy, phone: 323204111, declares with binding effect, that brush cutter Fieldmann FZS 4003-B (the year of manufacture is indicated on a type label and is followed by a serial number of the machine), complies with the requirements of DIRECTIVE OF THE COUNCIL:
No. 2006/42/EC, 2006/95/EC, (approval certificate no.: 17704045 001) No. 2004/26/EC, exhaust emission,
and has been tested in compliance with the following standards: EN ISO 11806:2008
The company FAST ČR, a.s. is entitled to act on behalf of the manufacturer.
CE label: 13
Říčany, 29 November 2013
name stamp signature

Petr Uher quality manager
11. DISPOSAL
INSTRUCTIONS AND INFORMATION ON USED PACKAGE DISPOSAL
Put the used packaging material to the place designated for waste disposal by a municipality.

This symbol is valid in the European Union. If you wish to dispose of this product, ask local authorities or your dealer for necessary information about the right disposal method.

This product meets all fundamental requirements of applicable EU directives.
Changes of the text, design and technical specifications can be done without prior notice and we reserve the right for the changes.
Home & Garden Performance
Music: Music Month: Music
20
Dom (DxF) Music (Music) Myk: 20 Day (Day) Month (Month) No Year: Ex
Day: (Def) Music: Music! Risk: 20 Day: (DelA: Nag) Month: Macqir 1960 Year: Feb
Oun (Duf.) Music (Music) Rock 20 Day (Day A. Nag. Monk (Message: Feb. Year: Ex
Razkko servisu: | Pełatka servisu | Stamp of the repair shop; | Pieczęć perwisu; | Szerviz socjalne:
servis.brno@fastcr.cz
www.fastcr.cz
Fast Plus, spol. s r. o.
Na Pántoch 18
SK 831 06 Bratislava
Slovenská republika
Tel.: +421/2/49 105 854
Fax: +421/2/49 105 859
servis@fastplus.sk
www.fastplus.sk
Conditions of guarantee
This product is warranted for the period of 24 months from the date of purchase to the end-user. Warranty is limited to the following conditions. Warranty is referred only to the customer goods using for common domestic use. The claim for service can be applied either at dealer's shop where the product was bought, or at below mentioned authorized service shops. The end-user is obligated to set up a claim immediately when the defects appeared but only will the end of warranty period. The end-user is obligated to cooperate to certify the claiming defects. Only completed and clean (according to hygienic standard) product will be accepted. In case of eligible warranty claim the warranty period will be prolonged by the period from the date of claim application till the date of taking over the product by end-user, or the date the end-user is obligated to take it over. To obtain the service under this warranty, end-user is obligated to certify his claim with duly completed following documents: receipt, certificate of warranty, certificate of installation.
This warranty is void especially if apply as follows: ■ Defects which were put on sale. ■ Wear-out or damage caused by common use.
■ The product was damaged by unprofessional or wrong installation, used in contrary to the applicable instruction manual, used in contrary to legal enactment and common process of use or used for another purpose which has been designed for. ■ The product was damaged by uncarred-for or insufficient maintenance. ■ The product was damaged by dirt, accident of force majeure (natural disaster, fire, flood, ...). ■ Effects on functionality caused by low duality of signal, electromagnetic field interference etc. ■ The product was mechanically damaged (e.g., broken button, fall...). ■ Damage caused by use of unsuitable media, filings, expendable supplies (batteries) or by unsuitable working conditions (e.g., high temperatures, high humidity, quicks...). ■ Repair, modification or other failure action to the product by unauthorized person. ■ End-user did not prove enough his right to claim (time and place of purchase). ■ Data on presented documents differs from data on products. ■ Cases when the claiming product can not be identified according to the presented documents (e.g. the serial number or the warranty seal has been damaged).
natural_image
Black-and-white photo of a manual metal tool with tripod base and lever handle (no text or symbols visible)
FIELDMANN®
Home & Garden Performance


- FIELDMANN®
- Gasoline brush cutter
- OPERATION MANUAL
- TABLE OF CONTENTS
- GENERAL SAFETY INSTRUCTIONS
- Important safety warnings
- Packaging
- Instructions for use
- EXPLANATION FOR INSTRUCTION PLATES ON THE MACHINE
- MACHINE DESCRIPTION AND DELIVERY CONTENT
- Machine description (see Fig.1)
- Use of the product
- Machine characteristic
- Delivery content
- MACHINE ASSEMBLY
- Drive shaft parts
- Drive shaft assembly (see Fig.2)
- Handle assembly (see Figs. 3, 4, 5)
- Gearbox parts (see Figs. 6, 7)
- Cord replacement (see Figs. 13, 14, 15, 16)
- Fuel filling
- Gas lever and main switch (STOP) (see Fig. 8)
- Starting (see Fig. 9)
- Idle speed setup (see Fig. 2)
- INSTRUCTIONS FOR USE
- Safety instructions
- Read carefully!
- Fuel
- Cutting tools
- MAINTENANCE AND STORAGE
- Machine maintenance
- Service
- Warranty does not cover
- Storage
- TECHNICAL DATA
- WHAT TO DO "IF..."
- DECLARATION OF CONFORMITY
- EC Declaration of Conformity
- DISPOSAL
- INSTRUCTIONS AND INFORMATION ON USED PACKAGE DISPOSAL
- Home & Garden Performance
- Fast Plus, spol. s r. o.
- Conditions of guarantee
Brand : Fieldmann
Model : FZS 4003 B
Category : Corded Lawn Mower