
FZS 2001-E - Corded Lawn Mower Fieldmann - Free user manual and instructions
Find the device manual for free FZS 2001-E Fieldmann in PDF.


| Product Type | Electric Garden String Trimmer |
| Brand | Fieldmann |
| Model | FZS 2001-E |
| Rated Voltage | 230 V AC |
| Rated Frequency | 50 Hz |
| Rated Power Input | 2 x 350 W |
| No-Load Speed | 10000 rpm |
| Cutting Width | 260 mm |
| Safety Class | II (Double Insulation) |
| Guaranteed Noise Level | 96 dB(A) |
| Weight | 2.6 kg |
| Power Cord Length | 400 mm |
| Cutting Line Type | Nylon line, automatic feed |
| Spool | Replaceable spool with line |
| Handle Adjustment | Adjustable second handle, telescopic pole |
| Protective Cover | Included with line cutting blade |
| Included Accessories | String trimmer, protective cover, handle with screw, user manual |
| Assembly Required | Attach protective cover and handle |
| Maintenance | Keep sharp, clean; store dry; sharpen cutting blade regularly |
| Safety Features | Safety lock switch, double insulation, overload protection (via fuse) |
| Usage Environment | Private gardens; not for wet grass or rain |
Frequently Asked Questions - FZS 2001-E Fieldmann
User questions about FZS 2001-E Fieldmann
0 question about this device. Answer the ones you know or ask your own.
Ask a new question about this device
Download the instructions for your Corded Lawn Mower in PDF format for free! Find your manual FZS 2001-E - Fieldmann and take your electronic device back in hand. On this page are published all the documents necessary for the use of your device. FZS 2001-E by Fieldmann.
USER MANUAL FZS 2001-E Fieldmann
natural_image
Abstract black and white spiral pattern with no text or symbolsFIELDMANN®
Home & Garden Performance
natural_image
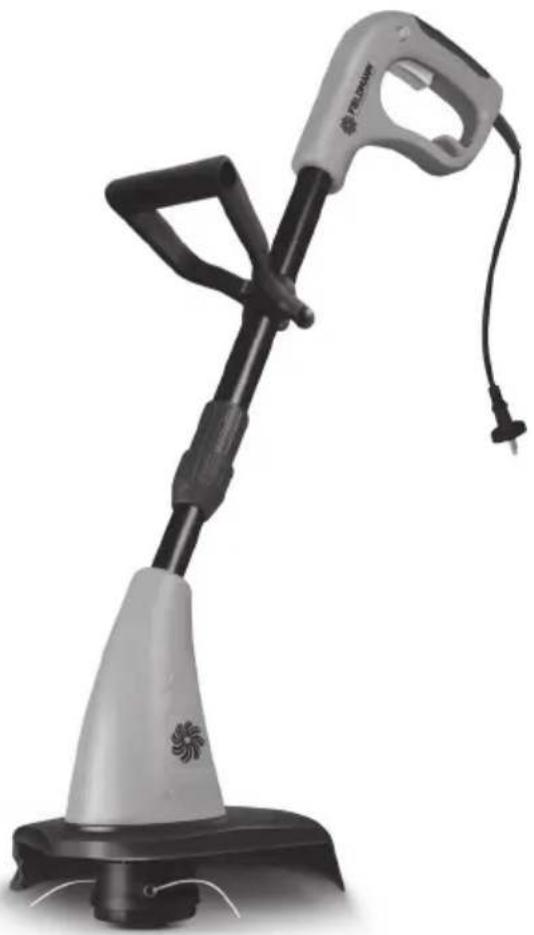
Exterior view of a handheld electric water heater with black and gray body (no text or symbols visible)FZS 2001-E
English.... 1 - 15
Čeština 16 – 27
Slovenčina 28 – 39
Magyarul....40-51
Polski 52 - 65
Русский 66 – 79
Lietuvių 80 – 93
1
| 2 | 3 | 4 |
 |  |  |
| 5 | 6 |
 |  |
| 7 | 8 |
 |  |
| 9 | 10 | 11 |
 |  |  |
Electric string trimmer
USER'S MANUAL
Thank you for purchasing this garden string trimmer. Before you start using it, please, carefully read this user's manual and save it for possible future use.
CONTENTS
ILLUSTRATED ATTACHMENT 1
- GENERAL SAFETY REGULATIONS ....5
Important safety notices
Packaging
Operating instructions
-
EXPLANATION OF INSTRUCTION LABELS ON THE MACHINE ....6
-
MACHINE DESCRIPTION AND INCLUDED CONTENTS ....6
-
ASSEMBLY OF THE MACHINE ....7
Attaching the protective cover
Attaching the support handle
Setting the working height
Setting the line length
Replacing the spool with line
- PUTTING INTO OPERATION....8
Turning on the machine
Connecting to a power source
Putting into operation
- OPERATING INSTRUCTIONS 9
Operation
Purpose of use
Instructions for use
Connecting to the mains power supply
Electrical safety
- INSTRUCTIONS FOR PROPER TRIMMING....12
Working procedure
-
MAINTENANCE AND STORAGE 13
-
DISPOSAL....14
-
TECHNICAL SPECIFICATIONS.... 15
-
WHAT TO DO "WHEN..." 15
1. GENERAL SAFETY REGULATIONS
Important safety notices
Carefully unpack the product and take care not to throw away any part of the packaging before you find all the parts of the product.
Store the string trimmer in a dry place out of reach of children.
Read all warnings and instructions. Not following warnings or instructions may lead to injury by electrical shock, a fire and/or serious injuries.
Packaging
The product is packed in a package that prevents damage during transport. This package is a resource and so can be handed over for recycling.
Operating instructions
Before you start working with the electric string trimmer, read the following safety and usage instructions. Understand the operating elements and the correct use of the device. Keep the user's manual in a safe place where it can be easily retrieved for future use. Save the original packaging, including the internal packing material, warranty card and proof of purchase receipt, at least for the duration of the warranty. If you need to ship this machine, pack it in the original cardboard box to ensure maximum protection during shipping or transport (e.g. when moving or when you need to send this product for repair).

Note: If you hand over the machine to somebody else, do so together with the user's manual. Following the instructions in the included user's manual is a prerequisite for the proper use of the string trimmer. The user's manual also contains operating, maintenance and repair instructions.
The manufacturer takes no responsibility for accidents or damages resulting from not following the instructions in this manual.
2. EXPLANATION OF INSTRUCTION LABELS ON THE MACHINE

General danger warnings.

Before putting into operation, carefully read the user's manual.

Do not use in the rain or in unfavourable climatic conditions.

While working use protective aids.
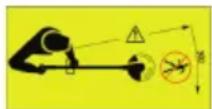
Keep other people away from the work area.
Make sure that people standing nearby are not injured by deflected foreign objects.
3. MACHINE DESCRIPTION AND INCLUDED CONTENTS
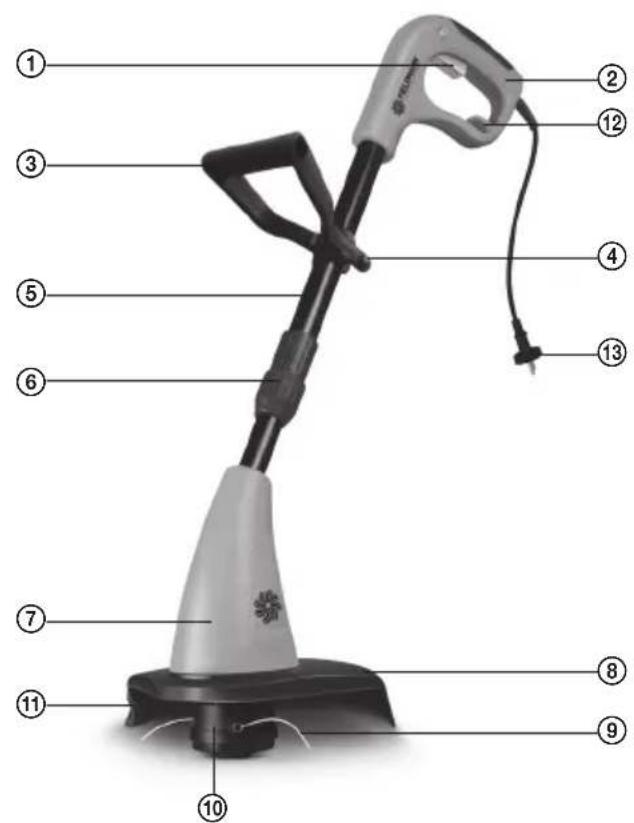
Machine description (see pic. 1)
① Switch
② Handle
③ Adjustable second handle
④ Screw for attaching the second handle
⑤ Telescopic pole for setting the working height
⑥ Locking bolt for fastening the telescopic pole
⑦ Trimmer head
⑧ Protective cover
⑨ Line
⑩ Spool with line
⑪ Blade for shortening the line
⑫ Power cord tension reduction
⑬ Power plug
ATTENTION: The line cutting blade on the protective cover is sharp!
Supplied contents
Carefully take out the garden tool from the packaging and check whether all the following parts are present:
Electric garden string trimmer
Protective cover
Handle with attachment screw
User's manual
If there are parts missing or they are damaged, please contact the vendor from whom you bought the machine.
4. ASSEMBLY OF THE MACHINE
Attaching the protective cover
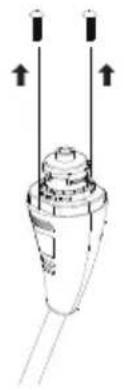
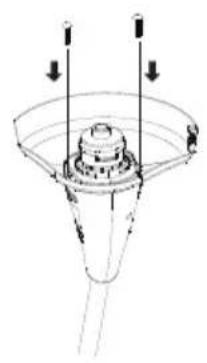
a. Unscrew the two screws on the string trimmer head (pic. 2).
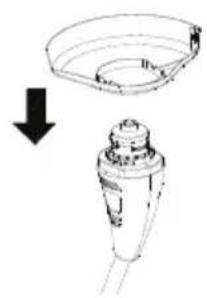
b. Slide the cover on to the head of the string trimmer (pic. 3).
c. Pull both screws through the slots in the protective cover into the string trimmer head as shown on pic. 4 and tighten securely.

Note: If the protective cover (included) is not mounted, the motor will overheat and the warranty will be void.
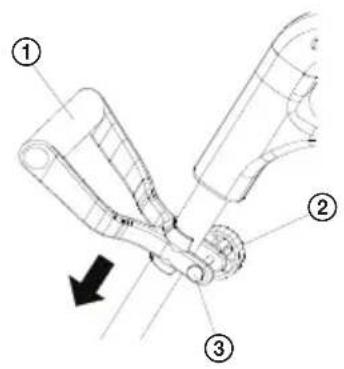
Attaching the support handle (see pic. 5)
a. Attach the support handle (no. 1) in the working position and lightly tighten using the screw on the handle (no. 2).
b. Set the height of the handle by sliding it along the telescopic pole of the string trimmer upwards or downwards and in the desired working position firmly tighten the nut (no. 3).
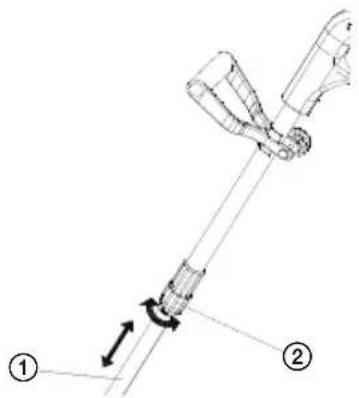
Setting the working height (ww pic. 6)
The working height of the string trimmer can be continuously set and adjusted to suit the height of the operator. With one hand hold the bearing pole of the string trimmer (no. 1) and with the other loosen the locking bolt (2). Set the handle to the appropriate working height and tighten the locking bolt.
Setting the line length
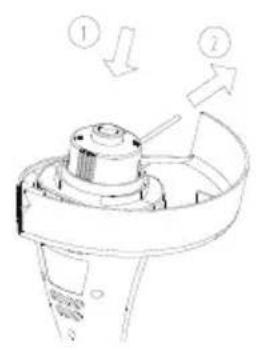
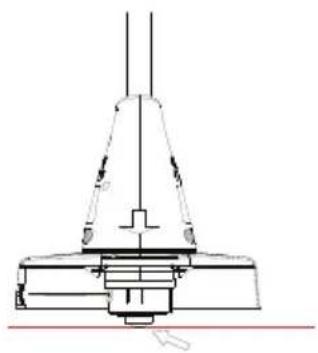
Before starting the string trimmer check the length of the nylon lines. If they are not long enough, press the button (pic. 7, no. 1) and pull out the nylon line (pic. 7, no. 2) so that the desired extension is achieved.
As soon as the string trimmer is turned on, the extended nylon line will automatically be shortened by the shortening blade to the correct length.
While the string trimmer is in operation the nylon line will become shorter and will wear out. If you wish to automatically extend the nylon line, tap the butt on the spool lightly against the ground (even while the string trimmer is in running) (pic. 8).
This procedure should be repeated several times before starting work to make sure that trimmer is working correctly and that you are completely informed about the use of the string trimmer. Start slowly and as soon as you become more experienced, you will be able to take advantage of the full potential of the string trimmer.
Replacing the spool with line
ATTENTION: Disconnect the string trimmer from the power source before replacing the spool.
Turn the bottom side of the head of the string trimmer towards yourself.
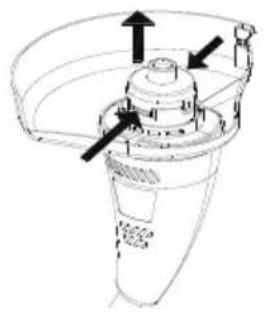
Press the clip on the line spool cover as shown on pic. 9 and remove the spool cover.
Take the spool out and remove the remains of the line found on the spool.
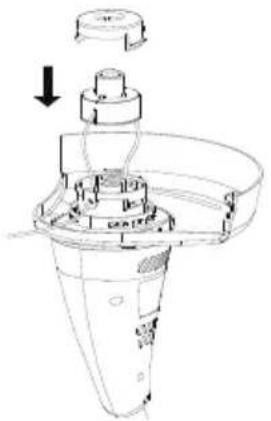
Thread the end of the line through the hole in the spool as shown in pic. 10. Check that the spring is in its place under the spool. Pull the line through the opening on the machine's head so that the line is tensioned when the spool is seated.
Note: Inside the head there is a spring that can easily be lost. Make sure that it is kept in a safe place.
* Press the spool GENTLY downwards on to the spring and turn it until you feel that it has been properly seated. Make sure that the line does not get stuck under the spool.
Reattach the spool cover, hold the string trimmer in the cutting position and turn on the machine. Within a few second or even sooner you will hear how the line is cut off to the correct length. If the line is not cut off, tap the butt on the butt lightly against the ground, which will release and extend the length of the line.
Turning on the machine
The power plug located on the machine (pic. 1, no. 13) must be connected to an extension cord (not included), secured by the pull reduction (no. 12)
Connecting to a power source
ATTENTION: Before connecting to a power source, always check that the switch is turned off. Connect the power plug to the power source with current protection.
Putting into operation
Note: Before starting the string trimmer check the length of the nylon lines.
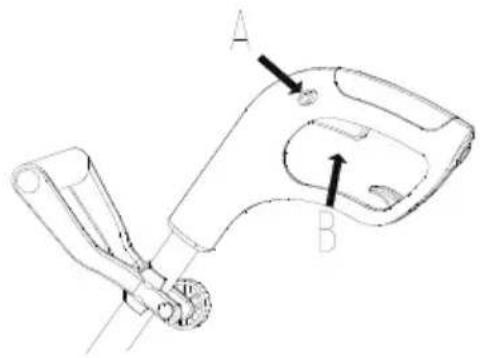
Hold the handle of the machine and with the thumb press the safety lock wheel of the trigger switch (pid. 11, A) and then press the trigger switch (B). Turn off the string trimmer by releasing the trigger switch.
⚠️ ATTENTION: Press or release the start switch carefully according to the manufacturer's instructions.
⚠️ ATTENTION: Make sure that feet are at a sufficient distance from the trimming mechanism.
The nylon line will continue to slow down for a few seconds after the string trimmer is turned off. Wait until the motor and the line are still before turning on the string trimmer again. Do not switch the string trimmer on and off in short succession.
6. OPERATING INSTRUCTIONS
Operation
This product must not be used by children and persons with physical or mental impairments or by inexperienced persons, unless properly trained or schooled in the safe use of the product, or unless they have been properly supervised by a qualified person who will be responsible for their safety.
* Never use the electric garden string trimmer if you are in close vicinity to other people, children or freely moving household pets.
Use extra care if the product is used near children. Always keep the appliance out of reach of children. Children must be supervised to ensure that they do not play with the product.
* Never allow children or persons who do not know the contents of this user's manual to work with the device. Local regulations may set the minimum age of the user. The user is responsible for damages caused to third parties in the string trimmer's working area as a result of its use.
Do not use the machine if your are fired, under the influence of alcohol or narcotics.
Purpose of use
The string trimmer is suitable for use in private gardens.
String trimmers considered to be suitable for use in private gardens are such devices, where the annual operation as a rule does not exceed 50 operating hours and which are predominantly used for the maintenance of lawn areas, but not public facilities, parks, sports fields or in agriculture or forestry.
Do not use the product for purposes other than those intended.
For safety reasons the string trimmer must not be used as a drive engine for any other work tools and tool sets, unless expressly permitted by the manufacturer.
Instructions for use
Turn on and operate the machine as described in the user's manual, carefully follow all instructions.
Before carrying out any kind of inspection, maintenance or repairs disconnect the power cord from the mains power supply.
Work only during good visibility or ensure suffi cient artifi cial lighting.
* Never operate the machine in enclosed, poorly ventilated rooms, or in the vicinity of flammable or explosive liquids, fumes or gases.
* Never use the string trimmer in places where there is danger of contact with a water surface (e.g. in direct vicinity of garden ponds, in-ground pools, etc.).
Before starting trimming, check the terrain where the string trimmer will be used and remove stones, wires, sticks, splinters, bones and other foreign objects, which could become caught in it or deflected or cause injuries.
* Press or release the start switch carefully according to the manufacturer's instructions. Make sure that feet are at a sufficient distance from the trimming mechanism.
* Never use the product if you have wet hands or feet or without proper footwear.
When trimming, wear solid, anti-slip footwear and long pants. Never work barefoot or in light sandals.
Secure loose clothing, long hair or jewellery so that they cannot get caught by the moving parts of the machine.
- Never use the electric garden string trimmer in excessively steep terrain. Be very careful in steep terrain – there is a danger of slipping and injuring yourself.
* Never place your hands or feet under the rotating parts. Keep the string trimmer at a safe distance from all your body parts when it is in operation.
During work ensure you have a safe stance.
Guide the machine only at walking speed.
Before lifting the string trimmer for transportation reasons, turn off the motor, pull the power cord out of the electrical mains.
Turn off the motor when leaving a lawn area.
Do not expose the string trimmer to rain. Do not trim wet or very damp grass.
* Only store and use the product away from fl ammable or volatile materials and solutions. - Keep the product away from extreme temperatures, direct sunlight and excessive humidity. Do not use in a dusty environment.
Do not place the product near heaters, open fires or other appliances or equipment that are sources of heat.
Do not spray the product with water or any other liquid. Do not pour water or any other liquids into the appliance. Do not submerge the appliance in water or any other liquid.
* Never leave the appliance switched on without supervision.
Do not touch machine parts until they have come to a complete stop.
Allow the motor to cool down before storing the string trimmer in a closed room.
Under no circumstances should you try to repair or amend the product on your own - danger of electric shock! Entrust all repairs and adjustments of this product to an authorised service centre or the vendor. Tampering with the appliance during the warranty period may void the warranty.
The manufacturer is not responsible for damages caused by incorrect use of this product or its accessories. Such damages include food spoilage, injuries, burns, scalding, fi re, etc.
When working with this machine dust is created or small bits of dirt are deflected, so use protective aids: work gloves, protective glasses, shield or dust mask (standard eye glasses do not provide sufficient eye protection).
We recommend using hearing protection when using the machine for extended periods of time. - Keep children and other persons and animals at a safe distance from the string trimmer. The grass that is cut and deflected away may contain stones and dirt.
* Always inspect the operating condition of the string trimmer. If the operating condition of the string trimmer is not in order this may present a danger to the operator.
Do not use the string trimmer if the cutting mechanism is not properly secured or is damaged.
Do not trim against hard objects. This could lead to injury or damage the string trimmer.
* Never use the string trimmer without the protective cover.
Be careful of the line of the trimmer, which can cause deep cutting wounds.
Do not attempt to stop the cutting mechanism (nylon line) using your hands. Always wait until the cutting mechanism stops on its own.
Do not use a grass trimmer that is not in contact with the ground. Do not for example cut grass located on walls, rocks, etc.
Use the right kind of tool
This user's manual describes the designated use of tools. Do not overload small tools or accessories for work, where high performance tools are necessary. The tool will work better and more safely on work for which it is designed. When using any accessories or additions or when performing any kind of work, which is not recommended by this user's manual, there may be a risk of injury to persons. Do not overload the tool.
* Prevent the situation where the tool is turned on accidentally. Do not carry the tool with the finger on the main trigger switch.
* Never pull on the power cord when disconnecting power plug from the power socket. Do not lead the power cord over greasy and hot surfaces and make sure that it does not go over sharp edges.
Connecting to the mains power supply
Before connecting the product to the power outlet ensure that the voltage on the label is the same as voltage source in your power socket. It is recommended to connect this machine to a power socket that is protected by current protection with a release current of 30 mA. Never hold the power plug with wet hands.
The connecting power socket on connecting elements must be made from rubber, soft PVC or another thermoplastic material of the same strength, or must be coated with this material.
Used connecting power conductors must have the minimum parameters of a rubber cable H07RN-F according to DIN 57 282/VDE 0282 and must have a diameter of at least 1.5mm^2 . Power plug connections must have protected contacts and connections protected against spraying water. Guide the connecting power cord through the pull reduction on the guide handle and insert into the combination trigger switch - power plug. Before use, check that the conductors are not damaged or showing signs of material ageing. Never operate the string trimmer if the electrical lines are not in perfect condition (also applies to lines going to the motor). If while trimming the lawn the power cord is damaged, immediately pull the power plug out of the mains and only then check the damage.
The extension cord must have the cross section in accordance with the user's manual and must be protected against spraying water. The power plug connection must not lie in water.
If the product's power cord is damaged, have an authorised service or qualified person replace it, in order to prevent hazards. It is forbidden to use a product with a damaged power cord or plug.
Do not disconnect the power cord from the electric power socket by pulling the power cord.
* Avoid turning the string trimmer on and off too frequently in a short time period, namely playing with the trigger switch.
Before stopping the string trimmer, cleaning it, and likewise before performing any inspection, maintenance or repairs, turn off the string trimmer and disconnect it from the electrical power source by pulling the power cord from the power socket.
The repairs of electrical parts may only be performed by an authorised service centre or the vendor.
On impact with a foreign object, turn off the motor, pull the power cord from the mains, identify the damage and carry out the necessary repairs. Only then start the string trimmer again and continue working.
If the device starts to vibrate unusually, immediately pull the plug out of the socket and inspect the string trimmer.
Do not work in such a way that limits the movement of the extension cord.
Do not place the power cord near hot surfaces, or over sharp objects. Do not place heavy objects on the power cord. Position the cord so that it will not be stepped on or tripped over. Make sure the power cord is not touching a hot surface.
* Keep the power cord and extension cord at a sufficient distance from the cutting mechanism. Danger of electrical shock, always be aware of where the power cord is located.
The voltage fluctuations caused by this machine during start-up may during unfavourable mains conditions cause interference with other devices connected to the same circuit. In such a case take appropriate measures (e.g. connect the string trimmer to a different circuit or operate it in circuit with a lower impedance).
Pay attention to necessary extension cords.
If you are not using the product, or if you know that you will not be using it soon, turn it off and disconnect the power cord from the wall socket. Prior to cleaning, proceed in the same manner.
Always pull the power plug from the mains, if:
– you are leaving the string trimmer,
– the machine starts to vibrate unusually (inspect immediately).
Electrical safety
The string trimmer can be inserted into any light power socket (with an alternating current of 230 V). Permissible is, however, only a socket protected by a 10 A protective switch and a protective switch against false current with max. 30 mA.
Use only undamaged power cords. Power cords cannot be of any length (max. 50 m), otherwise the power of the electrical motor will be reduced. The power cord to the machine must have a cross section of 3 × 1.5 mm^2 . The insulation on electric string trimmer power cords is damaged very often.
The causes of this are:
– damaged caused by driving over the power cord
- compression of the power cord when it goes under doors, windows, etc.
– cracks caused by the ageing of the insulation
– broken places caused by unprofessional connections or power cord routes.
Power cords damaged in this way are often used despite the fact that they are deadly. Power cords, power plugs and power sockets must meet the following conditions. Electrical power cords for connecting the string trimmer must have rubber insulation.
Power plugs and connecting sockets on power cords must be from rubber and protected against spraying water. Connecting power cords must not be of any length. Longer power cords require a larger cross section. Regularly inspect the power and extension cords for damage. During an inspection power cords must be disconnected. Fully unwind the power cord. Also inspect broken places on the connecting power cords at the power plug and the connecting power sockets.
The connecting power sockets on connecting elements must be made from rubber, soft PVC or another thermoplastic material of the same strength, or must be coated with this material.
7. INSTRUCTIONS FOR PROPER TRIMMING
Working procedure
Move the string trimmer left and right while holding it at a sufficient distance from the body.
The string trimmer can effectively cut grass up to a height of 15 cm. Cut higher grass gradually.
Take care when trimming around trees and bushes so that they do not come into contact with the line. Plants may die off if damaged.
8. MAINTENANCE AND STORAGE
Maintenance
* Check whether the device is showing signs of wear.
Only perform maintenance and cleaning of the string trimmer and the removal of protective devices if the motor is off and the string trimmer is disconnected from the mains.
Taking regular care of the string trimmer ensures not only a long lifetime and performance, but also helps to make trimming lawns better and easier.
* Maintain the cutting mechanism sharp and clean to ensure the best and safest performance. Follow the instructions for maintenance and replacement of accessories. Keep the handle and trigger switch clean and dry and ensure that they are not soiled by oil and grease.
Inspection of damaged parts
Before using the tool, carefully check that it has not been damaged and that it will function properly and perform the designated function. Check for deviation or blockage of the moving parts, damage of individual parts and other factors which could affect the operation of the tool. Have damaged parts repaired or replaced at an authorised service centre or the vendor. Do not use the tool if any part of it is damaged. Never attempt to make any repairs yourself.
All nuts, pins and screws must be firmly tightened and the entire device must be in safe working order.
* Check that all protective devices are attached and work perfectly.
* Replace damaged or worn parts.
* Damaged parts of the machine may only be replaced by a professional using original spare parts.
* Never use accessories that have not been delivered with this product or are not intended for it.
Before cleaning disconnect this product from the power source.
To clean the exterior parts of the product, use a soft cloth dipped in lukewarm water. Do not use aggressive cleaning products and solvents as this could damage the surface of the appliance.
Do not clean the string trimmer under running water, especially not with pressurised water.
The line may dry out over time. If you want to keep the line in perfect condition, store the sound replacement spool or lines in a closed plastic bag containing a tablespoon of water.
The shortening blade on the edge of the protective cover may become blunt over time. We recommend that this blade is regularly sharpened using a file.
Storage
Store the string trimmer in a dry room.
Do not place any other items on the machine.
* At the end of the season, perform a complete inspection of the string trimmer and remove accumulated grass clippings.
If a repair is necessary, contact an authorised customer service centre or the vendor.
9. DISPOSAL
INSTRUCTIONS AND INFORMATION REGARDING THE DISPOSAL OF USED PACKAGING MATERIALS
Dispose of packaging material at a public waste disposal site.
DISPOSAL OF USED ELECTRICAL AND ELECTRONIC APPLIANCES
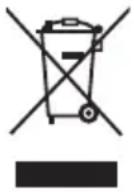
The meaning of the symbol on the product, its accessory or packaging indicates that this product shall not be treated as household waste. Please, dispose of this product at your applicable collection point for the recycling of electrical & electronic equipment waste. Alternatively in some states of the European Union or other you may return your products to your local retailer when buying an product. The correct disposal of this product will help save valuable natural resources and help in preventing the potential negative impact on the environment and human health, which could be caused as a result of improper liquidation of waste. Please ask your local authorities or the nearest waste collection centre for further details. The improper disposal of this type of waste may fall subject to national regulations for fines.
Eurc equiv
For business entities in the European Union
If you wish to dispose of an electrical or electronic device, request the necessary information from your seller or supplier.
Disposal in other countries outside the European Union
If you wish to dispose of this product, request the necessary information about the correct disposal method from local government departments or from your seller.

This product meets all the basic EU regulation requirements that relate to it.
Changes to the text, design and technical specifications may occur without prior notice and we reserve the right to make these changes.
10. TECHNICAL SPECIFICATIONS
Type.....Electric garden string trimmer FZS 2001-E
Nominal voltage 230 V AC (alternate current)
Nominal frequency....50 Hz
Rated power input....2x 350 W
Number of revolutions 10000 rpm
Cutting width....260 mm
Safety class (with regard to electric shock protection)......II
Guaranteed noise level 96 dB(A)
Length of the power cord 400 mm
Weight 2.6 kg
Amendments to text and technical parameters are reserved.
11. WHAT TO DO "WHEN..."
| When... Possible cause Remedy | ||
| The motor doesn't start up | – there is no power in the power plug– the string trimmer is standing in high grass– damaged power cord– damaged capacitor– damaged combination trigger switch- power plug– loosened connections on the motor or the capacitor | – check the electric wiring and the fuse– place it in lower grass, or on already trimmed areas, cut high grass gradually– check– at an authorised service centre or the vendor– at an authorised service centre or the vendor– at an authorised service centre or the vendor |
| Motor is losing power | – the grass is too high or wet – cut gradually | |
| The line does not turn after the machine is turned on | – struna v cívce namotaná, blokována– loosened line spool or missing line | – check the spool, or reinstall if necessary– use a spool with a suffi cient length of line |
| The line is breaking – line | – the string trimmer is being used incorrectly | – check the spool, or reinstall if necessary– prevent contact with rocks, walls and other rigid objects |
Changes in the text, design and technical specifications may change without prior notice and we reserve the right to make these changes.
natural_image
Exterior view of a handheld electric water heater device (no text or symbols visible)
FIELDMANN®
Home & Garden Performance


- FIELDMANN®
- Electric string trimmer
- USER'S MANUAL
- CONTENTS
- GENERAL SAFETY REGULATIONS
- Important safety notices
- Packaging
- Operating instructions
- EXPLANATION OF INSTRUCTION LABELS ON THE MACHINE
- MACHINE DESCRIPTION AND INCLUDED CONTENTS
- Machine description (see pic. 1)
- ATTENTION: The line cutting blade on the protective cover is sharp!
- Supplied contents
- ASSEMBLY OF THE MACHINE
- Attaching the protective cover
- Attaching the support handle (see pic. 5)
- Setting the working height (ww pic. 6)
- Setting the line length
- Replacing the spool with line
- Turning on the machine
- Connecting to a power source
- Putting into operation
- OPERATING INSTRUCTIONS
- Operation
- Purpose of use
- Instructions for use
- Use the right kind of tool
- Connecting to the mains power supply
- Electrical safety
- INSTRUCTIONS FOR PROPER TRIMMING
- Working procedure
- MAINTENANCE AND STORAGE
- Maintenance
- Inspection of damaged parts
- Storage
- DISPOSAL
- INSTRUCTIONS AND INFORMATION REGARDING THE DISPOSAL OF USED PACKAGING MATERIALS
- DISPOSAL OF USED ELECTRICAL AND ELECTRONIC APPLIANCES
- For business entities in the European Union
- Disposal in other countries outside the European Union
- TECHNICAL SPECIFICATIONS
- WHAT TO DO "WHEN..."
Brand : Fieldmann
Model : FZS 2001-E
Category : Corded Lawn Mower