![OLYMPUS Μ [MJU:]-III 150 - Digital Camera](/assets/marques/52.png "Notice OLYMPUS Μ [MJU:]-III 150 — Digital Camera — Mode d'emploi PDF")
Μ [MJU:]-III 150 - Digital Camera OLYMPUS - Free user manual and instructions
Find the device manual for free Μ [MJU:]-III 150 OLYMPUS in PDF.

![Notice OLYMPUS Μ [MJU:]-III 150 - page 2](/file/2019/11/5ddb1fac8594e/page-02.webp)


| Product Type | 35mm autofocus film camera with motorized zoom |
| Model | OLYMPUS µ [MJU:]-III 150 |
| Dimensions (W × H × D) | 117 × 61 × 43 mm (excluding protrusions) |
| Weight | 225 g (without battery) |
| Battery | 1 CR123A or DL123A 3V lithium battery |
| Lens | Olympus 37.5 mm – 150 mm (F5.1 – F13.3), 8 elements in 7 groups |
| Focusing | Passive multi-point autofocus (max. 11 points) with focus lock |
| Focusing Range | Wide (W): 0.6 m to ∞; Tele (T): 0.8 m to ∞ |
| Shutter Speed | Programmed electronic (4 s – 1/690 s at W, 4 s – 1/440 s at T) |
| Built-in Flash | Auto, modes: Auto, Red-Eye Reduction, Flash Off, Fill-In, Night Scene, Red-Eye Reduction + Night Scene |
| Flash Range (ISO 100) | W: 0.6 – 5.4 m; T: 0.8 – 2.1 m |
| Exposure Modes | Auto, Spot Metering, Infinity |
| Self-Timer | Electronic, approx. 12-second delay |
| Remote Control (optional) | Infrared RC-300C, delay ~3 s, range ~5 m |
| Film Loading and Advance | Automatic, simplified loading |
| Frame Counter | Progressive LCD display |
| Viewfinder | Real-image zoom with dioptric adjustment |
| Care and Cleaning | Clean with a soft, dry cloth. Avoid solvents, heat, humidity, sand. Protect from magnetic fields. |
| Safety | Do not disassemble (high voltage). Keep batteries out of reach of children. Do not expose to fire. |
| General Information | Instructions available in multiple languages. OLYMPUS warranty and after-sales service. |
Frequently Asked Questions - Μ [MJU:]-III 150 OLYMPUS
User questions about Μ [MJU:]-III 150 OLYMPUS
0 question about this device. Answer the ones you know or ask your own.
Ask a new question about this device
Download the instructions for your Digital Camera in PDF format for free! Find your manual Μ [MJU:]-III 150 - OLYMPUS and take your electronic device back in hand. On this page are published all the documents necessary for the use of your device. Μ [MJU:]-III 150 by OLYMPUS.
USER MANUAL Μ [MJU:]-III 150 OLYMPUS
natural_image
Line drawing of a Olympus digital camera with no text or symbols on the bodyEN INSTRUCTIONS 4
DE BEDIENUNGSANLEITUNG 14
FR MODE D'EMPLOI 24
ES INSTRUCCIONES 34
IT ISTRUZIONI 44
RU ИНСТРУКЦИЯ 54
UA ІНСТРУКЦІЯ 64
DK BETJENINGSVEJLEDNING 74
SE BRUKSANVISNING 84
NL GEBRUIKSAANWIJZING 94
FI KÄYTTÖOHJE 104
CZ NÁVOD K POUŽITÍ 114
![[ ] A](/content/2019/11/84387/images/4a047385a6c8c47c220952c114e771d650580cff1f0147256cbc199264844465.jpg)
![OLYMPUS Μ [MJU:]-III 150 - 2](/content/2019/11/84387/images/9cbfaca54bcc0c5d98c61859f7f67e7dd21c0f023fbac4048850b781bc5a06f9.jpg)
1
![OLYMPUS Μ [MJU:]-III 150 - 3](/content/2019/11/84387/images/6dbedcc539f8646cc413acc8e47e5a23a41f3cd9fab8c583b1db25858c49983f.jpg)
natural_image
Illustration of a double door with snow-capped mountains on the wall, framed by brick walls (no text or symbols)![OLYMPUS Μ [MJU:]-III 150 - 4](/content/2019/11/84387/images/f4dac7ac3ac65d1bbc8c153d8d03eeba9db4cb1c829322e01deca47a4e251bcf.jpg)
2
![OLYMPUS Μ [MJU:]-III 150 - 5](/content/2019/11/84387/images/6332578d6ab316453ad6603ca2510f283f775d22dd5a4168da80d26b423dc329.jpg)
![OLYMPUS Μ [MJU:]-III 150 - 6](/content/2019/11/84387/images/aeacca0eeb33c315055a70b0b021f36f455825c5bffe73245fffd87cc2ab73cc.jpg)
![OLYMPUS Μ [MJU:]-III 150 - 7](/content/2019/11/84387/images/51e235d7b66be9491e0c72027990a55a10b53e05ca0de3c7952d25e0173a542d.jpg)
![OLYMPUS Μ [MJU:]-III 150 - 8](/content/2019/11/84387/images/2a89452bac3248f2ca293072e01c6949e5e89076b137c61ccb4fc45f958fe1f7.jpg)
![26 [ ] 27 28 30 29](/content/2019/11/84387/images/fd3feb521e20fe46deb6f5cc2a8f5ed92564c224e9eb2992859d87fecdedd257.jpg)
![OLYMPUS Μ [MJU:]-III 150 - 13](/content/2019/11/84387/images/03ec6a17a162c5b29147f9c95e0b2296d4859053d068bc6f38b9152342a2f062.jpg)
INSTRUCTIONS
Read this manual carefully before using your camera (especially "Care and Storage" on page 12).
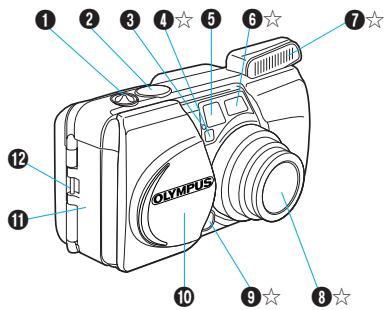
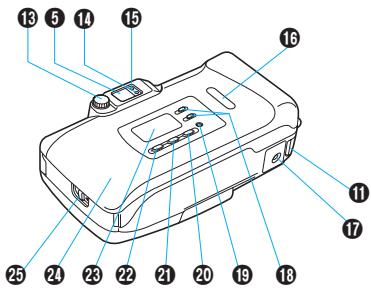
NAMES OF PARTS (Open the front flap and keep page 3 visible.)
Camera Body
1 Zoom lever (p. 7)
2 Shutter release button (p. 7)
3 Selftimer indicator/remote control indicator
4 Light sensor☆
5 Viewfinder
6 Autofocus window☆
7 Flash☆ (pp. 7–9)
8 Lens☆
9 Remote control sensor☆
10 Lens barrier
11 Battery compartment cover (p. 5)
12 Strap eyelet (pp. 5 & 10)
13 Diopter adjustment dial (p. 5)
14 Green lamp
15 Orange lamp
16 Film window
17 Tripod socket
18 Date MODE and SET buttons (Quartzdate model only) (p. 11
19 Mid-roll rewind button (p. 10)
20 Exposure mode button (p. 9)
21 Flash mode button (p. 8)
22 Selftimer/remote control button (p. 10)
23 LCD panel
24 Back cover
25 Back cover release (p. 6)
☆ Always try to keep this clean. Dirt and stains can result in pictures that are unclear and out-of-focus. Wipe off any dirt or stains with a soft cloth.
Viewfinder Indications
26 Autofocus marks (p. 7)
27 Spot marks (p. 9)
28 Close-up correction marks (p. 6)
29 Green lamp (autofocus indicator)
Lights: Subject is in focus. You can shoot.
Blinks: Subject is not in focus. Shutter is locked.
Blinks rapidly: Subject is difficult to focus on. You can shoot, but subject may be out of focus.
30 Orange lamp (flash indicator)
Goes out: Flash does not fire. You can shoot.
Lights: Flash will fire. You can shoot.
Blinks: The flash is being recharged. Wait until it lights.
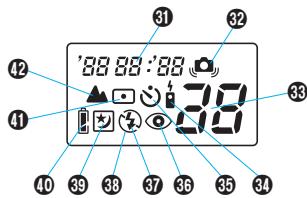
LCD Panel
31 Date/time indicator (Quartzdate model only) (p. 11)
32 Camera Shake Indicator (p. 10)
33 Exposure counter
34 Remote Control (optional) (p. 10)
35 Selftimer (p. 10)
36 Red-Eye Reduction Flash (p. 8)
37 Fill-In Flash (p. 8)
38 Flash-Off (p. 8)
39 Night Scene Flash (p. 9)
40 Battery check (p. 5)
41 Spot Metering (p. 9)
42 Infinity (p. 9)
Note: Not all indicators are displayed as shown at the same time.
![OLYMPUS Μ [MJU:]-III 150 - LCD Panel - 1](/content/2019/11/84387/images/b4bcbe891964205e8647afe45c8bc7b7839eb80c015c7ca4233b3aaa043dd6ba.jpg)
![OLYMPUS Μ [MJU:]-III 150 - LCD Panel - 2](/content/2019/11/84387/images/479eae73fe1d8eab17b4297fbd1dafd42f43ef58e8a721bdc47e0f78420fa760.jpg)
![OLYMPUS Μ [MJU:]-III 150 - LCD Panel - 3](/content/2019/11/84387/images/bcf47f3b6187ab7d4599aeb6de692103d7cf0bf81486421dae62f5157780130e.jpg)
![OLYMPUS Μ [MJU:]-III 150 - LCD Panel - 4](/content/2019/11/84387/images/d78b09f7262ed2c63815bcf9b8a1c499138d511b9452254def8cc762bf84aab2.jpg)
![OLYMPUS Μ [MJU:]-III 150 - LCD Panel - 5](/content/2019/11/84387/images/728930cb582b6db572fe39c13558b139457a45910d5fb03c703fa8d58dc80eaf.jpg)
FIRST STEPS
EN
LOADING AND CHECKING THE BATTERY
Use one 3 V lithium battery (CR123A or DL123A).
![OLYMPUS Μ [MJU:]-III 150 - LOADING AND CHECKING THE BATTERY - 1](/content/2019/11/84387/images/b86849a2d314569f2c49cee9f70d9d5041dc87ad16225f2728f9e1297b97e2ed.jpg)
![OLYMPUS Μ [MJU:]-III 150 - LOADING AND CHECKING THE BATTERY - 2](/content/2019/11/84387/images/1a1dd23a166fff2b135bbf484c20f1de9308ed74e12a3affa7b5bae75ef085ac.jpg)
- While pressing the bottom of the battery compartment cover in direction ①, turn it in direction ② to open.
- Make sure the lens barrier is closed before opening the battery compartment cover.
- Insert the battery correctly. Close the battery compartment cover.
- A brand-new battery lasts for about 15 rolls of film.
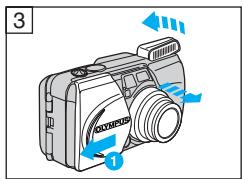
- Slide the lens barrier in direction 1 until it clicks. The lens comes out and the flash flips open. Check the remaining battery power on the LCD panel.
| lights (turns off automatically). | Battery is OK. You can shoot. |
| blinks and other indicators are displayed normally. | Battery is low and should be replaced with a new one. |
| blinks and other indicators go out. | Battery is dead and should be replaced with a new one immediately. |
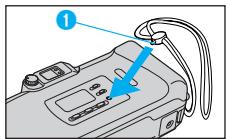
ATTACHING THE STRAP
Attach the strap as shown.
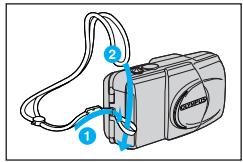
DIOPTER ADJUSTMENT
Turn the diopter adjustment dial until the autofocus marks are clear.
![OLYMPUS Μ [MJU:]-III 150 - DIOPTER ADJUSTMENT - 1](/content/2019/11/84387/images/0399312aa5ad435e7a19500b327aa53c58bc73e2612aa1d3b60e7c7ea8509bd3.jpg)
EN
STANDARD FUNCTIONS
LOADING THE FILM
![OLYMPUS Μ [MJU:]-III 150 - STANDARD FUNCTIONS - 1](/content/2019/11/84387/images/42f35dce14d9c24cd2ce61a16e3183adf81ac56211145bb643a09c2cd85f47f6.jpg)
natural_image
Diagram of a device showing airflow or movement arrows, no text or symbols present![OLYMPUS Μ [MJU:]-III 150 - STANDARD FUNCTIONS - 2](/content/2019/11/84387/images/bc686474ddb7b8026f82ab7c8449c86b75aa2d48c3f28fead4a85084ac6dbc1a.jpg)
natural_image
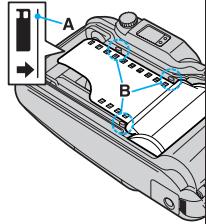
Diagram of a camera module showing internal components and a blue arrow indicating rotation (no text or symbols)- Slide open the back cover release upward to open the back cover.
- Do not touch the inside of the camera, especially the lens.
- Insert the film cartridge until it clicks into position.
FOCUSING AND WORKING DISTANCE
![OLYMPUS Μ [MJU:]-III 150 - FOCUSING AND WORKING DISTANCE - 1](/content/2019/11/84387/images/102393065a90a11708885e7c5d058997dba76bcf211ad26e9f8939a5add633b5.jpg)
natural_image
Illustration of two people standing outdoors with trees in the background (no text or symbols)This camera uses a wide multi-autofocus system that makes it easier for the camera to focus on subjects even if they are not in the center of the viewfinder. Shoot your subject from a distance of 0.6 m (2.0 ft) to (infinity).
CLOSE-UP PHOTOGRAPHY
![OLYMPUS Μ [MJU:]-III 150 - FOCUSING AND WORKING DISTANCE - 2](/content/2019/11/84387/images/d8cd9ae6507cbd569fa6712a08352e3fd6a768f013914faacda22f12f9df617e.jpg)
flowchart
graph TD
    A["①"] --> B["②"]
    B --> C["[ [ "] ]]
The picture area will move lower in the viewfinder as you get closer to the subject.
① Close-up correction marks (picture area at closest distance)
② Picture area at infinity
-
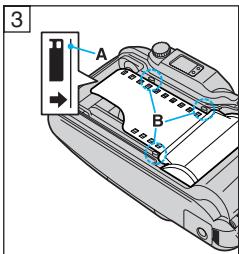
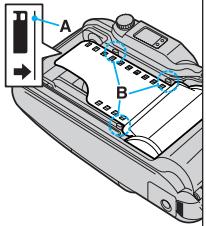
Align the film leader with the guide line (A), and place the film between the positioning guides (B). Then close the back cover until it clicks.
-
The film automatically advances to the first frame.
- Open the lens barrier until it clicks. Make sure the exposure counter on the LCD panel reads “/”.
- If “ ” blinks, reload the film.
STANDARD FUNCTIONS
TAKING PICTURES
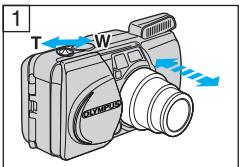
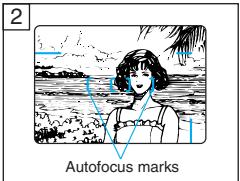
- Open the lens barrier until it clicks. The lens will extend slightly and the LCD panel will turn on. Push the zoom lever to the "T" side for telephoto (150 mm) or to the "W" side for wide angle (37.5 mm).
• After about 4 1/2 minutes of inactivity, the lens retracts and the LCD panel goes out. - Position the autofocus marks (AF) on your subject.
-
Do not look at the sun or other strong light sources through the viewfinder.
-
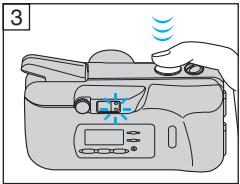
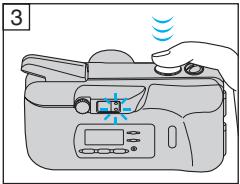
Press the shutter release button halfway to focus on the subject. Make sure that the green lamp lights; then press the shutter release button all the way to take the picture. After the shutter is released, the film automatically advances to the next frame.
AUTO FLASH — WORKING DISTANCE
(with color negative film)
When reversal film is used, the working range at the telephoto side will be reduced by about 40%.
| ISO | Wide angle (W) | Telephoto (T) |
| 100 | 0.6 to 5.4 m (2.0 to 17.7 ft) | 0.8 to 2.1 m (2.6 to 6.9 ft) |
| 200 | 0.6 to 7.6 m (2.0 to 24.9 ft) | 0.8 to 3.0 m (2.6 to 9.8 ft) |
| 400 | 0.6 to 10.8 m (2.0 to 35.4 ft) | 0.8 to 4.2 m (2.6 to 13.8 ft) |
FILM REWINDING AND UNLOADING
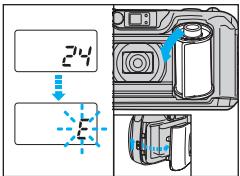
The camera automatically rewinds the film when you reach the end of a roll. Make sure the motor has stopped and that “ ” is blinking; then open the back cover to remove the film.
EN
SPECIAL FEATURES
Open the back flap and keep page 126 visible.
Red Eyes in Flash Pictures — RED-EYE REDUCTION FLASH
When taking flash photos of persons in the dark the flashlight falls into the wide-open iris. There the flashlight is reflected red from the retina.
The Red-Eye Reduction Flash emits a series of low-power pre-flashes before the main flash. This gives the subject's eyes a chance to adapt to the bright light by making the iris smaller. Assuming that the subject looks into the pre-flashes, the eyes will not appear red in the picture (see figure 3 on page 126).
- Hold the camera securely. It takes about 1 second until the shutter releases.
-
Red-eye reduction may not be effective when the subject:
-
Is not looking at the flash from right in front.
-
Is not watching the pre-flashes.
- Is too far from the camera.
The effectiveness of red-eye reduction varies depending on the individual characteristics of each subject.
![OLYMPUS Μ [MJU:]-III 150 - Red Eyes in Flash Pictures — RED-EYE REDUCTION FLASH - 1](/content/2019/11/84387/images/32043fde5026b85074556bb23578adcd6b6e10b8d37a22c00c9c61d679c231f0.jpg)
No Flash Allowed or Flash Spoils Atmosphere — FLASH-OFF
The Flash-Off is needed where flash photos are not allowed or where you want to keep the twilight or candlelight atmosphere unspoiled (see figure 4 on page 126).
- Since a slow shutter speed (as low as 2 seconds) is selected, use a tripod to prevent camera-shake.
- Have your subject stay still; otherwise, blurring may result.
Closing the lens barrier restores the Auto Flash mode.
![OLYMPUS Μ [MJU:]-III 150 - No Flash Allowed or Flash Spoils Atmosphere — FLASH-OFF - 1](/content/2019/11/84387/images/a4ab841a5524fe34b1798e4a883b2eb2b32eb5a4662afaf0396a19e65da7e23a.jpg)
Shadow on the Face — FILL-IN FLASH
When taking portrait photos in backlight or underneath a tree or roof, the subject's face may look too dark if it's in front of a brighter background.
The Fill-In Flash provides just the right amount of additional light to compensate for the shadow (see figure 5 on page 126) and for fluorescent light.
- Make sure your subject is within the flash working range (p. 7).
- Fill-in flash becomes ineffective in extremely bright conditions.
Closing the lens barrier restores the Auto Flash mode.
![OLYMPUS Μ [MJU:]-III 150 - Shadow on the Face — FILL-IN FLASH - 1](/content/2019/11/84387/images/3104a957f48091fd1a5102dad977696417bd0207f1c93cc42dfe4ca562b810f0.jpg)
City at Night — NIGHT SCENE FLASH
When taking a walk in the city at night, you may want to take photos of your subject in the foreground with the city lights in the background. The Night Scene Flash takes care of this. The main flash lights the subject in the foreground while the shutter stays open up to 4 seconds to capture the city lights. You'll need to secure the camera on a tripod or other support to prevent camera shake (see figure 6 on page 126).
SPECIAL FEATURES
EN
![OLYMPUS Μ [MJU:]-III 150 - EN - 1](/content/2019/11/84387/images/b054a2b7ad608aaaf22cbee92b51d0e7b469139c686b510b49d3141d1d0f0fe0.jpg)
Combination of the Two Modes —
Prevents the typical red eyes seen in pictures when shooting at night (see figure 7 on page 126). Both modes cannot be used with the Spot Metering mode. Closing the lens barrier restores the Auto Flash mode.
SETTING THE FLASH MODES
| No display | Auto Flash |
| Red-Eye Reduction Flash | |
| Flash-Off | |
| Fill-In | |
| Night Scene Flash | |
| Red-Eye Reduction Night Scene Flash |
Press the flash mode button (⚡). The mode switches in the order shown on the left. The selected mode is displayed on the LCD panel. Do not fire the flash right in front of the eyes of people and animals. Do not point the camera at a motorist and fire the flash.
![OLYMPUS Μ [MJU:]-III 150 - SETTING THE FLASH MODES - 1](/content/2019/11/84387/images/80ebaad068e2c9145eee93c8aced098bfdaaaba645c0ea0765076f45982d9a67.jpg)
High contrast — SPOT METERING
When taking photos in a high contrast environment (e.g. backlight portraits), the main subject may come out too dark or too bright. To make sure that the subject is exposed correctly use Spot Metering (see figure 1 on page 2).
Position the spot marks (A) on the area where you want to measure the light. Press the shutter release button halfway; the green lamp lights and the focus and exposure are locked on that area. Reframe your subject and press the shutter release button all the way.
![OLYMPUS Μ [MJU:]-III 150 - High contrast — SPOT METERING - 1](/content/2019/11/84387/images/6393191dd379c29a00f5b892bc99ef176456a8ca9067e749b3e5089f662d75b2.jpg)
Shooting scenery — INFINITY
The camera automatically sets the workings distance at infinity. The flash does not fire except in the Fill-In Flash mode (see figure 2 page 2).
SETTING THE EXPOSURE MODES
| No display | Auto Exposure |
| Spot Metering | |
| Infinity |
Press the exposure mode button
(☐/▲). The mode switches in the order shown on the left. The selected mode is displayed on the LCD panel. Closing the lens barrier restores the Auto Exposure mode.
EN
SPECIAL FEATURES
SETTING THE SELFTIMER/REMOTE CONTROL
| Mode display | Mode |
| —— | |
| Selftimer | |
| Remote Control | |
| Camera Shake Indicator |
Press the selftimer/remote control button. The mode switches in the order shown on the left. The selected mode is displayed on the LCD Panel.
Selftimer
Secure the camera on a tripod or other support. Compose your shot in the viewfinder. Press the shutter release button halfway (the focus and exposure are locked at this time). Then press the shutter release button all the way. The selftimer indicator lights for about 10 seconds and then blinks for about 2 seconds. After this, the shutter will release.
![OLYMPUS Μ [MJU:]-III 150 - Selftimer - 1](/content/2019/11/84387/images/5442351b4c27020cf87fa49a61d98094ef5f49a9f710915b581018f3c88f2b06.jpg)
Remote Control RC-300C (Optional)
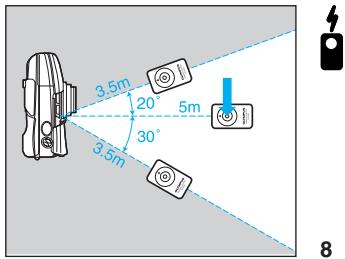
Compose your shot in the viewfinder. Position the autofocus frame on your subject. To take a picture, point the remote control at the camera and press the button on the remote control. The selftimer/remote control indicator starts blinking, and the shutter will release about 3 seconds later (see figure 8 on page 127).
![OLYMPUS Μ [MJU:]-III 150 - Remote Control RC-300C (Optional) - 1](/content/2019/11/84387/images/a13b00d32b629675cad424275688a2f6e8ff728a4e31964f04eb42409d42a33f.jpg)
Camera Shake Indicator
In this mode, the camera warns you before you shoot if camera shake is likely to cause blurring. Also, when there is significant camera shake, this mode helps reduce blurring. If the green and orange lamps blink alternately when you hold the camera, it means that the camera is shaking and blurring may result. Hold the camera securely until the lamps stop blinking; then press the shutter release button.
OTHER OPERATIONS
REWINDING THE FILM MID-ROLL
![OLYMPUS Μ [MJU:]-III 150 - REWINDING THE FILM MID-ROLL - 1](/content/2019/11/84387/images/f16b9340382cd7cec2341672ddff861971db2a9877ca15585469e2914d0b82de.jpg)
Press the mid-roll rewind button with the protrusion on the strap buckle 1. Do not use an instrument with a sharp tip. Unload the film as described on page 7.
OTHER OPERATIONS
EN
PRINTING THE DATE/TIME (Quartzdate model only)
![OLYMPUS Μ [MJU:]-III 150 - PRINTING THE DATE/TIME (Quartzdate model only) - 1](/content/2019/11/84387/images/51a9d7ff2764b5a114bab35aa0b466e3051421f3a130baccbefaa52a0f18361a.jpg)
flowchart
graph TD
    A["--- --- --"] --> B["04 10 23"]
    B --> C["10 23 '04"]
    C --> D["23 10 '04"]
    D --> E["23 15:59"]
    F["None"] --> G["Year-month-day"]
    G --> H["Month-day-year"]
    H --> I["Day-month-year"]
    I --> J["Day-hour-minute"]
First select the date/time mode you want to print. Press the MODE button. Each time you press it, the mode will switch in the order shown on the left. Keep the mode you want to print displayed. Date/time is imprinted in the lower right corner of the picture. If the date/time is superimposed on a bright color like white, orange, yellow, etc., it may be difficult to read. When black-and-white film is used, the date/time may not be printed.
CORRECTING THE DATE AND TIME
(Quartzdate model only)
Be sure to correct the date and time after the battery has been inserted or replaced.
- Keep the MODE button pressed until the "year" indicator starts blinking.
- Press the SET button to adjust the "year" indicator. If you press the button once, the number on the display will advance by 1. If you keep the button pressed, the numbers will run in rapid succession. If you pass the intended number, keep pressing to return to that number.
- Press the MODE button once more to make the "month" indicator blink. Press the SET button to adjust the "month" indicator. As you press the MODE button, the blinking indicator changes in the order of "year", "month", "day", "hour" and "minute".
- Repeat Steps 2 and 3 to set "hour" and "minute". Make sure the "minute" indicator is blinking.
- When "minute" has been set, press the MODE button. None of the indicators will be blinking and date/time correction is now complete.
REPLACING THE REMOTE CONTROL BATTERY
(Optional RC-300C)
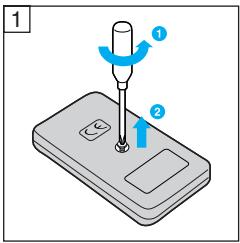
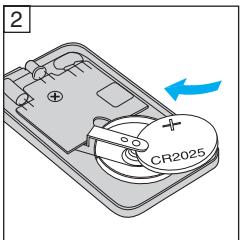
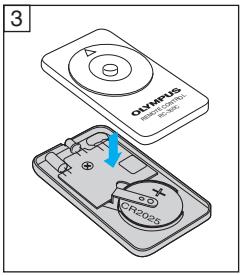
If the selftimer/remote control indicator doesn't blink even when you press the button, replace the battery with a new one (CR2025).
- Turn the screw on the bottom of the remote control counterclockwise to loosen.
- Turn the remote control over, and remove the cover. With the battery facing up, remove the old battery and insert a new battery as shown.
- Replace the cover, turn the remote control over, and turn the screw on the bottom clockwise to tighten (see figure 9 on page 127).
EN
CARE AND STORAGE
- Do not leave the camera in any place exposed to excessive heat, humidity or direct sunlight — for example, in a car or on the beach.
- Do not expose the camera to formalin or naphthalene.
- If the camera gets wet, wipe it with a dry towel. The salt in seawater can be especially damaging.
- Do not use organic solvents such as alcohol or paint thinner when cleaning the camera.
- Do not leave the camera on or near a television, refrigerator or other appliance with a magnetic field.
- Do not expose the camera to dust or sand as this could cause serious damage.
- Do not shake or shock the camera.
- Do not apply excessive force to the zoom lens.
- Do not expose the camera to extreme heat (over 40^ / 104^ ) or to extreme cold (below -10^ / 14^ ). Low temperatures, even within this range may sometimes cause deterioration in battery performance, temporarily disabling the camera.
- Avoid leaving the camera unused for long periods of time. This can cause mold to grow on the camera as well as other problems. Try to press the shutter release button and check the operation of the camera before use.
- Some airport X-ray machines can damage the film in your camera. Try to avoid passing your camera through these machines. Give it to the security officer for manual inspection.
- Do not touch the front surface of the flash after using it continuously over a short period as the surface may be hot.
WARNING
KEEP THE BATTERIES AWAY FROM FIRE. NEVER TRY TO DISASSEMBLE, RECHARGE OR SHORT-CIRCUIT BATTERIES.
KEEP THE BATTERIES OUT OF THE REACH OF CHILDREN. IF A CHILD SWALLOWS A BATTERY, CONTACT A DOCTOR IMMEDIATELY.
NEVER ATTEMPT TO DISASSEMBLE THE CAMERA; IT CONTAINS A HIGH-VOLTAGE CIRCUIT. IF THE INTERNAL PARTS OF THE CAMERA ARE EXPOSED DUE TO DROPPING OR DAMAGE, REMOVE THE BATTERY IMMEDIATELY TO PREVENT FURTHER USAGE.
IN CASE OF MALFUNCTION, CONSULT YOUR NEAREST OLYMPUS DEALER OR OLYMPUS SERVICE CENTER.
SPECIFICATIONS
EN
Type: Fully automatic 35 mm autofocus lens-shutter camera with built-in 37.5 mm \~ 150 mm zoom lens.
Film format: 35 mm standard DX-coded film (24 x 36 mm).
Lens: Olympus lens, 37.5 mm \~ 150 mm, F5.1 \~ 13.3, 8 elements in 7 groups.
Shutter: Programmed electronic shutter.
Viewfinder: Real image zoom view with diopter adjustment.
Focusing: Passive-type multi-autofocus system (max. 11 points). Focus lock possible.
Focusing range: wide angle 0.6 m (2.0 ft) \~ ∞ (infinity), telephoto 0.8 m (2.6 ft) \~ ∞ (infinity).
Exposure control: Programmed automatic exposure control, 3-zone light metering. Auto exposure range — EV2.7 (F5.1, 4-sec) \~ EV16.1 (F10, 1/690-sec) at wide angle, EV5.5 (F13.3, 4-sec) \~ EV17 (F17.5, 1/440-sec) at telephoto.
Exposure counter: Progressive type displayed on LCD panel.
Selftimer: Electronic selftimer with approx. 12-sec. delay.
Film speed range: Automatic setting with DX-coded film. Other intermediate film speeds will be automatically set for next lower speed. Non-DX-coded film is set at ISO100.
Film loading, advance, rewind: Automatic.
Flash: Built-in pop-up flash. Recycling time — Approx. 0.5 \~ 5.5 sec. (at normal temperature, with new battery).
Flash modes: Auto Flash (low-light, backlight and fluorescent light), Red-Eye Reduction Flash, Flash-Off, Fill-In, Night Scene Flash and Red-Eye Reduction Night Scene Flash.
Exposure modes: Auto Exposure, Spot Metering and Infinity.
Power source: One 3 V lithium battery (DL123A or CR123A).
Dimensions: 117 (W) x 61 (H) x 43 (D) mm ) (4.6 x 2.4 x 1.7 in) (excluding protrusions).
Weight: 225 g (7.9 oz) (without battery).
Weatherproof feature: Equivalent to IEC Standard publication 529 IPX4 (under OLYMPUS test conditions).
Remote Control RC-300C Specifications (Optional)
Remote control system: Infrared, with approx. 3-sec. delay.
Power source: One CR2025 battery.
Battery life: Approx. 5 years, with approx. 20,000 times.
Working distance: Approx. 5 m (16.4 ft).
Dimensions: 33 x 56 x 7 mm (1.3 x 2.2 x 0.3 in)
Weight: 11 g (0.4 oz) (without battery)
SPECIFICATIONS ARE SUBJECT TO CHANGE WITHOUT NOTICE OR OBLIGATION ON THE PART OF THE MANUFACTURER. THE ACTUAL PRODUCT MAY DIFFER FROM ONES SHOWN IN THIS MANUAL.
DE
BEDIENUNGSANLEITUNG
DIOPTRIEAUSGLEICH
natural_image
Diagram of a digital camera with blue arrows indicating motion or signal flow, no text or symbols present![OLYMPUS Μ [MJU:]-III 150 - DIOPTRIEAUSGLEICH - 1](/content/2019/11/84387/images/b33860bbfcbf13d9aa928422d8e03509b52a1df2cbbc7873b76361b155d01b73.jpg)
natural_image
Diagram of a DSLR camera showing internal components and a blue arrow indicating rotation (no text or symbols)natural_image
Illustration of two people standing outdoors with trees and foliage in the background (no text or symbols)flowchart
graph TD
    A["①"] --> B["[ [ "] ]
②]
natural_image
Diagram of a device showing airflow or movement arrows, no text or symbols present![OLYMPUS Μ [MJU:]-III 150 - DIOPTRIEAUSGLEICH - 3](/content/2019/11/84387/images/534324018699b2e9fefab0c61e60018ddf5365f755affb80c53d44f0916e0176.jpg)
natural_image
Diagram of a camera module showing internal components and a blue arrow indicating rotation (no text or symbols)natural_image
Illustration of two people standing outdoors with trees in the background (no text or symbols)Dimensions: 33 x 56 x 7 mm.
Poids: 11 g (sans pile).
LES SPECIFICATIONS SONT SUSCEPTIBLES DE MODIFICATION SANS PREAVIS NI OBLIGATION DE LA PART DU FABRICANT. LE PRODUIT PEUT DIFFERER DE CEUX PRESENTES DANS CE MANUEL.
ES
INSTRUCCIONES
![OLYMPUS Μ [MJU:]-III 150 - INSTRUCCIONES - 1](/content/2019/11/84387/images/7c07703471b71bd3a7c26d0d59fdc51bf6a32e3f6ae0eb48b8e515904075d0ff.jpg)
ES
FUNCIONES ESTÁNDAR
CARGA DE LA PELÍCULA
![OLYMPUS Μ [MJU:]-III 150 - FUNCIONES ESTÁNDAR - 1](/content/2019/11/84387/images/94eecd6f0a11cfab6b3304c979bb035ef1372385e85a4683df4aea7bb959f381.jpg)
natural_image
Diagram of a device showing airflow or movement arrows, no text or symbols present![OLYMPUS Μ [MJU:]-III 150 - FUNCIONES ESTÁNDAR - 2](/content/2019/11/84387/images/b32ff9da1da5746f768b4b9fcef5047d6a3c47026aa158c36cbd1abda1b9042c.jpg)
natural_image
Diagram of a camera module showing internal components and a blue arrow indicating rotation (no text or symbols)natural_image
Illustration of two people standing outdoors in a wooded area (no text or symbols visible)natural_image
Diagram of a device showing internal components with arrows indicating flow or movement (no text or symbols)3
2
![OLYMPUS Μ [MJU:]-III 150 - FUNCIONES ESTÁNDAR - 4](/content/2019/11/84387/images/f064c6a64cf0ea5b148ed3eb478cfa54d156b568429a8a43907981f75d5f5e78.jpg)
natural_image
Illustration of two people standing outdoors with trees in the background (no text or symbols)natural_image
Diagram of a device casing with internal components and directional arrows indicating flow or movement (no text or symbols)![OLYMPUS Μ [MJU:]-III 150 - FUNCIONES ESTÁNDAR - 5](/content/2019/11/84387/images/82fe1a47da491d8f1587ae2c11b516ccb7b8b45ca1823409652a422b43468902.jpg)
natural_image
Diagram of a camera module showing internal components and a blue arrow indicating rotation (no text or symbols)natural_image
Two individuals standing outdoors in a natural setting with trees and foliage in the background (no visible text or symbols)natural_image
Illustration of a hand operating a portable device with a digital display and control buttons (no text or symbols)natural_image
Diagram of a camera module with blue arrows indicating motion or movement, no text or symbols present![OLYMPUS Μ [MJU:]-III 150 - FUNCIONES ESTÁNDAR - 6](/content/2019/11/84387/images/6acdcbd79b43c8e0a62621b4f0c3f47c054d01c810598039b9fa9ade76908141.jpg)
natural_image
Diagram of a camera module showing internal components and a blue arrow indicating rotation (no text or symbols)natural_image
Illustration of two people standing outdoors with trees in the background (no text or symbols)natural_image
Illustration of a hand holding a portable electronic device with a digital display and control buttons (no text or symbols)30 Orange lampe (flashindikator)
DIOPTRIJUSTERING
natural_image
Diagram of a device casing with internal components and directional arrows indicating movement (no text or symbols)2
![OLYMPUS Μ [MJU:]-III 150 - DIOPTRIJUSTERING - 1](/content/2019/11/84387/images/400531fc9f3966d93ba4dd1148d8851d0ef543c99c3ed6a97e9d7fe8e931291a.jpg)
natural_image
Two people standing outdoors in a natural setting with trees and foliage in the background (no text or symbols visible)natural_image
Illustration of a hand operating a portable printer with control panel and display (no text or symbols)AUTO FLASH — RÆKKEVIDDE
MANUEL TILBAGESPOLING
![OLYMPUS Μ [MJU:]-III 150 - MANUEL TILBAGESPOLING - 2](/content/2019/11/84387/images/abae513b9faa2ceeb03eb6fd075cc3a34dbce150e5f61f0b20d7710a104eb9a9.jpg)
![OLYMPUS Μ [MJU:]-III 150 - MANUEL TILBAGESPOLING - 3](/content/2019/11/84387/images/f5cae74a1331984b5aa38e82721c3508c246aac2591fb4f0bd75df776bfa20e1.jpg)
SE
STANDARD FUNKTIONER
FILMLADDING
![OLYMPUS Μ [MJU:]-III 150 - STANDARD FUNKTIONER - 1](/content/2019/11/84387/images/cdb6ddb3e789999430a6f84bd457f85a7e85ca5304894ca49f5e2a1aaa9b6634.jpg)
natural_image
Diagram of a device showing internal components with arrows indicating flow or movement (no text or symbols)2
![OLYMPUS Μ [MJU:]-III 150 - STANDARD FUNKTIONER - 2](/content/2019/11/84387/images/f1d8022724a664771b962fdf81cdeb364ac8d251ec929472f3fe6b18361d7c16.jpg)
natural_image
Illustration of two people standing outdoors with trees in the background (no text or symbols)ÅTERSPOLNING AV FILM INNAN FILMSLUT
![OLYMPUS Μ [MJU:]-III 150 - ÅTERSPOLNING AV FILM INNAN FILMSLUT - 1](/content/2019/11/84387/images/3ef297404e17cf026549c185d872494affc8b0c5c83129d5b2b96d9835d772b1.jpg)
SKÖTSEL OCH FÖRVARING
29 Groene LED (Autofocusindicator)
INSTELLEN VAN DE OOGCORRECTIE
natural_image
Diagram of a device showing internal components with arrows indicating flow or movement (no text or symbols)![OLYMPUS Μ [MJU:]-III 150 - INSTELLEN VAN DE OOGCORRECTIE - 1](/content/2019/11/84387/images/621a6dbbd39e3ab325c2a2d0fa4be8a5f009d065e5c6bdd3785dec80926b49e8.jpg)
natural_image
Diagram of a camera module showing internal components and a blue arrow indicating rotation (no text or symbols)natural_image
Illustration of two people standing outdoors in a wooded area, no text or symbols visibleDIOPTERIN SÄÄTÖ
natural_image
Diagram of a device showing airflow or movement arrows, no text or symbols present3
2
![OLYMPUS Μ [MJU:]-III 150 - DIOPTERIN SÄÄTÖ - 2](/content/2019/11/84387/images/83b3098d82669aabd3450930c00a95d8c229b90cfe2b7bcd5b652908cdfd374f.jpg)
natural_image
Two individuals standing outdoors in a natural setting with trees and foliage in the background (no text or symbols visible)DIOPTRICKÁ KOREKCE
natural_image
Diagram of a camera module with blue arrows indicating motion or movement, no text or symbols present![OLYMPUS Μ [MJU:]-III 150 - DIOPTRICKÁ KOREKCE - 1](/content/2019/11/84387/images/87cb062f2967a71875ce0e591a66311ac8786cd74c8e422a8d7a747491230397.jpg)
natural_image
Diagram of a DSLR camera showing internal components and a blue arrow indicating rotation (no text or symbols)natural_image
Illustration of two people standing outdoors with trees in the background (no text or symbols)(Pouze u modelu Quartzdate)
natural_image
Pure electrical circuit lines without any symbols![OLYMPUS Μ [MJU:]-III 150 - (Pouze u modelu Quartzdate) - 1](/content/2019/11/84387/images/310be61c299d5fc2baf8d71df3223a9fec005992bbf0d3f22485ab63b3b7f7c1.jpg)
![OLYMPUS Μ [MJU:]-III 150 - (Pouze u modelu Quartzdate) - 2](/content/2019/11/84387/images/8698377c73b4194f721e59bdff53a9557a624f56ecff60ef0ea0096ae5b703e3.jpg)
![OLYMPUS Μ [MJU:]-III 150 - (Pouze u modelu Quartzdate) - 3](/content/2019/11/84387/images/5c8f962663a0310f0319c1a3a0a783145bfb2a6f7b1f34049cb98e70e3cadcec.jpg)
MEMO
![OLYMPUS Μ [MJU:]-III 150 - (Pouze u modelu Quartzdate) - 4](/content/2019/11/84387/images/3a29873cb38bc2f76573002d1579778a495124c44d17b65ca3270cd68622ddf3.jpg)
![OLYMPUS Μ [MJU:]-III 150 - (Pouze u modelu Quartzdate) - 5](/content/2019/11/84387/images/d881d7005927154c2b27dac9c175c984c93a136a6f4287d75f246047c4e754cd.jpg)
[NO TEXT]
3
![OLYMPUS Μ [MJU:]-III 150 - (Pouze u modelu Quartzdate) - 6](/content/2019/11/84387/images/5a972d6a4586f989f73877a81103d3074d5fd48c015357a79cd3a5cbb90dd7cb.jpg)
![OLYMPUS Μ [MJU:]-III 150 - (Pouze u modelu Quartzdate) - 7](/content/2019/11/84387/images/0c911d056a342d772f2143e59cccc14af10617e8a4c457f3450f026967cd02b1.jpg)
[NO TEXT]
4
![OLYMPUS Μ [MJU:]-III 150 - (Pouze u modelu Quartzdate) - 8](/content/2019/11/84387/images/41ad061b7db02f7113769d106b3d8a9f2156514e6c7fb50bb8a05e46292483d4.jpg)
![OLYMPUS Μ [MJU:]-III 150 - (Pouze u modelu Quartzdate) - 9](/content/2019/11/84387/images/befd5361f97dc8f7efedc24fd11f18c35f73def2d5762db8a7e9b2909fdd4f1f.jpg)
↓
5
![OLYMPUS Μ [MJU:]-III 150 - (Pouze u modelu Quartzdate) - 10](/content/2019/11/84387/images/b7d96936a1b529efd8570aee099bd272356b6f78d7c5b07fefbf3be9b8aecf5c.jpg)
![OLYMPUS Μ [MJU:]-III 150 - (Pouze u modelu Quartzdate) - 11](/content/2019/11/84387/images/82b630843f015a78d168540e1746273ae9c3d871d65dd5f29d34ce63a33e1da8.jpg)
[Non-Text]
6
![OLYMPUS Μ [MJU:]-III 150 - (Pouze u modelu Quartzdate) - 12](/content/2019/11/84387/images/624804b01e39d42d92cb1e241e8750baa0017bdd3e73f460388d757dc5052298.jpg)
![OLYMPUS Μ [MJU:]-III 150 - (Pouze u modelu Quartzdate) - 13](/content/2019/11/84387/images/393cf549b852abe29af5b4c4d4df7a97b300d6c82740fbcd8f19c86d2f304ba0.jpg)
7
[Non-Text]
126
125
![OLYMPUS Μ [MJU:]-III 150 - (Pouze u modelu Quartzdate) - 14](/content/2019/11/84387/images/86a106d17c8a526a7cc3914e70b7d5e7a74da440a8ada11d6169ad12d33474e1.jpg)
![OLYMPUS Μ [MJU:]-III 150 - (Pouze u modelu Quartzdate) - 15](/content/2019/11/84387/images/280dd8520824bfc4c6f4471db5660abac616f7bafd45c1f354cd7f2bde1b68d4.jpg)
![OLYMPUS Μ [MJU:]-III 150 - (Pouze u modelu Quartzdate) - 16](/content/2019/11/84387/images/4d66d22d3003968b109e40aeb1904c3a479bd5c79c7b2a60dfba1ebfed934659.jpg)
![OLYMPUS Μ [MJU:]-III 150 - (Pouze u modelu Quartzdate) - 17](/content/2019/11/84387/images/5d35ca45eb6a9e0e46fdc537f35b3cdd32253ddd7580c38ba0417ab03f8f4f47.jpg)
OLYMPUS
www.olympus-europa.com
This camera complies with EU directive 89/336/EEC for CE marking.
Diese Kamera erfüllt die EU-Richtlinien 89/336/EEC für die CE-Marke.
Cet appareil est conforme à la directive 89/336/CEE sur le marquage CE.
CE Esta cámara cumple las normas de la directiva 89/336/EEC de la Unión Europea relativa a la marca CE.
CE Questa fotocamera rispetta le direttive EU 89/336/EEC per il mercato CE.
СЕ Эта фотокамера соответствует Директиве ЕС 89/336/ЕЕС для маркировки СЕ.
Ця фотокамера відповідає Директиві ЄС 89/336/ЕЕС для маркування СЕ.
Dette kamera overholder EU direktiv 89/336/EEC for CE mærkning.
Denna kamera uppfyller EU direktiven 89/336/EEC för CE märkning.
CE Dit product voldoet aan richtlijn 89/336/EEC.
Tämä kamera täyttää EU-direktiivin 89/336/EEC vaatimukset, jotka oikeuttavat CE-merkintään.
Tento fotoaparát vyhovuje požadavkům evropské směrnice 89/336/EEC pro ochrannou značku CE.
CS1373000000-①
A0603
- INSTRUCTIONS
- NAMES OF PARTS (Open the front flap and keep page 3 visible.)
- Camera Body
- Viewfinder Indications
- LCD Panel
- FIRST STEPS
- EN
- LOADING AND CHECKING THE BATTERY
- ATTACHING THE STRAP
- DIOPTER ADJUSTMENT
- STANDARD FUNCTIONS
- FOCUSING AND WORKING DISTANCE
- AUTO FLASH — WORKING DISTANCE
- FILM REWINDING AND UNLOADING
- SPECIAL FEATURES
- Red Eyes in Flash Pictures — RED-EYE REDUCTION FLASH
- No Flash Allowed or Flash Spoils Atmosphere — FLASH-OFF
- Shadow on the Face — FILL-IN FLASH
- City at Night — NIGHT SCENE FLASH
- SETTING THE FLASH MODES
- High contrast — SPOT METERING
- Shooting scenery — INFINITY
- SETTING THE EXPOSURE MODES
- SETTING THE SELFTIMER/REMOTE CONTROL
- Selftimer
- Remote Control RC-300C (Optional)
- Camera Shake Indicator
- OTHER OPERATIONS
- REWINDING THE FILM MID-ROLL
- PRINTING THE DATE/TIME (Quartzdate model only)
- CORRECTING THE DATE AND TIME
- (Quartzdate model only)
- REPLACING THE REMOTE CONTROL BATTERY
- (Optional RC-300C)
- CARE AND STORAGE
- WARNING
- SPECIFICATIONS
- DE
- BEDIENUNGSANLEITUNG
- DIOPTRIEAUSGLEICH
- ES
- INSTRUCCIONES
- FUNCIONES ESTÁNDAR
- DIOPTRIJUSTERING
- AUTO FLASH — RÆKKEVIDDE
- MANUEL TILBAGESPOLING
- SE
- STANDARD FUNKTIONER
- ÅTERSPOLNING AV FILM INNAN FILMSLUT
- SKÖTSEL OCH FÖRVARING
- INSTELLEN VAN DE OOGCORRECTIE
- DIOPTERIN SÄÄTÖ
- DIOPTRICKÁ KOREKCE
- (Pouze u modelu Quartzdate)
- OLYMPUS
Brand : OLYMPUS
Model : Μ [MJU:]-III 150
Category : Digital Camera