
GH06 - Heating DCG - Free user manual and instructions
Find the device manual for free GH06 DCG in PDF.


| Product Type | Infrared Space Heater, mobile |
| Dimensions (D x W x H) | 40 x 40 x 720 cm |
| Weight | 9.5 kg |
| Gas Type | Butane / Propane |
| Gas Pressure | Butane: 28-30 mbar, Propane: 37 mbar |
| Heat Output | Min: 1.5 kW, Medium: 2.9 kW, Max: 4.2 kW |
| Gas Consumption | Min: 110 g/h, Medium: 207 g/h, Max: 305 g/h |
| Ignition System | Piezo Electric |
| Injector Size | 0.60 mm |
| Max Cylinder Capacity | Up to 14.5 kg (max 32 cm dia. x 62 cm H) |
| Safety Features | Atmosphere sensing system, flame failure device, tip-over shut-off |
| Minimum Distances from Combustibles | Sides: 50 cm, Front: 100 cm, Ceiling: 100 cm |
| Ventilation Requirements | Minimum room size 15 m³ with 105 cm² high and low ventilation |
| Countries of Destination | CH, ES, GR, RO, SK, IT, PT |
| Category | 13+ (28-20/37) |
| Regulator Standard | EN12864, 30 or 37 mbar |
| Hose Standard | EN1763-1 Class 3, max length 0.5 m |
| Cleaning | Damp soapy cloth, do not use abrasive cleaners |
| Maintenance | Annual service by competent person, inspect hose regularly |
| Warranty / Repair | Use only original manufacturer parts |
Frequently Asked Questions - GH06 DCG
User questions about GH06 DCG
0 question about this device. Answer the ones you know or ask your own.
Ask a new question about this device
Download the instructions for your Heating in PDF format for free! Find your manual GH06 - DCG and take your electronic device back in hand. On this page are published all the documents necessary for the use of your device. GH06 by DCG.
USER MANUAL GH06 DCG
natural_image
Exterior view of a black DCG air purifier with ventilation grilles and wheels (no signage or text visible)MANUALE D'ISTRUZIONI - INSTRUCTION MANUAL
PER LA PROPRIA SICUREZZA, LEGGERE ATTENTAMENTE QUESTO MANUALE E METTERE IN FUNZIONE LA STUFA NEL RISPETTO DI QUESTE ISTRUZIONI. CONSERVARE IL MANUALE IN UN LUOGO SICURO PER CONSULTAZIONI FUTURE. USARE LA STUFA ESCLUSIVAMENTE IN AMBIENTI BEN VENTILATI.
natural_image
Line drawing of a steam heating machine inside an armchair, with no text or symbols present.natural_image
Line drawing of a server rack with multiple panels and ventilation grilles, intersected by diagonal lines (no text or symbols)natural_image
Technical line drawing of a mechanical device with no visible text or symbolsnatural_image
Line drawing of a washing machine with doors and curtains, no text or symbols presentnatural_image
Illustration of a person's head and mouth with airflow lines next to an air conditioner unit (no text or symbols)FOR YOUR SAFETY PLEASE READ THIS MANUAL CAREFULLY AND OPERATE THE APPLIANCE ACCORDING TO THE TO THESE INSTRUCTIONS. PLACE INSTRUCTIONS IN A SAFE PLACE FOR FUTURE REFERENCE. ONLY USE IN A WELL VENTILATED AREA
THIS PRODUCT IS NOT SUITABLE FOR PRIMARY HEATING PURPOSES
WARNING: IF THE INFORMATION IN THIS MANUAL IS NOT FOLLOWED EXACTLY. A FIRE OR EXPLOSION MAY RESULT CAUSING PROPERTY DAMAGE. PERSONAL INJURY OR LOSS OF LIFE JIASHENG (ZHONGSHAN) ELECTRICAL APPLIANCE CO.,LTD
TECHNICAL CHARACTERISTICS

Type: Infrared Space Heater, mobile, equipped with
Atmosphere sensing system and flame failure Device.
Dimensions: 40*40*720(D*W*H)
Category: 13+(28-20/37)
COUNTRIES OF DESTINATION: CH, ES, GR, RO, SK, IT and PT
Pressure: Butane at 28-30mbar and Propane at 37mbar
Heater input: Minimum : 1.50kW, Medium : 2.9kW
Maximum : 4.20kW
Consumption: Minimum: 110g/h, Medium : 207g/h
Maximun: 305g/h
Regulator outlet pressure:28-30/37mbar
Injector size*: 0.60mm
Ignition system: Piezo Electric
Cylinder Type: UP to 14.5kg cylinders (at maximum 32 cm (dia.) x 620 cm (H)
Weight (kg) 9.5 kg
Marking 0.60 on the injector indicates that the size of injector is 0.60mm
SAFETY PRECAUTIONS

- Always use Heater in accordance with instructions supplied with each heater. Keep instructions in a safe place.
natural_image
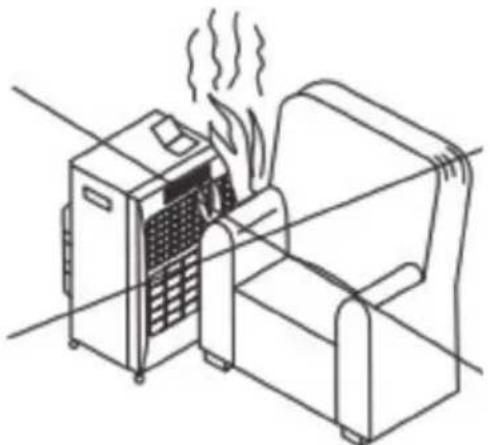
Line drawing of a steam heating machine with cooling unit and armchair (no text or symbols)3.DO NOT position heater close furniture.

natural_image
Line drawing of a server rack with multiple panels and ventilation grilles, intersected by diagonal lines (no text or symbols)- DO NOT place clothes or other material on the heater. This could cause a fire risk/ or affect the efficiency of the appliance.

natural_image
Technical line drawing of a mechanical device with no visible text or symbols- DO NOT move heater from room to room when lit.
natural_image
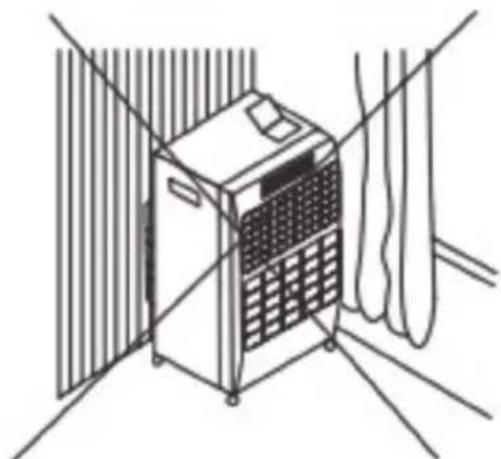
Line drawing of a washing machine with ventilation grilles and a close-up of its side panel (no text or symbols)- DO NOT position heater close to walls, furniture, net curtains, bed linen or any flammable materials as this could result in a risk of fire. The following minimum distances should be respected: 50 cm from the sides and 100cm from the front. ALWAYS face the heater towards the centre of the room. The heater should be positioned on a level surface at all times.

natural_image
Illustration showing airflow from a human face to a portable air conditioner unit (no text or symbols)- If a leak is suspected. DO NOT disconnect the regulator. Turn off the gas supply at the gas bottle or gas regulator. Take the appliance outdoors in a flame free atmosphere. Turn on the gas supply and Check all the connections. Slowly brush the connections with soapy water, or a leak detection spray a gas leak will form bubbles. If a leak is found turn the gas off. DO NOT use the heater again until it has been checked by a competent person in accordance with the Gas Safety(installations and use) Regulations 1998
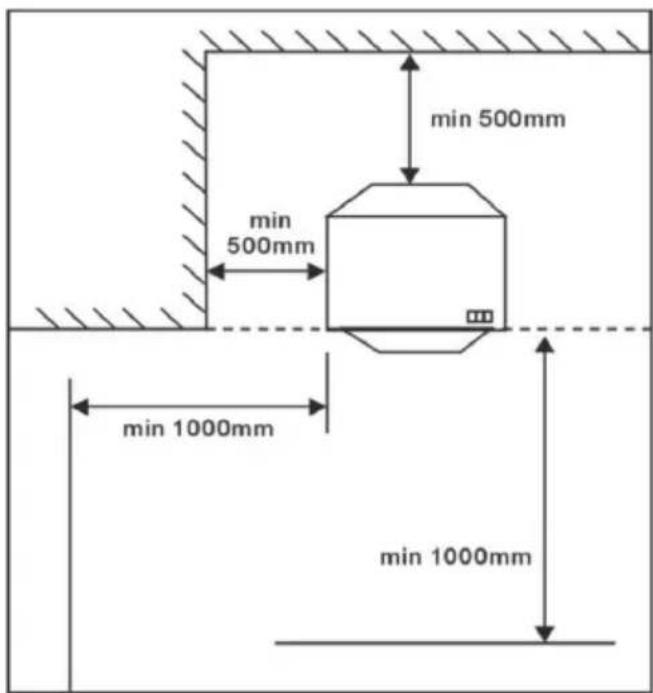
Note: Minimum distance from mobile heater to the ceiling at least 1000mm.
USING ENVIRONMENT
Your heater consumes oxygen while it is in use. For this reason, adequate ventilation should be provided in rooms in which the heater is used. This ensures the removal of products of combustion and allows the entry of replacement air.
Adequate ventilation should considerably reduce condensation occurring. The following table shows the smallest sizes of room suitable for each heat setting and the ventilation, which should be provided.
FOR INFRARED MODELS:
| Number of Radiant Continuously IN USE | OTHER ROOM SIZE | LIVING ROOM SIZE | VENTILATION | |
| Low level H | High level | |||
| 1 | 15cubic meters-say 1.5m*4m*2.5m | 28 cubic meters-say 2.8m*4m*2.5m | 105cm2 | 105cm2 |
| 2 | 28cubic meters-say 2.8m*4m*2.5m | 58 cubic meters-say 5.2m*4m*2.5m | 105cm2 | 105cm2 |
| 3 | 42cubic meters-say 4.2m*4m*2.5m | 84 cubic meters-say 8.4m*4m*2.5m | 105cm2 | 105cm2 |
- This appliance requires a hose and a regulator.
- Only use in well ventilated areas.
- Do not use in vehicles, caravans or auto caravans.
- Do not attempt to use in high rise flats, basements, bathroom or bedrooms.
- This appliance should be tested for leaks before initial use and whenever the cylinder is re-connected.
- It is important that all gas connections have been correctly made to prevent any leakage. Do not use a naked flame to test for leaks. Use soapy water or a leak detection spray.
- Always use your cylinder in an upright position.
- Always turn off the appliance at the regulator when not in use.
- When lighting your heater for the first time or after a period of time has passed since the last use, light the heater outside and burn outdoors for 15 minutes.
- Do not use your heater while sleeping.
- Do not use your heater in high-rise flats.
- Do not use your heater in basements, bathrooms or bedrooms.
- This appliance requires a hose and a regulator, check with your gas supplier for the correct type according to the cylinder being used and any regulations at that time.
- The guard on the appliance is to prevent risk of fire or injury from burns and no part of it should be permanently removed. It does not give full protection for young children or the infirm. We would recommend a fireguard to BS 8423 be fitted.
Use only regulator and hose approved for LP Gas at the correct pressures.
The pressure adjuster should comply with the standard EN12864 and current regulations in the country where it is installed, which may be found at your nearest retailer of gas items, Refer to the technical date. It is strictly prohibited to use adjustable pressure.
The life expectancy of the regulator is estimated as 10 years. It is recommended that the regulator is changed within 10 year of the date of manufacture or the national conditions require it.
The type of replaceable hose should meet the standard of EN1763-1 Class 3.
The hose used must conform to the relevant standard for the country of use. The length of the hose must be 0.5m (maximum). Worn or damaged hose must be replaced. Ensure that the hose is not obstructed, kinked, or in contact with any part of the appliance other than at its connection. It is recommended that the hose is changed within 1 year of the date of manufacture or the national conditions require it.
How to choose proper regulator:
37 mbar regulator with butane,propane or their mixtures @ category I3B/P(37)
30 mbar regulator with butane, propane or their mixtures @ category I3B/P(30)
Warning
Perform a leak test on all connections every time you reconnect the cylinder, or if the heater has not used for a significant period.
Don't twist the flexible tube or the hose.
Don't move the appliance when lit
FAULT FINDLING CHART:
| SYMPTOMS | FAULT REMEDY | |
| 1.Pilot will not light automatically | No spark across electrode gap | (a)Ensure that piezo-electric switch is functioning correctly.(b)Check that electrical lead is not damaged. |
| 2.Pilot will not light automatically but points(a) to (e) are satisfactory and the pilot will light with a match | Incorrect position of spark in relation to pilot gas flow. | Re-position spark plug so that spark jumps across gas flow. |
| 3.Heater will not remain alight when pressure is released from ignition button | Electro-magnetic valve closes while heater is alight. | (a)Ensure that thermocouple probe is located in pilot flame.(b)Ensure good connection between thermocouple and valve.(c)Check thermocouple.(d)Check electromagnetic valve. |
| 4.After changing to maximum position with all three plaques alight one or more plaques appear below normal intensively | (a)Blocked jets.(b)Partially blocked supply tube. | (a)Remove and clean blocked jet.(b)Remove supply tube, remove jets and blow through the tube. |
| 5.Difficulty in cross lighting from position 1 to position 2 or 3 | (a)Air draught directed away from first plaque.(b)Position of the pilot flame. | (a)Change the location of the appliance so that it is not adversely affected by air draught.(b)Position pilot so that impinges across bottom corner of 2^nd plaque as well as 1^st plaque. |
| 6.Smell of combustion | Missing piece of ceramic fireclay. | Inspect perimeter of each plaque and locate place where some fireclay has been displaced.Repair with PYRUMA and leave to sot for approx.24 hours. |
REPAIRS TO BE CONDUCTED BY AUTHORSED
CONSTRUCTION AND FUNCTION
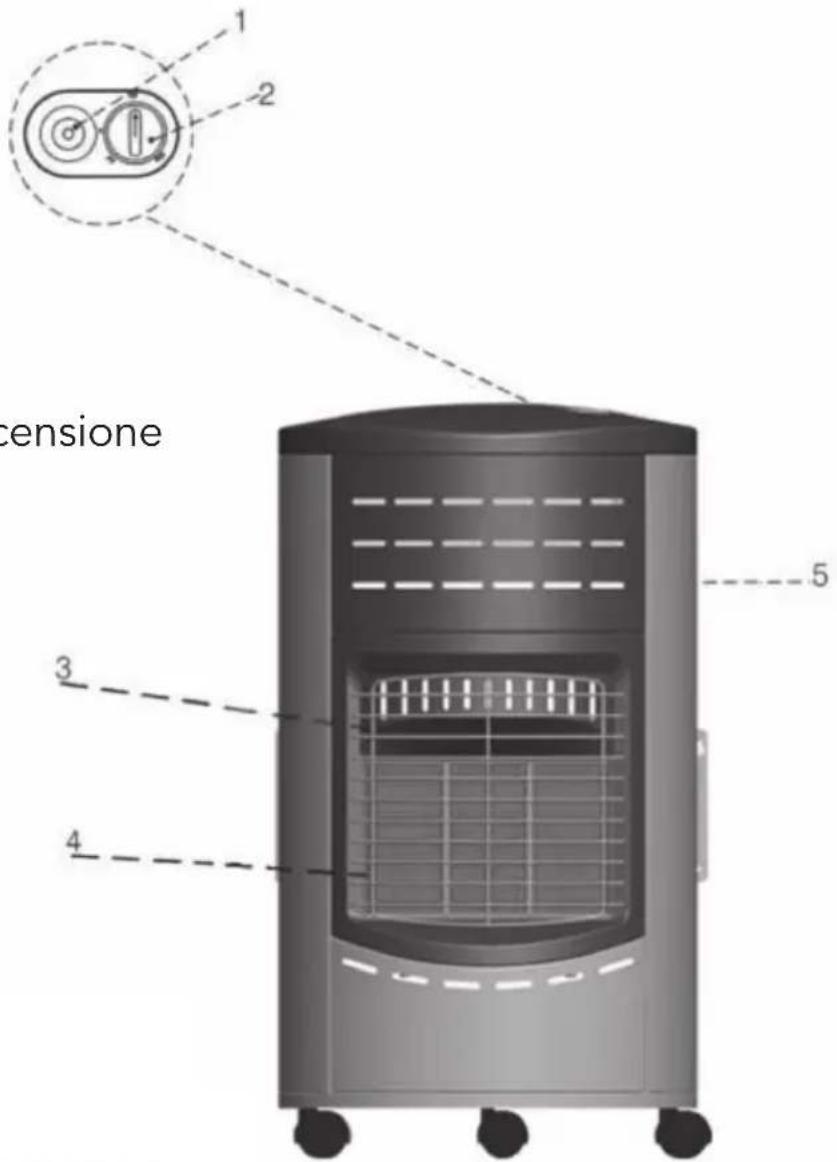
- Place the gas filled cylinder into the back of a
- Clip on the gas regulator to the gas cylinder, to flexible tubing and the valve.
- Turn the cylinder and the regulator on.
- Where the regulator is not supplied or is missing please contact your gas dealer to advise of the correct type for the gas cylinder being used.
- IMPORTANT TEST FOR LEAKS:
This must be carried out in a well ventilated area, free from naked flames
and any other sources of ignition. With the regulator connected to the cylinder turn on the regulator control. Brush all hose connections, pipe connections to the valve and gas cylinder with a 50;50 solution of detergent and water or a leak detection spray. A stream of bubbles forming indicates a leak. If a leak is found turn off at the regulator and disconnect the regulator from the bottle and remove the gas cylinder outdoors or to a well ventilated area. Contact your gas supplier for assistance. DO NOT USE THE HEATER..
Fix the rear cover after leakage test.
HOW TO CHANGE A CYLINDER
- Turn off at the regulator and allow the heater to cool fully before removing and replacing the cylinder. Do not attempt to replace the cylinder whilst the heater is still in use.
- Cylinders must be replaced in a flame free environment.
- Do not smoke while changing the cylinder
- When you need to replace your empty cylinder, turn the gas off at the valve or regulator and take the empty cylinder out of the heater.
- Remove the regulator from the empty cylinder.
- Follow the steps described under "Connecting the Cylinder", connect a new cylinder.
OPERATION GUIDE


LIGHTING INSTRUCTION
- The heater has three settings. Lighting and Minimum(Pos.1); Medium (Pos.2) and Maximum(Pos.3).
- Turn on the gas by turning the gas regulator to the on position.
2. LIGHTING:
The heater can be regulated to three different heat intensities Pos.1, Pos.2, Pos.3.
- Press down and turn the control knob to and hold for 10 seconds.
- Whilst still pressing down the control knob press the ignition button until the pilot light (at the bottom of the burner) ignites. Continue to hold the control knob down for 10-15 seconds more. Release the button if the pilot flame goes out repeat the above operation
3. HEAT SETTINGS
To change from minimum to maximum gently press control button and turn it position 3. To change from maximum to medium gently press control button and turn it position 2.
- Turn off heater at cylinder or turn the switch on the regulator to the "OFF" position. If the heater is not be used for a period of time disconnect the regulator from the cylinder and replace any value protection plug or cover
Attention!
Please do not forcefully turn the control knob, the button should be pushed down before changing the heat control settings. The control button will not turn without pushing downwards. Ensure the button is locked into the heat setting /position required.
WARNING
- Never attempt to light if the hose appears loose or damaged in any way.
- Do not press the ignition button for more than 40 seconds.
- Never disconnect the regulator while cylinder valve or regulator is open.
- Don't change cylinders with in area in which open fire exists.
- Don't expose your cylinder to extreme heat.
- Do not store any other cylinders in the room in which your heater is being used.
- Do not insert your finger or any other material through the front panel of the heater.
- Leave at lease 1 meter distance between your heater and any other heat source.
- Do not let unauthorized persons tamper with your heater.
- Do not use appliance under electrical socket outlets.
- Do not use the heater in bathrooms, showers of swimming pool, leisure vehicles such as caravans or auto caravans.
- This heater must not be used without a gas cylinder fitted for stability purposes.
- Do not cover your heater. Fabrics, clothing, hangings, net curtains, bed lines and other flammable materials may ignite if placed against the outlets of your heater.
- In the event of leakage, the appliance should be turned off either at the gas container valve or at the regulator switch-on valve and the regulator disconnected from the cylinder.
- After use, turn off the appliance at the regulator switch on valve and the regulator disconnected from the cylinder. Turn off the appliance from the container by means of the LPG container isolating valve.
- Only use in a well ventilated areas
- The guard on this appliance is to prevent risk of fire or injury from burner and no part of it should be permanently removed. IT DOES
NOT GIVE PROTECTION FOR YOUNG CHILDREN OR THE INFIRM.
- Do not move the appliance when operating, shocks and bumps may activate the safety device.
STORAGE
- Disconnect the cylinder and remove from the appliance.
- Store cylinders in a well-ventilated area away from combustible material. Storage should preferably be outdoors. Cylinders must not be stored be in a basements or in high-rise flats.
- The heater should be covered in a dry, dust-free area in its original packaging.
CLEANING
- Use a damp soapy wrung out cloth to clean the exterior and cylinder storage area of your heater.
- Make sure that no water gets onto the burners or pilot/light area. Wipe the heater completely dry before use.
- Don't use abrasive cleaners as they may damage the quality of paint finish.
MAINTENANCE
- Check flexible tubing between regulator and heater regularly and replace If perished, worn or damaged,
- It is recommended that the heater be serviced every year by a competent person in accordance with the Gas Safety (installations and use) Regulations 1998.
- If any parts need replacing, they should be replaced only with the correct parts as supplied by the original manufacturer.
- If no use after a long time term, user should check it if mobile heater does work normally, for example, flexible tubing and regulator are till in valid time, the gas connection from cylinder to heater is without any leakage, the heater can be ignited without light-back, without big noise inside heater.
MAINTENANCE GUIDE:
Injector marking:0.60(I3B/P30 or I3+),0.54(I3B/P3);
ASD model:S.I.T 8593(aeration Dia.2.6mm for 30mbar,aeration
Dia.2.4mm for 37mbar); Benan 20340(aeration Dia.3.0mm for 30mbar, Dia2.8mm for 37mbar)
There is no flame lift, no light back, no yellow flame and no leakage on internal gas connection after maintenance.
CONNECTING THE CYLINDER
- Place the gas filled cylinder into the back of the heater.
- Clip on the gas regulator to the gas cylinder, connect the regulator to flexible tubing and the valve.
- Turn the cylinder and the regulator on.
- Where the regulator is not supplied or is missing please contact your gas dealer to advise of the correct type for the gas cylinder being used.
- IMPORTANT TEST FOR LEAKS:
This must be carried out in a well ventilated area, free from naked flames and any other sources of ignition. With the regulator connected to the cylinder turn on the regulator control. Brush all hose connections, pipe connections to the valve and gas cylinder with a 50;50 solution of detergent and water or a leak detection spray. A stream of bubbles forming indicates a leak. If a leak is found turn of

natural_image
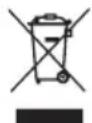
Symbol of a trash bin crossed with a diagonal line, no text or numbers present


- TECHNICAL CHARACTERISTICS
- SAFETY PRECAUTIONS
- USING ENVIRONMENT
- Warning
- REPAIRS TO BE CONDUCTED BY AUTHORSED
- CONSTRUCTION AND FUNCTION
- HOW TO CHANGE A CYLINDER
- OPERATION GUIDE
- LIGHTING INSTRUCTION
- LIGHTING:
- HEAT SETTINGS
- Attention!
- STORAGE
- CLEANING
- MAINTENANCE
- MAINTENANCE GUIDE:
- CONNECTING THE CYLINDER
Brand : DCG
Model : GH06
Category : Heating