
SAP81 - Air purifier PRIME3 - Free user manual and instructions
Find the device manual for free SAP81 PRIME3 in PDF.


| Type | Air Purifier |
| Brand | PRIME3 |
| Model | SAP81 |
| Power Supply | 220-240V ~ 50/60Hz |
| Power Consumption | 80W |
| Dimensions (H x W x D) | 65 x 37 x 19.5 cm |
| Weight | 8 kg |
| Filter Type | Cold Catalysis + Activated Carbon + Antibacterial + HEPA |
| Pre-filter Model | SAP81.2 (washable) |
| Main Filter Set Model | SAP81.1 (non-washable) |
| Filter Replacement Interval | Every 6 months (normal use) |
| Purifying Speeds | Basic (500 RPM), Medium (700 RPM), High (900 RPM) |
| Modes | Smart, Night, Manual Speed, UV Sterilization, Ionizer |
| Timer | 30 minutes to 12 hours (increments of 30 min) |
| Child Lock | Yes (hold button 3 seconds to lock/unlock) |
| Air Quality Indicator | PM2.5 sensor (Smart mode adjusts speed based on pollution level) |
| Remote Control | Included (CR2032 battery) |
| Clock Setting | Hold Smart Mode button 5 seconds |
| Maintenance | Clean pre-filter every 15 days; clean main filters every 60 days with vacuum cleaner |
| Safety Features | Automatic shutoff if not upright or front panel not installed; earthed socket required |
Frequently Asked Questions - SAP81 PRIME3
User questions about SAP81 PRIME3
0 question about this device. Answer the ones you know or ask your own.
Ask a new question about this device
Download the instructions for your Air purifier in PDF format for free! Find your manual SAP81 - PRIME3 and take your electronic device back in hand. On this page are published all the documents necessary for the use of your device. SAP81 by PRIME3.
USER MANUAL SAP81 PRIME3
natural_image
Diagram showing two views of a device with a lightning bolt and grid pattern, enclosed in dashed circular boundaries (no text or symbols)
natural_image
Technical line drawing of a device casing with fan and ventilation slots, showing internal components and an arrow indicating direction (no text or symbols)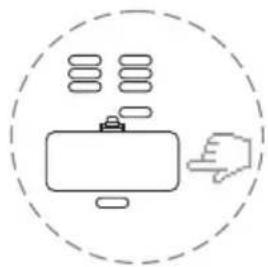
natural_image
Simple line drawing of a device inside a dashed circle, with no text or symbols present.fig 1
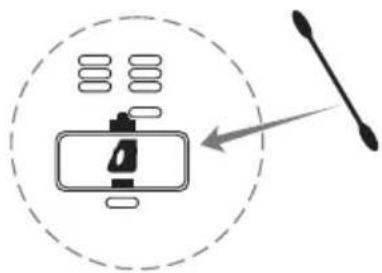
fig 2
natural_image
Simple line drawing of a door with arrows indicating motion or force (no text or symbols)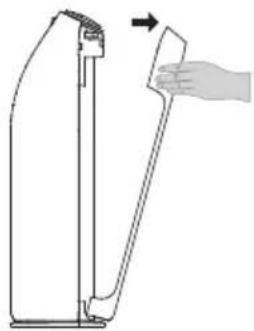
natural_image
Line drawing of a hand holding a small object against a vertical panel, with an arrow indicating rotation (no text or symbols)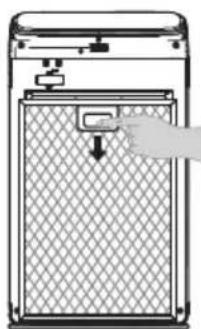
natural_image
Line drawing of a hand pressing down on a textured panel with a control knob (no text or symbols)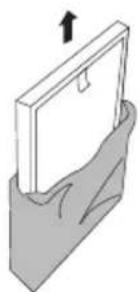
natural_image
Illustration of a hand holding a rectangular object with an upward arrow, no text or symbols present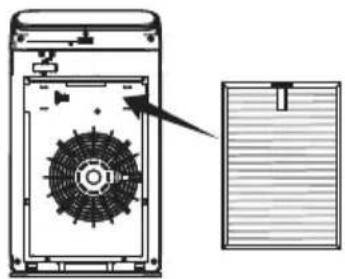
natural_image
Diagram of a device interior showing internal fan structure and adjacent to a textured panel (no text or symbols)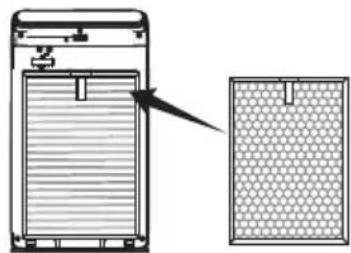
natural_image
Diagram showing a device with a grid pattern and an arrow pointing to its side panel (no text or symbols present)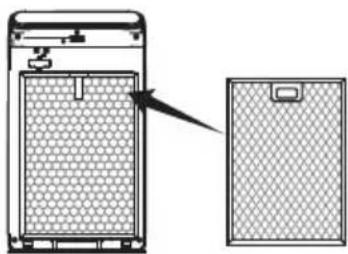
natural_image
Diagram of a device with mesh pattern and an arrow pointing to its side panel (no text or symbols)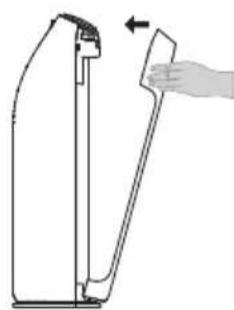
natural_image
Line drawing of a door handle with a hand holding the blade (no text or symbols)Important notes
Before using this device read the instruction manual and follow the instructions inside. The manufacturer is not liable for any damages caused by the misuse of this device due to inappropriate handling. Please keep this manual for future reference.
- This device is for domestic use only. Do not use for any other purposes.
- The device should only be connected to an earthed socket with values corresponding to the values on the rating label.
- The device is not designed to be controlled via an external timer, separate remote control, or other equipment that can turn the device on automatically.
- Before maintenance work always disconnect the unit from the power supply.
- Never leave the product connected to the power source without supervision.
- Never put the power cable, the plug or the whole device into the water or any other liquids.
- The device should be cleaned regularly complying with the recommendations described in the section on cleaning and maintenance.
- Do not place the device near sources of heat, flame, an electric heating element or a hot oven. Do not place on any other device.
- This equipment can be used by children aged 8 years and over under as long as supervision is provided. People with reduced physical or mental capabilities, as well as people with no previous experience of using this equipment must be supervised and made aware of the risks. The instruction manual should be used as a reference for the safe use of this equipment. Children should not play with the equipment. Children without ensured supervision should not be allowed to perform the cleaning and maintenance of equipment.
• Additional precautions should be taken when using this device in the presence of children or pets. Do not allow children to play with the
device.
- Never use the product close to combustibles.
- Never expose the product to atmospheric conditions such as direct sun light or rain, etc... Never use the product in humid conditions (like bathroom or camping house).
- The AC adapter should be connected to an outlet with characteristics consistent with the values on the rating label.
- If the cord or power plug or adaptor is damaged or the plug has a loose electrical outlet, do not charge the device and do not power it from the mains.
- Unplug the AC adapter from the electrical outlet when not in use.
- Do not connect or disconnect the adaptor from the power source with wet hands.
- The power cable should be periodically checked for damage. If the power cable is damaged the product should be taken to a professional service location to be fixed or replaced to prevent any hazards from arising.
- Never use the product with a damaged power cable or if it was dropped or damaged in any other way or if it does not work properly. Do not try to repair the defected product by yourself as it can lead to electric shock. Always return the damaged device to a professional service in order to repair it. Authorized service professionals should only perform all the repairs. Any attempted unauthorized repairs performed can be a hazard to the user.
- Only Original accessories should be used, as well as accessories recommended by the manufacturer. Using accessories, which are not recommended by the manufacturer, may result in damage of the device and may render the device unsafe for use.
- Do not put fingers or any other objects in the inlet/outlet holes of the device.
-
Place the device in way that does not interrupt the air inflow/outflow, leave at least 30 cm of space from each side of the device.
-
Do not use the device if the filter is completely utilized, not installed or not properly installed.
- Do not use in spaces where chemical agents are used, such as: paints, varnishes, glues, insecticides, air fresheners.

Device is compliant with EU directives:
- Low voltage directive (LVD)
- Electromagnetic compatibility (EMC)
Device marked CE mark on rating label
When this crossed-out wheeled bin symbol is attached to a product it means that the product is covered by the European Directive 2012/19/EU. Please inform yourself about the local separate collection system for electrical and electronic products. Used appliance should be delivered to the dedicated collecting points due to hazardous components, which may affect the environment. Do not dispose this appliance In the common waste bin.
Your product contains batteries covered by the European Directive2006/66/EC, which cannot be disposed with normal household waste. Please inform yourself about the local rules on separate collection of batteries because correct disposal helps to prevent negative consequences for the environmental and human health.
Environmental information
All unnecessary packaging has been omitted. We have tried to make the packaging easy to separate into three materials: cardboard (box), polystyrene foam (buffer) and poly ethylene (bags, protective foam sheet). Your system consists of material which can be recycled and reused if disassembled by a specialized company. Please observe the local regulations regarding the disposal of packaging materials, exhausted batteries and old equipment.

Your products is designed a manufactured with high quality materials and components, which can be recycled and reused.
Technical specification and parameters of the appliance
Power supply: 220-240V \~ 50 / 60Hz
Rated power: 80W
Dimensions: 37 x 19,5 x 65cm
Weight: 8kg
Accessories:
Filter set (cold catalysis + activated carbon + antibacterial + HEPA filters): SAP81.1
Pre-filter: SAP81.2
- Control panel.
- Air inlets.
- Air outlet.
- Handle.
- Front panel.
Control panel buttons:
- Smart Mode.
- Cleaning speed.
-
Night mode.
-
UV sterilization.
- ON / OFF switch.
- Timer.
- lonizer.
- Child lock.
- Purifying speed indicator.
- Filter replacement indicator.
- Air quality indicator.
CLEANING AND MAINTENANCE
Do not immerse the device in water. Wipe the surface with a damp cloth, then wipe dry.
Before carrying out maintenance work, make sure that the device is disconnected from the power supply.
The pre-filter is washable, it can be cleaned in water, dry the filter before further use.
Filters (cold catalysis + activated carbon + antibacterial + HEPA) are not washable; do not immerse them in water. The filters can be cleaned using a vacuum cleaner with a soft brush. The filters are extremely delicate; they must not be pressed too much when vacuuming.
If the device is operated under normal conditions, it is recommended to replace the filters every 6 months (cold catalysis + activated carbon + antibacterial + HEPA) assuming that the device works approx. 8 hours a day. In case of strong air pollution or prolonged use, the filter may require more frequent replacement. It is recommended to clean the filters every 60 days. It is recommended to clean the pre-filter every 15 days.
Maintenance of the ionizer head (Fig. 3)
It is recommended to clean the ionizer head from the dust with a dry brush, if the device starts to make sounds resembling crackles. Insert a soft brush through the air outlet opening above the ionizer head. Regularly remove the dust that accumulates near the ionizer head.
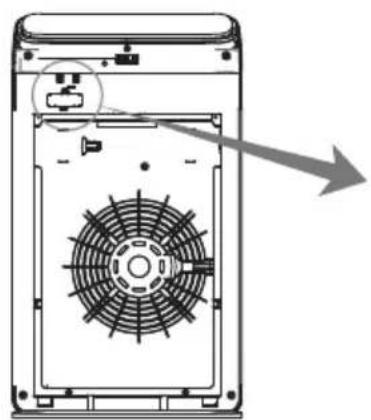
Maintenance of the particles sensor (Fig.4)
Pollution sensor - it is recommended to clean the particle sensor every 2 months. To clean the sensor, remove its cover and then clean the lens with a dry cotton swab.
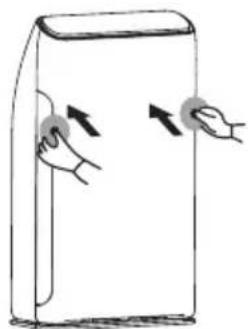
Installation / replacement of filters (Fig.5):
- Press in the points marked on the picture to unclip the front panel of the device.
- Remove the front panel.
- Remove all filters from the device.
- Remove the HEPA + antibacterial filter, the cold catalysis filter + activated carbon filter and the pre-filter from plastic packaging.
- Insert the HEPA + antibacterial filter so that the side with the handle is facing you.
- Insert the cold catalysis filter + activated carbon so that the side of the handle is facing you.
- Insert the pre-filter so that the side of the handle is facing you.
- Install the front panel.
Switching on the device
- On / off switch (10) - press the switch to switch on the purifier. The device will automatically switch to the last saved operating mode (excluding the timer and night mode settings). The device will not turn on if it is not in an upright position or the front panel is not correctly installed).
- Press the button to turn off the device.
Description of the device function
- Smart Mode (6) - in Smart mode, the device will adjust the work to the level of pollution. PM2.5 particle level below 60 (basic speed), below 150 (average speed), above 150 (high speed).
- Purifying speed (7) - the button allows you to control the purifying speed, basic (500RPM), medium (700RPM), high (900RPM).
- Night mode (8) - After pressing the button, the device will go to night mode after 5 seconds. In this mode, the device operates at the basic purifying speed and the control panel backlight is turned off. Press any button to exit the night mode.
- UV Sterilization (9) - press the UV sterilization button to turn the device on or off.
- Timer (11) - pressing the button will start the timer function, each press extends the working time by 30 minutes. The minimum time is 30 minutes, maximum time is 12 hours. Press and hold the button for 3 seconds to turn off the timer function.
- Ionizer (12) - pressing the button will start the air ionization process. The ionization icon will be highlighted.
- Child lock (13) - pressing the button will cause the buttons to not react to pressing, and the device will operate in the previously selected operating mode. Press and hold the button for 3 seconds to disable the lock. The icon will be illuminated when the child lock is on.
- Purifying speed indicator (14) - the indicator shows the current air purifying speed, basic (500RPM), average (700RPM)
Remote control:
The device has been equipped with a remote control powered by button batteries (CR2032). The remote control has the same set of buttons as the target device.
Comments:
Before first use, open the battery cover and remove it from the packaging. Then re-insert, otherwise the remote control will not work. If you do not intend to use the remote control for a long time, remove the battery.
Clock settings:
- Press and hold the Smart Mode button (6) for 5 seconds to activate the clock settings. Use the purge speed (7) and night mode (8) buttons to set the hour. Press the Smart Mode button (6) once again to go to the minute settings; set the number of minutes using the cleaning speed (7) and night mode (8) buttons, wait a few seconds and the set time will be saved.
WICHTIGE INFORMATIONEN
natural_image
White and black portable water purifier with digital display and control buttons (no visible text or symbols)SAP11
natural_image
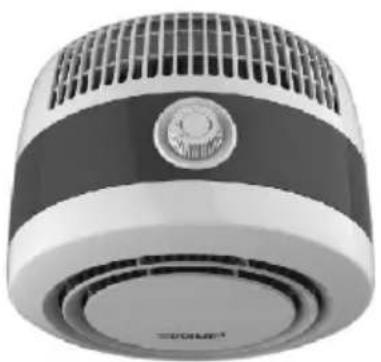
Close-up of a modern electric air purifier with a circular vent and control knob (no visible text or symbols)SAP21
natural_image
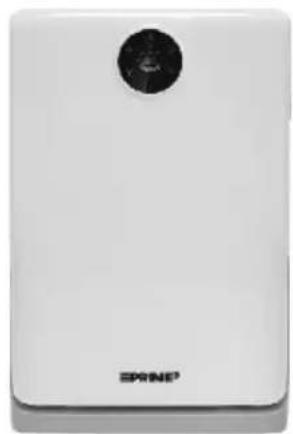
White rectangular electronic device with a circular top and 'SPINEP' branding (no additional text or symbols visible)SAP41
natural_image
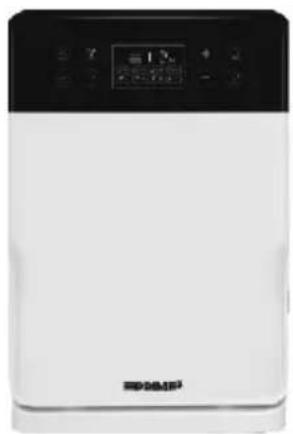
White appliance with black top and digital display, no visible text or symbols on bodySAP51
PRIME ^3
2N-Everpol Sp. z o.o.
ul. Pulawska 403A
02-801 Warsaw, Poland
phone: +48 22 331 99 59
e-mail: info@prime3.pl
www.prime3.pl
In case of questions or problems
please contact our service.
Tel. 00 48 22 331 99 54
E-mail: info@prime3.pl
All rights reserved. All brand names are registered trademarks of their
respective owners. Specifications are subject to change without prior notice.

- Important notes
- device.
- Environmental information
- Control panel buttons:
- CLEANING AND MAINTENANCE
- Maintenance of the ionizer head (Fig. 3)
- Maintenance of the particles sensor (Fig.4)
- Installation / replacement of filters (Fig.5):
- Switching on the device
- Description of the device function
- Remote control:
- Comments:
- Clock settings:
- WICHTIGE INFORMATIONEN
- PRIME 3
Brand : PRIME3
Model : SAP81
Category : Air purifier