
PS002-S - Saw Cotech - Free user manual and instructions
Find the device manual for free PS002-S Cotech in PDF.


| Brand | Cotech |
| Model | PS002-S |
| Product Type | Telescopic Pruning Saw |
| Power | 600 W |
| Voltage / Frequency | 230 V, 50 Hz |
| Safety Class | II |
| Cutting Speed | 13 m/s |
| Cutting Length | 180 mm |
| Max Shaft Length | 3 m |
| Weight | 4.9 kg |
| Sound Pressure Level (LpA) | 82 dB(A) |
| Sound Power Level (LwA) | 103 dB(A) |
| Vibration Value | 2.4 m/s² (K=1.5 m/s²) |
| Chain Lubrication | Manual oiling via tank (saw chain oil recommended) |
| Chain Tension Adjustment | Via tensioning screw (tool included) |
| Safety Features | Safety cut-off, chain catcher, chain guard, shoulder strap |
| Intended Use | Pruning trees and branches |
| Maintenance | Clean oil guide groove, keep ventilation openings clear |
| Storage | Horizontal in dry place; drain oil for long storage |
Frequently Asked Questions - PS002-S Cotech
User questions about PS002-S Cotech
0 question about this device. Answer the ones you know or ask your own.
Ask a new question about this device
Download the instructions for your Saw in PDF format for free! Find your manual PS002-S - Cotech and take your electronic device back in hand. On this page are published all the documents necessary for the use of your device. PS002-S by Cotech.
USER MANUAL PS002-S Cotech
Read the entire instruction manual carefully and make sure that you fully understand it before you use the equipment. Keep the manual for future reference.
Viktig information:
natural_image
Illustration of a long, segmented mechanical device with attached clamps and a handle (no text or symbols)ART.NO
18-4377
31-4879
MODEL
PS002-S-UK
PS002-S
Ver. 20130918
Original instructions
Bruksanvisning i original
Please read the entire instruction manual before using the product and save it for future reference.
We reserve the right for any errors in text or images and any necessary changes made to technical data.
If you have any questions regarding technical problems please contact our customer services.
Safety
General safety
1) Work area
a) Keep the work area clean and well illuminated. Cluttered and poorly lit areas invite accidents.
b) Do not use power tools in explosive environments, e.g. near flammable liquids, gases or dust.
Power tools generate sparks that can easily ignite dust or fumes.
c) Keep children and other bystanders away from the area where you are using the power tool.
Distractions can cause you to lose your concentration and control.
2) Electrical safety
a) The power tool's plug must fit correctly into the wall socket. Never modify the plug in any way. Never use an adaptor together with earthed power tools. Unmodified plugs and suitable wall sockets decrease the risk of electric shock.
b) Avoid physical contact with earthed objects, such as pipes, radiators, ovens or refrigerators. There is an increased risk of receiving an electrical shock if your body is earthed.
c) Do not expose the power tool to rain or other wet conditions. If water gets inside a power tool it increases the risk of electric shock.
d) Do not abuse the mains lead. Never use the lead to carry the tool or pull the plug from the wall socket. Keep the lead away from heat, oil, sharp edges and moving parts. Damaged or tangled leads increase the risk of electric shock.
e) When using power tools outdoors, use an extension lead that is suitable for this purpose. The use of an extension lead designed for outdoor use decreases the risk of electric shocks.
f) If for some reason you must use a power tool in a wet environment, always connect it to the mains via an earth-fault circuit breaker such as an RCD (residual current device). Using an RCD significantly reduces the chances of you receiving an electric shock.
3) Personal safety
a) This product must not be used by anyone (including children) suffering from physical or mental impairment. This product should not be used by anyone that has not read the instruction manual unless they have been instructed in its use by someone who will take responsibility for their safety.
b) Pay attention to your actions and use common sense when using power tools. Never use power tools if you are tired or under the influence of drugs, alcohol or medication. One moment of inattention while using a power tool may result in serious injury.
c) Use protective equipment. Always wear safety glasses. Using protective clothing such as dust masks, non-slip safety shoes, helmets and ear defenders decreases the risk of injury.
d) Avoid accidental starts. Make sure that the power switch is set to OFF before plugging the tool into a wall socket. Never carry a power tool with your finger on the trigger and never connect the power tool to a wall socket when the switch is set to ON, since it may result in injury.
e) Remove all service tools/keys before switching on the power tool. A service tool left on a moving part of the power tool may result in injury.
f) Do not overreach. Make sure you stand steady and well balanced at all times. This enables you to have more control in case of unexpected events.
g) Wear suitable attire. Do not wear loose-fitting clothing or jewellery. Keep hair, clothes and gloves away from moving parts. Loose-fitting clothes, jewellery or long hair could become caught in moving parts.
h) If equipment for dust extraction or collection is available, make sure that it is connected and used properly. Using technical aids may decrease dust related hazards.
4) Use and maintenance of power tools
a) Do not force the power tool. Use a power tool suitable for the work you are about to perform. The proper power tool will perform the task better and safer if used at the correct feed rate.
b) Never use the power tool if the power switch does not switch the tool on and off properly. All power tools that cannot be controlled by the power switch are dangerous and must be repaired.
c) Unplug the lead from the wall socket before making any adjustments, changing accessories or storing the power tool. These precautions reduce the risk of the power tool starting unexpectedly.
d) Store any power tools that are not being used out of children's reach. Do not allow people who are unfamiliar with the tool or its functions to operate the tool. Power tools can be dangerous if they fall into the hands of inexperienced users.
e) Maintaining power tools. Check for any incorrect settings, parts that catch, broken parts or anything else which may cause the power tool to malfunction. If something is damaged it must be repaired before use. Many accidents are caused by poorly maintained power tools.
f) Keep tools sharp and clean. Properly maintained cutting tools with sharp blades are less likely to bind and are easier to control.
g) Use the power tool, accessories and similar according to the instructions and in an appropriate way for the type of power tool used, taking into consideration your work environment and the type of work to be done. Using the power tool for a purpose other than that for which it is intended could result in a dangerous situation.
5) Service
a) Repairs and service should only be performed by qualified tradesmen, and only with original spare parts. This guarantees that the safety of the power tool is maintained.
Safety Instructions Specific to Pruning Saws
- Bear in mind that the product's use might be restricted by national or local regulations. Find out if any restrictions apply to your area.
- A safe working distance of at least 10 m must always be maintained between the product and any high-voltage power cables.
- Read and make sure you understand the instruction manual before using the product.
- Always make sure that you are well-balanced when using the saw. Take regular breaks when working for long periods.
- Maintain a firm stance and posture and always use the supplied shoulder strap.
- Keep bystanders at a safe distance from the work area.
- Always remove branches in small pieces working from the tip in towards the trunk. Be aware of your position to avoid being struck by falling branches.
- Never operate the product if any of its safety devices is missing or damaged.
- Use protective eyewear and hearing protection. In addition, it is recommended that personal protection equipment for the head, hands, legs and feet are also worn. Wearing the correct protective equipment reduces the risk of injury from flying objects and accidental contact with the saw chain.
Product safety symbols

Hazard warning.

Read the instruction manual before operating this machine.

Head, eye and ear protection must be worn.

Safety shoes must be worn.

Safety gloves must be worn.

Keep bystanders at least 15 m away when operating the saw.
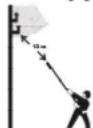
Keep at a distance of 10 m from overhead power lines.

Do not expose the product to rain.

Unplug the mains lead if it is damaged.

Sound level (dB).
Product description
- Saw chain
- Guide bar
- Chain catcher
- Locking screw
- Rear handle
- On/off switch
- Safety cut-off
- Strain relief
- Chain guard
- Chain oil tank
- Oil filler cap
- Telescopic shaft
- Front handle
- Shoulder strap eyelet
- Shoulder strap

Assembly
Note: Always make sure that the product is unplugged before assembly.
Chain bar and saw chain
Note: The teeth of the chain are very sharp. Always wear protective gloves.

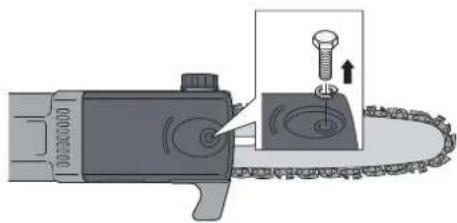
- Remove the locking screw and circlip and pull off the chain wheel guard (a).

natural_image
Technical diagram of a mechanical chain with a central slot and evenly spaced teeth (no text or labels)- Place the saw chain onto the guide bar.
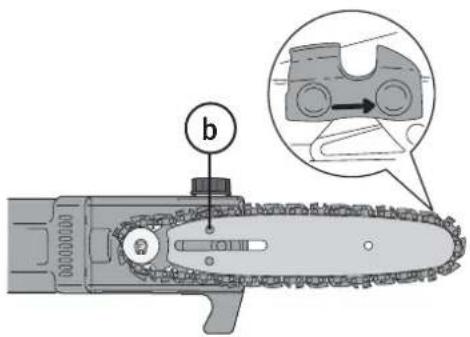
- Position the guide bar so that the chain tensioning pin (b) engages into the hole on the guide bar and the saw chain is around the chain wheel.
natural_image
Diagram of a chain saw cutting process with a screw and nut inserted (no text or symbols)- Refit the chain wheel guard, circlip and finger-tighten the locking screw. Do not tighten the locking screw until after the chain has been tensioned.
Note: Make sure the saw chain is the right way round. Refer to the previous diagram and the markings on the chain bar and chain.
Chain tension
Note: A new saw chain stretches during use and should be checked and readjusted after just a few minutes use. The chain tension should be checked regularly.
The chain should not be so slack that it is hanging down away from the chain bar.
You should be able to lift the chain about 2 mm up from the chain bar.
-
Turn the saw chain by hand to make sure that it is running correctly around the chain bar. Wear protective gloves as the chain is sharp!
-
Adjust the tension of the chain by turning the tensioning screw (c) clockwise until the chain is tensioned correctly as described above. Use the supplied tool.
-
Tighten the chain wheel guard locking screw properly.

natural_image
Diagram of a chain saw with labeled components (no text or symbols present)Front handle

natural_image
Diagram of a mechanical clamp or connector with directional arrows indicating movement (no text or symbols)- Place the front handle on the holder. Refer to the diagram in the Product description section.

natural_image
Mechanical assembly diagram showing a lever mechanism with a cylindrical component and mounting fasteners (no text or symbols)- Pass the bolt through the holes in the handle, fit the washer and tighten the wing knob.
Operation
Note: Always make sure that the saw is completely disconnected from the mains power supply before making any adjustments or cleaning it.
Note: The saw chain must always be sharp and correctly tensioned for tree pruning to be performed properly and safely. Have a professional sharpen the chain for you if you are not sure how to do it.
Preparations
Topping up the saw chain oil
Note: Only use a good quality saw chain oil.
- Set the saw down securely onto the ground.
- Remove the oil filler cap.
- Carefully pour oil into the tank.
- Check the gasket in the oil filler cap and clean/change it if necessary. Keep the area around the filler cap free of dirt so that none gets into the tank.
- Screw the filler cap back on.
- Wipe up any spilled oil.
- Check the saw chain lubrication. Refer to the Starting the saw section below.
Setting the telescopic shaft
- Undo the locking screw (4).
- Set the telescopic shaft (12) to the desired length.
- Tighten the locking screw.

Work area
• Always keep the work area tidy so you can move freely without the risk of tripping over obstacles.
• Make sure that there are no loose branches which could become caught in the saw.
Safety checks
- Make sure that you wear suitable protective clothing (refer to the Personal safety section above).
- Make sure that all parts of the saw are present, firmly attached and undamaged.
- Make sure that the saw chain is correctly tensioned.
- Always clamp the mains lead into the strain relief on the rear handle.
Sawing technique
It might be wise to practices different sawing techniques on small, lower branches before progressing to more advanced sawing and hard-to-reach branches.
Note: Never saw in bushes as small branches can get caught in the saw chain and cause the saw to be thrown out of control.
Pull sawing (recommended)
This technique involves sawing the branch from the top to the bottom. The saw chain pulls the saw forwards, away from the user. When pull sawing, the user has much more control over the saw and can better avoid kickbacks.
Push sawing
This technique involves sawing the branch from the bottom to the top. The saw chain thus pulls the saw back towards the user.
This means that the user has to equalise the rearward force of the saw chain to compensate. If the force is not equalised, there is a danger of the saw bar being pulled too far backwards so that just the tip of the bar is in contact with the branch.
This can cause kickbacks or unexpected bar movement.
Lopping off branches
When sawing thinner branches, it is usually sufficient to employ the pull sawing technique.
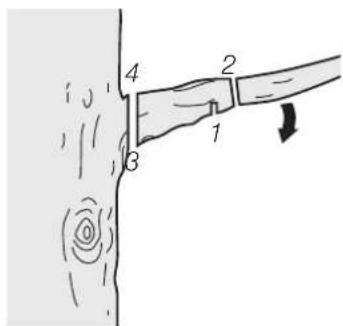
When sawing thicker branches, use the following technique:
- Make the first cut from below, about 15–20 cm from the tree trunk. Cut about 1/3 of the way through the branch.
- Make the second cut about 5–10 cm outside the first cut. Cut from above and cut all the way through the branch.
- Place the third cut as close to the tree trunk as possible. Cut about 1/3 of the way through the branch.
- Make the fourth cut as close the tree trunk as possible and cut all the way through the branch.

natural_image
Diagram of a chain drive with arrows indicating motion, showing tire and chain (no text or symbols)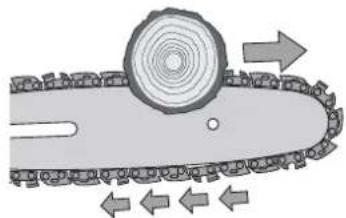
natural_image
Diagram of a chain drive with gear and moving arrows indicating motion (no text or symbols)
Note:
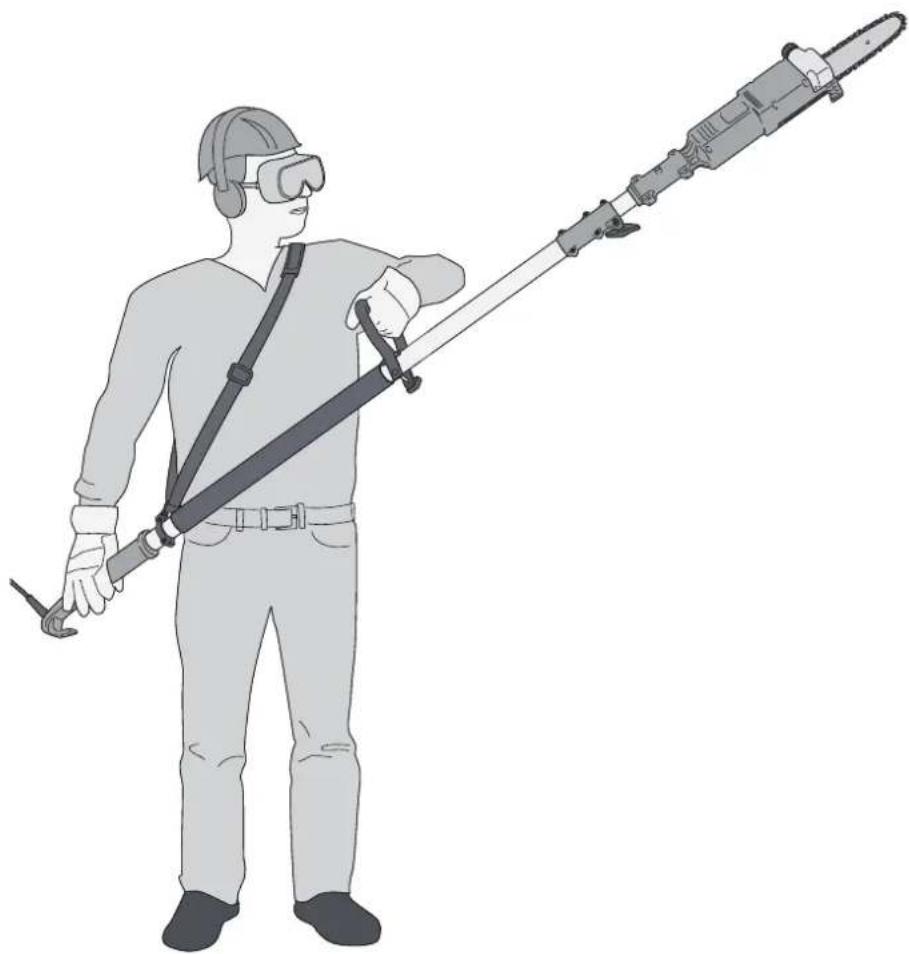
• Always begin with the branches lowest down on the trunk.
• Always stand in a well-balanced stable stance.
• Never work whilst standing on a ladder.
• Never saw off a branch which is directly above your head.
• Never overreach, lean too far forward or too far backward.
• Never work in poor light or weather conditions.
• Always use the shoulder strap.
- Tidy the work area before beginning work and check the surroundings for foreign objects.
• Always hold the saw with both hands.
natural_image
Illustration of a person wearing VR headset and holding a long-handled mechanical device (no text or symbols)Starting the saw
- Connect the saw to the power supply.
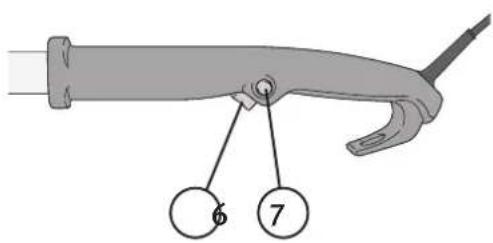
- Press both the on/off switch (6) and the safety cut-off (7) at the same time.
- Check the saw chain lubrication. Point the tip of the chain bar at a solid light object and hold it about 10–15 cm away. After about 30 seconds of running, a line of oil should appear on the light object.
- Allow the saw chain to reach full speed before beginning to saw.

Care and maintenance
Note: Always make sure that the saw is completely disconnected from the mains power supply before making any adjustments or cleaning it.
- In order for you to be able to saw safely and satisfactorily, the saw chain must always be kept sharp and correctly tensioned. Have a professional sharpen the chain for you if you are not sure how to do it.
- Make sure that the motor's ventilation openings are kept clear.
- Regularly remove the chain and bar and clean the oil guide groove and the area around the chain wheel.
- Clean the exterior of the product using a lightly moistened cloth. Only use mild detergents, never solvents or corrosive chemicals.
• Always put the chain guard over the bar and carry the saw with the bar pointing backwards when walking around. - If the saw is not to be used for a long time, always drain the chain oil and store the saw horizontally in a dry, well-ventilated place.
Troubleshooting guide
| The saw does not start. • Connected to the power supply?• Is the wall socket live?• Are all leads whole and undamaged?• Have both the on/off switch and safety cut-off been pressed in? |
| Poor cutting performance. • Check the sharpness of the chain.• Check the tension of the chain, seeChain tensionabove.• Incorrectly fitted chain, check direction of rotation. |
Disposal
This product should be disposed of in accordance with local regulations. If you are unsure how to proceed, contact your local authority.
Specifications
Voltage 230 V, 50 Hz
Power 600 W
Safety class II
Cutting rpm 13 m/s
Cutting length 180 mm
Sound level LpA: 82 dB(A)
LwA: 103 dB(A)
Instability K=1.0 dB(A)
Vibration value 2.4 m/s², K: 1.5 m/s²
Weight 4.9 kg
Max shaft length 3 m
Teleskopisk grensåg
ART.NR 18-4377 MODELL PS002-S-UK
31-4879 PS002-S
Allmän fara.
Montering
natural_image
Technical diagram of a mechanical chain or gear assembly with no visible text or symbolsnatural_image
Mechanical assembly diagram showing a chain with a gear and a screw inserted into a sink (no text or symbols)natural_image
Diagram of a chain saw with labeled component (no text or symbols present)Främre handtag

natural_image
Diagram of a mechanical clamp or connector with directional arrows indicating movement (no text or symbols)natural_image
Mechanical assembly diagram showing a lever mechanism with a cylindrical component and mounting fasteners (no text or symbols)Tänk på:
natural_image
Illustration of a person wearing VR headgear and holding a long-handled mechanical device (no text or symbols)Starta sågen
Instabilitet K=1,0 dB(A)
Vibration 2,4 m/s ^2 , K=1,5 m/s ^2
Vikt 4,9 kg
Montering
natural_image
Technical diagram of a mechanical chain or gear assembly with no visible text or symbolsnatural_image
Diagram of a chain saw cutting process with a screw and nut assembly (no text or symbols)natural_image
Diagram of a chain drive with labeled parts (no text or symbols present)Fremre håndtak

natural_image
Diagram of a mechanical clamp or connector with directional arrows indicating movement (no text or symbols)- Plasser håndtaket på sagen. Se bilde under avsnittet Produktbeskrivelse.

natural_image
Mechanical assembly diagram showing a lever mechanism with a cylindrical component and mounting fasteners (no text or symbols)natural_image
Diagram of a chain drive with arrows indicating motion, showing tire and chain (no text or symbols)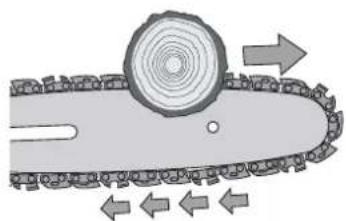
natural_image
Diagram of a chain drive with gear and wheel, showing motion arrows (no text or symbols)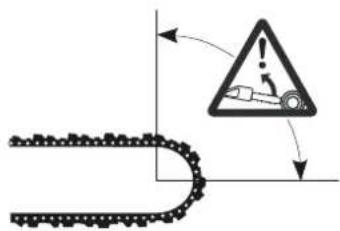

Husk følgende:
- Start alltid med de greinene som sitter lengst nede på stammen.
• Sørg for en stabil arbeidsstilling. - Ikke foreta jobbing stående på en stige.
- Sag ikke av greiner som er rett over hodet.
• Bøy deg ikke for langt fram eller len deg for langt bakover.
• Sørg for gode værforhold og fult dagslys.
• Benytt alltid bæreselen. - Rydd alltid arbeidsområdet før jobben startes og påse at det ikke er fremmede gjenstander som kan forstyrre jobbingen.
- Hold alltid i sagen med begge hendene.

natural_image
Illustration of a person wearing VR headgear and holding a long, articulated tool (no text or symbols)Start sagingen
- Koble sagen til strømnettet.
- Trykk inn strømbryteren (6) og sikkerhetssperren (7).
-
Kontroller sagkjedesmøringen. Vend sverdspissen mot en fast lys gjenstand i en avstand på ca. 10–15 cm fra denne. Etter ca. 30 sekunders kjøring skal man se en oljerand på den lyse gjenstanden.
-
La sagkjedet komme opp i full hastighet för sagingen starter.
Asennus
natural_image
Diagram of a mechanical chain or gear assembly with no visible text or symbolsnatural_image
Mechanical assembly diagram showing a chain with a gear and a screw inserted into a sink (no text or symbols)natural_image
Diagram of a chain saw with labeled parts (no text or symbols present)Etukahva

natural_image
Diagram of a mechanical clamp or connector with directional arrows indicating movement (no text or symbols)natural_image
Mechanical assembly diagram showing a lever mechanism with a cylindrical component and mounting fasteners (no text or symbols)natural_image
Diagram of a chain drive with arrows indicating motion, showing gear and wheel (no text or symbols)
natural_image
Diagram of a chain drive with gear and wheel, showing motion arrows (no text or symbols)

Huomioi:
natural_image
Illustration of a person wearing safety goggles and holding a long-handled device (no text or symbols present)Sahan käynnistys
Huolto ja ylläpito
Montage
natural_image
Diagram of a mechanical chain or gear assembly with no visible text or symbolsnatural_image
Diagram of a chain saw cutting into a mechanical component (no text or symbols)Vorderer Griff

natural_image
Diagram of a mechanical clamp or connector with directional arrows indicating movement (no text or symbols)natural_image
Mechanical assembly diagram showing a lever mechanism with a cylindrical component and mounting fasteners (no text or symbols)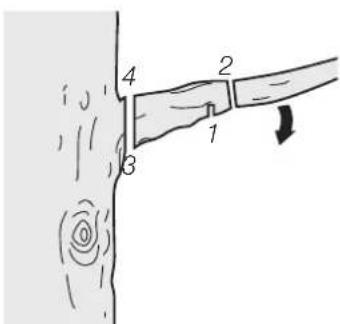
Bitte beachten
natural_image
Illustration of a person wearing VR headgear and holding a long-handled tool (no text or symbols)Säge starten
Pflege und Wartung
Declaration of Conformity
EC type certificate, no. 10SHW1319-02
Issued by the following notified body:
(Notified Body no. 0905)
Klas Balkow
President
Insjön, Sweden, 2011-12-12
SVERIGE
KUNDTJÄNST
Tel:
0247/445 00
Fax:
0247/445 09
E-post: kundservice@clasohlson.se
INTERNET
www.clasohlson.se
BREV Clas Ohlson AB, 793 85 INSJÖN
NORGE
KUNDESENTER
Tlf.:
23 21 40 00
Faks:
23 21 40 80
E-post: kundesenter@clasohlson.no
INTERNETT
www.clasohlson.no
POST
Clas Ohlson AS, Postboks 485 Sentrum, 0105 OSLO
SUOMI
ASIAKASPALVELU
Puh.: 020 111 2222
10 – 13 Market Place
Kingston Upon Thames
Surrey
KT1 1|Z
DEUTSCHLAND
KUNDENSERVICE

- Safety
- General safety
- 1) Work area
- 2) Electrical safety
- 3) Personal safety
- 4) Use and maintenance of power tools
- 5) Service
- Safety Instructions Specific to Pruning Saws
- Product safety symbols
- Product description
- Assembly
- Chain bar and saw chain
- Chain tension
- Front handle
- Operation
- Preparations
- Topping up the saw chain oil
- Setting the telescopic shaft
- Work area
- Safety checks
- Sawing technique
- Pull sawing (recommended)
- Push sawing
- Lopping off branches
- Note:
- Starting the saw
- Care and maintenance
- Troubleshooting guide
- Disposal
- Specifications
- Teleskopisk grensåg
- Montering
- Främre handtag
- Tänk på:
- Starta sågen
- Fremre håndtak
- Husk følgende:
- Start sagingen
- Asennus
- Etukahva
- Huomioi:
- Sahan käynnistys
- Huolto ja ylläpito
- Montage
- Vorderer Griff
- Bitte beachten
- Säge starten
- Pflege und Wartung
- Declaration of Conformity
- SVERIGE
- NORGE
- SUOMI
- DEUTSCHLAND
Brand : Cotech
Model : PS002-S
Category : Saw