
MDDG-20DEN3-QA3 - Humidifier Cotech - Free user manual and instructions
Find the device manual for free MDDG-20DEN3-QA3 Cotech in PDF.


| Product Type | Dehumidifier |
| Brand | Cotech |
| Model | MDDG-20DEN3-QA3 |
| Power Supply | 220–240 V, 50 Hz |
| Power Consumption | 400 W |
| Dehumidification Capacity | Up to 20 L/day |
| Water Reservoir Capacity | 3.1 L |
| Coolant | R134a |
| Operating Temperature Range | 5–35 °C |
| Dimensions (W x D x H) | 51 x 35 x 21 cm |
| Weight | 12 kg |
| Timer | 1–24 hours (auto start/stop) |
| Continuous Drainage | Yes (drain hose connection, 13.5 mm bore) |
| Air Filter | Washable, clean every 14 days |
| Auto Defrost | Yes, automatic |
| Auto Shut-off | When water reservoir is full |
| Control Type | Electronic buttons with LED display |
| Fan Speeds | 2 (Normal / Turbo) |
| Humidity Setting Range | 35–85% RH (in 5% increments) |
| Safety Features | RCD protected plug, child safety, overheat protection |
| Placement Clearance | At least 20 cm on all sides |
| Warranty | Check manufacturer's website |
Frequently Asked Questions - MDDG-20DEN3-QA3 Cotech
User questions about MDDG-20DEN3-QA3 Cotech
0 question about this device. Answer the ones you know or ask your own.
Ask a new question about this device
Download the instructions for your Humidifier in PDF format for free! Find your manual MDDG-20DEN3-QA3 - Cotech and take your electronic device back in hand. On this page are published all the documents necessary for the use of your device. MDDG-20DEN3-QA3 by Cotech.
USER MANUAL MDDG-20DEN3-QA3 Cotech
natural_image
Line drawing of a portable air purifier device with control panel and wheels (no text or symbols)Art.no 18-2799 36-5205
Model MDDG-20DEN3-QA3 MDDG-20DEN3-QA3

Important!
Read the entire instruction manual carefully and make sure that you fully understand it before you use the equipment. Keep the manual for future reference.
Viktig information:
Original instructions
Bruksanvisning i original
Please read the entire instruction manual before using the product and then save it for future reference. We reserve the right for any errors in text or images and any necessary changes made to technical data. If you have any questions regarding technical problems please contact our Customer Services.
NOTE:
- The (relative) humidity of air is usually expressed as a percentage and is a measure of how much water the air contains at a certain temperature.
- Humidity is low during the winter/spring. If the appliance does not extract water from the air it might be because there is not enough humidity for the appliance to operate.
- The appliance can extract a lot of water or a very little water, depending on the humidity of the room.
- If the humidity of the room is 40 % and the appliance is set to maintain a humidity level of 60 %, the appliance will not remove any moisture (the fan will run but not the compressor).
- Contains fluorinated greenhouse gases covered by the Kyoto Protocol.
Safety
- The dehumidifier must only be connected to a 220–240 V, 50 Hz earthed outlet fitted with an RCD.
- The dehumidifier may be used by children of 8 years and above and by persons with reduced physical, sensory or mental capability or lack of experience and knowledge provided they have been given supervision or instruction concerning use of the appliance in a safe way and understand the hazards involved.
- Never let children play with the dehumidifier.
- Cleaning and maintenance may be carried out by children but only under adult supervision.
- The dehumidifier must always stand upright.
- Never sit, cover or place foreign objects on the dehumidifier.
- Make sure that the rubber plug in the drain hose hole is securely in place before turning the dehumidifier on if it is not to be used for continuous dehumidification.
- The dehumidifier must stand upright for at least 1 hour before it is used for the first time. The same applies after the the dehumidifier has been moved or cleaned, etc.
- Make sure that the air filter is clean and correctly fitted before turning the dehumidifier on.
-
Never use the dehumidifier if the mains lead, plug or any other part is damaged or does not work properly.
-
Never try to dismantle or repair you dehumidifier yourself.
- If the dehumidifier needs to be used with an extension lead or trailing socket, make sure that the lead used is suitable for use with the dehumidifier.
- Never plug in or unplug the dehumidifier with wet hands.
- Never insert foreign objects into the dehumidifier's openings.
- Unplug the dehumidifier immediately if it emits strange noises, odours or smoke.
- Unplug the dehumidifier immediately if it tips over or if it is splashed with water. Contact a qualified service technician before using the dehumidifier again.
- The dehumidifier must not be covered in any way. Make sure that no foreign objects cover or block the air inlet/outlet. Blockages can lead to fires, electric shocks or damage to the dehumidifier.
- Never use the dehumidifier in areas where flammable liquids/materials or gases (petrol, solvents, gas cylinders) are stored or used.
- Unplug the dehumidifier from the wall socket when it is not in use.
- Never use the mains lead plug for turning the dehumidifier on or off. The dehumidifier should only be switched on and off using the on/off switch.
- Before moving the dehumidifier: Make sure it is switched off, unplugged and that the water reservoir is empty.
- Never expose the dehumidifier to running/splashing water or other liquids. Liquid coming in contact with electrical components can be extremely hazardous.
- Do not place the dehumidifier where there is a risk of it falling into water or other liquid. Do not place any objects which contain liquid onto the dehumidifier such as vases, drinks, etc.
Disposal
This dehumidifier should be disposed of in accordance with local regulations. If you are unsure how to proceed, contact your local authority.
Specifications
Power supply 220–240 V, 50 Hz
Power 400 W
Dehumidification capacity up to 20 l/day
Reservoir capacity 31
Operating temperature 5–35°C
Coolant R134a
Size 51 x 35 x 21 cm
Weight 12 kg
Buttons and functions
Top

-
Air outlet
-
Folding handle
-
[Turbo] Fan speed setting low/high
-
On: LED indicator – indicates that the automatic start timer function is activated
-
[Timer] Enables automatic start/stop times to be set
-
Off: LED indicator – indicates that the automatic stop timer function is activated
-
[- ] Control used for setting the humidity level and timer
-
Water full: LED indicator - lights when the water reservoir is full, missing or not fitted correctly
-
Display
-
[ + ] Control used for setting the humidity level and timer
-
[Mode] Select from:
- Normal dehumidification, regulated by the humidity level setting (the water reservoir is subsequently filled with water).
- Continuous dehumidification, a humidity level setting cannot be made (the water runs out through the connected drain hose).
-
Cont: LED indicator – lights when in continuous dehumidification mode
-
LED indicator: Lights when the dehumidifier is turned on.
-
[Power] On/Off
Front panel
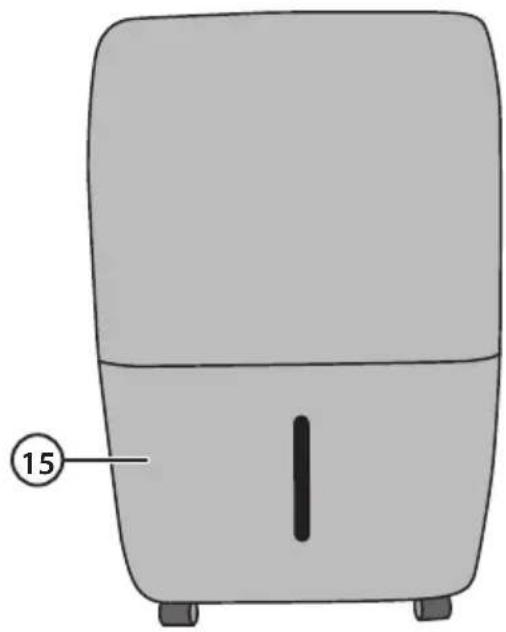
natural_image
Illustration of a portable refrigerator with a label pointing to the front panel (no text or symbols on the device itself)- Water reservoir
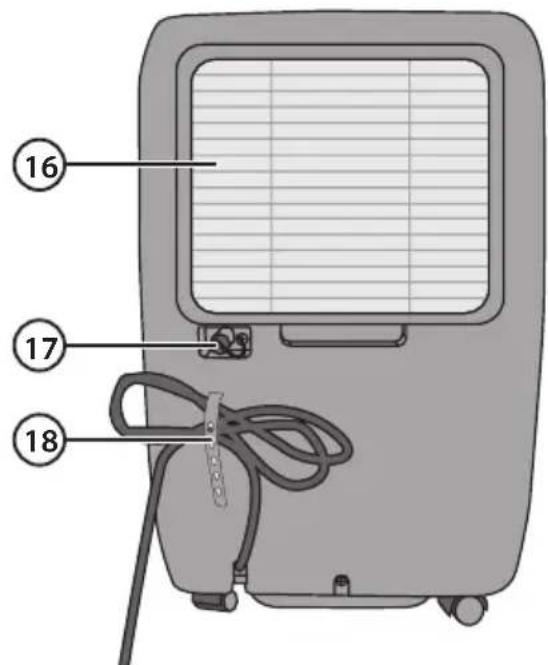
Back panel

-
Air inlet with air filter
-
Drain hose connection for continuous operation
-
Mains lead holder
Placement
- The dehumidifier is only intended for normal domestic use and only in the manner described in this instruction manual.
- Do not use the dehumidifier in a room in which the temperature might fall to below 5 °C.
- Make sure that the dehumidifier is standing firmly on a flat surface capable of supporting its weight even when the water reservoir is full.
- Make sure that the mains lead is easily accessible and is not damaged by sharp edges or is crushed in any way during use.
- Extra caution should taken be when the dehumidifier is used in the same environment as infants, small children and the elderly.
• The dehumidifier should be placed where it can draw in air from the entire house.
- All interior doors should be opened. Close exterior doors and windows.
- If any part of your house suffers from severe humidity, the dehumidifier can be placed there first and then moved to another part of the house later.
- Position the dehumidifier where the air can circulate freely, allow at least 20 cm of air space on all sides.
- Never place the dehumidifier next to a radiator or heating appliance.
Operating instructions
Note:
- Make sure that the rubber plug in the drain hose hole is securely in place before turning the dehumidifier on if it is not to be used for continuous dehumidification.
- The water reservoir must be correctly fitted before the dehumidifier can be switched on.
- Remember to empty the water reservoir before moving the dehumidifier.
- The dehumidifier works best at normal room temperature, its efficiency is reduced if the ambient temperature falls to below 15 °C.
- Let the dehumidifier operate continuously for 24 hours the first time it used. See the Continuous operation section.
- If the dehumidifier is turned off and then turned back on again immediately, it will take approximately 3 minutes to reach full power.
- Never use the dehumidifier without the air filter in place.
- If the dehumidifier is switched off by a power cut it will automatically switch back on once the power is restored.
Switching the dehumidifier on/off
- Read all the instructions in the Safety and Placement sections above.
- Connect the mains lead to a wall socket with the specifications listed in part 1 of the Safety section above.
- Turn the dehumidifier on by pressing the [Power] button.
- Turn the dehumidifier off by pressing the [Power] button again.
Setting the desired level of humidity
Note:
- When the dehumidifier is switched on the display shows the current humidity in the room in which the dehumidifier is located.
-
If the humidity of the room is 40 % and the appliance is set to maintain a humidity level of 60 %, the appliance will not operate.
-
Press [-] or [+] to set the desired humidity. The humidity level can be set in the range 35–85 % RH in increments of 5 %.
-
When the desired humidity level has been reached the dehumidifier switches off automatically.
Setting the timer
When the dehumidifier is switched on:
- Press [Timer], the stop timer indicator lights up.
- Set the desired stop time by pressing or holding down [-] or [+]. Each press changes the time in 30-min increments up to the 10-hour mark. Thereafter in increments of 60 minutes.
-
Press [Timer] again, the start timer indicator lights up.
-
Set the desired start time by pressing or holding down [-] or [ + ].
- After a few seconds the display reverts to showing the current humidity and the timer indicators light up to show that the timer settings are activated.
- The [Timer] button can be pressed at any time to check the settings.
- The timer settings can be changed at any time by pressing [Timer] and then [-] or [+].
- If the dehumidifier is switched off after the timer settings have been made, the settings will be deleted.
- If the water reservoir fills up (“P2” appears on the display) while the dehumidifier is operating and before the set timer time has been reached, the timer setting will be deleted.
When the dehumidifier is switched off:
- Press [Timer], the start timer indicator lights up.
- Set the desired start time by pressing or holding down [-] or [+]. Each press changes the time in 30-min increments up to the 10-hour mark. Thereafter in increments of 60 minutes.
- Press [Timer] again, the stop timer indicator lights up.
- Set the desired stop time by pressing or holding down [-] or [ + ].
- After a few seconds the display reverts to showing the current humidity and the timer indicators light up to show that the timer settings are activated.
- The [Timer] button can be pressed at any time to check the settings.
- The timer settings can be changed at any time by pressing [Timer] and then [-] or [+].
- If the dehumidifier is switched on after the timer settings have been made, the settings will be deleted.
- If the water reservoir fills up (“P2” appears on the display) while the dehumidifier is operating and before the set timer time has been reached, the timer setting will be deleted.
Automatic shut-off
- When the water reservoir becomes full during normal use, the dehumidifier's compressor shuts off automatically.
- The fan continues for another 30 seconds to dry the inside of the dehumidifier.
- The dehumidifier beeps 8 times, the “Water Full” LED indicator flashes and “P2” appears on the display.
Emptying the water reservoir
- Unplug the mains lead from the wall socket.
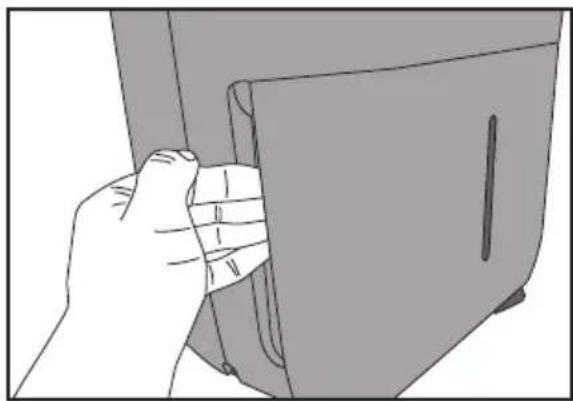
- Grip the water reservoir by the handles (one on each side) and pull it forwards.
- Empty the water out of water reservoir and then refit it onto the dehumidifier. The dehumidifier will restart automatically once the water reservoir has been refitted if it was shut off automatically.
natural_image
Illustration of a hand inserting a small object into a device (no text or symbols visible)Automatic defrost feature
- The dehumidifier is equipped with an automatic defrost feature. Frost can build up on some components inside the dehumidifier under certain conditions. The defrost feature removes this frost.
- The dehumidifier's compressor will shut off when the defrost feature is activated and the fan continues to run until the frost has disappeared.
- A purling sound might be heard from the dehumidifier during defrosting, this is normal.
- No settings can or need to be made for this feature.
Air filter
Disassembly

natural_image
Illustration of a hand holding a flat-screen solar panel with grid lines (no text or symbols)- Remove the grille and air filter from the back of the dehumidifier.

natural_image
Illustration of a hand inserting a grid into a rectangular device (no text or symbols)- Remove the filter from the grille.
Cleaning
- Wash the filter carefully in warm water, use a mild detergent if necessary. Note: Do not wash the air filter in a dishwasher.
- Rinse the filter in clean water and let it dry before reinserting it.
Assembly
Fit the air filter back onto the grille and then fit the grille onto the dehumidifier.
Continuous operation
When the dehumidifier is used in an environment with high humidity, the water reservoir will need emptying often. In such circumstances, it could be more practical to run the dehumidifier continuously. When the dehumidifier is in continuous operation mode it is not possible to set the desired humidity level. The dehumidifier will operate as long as the ambient conditions (temperature and humidity) permit.
- Press [Mode] until the "Cont." LED indicator lights up.
- Remove the rubber plug covering the drain hose connection (17).
- Connect a suitable 13.5 mm bore drain hose (sold separately). Make sure that the drain hose is secure and tight to prevent leakage.
- The other end of the drain hose should be inserted into a drain which is lower than the drain hose connection on the dehumidifier.
- Position the hose in such a way that the water can drain freely. Avoid kinking and pinching the hose.
- To discontinue continuous operation, switch the dehumidifier off, unplug it and disconnect the drain hose.
- Re-insert the rubber plug into the drain hose connection.
- Plug the mains lead back in and switch the dehumidifier on again.
Care and maintenance
Note: Turn the dehumidifier off and pull out the plug before cleaning or servicing it.
- Clean the exterior of the dehumidifier using a lightly moistened cloth. Only use mild cleaning agents, never solvents or corrosive chemicals.
• Vacuum clean the air inlet and outlet grilles of the dehumidifier. - Remove the water reservoir (see the Emptying the water reservoir section above) every 14th day and wash it by hand using a mild detergent. Rinse it with clean water. Note: Do not wash the water reservoir in a dishwasher.
- Clean the air filter every 14th day, see the Air filter section above.
- If the dehumidifier is not to be used for an extended period:
- Switch the dehumidifier off, unplug it, wind up the mains lead and hang it on the lead holder.
- Clean the housing of the dehumidifier.
- Wait 24 hours before emptying the water reservoir to ensure that all the water in the dehumidifier has had time to collect in it.
- Remove the water reservoir, empty it, dry it and then refit it.
- Remove the air filter, clean and refit it.
- Store the dehumidifier in a dry, well-ventilated place.
Troubleshooting guide
| The dehumidifier will not switch on. | Make sure that the mains lead is properly plugged in and that there is power in the wall socket.The water reservoir is full or incorrectly fitted.The set humidity level has been reached. |
| The humidity is not reducing. | The dehumidifier has not been used long enough.Make sure that nothing is preventing the air in the room where the dehumidifier is used from circulating properly.The humidity level is not set low enough.Make sure that no outdoor air can enter the room in which the dehumidifier is being used.The ambient temperature is below 15 °C.Is there a heat source in the room which is raising the humidity? |
| Unusual noises emitted during use. | Make sure that the air filter is clean.The dehumidifier is tilted or standing on an uneven surface. |
| Error and protection codes (shown on the dehumidifier's display) | AS: Defective humidity sensor. Turn off the air conditioner, pull out the plug and plug it in again. If this does not solve the problem, contact a qualified service centre.ES: Defective temperature sensor. Turn off the air conditioner, pull out the plug and plug it in again.If this does not solve the problem, contact a qualified service centre.P1: Automatic defrosting in progress. Let the dehumidifier be switched on until P1 no longer appears on the display.P2: The water reservoir is full or incorrectly fitted.Empty of refit it.E3: Other defects. Turn off the air conditioner, pull out the plug and plug it in again. If this does not solve the problem, contact a qualified service centre. |
Luftavfuktare 20 l
Art.nr 18-2799 Modell MDDG-20DEN3-QA3
36-5205
MDDG-20DEN3-QA3
natural_image
Illustration of a portable refrigerator with wheels and a label pointing to the front panel (no text or symbols on the device itself)- Vattenbehållare
Baksida
natural_image
Illustration of a hand inserting a card into a device (no text or symbols visible)natural_image
Illustration of a hand holding a flat-screen solar panel with grid lines (no text or symbols)natural_image
Illustration of a hand inserting a grid into a rectangular device (no text or symbols)natural_image
Illustration of a portable refrigerator with a label pointing to the front panel (no text or symbols on the device itself)- Vannbeholder
Bakside

natural_image
Illustration of a hand inserting a small object into a device (no text or symbols visible)natural_image
Illustration of a hand holding a grid-patterned device with a handle (no text or symbols visible)natural_image
Illustration of a hand holding a grid-patterned device with a handle, no text or symbols presentnatural_image
Illustration of a hand inserting a component into a device (no text or symbols visible)natural_image
Illustration of a hand holding a flat-screen electronic device with grid lines (no text or symbols visible)natural_image
Illustration of a hand inserting a grid into a rectangular device (no text or symbols)natural_image
Illustration of a portable refrigerator with a label pointing to the front panel (no text or symbols on the device itself)- Wasserbehälter
Rückseite

natural_image
Illustration of a hand inserting a small object into a device (no text or symbols visible)Abtauautomatik
natural_image
Illustration of a hand holding a solar panel with grid lines, no text or symbols presentnatural_image
Illustration of a hand inserting a grid into a rectangular device (no text or symbols)10 – 13 Market Place
Kingston Upon Thames
Surrey
KT1 1JZ
DEUTSCHLAND
Kundenservice Hotline: 040 2999 78111
E-Mail: kundenservice@clasohlson.de
Homepage
www.clasohlson.de
Postanschrift


- Important!
- Viktig information:
- NOTE:
- Safety
- Disposal
- Specifications
- Buttons and functions
- Top
- Placement
- Operating instructions
- Switching the dehumidifier on/off
- Setting the desired level of humidity
- Setting the timer
- When the dehumidifier is switched off:
- Automatic shut-off
- Emptying the water reservoir
- Automatic defrost feature
- Air filter
- Disassembly
- Cleaning
- Assembly
- Continuous operation
- Care and maintenance
- Troubleshooting guide
- Luftavfuktare 20 l
- Abtauautomatik
- DEUTSCHLAND
Brand : Cotech
Model : MDDG-20DEN3-QA3
Category : Humidifier