922206 - Lighting Cotech - Free user manual and instructions
Find the device manual for free 922206 Cotech in PDF.


| Product Type | LED Work Light |
| Brand | Cotech |
| Model | 922206 |
| Light Source | LED |
| Power Consumption | 20W |
| Luminous Flux | 1500 lm |
| Color Temperature | 4000K (Neutral White) |
| Beam Angle | 120° |
| IP Rating | IP54 |
| Dimensions (HxWxD) | 300 x 200 x 150 mm |
| Weight | 1.2 kg |
| Power Supply | AC 230V, 50Hz |
| Power Cord Length | 5 m |
| Material | ABS Plastic, Metal Stand |
| Adjustable Head | Yes, tilt and swivel |
| Mounting Options | Stand, hanging hook |
| Usage Location | Indoor and covered outdoor areas |
| Cleaning Instructions | Wipe with dry, soft cloth |
| Safety Precautions | Do not immerse in water; avoid direct eye exposure to light |
| Spare Parts Availability | Not available individually |
| Certifications | CE |
Frequently Asked Questions - 922206 Cotech
User questions about 922206 Cotech
0 question about this device. Answer the ones you know or ask your own.
Ask a new question about this device
Download the instructions for your Lighting in PDF format for free! Find your manual 922206 - Cotech and take your electronic device back in hand. On this page are published all the documents necessary for the use of your device. 922206 by Cotech.
USER MANUAL 922206 Cotech
natural_image
Black and white photo of a modern 3D lighting fixture with a transparent cube cover and cylindrical base (no text or symbols visible)Art.no
36-6504
36-6505
Model
922206-B
922206-W

Important!
Read the entire instruction manual carefully and make sure that you fully understand it before you use the equipment. Keep the manual for future reference.
Viktig information:
Original instructions
Bruksanvisning i original
Originalbruksanvisning
Please read the entire instruction manual before using the product and then save it for future reference. We reserve the right for any errors in text or images and any necessary changes made to technical data. If you have any questions concerning technical problems please contact our Customer Services.
Safety
- High intensity LED module. Do not look directly into the light or direct the light into another person's eyes, doing so could cause eye damage.
- Do not touch the floodlight's housing or glass when it is on – risk of burn injury.
- Under no circumstances should the floodlight be mounted onto any flammable surfaces.
- The floodlight is suitable for use in temperatures between -30 and +40^ .
- The floodlight is designed to be wall mounted.
- The floodlight is designed for fixed installation.
- Fixed wire installation should only be performed by an authorised electrician.
- The mains lead should be checked regularly. Never use the work light if the mains lead or plug is damaged.
- If the supply cord is damaged, it must be replaced by the manufacturer, its service agent or qualified persons in order to avoid a hazard.

The light source contained in this luminaire shall only be replaced by the manufacturer or his service agent or a similar qualified person.
Product description

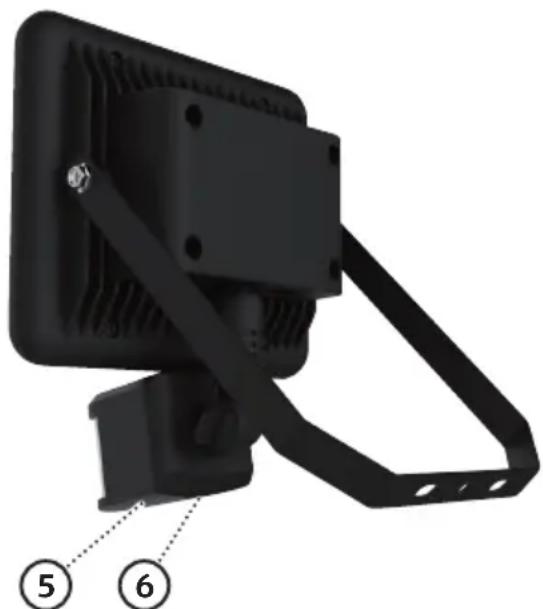
- Lamp housing
- Locking screws
- Wall bracket
- PIR sensor
natural_image
3D model of a black computer monitor with attached black frame and cable (no text or symbols visible)- [LUX] Sets the light sensitivity level for light activation
- [TIME] Sets the duration
Placement
• The floodlight is approved for outdoor use.
- The floodlight must not be used in explosive environments or close to chemicals.
- The floodlight may be mounted on plasterboard, wooden or brick walls. It must not be mounted on walls made of, or coated with, flammable materials such as polystyrene or plastic. Do not install the floodlight on damp surfaces or conductive metal surfaces. The floodlight must not be placed close to flammable materials.
- The floodlight's optimal mounting height is 2–4.5 m above the detection zone.
- Ensure that the floodlight is installed in such a way that air is free to circulate around it.
- Make sure that the desired wall mounting location is free from hidden electrical conduit or plumbing before drilling any holes.
Consider the following for the best results:
- Do not point the sensor at the sun.
- To avoid the light coming on unnecessarily, do not aim the PIR sensor towards heat sources such as BBQ's, AC units, other outdoor lighting, car headlights or sources of electromagnetic interference such as transformers.
- Do not aim the PIR sensor at reflective surfaces such as white walls or swimming pools.

The PIR sensor's detection zone (max 12 m at 140°) can vary depending on mounting height and positioning. Changes in temperature can affect the PIR sensor's range.
Before positioning the floodlight, bear in mind that movement across the detection zone will be detected sooner than any movement towards or away from the sensor.
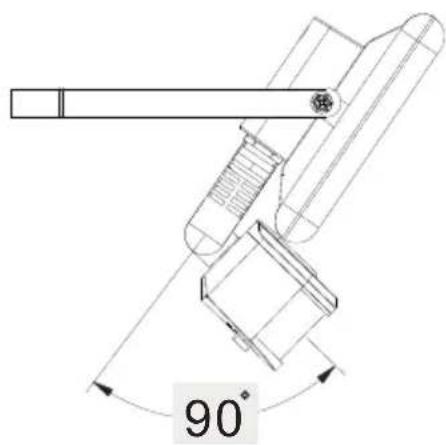
The PIR sensor has a 90° adjustment range (see illustration).

Installation
- Important: Read the entire instruction manual before installation. Installation should be carried out by a qualified electrician and conform to current regulations.
- Warning: Make sure that the power is turned off and that the fuse is removed before beginning any installation or service.
- The floodlight must only be connected to a 230 V, 50 Hz power supply.
-
Warning: Make sure that the chosen wall mounting area is free from electrical conduit or plumbing.
-
The floodlight is intended for fixed installation and should be connected to a circuit protected by a safety device such residual current circuit breaker (RCCB/RCD).
- Mark out the position of the mounting holes on the wall using the wall bracket (3) as a template. Drill holes for the mounting screws. Use suitable screws (and wall plugs if necessary). The floodlight must be fixed securely.
- Screw the floodlight onto the wall bracket.
- The floodlight has 50 cm connection cable. It should be connected to a watertight connection box (sold separately) with a strain relief (as pictured).
- Use the connection box as a template to mark out the position of the mounting holes. Make sure that the mounting surface is flat. Drill holes for the mounting screws. Use suitable screws (and wall plugs if necessary).
- Connect the three wires: L Live (brown), N Neutral (blue) and Protective Earth (green/yellow).

natural_image
Illustration of a black LED flood light and its internal electrical enclosure with wires (no text or symbols)- Tilt the lamp housing to the desired angle and tighten the locking screws (2).

natural_image
Simple line drawing of a person climbing a vertical structure with a curved arm (no text or symbols)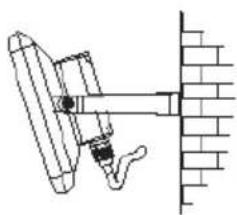
natural_image
Diagram of a mechanical assembly with a tool and bracket, no text or symbols present
natural_image
Simple line drawing of a wooden structure with a vertical post and a diagonal cross mark, adjacent to a brick wall (no text or symbols)Settings
Duration time [TIME]
The length of time the light remains on can be set from 15 sec. to approx. 10 minutes (adjustable). Adjust the duration time by turning the [TIME] knob towards + or – respectively.
Note: Every new detected movement resets the duration time.
Activation light level [ LUX ]
The sensor has a photocell which detects various degrees of light and darkness. Adjust the activation light level by turning the [LUX] knob between and Use to adjust the dawn-to-dusk sensitivity level for turning the light on at dawn and the dusk-to-dawn sensitivity level for turning the light off at dusk.
PIR sensor
- Set the [LUX] knob to and allow the PIR sensor to calibrate for 30 sec. Make sure that the [TIME] knob is set to its minimum setting (-). The floodlight will now come on for 5 seconds (this will occur within 1 minute).
- Aim the sensor towards the desired detection zone.
- Have someone move across the detection zone. Adjust the PIR sensor's aim so that it triggers the light to come on by the person moving across the detection zone.
- Adjust the light - on time as desired by setting the [TIME] knob.
- Setting the Lux level for desired light activation: Turn the [LUX] knob from to , so that the light is set to only activate while dark.
To set the light to come on at dusk: Wait until the light has dropped to the desired level. Then slowly turn the [LUX] knob towards the Sun symbol, whilst having someone slowly walk across the detection zone. Keep turning the knob until light comes on and leave it at that setting.
Note: This procedure may need to be repeated several times before the correct setting is found.
Troubleshooting
| Problem Possible cause Correction | ||
| The floodlight is not activated by movement within the detection zone. | No mains voltage, blown fuse, switch set to off. | Check the connections, fuses, switch. |
| The environment is too bright. Redirect the sensor, or move the sensor itself. | ||
| Incorrect positioning. Redirect the sensor. | ||
| The floodlight comes on for no reason. | Heat sources, other lighting or car headlights are activating the sensor. | Redirect the sensor away from interfering light sources. |
| Wild animals/birds, pets activating the sensor. | Redirect the sensor. | |
| Reflections from a swimming pool or other reflecting surface. | Redirect the sensor. | |
| The floodlight does not turn off. | Continuous false triggering. Redirect the sensor. | |
| The [TIME] setting is incorrect. Reduce the time setting. | ||
| The floodlight comes on during the day. | The [LUX] knob is set to full daylight activation. | Adjust the [LUX] knob. |
| When the [LUX] setting is set to, the detection distance is shortened. | Interference from sunlight. Re-test at night. | |
Cleaning
Wipe the PIR sensor's diffuser with a damp cloth a few times a year. Never remove the PIR sensor housing. This may cause damage and invalidate the guarantee.
Responsible disposal
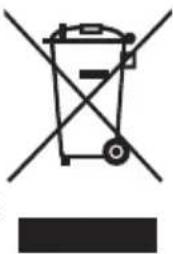
This symbol indicates that this product should not be disposed of with general household waste. This applies throughout the entire EU. In order to prevent any harm to the environment or health hazards caused by incorrect waste disposal, the product must be handed in for recycling so that the material can be disposed of in a responsible manner. When recycling your product, take it to your local collection facility or contact the place of purchase. They will ensure that the product is disposed of in an environmentally sound manner.
natural_image
Symbol of a trash bin with crossed lines and a solid black rectangle below (no text or labels)Specifications
Voltage 220–240 V, 50/60 Hz
Power 15 W
Light source COB/Bridgelux LED
Luminous flux 1500 lm
Colour temperature 4000 K
Colour rendition > 80 Ra
Ingress protection IP44
Protection class Class 1 (light fitting must be earthed)
Sensor type Infrared (PIR)
Max range 12 m at a 140^ detection angle
Timer setting 15 sec to approx 10 min (adjustable)
natural_image
Black mechanical device with attached black bracket and numbered callouts (5 and 6), no visible text or symbols on the device itself.natural_image
Illustration of a black LED light fixture connected to an open electrical enclosure with wires (no text or symbols)natural_image
Simple line drawing of a person climbing a platform with a ladder (no text or symbols)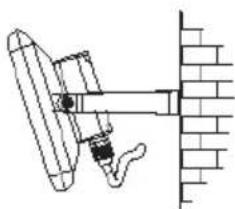
natural_image
Simple line drawing of a mechanical device attached to a brick wall (no text or symbols)
natural_image
Simple line drawing of a firecracker inside a firecracker, with no text or symbols present.Inställningar
Belysningstid [TIME]
natural_image
Symbol of a trash bin crossed with a diagonal line, no text or numbers presentSpecifikationer
Drivspänning 220–240 V, 50/60 Hz
Effekt 15 W
- Lampehus
- Låseskruer
- Veggfeste
- Bevegelsessensor

natural_image
3D model of a black computer monitor with attached black cable and mounting bracket, labeled with numbers 5 and 6 (no text or symbols on the device itself)natural_image
Technical line drawing of a mechanical assembly with angular dimension标注 (90°), no readable text or symbols present.Bevegelsessensorens vinkel kan justeres i 90° (se fig.).

Installasjon
natural_image
Illustration of a black LED light fixture connected to an open electrical enclosure with wires (no text or symbols)natural_image
Simple line drawing of a person climbing a pole with a ladder (no text or symbols)
natural_image
Diagram of a mechanical device attached to a brick wall, showing a lever and base structure (no text or symbols)
natural_image
Simple line drawing of a crane lifting a wooden beam against a brick wall, with no text or symbols present.Innstillinger
Belysningstid [TIME]
natural_image
Close-up of a black computer monitor with a black strap and numbered annotations (5 and 6) pointing to the base panel (no text or symbols on the device itself)natural_image
Illustration of a black LED light fixture connected to an open electrical enclosure with wires (no text or symbols)natural_image
Simple line drawing of a person climbing a vertical pole with a cylindrical object on top (no text or symbols)![Cotech 922206 - Belysningstid [TIME] - 1](/content/2026/05/834715/images/7b47b0776e3c170f92c23eaf19e6899b7adc8a4ffbd9aa572b93f76f24a9ba01.jpg)
natural_image
Simple line drawing of a mechanical device attached to a brick wall (no text or symbols)![Cotech 922206 - Belysningstid [TIME] - 2](/content/2026/05/834715/images/9de8a193569415a52fe6abe5eb7cca68ddf156e042880cac47ff196cddbbbabc.jpg)
natural_image
Simple line drawing of a mechanical assembly with a hammer and crossbar, no text or symbols presentAsetukset
Valaisuaika [TIME]
natural_image
3D model of a black mechanical device with attached black bracket and mounting holes (no text or symbols visible)natural_image
Technical line drawing of a mechanical assembly with angular dimension (90°), no readable text or symbols present.natural_image
Illustration of a black LED flood light connected to an open electrical outlet with wires (no text or symbols)natural_image
Symbol of a waste bin with no text or labels, crossed by two diagonal lines (no text or numbers present)Technische Daten
Stromversorgung 220–240 V, 50/60 Hz
10 – 13 Market Place
Kingston Upon Thames
Surrey
KT1 1JZ
DEUTSCHLAND
Kundenservice Hotline: 040 2999 78111
E-Mail: kundenservice@clasohlson.de
Homepage
www.clasohlson.de
Postanschrift


- Important!
- Viktig information:
- Safety
- Placement
- Consider the following for the best results:
- Installation
- Settings
- Duration time [TIME]
- Activation light level [ LUX ]
- PIR sensor
- Troubleshooting
- Cleaning
- Responsible disposal
- Specifications
- Inställningar
- Belysningstid [TIME]
- Specifikationer
- Installasjon
- Innstillinger
- Asetukset
- Valaisuaika [TIME]
- Technische Daten
- DEUTSCHLAND
Brand : Cotech
Model : 922206
Category : Lighting