HB 1300 - Water pump Cocraft - Free user manual and instructions
Find the device manual for free HB 1300 Cocraft in PDF.


| Brand | Cocraft |
| Model | HB 1300 |
| Product Type | Water Pump (Booster Pump) |
| Rated Power | 1300 W |
| Rated Voltage | 220–240 V AC, 50 Hz |
| Tank Volume | 20 litres |
| Max. Pump Capacity | 83 l/min |
| Max. Pressure Head | 48 metres |
| Max. Suction Head | 8 metres |
| Hose Connections | R25 (1") female |
| Power Lead Length | 1.5 metres |
| Pressure Switch Settings | Starts at 1.8 bar, stops at 3.2 bar |
| Safety Device | Requires RCD (residual current device) ≤ 30 mA |
| Intended Use | Clean water pumping, irrigation, water transfer |
| Prohibited Liquids | Corrosive, flammable, explosive, saltwater, sewage |
| Max Liquid Temperature | 35 °C |
| Duty Cycle | Intermittent use, not for continuous operation |
| Maintenance | Empty before frost, check rotor movement, clean with damp cloth |
| Protection Features | Dry-run protection (voids guarantee if run dry), frost protection |
Frequently Asked Questions - HB 1300 Cocraft
User questions about HB 1300 Cocraft
0 question about this device. Answer the ones you know or ask your own.
Ask a new question about this device
Download the instructions for your Water pump in PDF format for free! Find your manual HB 1300 - Cocraft and take your electronic device back in hand. On this page are published all the documents necessary for the use of your device. HB 1300 by Cocraft.
USER MANUAL HB 1300 Cocraft
natural_image
Exterior view of a black industrial air compressor with blue internal components and attached wiring (no visible text or symbols)Art.no Model
18-3605
LKJ-1300SA
41-1005
LKJ-1300SA

Important!
Read the entire instruction manual carefully and make sure that you fully understand it before you use the equipment. Keep the manual for future reference.
Viktig information:
Original instructions
Bruksanvisning i original
Originalbruksanvisning
Please read the entire instruction manual before using the product and save it for future reference. We reserve the right for any errors in text or images and any necessary changes made to technical data. If you have any questions regarding technical problems please contact our Customer Services (see address on reverse).
Safety
- Always use a residual current device (RCD or RCCB) which trips at < 30 mA between the pump and the power supply.
- Always inspect the pump before using it, especially the power lead and plug. Never use the pump if any of the parts is damaged.
- Make sure that the pump and all electrical connections (extension lead, RCD, etc) are placed in a dry place and protected from rain, moisture and high water level. The temperature should not exceed 35 °C.
- Do not expose the mains lead to extreme heat, oil or sharp edges.
- Keep children and animals away from the pump when it is running.
- Keep everyone out of the liquid (pool, etc.) being pumped.
- Only use the pump as described in this instruction manual.
- The operator of the pump is responsible for the safety of the pump and all applications.
• Always unplug the pump before adjusting or repairing it. - Do not expose the pump directly to jets of water.
- The pump should only be repaired by a qualified electrician using original parts.
-
The pump must not be run dry as this voids the guarantee.
-
The pump must only be used by those who have read the instruction manual. Keep children and animals away from the pump, especially if it is under pressure.
- This pump may be used by children aged 8 or over provided they have been instructed in the safe use of the product and that they understand the hazards and risks involved. Cleaning and maintenance may be carried out by children aged 8 or over, but only under adult supervision.
- Keep the pump and its mains lead out of the reach of children under the age of 8.
- The pump may be used by persons with reduced physical, sensory or mental capability, lack of experience or knowledge which could jeopardise their safety, provided they have been instructed in the safe use of the product and understand the hazards involved. Never let children play with the pump.
- If the supply cord is damaged, it must be replaced by the manufacturer, its service agent or similarly qualified persons in order to avoid a hazard.
Product description
Areas of use
• Automatic irrigation of lawns, vegetable gardens and gardens.
- Pumping water from springs, wells, water containers, etc.
- The booster pump is intended for pumping clean water.
Note: The pump cannot be used for corrosive, flammable, or explosive liquids (i.e. petrol, paraffin or solvents), fats, oils, saltwater, brackish water, urine or sewage water.
- The temperature of the liquid must not exceed 35^ C .
Parts
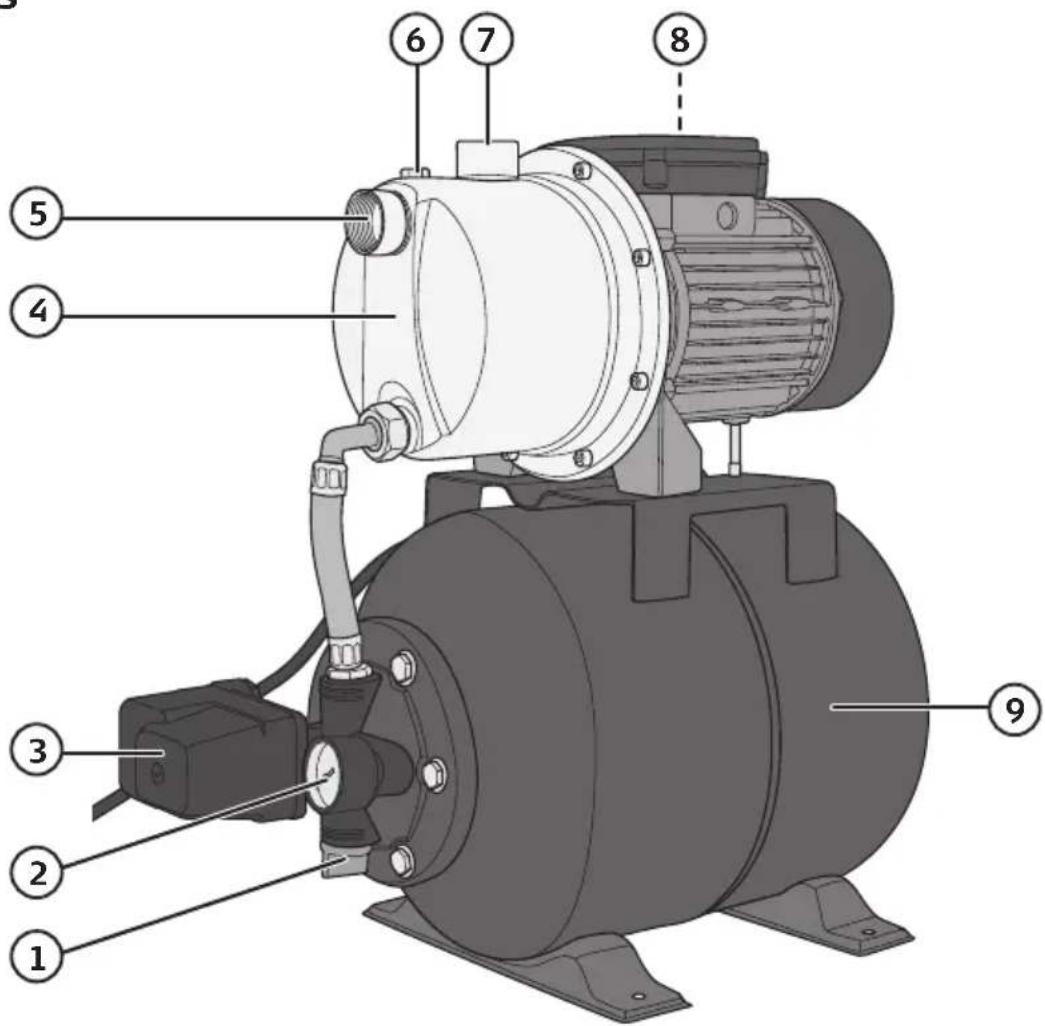
- Drain plug
- Manometer
- Pressure switch
- Pump
-
Vacuum port
-
Filler plug
- Pressure Hose Connection
- On/off switch
- Pressure vessel
Preparations
Placement
Preventing water damage. Pre-planning prevents accidents!
- Leakage in the pump and hoses may occur through freezing, incorrect installation, pressure surges, etc. The pump should therefore be placed in a waterproof environment approved by your insurance company and your insurance policy. Contact your insurance company if you are unsure.
- Place the pump on a firm, hard surface, well protected from water spray.
Mains connection
- Connect the mains lead to an RCD protected earthed socket for personal safety.
Suction hose connection
- Connect a suction hose with a 25 mm (1") minimum diameter to the vacuum port (R25) (5).
- The suction hose should be fitted with a foot valve/non-return valve.
- Place the suction hose so that it slopes upwards from the water to the pump inlet.
- The suction hose must always be on a lower level than the inlet to the pump. Airpockets in the hose could disrupt the pump's operation.
- Hoses or pipes must not be connected in such a way as to exert any pulling strain or tensile stress on the pump unit.
- Fit the foot valve to the end of the suction hose (pipe).
- The foot valve should be anchored to the bottom so that the pump does not run dry if the water level drops.
- The suction hose assembly must be air-tight to prevent air from being sucked into the pump.
- A filter should be fitted to the suction side to prevent sand, mud, etc from being sucked into the pump.
Pressure connection
- Connect a 19 mm (3/4") spiral-reinforced high-pressure hose to the outlet hose connection (R25, 1") (7). Smaller hoses reduce capacity.
Starting the pump
- Fill the pump housing with water via the filler hole (6).
- Open all valves and the pressure hose nozzle to let any trapped air in the system to escape.
- Start the pump by connecting its mains lead to an RCD protected earthed socket designed for personal safety.
- It can take up to 6 minutes for the pump to reach maximum effectiveness, depending on the pressure head, and amount of air on the suction side. The pump must not be run with air in the system more than 4 minutes at a time. If the pump does not work satisfactorily after 4 min, it should be turned off and all hoses and connections on the suction side should be checked for leaks. Fill the pump housing with water via the filler hole (6) and start the pump again.
- Let the pump run for a few minutes with the nozzle and all valves open to release any trapped air in the system. Then shut all valves and taps.
- The booster pump stops automatically when the pressure in the tank reaches 3.2 bar.
- When a tap is opened the pressure drops. When it has reached 1.8 bar the pump will start automatically to rebuild the pressure back to 3.2 bar.
Maintenance
• Always unplug the pump before carrying out any kind of maintenance.
- Use a soft lightly moistened cloth to clean the plastic parts of the pump. Never clean the product using strong detergents or solvents.
- If the pump is not to be used during the winter, both the pump and the tank should be emptied. Store the pump in a dry place.
- If there is a chance of frost the pump should be completely emptied.
- If the pump has not been used for an extended period, you should check that the rotor moves freely by quickly plugging and unplugging the mains lead.
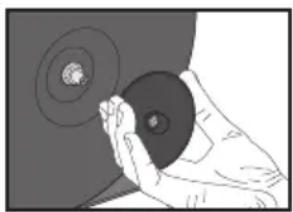
- Check the air-pressure in the tank (it should be about 1.5 bar). Use a vehicle air pressure gauge to measure the pressure in the tank. The air pressure is measured at the valve under the plastic cap at the end of the tank.
- The pump should be checked regularly. Check the operation and inspect for any damage.
natural_image
Illustration of a hand holding a circular object with concentric rings (no text or symbols)General use guidelines
- Dry running of the pump should be avoided because it increases wear.
- Pull the plug not the lead when unplugging the pump from the mains.
- Never lift or carry the pump by its power lead.
- Sand and other abrasive substances in the liquid that is pumped will increase wear and tear and reduce the pump's capacity.
- Make sure that the recommended suction head (8 m) is not exceeded.
- Protect the pump from frost.
- The pump is designed for intermittent use, not continual operation such as for fountains.
Troubleshooting
| Problem Possible Cause Remedy | ||
| The pump does not start. | Inlet water pressure is greater than the starting pressure of the pump. | Check pressure. |
| No power. Check fuses and RCD. | ||
| Dirt in the pump. Remove any dirt or deposits. | ||
| The pressure switch has turned off the pump due to max pressure in the tank. | Check the pressure in the tank or open a tap to check if the tank is at full pressure capacity. | |
| The pump runs but doesn’t pump. | There is air in the pump. Open all nozzles and valves to let the air escape. | |
| The suction hose’s foot valve is above the water level. | Move it so that it is below the water level. | |
| Leaking hose. Tighten, or seal the leak. | ||
| Max. suction head exceeded. Check suction head (max. 8 m). | ||
| Max. pressure head exceeded. Check pressure head (max. 48 m). | ||
| Low capacity, low pressure. | Max. suction head exceeded. Check suction head (max. 8 m). | |
| Max. pressure head exceeded. Check pressure head (max. 48 m). | ||
| The suction hose's foot valve is above water level. | Move it so that it is below the water level. | |
| Dirt in the pump. Remove any dirt or deposits. | ||
| Pump does not stop. | Loose tap or leaking pipe. Check and tighten or seal. | |
| Pump starts and stops all the time. | Loose tap or leaking pipe. Check and tighten or seal. | |
| Faulty diaphragm. Replace diaphragm and fill with air. | ||
| Air pressure in the tank too low. Check and increase (to 1.5 bar). | ||
Responsible disposal
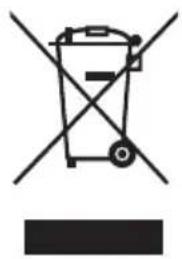
This symbol indicates that this product should not be disposed of with general household waste. This applies throughout the entire EU. In order to prevent any harm to the environment or health hazards caused by incorrect waste disposal, the product must be handed in for recycling so that the material can be disposed of in a responsible manner. When recycling your product, take it to your local collection facility or contact the place of purchase. They will ensure that the product is disposed of in an environmentally sound manner.
natural_image
Symbol of a trash bin crossed with no visible text or labelsSpecifications
Rated power 1300 W
Rated voltage 220–240 V AC, 50 Hz
Tank volume 20 litres
Max. pump capacity 83 l/min
Max. pressure head 48 metres
Max. suction head 8 metres
Hose connections R25 (1") female
Power Lead
1.5 metres
Pumpautomat 1300 W
Art.nr
18-3605
Modell
LKJ1300SA
41-1005
LKJ1300SA
natural_image
Illustration of a hand holding a circular object with concentric rings (no text or symbols)Användningsråd
natural_image
Symbol of a trash bin crossed out by two crossed lines, with no text or labels present.Specifikationer
Märkeffekt 1300 W
Märkspänning 220–240 V AC, 50 Hz
Tankvolym 20 liter
Max pumpkapacitet 83 l/min
natural_image
Illustration of a hand holding a circular object with concentric rings (no text or symbols)Brukstips
natural_image
Symbol of a trash bin crossed with no text or labels, accompanied by a black rectangular block below (no readable text or symbols)Spesifikasjoner
Effekt 1300 W
Spenning 220–240 V AC, 50 Hz
Tankvolum 20 liter
natural_image
Illustration of a hand holding a circular object with concentric rings (no text or symbols)Käyttövinkkejä
natural_image
Symbol of a trash bin crossed with no text or numbers, representing waste sorting or disposal (no text present)Tekniset tiedot
Teho 1300 W
Jännite 220–240 V AC, 50 Hz
natural_image
Illustration of a hand holding a circular object with concentric rings, no text or symbols presentBedienungshinweise
natural_image
Symbol of a trash bin crossed with no text or numbers, representing waste sorting or disposal (no text present)Technische Daten
Nennleistung 1300 W
Declaration of Conformity
Declares that this product complies with the requirements of the following directives and standards
Low Voltage Directive
2014/35/EU
EN 55014-1:2006/A2:2011
EN 55014-2:1997/A2:2008
EN 61000-3-2:2014
EN 61000-3-3:2013
EN 60335-2-41:2003/A2:2010
EN 60335-1:2012/A11:2014
EN 62233:2008
Henrik Alfredsson
Manager Technique & Quality
Insjön, Sweden, 2016-05-11
Sverige
Postal 10 - 13 Market Place
Kingston Upon Thames
Surrey
KT1 1JZ
Deutschland
Kundenservice

- Important!
- Viktig information:
- Safety
- Product description
- Areas of use
- Preparations
- Placement
- Mains connection
- Suction hose connection
- Pressure connection
- Starting the pump
- Maintenance
- General use guidelines
- Responsible disposal
- Specifications
- Pumpautomat 1300 W
- Användningsråd
- Specifikationer
- Brukstips
- Spesifikasjoner
- Käyttövinkkejä
- Tekniset tiedot
- Bedienungshinweise
- Technische Daten
- Declaration of Conformity
- Sverige
- Deutschland
Brand : Cocraft
Model : HB 1300
Category : Water pump