
HG 500-D - Glue gun Cocraft - Free user manual and instructions
Find the device manual for free HG 500-D Cocraft in PDF.


| Product Type | Glue Gun |
| Brand | Cocraft |
| Model | HG 500-D |
| Power Supply | 230 V AC, 50 Hz |
| Power Consumption | 35 W |
| Protection Class | II |
| Glue Stick Diameter | 11 mm |
| Glue Stick Length (included) | 15 cm |
| Warm-up Time | Approx. 4 minutes |
| Weight | 0.3 kg |
| Operating Modes | Mains operated with charging station for tether-free operation |
| Included Accessories | Charging station, 3 nozzles, nozzle spanner, support stand, 6 glue sticks |
| Non-drip Protection | Yes (trigger release stops glue flow) |
| Nozzle Types | 3 included (various shapes) |
| Safety Features | Return to stand to cool; never leave unattended |
| Cleaning | Wipe with damp cloth; do not use abrasive cleaners or solvents |
| Disposal | Recycle at designated facility; do not dispose with household waste |
| Warranty | Not specified; refer to manufacturer |
| Intended Use | Gluing wood, paper, cardboard, and certain plastics |
Frequently Asked Questions - HG 500-D Cocraft
User questions about HG 500-D Cocraft
0 question about this device. Answer the ones you know or ask your own.
Ask a new question about this device
Download the instructions for your Glue gun in PDF format for free! Find your manual HG 500-D - Cocraft and take your electronic device back in hand. On this page are published all the documents necessary for the use of your device. HG 500-D by Cocraft.
USER MANUAL HG 500-D Cocraft
CORDLESS OR MAINS OPERATED
LIMPISTOL
LIIMAPISTOOLI
LIMPISTOL
KLEBEPISTOLE

Important!
Read the entire instruction manual carefully and make sure that you fully understand it before you use the equipment. Keep the manual for future reference.
Viktig information:
Original instructions
Bruksanvisning i original
Originalbruksanvisning
Please read the entire instruction manual before using the product and save it for future reference. We reserve the right for any errors in text or images and any necessary changes made to technical data. If you have any questions regarding technical problems please contact Customer Services.
Safety
The tool can become a fire risk if used improperly. Please take the following into consideration:
- Return the tool to its stand after use and let it cool sufficiently before putting it away for storage.
- Never leave the tool unattended.
- Never expose the tool to rain or moisture.
- The power lead should be checked regularly. Never use the device if the power lead or plug is damaged.
- If the power lead is damaged it must only be replaced with a power lead recommended by the manufacturer or its service centre.
- This product must not be used by anyone (including children) suffering from physical or mental impairment. This product should not be used by anyone that has not read the instruction manual unless they have been instructed in its use by someone who will take responsibility for their safety.
- Never let children play with the product.
- The glue will become very hot during use. This can cause burn injuries. If this happens, rinse the burn with cold water and let it run over the burn for some time.
- Make sure that power from the wall socket corresponds to the rated voltage of the glue gun.
Product description
Contents
- Glue Gun
- Charging station
- 3 nozzles
- Nozzle spanner for nozzle changes
- Support stand
- 6 glue sticks (∅ 11 mm, length: 15 cm)
Parts
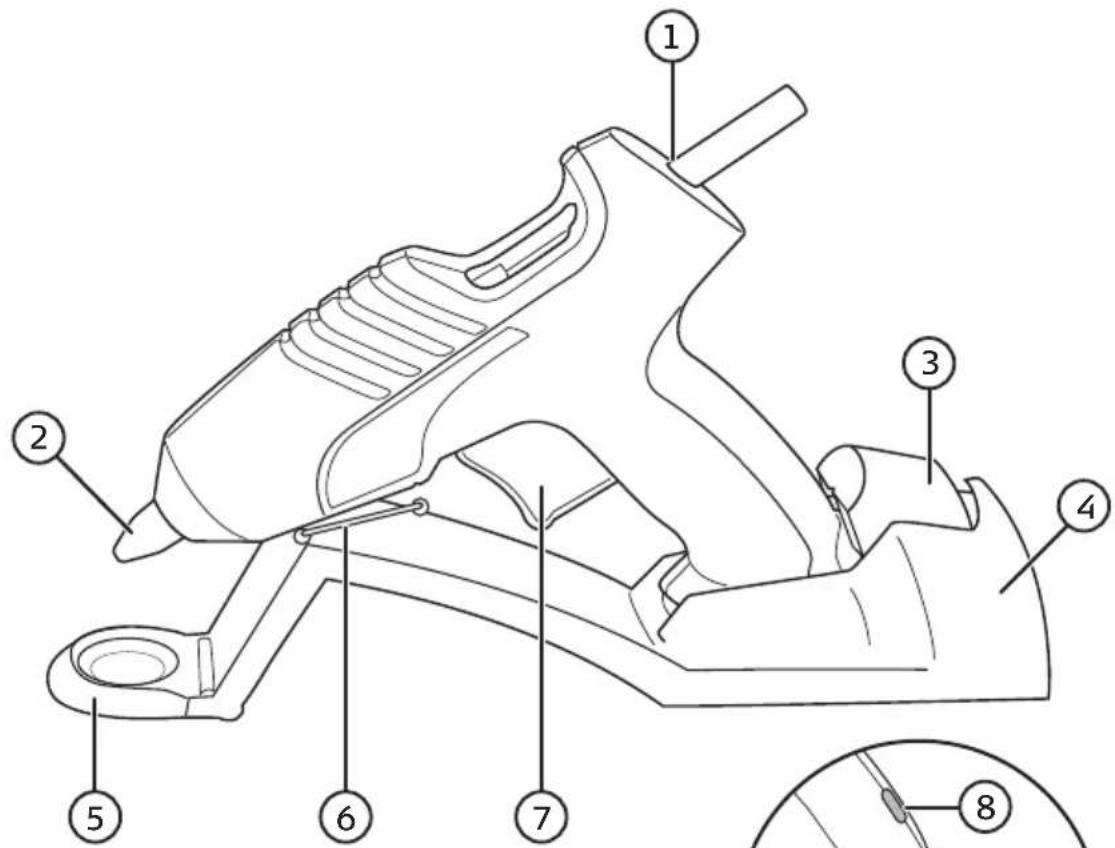
- Glue stick insert hole
- Nozzle
- Eject button
- Charging station
- Drip tray
- Support stand
- Trigger
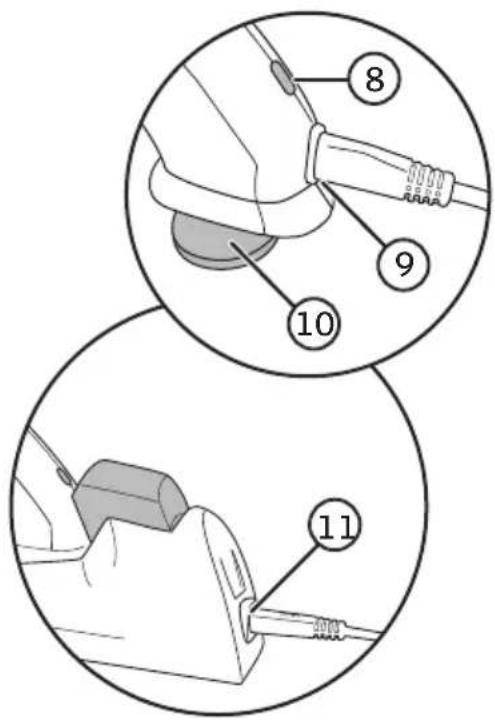
- Indicator lamp
- Gun mains connection
- Support plate
- Charging station mains connection
Areas of use
This glue gun can be used for gluing wood, paper, cardboard and certain plastic materials.
Before initial use
Unpack the glue gun and accessories. Check that no parts are missing.
Preparations Glue gun
-
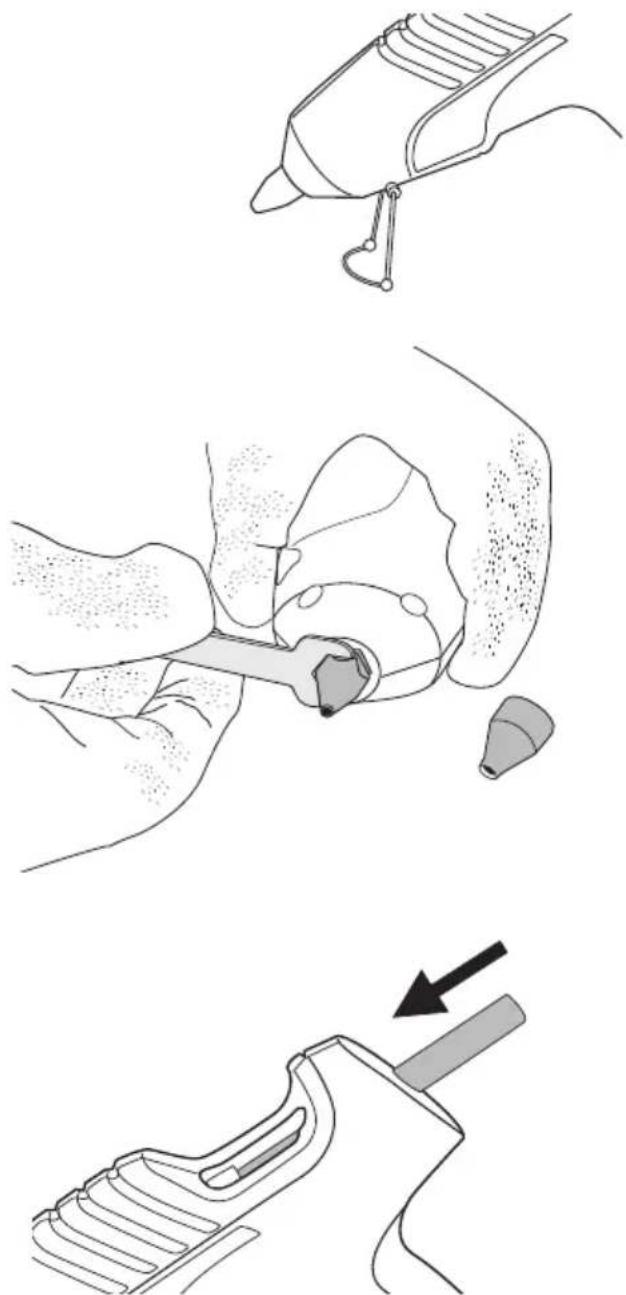
Assemble the support stand according to the figure.
-
Attach the desired nozzle with the help of the included nozzle spanner. Make sure the nozzle is screwed on correctly and not cross-threaded.
-
Insert the glue stick into the feed opening on the back of the glue gun according to the figure. Insert the glue stick as far in as possible.
natural_image
Three-step illustration showing a hand operating a tool, with no visible text or symbols.Cleaning
Clean the surfaces of all glue residues. The exterior should be dry and clear of dust or grease. Smooth surfaces should be roughed before gluing.
Gluing
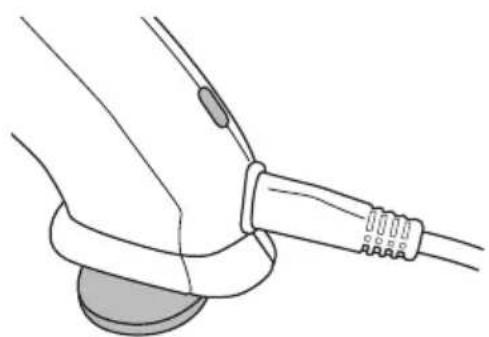
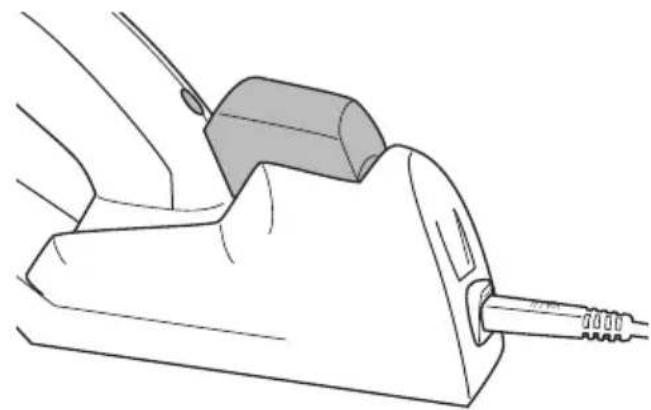
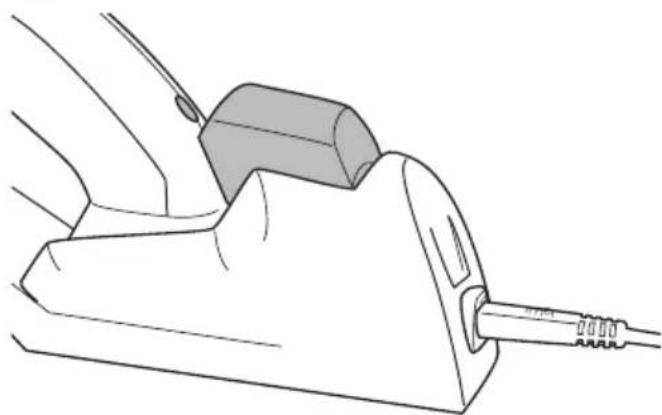
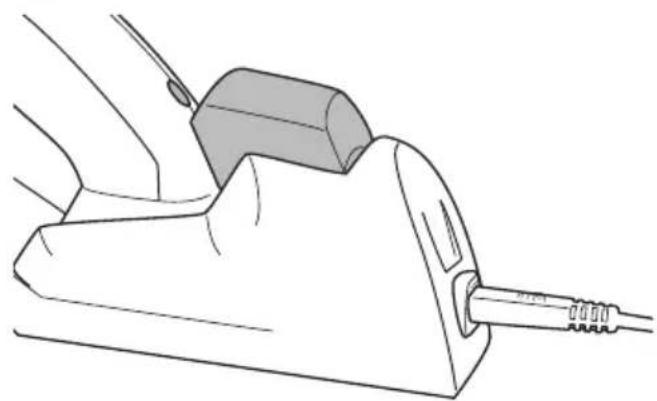
The glue gun can be mains operated with the mains lead plugged into the socket at the base of the handle or used cordlessly with the cable connected to the charging station. Place the glue gun in the charging station at regular intervals to keep the glue stick at a working temperature.
- Let the glue gun heat up for about 4 minutes in one of the following ways:
a) Mains lead connected directly to the glue gun.
b) Mains lead connected to the charging station and glue gun placed in the charging station. The glue gun is correctly connected when the indicator light is on.
a
natural_image
Line drawing of a car's seat and cable connector (no text or symbols)b
natural_image
Line drawing of a mechanical component with a handle and shaft (no text or symbols)- Press the trigger to feed the glue as the glue stick begins to melt.
- Apply the glue to those surfaces you wish to adhere.
- Immediately press the surfaces together and hold them in position for 15 seconds.
- Let any excess glue cool and remove it with a sharp knife.
- Unplug the glue gun from the wall socket.
Non-drip protection
The non-drip protection is activated once the feed trigger is released. This will shut off the flow of glue to the nozzle. A small amount of glue will remain in the nozzle and must be allowed to flow out completely.
Changing nozzles
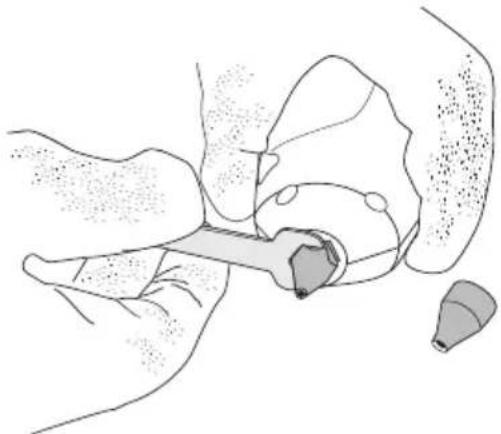
Note: Change nozzles while the glue is still warm since the glue gun can be damaged by trying to change the nozzle once the glue has hardened. Use protective gloves when changing nozzles.
- Unplug the glue gun from the wall socket.
- Remove the protective rubber cap from the nozzle.
- Use the included spanner to remove the existing nozzle.
- Attach the desired nozzle with the help of the included nozzle spanner.
Make sure the nozzle is screwed on correctly and not cross-threaded.
Place the protective rubber cap over the nozzle.
natural_image
Anatomical illustration of a human ear with surgical hardware (no text or labels)Care and maintenance
Always unplug the device from the wall socket before cleaning. Wipe the glue gun clean with a damp cloth when needed. Never use abrasive cleaning agents or solvents.
Responsible disposal
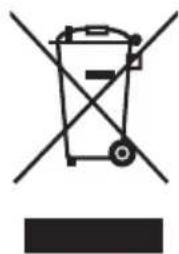
This symbol indicates that this product should not be disposed of with general household waste. This applies throughout the entire EU. In order to prevent any harm to the environment or health hazards caused by incorrect waste disposal, the product must be handed in for recycling so that the material can be disposed of in a responsible manner. When recycling your product, take it to your local collection facility or contact the place of purchase. They will ensure that the product is disposed of in an environmentally sound manner.
natural_image
Symbol of a trash bin crossed with a diagonal line and a horizontal bar below (no text or labels)Specifications
Power supply 230 V AC, 50 Hz
Power 35 W
Protection class II
Glue sticks ∅ 11 mm, length: 15 cm
Warm-up time Approx. 4 min
Weight 0.3 kg
Limpistol
Art.nr 18-3121
40-6975
Modell JS500JQ
JS500JQ
natural_image
Line drawing of a mechanical device with lever and handle (no text or symbols)natural_image
Anatomical illustration of a surgical procedure on an insect, showing hand placement and tool insertion (no text or labels)natural_image
Diagram of a mechanical component with an arrow indicating direction (no text or symbols present)Rengöring av ytor
natural_image
Line drawing of a car's seat and cable connector (no text or symbols)b
natural_image
Line drawing of a mechanical component with a plug inserted into a housing (no text or symbols)natural_image
Anatomical line drawing of a human head and neck region, showing internal structures without any text or labels.natural_image
Symbol of a trash bin crossed out by two crossed lines, with no text or labels present.Specifikationer
natural_image
Three-step medical procedure illustration showing a hand holding a tool, a close-up of the tool tip, and a mechanical device with an arrow indicating motion (no text or symbols)natural_image
Diagram of a car's seatbelt with attached cable, no text or symbols present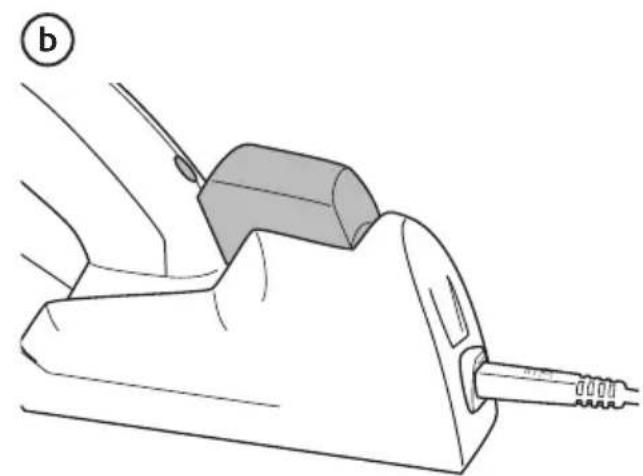
natural_image
Line drawing of a mechanical lever assembly with a handle and shaft (no text or symbols)natural_image
Anatomical line drawing of a human head and neck region, showing internal structures without any text or labels.natural_image
Symbol of a trash bin crossed out by two crossed lines, with no text or labels present.Spesifikasjoner
Strømforsyning 230 V AC, 50 Hz
Effekt 35 W
natural_image
Medical illustration showing two steps of a surgical procedure on an anatomical structure (no text or labels)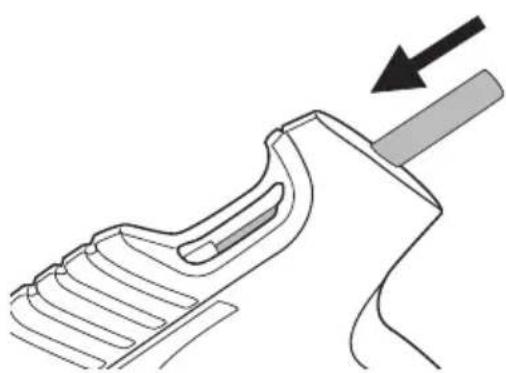
natural_image
Diagram of a mechanical component with an arrow indicating direction (no text or symbols present)natural_image
Line drawing of a car's seat and cable connector (no text or symbols)b
natural_image
Line drawing of a mechanical component with a cable inserted into a housing (no text or symbols)natural_image
Anatomical line drawing of a human ear with surgical hardware (no text or labels)Huolto ja ylläpito
natural_image
Symbol of a trash bin crossed with no visible text or labelsTekniset tiedot
natural_image
Three-step medical procedure illustration showing hand positioning, tool insertion, and insertion of a device (no text or labels)natural_image
Diagram of a medical or surgical device with a connector inserted into a body (no text or symbols present)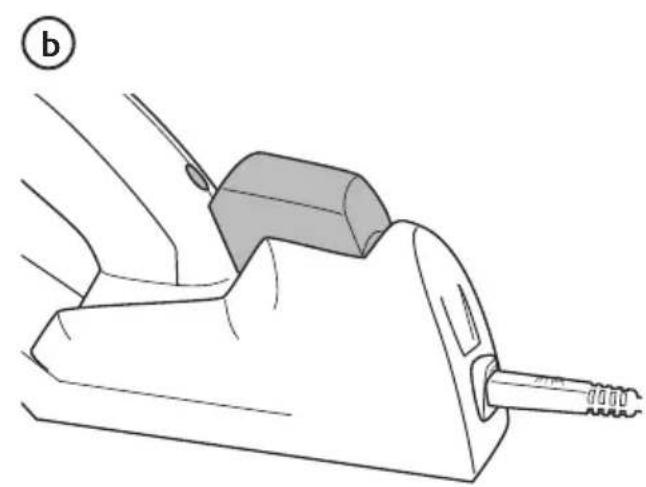
natural_image
Line drawing of a mechanical device with a lever and handle (no text or symbols)natural_image
Anatomical line drawing of a human ear with surgical hardware (no text or labels)Pflege und Wartung
natural_image
Symbol of a trash bin with crossed lines indicating no waste or restriction, and a solid black rectangle below (no text or labels)Technische Daten
Declaration of Conformity
Declares that this product complies with the requirements of the following directives and standards
Manager Technique & Quality
Insjön, Sweden, 2016-04-20
Sverige
Postal 10 - 13 Market Place
Kingston Upon Thames
Surrey
KT1 1JZ
Deutschland
Kundenservice

- Important!
- Viktig information:
- Safety
- Product description
- Contents
- Parts
- Areas of use
- Before initial use
- Preparations Glue gun
- Cleaning
- Gluing
- Non-drip protection
- Changing nozzles
- Care and maintenance
- Responsible disposal
- Specifications
- Limpistol
- Rengöring av ytor
- Specifikationer
- Spesifikasjoner
- Huolto ja ylläpito
- Tekniset tiedot
- Pflege und Wartung
- Technische Daten
- Declaration of Conformity
- Sverige
- Deutschland
Brand : Cocraft
Model : HG 500-D
Category : Glue gun