USER MANUAL KM005 KENWOOD
Chef and Major KM001 - KM006 series
KENWOOD
Kenwood
English
page 1 instructions
Congratulations on buying a Kenwood. With such a wide range of attachments available, it's more than just a mixer. It's a state-of-the-art kitchen machine. We hope you'll enjoy it. Robust. Reliable. Versatile. Kenwood.
Français
know your Kenwood kitchen machine
safety
- Switch off and unplug before fitting or removing tools/attachments, after use and before cleaning.
- This machine is not intended for use by young children or infirm persons without supervision.
- Keep your fingers away from moving parts and fitted attachments.
- Never leave the machine on unattended.
- Never use a damaged machine. Get it checked or repaired: see 'service', page 6.
- Never use an unauthorised attachment or more than one attachment at once.
- Never exceed the maximum capacities on page 2.
- Don't let children play with this machine.
- When using an attachment, read the safety instructions that come with it.
- Only use this machine for its intended domestic use.
- Take care when lifting this appliance as it is heavy. Ensure the head is locked and that the bowl, tools, outlet covers and cord are secure before lifting.
Before plugging in
Important - UK only
- Make sure your electricity supply is the same as the one shown on the underside of your machine.
- The wires in the cord are coloured as follows:
Blue = Neutral, Brown = Live.
- This machine complies with European Economic Community Directive 89/336/EEC.
Before using for the first time
1 Remove all packaging. 2 Wash the parts: see 'care and cleaning', page 6. 3 Push excess cord into the cord stowage compartment at the back of the machine.
Know your Kenwood kitchen machine
Attachment outlets
the mixer
1 high-speed outlet 2 medium-speed outlet 3 slow-speed outlet 4 tool socket 5 mixer head 6 outlet catch 7 bowl 8 head-lift lever 9 on/off and speed switch 10 power unit 11 K-beater 12 whisk 13 dough hook 14 spatula 15 splashguard


the mixer
K-beater • For making cakes, biscuits, pastry, icing, fillings, éclairs and mashed potato.
whisk • For eggs, cream, batters, fatless sponges, meringues, cheeses, mousses, soufflés. Don't use the whisk for heavy mixtures (eg creaming fat and sugar) - you could damage it.
dough hook • For yeast mixtures.
to use your mixer
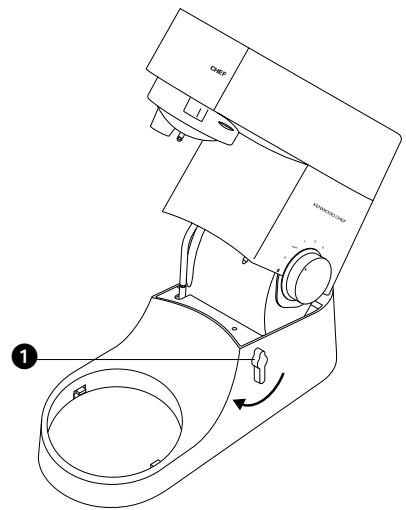
1 Turn the head-lift lever clockwise 1 and raise the mixer head till it locks.
to insert a tool 2 Turn till it stops 2 then push.
3 Fit the bowl onto the base - press down and turn clockwise 3 4 To lower the mixer head, raise it slightly, then turn the head lift lever clockwise. Lower into the locked position.
5 Switch on and turn the speed switch to the desired setting.
- Switch to pulse P for short bursts.
to remove a tool 6 Unscrew.
Hints - Switch off and scrape the bowl with the spatula frequently.
- Eggs at room temperature are best for whisking.
- Before whisking egg whites, make sure there's no grease or egg yolk on the whisk or bowl.
- Use cold ingredients for pastry unless your recipe says otherwise.
Points for bread making
Important - Never exceed the maximum capacities below - you'll overload the machine.
- If you hear the machine labouring, switch off, remove half the dough and do each half separately.
- The ingredients mix best if you put the liquid in first.
Maximum capacities
CHEF MAJOR
| shortcrust pastry | Flour weight: 680g - 1lb 8oz | Flour weight: 910g - 2lb |
| stiff yeast dough | Flour weight: 1.36kg - 3lb | Flour weight: 1.5kg - 3lb 5oz |
| British type | Total weight: 2.18kg - 4lb 13oz | Total weight: 2.4kg - 5lb 5oz |
| soft yeast dough | Flour weight: 1.3kg - 2lb 14oz | Flour weight: 2.6kg - 5lb 12oz |
| continental type | Total weight: 2.5kg - 5lb 8oz | Total weight: 5kg - 11lb |
| fruit cake mix | Total weight: 2.72kg - 6lb | Total weight: 4.55kg - 10lb |
| egg whites | 12 | 16 |
Speed switch 4
K-beater • creaming fat and sugar start on min, gradually increasing to 'max'. - beating eggs into creamed mixtures 4 - 'max'. - folding in flour, fruit etc Min - 1 - all in one cakes start on min speed, gradually increase to max. - rubbing fat into flour min - 2. - Gradually increase to 'max'. dough hook - Start on 'min', gradually increasing to 1.


Troubleshooting
Problem
- The whisk or K-beater knocks against the bottom of the bowl or isn't reaching the ingredients in the bottom of the bowl. Solution: Adjust the height. Here's how: 1 Unplug. 2 Raise the mixer head and insert the whisk or beater. 3 Hold it, then loosen the nut 1 4 Lower the mixer head. 5 Adjust the height by turning the shaft. Ideally the whisk/K-beater should be almost touching the bottom of the bowl 2 6 Raise the head, hold the whisk/K-beater and tighten the nut.
Problem
- The mixer stops during operation. Solution - Your mixer is fitted with an overload protection device and will stop if overloaded to protect the machine. If this happens, switch off and unplug the mixer. Remove some of the ingredients to reduce the load, and allow the mixer to stand for a few minutes. Plug in and reselect the speed. If the mixer does not restart immediately, allow it to stand for additional time.


To fit and use your splashguard
1. Raise the mixer head until it locks. 2. Fit the bowl onto the base. 3. Push the splashguard onto the underside of the mixer head ③ until fully located. The food chute should be positioned as shown. 4. Insert the required tool. 5. Lower the mixer head. 6. Fit the food chute cover 4. - During mixing, the chute cover can be removed and ingredients added directly to the bowl 5. - You do not need to remove the splashguard to change tools. 7. Remove the splashguard by raising the mixer head and sliding it down.


The attachments available
To buy an attachment not included in your pack, call your KENWOOD repairer.
Attachment attachment code
Flat pasta maker ① A970
Additional pasta attachments (not shown) used in conjunction
with A970
A971 tagliatelle
A972 tagliolini
A973 trenette
A974 spaghetti
Pasta maker slow speed slicer/shredder
A936 comes with 6 screens
super mincer
③ A948 comes with 4 drums A950 comes with
a large sausage nozzle b small sausage nozzle c kebbe maker
grain mill ⑤ A941
citrus juicer ⑥ A960
food processing attachment ⑦ A980 includes 3 cutting plates as standard and a knife blade
high speed slicer/shredder ⑧ A998 includes 3 cutting plates as standard
optional plates for A980 & A998 a extra coarse shredder part number 639021
b rasping plate part number 639150 c standard chipper part number 639083
liquidiser 1.2 I acrylic A993A, 1.2 I glass A994A,
1.5 I stainless steel A996A
multi-mill A938A comes with 3 glass jars and 3 lids for storage
continuous juice extractor ① A935
ice-cream maker 12CHEF A956, MAJOR A957
potato peeler 13CHEF A934, MAJOR A952
colander and sieve 14CHEF A992, MAJOR A930
stainless steel bowls ⑤ polished: CHEF 672487, MAJOR 672499
splashguard 16 CHEF & MAJOR 672475
cover ⑦CHEF,672504,MAJOR 672516


cleaning and service
care and cleaning
Always switch off and unplug before cleaning. - A little grease may appear at outlet 2 when you first use it. This is normal - just wipe it off.
power unit, outlet covers
- Wipe with a damp cloth, then dry.
- Never use abrasives or immerse in water.
- Wash by hand, then dry thoroughly or wash in the dishwasher.
- Never use a wire brush, steel wool or bleach to clean your stainless steel bowl. Use vinegar to remove limescale.
- Keep away from heat (cooker tops, ovens, microwaves).
- Stainless steel tools can be washed by hand or in a dishwasher.
- Non stainless steel tools (coated) should only be washed by hand, then dried thoroughly.
- Wash by hand, then dry thoroughly.
Service and customer care
- If the cord is damaged it must, for safety reasons, be replaced by KENWOOD or an authorised KENWOOD repairer.
UK If you need help with:
- using your machine
- servicing or repairs (in or out of guarantee)
call KENWOOD Customer Care on 023 92392333.
Have your model number ready - it's on the underside of the mixer.
- spares and attachments call 0870 2413653
Eire See our advertisement in Golden Pages.
other countries • Contact the shop where you bought your machine.
guarantee UK only
- If your machine goes wrong within one year from the date you bought it, we will repair or replace it free of charge provided:
- you have not misused, neglected or damaged it;
- it has not been modified;
- it is not second-hand;
- it has not been used commercially;
- you have not fitted a plug incorrectly; and
- you supply your receipt to show when you bought it.
This guarantee does not affect your statutory rights.

recipes
See important points for bread making on page 2.
white bread stiff British-type dough
ingredients · 1.36kg (3lb) strong plain flour
- 15ml (3tsp) salt
- 25g (1oz) fresh yeast; or 15g/20ml (1/2 oz) dried yeast + 5ml (1 tsp) sugar
- 750ml (1¼pts) warm water: 43°C (110°F). Use a thermometer or add 250ml (9floz) boiling water to 500ml (18floz) cold water
- 25g (1oz) lard
Method 1: Dried yeast (the type that needs reconstituting): pour the warm water into the bowl. Then add the yeast and the sugar and leave to stand for about 10 minutes until frothy.
Fresh yeast: crumble into the flour.
Other types of yeast: follow the manufacturer's instructions.
2 Pour the liquid into the bowl. Then add the flour (with fresh yeast if used), salt and lard. 3 Knead at minimum speed for 45 - 60 seconds. Then increase to speed 1, adding more flour if necessary, until a dough has formed. 4 Knead for 3 - 4 more minutes at speed 1 until the dough is smooth, elastic and leaves the sides of the bowl clean. 5 Put the dough into a greased polythene bag or a bowl covered with a tea towel. Then leave somewhere warm until doubled in size. 6 Re-knead for 2 minutes at speed 1. 7 Half fill four 450g (1lb) greased tins with the dough, or shape it into rolls. Then cover with a tea towel and leave somewhere warm until doubled in size. 8 Bake at 230°C / 450°F / Gas Mark 8 for 30 - 35 minutes for loaves or 10 - 15 minutes for rolls. - When ready, the bread should sound hollow when tapped on the base.
Shortcrust pastry
Ingredients: 450g (1lb) flour, sieved with the salt
- 5ml (1tsp) salt
- 225g (8oz) fat (mix lard and margarine straight from the fridge)
- About 80ml (4tbsp) water
Hint: Don't overmix
Method 1: Put the flour into the bowl. Chop the fat up roughly and add to the flour.
2 Mix at speed 1 until it resembles crumbs. Stop before it looks greasy. 3 Add the water and mix at minimum speed. Stop as soon as the water is incorporated. 4 Cook at around 200°C / 400°F / Gas Mark 6, depending on the filling.
Pavlova
Ingredients: 3 large egg whites
- 175g (6oz) caster sugar
- 275ml (10 fl.oz.) double cream
- fresh fruit e.g. raspberries, strawberries, grapes, kiwi fruit
method 1 Whisk the egg whites on a high speed until they form 'soft peaks'.
2 With the whisk operating on speed 5, gradually add the sugar one tablespoon at a time, whisking after each addition. 3 Line a baking tray with silicone paper, then spoon the meringue onto the paper forming a nest approximately 20cm / 8 in diameter. 4 Place the baking tray into an oven preheated to 150°C / 300°F / Gas Mark 2, then immediately reduce the temperature to 140°C / 275°F / Gas Mark 1 and bake for 1 hour. Turn the heat off but leave the pavlova in the oven to cool down. 5 When ready to serve, peel off the silicone paper and place on a serving dish. Whip the cream until soft peaks form then spread over the top of the pavlova and decorate with the fruit.
recipes continued
scrumptious chocolate cake
ingredients • 225g (8oz) butter, softened
- 250g (9oz) caster sugar 4 eggs
- 5ml (1tsp) instant coffee dissolved in 15ml (1tbsp) hot water
- 30ml (2tbsp) milk
- 5ml (1 tsp) almond essence
- 50g (2oz) ground almonds
- 100g (4oz) self raising flour
- 5ml (1tsp) baking powder
- 50g (2oz) unsweetened cocoa powder
Method 1: Cream the butter and sugar on a low speed, gradually increasing to a higher speed until the mixture is light and fluffy. Scrape down the bowl and beater.
2. Beat the eggs in a jug and, whilst the mixer is operating on a high speed, gradually add the egg a little at a time until incorporated. Switch off and scrape down. 3. Incorporate the dissolved coffee, milk, and almond essence on a low speed. Add the ground almonds, sieved flour, baking powder, and cocoa. Mix on a low speed to incorporate. 4. Divide the mixture between two 20cm / 8" cake tins that have been lined with greased greaseproof paper. Level the tops, then bake at 180°C / 350°F / Gas Mark 4 for approximately 30 minutes until springy to the touch. 5. Turn out and cool on a wire rack.
Chocolate Mousseline Filling
Ingredients: • 275g (10oz) plain chocolate, broken into pieces - 225ml (8 fl.oz.) double cream
Method: 1. Melt the chocolate by placing in a bowl over a pan of barely simmering water.
2. Whisk the cream starting on a low speed, gradually increasing to a higher speed until it forms soft peaks. 3. When the chocolate has melted, remove the bowl from the heat and, using a large spoon, fold into the cream. 4. Spread the chocolate filling between the cooled cakes.
Carrot and Coriander Soup
Ingredients: • 25g (1oz) butter
- 1 onion, chopped; 1 clove garlic, crushed
- 600g (1lb 6oz) carrot, cut into 2.5cm cubes
- Cold chicken stock; 10-15ml (2-3tsp) ground coriander
- Salt and pepper
Method: 1. Melt the butter in a pan, add the onion and garlic and fry until soft.
2. Place the carrot into the liquidiser, add the onion and garlic. Add sufficient stock to reach the 1.2 level marked on the goblet. Fit the lid and filler cap. 3. Blend on maximum speed for 5 seconds for a coarse soup or longer for a finer result. 4. Transfer the mixture to a saucepan, add the coriander and seasoning and simmer the soup for 30 to 35 minutes or until cooked. 5. Adjust the seasoning as necessary and add extra liquid if required.
preparation tank