
KMDJ002 - DJ Equipment Krüger&Matz - Free user manual and instructions
Find the device manual for free KMDJ002 Krüger&Matz in PDF.


| Brand | Krüger&Matz |
| Model | KMDJ002 |
| Product Type | DJ Controller with Internal Soundcard |
| Dimensions (W x H x D) | 358 x 65 x 277 mm |
| Weight | Approx. 2.5 kg |
| Power Supply | USB 5V or AC Adapter 5V/1A |
| Audio Sampling Rate | 44.1, 48, 96, 192 kHz |
| Bit Resolution | 16/24 bit |
| Master Outputs | Balanced XLR and Unbalanced RCA |
| Booth Output | RCA (independent volume) |
| Recording Output | RCA (independent of master/booth) |
| Headphone Outputs | 6.3 mm and 3.5 mm jacks |
| Microphone Input | XLR and 6.3 mm jack with volume control |
| Line/Phono Inputs | 2-channel switchable RCA |
| Equalizer | 3-band (High, Mid, Low) |
| Crossfader | Adjustable slope (smooth to sharp) |
| Loop Controls | 1/2, 1, 2, 4, 8, 16, 32 beats |
| Pitch Range | ±6%, ±12%, ±25%, ±100% |
| Master Tempo | Yes (key lock) |
| Effects | Selectable with 2 parameter controls |
| Samples | 6 presets + 6 user-recordable |
| Software Included | Virtual DJ LE |
| Compatibility | Windows and macOS |
| Cleaning | Soft, slightly damp cloth; no chemical agents |
| Safety Certifications | FCC, CE, ETL |
Frequently Asked Questions - KMDJ002 Krüger&Matz
User questions about KMDJ002 Krüger&Matz
0 question about this device. Answer the ones you know or ask your own.
Ask a new question about this device
Download the instructions for your DJ Equipment in PDF format for free! Find your manual KMDJ002 - Krüger&Matz and take your electronic device back in hand. On this page are published all the documents necessary for the use of your device. KMDJ002 by Krüger&Matz.
USER MANUAL KMDJ002 Krüger&Matz
2. VIRTUAL DJ
IV. BEDIENUNG
Read this instruction manual carefully before use and keep it for future reference. CAUTION: This product satisfies FCC regulations when shielded cables

and connectors are used to connect the unit to other equipment. To prevent electromagnetic interference with electric appliances such as radios and televisions, use shielded cables and connectors for connections.
The exclamation point within an equilateral triangle is intended to alert the user to the presence of important operating and maintenance (servicing) instructions in the literature accompanying the appliance.
The lightening flash with arrowhead symbol, within an equilateral triangle, is intended to alert the user to the presence of uninsulated "dangerous voltage" within the product's enclosure that may be of sufficient magnitude to constitute a risk of electric shock to persons.
- All warnings on the product and in the operating instructions should be adhered to.
- ALWAYS disconnect this device from power supply mains before cleaning. The product should be cleaned only with a soft, slightly damp cloth. Never clean with chemical agents.
- Use only original accessories.
- Protect this product from water, humidity and moisture.
- Make sure the product is positioned in a place with proper ventilation. The product should be located away from heat sources such as radiators, heat vents, or other devices that produce heat.
- POWER SOURCES: This product should be operated only from the type of power source indicated on the marking label. If you are not sure of the type of power supply to your home, consult your product dealer or local power company.
- Never use this device if the power supply cord is damaged.
- Disconnect the device from the power supply if it is not going to be used for a long time.
- Make sure to place this product on flat, dry and stable surface.
- POWER-CORD PROTECTION: The power supply cables should be routed
so that they are not likely to be walked on or pinched by items placed upon or against them, paying particular attention to cables at plugs and the point where they exit from the product.
-
LIGHTNING: For added protection for this product during a lightening storm or when it is left unattended and unused for long periods of time, unplug it from the wall outlet and disconnect the antenna or cable system. This will prevent damage to the product due to lightening and power-line surges.
-
SERVICING: Do not attempt to service this product yourself as opening or removing covers may expose you to dangerous voltage or other hazards. In case of damage, contact an authorized service point for check-up/repair.
-
Unplug this product from the wall outlet and refer servicing to qualified service personnel under the following conditions:
-
When the power-supply cord or plug is damaged.
- If liquid has been spilled, or objects have fallen into the product.
- If the product has been exposed to rain or water.
- If the product does not operate normally by following the operating instructions. Adjust only those controls that are covered by the operating instructions as an improper adjustment of other controls may result in damage and will often require extensive work by a qualified technician to restore the product to its normal operation.
- If the product has been dropped or damaged in any way.
- When the product exhibits a distinct change in performance, this indicates a need for service.
I. PRODUCT DESCRIPTION
1. TOP PANEL

- EFFECT SELECTOR - For selecting an effect
- EFFECT ON BUTTON - Switches the selected effect on and off. With the effect activated, the LED will light up.
- SYNC BUTTON - To synchronize the beats per minute to the other deck.
- SAMPLER PLAY BUTTON - To restart the sample selected last.
- LOAD A BUTTON - To load the title selected in the browser section into Deck A.
- FOLDER SELECT BUTTON - To activate the browser section and to jump back to the main directory.
- TRACK KNOB - Turn the control to browse the drives and folders of the computers. Press the control to select subdirectories.
- CONTROL GAIN - Adjusts the input amplification.
- TREBLE TONE EQUALIZER - Adjust the treble tone of the music of the deck.
-
MIDDLE TONE EQUALIZER - Adjust the middle tone of the music of the deck.
-
BASS TONE EQUALIZER - Adjust the bass tone of the music of the deck.
-
LOOP SHIFT BUTTON (SHORTEN) - Half the loop length-the minimum length of a loop is one computer beat grid (CBG).
-
"LOOP IN" BUTTON - Mark the start point of a loop.
-
"LOOP OUT" BUTTON - Mark the end point of a loop and start looping. Press it again to quit the loop.
-
LOOP SHIFT BUTTON (LENGTHEN) - Double the loop length-the maximum length of a loop is 32 CBG.
-
MASTER TEMPO BUTTON
-
PITCH BUTTON - The pitch button allows you to change the adjustable pitch range from ±6% to ±100%.
-
PITCH SLIDE CONTROL - Sets the speed (if the button MASTER TEMPO lights up, the tonal pitch will not be changed). Slide the control up to decrease the pitch, slide it down to increase it. The pitch percentage is indicated on the display.
-
BUTTONS HOT CUE 1-3 - To store and to call up to three cue points per title.
-
BUTTONS PITCH "BEND +"AND "BEND -" - The function pitch bend creates a temporary change of speed. As long as the buttons are pressed, the title is played slower or faster.
-
PC/LINE TOGGLE - Toggles between the LINE input or PC signal for playback and control.
-
PLAY BUTTON - To start playback.
-
TOUCH JOG WHEEL - The touch jog wheel is used for scratching or searching.
-
PAUSE BUTTON - To switch to pause and to go to new cue point set up.
-
CUE BUTTON - For return to the beginning of the title or a cue point defined before (the unit is in pause mode). When keeping the button pressed in pause mode, the title is momentarily played. As soon as you release the button the unit instantly returns to the cue point.
-
CHANNEL FADER - Adjusts the channel level.
-
POWER INDICATOR - Lights up when the DJ controller is on.
-
CROSSFADER - For crossfading between Deck A and Deck B. In mid position both decks can be heard at the same volume.
-
CONTROL BOOTH VOLUME - level control for the output booth.
-
EFFECT PARAMETER 1 ADJUSTMENT KNOB - Adjust the first parameter (if any) of the selected effect.
-
EFFECT PARAMETER 2 ADJUSTMENT KNOB - Adjust the second parameter (if any) of the selected effect.
-
CONTROL SAMPLE SELECTOR - For selecting and playing samples.
-
CONTROL SAMPLER LEVEL - For adjusting sample level.
- LED LEVEL METER L/R - 6-digit LED meter of the stereo master signal within the range of -13 dB to +3 dB.
- SEARCH BUTTON - Press to turn on/off the searching function of the touch jog wheel. With the search function, you can go to a specific point in the music on the deck easily by turning the touch jog wheel.
- SCRATCH BUTTON - Press to turn on/off the scratch function of the touch jog wheel. Note that the touch jog wheel cannot be used for scratching and searching at the same time.
- TOUCH JOG WHEEL SENSOR LED - Lights when the touch jog wheel is touched.
- BPM BUTTON - Sets the number of beats per minute (BPM) of a title manually. For this press the button several times to the beat of the music.
2. FRONT PANEL
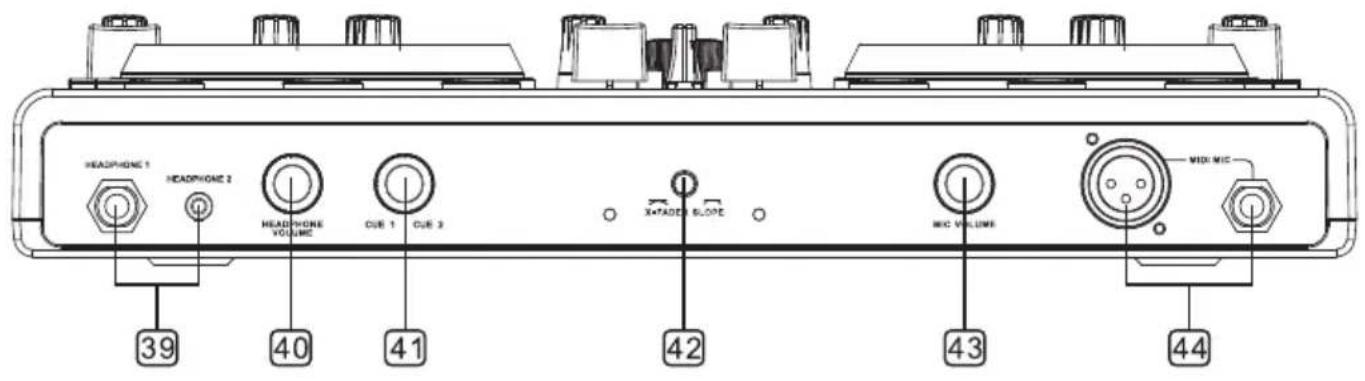
- WHEADPHONES INPUTS - 6.3 mm and 3.5 mm jacks headphone 1 and 2 for connecting stereo headphones (impedance >=8 Ω).
- CONTROL HEADPHONE VOLUME - Level control for headphones connected to the jacks headphone 1 and 2.
- CONTROL CUE - For selecting and crossfading the monitoring signal for the headphones depending on the cue mode selector switch.
- CONTROL X-FADER CURVE - Adjusts the characteristic of the crossfader: left position: smooth crossfading (gradual transition) e.g. for lone mixes. right position: sharp crossfading (abrupt transition) e.g. for scratching and cutting.
- CONTROL MIC LEVEL - Level control for DJ microphones connected to the jacks MIDI MIC.
- MICROPHONE INPUTS MIDI MIC - Input jacks for connecting DJ microphones via XLR or a 6.3 mm plugs.
3. REAR PANEL

- GROUNDING SCREW - If you intend to use a turntable, you will need to ground the RCA cable(s) by screwing in the grounding fork(s) to the grounding screw located on the rear panel of the mixer.
- CONVERTIBLE LINE/PHONE RCA INPUT - The unit has a convertible line/phone RCA input that accepts a standard dual L&R RCA connection.
- PHONO/LINE SWITCH - This small switch allow you to convert the RCA input connection between a phono (turntable) input or a Line Level (MP3, CD, cassette deck, etc) input. The unit has a convertible Line/phono RCA.
- RECORDING OUTPUT REC - Stereo output(RCA) for connecting a recording unit. The recording level is independent of the output controls mastercontrol, masterlevel and booth volume.
- MASTER OUTPUT, UNBALANCED - Unbalanced stereo output (RCA) for connecting an amplifier or other units with line level inputs. The output supplies an audio signal coming from the computer or the signal of an external source at the line input-depending on the position of the selector switch PC/Line.
- OUTPUT BOOTH - Stereo output (RCA) for connecting a further amplifier, e.g. for the monitoring system or PA application in a secondary root. The output supplies an audio signal coming from the computer or the signal of an external source at the line input-depending on the position of the selector switch PC/Line.
- AC POWER ADAPTOR SOCKET
- POWER SUPPLY SELECTOR SWITCH
- USB POWER SUPPLY CABLE SOCKET
- MASTER OUTPUT, BALANCED - Independently adjustable balanced stereo output (XLR) of the master signal for connecting an amplifier or other units with line level inputs. The output supplies an audio signal coming from the computer or the signal of an external source at the line input-depending on the position of the selector switch PC/Line..
II. VIRTUAL DJ SOFTWARE
1. INSTALLATION
» Windows
- Once the VIRTUAL DJ installer is launched, click NEXT.

- Read the contents of the End-User license agreement carefully, and check AGREE button if you do agree to the terms. Click NEXT to go forward.
- Select the type of installation for VIRTUAL DJ, then click NEXT.

- Click Install to perform an installation, then press FINISH.
- Enter the serial number attached to the CD, then click OK to confirm.
» Mac OS X
- Double click the VIRTUAL DJ installer.
- Once the installer is launched, click CONTINUE.
- Read the contents of the End-User license agreement carefully, and check Agree if you do agree to the terms. Click NEXT to go forward.
- Select the type of installation for VIRTUAL DJ, then click NEXT.
- Click CLOSE.
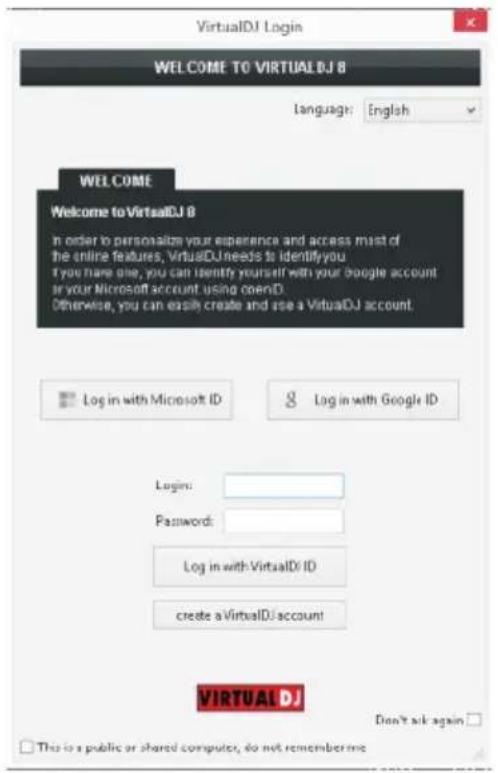
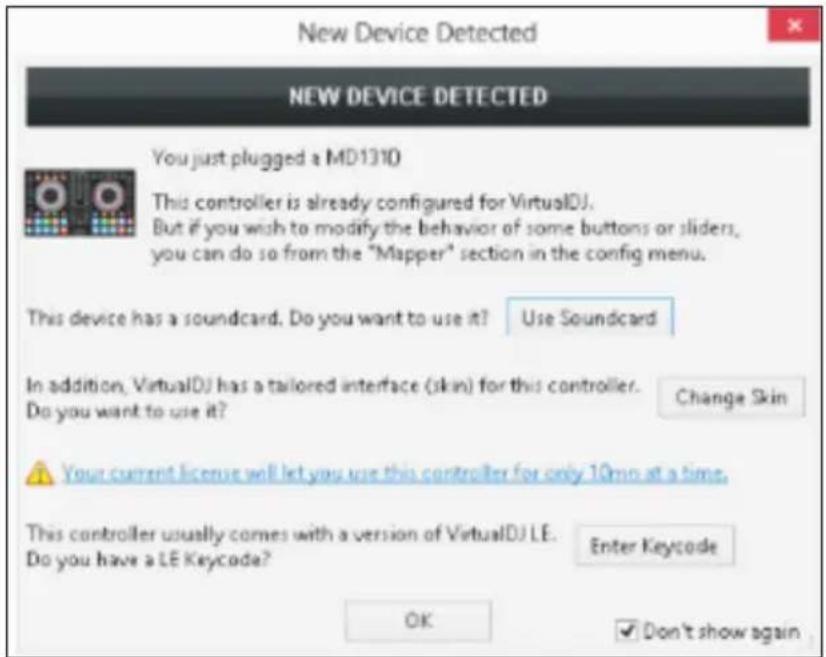
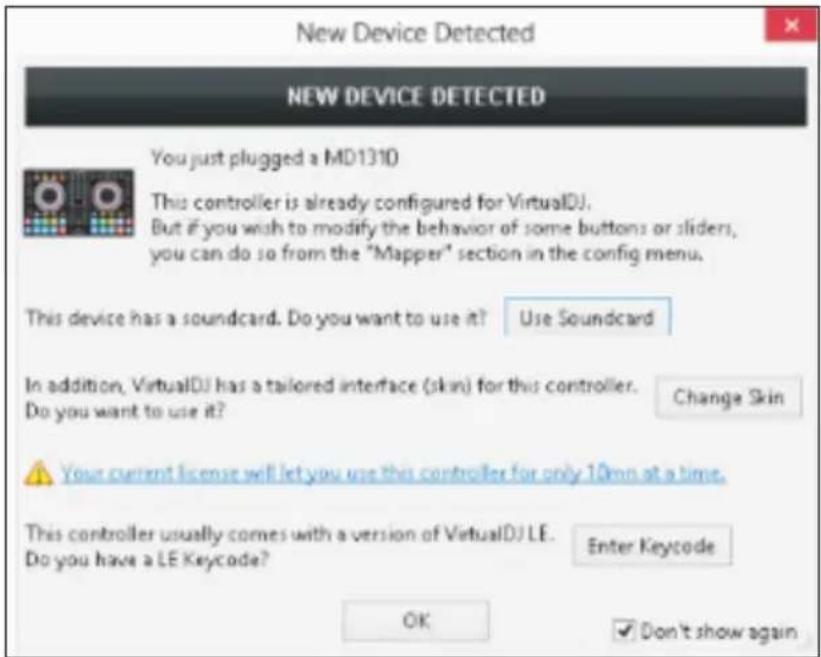
A license keycode (provided with Virtual DJ LE) is required to use the unit. Without the above license key, the controller will operate for 10 minutes each time you restart Virtual DJ.
A detection window will appear asking to use or not the pre-defined audio setup with the built-in sound card of the unit. By choosing the pre-defined audio setup speakers and headphones need to be connected to the relative unit sockets.
If your unit came with a Virtual DJ LE Keycode, use the enter keycode button to enter it. If a Pro Infinity or Plus license is available and you have logged in the previous window, this button will not be offered.
2. INTERFACE VIRTUAL DJ
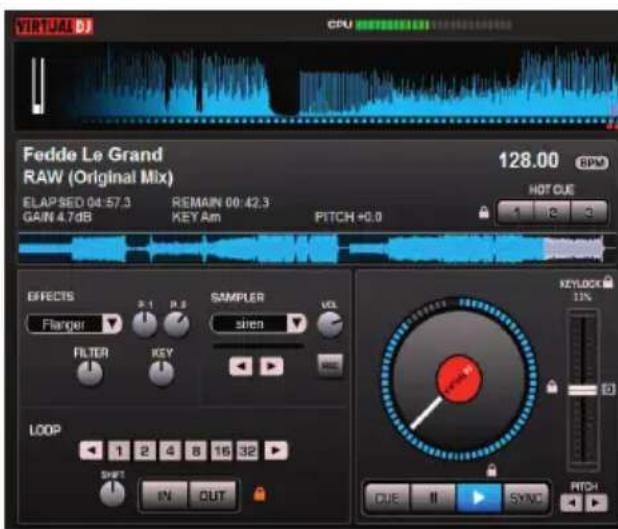
Similar to the controller the software's user interface is split up into several sections: on the top of the screen you will see the rhythm window and the access button to the configuration menu. Underneath are the decks on the right and left side, which are separated by the mixer section in the middle. On the bottom half, the browser section is displayed.

- BROWSER SECTION - Lists all compatible drives and folders of the computer in a tree structure.
- SEARCH FIELD - For searching titles in the data base of the computer. Via the selector button several search criteria can be selected.
- FILE AND SEARCH RESULT WINDOW - Lists all files of the selected folder or displays the search results.
- CONTROL PANEL DECK A
- MIXER SECTION - Switchable to mixer/video/scratch mode.
- CONTROL PANEL DECK B
- RHYTHM WINDOW
- BUTTON CONFIG -For calling the configuration menu.
III. CONNECTING THE CONTROLLER
![graph TD A["Computer with keyboard"] -->|①| B["DJ CONTROLLER"] C["Speaker with headphones"] -->|② AMPLIFIER| B D["CD Player"] -->|③| B E["Mixer"] -->|④| B F["DJ MICROPHONE"] -->|⑤| B G["NOTED OUT"] -->|USB| B H["NOTEBOOK WITH DJ SOFTWARE"] --> B I["HEADphones"] --> B J["DJ CONTROLLER"] --> K["DJ MIC…](/content/2026/05/830223/images/c01af407571d21f3ac86fcd9c203823ec36cf68c035ace19a2c9c542ac165d7f.jpg)
| 1. | Notebook with DJ software 4. Mixer | ||
| 2. | Amplifier 5. Headphones | ||
| 3. | CD player 6. Microphone |
1. CONNECTING AUDIO UNITS
- Set up the controller on a stable, flat surface.
-
You can connect a DJ microphone (balanced or unbalanced) optionally via an XLR plug or a 6.3 mm plug to the respective microphone input MIDI MIC on the front panel. Balanced cables provide +6 dB more output and guarantee a better protection against interference in case of long cable runs.
-
For prefader listening to both decks or for monitoring the sum signal ahead of the output controls MASTER CONTROL and BOOTH VOLUME, it is possible to connect stereo headphones optionally via a 6,3 mm plug to input HEADPHONE 1 or a 3,5 mm plug to input HEADPHONE 2 on the front panel.
-
For connecting amplifiers, several stereo outputs with individual level controls are available:
- Connect the main amplifier to the unbalanced RCA output MASTER and/or to the balanced XLR output BAL OUT.
- If a monitoring system is available, connect the amplifier of the monitoring system to the RCA output BOOTH.
-
For sound recordings, connect a recording unit to the recording output REC. The recording level is independent of the position of the output controls MASTER CONTROL, MASTER LEVEL and BOOTH VOLUME.
-
Instead of the audio signal coming from the computer, the master outputs and the booth output can also supply the signal of an external signal source with line level output (e.g, CD player). Use the stereo RCA jacks LINE INPUT for connecting the unit.
2. CONNECTING A COMPUTER
- Set the power selector switch to the position USB for power supply via the USB connection of the computer.
- Use the supplied USB cable to connect the controller to an available USB port on your computer. As soon as the controller is connected to a computer, it will be recognized as a generic USB audio device and the required drivers are installed. The power indicator lights up red to indicate that the controller is receiving power from the USB. The controller can be used in conjunction with your computer's soundcard without causing conflicts. You may connect and disconnect the controller at any time.
- The controller is supplied with power via the USB connection of the computer. However, if the connection should not supply sufficient power (e.g. when connected to a non-powered USB hub), use the supplied power unit: Connect the cable of the power unit to the power input DC IN 5 V/1 A and the power unit to a power outlet. Set the power selector switch to the position ADAPTOR. Use the unit only with the supplied power unit. Always disconnect the mains connector when you wish to change connections, move the unit to a different place or if it is not used for a longer period.
- After connecting, start the DJ software Virtual DJ LE. If the program has already been started prior to the connection, it must be terminated and restarted, otherwise the controller cannot be operated.
-
Call the software's configuration menu with the button CONFIG and configure the program for operation with this device in the tab Sound Setup.
-
In control panel Sound card, select the setting HEADPHONES. The two output channels master and headphones will be available for the controller. If required, you can switch the output channels in the adjacent control panel.
- In control panel Sound card, select the setting 2 CARDS and in the adjacent panel the settings USB AUDIO MAIN (=master channel) and USB AUDIO PHONE (=headphones channel).
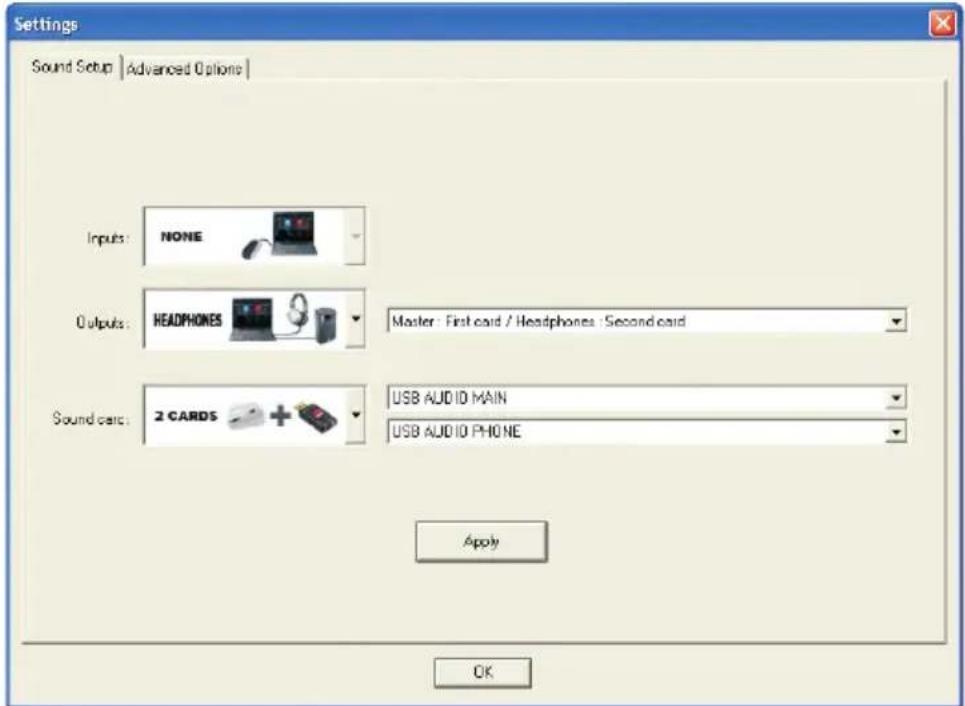
- Leave control panel input at NONE and confirm your settings with Apply.
IV. OPERATION
1. LOADING TITLES FROM THE COMPUTER'S DATABASE
-
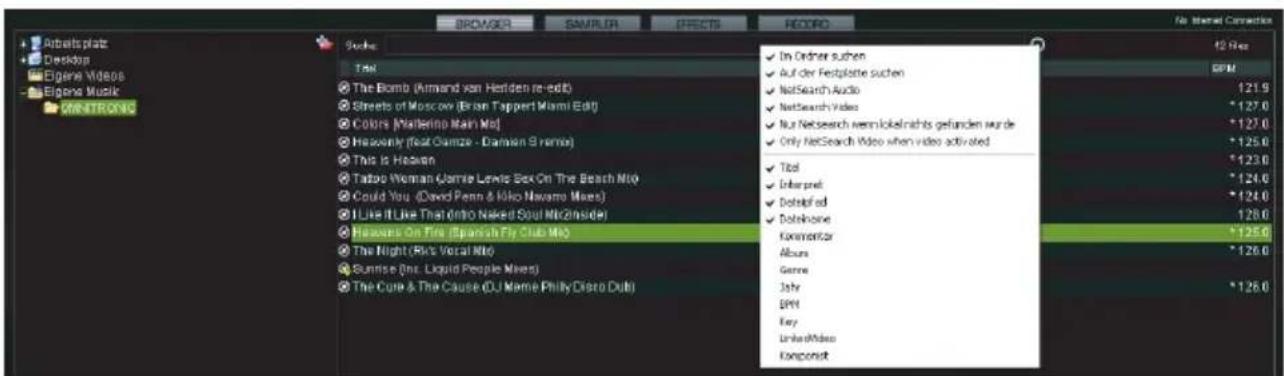
On the lower left side of the screen is the browser section of the software, which lists all compatible drives and folders of the computer in a tree structure. Form here you can access your music and video files.
-
With Virtual DJ PRO it is possible to create further navigation tools such as virtual folders, play and waiting lists, and filters. With the function NetSearch you can even search for titles and videos on the internet.
-
Shortly press the button ENTER/FOLDER SELECT to activate the browser section. Then turn the track knob to select a directory. Press the encoder to select subdirectories. With the button ENTER/FOLDER SELECT you can jump back to the main directory. The search result window lists the titles with various information: title, artist and beats per minute. Virtual DJ PRO displays further data of ID3 tags and MP4 and MOV tags, e.g. with cover flow.
-
To search titles in the database of the computer enter the search term in the search field. Via the selector button Ⓧ several search criteria can be selected. The results will be shown below in the search result window.
-
Select the desired title with the track knob and press the button LOAD A to load the title into Deck A or press the button LOAD B to load it into Deck B. After loading, the display of the deck shows the name of the artist and the title as well as the beats per minute, the elapsed and remain time, the gain level and the pitch percentage.
2. PLAYING A TITLE
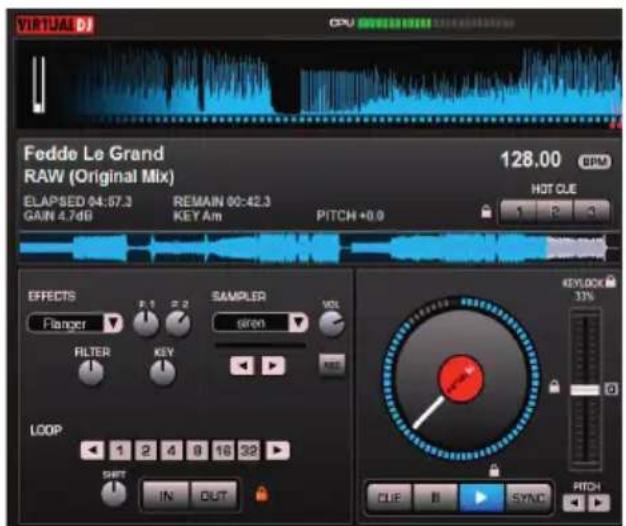
Virtual DJ KMDJ002
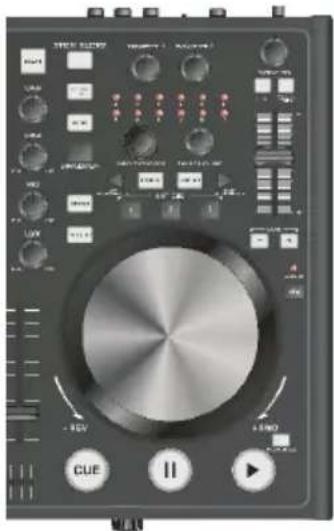
-
Press the Play button (blue LED lights up) to start playback from starting point of the title (time index 00:00) or click the right mouse button over the button Pause to start the title from the first detected bass beat.
-
Press the button Pause to interrupt playback (green LED lights up). Pressing the button several times will cycle through the starting point of the title and all cue points.
-
The unit stops at the end of the title. However, the title remains in the deck until another title will be loaded.
3. BASIC ADJUSTMENT OF THE MIXER
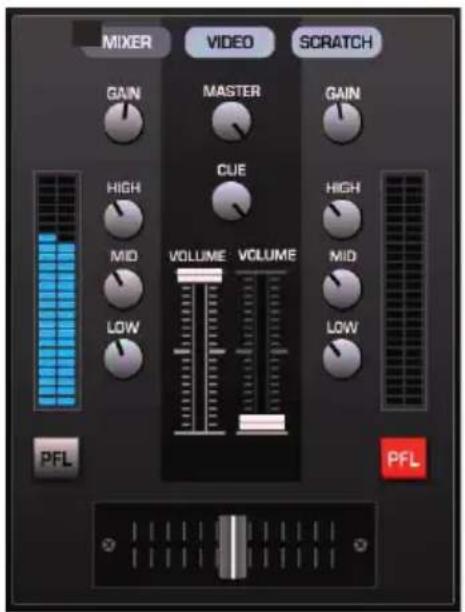
Virtual DJ KMDJ002
-
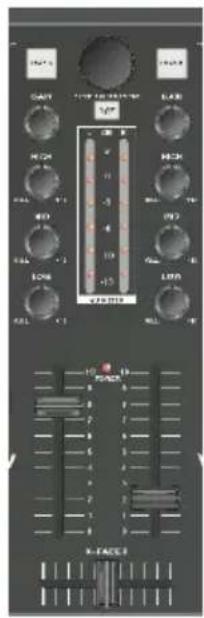
For basic adjustment set the master controls MASTER CONTROL and MASTER LEVEL, the crossfader and in both channels the controls GAIN and the equalizers to mid-position.
-
Advance the two channel faders approx. to 2/3 of the maximum for sufficient way for fading in and out.
-
Play a title with Deck A and control the deck with the respective gain control according to the level indication. An optimum level control is obtained if level values in the 0 dB range are shown at average volume. If the red LEDs of the output meter light up, there is an overload of the channel. Stop the playback on Deck A and adjust Deck B in the same way.
-
Adjust the desired sound with the tone controls of the channel. By adjusting the three tone controls, the high frequencies (control HIGH), the midrange frequencies (control MID), and the low frequencies (control LOW) can be boosted or substantially attenuated. With the controls in mid-position, the frequency response is not affected. Readjust the channel level with the gain control, if necessary.
-
Adjust the low frequencies for the output signal at the balanced master output with the control BASS LEVEL.
-
Adjust the definite level of the output signal at the master outputs with the controls MASTER CONTROL and MASTER LEVEL.
- Adjust the desired signal level for the output BOOTH with the control BOOTH VOLUME.
- The recording signal at the recording output REC is taken off ahead of the output controls, i.e. it is not affected by the controls MASTER CONTROL, MASTER LEVEL and BOOTH VOLUME.
4. CROSSFADING BETWEEN THE DECKS
- The crossfader allows crossfading between both decks:
• crossfader moved to the left: fade-in of Deck A and fade-out of Deck B
• crossfader moved to the right: fade-in of Deck B and fade-out of Deck A
- for hearing the signals of the two decks at the same level, set the crossfader to mid-position
-
The characteristic of the crossfader can be adjusted with the control X-FADER CURVE:
-
left position: smooth crossfading (gradual transition) e.g. for long mixes
- right position: sharp crossfading (abrupt transition) e.g. for scratching and cutting.
CAUTION! Do not use the control X·FADER CURVE while a signal is present as this may cause a sudden change in volume.
5. ANNOUNCEMENTS VIA THE DJ MICROPHONE
Announcements via the DJ microphone are directly mixed to the master signal. Use the control MIC LEVEL to adjust the desired volume.
6. PREFADER LISTENING TO THE CHANNELS (PFL)
The cue function allows monitoring each of the decks via headphones even if the corresponding channel is faded out. Thus, it is possible, e.g. play the beginning of a title, to set a cue point, or to adjust a continuous loop without the audience listening in. Alternatively it is possible to monitor the current music program ahead of the controls MASTER CONTROL and BOOTH VOLUME.
-
ZUse the cue mode selector (41) knob to select the cue mode for the headphones.
-
Use the control CUE to select and crossfader the monitoring signal for the headphones:
- Turn the control to the left to monitor Deck A, turn the control to the right to monitor Deck B. In mid-position, both decks can be heard at the same volume.
- Adjust the desired headphones volume with the control HEADPHONE VOLUME (40).
7. FAST FORWARD AND REVERSE
For fast forward and reverse first activate the search function for the jog dial by shortly pressing the button SEARCH (orange LED lights up). Then turn the jog dial in the corresponding direction. In order to quickly jump to a certain spot in the title, click on the corresponding position in the signal diagram or in the position ring around the turntable platter (Jog wheel on Virtual DJ interface).
8. RETURN TO THE STARTING POINT OF THE TITLE OR TO A DEFINED SPOT (CUEING)
To quickly jump to a defined spot, three starting points (cue points) can be stored permanently for the buttons HOT CUE 1 to 3. The cue points well be kept even after closing the program and can be overwritten at any time. With the button CUE you can return to the beginning of the title or a cue point defined before, and momentarily play the title.
Button CUE
-
To jump to the starting point of a title, press the button CUE in pause or play mode. Now the unit is in pause mode at the starting point of the title (LED of the button CUE lights up red).
-
After jumping to the cue point, playback can be started with the button Play. Alternatively, you can keep the button CUE pressed and momentarily play the title. As soon as you release the button the unit instantly returns to the cue point and is in pause mode.
-
If cue points have been stored with the buttons HOT CUE 1 to 3, pressing the button CUE will not return you to the starting point of a title but to the cue point stored last.
Buttons HOT CUE 1 to 3
- To set a cue point while playing a title, either press one of the buttons HOT CUE 1 to 3 when the desired spot is reached (fly cue).
- It is now possible to jump to the corresponding cue points with the buttons HOT CUE 1 to 3. The title is played from the cue point.
- To overwrite a cue point, first press the button CUE and then press the desired button HOT CUE 1 to 3.
9. PITCH ADJUSTMENT
The playback speed can be adjusted variably up to ±100 % with the pitch slide control.
- The adjusting range for the speed is preset to ±25 %. Each push of the button PITCH switches between ±100 %, ±6 %, ±12 % and back to ±25 %.
- Then slide up the pitch control to decrease the pitch and slide it down to increase it. The display shows the percentage deviation from the standard speed.
- The control locks into place in mid-position. In this position a title is played at standard speed.
10. ACTIVATING THE MASTER TEMPO FUNCTION
With the change of speed, the tonal pitch is also changed proportionally. However, with the function Master Tempo activated, it will remain constant. For this press the button MASTER TEMPO (LED lights up). The key lock symbol is lights up orange on the display.
11. MATCHING THE BEAT BETWEEN DECK A AND DECK B

The speed and the beats of two titles on Deck A and B can be precisely synchronized. Thus the rhythm will not be interrupted while crossfading from one deck to the other. As visual aid, the speed/rhythm of both decks is displayed in waveform in the rhythm window above the decks. The peaks represent beats. The squares below represent the position of measures in 4/4 time of the CBG (Computer Beat Grid). The large squares mark the beginning of the of a measure 4/4 time. The CBG is particularly useful, e.g., when mixing a title at the time of an intra where the beat is not yet present. Two titles are precisely synchronized when the peaks of both waveforms and the CGB squares occur at the same time.
- To synchronize, the title to crossfade should be monitored via headphones.
- Start the playback and press the button SYNC of the deck to which crossfading is desired. Thus the speed and the beats of the title are precisely matched to the title on the other deck.
- In order to synchronize the beginnings of the 4/4 measure the large squares of the CBG must overlap. For this use the Jog dial with activated scratch mode: shortly before the large squares overlap, let go of the jog dial. Then press the button SYNC for a slight correction.
- It is also possible to use the buttons PITCH BEND to change the speed for beat synchronization. As long as one of the buttons PITCH BEND + or - is kept pressed, the title is played faster or slower.
12. PLAYING A CONTINUOUS LOOP SYNCHRONIZED WITH THE BEAT
A section within a title can be repeated as a seamless continuous loop as many times as desired. These loops are synchronized with the beat of the title through the smart loop function of the software.
- In play mode, shortly actuate the button LOOP IN when the desired starting point of the loop is reached.
- Shortly actuate the button LOOP OUT when the desired end point of the loop is reached. The section between the starting point and the end point of the loop is continuously repeated.
- Press the arrow buttons LOOP ADJ to adjust the loop to exactly 1, 2, 4, 8, 18 or 32 beats. Via the software's rotary control SHIFT, the loop length can be adjusted by half length or double length increments.
- To exit the loop and to continue the title, press the button LOOP OUT.
- To program another loop, redefine the starting and the end point with the buttons LOOP IN and LOOP OUT.
V. EFFECT FUNCTIONS
1. SWITCHING ON EFFECTS
- Select the desired effect by pressing the button EFFECT SELECTOR repeatedly. The display of the deck shows the selected effect.
- Press the button EFFECT ON (LED lights up) to switch on the selected effect. In the display, the selector panel is highlighted red. To switch off the effect press the button once again (LED extinguishes).
- Adjust the parameters of the effects as desired with the control PARAMETER 1 and 2.
2. PLAYING SAMPLES
There are six preset samples available which can be combined as desired. The software allows you to record your own samples and assign them to the other six storage places. For this click the button REC and adjust the desired length with the arrow buttons.
- Turn the control SAMPLE SELECTOR to select the desired sample. The corresponding LED lights up red.
| No. Sample | |
| 1 Siren | |
| 2 Saxo | |
| 3 Put your hands up | |
| 4 Push | |
| 5 Pump it up | |
| 6 This this this | |
| 7-12 Freely assignable | |
- Press the control to play the sample. In the display, the selector panel is highlighted green. The sample is played until you press the control once again. If required, further samples can be activated and played in the same way.
- Adjust the level of the sampler unit with the control SAMPLER VOLUME. Via the software's arrow buttons, the sample length can be adjusted by half length or double length increments.
3. SCRATCH EFFECTS
Press the button SCRATCH (LED lights up) to switch on the scratch function for the jog dial. Turn the jogdial back and forth to create scratch effects. To switch off the function press the button SCRATCH once again (LED extinguishes).
4. DRONING EFFECTS
The jogdial can also be used for droning effects. The scratch function, the fast search and the master tempo function must not be activated. Turn the jog dial back and forth to increase or reduce the playing speed, generating a droning effect.
VI. SPECIFICATION
- MIDI control
• Soundcard provides multi-output operation (Booth, Master, Rec)
• Soundcard feature: USB 2.0
• Sample Rate: 44.1/48/96/192 kHz/s - Bit Resolution: 16/24 bit
• Traditional mixer/CD player layout - Large jog wheels
• 3-band EQ and gain control
• Crossfader with adjustable X-Y slope - Loop control (1/8, 16)
- Pitch/tempo controls
• Effects parameter controls - Switchable between USB or AC adapter (5 V, 1 A)
- Standalone mixer
• 2-channel switchable line/phono
• Balanced XLR output - 6.3 mm and 3.5 mm headphone outputs with volume control
- XLR and 6.3 mm mic input with mic volume control
• Provided with: Virtual DJ software
• Power supply: 5 V (USB) - Dimensions: 358x277x65 mm
Specifications are subject to change without prior notice.

English
Correct Disposal of This Product
(Waste Electrical & Electronic Equipment)

(Applicable in the European Union and other European countries with separate collection systems) This marking shown on the product or Its literature, indicates that It should not be disposed with other household wastes at the end of its working life. To prevent possible harm to the environment or human health from uncontrolled waste disposal, please separate this from other types of wastes and recycle it responsibly to promote the sustainable reuse of material resources. Household users should contact either the retailer where they purchased this product, or their local government office, for details of where and how they can take this item for environmentally safe recycling. Business users should contact their supplier and check the terms and conditions of the purchase contract This product should not be mixed with other commercial wastes for disposal.
Made in China for LECHPOL Zbigniew Leszek, Miętne, 1 Garwolińska Street, 08–400 Garwolin.
2. VIRTUAL DJ
2. CONECTAREA UNUI CALCULATOR
2. REDAREA UNEI MELODII
Virtual DJ KMDJ002

Virtual DJ KMDJ002
Butoane HOT CUE 1 to 3
| No. Esantion | |
| 1 Siren | |
| 2 Saxo | |
| 3 Put your hands up | |
| 4 Push | |
| 5 Pump it up | |
| 6 This this this | |
| 7-12 Libere, pot fi inregistrate | |

www.krugermatz.com
Krüger&Matz is a registered trademark

- VIRTUAL DJ
- BEDIENUNG
- PRODUCT DESCRIPTION
- TOP PANEL
- FRONT PANEL
- REAR PANEL
- VIRTUAL DJ SOFTWARE
- INSTALLATION
- WINDOWS
- MAC OS X
- INTERFACE VIRTUAL DJ
- CONNECTING THE CONTROLLER
- CONNECTING AUDIO UNITS
- CONNECTING A COMPUTER
- OPERATION
- LOADING TITLES FROM THE COMPUTER'S DATABASE
- PLAYING A TITLE
- BASIC ADJUSTMENT OF THE MIXER
- CROSSFADING BETWEEN THE DECKS
- ANNOUNCEMENTS VIA THE DJ MICROPHONE
- PREFADER LISTENING TO THE CHANNELS (PFL)
- FAST FORWARD AND REVERSE
- RETURN TO THE STARTING POINT OF THE TITLE OR TO A DEFINED SPOT (CUEING)
- BUTTON CUE
- BUTTONS HOT CUE 1 TO 3
- PITCH ADJUSTMENT
- ACTIVATING THE MASTER TEMPO FUNCTION
- MATCHING THE BEAT BETWEEN DECK A AND DECK B
- PLAYING A CONTINUOUS LOOP SYNCHRONIZED WITH THE BEAT
- EFFECT FUNCTIONS
- SWITCHING ON EFFECTS
- PLAYING SAMPLES
- SCRATCH EFFECTS
- DRONING EFFECTS
- SPECIFICATION
- ENGLISH
- CORRECT DISPOSAL OF THIS PRODUCT
- (WASTE ELECTRICAL & ELECTRONIC EQUIPMENT)
- CONECTAREA UNUI CALCULATOR
- REDAREA UNEI MELODII
- BUTOANE HOT CUE 1 TO 3
Brand : Krüger&Matz
Model : KMDJ002
Category : DJ Equipment