
KMDJ001 - DJ Equipment Krüger&Matz - Free user manual and instructions
Find the device manual for free KMDJ001 Krüger&Matz in PDF.


| Product Type | DJ Controller |
| Model | KMDJ001 |
| Brand | Krüger&Matz |
| Dimensions (W x D x H) | 300 x 110 x 46 mm |
| Weight | Approx. 1.2 kg |
| Power Source | USB bus-powered (via computer) |
| Software Compatibility | Virtual DJ; Windows 7/Vista, Mac OS X 10.5 & 10.6 |
| Jog Wheels | Smooth, with scratch and pitch bend modes |
| Crossfader | Adjustable, for blending tracks |
| Equalizer | 2-band (Low, High) with MID via shift |
| Effects | Filter, Loop, Reverse, Keylock, Hot Cue |
| Controls | Play/Pause, Cue, Sync, Scratch, Rev, Browse knob, Load, FX On |
| Connectivity | USB port, 3.5mm headphone jack (PFL), RCA output |
| Included Accessories | Virtual DJ software (download) |
| Cleaning | Soft, slightly damp cloth only; no chemical agents |
| Safety | Indoor use; avoid water/humidity; unplug during storms |
Frequently Asked Questions - KMDJ001 Krüger&Matz
User questions about KMDJ001 Krüger&Matz
0 question about this device. Answer the ones you know or ask your own.
Ask a new question about this device
Download the instructions for your DJ Equipment in PDF format for free! Find your manual KMDJ001 - Krüger&Matz and take your electronic device back in hand. On this page are published all the documents necessary for the use of your device. KMDJ001 by Krüger&Matz.
USER MANUAL KMDJ001 Krüger&Matz
natural_image
Completely black image with no visible content or text.natural_image
Technical line drawing of a mechanical component with multiple ports and a labeled USB tag (no text or symbols beyond the label)TECHNISCHE DATEN
Glatte Jogwheels
Browse-Knopf
Crossfader
Read this instruction manual carefully before use and keep it for future reference

CAUTION: This product satisfies FCC regulations when shielded cables and connectors are used to connect the unit to other equipment. To prevent electromagnetic interference with electric appliances such as radios and televisions, use shielded cables and connectors for connections.
The exclamation point within an equilateral triangle is intended to alert the user to the presence of important operating and maintenance (servicing) instructions in the literature accompanying the appliance.
The lightening flash with arrowhead symbol, within an equilateral triangle, is intended to alert the user to the presence of uninsulated „dangerous voltage” within the product’s enclosure that may be of sufficient magnitude to constitute a risk of electric shock to persons.
- All warnings on the product and in the operating instructions should be adhered to.
- ALWAYS disconnect this device from power supply mains before cleaning. The product should be cleaned only with a soft, slightly damp cloth. Never clean with chemical agents.
- Use only original accessories.
- Protect this product from water, humidity and moisture.
- Make sure the product is positioned in a place with proper ventilation. The product should be located away from heat sources such as radiators, heat vents, or other devices that produce heat.
- POWER SOURCES: This product should be operated only from the type of power source indicated on the marking label. If you are not sure of the type of power supply to your home, consult your product dealer or local power company.
- Never use this device if the power supply cord is damaged.
- Disconnect the device from the power supply if it is not going to be used for a long time.
- Make sure to place this product on flat, dry and stable surface.
- POWER-CORD PROTECTION: The power supply cables should be routed so that they are not likely to be walked on or pinched by items placed upon or against them, paying particular attention to cables at plugs and the point where they exit from the product.
- LIGHTNING: For added protection for this product during a lightening storm or when it is left unattended and unused for long periods of time, unplug it
from the wall outlet and disconnect the antenna or cable system. This will prevent damage to the product due to lightening and power-line surges.
- Never push objects of any kind into this product through openings as they may touch dangerous voltage points or short-out parts that could result in a fire or electric shock. Never spill liquid of any kind on the product.
- SERVICING: Do not attempt to service this product yourself as opening or removing covers may expose you to dangerous voltage or other hazards. In case of damage, contact an authorized service point for check-up/repair
-
Unplug this product from the wall outlet and refer servicing to qualified service personnel under the following conditions
-
When the power-supply cord or plug is damaged.
- If liquid has been spilled, or objects have fallen into the product.
- If the product has been exposed to rain or water.
- If the product does not operate normally by following the operating instructions. Adjust only those controls that are covered by the operating instructions as an improper adjustment of other controls may result in damage and will often require extensive work by a qualified technician to restore the product to its normal operation.
- If the product has been dropped or damaged in any way.
- When the product exhibits a distinct change in performance, this indicates a need for service.
GETTING STARTED
Set Up
Before plugging the unit in, always make sure that the power supply matches the product specification voltage. The power supply is printed on the back of the device.
OPERATION
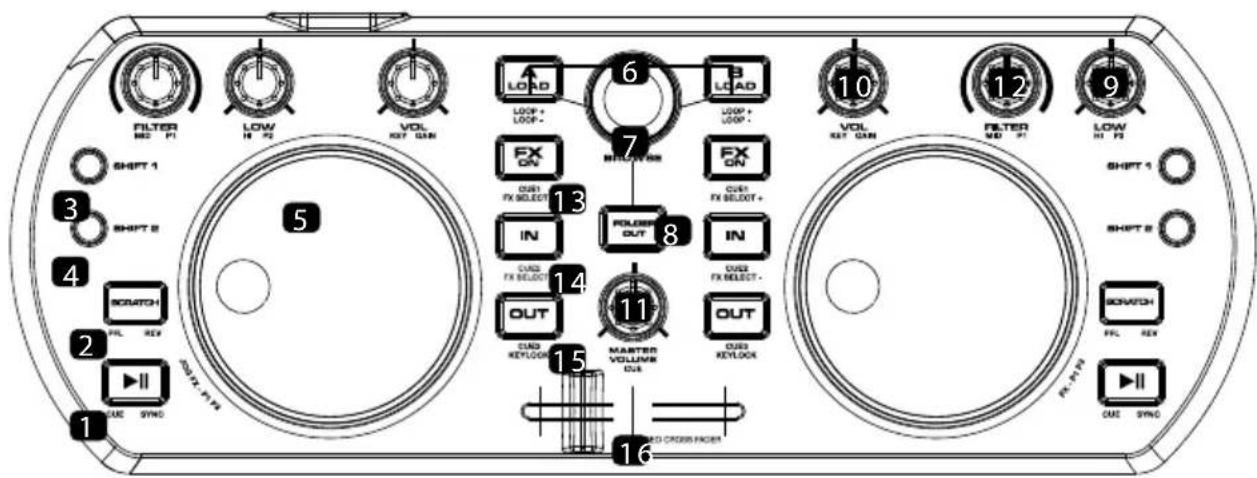
- PLAY/PAUSE - Press to play/pause play.
- [SHIFT1]+CUE - Pressing CUE returns the track to the Cue Point and pauses it. (If you haven't set a Cue Point with the PAUSE button yet, the Cue Point will be the beginning of the track). When you are at the Cue Point, pressing and holding CUE will start playback. When CUE is released, the track will return to the Cue Point and the track will be paused.
- [SHIFT2]+SYNC - Press this button to match the tempo and align the beats of the track on that deck with the Track on the opposite deck automatically.
-
SCRATCH - This switches the vinyl mode on/ off.
-
[SHIFT 1]+PFL - The sound of channels for which the headphones [CUE] button is pressed is output to the headphone.
-
[SHIFT 2]+REV - Push the reverse button to play your track in reverse, Push the reverse button again to cancel this feature.
-
SHIFT 1 - When another button is pressed while pressing the [SHIFT 1] button, the blue function is called out.
- SHIFT 2 - When another button is pressed while pressing the [SHIFT 2] button, the red function is called out.
- JOG WHEEL - When the vinyl mode is on, the scratch operation is possible. When the vinyl mode is off, the pitch bend operation (adjustment of the playing speed) is possible.
- [SHIFT 1]+Rotate PARAMETER 1 - Adjust the value associated with Parameter 1 of the selected effect.
- [SHIFT 2]+Rotate PARAMETER 2 - Adjust the value associated with Parameter 2 of the selected effect.
-
LOAD - Press this button to load the selected track to that deck.
-
[SHIFT 1]+LOOP+ - Pressing the LOOP+ button doubles the set loop's length.
-
[SHIFT 2]+LOOP-- Pressing the LOOP- button halves the set loop's length.
-
BROWSE KNOB-Turn this knob to scroll through and select your music tracks in the software. To enter a folder or return to the next-highest folder in the software, press the knob.
- FOLDER OUT - Allows you to navigate through folders similarly in either USB or CD mode.
- LOW - Adjusts the low-end frequencies of the music on that deck.
- [SHIFT 1]+HIGH - Adjusts the high-end frequencies of the music on that deck.
- [SHIFT 2]+rotate Parameter 2 - Adjust the value associated with Parameter 2 of the selected effect.
-
VOLUME - Adjusts the volume level of the music on that deck.
-
[SHIFT 1]+KEY - Adjust the value associated with Key.
-
[SHIFT 2]+GAIN - Allows you to increase the signal of each individual channel by turning the knob clockwise. The channels signal is lowered when the knob is turned counter-clockwise.
-
MASTER VOLUME - Adjusts the volume of the entire mix (the music both
decks heard together). To adjust the volumes of each deck separately, use the VOLUME knobs.
- [SHIFT 1]+CUE MIX - Adjust the balance of the monitor volume between the sound of the channels for which the headphone [CUE] button is pressed and the sound of the master channel.
-
FILTER - Applies the filter effect for the respective channel. The original sound is output when the control is at the center position. Turn counterclockwise: Gradually decreases the low-pass filter's cut off frequency. Turn clockwise: Gradually increases the high-pass filter's cut off frequency.
-
[SHIFT 1]+MID - Adjust the middle-end frequencies of the music on that deck.
-
[SHIFT 2]+PARAMETER 1 - Adjust the value associated with Parameter 1 of the selected effect.
-
FX ON - EFFECT ON button applies the effect chosen by the EFFECTS SELECTOR to the current playing/loaded track.
-
[SHIFT 1]+HOT CUE 1-Create cue point 1 for the hot cue.
-
[SHIFT 2]+FX SELECT + - Select the next effect to apply to the engaged track.
-
IN - Loop In Point is set. When this button is pressed during loop playback.
-
[SHIFT 1]+HOT CUE 2 - Create cue point 2 for the hot cue.
-
[SHIFT 2]+FX SELECT-- Select the previous effect to apply to the engaged track.
-
OUT-The loop out point is set, and loop playback begins.
-
[SHIFT 1]+HOT CUE 3 - Create cue point 3 for the hot cue.
- [SHIFT 2]+KEYLOCK - Turns the key lock function on and off.
-
When the key lock function is on, the key does not change even when the playing speed is changed with the [TEMPO] slider. The sound is digitally processed, so the sound quality decreases.
-
CROSSFADER - Slide the CROSSFADER towards a deck to cause that deck's track to be heard in the mix; tool for blending the tracks together, moving from one track to the next, etc.
-
POWER INPUT

natural_image
Technical line drawing of a mechanical component with multiple ports and a 17 USB tag (no text or symbols beyond label)SPECIFICATIONS
Smooth jog wheels
Browse knob
Crossfader
Bass and Treble controls
Scratch, Rev and Sync, Locator & Cue points functions
Playlist management
2-band equalizer
Provided with: Virtual DJ software
Supports: Window 7 / Vista / Mac OS X 10.5 & 10.6
Dimensions: 300x110x46 mm
Specifications are subject to change without prior notice.
English
Correct Disposal of This Product
(Waste Electrical & Electronic Equipment)

(Applicable in the European Union and other European countries with separate collection systems) This marking shown on the product or Its literature, indicates that It should not be disposed with other household wastes at the end of its working life. To prevent possible harm to the environment or human health from uncontrolled waste disposal, please separate this from other types of wastes and recycle it responsibly to promote the sustainable reuse of material resources. Household users should contact either the retailer where they purchased this product, or their local government office, for details of where and how they can take this item for environmentally safe recycling. Business users should contact their supplier and check the terms and conditions of the purchase contract This product should not be mixed with other commercial wastes for disposal.
Made in China for LECHPOL Zbigniew Leszek, Miętne, 1 Garwolińska Street, 08-400 Garwolin.
natural_image
Technical line drawing of a mechanical component with multiple ports and a labeled USB tag (no text or symbols beyond label)SPECYFIKACJA
natural_image
Technical line drawing of a mechanical component with multiple ports and a lock symbol labeled '17 USB' (no text or symbols beyond label)SPECIFICATII
Lin jog-wheels
Buton browser
Crossfader
Control bass si treble
natural_image
Completely black image with no visible content or text.
line
| X | Y | |---|---| | 0.0 | 0.0 | | 0.1 | 0.1 | | 0.2 | 0.2 | | 0.3 | 0.3 | | 0.4 | 0.4 | | 0.5 | 0.5 | | 0.6 | 0.6 | | 0.7 | 0.7 | | 0.8 | 0.8 | | 0.9 | 0.9 | | 1.0 | 1.0 | | 1.1 | 0.9 | | 1.2 | 0.8 | | 1.3 | 0.7 | | 1.4 | 0.6 | | 1.5 | 0.5 | | 1.6 | 0.4 | | 1.7 | 0.3 | | 1.8 | 0.2 | | 1.9 | 0.1 | | 2.0 | 0.0 |www.krugermatz.com
Krüger&Matz is a registered trademark

Brand : Krüger&Matz
Model : KMDJ001
Category : DJ Equipment