
PRO WS30-A - Vacuum Cleaner Cocraft - Free user manual and instructions
Find the device manual for free PRO WS30-A Cocraft in PDF.


| Brand | Cocraft |
| Model | PRO WS30-A |
| Product Type | Canister Vacuum Cleaner |
| Power Supply | 1200W, corded |
| Voltage | 220-240V, 50/60Hz |
| Dimensions (L x W x H) | 28 x 28 x 48 cm |
| Weight | 4.5 kg |
| Dust Container Capacity | 1.5 L |
| Filtration System | HEPA washable filter |
| Noise Level | 78 dB(A) |
| Cord Length | 5 m |
| Cleaning Radius | 8 m |
| Included Accessories | Floor nozzle, crevice tool, brush |
| Functions | Dry vacuuming for carpets and hard floors |
| Maintenance | Empty dust container, clean filter regularly |
| Safety Features | Overheat protection, automatic shut-off |
| Spare Parts Available | Replacement HEPA filter, dust bag (optional) |
| Repairability | User-replaceable filter and bag |
| Warranty | 1 year |
Frequently Asked Questions - PRO WS30-A Cocraft
User questions about PRO WS30-A Cocraft
0 question about this device. Answer the ones you know or ask your own.
Ask a new question about this device
Download the instructions for your Vacuum Cleaner in PDF format for free! Find your manual PRO WS30-A - Cocraft and take your electronic device back in hand. On this page are published all the documents necessary for the use of your device. PRO WS30-A by Cocraft.
USER MANUAL PRO WS30-A Cocraft
Read the entire instruction manual carefully and make sure that you fully understand it before you use the equipment. Keep the manual for future reference.
Viktig information:
Original instructions
Bruksanvisning i original
Originalbruksanvisning
Wet and Dry Vacuum Cleaner
Art.no 40-9908 Model VK1530SIWDC
Please read the entire instruction manual before using the product and then save it for future reference. We reserve the right for any errors in text or images and any necessary changes made to technical data. In the event of technical problems or other queries, please contact our Customer Services (see address details on the back).
Safety
- This product is only intended for domestic use and only in the manner described in this instruction manual.
- The product should only be connected to a 230 V, 50 Hz outlet protected by a 30 mA RCD. Check the RCD before each use.
- This product is intended for indoor use only.
- This product should not be exposed to excessive heat such as open flames or other heat sources, prolonged sunlight or moisture.
- Never immerse the product in water or any other type of liquid.
- Never handle the product if your hands are moist or wet.
• Always grip the plug when unplugging the product, never pull the mains lead.
• Always unplug the product from the mains if its motor has become wet or damp. - This product may only be used to vacuum non-hazardous materials and non-flammable liquids.
- Never point the nozzle at yourself, others or animals.
- The product may not be used without a correctly mounted dust bag and filter when dry vacuuming.
- Never use the product if it, its mains lead or plug are damaged in any way.
- The mains lead must be replaced by a qualified electrician if it is damaged in any way.
- Never vacuum up hot ashes or coals. Never use the vacuum to vacuum up glass shards or other sharp objects.
- Do not vacuum toner powder used in printers. This may damage the product and re-distribute the powder throughout the room.
- Never vacuum asbestos, asbestos dust, hazardous or flammable particulates.
- Never vacuum up petrol, oil, acid or other flammable and hazardous liquids.
- Never vacuum up liquids exceeding 60 °C.
- The product must always be used in a balanced upright position.
- Always unplug the mains lead before cleaning, changing the dust bag, filter or any other accessories.
- Never attempt to repair or modify the product in any way.
-
Any repairs should only be carried out by qualified service technicians.
-
Never use the product whilst under the influence of drugs, alcohol or medicine. Do not use the product if you are tired or sick.
- The product may be used by children of 8 years and above and by persons with reduced physical, sensory or mental capability or lack of experience and knowledge provided they have been given supervision or instruction concerning use of the product in a safe way and understand the hazards involved.
- Never let children play with the product.
- Cleaning and maintenance may be carried out by children but only under adult supervision.
Package contents
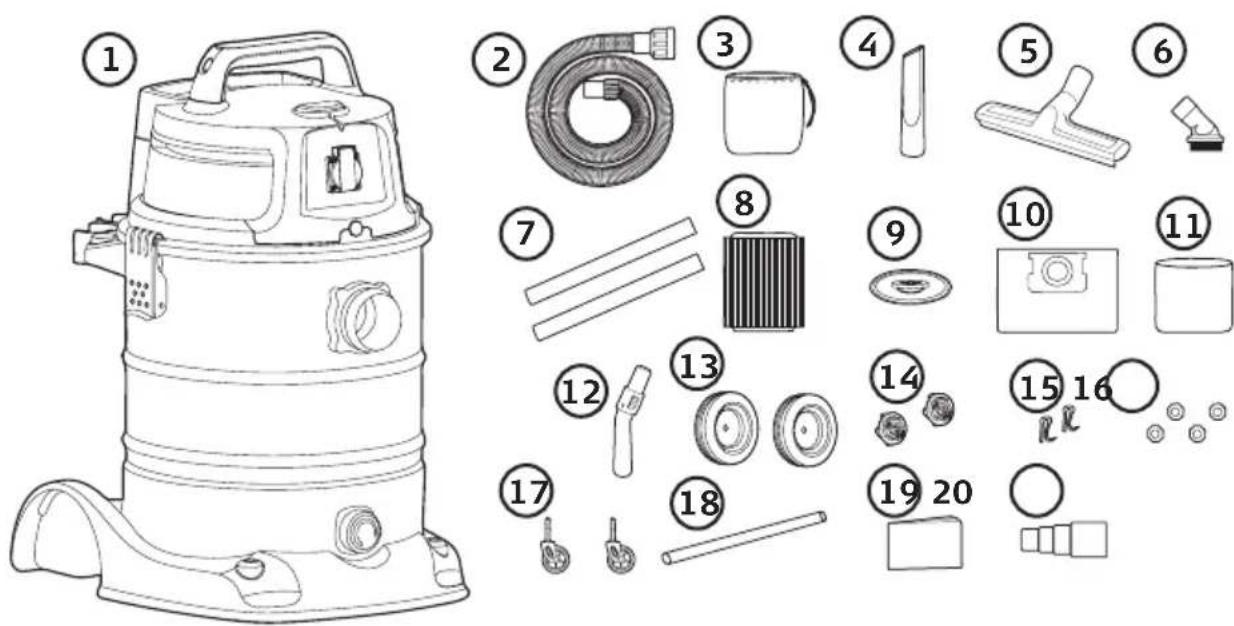
- Wet and dry vacuum cleaner
- Suction hose
- Pre-filter cloth bag
- Crevice nozzle for corners and confined spaces
- Floor nozzle
- Brush nozzle
- Extension tubes
- Cartridge filter
- Filter retainer
-
Dust bag
-
Wet vacuuming - foam filter
- Handle with suction adjuster
- Wheels
- Hub caps
- Spring cotter pins
- Washers
- Castors
- Axle
- Instruction manual
- Adaptor
Product description
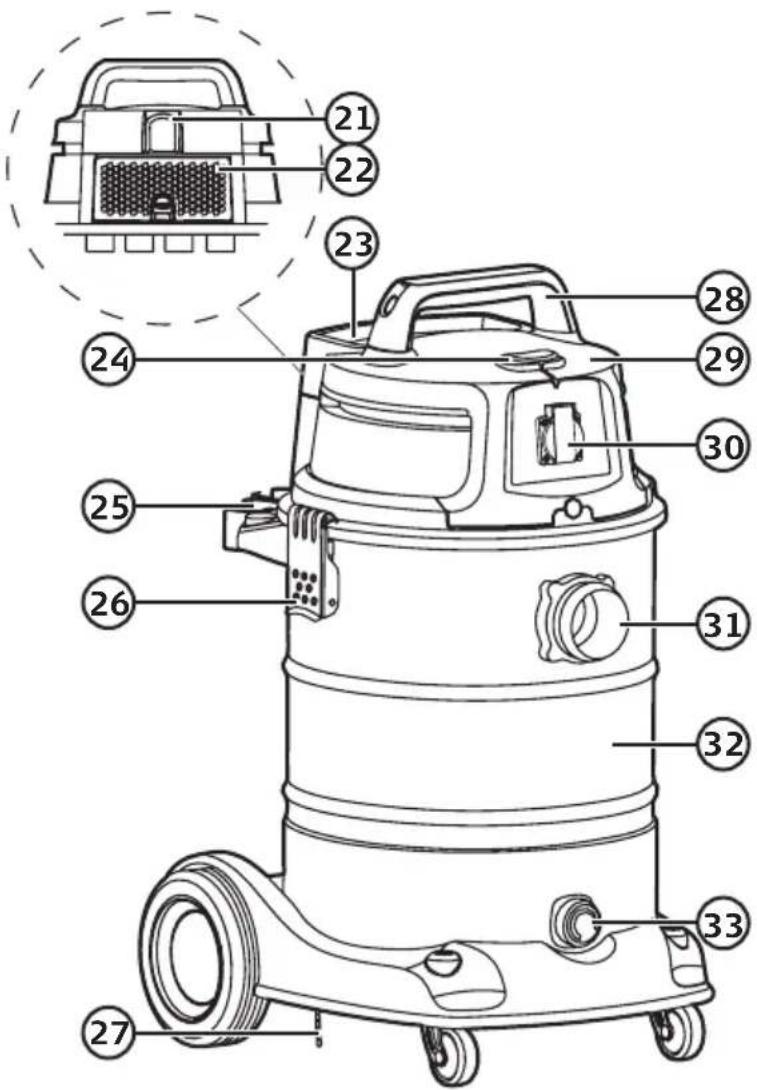
- Hanging hook
- HEPA filter
- Storage tray
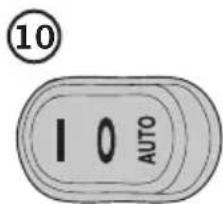
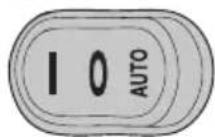
- [10 AUTO] Vac on/Vac off/Vac + power socket on
- Accessory shelf
- Motor unit toggle catch
- Anti-static chain
- Handle
- Motor unit
- Power tool socket
- Vacuum port
- Container
- Drain cap
Assembly instructions
natural_image
Mechanical component diagram showing a piston assembly with an upward arrow, no text or symbols present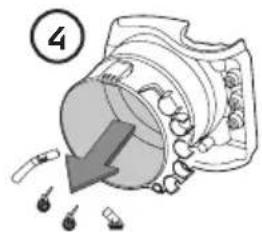
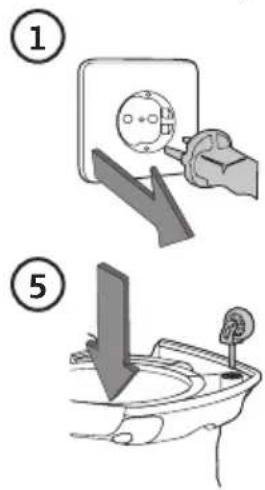
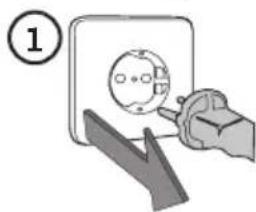
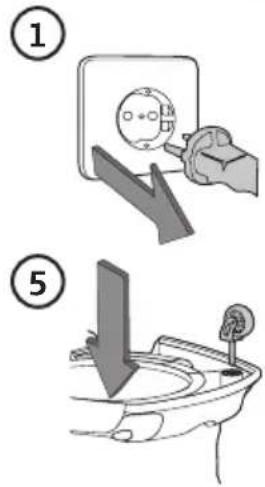
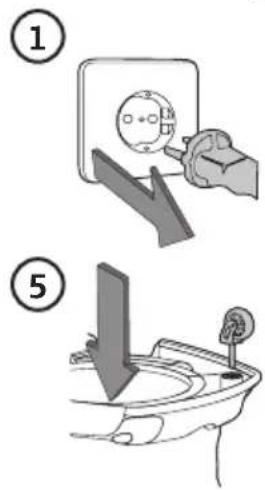
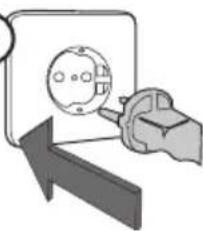
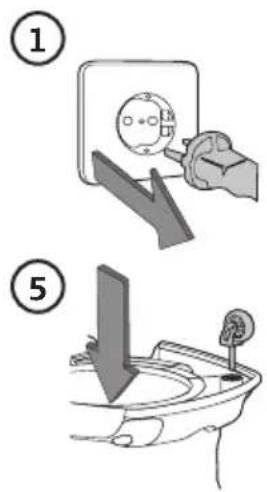
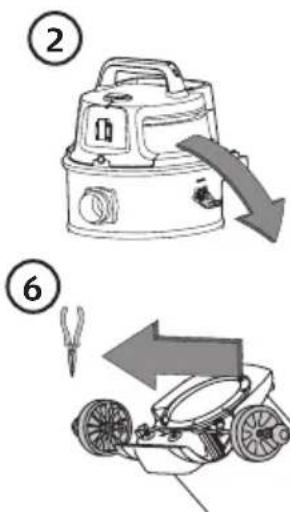
- Make sure that the vacuum is unplugged from the mains.
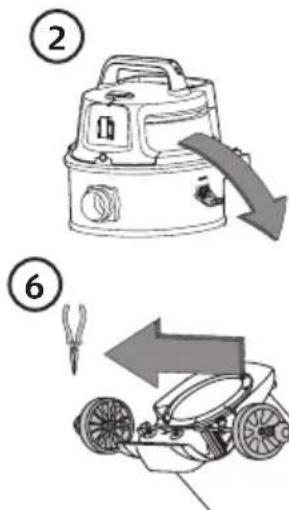
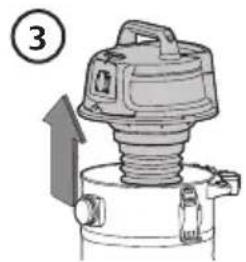
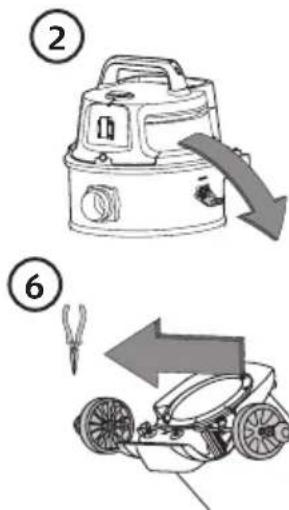
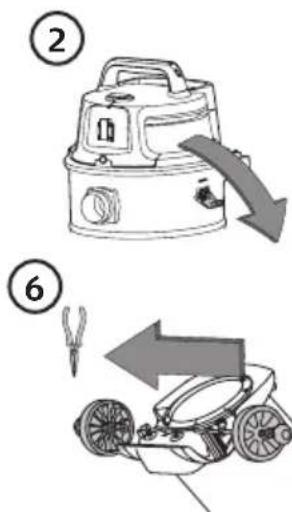
- Open the toggle catches.
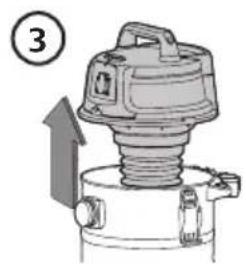
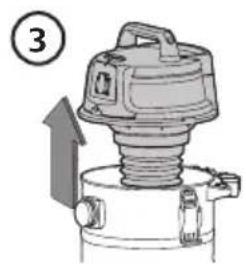
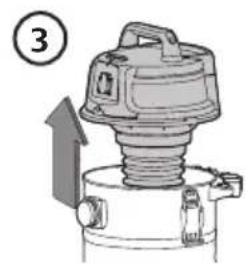
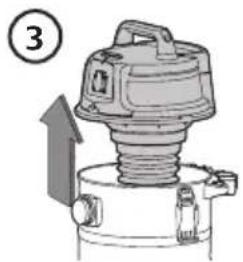
- Lift up the motor unit and remove the accessories from the container.
- Check that all the parts are intact and that nothing is missing.
- Press the castors securely into the underside of the container.
-
Assemble the wheels as follows:
-
Insert the wheel axle into the rear support block.
- Pass a washer over each end of the axle.
- Fit the wheels onto the axle.
- Fit a washer outside the wheels on each end of the axle.
- Secure the washers with the spring cotter pins.
- Fit the hub caps.
Operating instructions
- Warning: Read all the warnings and safety instructions in the manual before use.
- Warning: Always unplug the mains lead from the wall socket before any maintenance or adjustments.
- Note: The cartridge filter (8) is for vacuuming dust. The foam filter (11) must only be used for vacuuming water.
- When very fine-particled substances are to be vacuumed, the filter cartridge, pre-filter (3) and the dust bag must be used.
Switching on/off
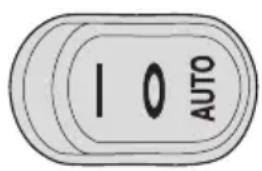
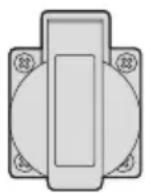
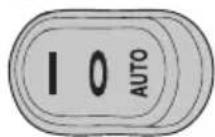
Power switch Power tool socket
The power switch has three settings:
- | On
• 0 Off - AUTO Power tool socket energized, automatic on/off switching of the vacuum cleaner.
Switching on a power tool connected to the socket automatically switches on the vacuum cleaner; switching the connected tool off, switches off the vacuum cleaner.
- Plug a circular saw or similar power tool into the onboard power socket.
- Then connect the suction hose (2) from the vacuum cleaner to the dust extractor port on the circular saw (or respective power tool). Set the power switch to the AUTO position.
- The on and off switchings of the vacuum cleaner will now be controlled by the connected power tool. The vacuum cleaner will be switched on as soon as the connected power tool is switched on. When the connected power tool is switched off there will be about a 5-second delay before the vacuum cleaner is switched off.
Note: The power tool socket must not be loaded with more than 2180 W.
Dry vacuuming
natural_image
Illustration of a mechanical device with a dial and handle, no text or symbols present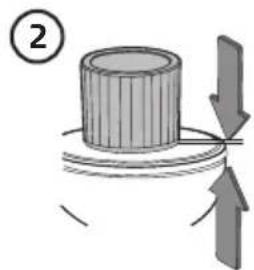
natural_image
Diagram showing a cylindrical object with arrows indicating motion or force direction, no text or symbols present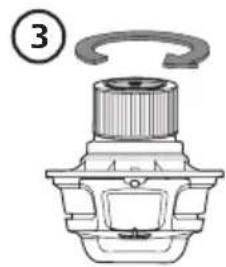
natural_image
Mechanical component diagram showing a rotating shaft and housing (no text or symbols)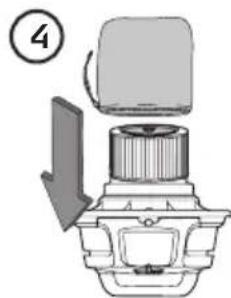
natural_image
Diagram of a mechanical component with a downward arrow and circular base, no text or symbols present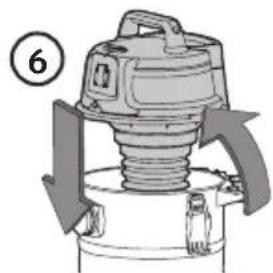
natural_image
Diagram of a mechanical device with arrows indicating motion or force direction (no text or symbols)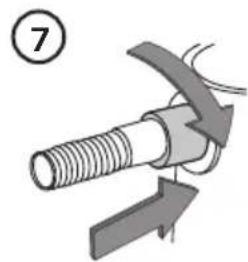
natural_image
Mechanical diagram showing a threaded bolt being inserted into a clamp, with no visible text or symbols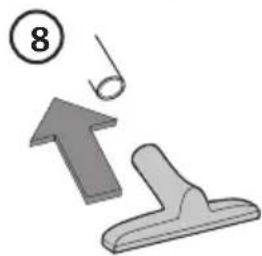
natural_image
Diagram showing a mechanical component with an upward arrow and a pin, no text or symbols present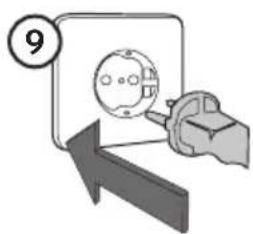
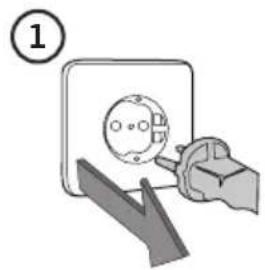
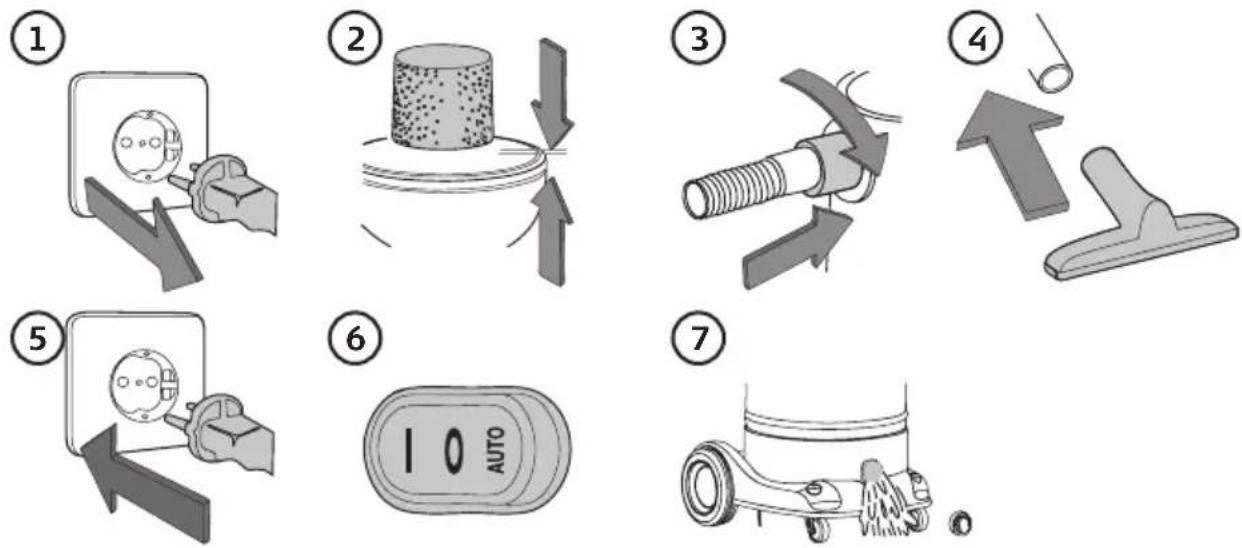
- Make sure that the vacuum is unplugged from the mains.
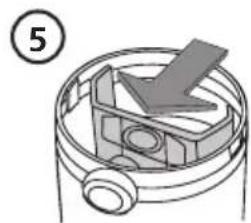
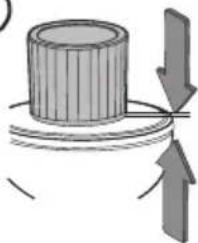
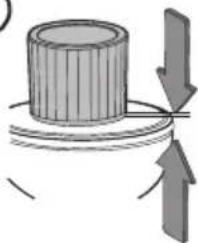
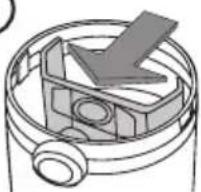
- Fit the cartridge filter onto the bottom of the motor unit.
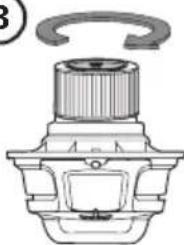
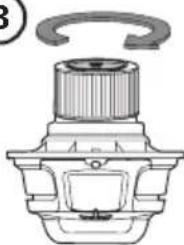
- Secure the cartridge filter in place by turning the filter retainer clockwise.
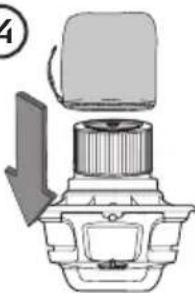
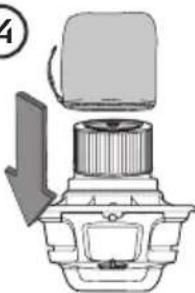
- Pass the pre-filter over the cartridge filter so that it completely encapsulates it.
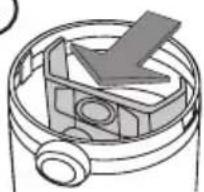
- Fit the dust bag.
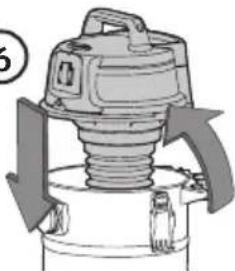
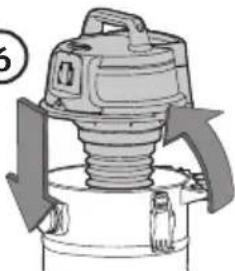
- Refit the motor unit onto the container and fasten it on using the toggle catches.
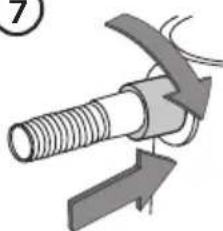
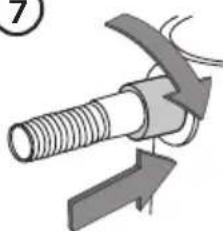
- Attach the suction hose to the container by screwing it onto the vacuum port.
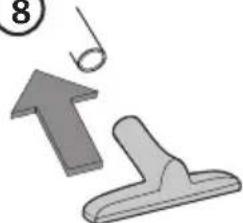
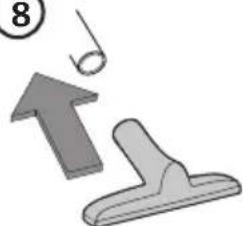
- Attach the appropriate accessory.
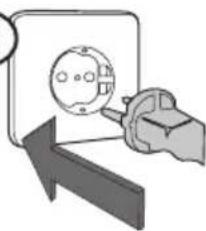
- Plug the mains lead into a wall socket.
- Switch the vacuum cleaner on by setting the power switch to the desired setting.
Wet vacuuming
Note: Do not submerge the entire nozzle under the surface of the liquid. Leave some space so that air can also pass through when vacuuming a large amount of liquid.
- Make sure that the vacuum is unplugged from the mains.
- Remove the motor unit and fit the foam filter. Refit the motor unit onto the container and fasten it on using the toggle catches.
- Attach the suction hose to the container by screwing it onto the vacuum port.
- Attach the appropriate accessory.
- Plug the mains lead into a wall socket.
- Start the vacuum with the power switch.
- Empty the container when it becomes full (see below).
Things to consider when wet vacuuming
- The cloth bag pre-filter, cartridge filter and dust bag must first be removed and the foam filter fitted, before beginning any type of wet vacuuming.
- Make sure that the foam filter is clean and dry before fitting it onto the motor unit and beginning to wet-vacuum.
- The water level within the container is regulated by a safety float valve. When the container needs to be emptied, the safety valve stops suction and the motor will race. Turn off the motor with the power switch, remove the drain cap (33) and empty the container.
- Clean the foam filter regularly. Remove the foam filter and hand wash it with water and a little mild detergent. Allow the filter to air dry.
- Wipe the container clean and allow it to dry before storing the vacuum or continuing with any type of dry vacuuming.
- Don't forget to fit the cartridge filter, pre-filter and dust bag before beginning any type of dry vacuuming.
Care and maintenance
- Always unplug the vacuum from the wall socket before cleaning/maintenance or when it is not in use for an extended period.
- Clean the exterior of the vacuum cleaner using a lightly moistened cloth. Use only mild cleaning agents, never solvents or corrosive chemicals.
- Make sure that all components are completely dry before storing the vacuum in a dry dust-free place out of the reach of children.
Cleaning the pre-filter and cartridge filter
- Make sure that the vacuum is unplugged from the mains.
- Remove the filters.
- Brush or shake any dirt and debris off the filters (in an appropriate outdoor area).
- Refit the filters back onto the motor unit.
Cleaning the foam filter
- Make sure that the vacuum is unplugged from the mains.
- Remove the filter.
- Hand wash the filter with mild soapy water and then rinse well with clean water.
- Allow the filter to air dry. Refit the filter only when it is completely dry.
Cleaning the HEPA filter
natural_image
Diagram of a truck with a ramp and a battery, no text or symbols present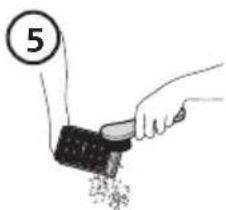
natural_image
Hand holding a small object with granular material, no visible text or symbols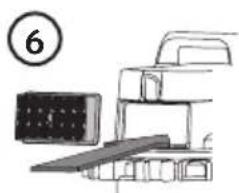
natural_image
Simple line drawing of a mechanical assembly with a numbered circle (6) and no visible text or symbols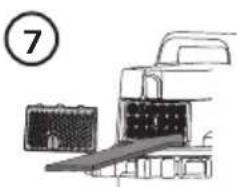
natural_image
Illustration of a truck loading equipment into a storage tray, with a numbered circle highlighting the number 7 (no text or symbols on the diagram itself)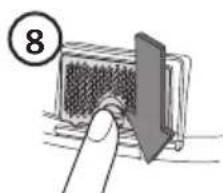
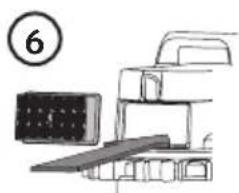
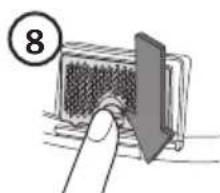
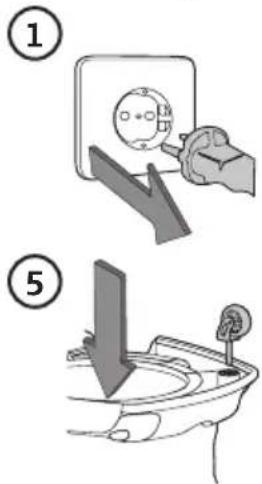
- Make sure that the vacuum is unplugged from the mains.
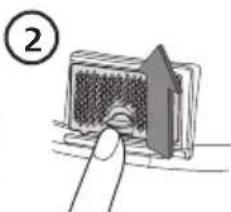
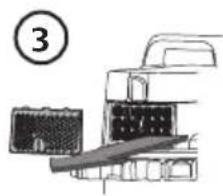
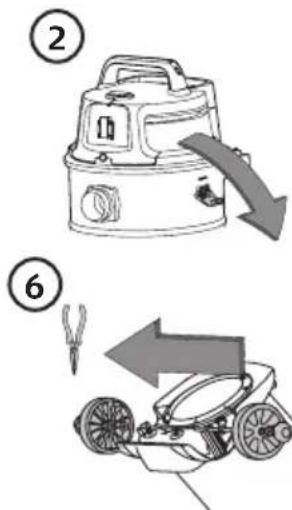
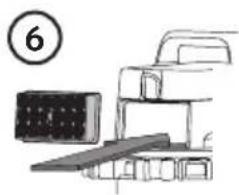
- Release the filter cover by lifting the locking tab.
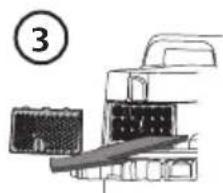
- Remove the filter cover.
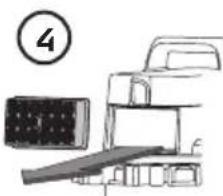
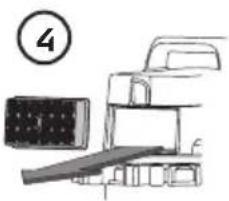
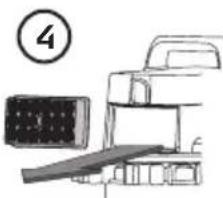
- Remove the HEPA filter.
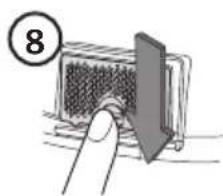
- Brush the filter clean.
- Refit the filter.
- Refit the filter cover.
- Push the locking tab down to lock the cover in place.
Troubleshooting guide
| The vacuum doesn’t start. | Make sure that the mains lead is undamaged and securely plugged into a wall socket.Make sure that the wall socket live.The container is full. Empty the container. |
| Poor suction, racing motor. | The dust bag is full. Empty the dust bag.The container is full. Empty the container.Nozzle, hose or coupling clogged. Check and clean as required. |
Responsible disposal
This symbol indicates that this product should not be disposed of with general household waste. This applies throughout the entire EU. In order to prevent any harm to the environment or health hazards caused by incorrect waste disposal, the product must be handed in for recycling so that the material can be disposed of in a responsible manner. When recycling your product, take it to your local collection facility or contact the place of purchase. They will ensure that the product is disposed of in an environmentally sound manner.
natural_image
Symbol of a trash bin crossed with no visible text or labelsSpecifications
Rated voltage 230 V, 50 Hz
Motor power 1500 W
Power tool socket load Max 2180 W
Total power load Max 3680 W
Max vacuum pressure 180 mbar
Suction capacity 60 l/s
Container 30 I
Mains lead 7.5 m
Vacuum hose ∅ 35 mm, length: 3.5 m
Torr- och våtsugare
Montering
natural_image
Diagram of a mechanical device with an upward arrow indicating motion (no text or symbols present)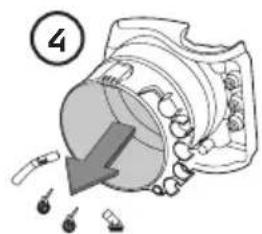
natural_image
Illustration of a hand holding a plug inserted into a socket, with a downward arrow indicating a decrease or drop (no text or symbols present)2
natural_image
Diagram of a cylindrical object with a curved arrow indicating direction, no text or symbols present3
natural_image
Mechanical component diagram showing a cylindrical shaft with a curved arrow indicating rotation (no text or symbols)4
natural_image
Mechanical component diagram showing a piston and housing assembly with a downward arrow (no text or symbols)5
natural_image
Pure mechanical component diagram without any text, numbers, or symbols6
natural_image
Diagram of a mechanical component with arrows indicating motion or force direction (no text or symbols)7
natural_image
Mechanical diagram showing a threaded bolt being inserted into a clamp, with no visible text or symbols8
natural_image
Illustration of a mechanical component with an upward arrow and a pin (no text or symbols)9
natural_image
Illustration of a hand inserting a plug into an electrical socket with a downward arrow (no text or symbols)10
natural_image
Symbol of a trash bin with crossed lines indicating no waste or restriction, and a solid black rectangle below (no text or labels)Specifikationer
Montering
natural_image
Diagram of a mechanical device with an upward arrow indicating motion (no text or symbols present)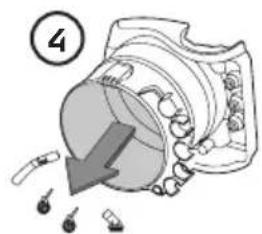
natural_image
Illustration of a hand holding a plug inserted into a socket, with a downward arrow indicating a decrease or drop (no text or symbols present)2
natural_image
Diagram of a cylindrical object with a downward arrow indicating rotation or force direction (no text or symbols)3
natural_image
Technical line drawing of a mechanical component with a circular arrow indicating rotation (no text or symbols)4
natural_image
Mechanical component diagram showing a piston and housing assembly with a downward arrow indicating motion (no text or symbols)5
6
natural_image
Mechanical component diagram showing a piston and handle assembly with directional arrows (no text or symbols)7
natural_image
Mechanical diagram showing a threaded bolt being inserted into a clamp, with no visible text or symbols8
natural_image
Illustration of a mechanical component with an upward arrow and a pin (no text or symbols)9
natural_image
Illustration of a hand inserting a plug into a socket, with an arrow indicating direction (no text or symbols)10
natural_image
Diagram of a mechanical device with a labeled component (3), showing internal components and a handle (no text or symbols present)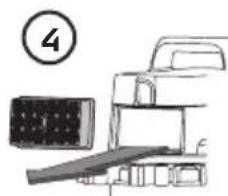
natural_image
Illustration of a truck with a ramp and a battery, no text or symbols present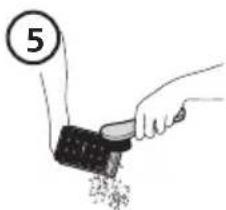
natural_image
Simple line drawing of a mechanical assembly with a numbered circle (6) and no visible text or symbols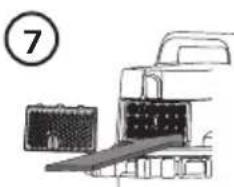
natural_image
Symbol of a trash bin with crossed lines and a blank rectangular base (no text or labels)Spesifikasjoner
Spenning 230 V, 50 Hz
Effekt motor 1500 W
Maskinkontakt Maks 2180 W
Maks. effekt totalt 3680 W
Undertrykk 180 millibar
Sugekapasitet 60 l/s
Asentaminen
natural_image
Diagram of a mechanical device with an upward arrow indicating motion (no text or symbols present)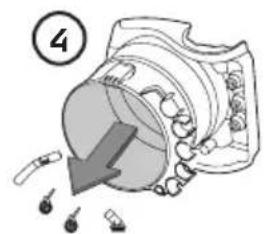
natural_image
Illustration of a hand using a tool to adjust or install a wall-mounted component, with no visible text or symbols.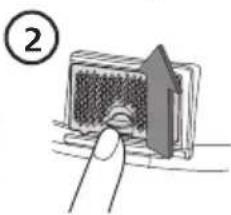
natural_image
Diagram of a vehicle ramp with a gear and a truck, no text or symbols present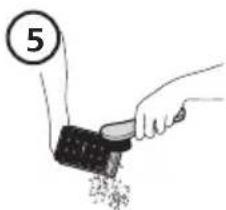
natural_image
Hand using a hammer to press small debris (no text or symbols visible)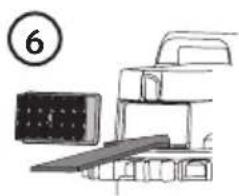
natural_image
Simple line drawing of a mechanical assembly with a numbered circle (6) and no visible text or symbols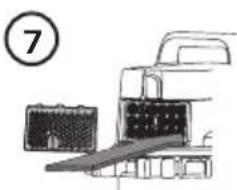
natural_image
Symbol of a trash bin crossed with no text or numbers, representing waste sorting or disposal (no text present)Tekniset tiedot
Montage
natural_image
Diagram of a mechanical device with an upward arrow indicating motion (no text or symbols present)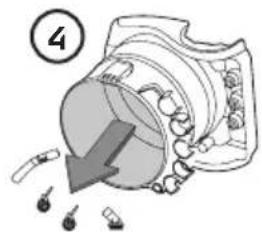
natural_image
Hand inserting a grid into a device (no text or symbols visible)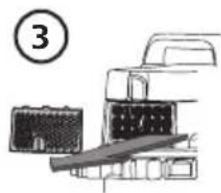
natural_image
Illustration of a vehicle chassis with a numbered circle and a separate panel, no text or symbols present.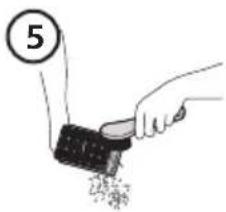
natural_image
Illustration of a vehicle climbing stairs with a numbered circle (6) in the top-left corner, no text or symbols present.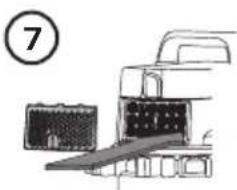
natural_image
Diagram of a vehicle's internal components being loaded onto a roof, with no visible text or symbols.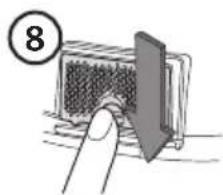
natural_image
Illustration of a finger pressing down on a textured surface next to a dark panel, with no visible text or symbols.natural_image
Symbol of a trash bin crossed with no visible text or labelsTechnische Daten
Declaration of Conformity
Declares that this product complies with the requirements of the following directives and standards
Postal 10 - 13 Market Place
Kingston upon Thames
Surrey
KT1 1JZ
Deutschland
Kundenservice Hotline: 040 2999 78111
E-Mail: kundenservice@clasohlson.de
Homepage
www.clasohlson.de


- Viktig information:
- Wet and Dry Vacuum Cleaner
- Safety
- Package contents
- Product description
- Assembly instructions
- Operating instructions
- Switching on/off
- Dry vacuuming
- Wet vacuuming
- Things to consider when wet vacuuming
- Care and maintenance
- Cleaning the pre-filter and cartridge filter
- Cleaning the foam filter
- Cleaning the HEPA filter
- Troubleshooting guide
- Responsible disposal
- Specifications
- Torr- och våtsugare
- Montering
- Specifikationer
- Spesifikasjoner
- Asentaminen
- Tekniset tiedot
- Montage
- Technische Daten
- Declaration of Conformity
- Deutschland
Brand : Cocraft
Model : PRO WS30-A
Category : Vacuum Cleaner