HWD 30S - Vacuum Cleaner Cocraft - Free user manual and instructions
Find the device manual for free HWD 30S Cocraft in PDF.


| Product Type | Wet and Dry Vacuum Cleaner |
| Brand | Cocraft |
| Model | HWD 30S / MWW707S-30L-1200WB |
| Rated Voltage | 220–240 V, 50/60 Hz |
| Power | 1200 W |
| Container Capacity | 30 L |
| Weight (empty) | 6 kg |
| Cable Length | 4.5 m |
| Suction Hose Length | 1.5 m |
| Suction Hose Diameter | 35 mm |
| Max Vacuum Pressure | 180 mbar |
| Suction Capacity | 1920 L/min |
| IP Rating | IPX4 |
| Power Tool Socket Max Load | 2200 W (UK 1750 W) |
| Wet/Dry Capability | Yes |
| Blower Function | Yes |
| Safety Float Valve | Yes (for wet vacuuming) |
| Filter Types | Cartridge filter (dry), Foam filter (wet) |
| Dust Bag | Included |
| Protection Class | Class I |
| Recommended RCD | 30 mA |
Frequently Asked Questions - HWD 30S Cocraft
User questions about HWD 30S Cocraft
0 question about this device. Answer the ones you know or ask your own.
Ask a new question about this device
Download the instructions for your Vacuum Cleaner in PDF format for free! Find your manual HWD 30S - Cocraft and take your electronic device back in hand. On this page are published all the documents necessary for the use of your device. HWD 30S by Cocraft.
USER MANUAL HWD 30S Cocraft
Read the entire instruction manual carefully and make sure that you fully understand it before you use the equipment. Keep the manual for future reference.
ND DRY VACUUM CLEANER Viktig information:
natural_image
CoRaft automatic vacuum cleaner with blue handle and black body, mounted on wheels against a textured wall (no visible text or symbols)Art.no Model
41-1925
MWW707S-30L-1200WB
Ver. 20220323
Original instructions
Bruksanvisning i original
Originalbruksanvisning
Wet and Dry Vacuum Cleaner
Art.no 41-1925 Model MWW707S-30L-1200WB
Please read the entire instruction manual before using the product and then save it for future reference. We reserve the right for any errors in text or images and any necessary changes made to technical data. In the event of technical problems or other queries, please contact our Customer Services (see address details on the back).
Safety
- The product may be used by children aged 8 years and above and by persons with reduced physical, sensory or mental capability or lack of experience and knowledge provided they have been given supervision or instruction concerning use of the product in a safe way and understand the hazards involved.
- Never let children play with the product.
- This product is only intended for domestic use and only in the manner described in this instruction manual.
- The product should only be connected to a 230 V, 50 Hz outlet protected by a 30 mA RCD. Check the RCD before each use.
- Do not subject the product to continuous humidity, sunlight or sources of heat, such as stoves or open fire.
- Never immerse the product in water or other liquid.
- Never use the product if your hands are moist or wet.
• Always grip the plug when unplugging the product, never pull the mains lead. - Unplug the product immediately if the motor gets wet or becomes damp.
- The product must only be used to vacuum up substances which are not harmful to health. The product must never be used to vacuum combustible or flammable liquids.
- Never point the nozzle at yourself, other persons or animals.
- Never use the product without the dust bag and filter when dry vacuuming.
- Never use the product if it, its mains lead or plug is damaged in any way.
- If the mains lead has been damaged, it must only be replaced by the manufacturer, authorised service facility or qualified tradesman. This is to prevent the risk of electric shock or fire.
- Never vacuum anything that is smoking or smouldering such as hot ashes or coals. Never vacuum up pointed or sharp objects such a shards of glass.
- Do not vacuum up the toner powder used in photocopiers and printers. Such powder can damage the product and may even pass through the product and be redistributed back into the room.
- Never vacuum pieces of asbestos, asbestos dust or other toxic or flammable dust.
- Never vacuum up petrol, oil, acid or other flammable or toxic liquids.
- The product must always be used in an upright and stable position.
• Always unplug the mains lead before cleaning, changing the dust bag, filter or any other accessories. -
Never attempt to repair or modify the product in any way.
-
All repairs must be carried out by qualified service technicians using genuine spare parts.
- Never use the product whilst under the influence of drugs, alcohol or medicine. Do not use the product if you are tired or sick.
- Cleaning and maintenance may be carried out by children but only under adult supervision.
- The vacuum cleaner must not be used as a water pump. It is only designed to suction up a mixture of air and water.
Product description
- [I, 0, II] Power switch
- Motor unit
- Power tool socket
- Toggle latch
- Vacuum port
- Container
- Drain cap
- Wheels × 2
- Accessory holders × 8
- Castors × 2
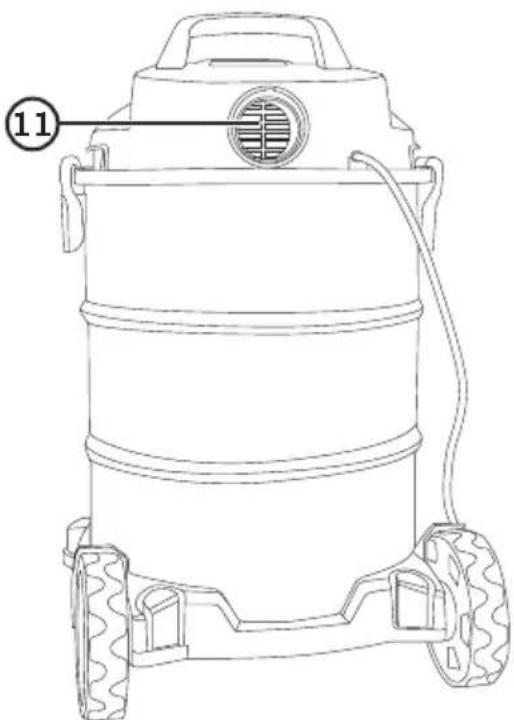
- Air outlet and suction hose port
natural_image
Line drawing of a portable industrial machine with wheels and a vent, labeled with number 11 (no text or symbols on the device itself)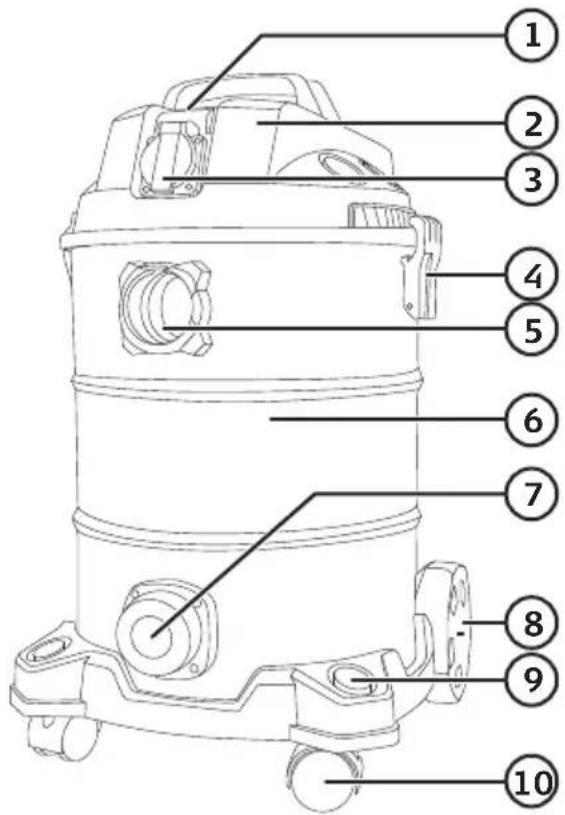
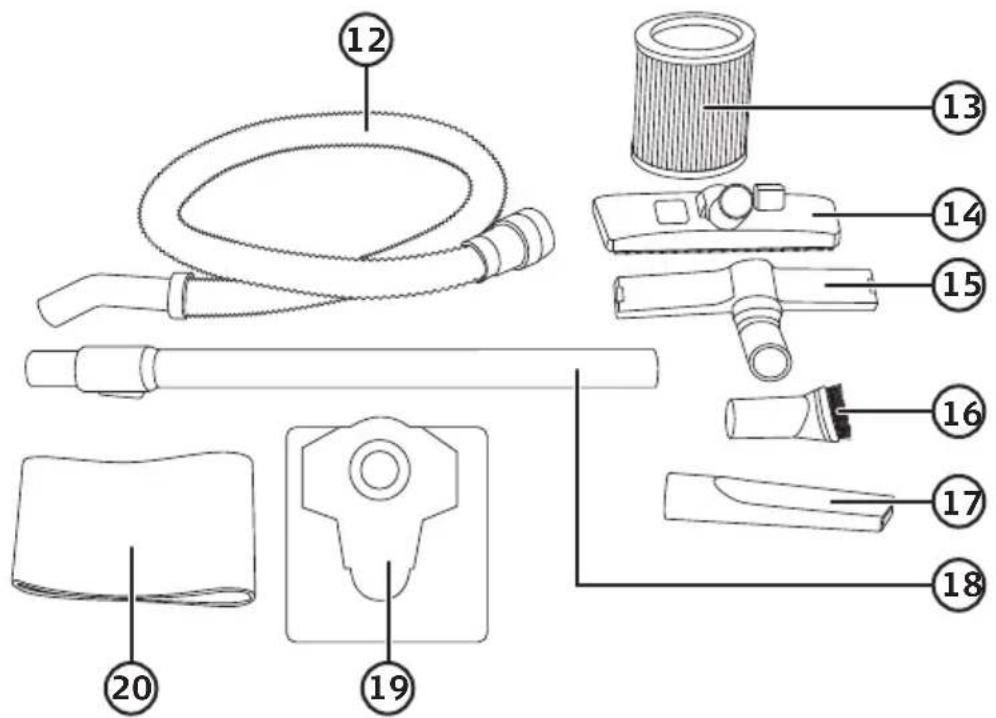
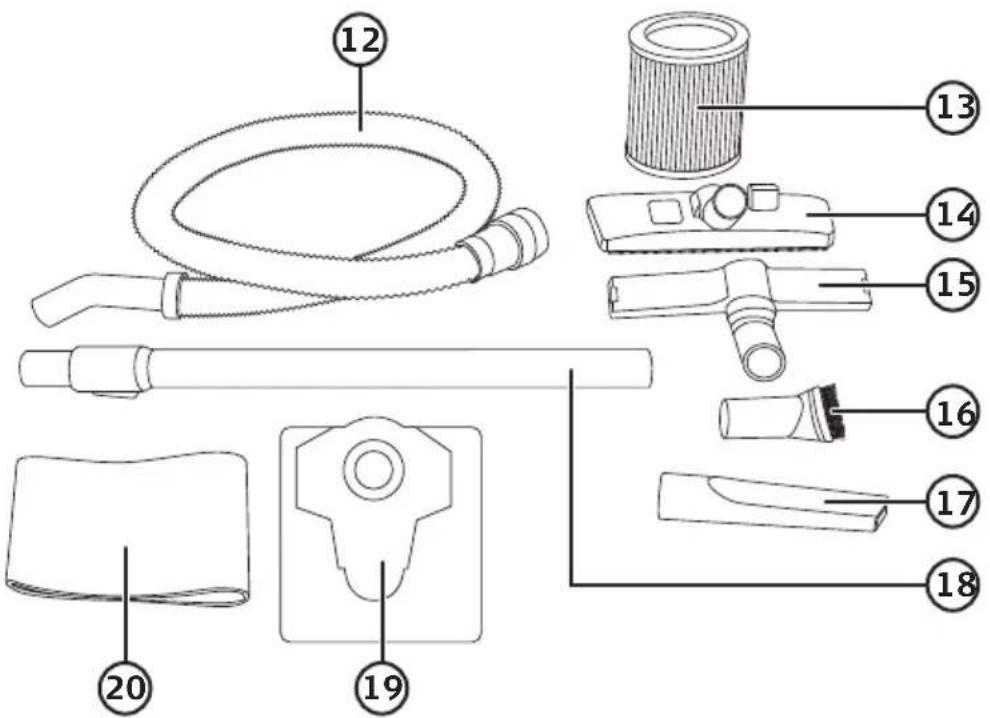
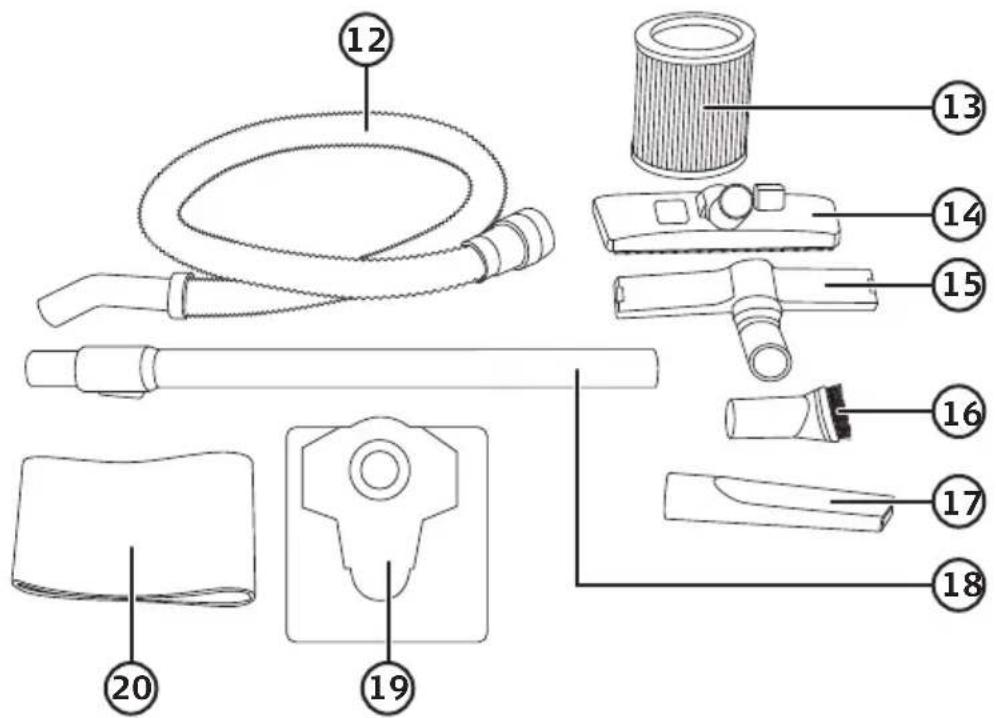
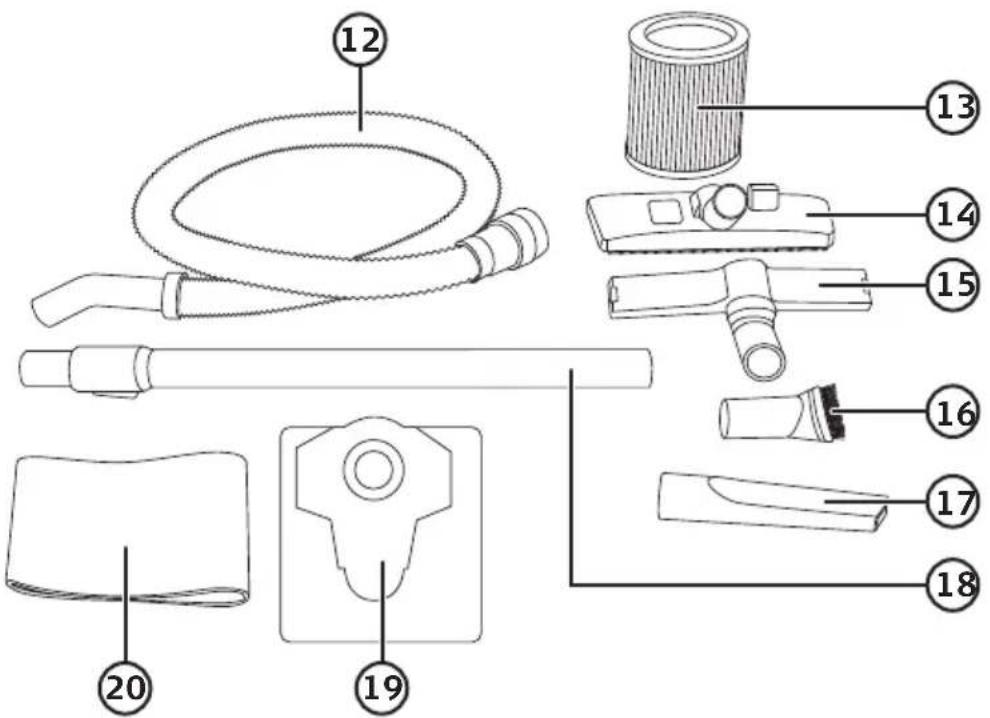
- Suction hose
- Cartridge filter
- Hard floor/carpet nozzle
- Ash/wet vac nozzle
-
Brush nozzle
-
Crevice tool
- Telescopic suction tube
- Dust bag
- Foam filter for wet use
Assembly
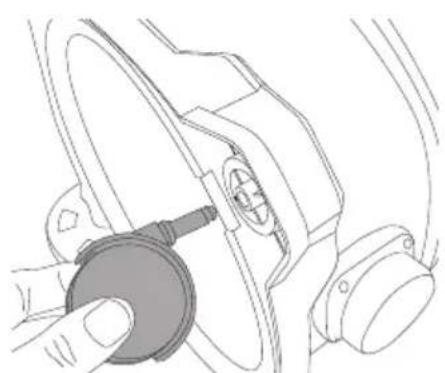
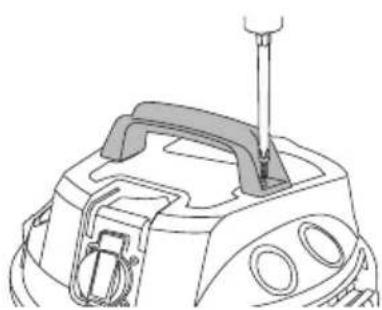
- Attach the handle.
natural_image
Line drawing of a hand holding a circular component inside a vehicle's steering wheel (no text or symbols)- Push the castors into the holes on the base.
natural_image
Line drawing of a mechanical device with a screwdriver inserted (no text or symbols)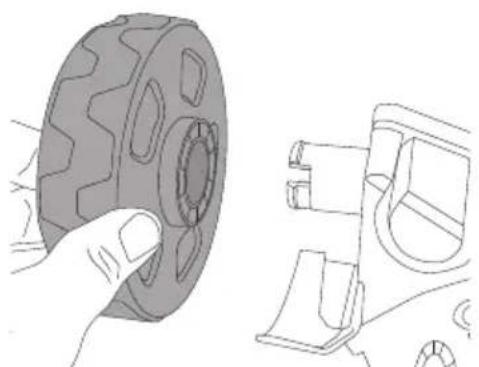
natural_image
Technical line drawing showing a hand holding a tire and a mechanical component (no text or symbols)- Push the wheels onto their axle stubs. Make sure that they click securely into place.
Instructions for use
Power switch
The power switch (1) has three positions:
• I: On
• 0: Off
- II: Power tool socket energised, the vacuum cleaner switches on/off in synchronisation with the operation of a connected power tool.
Dry vacuuming
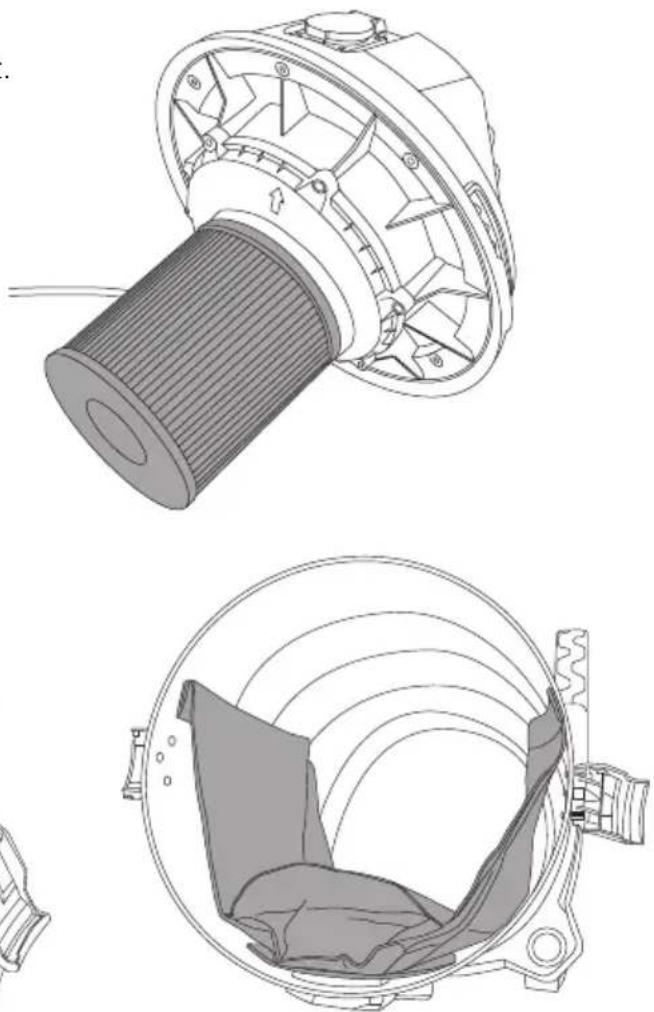
- Push the cartridge filter onto the motor unit.
natural_image
Technical line drawings of a mechanical component, showing top and front views with no visible text or symbols.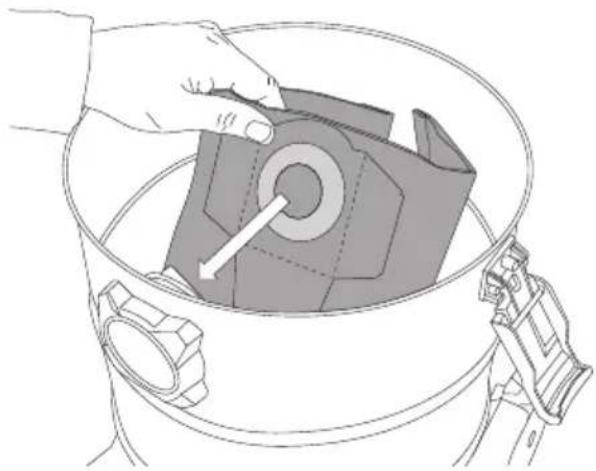
natural_image
Illustration of a hand placing a component into a cylindrical container with a tool, no text or symbols present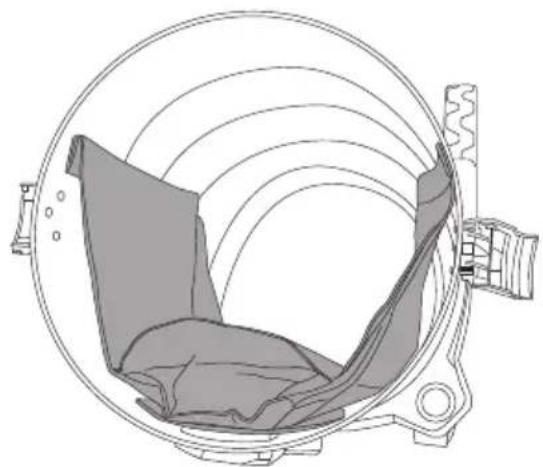
natural_image
Technical line drawing of a mechanical component with curved internal structure (no text or symbols)- Fit the dust bag.
- Fit the motor unit onto the container and lock it into place using the toggle latches.
- Attach the suction hose, telescopic suction tube and appropriate nozzle for the task.
- Start the motor by switching the power switch to I.
Wet vacuuming

Do not use the wet and dry vacuum to vacuum toxic, hazardous or flammable substances/liquids.

Important:
- Do not use the cartridge filter or dust bag when wet vacuuming. Remove the cartridge filter and dust bag.
- The level of liquid in the container is regulated by a safety float valve. When the container needs to be emptied, the safety valve stops suction and the motor will race. Turn off the motor using the power switch, remove the drain cap (7) and empty the container.
-
Do not submerge the entire nozzle under the surface of the waste liquid. Allow some air to also enter the suction hose when vacuuming a large amount of liquid.
-
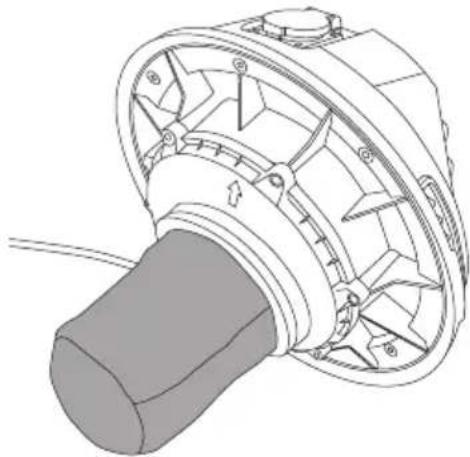
Fit the foam filter onto the motor unit.
- Attach the suction hose, telescopic suction tube and appropriate nozzle for the task.
- Start the motor by switching the power switch to I.
natural_image
Technical line drawing of a mechanical component with internal gear and shaft (no text or symbols)Precautionary measures for wet vacuuming
- Make sure that the foam filter is clean and dry before fitting it onto the motor unit and beginning to wet-vacuum.
- Clean the foam filter regularly. Remove the foam filter and hand wash it with water and a mild detergent. Allow the filter to air dry.
- Dry the container and make sure that it is completely dry before using the vacuum cleaner for dry vacuuming or before putting the vacuum cleaner away for storage.
- Don't forget to fit the cartridge filter and dust bag before dry vacuuming.
Power tool socket
The power tool socket (3) is designed to allow the connected power tool to automatically control the on and off switch of the vacuum cleaner.
- Connect the plug of your power tool such as a circular saw to the power take-off socket.
- Then connect the suction hose (12) from the vacuum cleaner to the dust extractor port on the circular saw (or respective power tool). Set the power switch to position II.
- The on and off switchings of the vacuum cleaner will now be controlled by the connected power tool. The vacuum cleaner will be switched on as soon as the connected power tool is switched on. When the connected power tool is switched off there will be about a 5-second delay before the vacuum cleaner is switched off.

The power tool socket must not be loaded with more than 2200 W (UK 1750 W).
Blower function
Connect the suction hose to the air outlet (11). Bear in mind that any dust or waste particles left inside the suction hose will be blown out when the vacuum cleaner is switched on.
Care, maintenance and storage
• Always unplug the product from the wall socket before cleaning.
- Clean the exterior of the vacuum cleaner using a damp cloth. Use only mild cleaning agents, never solvents or corrosive chemicals.
Cleaning the cartridge filter
- Make sure that the vacuum cleaner is unplugged from the mains.
- Remove the filter.
- Brush or shake any dirt and debris off the filter (in an appropriate outdoor area).
- Refit the filter.
Cleaning the foam filter
- Make sure that the vacuum cleaner is unplugged from the mains.
- Remove the filter.
- Hand wash the filter with mild soapy water and then rinse well with clean water.
- Allow the filter to air dry. Refit the filter only when it is completely dry.
If the wet and dry vacuum cleaner is not to be used for an extended period
Unplug the vacuum cleaner and make sure that all the parts are dry.
Store it in a dry place out of children's reach.
Troubleshooting guide
| The wet and dry vacuum cleaner won’t start. | Make sure that the mains lead is undamaged and securely plugged into a wall socket.Is the wall socket energised? |
| Poor suction and high motor speed. | Dust bag is full, change the bag.The container is full of liquid, empty it.Nozzle, hose or coupling clogged. Check and clean as required. |
Responsible disposal
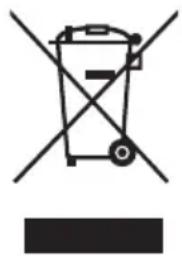
This symbol indicates that this product should not be disposed of with general household waste. This applies throughout the entire EU. In order to prevent any harm to the environment or health hazards caused by incorrect waste disposal, the product must be handed in for recycling so that the material can be disposed of in a responsible manner. When recycling your product, take it to your local collection facility or contact the place of purchase. They will ensure that the product is disposed of in an environmentally sound manner.
natural_image
Symbol of a waste bin with no text or labels, crossed by two diagonal lines (no text or symbols present)Specifications
Rated voltage 220–240 V, 50/60 Hz
Power 1200 W
Power tool socket Max load 2200 W (UK 1750 W)
Max total wattage 3400 W (UK 2950 W)
Max vacuum pressure 180 mbar
Suction capacity 1920 L/min
Container 30 L
Mains lead 4.5 m
Weight 6 kg when empty
Suction hose Diameter: 35 mm, length: 1.5 m
Protection class |
IP rating IPX4
Torr- och våtsugare
Art.nr 41-1925 Modell MWW707S-30L-1200WB
natural_image
Line drawing of a portable industrial vacuum cleaner with wheels and a vent, labeled with number 11 (no text or symbols on the device itself)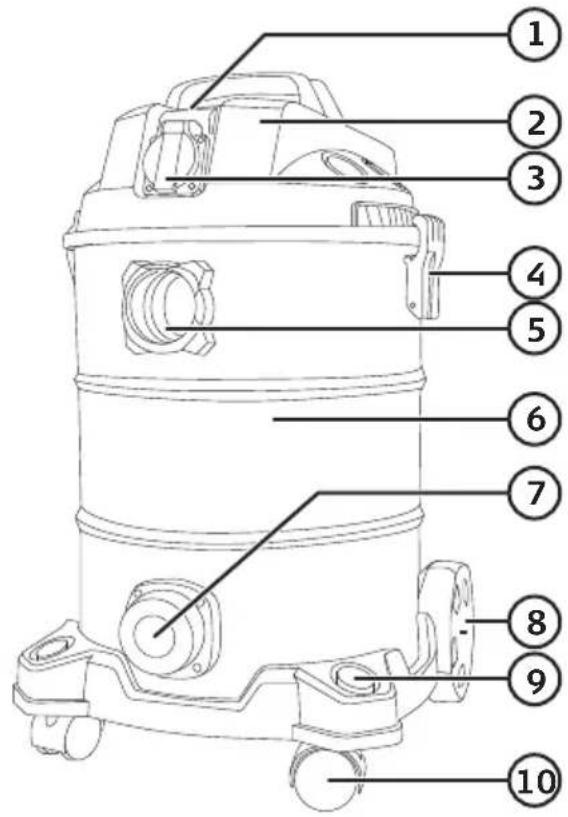
natural_image
Line drawing of a car interior showing a hand holding a circular component (no text or symbols)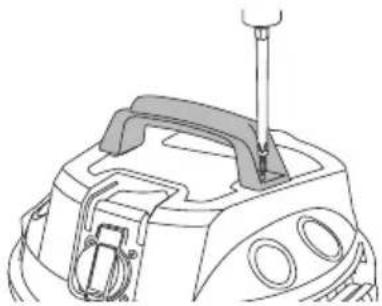
natural_image
Technical line drawing of a mechanical device with a screwdriver inserted (no text or symbols)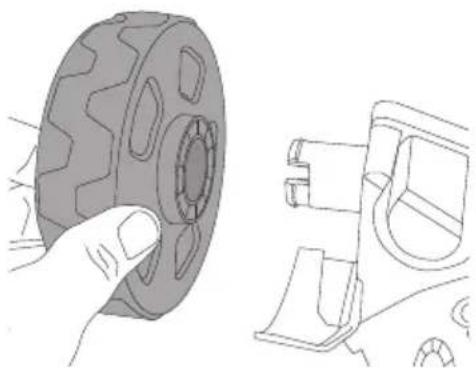
natural_image
Technical line drawing showing a hand adjusting a tire and a mechanical component (no text or symbols)natural_image
Technical line drawing of a mechanical component with internal structure and mounting holes (no text or symbols)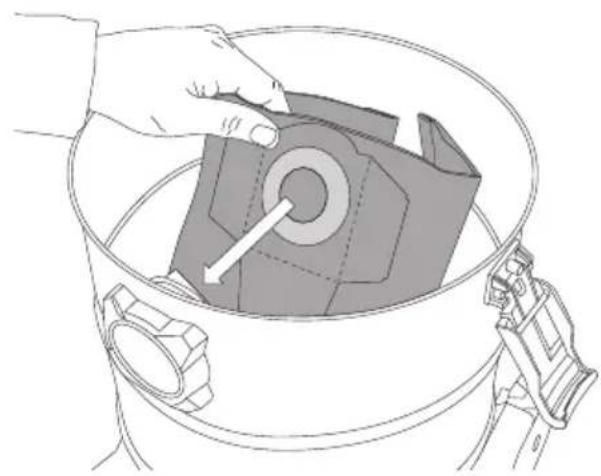
natural_image
Line drawing of a hand holding a mechanical component inside a cylindrical container (no text or symbols)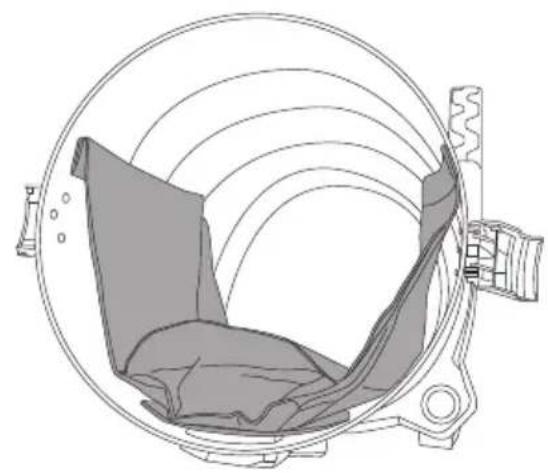
natural_image
Technical line drawing of a mechanical component with curved internal structure (no text or symbols)natural_image
Technical line drawing of a mechanical component with no visible text or symbolsnatural_image
Symbol of a trash bin crossed out by two crossed lines, with no text or labels present.Specifikationer
Nätanslutning 220–240 V, 50/60 Hz
Motoreffekt 1200 W
Maskinuttag Max 2200 W (UK 1750 W)
Maxeffekt totalt 3400 W (UK 2950 W)
Undertryck 180 mbar
Sugkapacitet 1920 l/min
Behållare 30 l
Nätkabel 4,5 m
Vikt, tom 6 kg
natural_image
Line drawing of a portable industrial machine with wheels and a vent, labeled with number 11 (no text or symbols on the device itself)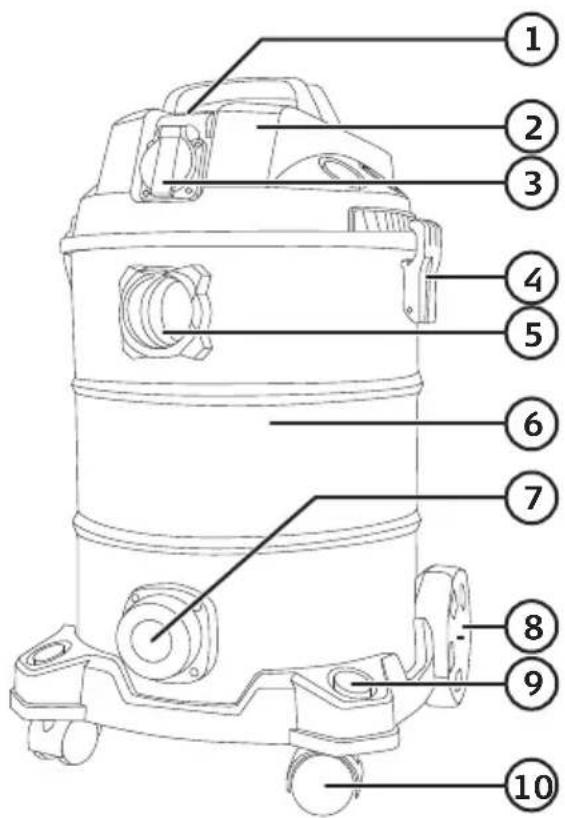
natural_image
Line drawing of a hand inserting a circular component into a mechanical device (no text or symbols)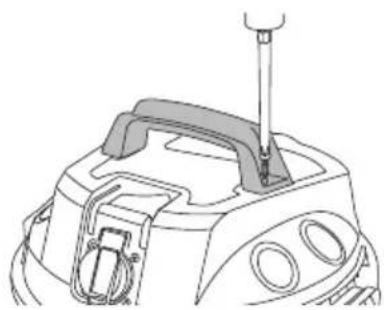
natural_image
Technical line drawing of a mechanical device with a screwdriver inserted (no text or symbols)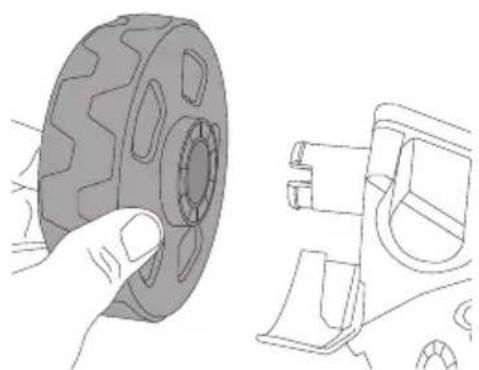
natural_image
Technical line drawing showing a hand holding a tire and a mechanical component (no text or symbols)natural_image
Technical line drawing of a mechanical component with internal structure and mounting holes (no text or symbols)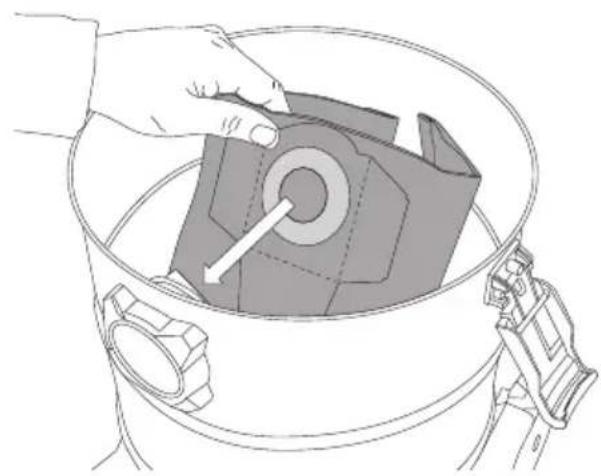
natural_image
Line drawing of a hand holding a mechanical component inside a cylindrical container (no text or symbols)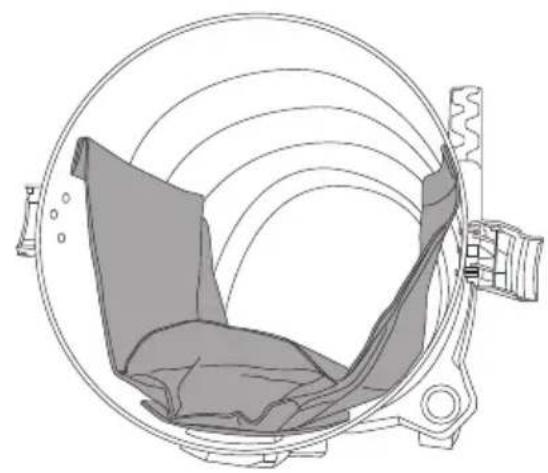
natural_image
Technical line drawing of a mechanical component with curved internal structure (no text or symbols)natural_image
Technical line drawing of a mechanical component with no visible text or symbolsnatural_image
Symbol of a trash bin with crossed lines indicating no waste or discharge (no text or labels)Spesifikasjoner
Nettilkobling 220–240 V, 50/60 Hz
Motoreffekt 1200 W
Maskinuttak Maks 2200 W (UK 1750 W)
Makseffekt totalt 3400 W (UK 2950 W)
Undertrykk 180 mbar
Sugekapasitet 1920 l/min
Beholder 301
Nettkabel 4,5 m
Vekt 6 kg (netto)
natural_image
Line drawing of a portable industrial machine with wheels and a vent, labeled with number 11 (no text or symbols on the device itself)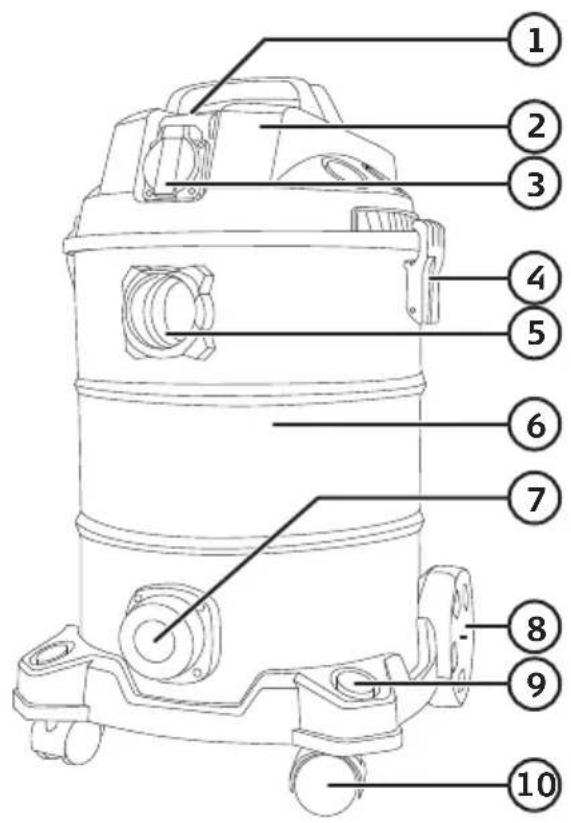
natural_image
Technical line drawing of a mechanical component with internal structure and mounting holes (no text or symbols)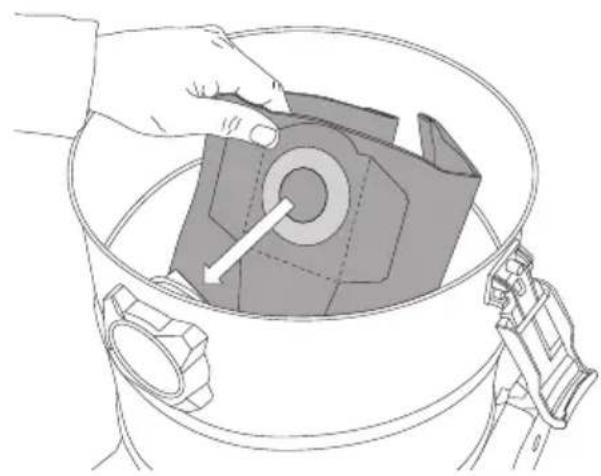
natural_image
Line drawing of a hand holding a mechanical component inside a cylindrical container (no text or symbols)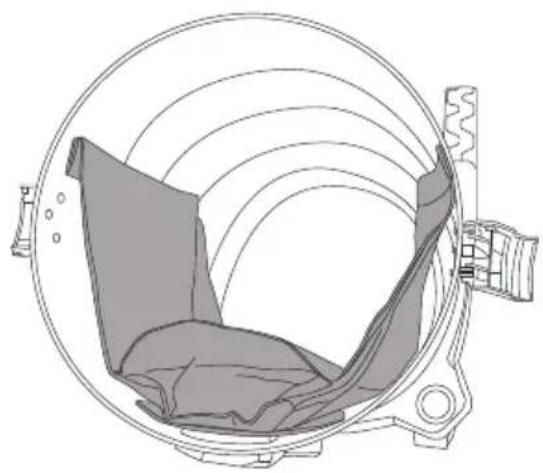
natural_image
Technical line drawing of a mechanical component with curved internal structure (no text or symbols)natural_image
Technical line drawing of a mechanical component with no visible text or symbolsnatural_image
Symbol of a trash bin crossed with a diagonal line, no text or numbers presentTekniset tiedot
EC Declaration of Conformity
This declaration of conformity is issued under the sole responsibility of the manufacturer.
EU-försäkran om överensstämmelse utfärdas på tillverkarens eget ansvar. / Egenerkläringen er utstedt under produsentens eget ansvar. / Tämä vaatimustenmukaisuusvakuutus on annettu valmistajan yksinomaisella vastuulla
Manufacturer and person authorised to compile technical file: Clas Ohlson AB, SE-793 85 Insjön, Sweden
| Name | Torr &Våtsugare Cocraft |
| Type/Model | MWW707S-30L-1200WB |
| Clas Ohlson Article Number | 411925000 |
The product satisfies the provision for CE-marking according to the following directive(s) / regulation(s) including amendments / Produkten uppfyller kraven för CE-märkning enligt följande direktiv / förordningar inklusive ändringar/ Produktet tilfredsstiller bestemmelsen om CE-merking i henhold til fölgende direktiv (er) / forskrifter, inkludert endringer / Tuote täyttää seuraavien direktiivien / asetusten mukaiset CE-merkintää koskevat vaatimukset, mukaan lukien muutokset;
□ Machinery Directive 2006/42/EC
EMC Directive 2014/30/EU
References to the relevant harmonised standards used or references to the other technical specifications in relation to which conformity is declared. Hänvisning till de harmoniserade standarder som använts eller hänvisningar till de specifikationer som försäkran om överensstämmelse deklareras: / Referere til harmoniserte standarder som brukes, eller henvisninger til spesifikasjonene der samsvarserklæring er erklärt: / Viittaus yhdenmukaistettuihin standardeihin tai viittaus eritelmiin, jossa vaatimustenmukaisuusvakuutus on julistettu; LVD: EN 60335-2-2:2010 + A11:2012 + A1:2013, EN 60335-1:2012 + A11:2014 + AC:2014 + A13:2017 + A1:2019 + A14:2019 + A2:2019, EN 62233:2008. EMC: EN 55014-1:2017 + A11:2020, EN 55014-2:2015, EN IEC 61000-3-2:2019, EN 61000-3-3:2013 + A1:2019
Signed for and on behalf of;

Product Compliance & Sustainability Manager
Clas Ohlson AB, SE-793 85 Insjön, Sweden
Place and date: 2022-03-04
Sverige


- ND DRY VACUUM CLEANER Viktig information:
- Wet and Dry Vacuum Cleaner
- Safety
- Product description
- Assembly
- Instructions for use
- Power switch
- Dry vacuuming
- Wet vacuuming
- Important:
- Precautionary measures for wet vacuuming
- Power tool socket
- Blower function
- Care, maintenance and storage
- Cleaning the cartridge filter
- Cleaning the foam filter
- If the wet and dry vacuum cleaner is not to be used for an extended period
- Troubleshooting guide
- Responsible disposal
- Specifications
- Torr- och våtsugare
- Specifikationer
- Spesifikasjoner
- Tekniset tiedot
- EC Declaration of Conformity
- Sverige
Brand : Cocraft
Model : HWD 30S
Category : Vacuum Cleaner