
HEV 15 - Multifunction tool Cocraft - Free user manual and instructions
Find the device manual for free HEV 15 Cocraft in PDF.


| Product Type | Multifunction Tool |
| Brand | Cocraft |
| Model | HEV 15 |
| Dimensions (L x W x H) | Approx. 30 x 10 x 15 cm |
| Weight | Approx. 1.2 kg |
| Power Source | Electric corded, 220-240 V AC, 50/60 Hz |
| Power Consumption | 300 W |
| No-Load Speed | 10,000 - 20,000 oscillations per minute |
| Oscillation Angle | 3.2° |
| Main Functions | Cutting, sanding, scraping, sawing, grinding |
| Tool Free Accessory Change | Yes, via quick-release clamp |
| Variable Speed Control | Yes, with dial |
| LED Light | Yes, for work area illumination |
| Dust Extraction Adapter | Yes, compatible with vacuum cleaners |
| Soft Grip Handle | Yes, ergonomic design |
| Protection Class | II (double insulated) |
| Safety Features | Lock-on switch, safety guard |
| Operating Temperature | 0 °C to 40 °C |
| Storage Temperature | -20 °C to 60 °C |
| Maintenance | Keep ventilation slots clean; regularly check carbon brushes |
| Cleaning | Wipe with a dry cloth; do not use water or solvents |
| Spare Parts Availability | Accessory sets and carbon brushes available via manufacturer or retailers |
| Repairability | Designed for professional repair; user can replace accessories and carbon brushes |
| Warranty | 2 years limited warranty |
| Certifications | CE, RoHS |
Frequently Asked Questions - HEV 15 Cocraft
User questions about HEV 15 Cocraft
0 question about this device. Answer the ones you know or ask your own.
Ask a new question about this device
Download the instructions for your Multifunction tool in PDF format for free! Find your manual HEV 15 - Cocraft and take your electronic device back in hand. On this page are published all the documents necessary for the use of your device. HEV 15 by Cocraft.
USER MANUAL HEV 15 Cocraft
ADJUSTABLE IMPACT FORCE
GRAVYRMASKIN GRAVÉRMASKIN KAIVERRUSKONE GRAVIERMASCHINE

Important!
Read the entire instruction manual carefully and make sure that you fully understand it before you use the equipment. Keep the manual for future reference.
Viktig information:
Please read the entire instruction manual before using the product and then save it for future reference. We reserve the right for any errors in text or images and any necessary changes made to technical data. In the event of technical problems or other queries, please contact our Customer Services (see address details on the back).
Safety
1) Work area
a) Keep the work area clean and well illuminated. Cluttered and poorly lit areas invite accidents.
b) Do not use power tools in explosive environments, e.g. near to flammable liquids, gases or dust. Power tools generate sparks that can easily ignite dust or fumes.
c) Keep children and bystanders away from the area where you are using the power tool. Distractions can cause you to lose your concentration and control.
2) Electrical safety
a) The plug of the power tool must fit correctly into the wall socket. Never modify the plug in any way. Never use an adaptor together with earthed power tools. Unmodified plugs and suitable wall sockets minimize the risk of electric shocks.
b) Avoid physical contact with earthed objects, such as pipes, radiators, ovens or refrigerators. There is an increased risk of receiving an electrical shock if your body is earthed.
c) Do not expose the power tool to rain or other wet conditions. Water entering a power tool will increase the risk of electric shock.
d) Do not abuse the mains lead. Never use the lead to carry the tool or pull the plug from a wall socket. Keep the lead away from heat, oil, sharp edges and moving parts. Damaged or tangled leads increase the risk of electric shock.
e) When using power tools outdoors, use an extension lead that is suitable for this purpose. The use of an extension lead designed for outdoor use decreases the risk of electric shocks.
3) Personal safety
a) Pay attention to what you are doing and use common sense when using power tools. Never use power tools if you are tired or under the influence of drugs, alcohol or medication. One moment of inattention while using a power tool may result in serious injury.
b) Wear protective clothing. Always wear safety glasses. Using protective clothing such as dust masks, non-slip safety shoes, helmets and ear defenders when needed decreases the risk of injury.
c) Avoid accidental starts. Make sure that the power switch is set to OFF before plugging the tool into a wall socket. Never carry a power tool with your finger on the trigger and never connect the power tool to a wall socket when the switch is set to ON, since it may result in injury.
d) Remove all service tools/keys before switching on the power tool. A service tool left on a rotating part of the power tool may result in personal injury.
e) Do not overreach. Make sure you stand steady and well balanced at all times. This will allow you to have more control in unexpected situations.
f) Wear suitable clothing. Do not wear loose-fitting clothing or jewellery. Keep hair, clothes and gloves away from moving parts. Loose-fitting clothes, jewellery or long hair could potentially become caught in any moving parts.
g) If equipment for dust extraction or collecting is available make sure it is connected and used properly. Use of dust collection equipment can reduce dust related hazards.
4) Use and maintenance of the power tool
a) Do not force the power tool. Use the correct power tool for your application. The correct power tool will perform the task better and safer if used at the correct feed rate.
b) Never use the power tool if the power switch does not switch the tool on and off. Any power tool that cannot be controlled by the power switch is dangerous and must be repaired.
c) Unplug the lead from the wall socket before making any adjustments, changing accessories or storing the power tool. These precautions reduce the risk of the power tool starting unexpectedly.
d) Store power tools that are not being used out of children's reach. Do not allow people who are unfamiliar with the tool or its functions to operate it. Power tools can be dangerous if they fall into the hands of inexperienced users.
e) Maintain power tools. Check for any incorrect settings, parts that catch, broken parts or anything else which may cause the power tool to malfunction. If something is damaged it must be repaired before use. Accidents are frequently caused by poorly maintained power tools.
f) Keep tools sharp and clean. Properly maintained cutting tools with sharp cutting edges are less likely to bind and are easier to control.
g) Use the power tool, accessories and similar according to the instructions and in an appropriate way suitable for the type of power tool used. Also take into consideration your work environment and the type of work to be done. Using the power tool for a purpose other than that for which it is intended could result in a dangerous situation.
5) Service
a) Repairs and service should only be performed by qualified tradesmen, and only with original spare parts. This guarantees that the safety of the power tool is maintained.
If the mains lead is damaged it should only be replaced by the retailer.
Product safety symbols

natural_image
Simple line drawing of a person wearing sunglasses inside a circle (no text or symbols)Always use ear defenders and safety goggles or a visor.
Buttons and functions
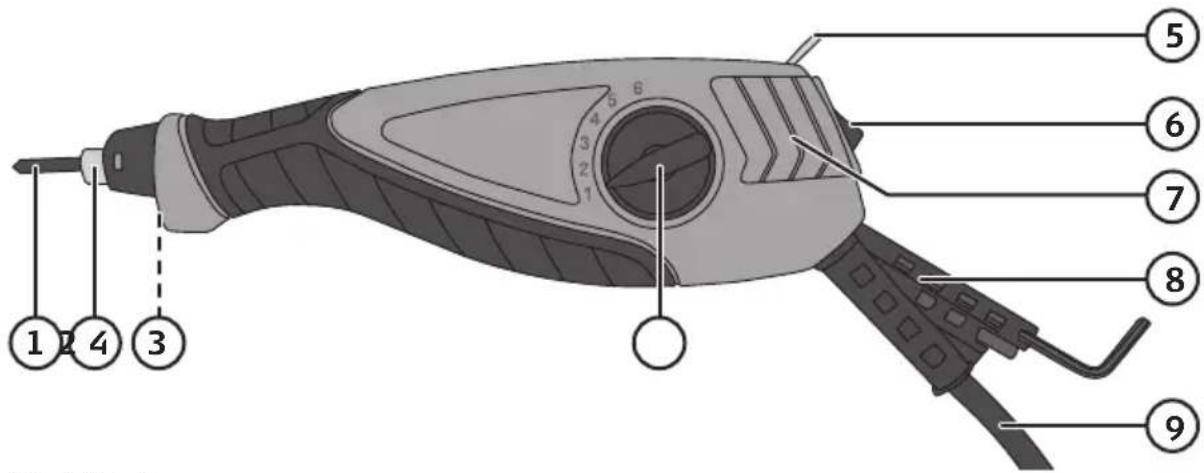
- Carbide tip
- Carbide tip locking screw
- Light
- Impact force selector
- Hanging hook
- [I/0] Power switch
- Motor housing ventilation slots
- Hex key and carbide tip holder
- Mains lead
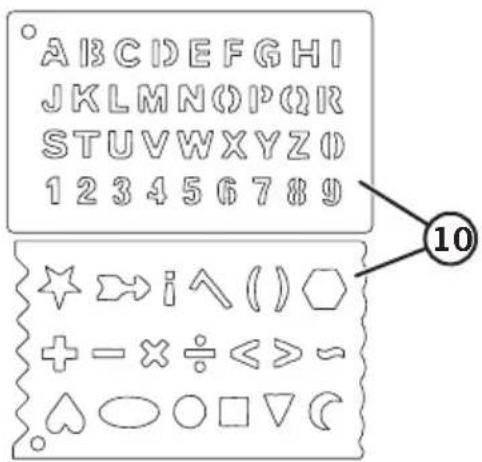
- Stencils
Getting started
- Always unplug the engraver before cleaning it or replacing the tip.
- Undo the locking screw (2) using the included hex key.
- Insert a carbide tip, pushing it in as far as it will go.
- Tighten the locking screw.
- Put the hex key back into its holder.
Operating instructions
- Always wear safety glasses and ear defenders when using the engraver.
- Check that the carbide tip is intact and properly fitted.
- Plug the mains lead into a wall socket.
- Hold the engraver in the same way as you would hold a pen.
- You may engrave freehand or use the stencils as a guide.
- Apply only light pressure whilst engraving.
Setting the impact force
Set the impact force by turning the selector knob (4).
- Level 1 is for fine or shallow engraving.
- Level 6 is for broader and deeper engraving.
Test the setting on a scrap piece of the same material before working on the real workpiece.
Care and maintenance
• Always unplug the engraver before cleaning it or replacing the tip.
- Clean the exterior of the engraver by wiping it with a damp cloth. Use only mild cleaning agents, never solvents or corrosive chemicals.
- Make sure that the ventilation slots on the motor housing are clean and free from contaminants.
- If the engraver is not to be used for an extended period, it should be unplugged and stored in a dry and dust-free location out of reach of children.
Responsible disposal
This symbol indicates that this product should not be disposed of with general household waste. This applies throughout the entire EU. In order to prevent any harm to the environment or health hazards caused by incorrect waste disposal, the product must be handed in for recycling so that the material can be disposed of in a responsible manner. When recycling your product, take it to your local collection facility or contact the place of purchase. They will ensure that the product is disposed of in an environmentally sound manner.
natural_image
Symbol of a trash bin crossed out by two crossed lines, with no text or labels present.Specifications
Rated voltage 220–240 V AC, 50 Hz
Power 15 W
Engraving tip Tungsten carbide
Impact force 6-stage
Impact rate 7200 bpm
Sound power level LwA = 87.5 dB(A), K = 3 dB(A)
Sound pressure level LpA = 76.5 dB(A), K = 3 dB(A)
Vibration value a h = 10.5 m/s^2 , K = 1.5 m/s^2
Weight 0.35 kg
Protection class Class II
Duty type S2: 2 min
Gravyrmaskin
Art.nr 40-9980 Modell Q1K-DW02-15
natural_image
Simple line drawing of a person's head wearing glasses inside a circle (no text or symbols)natural_image
Symbol of a trash bin crossed with no text or labels, accompanied by a solid black rectangle below (no text or symbols present)Specifikationer
Nätanslutning 220–240 V AC, 50 Hz
Effekt 15 W
Karbidstift Tungstenskarbid
Slagstyrka 6 steg
Slag/min 7200
Ljudeffekt LwA = 87,5 dB(A), K = 3 dB(A)
Ljudtryck LpA = 76,5 dB(A), K = 3 dB(A)
Vibration a _h=10,5 m/s^2, K=1,5 m/s^2
Vikt 0,35 kg
natural_image
Simple line drawing of a person wearing sunglasses inside a circle (no text or symbols)natural_image
Symbol of a trash bin crossed with no text or numbers, representing waste sorting or disposal (no text present)Spesifikasjoner
Nettspenning 220–240 V AC, 50 Hz
Effekt 15 W
Karbidstift Wolframkarbid
Slagstyrke 6 trinn
Slag/min. 7200
Lydeffekt LwA = 87,5 dB(A), K = 3 dB(A)
natural_image
Simple line drawing of a person wearing sunglasses inside a circle (no text or symbols)natural_image
Symbol of a trash bin crossed with no visible text or labelsTekniset tiedot
natural_image
Simple line drawing of a person's head wearing sunglasses inside a circle (no text or symbols)Erste Schritte
natural_image
Symbol of a trash bin crossed out by two crossed lines, with no text or labels present.Technische Daten
Declaration of Conformity
Declares that this product complies with the requirements of the following directives and standards
Machinery Directive 2006/42/EC
EMC Directive 2014/30/EU
EN 60745-1:2009+A11 EN
↓ 55014-1: 2006+A1+A2
EN 55014-2: 1997+A1+A2
EN 61000-3-2: 2014
EN 61000-3-3: 2013
Henrik Alfredsson
Manager Technique & Quality
Insjön, Sweden, 2016-05-17
Sverige
Postal 10 - 13 Market Place
Kingston Upon Thames
Surrey
KT1 1JZ
Deutschland
Kundenservice

- ADJUSTABLE IMPACT FORCE
- GRAVYRMASKIN GRAVÉRMASKIN KAIVERRUSKONE GRAVIERMASCHINE
- Important!
- Viktig information:
- Safety
- 1) Work area
- 2) Electrical safety
- 3) Personal safety
- 5) Service
- Product safety symbols
- Buttons and functions
- Getting started
- Operating instructions
- Setting the impact force
- Care and maintenance
- Responsible disposal
- Specifications
- Gravyrmaskin
- Specifikationer
- Spesifikasjoner
- Tekniset tiedot
- Erste Schritte
- Technische Daten
- Declaration of Conformity
- Sverige
- Deutschland
Brand : Cocraft
Model : HEV 15
Category : Multifunction tool