
LXC HDD18 - Tour Cocraft - Free user manual and instructions
Find the device manual for free LXC HDD18 Cocraft in PDF.


| Type | Cordless Drill/Driver |
| Model | LXC HDD18 |
| Brand | Cocraft |
| Battery Voltage | 18 V LXC series (sold separately) |
| No-load Speed (Low/High) | 0–400 / 0–1500 rpm |
| Torque Settings | 18 + drill setting, max 45 Nm |
| Chuck Size | 13 mm keyless |
| Weight (with 2.0 Ah battery) | 1.7 kg |
| Sound Pressure Level (LpA) | 90.0 dB(A), K = 3 dB(A) |
| Sound Power Level (LwA) | 101.0 dB(A), K = 3 dB(A) |
| Vibration Emission (Drilling Metal) | a_h,D = 1.135 m/s², K = 1.5 m/s² |
| Vibration Emission (Drilling Concrete) | a_h,ID = 15.721 m/s², K = 1.5 m/s² |
| Modes | Drill, Screwdriver, Hammer Drill |
| Forward/Reverse Selector | Yes, with lock-off center position |
| Variable Speed Trigger | Yes |
| Work Light | Yes, near battery |
| Overload Protection | Automatic reset |
| Overheating Protection | Self-resetting after cooling |
| Deep Discharge Protection | Automatic shut-off |
| Storage Temperature (Battery) | 5–50 °C |
| Cleaning Method | Soft brush or cloth; no water or solvents |
Frequently Asked Questions - LXC HDD18 Cocraft
User questions about LXC HDD18 Cocraft
0 question about this device. Answer the ones you know or ask your own.
Ask a new question about this device
Download the instructions for your Tour in PDF format for free! Find your manual LXC HDD18 - Cocraft and take your electronic device back in hand. On this page are published all the documents necessary for the use of your device. LXC HDD18 by Cocraft.
USER MANUAL LXC HDD18 Cocraft
Read the entire instruction manual carefully and make sure that you fully understand it before you use the equipment. Keep the manual for future reference.
Viktig information:
natural_image
Blue and black Cocrac® LXC HDD18 electric drill press tool (no visible text or symbols on body)SVERIGE
Postal 10 - 13 Market Place
Kingston upon Thames
Surrey
KT1 1JZ
DEUTSCHLAND
Kundeservice Hotline: 040 2999 78111
E-Mail: kundenservice@clasohlson.de
Please read the entire instruction manual before use and then save it for future reference. We reserve the right for any errors in text or images and any necessary changes made to technical data. In the event of technical problems or other queries, please contact our Customer Services.
Safety
General Power Tool Safety Warnings – Personal Safety
Warning: Read all safety warnings and all instructions. Failure to follow the warnings and instructions may result in electric shock, fire and/or serious injury.
SAVE ALL WARNINGS AND INSTRUCTIONS FOR FUTURE REFERENCE.
The term "power tool" in the warnings refers to your mains-operated (corded) power tool or battery-operated (cordless) power tool.
1) Work area safety
a) Keep work area clean and well lit. Cluttered or dark areas invite accidents.
b) Do not operate power tools in explosive atmospheres, such as in the presence of flammable liquids, gases or dust. Power tools create sparks which may ignite the dust or fumes.
c) Keep children and bystanders away while operating a power tool.
Distractions can cause you to lose control.
2) Electrical safety
a) Power tool plugs must match the outlet. Never modify the plug in any way. Do not use any adapter plugs with earthed (grounded) power tools. Unmodified plugs and matching outlets will reduce risk of electric shock.
b) Avoid body contact with earthed or grounded surfaces, such as pipes, radiators, ranges and refrigerators. There is an increased risk of electric shock if your body is earthed or grounded.
c) Do not expose power tools to rain or wet conditions. Water entering a power tool will increase the risk of electric shock.
d) Do not abuse the cord. Never use the cord for carrying, pulling or unplugging the power tool. Keep cord away from heat, oil, sharp edges or moving parts. Damaged or entangled cords increase the risk of electric shock.
e) When operating a power tool outdoors, use an extension cord suitable for outdoor use. Use of a cord suitable for outdoor use reduces the risk of electric shock.
f) If operating a power tool in a damp location is unavoidable, use a residual current device (RCD) protected supply. Use of an RCD reduces the risk of electric shock.
3) Personal safety
a) Stay alert, watch what you are doing and use common sense when operating a power tool. Do not use a power tool while you are tired or under the influence of drugs, alcohol or medication. A moment of inattention while operating power tools may result in serious personal injury.
b) Use personal protective equipment. Always wear eye protection. Protective equipment such as dust mask, non-skid safety shoes, hard hat, or hearing protection used for appropriate conditions will reduce personal injuries.
c) Prevent unintentional starting. Ensure the switch is in the off-position before connecting to power source and/or battery pack, picking up or carrying the tool. Carrying power tools with your finger on the switch or energising power tools that have the switch on invites accidents.
d) Remove any adjusting key or wrench before turning the power tool on. A wrench or a key left attached to a rotating part of the power tool may result in personal injury.
e) Do not overreach. Keep proper footing and balance at all times. This enables better control of the power tool in unexpected situations.
f) Dress properly. Do not wear loose clothing or jewellery. Keep your hair, clothing and gloves away from moving parts. Loose clothes, jewellery or long hair can be caught in moving parts.
g) If devices are provided for the connection of dust extraction and collection facilities, ensure these are connected and properly used. Use of dust collection can reduce dust related hazards.
4) Power tool use and care
a) Do not force the power tool. Use the correct power tool for your application. The correct power tool will do the job better and safer at the rate for which it was designed.
b) Do not use the power tool if the switch does not turn it on and off. Any power tool that cannot be controlled with the switch is dangerous and must be repaired.
c) Disconnect the plug from the power source and/or the battery pack from the power tool before making any adjustments, changing accessories, or storing power tools. Such preventive safety measures reduce the risk of starting the power tool accidentally.
d) Store idle power tools out of the reach of children and do not allow persons unfamiliar with the power tool or these instructions to operate the power tool. Power tools are dangerous in the hands of untrained users.
e) Maintain power tools. Check for misalignment or binding of moving parts, breakage of parts and any other condition that may affect the power tool's operation. If damaged, have the power tool repaired before use.
Many accidents are caused by poorly maintained power tools.
f) Keep cutting tools sharp and clean. Properly maintained cutting tools with sharp cutting edges are less likely to bind and are easier to control.
g) Use the power tool, accessories and tool bits, etc. in accordance with these instructions, taking into account the working conditions and the work to be performed. Use of the power tool for operations different from those intended could result in a hazardous situation.
5) Battery tool use and care
a) Make sure that the power switch is set to OFF before the battery is inserted. Attaching a battery to a power tool when the power switch set to ON increases the risk of an accident occurring.
b) Recharge only with the charger specified by the manufacturer. A charger that is suitable for one type of battery pack may create a risk of fire when used with another battery pack.
c) Use power tools only with specifically designated battery packs. Use of any other battery packs may create a risk of injury and fire.
d) When battery pack is not in use, keep it away from other metal objects, like paper clips, coins, keys, nails, screws or other small metal objects, that can make a connection from one terminal to another. Shorting the battery terminals together may cause burns or a fire.
e) Under abusive conditions, liquid may be ejected from the battery; avoid contact. If contact accidentally occurs, flush with water. If liquid contacts eyes, additionally seek medical help. Liquid ejected from the battery may cause irritation or burns.
6) Service
a) Have your power tool serviced by a qualified repair person using only identical replacement parts. This will ensure that the safety of the power tool is maintained.
Drill Safety Warnings
a) Use auxiliary handle(s), if supplied with the tool. Loss of control can cause personal injury.
b) Hold power tool by insulated gripping surfaces, when performing an operation where the cutting accessory may contact hidden wiring.
Cutting accessory contacting a "live" wire may make exposed metal parts of the power tool "live" and could give the operator an electric shock.
Product safety symbols

Read the entire instruction manual.

Always use safety glasses.

Always use ear protection.

For indoor use only.
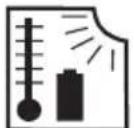
max 50 °C

Protect the battery against heat, e. g., against continuous intense sunlight, fire, water, and moisture. Danger of explosion.
Product description
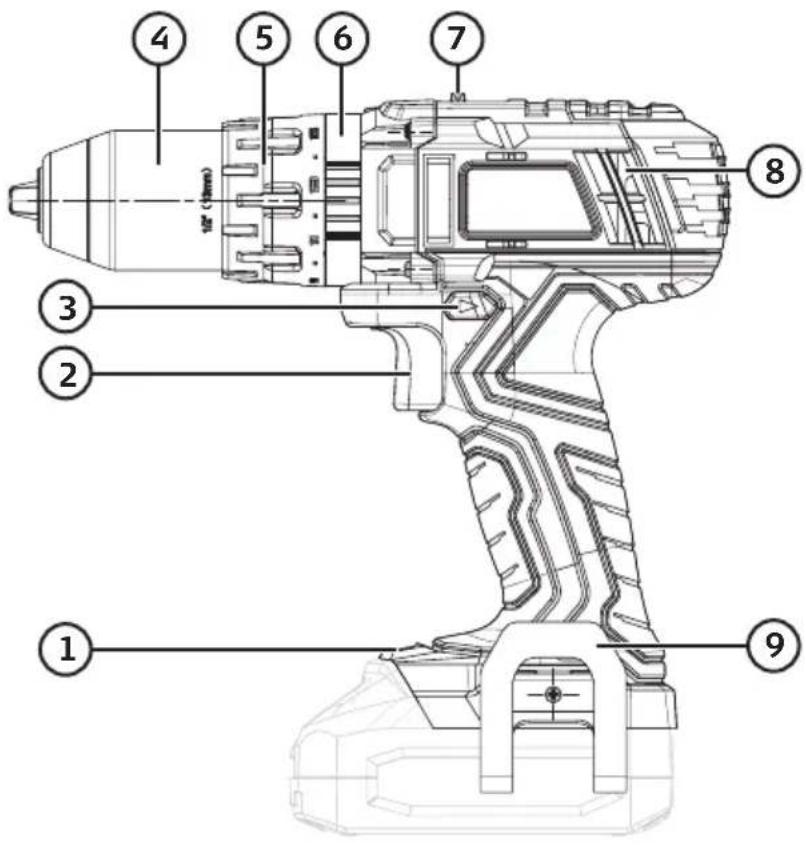
- Work light
- Power trigger (variable speed control)
- Forward/reverse selector
- Keyless chuck
- Torque selector ring
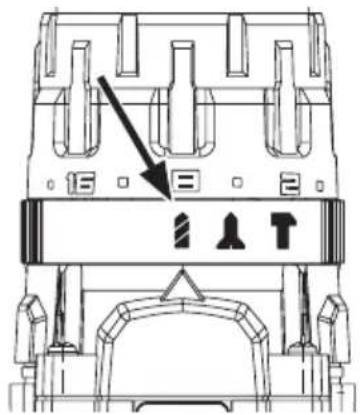
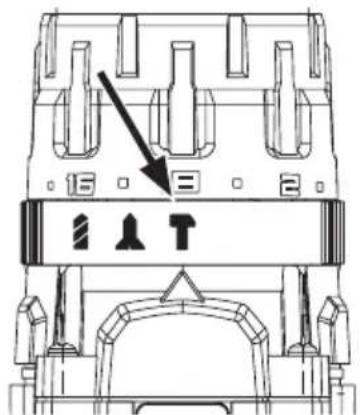
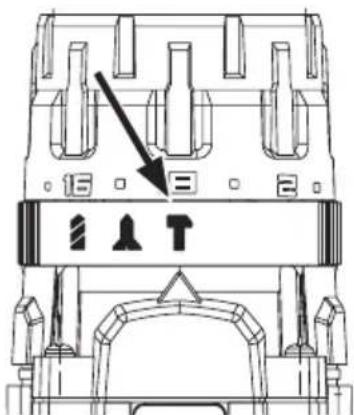
- Drill, screwdriver or hammer drill mode selector ring
- High/low gear selector switch
- Motor housing ventilation slits
-
Belt clip
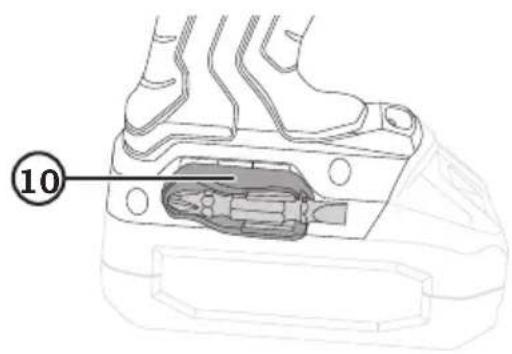
-
Bit holder
Overload protection and other safety features
The battery has a number of safety features to prevent damage to the drill/driver and battery during use.
- During short high-load situations the overload protection may turn the drill/driver off. This protection resets automatically. Release the trigger, wait a few seconds, ensure that the drill/driver is under no load and then restart it. The drill/driver should now function normally again.
- If subjected to a highload for an extended period the overheating protection may turn the drill/driver off. This feature is self-resetting but the drill/driver cannot be restarted until it has returned to normal operating temperature. Let the drill/driver and battery cool properly before trying to start working again. Exposure to continuous sunlight can give rise to detrimental temperatures and should therefore be avoided.
- The battery has a deep discharge undervoltage protection device which operates when the battery becomes discharged. The undervoltage protection device turns the drill/driver off automatically and the battery then needs to be recharged.
Instructions for use
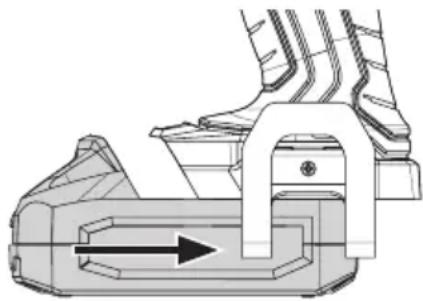
Slide the battery into the battery connection, making sure that it clicks securely into place.
natural_image
Mechanical assembly diagram showing a clamping mechanism with no visible text or symbolsFunctions
Power trigger
Select forward or reverse using the rotation selector (3). The rotation selector also has a middle setting which locks the power trigger. If the selector is set to this middle position, the drill will not start. The drill/driver is started and stopped by squeezing or releasing the power trigger (2).
The drill/driver is equipped with a variable speed control, which makes it extremely practical for driving screws. The more the power trigger is squeezed, the higher the speed of the chuck.
Light
The drill/driver is equipped with a light (1) which is positioned close to the battery so that it can light up the work area without being obscured by the chuck. The light comes on when the power trigger is squeezed and goes off when the power trigger is released.
Changing drill and screwdriver bits
The drill/driver has a keyless chuck which enables drill or screwdriver bits to be changed with one hand. Twist the chuck to the left to tighten, to the right to untighten. Make sure that the bit sits centred and secured in the chuck.
Drilling tips and advice
- When drilling into slippery materials, like tiles, you should place a strong piece of tape on the area in which you wish to drill to prevent the bit from wandering.
- When drilling into metal you should first use a centre punch to make a small indentation at the spot where you wish to drill. This indentation will help hold the bit in place and prevents it from wandering when you drill.
- When drilling into metal you should also use cutting oil to assist in drilling and to preserve the machine and drill bit.
• Always use a clamp or vice to hold the workpiece. - When drilling into walls, make sure not to damage water pipes, electricity cables or gas pipes.
Screwdriver mode
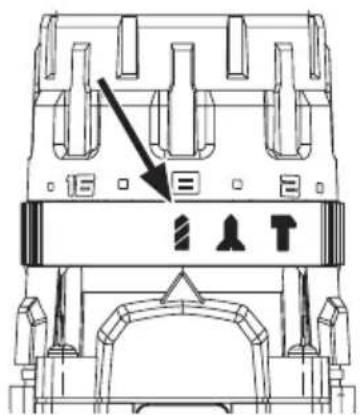
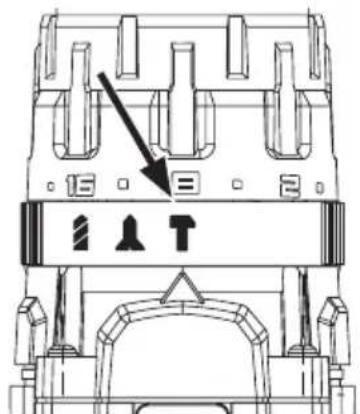
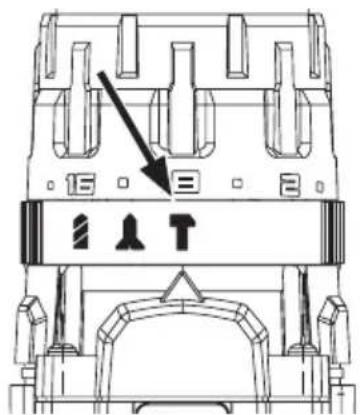
Select the screwdriver mode using the selector ring (6).
Use the torque selector ring (5) to set a suitable torque setting. The correct torque setting will disengage the drive at the preset torque to prevent screws from being over-tightened or driven in too far. The setting should be based on the type and size of screw and the material being screwed into. Always start at the lowest setting and increase in increments to find the correct setting.
Drill mode
Select the drill mode using the selector ring (6).
Hammer drill mode
Select the drill mode using the selector ring (6).
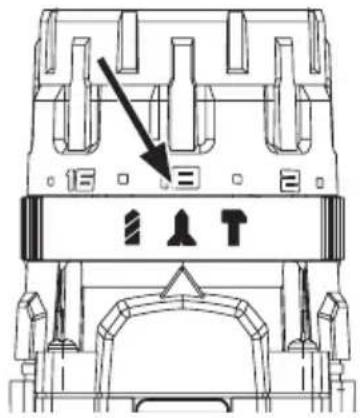
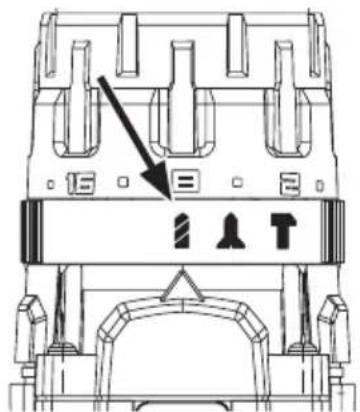
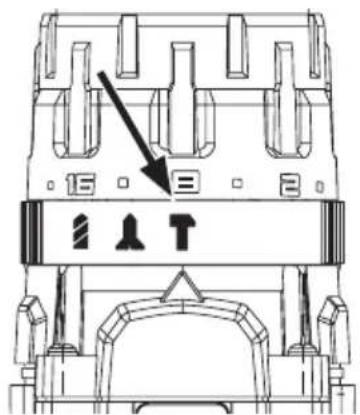
High/Low gear
The gear selector (7) has two settings:
Position 1: 0–400 rpm, mode 2: 0–1500 rpm
Care, maintenance and storage
• Always remove the battery from the drill/driver before cleaning it and putting it away.
- Clean the exterior of the drill/driver with a soft brush or cloth. Never use water, solvents or corrosive chemicals for cleaning.
- Regularly remove all dirt, especially from around the motor ventilation slits (8).
- Store the drill/driver in a dry place out of children's reach whenever it is not to be used for a long time.
- The battery should be stored in an ambient temperature of 5–50 °C.
- Charge the battery fully every six months to maintain the battery capacity.
Troubleshooting guide
| The drill/driver doesn’t start. | Discharged or incorrectly inserted battery. Charge the battery and ensure that it is properly fitted to the drill/driver. |
| The drill/driver is sluggish and/or cuts out. | Too much force applied. Decrease the applied force.The battery might be overheated. Read the Overload protection and other safety features section. |
| Poor battery operating time. | The battery is not fully charged. A few charging cycles where the battery is charged 100% might be needed before it reaches full capacity.The battery needs replacing. |
| The battery does not charge. | Check that the mains lead is properly plugged into a wall socket.Check that the wall socket is energised.The battery is too warm, let it cool.Check that the battery is inserted correctly into the charger.The contacts of the battery or charger may need to be cleaned.Unplug the charger from the mains before cleaning the contacts.The charger or its cable is damaged.The battery is defective and must be replaced. |
| The battery charge is poor after it has been charged. | The battery is not fully charged. Charge the battery until the indicator shines a steady green.The battery needs replacing. |
Responsible disposal
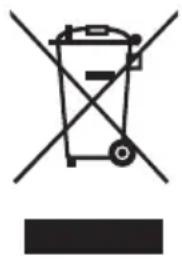
This symbol indicates that this product should not be disposed of with general household waste. This applies throughout the entire EU. In order to prevent any harm to the environment or health hazards caused by incorrect waste disposal, the product must be handed in for recycling so that the material can be disposed of in a responsible manner. When recycling the product, take it to your local collection facility or contact the place of purchase. They will ensure that the product is disposed of in an environmentally sound manner.
natural_image
Symbol of a trash bin crossed out by two crossed lines, with no text or labels present.Specifications
No-load speed 0–400 / 0–1500 rpm
Battery 18 V LXC series (sold separately)
Torque settings 18 + drill setting, max 45 Nm
Chuck 13 mm
Noise emission LpA = 90.0 dB(A), Uncertainty K = 3 dB(A)
LwA = 101.0 dB(A), Uncertainty K = 3 dB(A)
Vibration emission
$$ \begin{array}{l} \text { Drilling in metal } \quad a _ {\mathrm{h,D}} = 1. 1 3 5 \mathrm{m} / \mathrm{s} ^ {2}, \text { Uncertainty } K = 1. 5 \mathrm{m} / \mathrm{s} ^ {2} \ \text { Drilling in concrete } \quad a _ {\mathrm{h}, \mathrm{ID}} = 1 5. 7 2 1 \mathrm{m} / \mathrm{s} ^ {2}, \text { Uncertainty } K = 1. 5 \mathrm{m} / \mathrm{s} ^ {2} \ \end{array} $$
Weight 1.7 kg with 2.0 Ah battery
Charger 18 V LXC (sold separately)
Vibration
- The measurement of the vibration emission level (triaxial vector sum) and the noise level values declared in this instruction manual have been carried out in accordance with a standardised test method described in EN 60745 and can be used for comparing one power tool with another.
- The measurement method may also be used for a preliminary assessment of vibration exposure.
- The declared vibration emission level applies when the power tool is used in accordance with this instruction manual. If however, the power tool is used for other purposes and with other accessories or has not been properly maintained, the vibration emission level could increase significantly over the total working period.
- For an exact assessment of the vibration exposure, the times when the tool is switched off or running idle should also be taken into account. This significantly reduces the vibration exposure over the total working period. Decide upon safety measures to protect the operator from the effects of vibration during all types of use.
Skruvdragare
Art.nr 41-1378 Modell DJC159SZC-180
natural_image
Mechanical assembly diagram showing a lever mechanism with no visible text or symbolsFunktioner
Strömbrytaren
Hög-/lågväxel
natural_image
Symbol of a trash bin crossed with no text or numbers, representing waste sorting or disposal (no text present)Specifikationer
Varvtal 0–400 / 0–1500 v/min
Batteri 18 V LXC-serie (säljs separat)
natural_image
Mechanical assembly diagram showing a hand pressing a component with an arrow indicating motion (no text or symbols present)Funksjoner
Strømbryteren
natural_image
Technical line drawing of a mechanical component with no visible text or symbols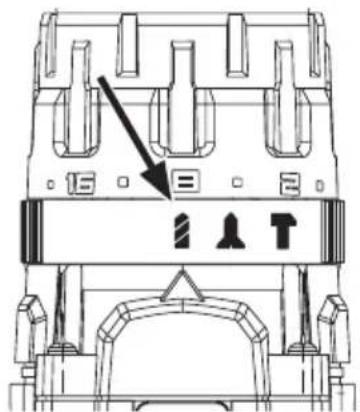
Høy- og lavgir
natural_image
Symbol of a trash bin crossed with no text or labels, accompanied by a blank rectangular block below (no text or symbols present)Spesifikasjoner
Turtall 0–400 / 0–1500 o/min
Batteri 18 V LXC-serien (selges separat)
Justerbart moment 18 + bor, maks 45 Nm
Chuck 13 mm
Lyd LpA = 90,0 dB(A), Unøyaktighet K = 3 dB(A)
LwA = 101,0 dB(A), Unøyaktighet K = 3 dB(A)
Vibrasjonsverdi
Boring i metall a_h,D = 1,135 m/s^2 , Unøyaktighet K = 1,5 m/s^2 Boring i betong a_h,ID = 15,721 m/s^2 , Unøyaktighet K = 1,5 m/s^2
natural_image
Mechanical assembly diagram showing a hand pressing a component with directional arrow (no text or symbols)Toiminnot
Virtakytkin
Hidas/nopea vaihde
natural_image
Symbol of a trash bin crossed with no text or labels, accompanied by a black rectangular block below (no text or symbols present)Tekniset tiedot
natural_image
Mechanical assembly diagram showing a hand operating a component with an arrow indicating direction (no text or symbols present)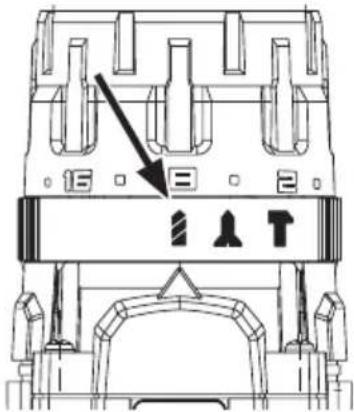
natural_image
Symbol of a trash bin with crossed lines indicating no waste or discharge (no text or labels)Technische Daten
Declaration of Conformity
Declares that this product complies with the requirements of the following directives and standards
Product Compliance Manager
Insjön, Sweden, 2019-06-24
CLAS OHLSON AB, SE-793 85 INSJÖN, SWEDEN
LXC
LITHIUM XROSS CONNECT
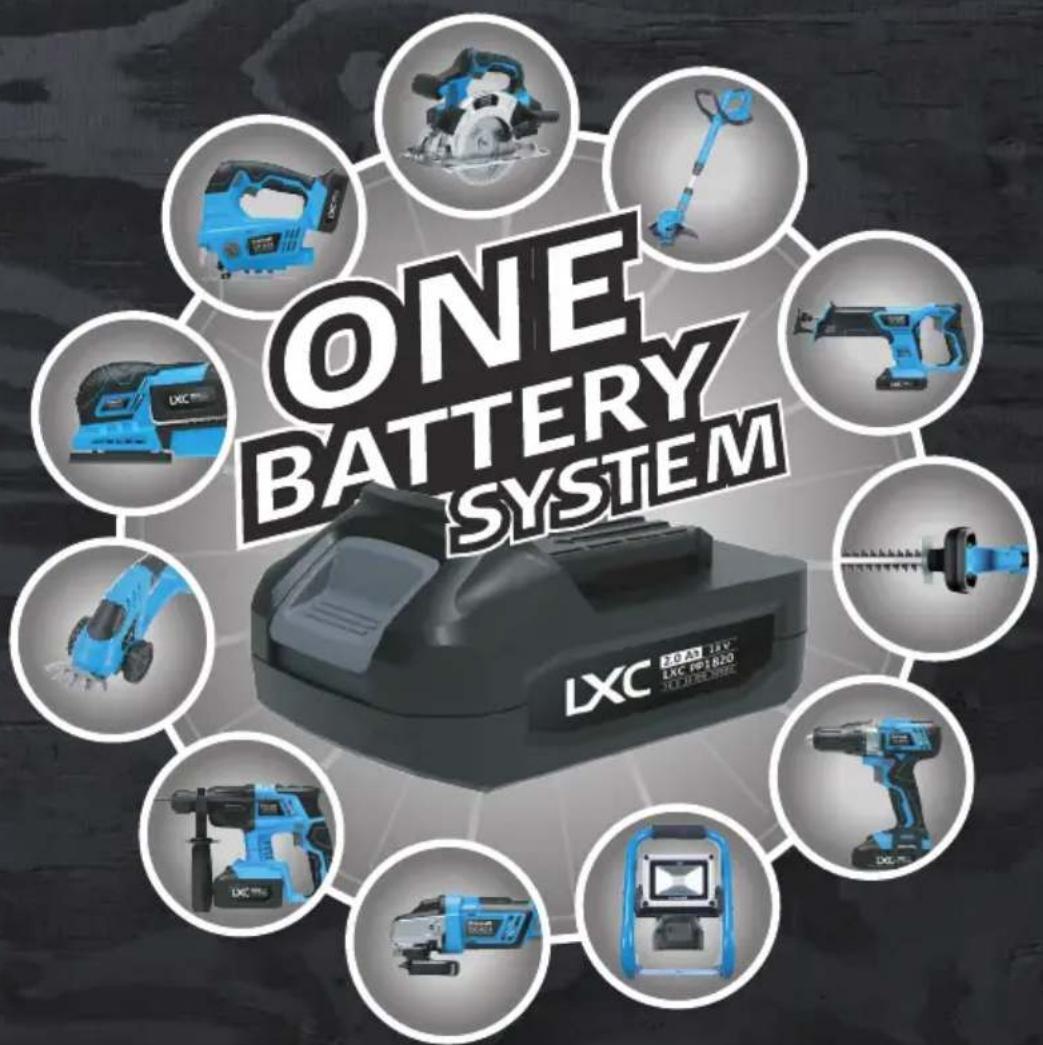
18V LITHIUM SERIES


- Viktig information:
- SVERIGE
- DEUTSCHLAND
- Safety
- General Power Tool Safety Warnings – Personal Safety
- 1) Work area safety
- 2) Electrical safety
- 3) Personal safety
- 4) Power tool use and care
- 5) Battery tool use and care
- 6) Service
- Drill Safety Warnings
- Product safety symbols
- Product description
- Overload protection and other safety features
- Instructions for use
- Functions
- Power trigger
- Light
- Changing drill and screwdriver bits
- Drilling tips and advice
- Screwdriver mode
- Drill mode
- Hammer drill mode
- High/Low gear
- Care, maintenance and storage
- Responsible disposal
- Specifications
- Vibration emission
- Vibration
- Skruvdragare
- Funktioner
- Strömbrytaren
- Hög-/lågväxel
- Specifikationer
- Funksjoner
- Strømbryteren
- Høy- og lavgir
- Spesifikasjoner
- Vibrasjonsverdi
- Toiminnot
- Virtakytkin
- Hidas/nopea vaihde
- Tekniset tiedot
- Technische Daten
- Declaration of Conformity
- LXC
- 18V LITHIUM SERIES
Brand : Cocraft
Model : LXC HDD18
Category : Tour