
AirCO2ntrol 31.5008.02 - Multimeter TFA - Free user manual and instructions
Find the device manual for free AirCO2ntrol 31.5008.02 TFA in PDF.


| Product Type | CO2 Monitor with Data Logger |
| Brand | TFA |
| Model | AirCO2ntrol 31.5008.02 |
| Dimensions | 4.7 x 2.6 x 1.3 inches (120 x 66 x 33 mm) |
| Weight | 103 g (instrument only, without power supply) |
| Power Supply | 5V DC via Micro USB; included AC adapter (115/230V, 0.2A) |
| Power Consumption | 160 mA peak, 15 mA average |
| CO2 Measurement Range | 0-5000 ppm |
| CO2 Resolution | 1 ppm (0-1000), 5 ppm (1000-2000), 10 ppm (>2000) |
| Temperature Measurement Range | Not specified (display resolution 0.1°C/°F) |
| Humidity Measurement Range | 5-95% RH, resolution 1% |
| Data Logging | Micro SD card; records date, time, CO2, temperature, RH |
| Display | LCD with trend chart and numerical values |
| Alarm | Adjustable CO2 level alarm with audible beep and LED indicators (green <800 ppm, yellow 800-1200 ppm, red >1200 ppm) |
| Calibration | Manual calibration using outside air (~400 ppm) |
| Altitude Correction | Yes, user-adjustable |
| Operating/Storage RH | 0-95% non-condensing |
| Warm-up Time | Less than 30 seconds |
| Response Time (CO2) | Less than 30 seconds |
| Certification | CE |
| Maintenance | Clean with dry or moist soft cloth; avoid liquids inside |
| Spare Parts | Not available separately; use included Micro USB cable and adapter |
| Waste Disposal | WEEE compliant; do not dispose with household waste |
Frequently Asked Questions - AirCO2ntrol 31.5008.02 TFA
User questions about AirCO2ntrol 31.5008.02 TFA
0 question about this device. Answer the ones you know or ask your own.
Ask a new question about this device
Download the instructions for your Multimeter in PDF format for free! Find your manual AirCO2ntrol 31.5008.02 - TFA and take your electronic device back in hand. On this page are published all the documents necessary for the use of your device. AirCO2ntrol 31.5008.02 by TFA.
USER MANUAL AirCO2ntrol 31.5008.02 TFA
Air Co _2 ntrol 5000
CO _2 -Monitor with Data logger function (Micro-SD-card)
5020-0111
Air CO _2 ntrol 5000
CO2 LEVEL

POOR

NORMAL

GOOD
HOLD HOME
ENTER
ZOOM

MENU

CO _2 -Monitor with Data logger function (Micro-SD-card)
Operating Instruction 7
natural_image
Front view of a white electronic device casing with two ports and a green indicator lights (no visible text or symbols)Thank you very much for purchasing one of our products. Before operating the data logger please read this manual carefully. You will get useful information for understanding all functions.
2. Kindly note
- Check if the contents of the package are undamaged and complete.
• For cleaning the instrument please do not use an abrasive cleaner only a dry or moist piece of soft
cloth. Do not allow any liquid into the interior of the device. - Please store the measuring instrument in a dry and clean place.
- Avoid any force like shocks or pressure to the instrument.
- No responsibility is taken for irregular or incomplete measuring values and their results, the liability for subsequent damages is excluded!
3. Delivery contents
• CO _2 -Monitoring Unit with Datenlogger
- Micro USB cabel for power
- User Manual
- AC adapter
- Micro SD carte
4. Features at a Glance
• CO, Monitor: Tracer
• Chart with variable time Zoom Levels
• 2-Channel Low Drift NDIR Sensor
• Data Logger by SD card
• Real-Time colock
• 3 color LEDs for Easy-Reading
5. Operating Instructions
Initial Setup: When first unboxing, plug in the unit to the included Micro USB (or one of your own) to almost any cell phone charger or USB power source. If successfully connected, 3 things will happen while booting up:
• 3 LEDs flash one by one
- Chart display shows the current software version & "Warm Up"
• Main display shows a countdown from 10
Once the countdown is complete, your product is ready to use. No initial setup or calibration is needed.

1. Plug in USB Power Cable

2. Plug in SD Card
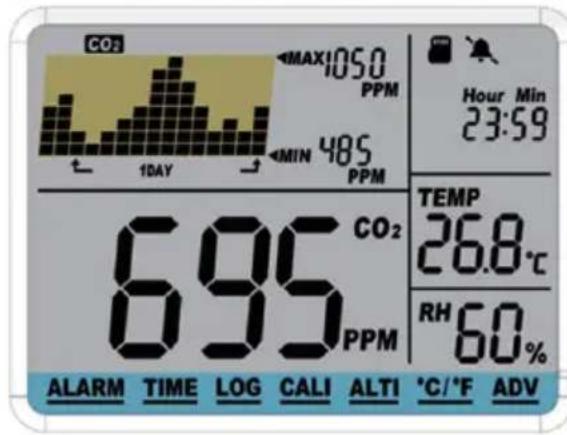
5.1. LCD Display
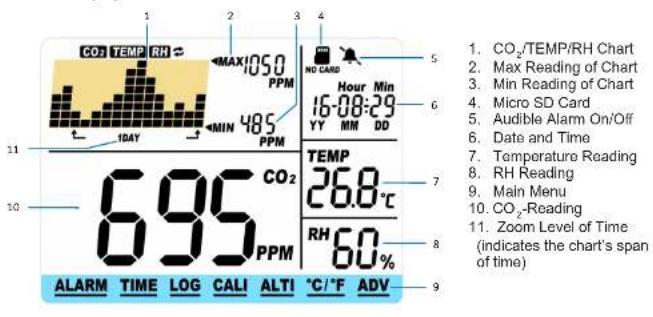
5.2 Trend Chart
The trend chart (1) displays the past readings for CO_2 and temperature and RH parameters. That can be toggled by using DOWN key: CO_2 , TEMP, RH. As show below:

bar
| Condition | CO₂ TEMP RH (°C) | MAX (PPM) | CO₂ TEMP RH (°C) | MAX (PPM) | CO₂ TEMP RH (min) | MAX (min) | |-----------|------------------|---------|------------------|---------|-------------------|---------| | auto cycle | 105.0 | 28.0 | 65.0 | 48.5 | 48.5 | 48.5 |5.3 Trend Chart Zoom
Below is a table that show the available Zoom Levels for all parameters, as well as the duration of each division for corresponding Zoom Levels:
| Zoom Level (Time Span) (11) | Time Per Division |
| 1MIN (minute) 5sec /div | |
| 1HR (hour) 5m/div | |
| 1Day (day) 2h/div | |
| 1WEEK(week) 0.5d/div |
Using UP will toggle the available Zoom Levels for each parameters. Note that in addition to the Zoom Levels for each paramete.
5.4 Max/Min
At the top right corner of the display, there are two numerical indicators: Max (2) and Min (3). As the Zoom Level is changed, the Max and Min values will reflect the maximum and minimum values on the chart of the selected CO2 parameter. At startup, the unit will automatically display values for CO2 .
5.5 Real Time
The real-time (6) display at the top right corner of LCD, user can adjust date and time by enter TIME mode.
5.6 SD Card For Logger
The device will record data logger by SD card while it existed. It's can record Date, Time, CO₂, Temperature, RH, user can check and download logger by SD card reader.
5.7 Main Menu Functions
The Main Menu (9) functions can be toggled through by using MENU. If the main menu is not brought up, the green bar will remain blank, leaving the UP / DOWN buttons to toggle between parameters and Zoom Levels, respectively.
ALARM TIME LOG CALI ALTI °C/°F ADV
Pressing MENU once will bring up the main menu, with a flashing bar indicating the current choice. To select the function, press ENTER when the bar flashing over the current choice. Note that after 1 minute if nothing is pressed, the Main Menu will disappear and the device will revert to the normal state.
HOLD HOME
To revert to start up settings at any point, hold ENTER for 3 sec until an audible beep. The device will revert to Home Setting, displaying "Back Home done." Note that this is not the same as Restore to factory settings.
Below is a table showing what main menu selection is made by pressing MENU multiple times as well as their functions. Note that the device will display "Pass" followed by the confirmed selection if selected correctly.
| Function Directions | |
| ALARM When | ALARM is set ON, an audible alarm will resound if the CO level exceeds varying levels (depending on border lever set). Once ALARM is selected (by pressing ENTER), use either UP or DOWN to toggle the selection from ON to OFF or vice versa. Press ENTER one more time to confirm. A regular bell icon will be displayed if alarm is on; a silenced bell icon will appear on the screen if the alarm is set to be off. As soon as the acoustic alarm will sound, it can be temporarily muted by pressing ENTER. The alarm will resound, if the CO2 value exceeds the upper boarder again. |
| TIME This function allows the user to adjust the real-time, once TIME is selected, use UP and DOWN to adjust the current date and time, Press ENTER to confirm. | |
| LOG This feature | allows the user to see historical data recorded in the log at any point that is displayable on the chart. First make sure the desired Zoom Level is selected before enabling this function. Then once LOG is enabled, use UP and DOWN toggle between the time divisions to see all parameters' measurements for each division. Press ENTER once more to exit this mode. |
| CALI Use this function to calibrate your device with outside atmospheric CO level ~ 400ppm. Select this mode, hold ENTER for 3 seconds until a beep and the chart will read "Calibrating", then place the device outside for 20min. To escape, press MENU. Make sure the device is far from a source of CO2, not in direct sunlight, and not exposed to water. | |
| ALT1 This feature provides an altitude correction to the CO _2 level for increased accuracy. Select this feature, then use UP and DOWN to input the current altitude (look it up if unknown) in meters. Press ENTER once altitude is correct. | |
| °C/°F Use this feature to toggle between Celsius and Fahrenheit for the temperature display. First use UP and DOWN, then ENTER when the desired one is selected. | |
| ADV This function toggles between 4 things when selected: changing the alarm and lights to suit levels For Low border, or For HI border, or change the dataloginterval, or Restore factory setting. Restore factory setting will reset the device to factory settings and erase all stored data in the chart. To use any of these modes, hold ENTER for 3 seconds until an audible beep.Default settings of the traffic light:green LED: below 800 ppm, yellow LED: from 800 ppm and red LED: from 1200 ppm | |
| (Return) Exits the main menu. No options will be displayed on the green bar. A different audible beep be heard in this option. | |
6. Specifications
Typical test conditions, unless otherwise specified: Ambient Temp =23+/-3°C, RH=50%-70%, Altitude=0\~100 meter
Measurement Spec
Operating & Storage RH: 0-95%, non-condensing
CO _2 Measurement
Measurement Range: 0-5000ppm
Display Resolution: 1ppm (0-1000); 5ppm (1000-2000); 10ppm (>2000)
Response Time / Warm-up Time: <30 sec
Temp. Measurement
Display Resolution: 0.1°F (0.1°C)
Response Time: <20min (63%)
RH Measurement
Range: 5-95%
Resolution: 1%
Power Requirements: 160mA Peak, 15mA average bei 5.0V
Input: 115VAC 60Hz, or 230VAC 50Hz, 0.2A
Output: 5VDC 5.0W max.
Average active efficiency: 73.77%
Noload power consumption: 0.075W
Dimension: 4.7x2.6x1.3inch (120x66x33mm)
Weight: 103g only instrument without power supply
7. Rear View:

natural_image
Front view of a device rear panel with indicator lights and ports (no readable text or symbols)8. Disclaimers:
USB connection is for power supply only; no communication with PC. Unplugging the device may result in loss of most recent logged data on the chart. This device is not intended for workplace hazard CO₂ monitoring, nor intended as a definitive monitor for human or animal health institutions, life sustenance, or any medical-related situation. We and the manufacturer assumes no responsibility for any damage or loss suffered by the user or any third party arising through the use of this product or its malfunction. We reserve the right to change the spec without notice.
9. Explanation of symbols
CE This sign certifies that the product meets the requirements of the EEC directive and has been tested according to the specified test methods.

10. Waste disposal
This product and its packaging have been manufactured using high-grade materials and components which can be recycled and reused. This reduces waste and protects the environment. Dispose of the packaging in an environmentally friendly manner using the collection systems that have been set up.

Remove non-permanently installed batteries and rechargeable batteries from the device and dispose of them separately.
This product is labelled in accordance with the EU Waste Electrical and Electronic Equipment Directive (WEEE). This product must not be disposed of in ordinary household waste. As a consumer, you are required to take end-of-life devices to a designated collection point for the disposal of electrical and electronic
equipment, in order to ensure environmentally-compatible disposal. The return service is free of charge. Observe the current regulations in place!
DOSTMANN electronic GmbH


- Air Co _2 ntrol 5000
- Kindly note
- Delivery contents
- Features at a Glance
- Operating Instructions
- Trend Chart
- Trend Chart Zoom
- Max/Min
- Real Time
- SD Card For Logger
- Main Menu Functions
- ALARM TIME LOG CALI ALTI °C/°F ADV
- HOLD HOME
- Specifications
- Measurement Spec
- CO _2 Measurement
- Temp. Measurement
- RH Measurement
- Rear View:
- Disclaimers:
- Explanation of symbols
- Waste disposal
- DOSTMANN electronic GmbH
Brand : TFA
Model : AirCO2ntrol 31.5008.02
Category : Multimeter