
ACP-12CH35AEVI - Air-conditioner Vivax - Free user manual and instructions
Find the device manual for free ACP-12CH35AEVI Vivax in PDF.

| Product Type | Portable Air Conditioner |
| Brand | Vivax |
| Model | ACP-12CH35AEVI |
| Cooling Capacity (BTU) | 12,000 BTU/h |
| Heating Capacity (BTU) | 12,000 BTU/h (Heat Pump) |
| Power Supply | 220-240 V ~ 50 Hz |
| Rated Cooling Power Input | Approx. 1200 W |
| Dimensions (W x D x H) | 430 x 350 x 700 mm |
| Net Weight | 30 kg |
| Refrigerant Type | R32 |
| Functions | Cooling, Heating, Dehumidification, Fan, Auto Mode, Sleep Mode |
| Dehumidification Capacity | 1.5 L/h |
| Airflow Rate (High) | 350 m³/h |
| Noise Level (Low/High) | 48 / 55 dB(A) |
| Energy Efficiency Class (Cooling) | A |
| Energy Efficiency Class (Heating) | A+ |
| Timer | 24-hour programmable timer |
| Remote Control | Yes (included) |
| Maintenance | Clean air filter every 2 weeks; empty condensate tank if full |
| Safety Features | Auto restart after power failure; overheat protection |
Frequently Asked Questions - ACP-12CH35AEVI Vivax
User questions about ACP-12CH35AEVI Vivax
0 question about this device. Answer the ones you know or ask your own.
Ask a new question about this device
Download the instructions for your Air-conditioner in PDF format for free! Find your manual ACP-12CH35AEVI - Vivax and take your electronic device back in hand. On this page are published all the documents necessary for the use of your device. ACP-12CH35AEVI by Vivax.
USER MANUAL ACP-12CH35AEVI Vivax
natural_image
Line drawing of a wrench crossed with a screwdriver and a gear with a magnifying glass, connected by dotted lines (no text or symbols)Mjere opreza
natural_image
Illustration of hands installing a brick wall with a black panel (no text or symbols)Prikaz radne površine
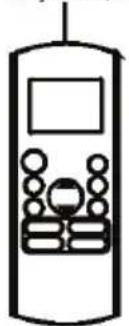
Daljinski upravljač
natural_image
Simple line drawing of a mobile phone with keypad and screen (no text or symbols)temperature ispod 0°C
(32°F), izrazito
preporučujemo da je
uredaj ukopčan u struju
flowchart
graph LR
    A["Set temperature"] --> B["+/- 1°C/2°F"]
    B --> C["+/- 1°C/2°F"]
    C --> D["7 hours timer off"]
    D --> E["Saving energy during sleep"]
    style A fill:#f9f,stroke:#333
    style B fill:#ccf,stroke:#333
    style C fill:#ccf,stroke:#333
    style D fill:#cfc,stroke:#333
    style E fill:#fcc,stroke:#333
Sl. 3.1
2.Ručno upravljanje (bez daljinskog upravljača)
natural_image
Line drawing of a rectangular device with a circular component and a magnified inset showing a hand interacting with a small object (no text or symbols)natural_image
Technical line drawing of a mechanical component or housing (no text or symbols)Automatska teleskopska ručica (pritisnite u sredinu za otpuštanje).
natural_image
Technical line drawing of a car air conditioner unit showing internal components (no text or labels)Tipka za ručno upravljanje
3. Briga i održavanje
Čišćenje unutarnjeg dijela uređaja. PRIJE ČIŠĆENJA ILI ODRŽAVANJA UVIJEK ISKLJUČITE SVOJ KLIMA UREĐAJ I ISKOPČAJTE GA IZ IZVORA STRUJE PRIJE OBAVLJANJA ISTOG.
! OPREZ
natural_image
Simple line drawing of a garage with a parking lot and trees (no text or symbols)
natural_image
Diagram showing a brick wall being pulled with a string, no text or symbols presentnatural_image
Diagram showing a faucet above a textured rectangular object with a starburst effect (no text or symbols)Sl. 5.1
! OPREZ
natural_image
Diagram of a grid-patterned rectangular structure with a small protrusion on top (no text or symbols)Očistite sve filtare
natural_image
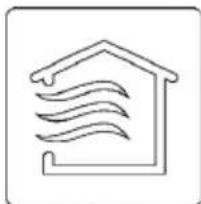
Simple line drawing of a house with wavy lines inside, no text or symbols presentPobrinite se da ništa ne blokira ulazne i izlazne otvore
4. Riješavanje problema
!MJERE OPREZA
6.TURBO/SAMOČISTAČ GUMB:
UPALJEN VREMENSKI BROJAČ (Automatska radnja)
flowchart
graph TD
    A["Start"] --> B["Off"]
    B --> C["Set"]
    C --> D["2 hours later after setting"]
    D --> E["5 hours later after setting"]
    E --> F["Stop"]
natural_image
Line drawing of a wrench crossed with a screwdriver and a gear with a magnifying glass, connected by dotted lines (no text or symbols)Mere opreza
temperature ispod 0°C
(32°F ), izrazito
preporučujemo da je
uredaj ukopčan u struju
flowchart
graph LR
    A["Set temperature"] --> B["+/- 1°C/2°F"]
    B --> C["+/- 1°C/2°F"]
    C --> D["7 hours timer off"]
    D --> E["Saving energy during sleep"]
Sl. 3.1
2. Ručno upravljanje (bez daljinskog upravljača)
Kako upravljati uređajem bez daljlnskog upravljača
U slučaju da je daljinski upravljač van funkcije, možete da upravljate uređajem ručno sa tasteromMANUAL CONTROL koja se nalazi na unutrašnjem delu uređaja. Upamtite da ručno upravljanje nije dugoročno rešenje i da se izrazito preporučuje upravljanje uređajem pomoću daljinskog upravljača.
natural_image
Line drawing of a rectangular device with a circular button and a magnified inset showing a finger pointing to a textured surface (no text or symbols)Pritisnite ovde za opuštanje prednje ploče,
natural_image
Simple line drawing of a mechanical component or housing (no text or symbols)Automatska teleskopska ručica (pritisnite u sredinu za otpuštanje).
natural_image
Technical line drawing of a car air conditioner unit showing internal components and housing (no text or labels)Taster za ručno upravljanje
3. Briga i održavanje
Čišćenje unutrašnjeg dela uređaja. PRE ČIŠĆENJA ILI ODRŽAVANJA UVEK ISKLJUČITE KLIMA UREĐAJ I IZVUCITEKABL IZ STRUJE.
! OPREZ
natural_image
Simple line drawing of a garage with a parking lot and trees (no text or symbols)
natural_image
Diagram showing a brick wall being cut with a tool, no text or symbols presentOdvojite osvežavajući filtar od većeg filtra (neki uređaji).
natural_image
Illustration of a faucet spraying water onto a textured surface (no text or symbols)SI. 5.1
! OPREZ
natural_image
Diagram of a grid-patterned rectangular structure with a small protrusion on top (no text or symbols)Očistite sve filtare

natural_image
Simple line drawing of a house with wavy lines inside, no text or symbols present1. ON/OFF
Radnja se pokreće kada se pritisne ovaj taster a zaustavlja kada se pritisne ovaj taster ponovo.
2. NAČIN RADA
3. SWING (gore-dole)
Koristi se za zaustavljanje ili pokretanje lopatice otvora za vazduh odnosno, podešavanje željenog smera protoka vazduha gore-dole. Svakim pritiskom tastera, lopatica se pomeri za šest stepeni. Ako taster držite pritisnut više od 2 sekunde, lopatica će konstantno da se kreće gore-dole.
4. SWING (Ievo-desmo)
Koristi se za podešavanje željenog smera protoka vazduha levo/desno.
Vertikalne lopatice pomeraju se za šest stepeni svakim pritiskom tastera. Unutrašnja jedinica pokazuje na displeju 'VV', na jedan sekund. Ako pritisnete taster duže od dve sekunde, kretanje lopatica levo-desno je uključeno. Unutrašnja jedinice pokazuju na displeju 'III', posle čega se ponovo prikaže željena temperatura.
6. TURBO/SAMOČISTAČ:
Aktivirana/Onemogućena TURBO funkcija.
→ AUTO → LOW → MED → HIGH
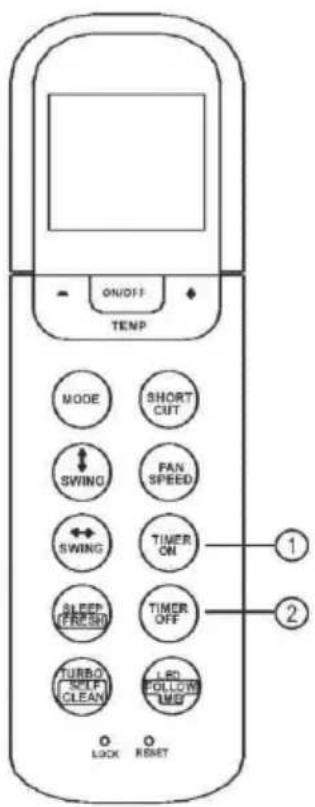
12. TIMER ON
Pritisnite taster merača vremena kako biste pokrenuli automatski sled - svaki pritisak na taster povećaće zadato za 30 minuta. Kada postavljeno vreme na displeju pokaže 10 H, svaki pritisak će povećati zadato vreme za 60 minuta. Kako biste otkazali postavljeni brojač, jednostavno podesite vrednost boja na 0.0.
13.TIMER OF
Način rada vremenskog brojača
Pritisnite TIMER ON da podesite vreme automatskog paljenja uređaja a TIMER OFF da podesite vreme automatskog gašenja uređaja.
Kako postaviti automatsko vreme.
flowchart
graph TD
    A["Start"] --> B["Off"]
    B --> C["Set"]
    C --> D["2 hours later after setting"]
    D --> E["5 hours later after setting"]

natural_image
Line drawing of a wrench crossed with a screwdriver and a gear with a magnifying glass, connected by dotted lines (no text or symbols)Mjere opreza
natural_image
Simple line drawing of a mobile phone with keypad and screen (no text or symbols)Držač
daljinskog
flowchart
graph LR
    A["Set temperature"] --> B["+/- 1°C/2°F"]
    B --> C["+/- 1°C/2°F"]
    C --> D["7 hours timer off"]
    D --> E["Saving energy during sleep"]
Sl. 3.1
2.Ručno upravljanje (bez daljinskog upravljača)
natural_image
Line drawing of a rectangular device with a circular component and a magnified inset showing a hand interacting with a small object (no text or symbols)natural_image
Technical line drawing of a mechanical component or housing (no text or symbols)Automatska teleskopska ručica (pritisnite u sredinu za otpuštanje).
natural_image
Technical line drawing of a car air conditioner unit showing internal components (no text or labels)Tipka za ručno upravljanje
3. Briga i održavanje
Čišćenje unutrašnjeg dijela uređaja. PRIJE ČIŠĆENJA ILI ODRŽAVANJA UVIJEK ISKLJUČITE SVOJ KLIMA UREĐAJ I ISKOPČAJTE GA IZ IZVORA STRUJE PRIJE OBAVLJANJA ISTOG.
! OPREZ
natural_image
Simple line drawing of a car parked under a shelter (no text or symbols)
natural_image
Diagram showing a brick wall being cut with arrows indicating direction (no text or symbols)natural_image
Simple line drawing of a faucet above a textured rectangular object with a starburst pattern (no text or symbols)Sl. 5.1
! OPREZ
Ne dirajte filter za osvježivanje vazduha (Plazmu) najmanje 10 minuta nakon isključenja uređaja.
! OPREZ
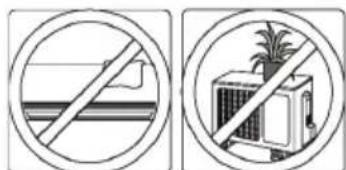
- Prije mijenjanja filtera ili čišćenja, isključite uređaj i odvojite ga od izvora energije.
- Prilikom uklanjanja filtera, ne dirajte metalne dijelove u uređaju. Oštri metalni rubovi Vas mogu porezati.
- Ne koristite vodu za čišćenje unutrašnjosti uređaja. Može uništiti izolaciju i uzrokovati strujni udar.
- Ne izlažite filter direktnoj Sunčevoj svjetlosti. Može uzrokovati sužavanje filtera.
natural_image
Diagram of a grid-patterned panel with a small protrusion on top (no text or symbols)Očistite sve filtere
natural_image
Simple line drawing of a house with wavy lines inside, no text or symbols presentnatural_image
Simple line drawings of weather symbols including sun, house, drop, snowflake, and refresh (no text or labels)natural_image
Line drawing of a wrench and screwdriver crossed with a gear mechanism, connected by dotted lines (no text or symbols)Masa sigurie
natural_image
Illustration of hands installing or adjusting a brick wall panel (no text or symbols visible)Dritarja e ekranit

për 3 sekonda kur:
natural_image
Line drawing of a rectangular device with a circular button and a hand pointing to it, no text or symbols present.natural_image
Technical line drawing of a mechanical component or housing (no text or symbols)Butoni | kontrollit manual
natural_image
Technical line drawing of a car air conditioner unit showing internal components and housing (no text or labels)natural_image
Simple line drawing of a building with a roof and windows (no text or symbols)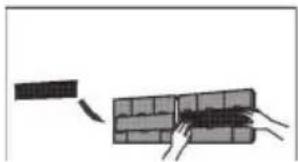
natural_image
Diagram showing a brick wall with a hand pulling a cable and another cable extending into it (no text or symbols)natural_image
Diagram showing a faucet above a textured panel with a starburst pattern (no text or symbols)Fig. 5.1
natural_image
Diagram of a 3D grid structure with a small protrusion on top-right corner (no text or symbols)natural_image
Simple line drawing of a house with wavy lines indicating airflow or ventilation (no text or symbols)natural_image
Line drawing of a mobile phone with ports and connectors (no text or symbols)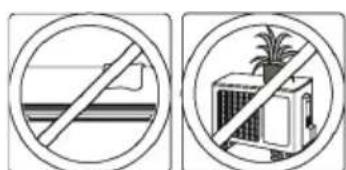
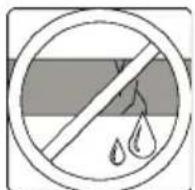
natural_image
Two circular signs showing no protection symbols: one with a diagonal line crossing over water, the other with a building and palm tree (no text or numbers present)1. ON/OFF Button
Auto veprimi
flowchart
graph LR
    A["On"] --> B["Stop"]
    B --> C["Start"]
    style A fill:#f9f,stroke:#333
    style B fill:#ccf,stroke:#333
    style C fill:#cfc,stroke:#333
    note1["Set: 2 hours later after setting"] -.-> note2["10 hours later after setting"]
TIMER OFF
(Auto-off veprimi)
flowchart
graph LR
    A["Start"] --> B["Off"]
    B --> C["Set"]
    C --> D["Stop"]
    D --> E["5 hours later after setting"]
    style A fill:#f9f,stroke:#333
    style B fill:#ccf,stroke:#333
    style C fill:#cfc,stroke:#333
    style D fill:#fcc,stroke:#333
SLEEP(FJETJE)/FRESH
(FRESKIM)funksion
natural_image
Line drawing of a wrench and screwdriver crossed with a gear mechanism, connected by dotted lines (no text or symbols)Varnostni ukrepi
Pred namestitvljo preberite varnostne ukrepe.
flowchart
graph LR
    A["Set temperature"] --> B["+/- 1°C/2°F"]
    B --> C["+/- 1°C/2°F"]
    C --> D["7 hours timer off"]
    D --> E["Saving energy during sleep"]
Sl. 3.1
2.Ročno upravljanje
natural_image
Line drawing of a rectangular device with a circular button and a hand cursor pointing to it (no text or symbols)natural_image
Technical line drawing of a mechanical component or housing (no text or symbols)Samodejna teleskopska ročka (pritisnite na sredino za spust).
natural_image
Technical line drawing of a car air conditioner unit showing internal components and housing (no text or labels)natural_image
Simple line drawing of a vehicle parked under a covered canopy (no text or symbols)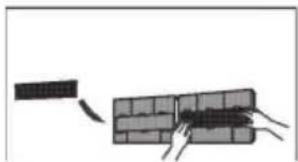
natural_image
Diagram showing a brick wall with a broken section and hands pulling it (no text or symbols)natural_image
Illustration of a faucet spraying water onto a textured surface (no text or symbols)SI. 5.1
! PREVIDNO
natural_image
Diagram of a grid-patterned rectangular structure with a small protrusion on top (no text or symbols)Očistite vse filtre
natural_image
Simple line drawing of a house with wavy lines inside, no text or symbols presentVklopite FAN funkcijo, dokler se naprava popolnoma ne osuši
1. ON/OFF tipka
Aktivira se s pritiskom tipke in ugasne s ponovnim pritiskom.
2. NAČIN tipka
6. TURBO/SAMOČISTILEC TIPKA:
11.HITROST VENTILATORJA tipka
→ AUTO → LOW → MED → HIGH
12. ČASOVNIK

Samodejno delovanje
flowchart
graph TD
    A["Start"] --> B["Off"]
    B --> C["Set"]
    C --> D["2 hours later after setting"]
    D --> E["5 hours later after setting"]

0 Safety Precautions
1 Unit Specifications and Features
flowchart
graph TD
    A["Remote Control"] -->|2| B["Manual Operation (Without Remote)"]
    C["SAFETY FIRST"] --> B
natural_image
Simple line drawings of weather symbols including sun, house, drop, snowflake, and refresh (no text or labels)3 Care and Maintenance
4 Troubleshooting
5 European Disposal Guidelines
natural_image
Line drawing of a wrench and screwdriver crossed with a gear mechanism, connected by dotted lines (no text or symbols)Safety Precautions
Read Safety Precautions Before Installation
Incorrect installation due to ignoring instructions can cause serious damage or injury. The seriousness of potential damage or injuries is classified as either a WARNING or CAUTION.

This symbol indicates that ignoring instructions may cause death or serious injury.
This symbol indicates that ignore ring instructions may cause moderate injury to your person, or damage to your appliance or other property.

WARNING
This appliance can be used by children aged from 8 years and above and persons with reduced physical, sensory or mental capabilities or lack of experience and knowledge if they have been given supervision or instruction concerning use of the appliance in a safe way and understand the hazards involved. Children shall not play with the appliance. Cleaning and user maintenance shall not be made by children without supervision.
INSTALLATION WARNINGS
Ask an authorized dealer to install this air conditioner. Inappropriate installation may cause water leakage, electric shock, or fire.
All repairs, maintenance and relocation of this unit must be performed by an authorized service technician. Inappropriate repairs can lead to serious injury or product failure.
WARNINGS FOR PRODUCT USE
- If an abnormal situation arises (like a burning smell), immediately turn off the unit and pull the power plug. Call your dealer for instructions to avoid electric shock, fire or injury.
- Do not insert fingers, rods or other objects into the air inlet or outlet. This may cause injury, since the fan may be rotating at high speeds.
- Do not use flammable sprays such as hair spray, lacquer or paint near the unit. This may cause fire or combustion.
- Do not operate the air conditioner in places near or around combustible gases. Emitted gas may collect around the unit and cause explosion.
- Do not operate the air conditioner in a wet room (e.g., bathroom or laundry room). This can cause electrical shock and cause the product to deteriorate.
- Do not expose your body directly to cool air for a prolonged period of time.
ELECTRICAL WARNINGS
- Only use the specified power cord. If the power cord is damaged, it must be replaced by the manufacturer or certified service agent.
- Keep power plug clean. Remove any dust or grime that accumulates on or around the plug. Dirty plugs can cause fire or electric shock.
- Do not pull power cord to unplug unit. Hold the plug firmly and pull it from the outlet. Pulling directly on the cord can damage it, which can lead to fire or electric shock.
- Do not use an extension cord, manually extend the power cord, or connect other appliances to the same outlet as the air conditioner. Poor electrical connections, poor insulation, and insufficient voltage can cause fire.
CLEANING AND MAINTENANCE WARNINGS
- Turn off the device and pull the plug before cleaning. Failure to do so can cause electrical shock.
- Do not clean the air conditioner with excessive amounts of water.
- Do not clean the air conditioner with combustible cleaning agents. Combustible cleaning agents can cause fire or deformation.

CAUTION
- If the air conditioner is used together with burners or other heating devices, thoroughly ventilate the room to avoid oxygen deficiency.
- Turn off the air conditioner and unplug the unit if you are not going to use it for a long time.
- Turn off and unplug the unit during storms.
- Make sure that water condensation can drain unhindered from the unit.
- Do not operate the air conditioner with wet hands. This may cause electric shock.
- Do not use device for any other purpose than its intended use.
- Do not climb onto or place objects on top of the outdoor unit.
- Do not allow the air conditioner to operate for long periods of time with doors or windows open, or if the humidity is very high.
Unit Specifications and Features
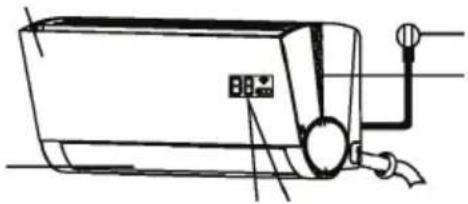
Unit Parts
Front Panel
Louver
natural_image
Line drawing of a wall-mounted air conditioner unit with control panel and piping (no text or symbols)Power Cable (Some Units)
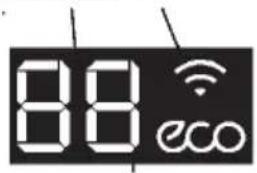
V-sh ape light area:
Lights up in different colour according to the operation mode: In (AUTO)COOL and DRY mode, the light is blue.
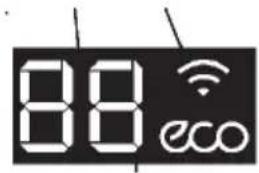
Display window
In (AUTO)HEAT mode, the light is orange. The light is off in Fan mode. N OTE: When room light is turned off, the display window will slowly darken after 5 seconds, and the buzzer turn off. It will be back to normal after the light is turned on.
Functional Filter
(On Front of Main Filter - Some Units)
natural_image
Illustration of hands installing or adjusting a grid panel (no text or symbols visible)Display window
Remot Remote Holder

for 3 seconds when:
- TIMER ON is set
• FRESH, SWING, TURBO, or SILENCE features are turned on

" for 3 seconds when;
• TIMER OFF is set
- FRESH, SWING, TURBO, or SILENCE features are turned off

when anti-cold air feature is turned on

when defrosting

when unit is self-deaning

when freeze protection is turned on

when WIFI Control feature is activated(some units)

when ECO function is activated(some units)
Optimal performance for the COOL, HEAT, and DRY modes can be achieved in the following temperature ranges. When your air conditioner is used outside of these ranges, certain safety protection features will activate and cause the unit to perform less than optimally.
Inverter Split Type
| COOL mode | HEAT mode | DRY mode | |
| Room Temperature | 17°C - 32°C (63°F - 90°F) | 0°C - 30°C (32°F - 86°F) | 10°C - 32°C (50°F - 90°F) |
| Outdoor Temperature | 0°C - 50°C (32°F - 122°F) | -15°C - 30°C (5°F - 86°F) | 0°C - 50°C (32°F - 122°F) |
| -15°C - 50°C (5°F - 122°F)(For models with low temp. cooling systems.) |
FOR UNITS WITH AUXILARY ELECTRIC HEATER When outside temperature is below 0°C (32°F), we strongly recommend keeping the unit plugged in at all timers to ensure smooth ongoing performance.
Fixed-speed Type
| COOL mode | HEAT mode | DRY mode | |
| Room Temperature | 17°-32°C (63°-90°F) | O°-30°C (32°-86°F) | 10°-32°C (50°-90°F) |
| Outdoor Temperature | 18°-43°C (64°-109°F) | -7°-24°C (19°-75°F) | 11°-43°C (52°-109°F) |
| -7°-43°C (19°-109°F) (For models with low-temp cooling systems) | 18°-43°C (64°-109°F) | ||
| 18°-52°C (64°-126°F) (For special tropical models) | 18°-52°C (64°-126°F) (For special tropical models) |
To further optimize the performance of your unit, do the following:
- Keep doors and windows closed.
- Limit energy usage by using TIMER ON and TIMER OFF functions.
- Do not block air inlets or outlets.
- Regularly inspect and clean air filters.
| For a detailed explanation of each function, refer to the Remote Control Manual.Other FeaturesAuto-RestartIf the unit loses power, it will automatically restart with the prior settings once power has been restored.Anti-mildew (some units)When turning off the unit from COOL, AUTO (COOL), orDRY modes, the air conditioner will continue operate at very low power to dry up condensed water and prevent mildew growth.Intelligent Light DetectionWhen room light is turned off, the display window and V-shape light area will slowly darken after 5 seconds, and the buzzer turn off. It will be back to normal after the light turned on.NOTE: When room light is bright, the display window and V-shape area remains on. When the room light is dark,you can press the LED button on the remote controller to turn on/off the display window. | Wi-Fi Control (some units) Wi-Fi control allows you to control your air conditioner using your mobile phone and Wi-Fi connection.Louver Angle Memory(some units) When turning on your unit, the louver will automatically resume its formerangle.Refrigerant Leakage Detection (some units)The indoor unit will automatically display "EC" when it detects refrigerant leakage.Smart Air Manager When the unit is under COOL or AUTO mode, press the SWING button on the remote controller ,it will blow out very comfortable & quiet wind, which brings you feeling of nature.For a detailed explanation of your unit's advanced functionality (such as TURBO mode and its self-cleaning functions), refer to the Remote Control Manual. |
NOTE ON ILLUSTRATIONS
Illustrations in this manual are for explanatory purposes. The actual shape of your indoor unit may be slightly different. The actual shape shall prevail.
Setting Angle of Air Flow
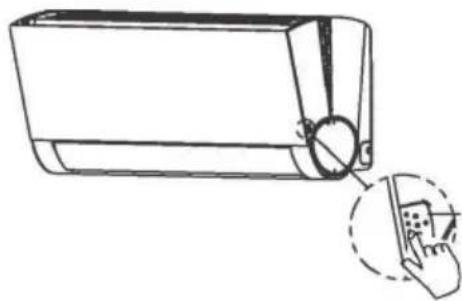
Setting vertical angle of air flow
While the unit is on, use the SWING /DIRECT button to set the direction (vertical angle) of airflow.
-
Press the SWING /DIRECT button once to activate the louver. Each time you press the button, it will adjust the louver by 6°. Press the button until the direction you prefer is reached.
-
To make the louver swing up and down continuously, press and hold the SWING/ DIRECT button for 3 seconds. Press it again to stop the automatic function.
Setting horizontal angle of air flow
The horizontal angle of the airflow must be set manually. Grip the deflector rod (See Fig.2.3) and manually adjust it to your preferred direction. For some units, the horizontal angle of the airflow can be set by remote control. please refer to the Remote Control Manual.
NOTE ON LOUVER ANGLES
When using COOL or DRY mode, do not set louver at too vertical an angle for long periods of time. This can cause water to condense on the louver blade, which will drop on your floor or furnishings. (See Fig. 2.2) When using COOL or HEAT mode, setting the louver at too vertical an angle can reduce the performance of the unit due to restricted air flow.
Do not move louver by hand. This will cause the louver to become out of sync. If this occurs, turn off the unit and unplug it for a few seconds, then restart the unit. This will reset the louver.
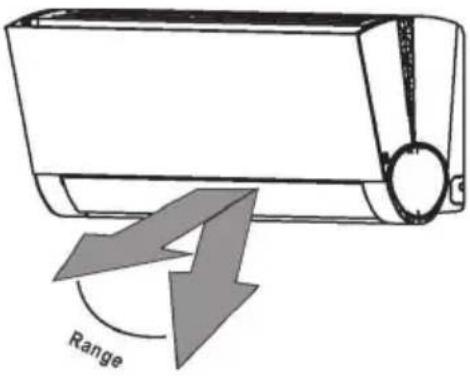
Caution: Do not keep louver at too vertical an angle for long periods of time. This can cause water condensation to drip on your
Fig. 2.2
! CAUTION
Do not put your fingers in or near the blower and suction side of the unit. The high-speed fan inside the unit may cause injury.

Fig. 2.3
Sleep Operation
The SLEEP function is used to decrease energy use while you sleep (and don't need the same temperature settings to stay comfortable). This function can only be activated via remote control.
Press the SLEEP button when you are ready to go to sleep. When in COOL mode, the unit will increase the temperature by 1^ C ( 2^ F) after 1 hour, and will increase an additional 1^ C ( 2^ F) after another hour. When in HEAT mode, the unit will decrease the temperature by 1^ C ( 2^ F) after 1 hour, and will decrease an additional 1^ C ( 2^ F) after another hour.
It will hold the new temperature for 7 hours, then the unit will turn off automatically.
Note: The SLEEP function is not available in FAN or DRY mode.
Fig. 3.1
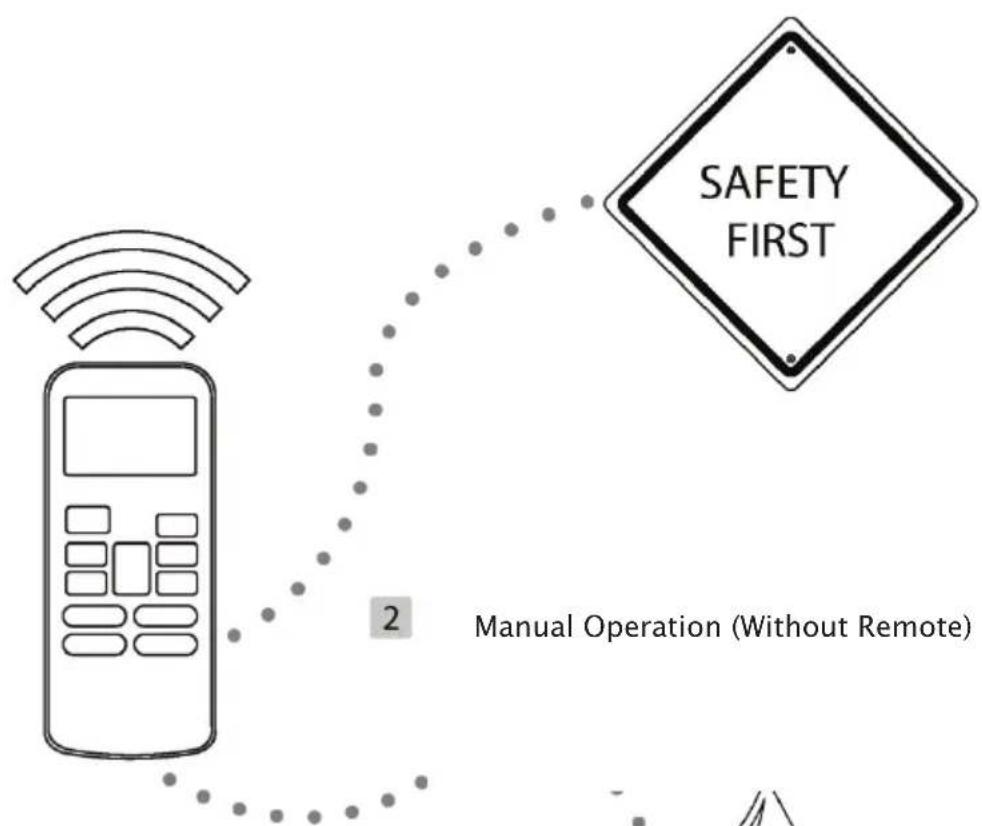
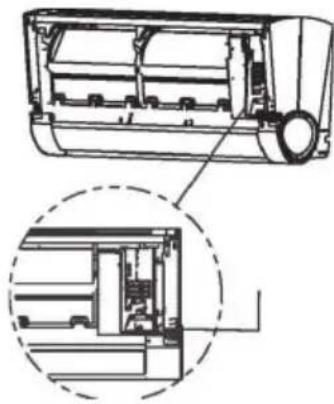
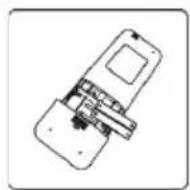
Manual Operation (Without Remote) 2
How to operate your unit without the remote control
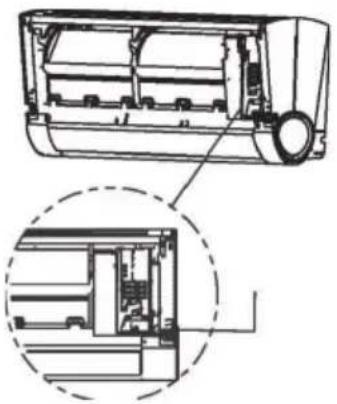
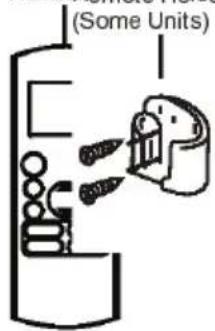
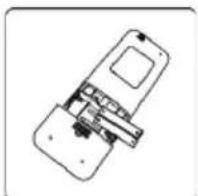
In the event that your remote control fails to work, your unit can be operated manually with the MANUAL CONTROL button located on the indoor unit. Note that manual operation is not a long-term solution, and that operating the unit with your remote control is strongly recommended.
Unit must be turned off before manual operation.
To operate your unit manually:
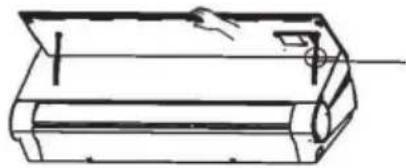
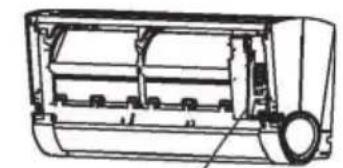
. Press the button on both side of the indoor unit to loosen the panel, then lift the front panel up, use the automatic telescopic rod to prop up the panel.
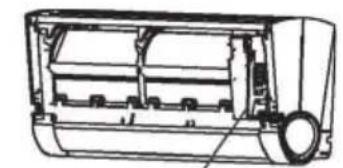
. Locate the MANUAL CONTROL button on the right-hand side of the unit. Press the recessed button with your finger or the tip of a ballpoint pen.
. Press the MANUAL CONTROL button one time to activate FORCED AUTO mode.
. Press the MANUAL CONTROL again to activate FORCED COOLING mode.
. Press the MANUAL CONTROL button a third time to turn the unit off.
. Hold the panel by hand, and press the middle position of the automatic telescopic rod to close the front panel.
! CAUTION
Manual control button
The manual button is intended for testing purposes and emergency operation only. Please do not use this function unless the remote is lost and it is absolutely necessary. To restore regular operation, use the remote control to activate the unit.
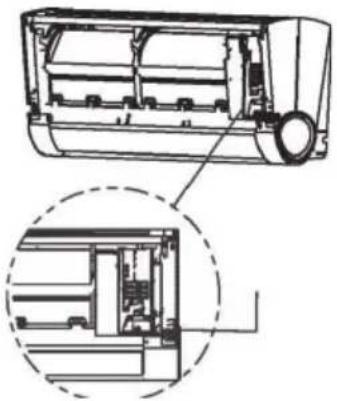
natural_image
Line drawing of a rectangular device with a circular button and a hand pointing to it, no text or symbols present.Press here to loosen the front panel
natural_image
Technical line drawing of a mechanical component or housing (no text or symbols)Automatic telescopic rod (press the middle position to release)
natural_image
Technical line drawing of a car air conditioner unit showing internal components and housing (no text or labels)Manual control button
Care and Maintenance
Cleaning Your Indoor Unit
A BEFORE CLEANING OR "MAINTENANCE ALWAYS TU RN OFF YOUR AIR CONDITIONER SYSTEM AND DISCONNECT ITS POWER SUPPLY BEFORE CL EANING OR MAINTENANCE.
! CAUTION
Only use a soft, dry cloth to wipe the unit clean. If the unit is especially dirty, you can use a cloth soaked in warm water to wipe it clean.
Do not use chemicals or chemically treated cloths to clean the unit
Do not use benzene, paint thinner, polishing powder or other solvents to clean the unit.
They can cause the plastic surface to crack or deform.
Do not use water hotter than 40^ C ( 104^ F) to clean the front panel. This can cause the panel to deform or become discolored.
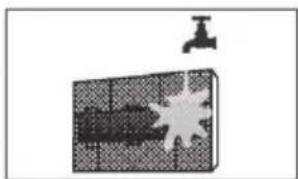
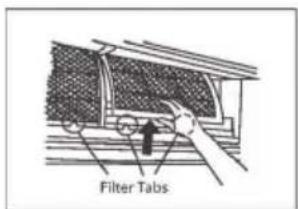
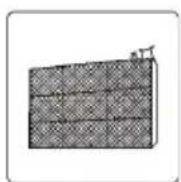
Cleaning Your Air Filter
A clogged air conditioner can reduce the cooling efficiency of your unit, and can also be bad for your health. Make sure to clean the filter once every two weeks.
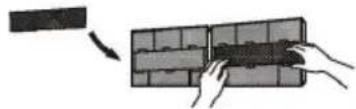
Press the button on both side of the indoor unit to loosen the panel, then lift the front panel up, use the suspension bar to prop up the panel.
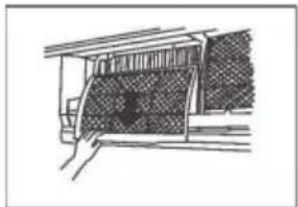
Grip the tab on the end of the filter, push it up slightly, then pull it a little towards yourself.
Now pull down to extract the filter.
If your filter has a small air freshening filter, unclip it from the larger filter. Clean this air freshening filter with a hand-held vacuum.
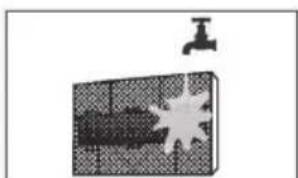
Clean the large air filter with warm, soapy water. Be sure to use a mild detergent.
Rinse the filter with fresh water, then shake off excess water.
Dry it in a cool, dry place, and refrain from exposing it to direct sunlight.
When dry, re-clip the air freshening filter to the larger filter, then slide it back into the indoor unit.
Close the front panel of the indoor unit. NOTE: After cleaning, re-connect the power the front panel will reset its position.
natural_image
Simple line drawing of a vehicle under a roof structure (no text or symbols)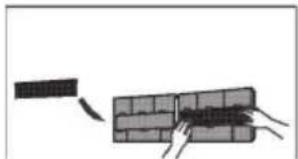
natural_image
Diagram showing a brick wall being inserted into a larger block, with no text or symbols present.Remove air freshening filter from back of larger filter (some units)
natural_image
Simple line drawing of a faucet above a grid-patterned object with a starburst (no text or symbols)Fig. 5.1
! CAUTION
Do not touch air freshening (Plasma) filter for at least 10 minutes after turning off the unit.
! CAUTION
- Before changing the filter or cleaning, turn off the unit and disconnect its power supply.
- When removing filter, do not touch metal parts in the unit. The sharp metal edges can cut you.
- Do not use water to clean the inside of the indoor unit. This can destroy insulation and cause electrical shock.
- Do not expose filter to direct sunlight when drying. This can shrink the filter.
If you plan not to use your air conditioner for an extended period of time, do the following:
Air Filter Reminders (Optional)
Air Filter Cleaning Reminder
After 240 hours of use, the displaywindow on the indoor unit will flash "CL." This is a reminder to clean your filter. After 15 seconds, the unit will revert to its previous display.
To reset the reminder, press the LED button on your remote control 4 times, or press the
MANUAL CONTROL button 3 times. If you don't reset the reminder, the "CL" indicator will flash again when you restart the unit.
Air Filter Replacement Reminder
After 2,880 hours of use, the display window on the indoor unit will flash "nF." This is a reminder to replace your filter. After 15 seconds, the unit will revert to its previous display.
To reset the reminder, press the LED button on your remote control 4 times, or press the MANUAL CONTROL button 3 times. If you don't reset the reminder, the "nF" indicator will flash again when you restart the unit.
CAUTION
- Any maintenance and cleaning of outdoor unit should be performed by an authorized dealer or licensed service provider.
- Any unit repairs should be performed by authorized dealer or licensed servic e provider.
Maintenance -
Long Periods of Non-Use
If you plan not to use your air conditioner for an extended period of time, do the following:
natural_image
Diagram of a grid-patterned rectangular block with a small protrusion on top (no text or symbols)Clean all filters
natural_image
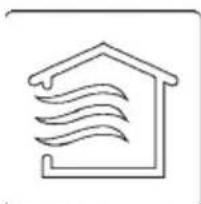
Simple line drawing of a house with wavy lines indicating airflow or ventilation (no text or symbols)Turn on FAN function until unit dries out completely
Turn off the unit and disconnected the power
Remove batteries from remote control
Maintenance
-Pre-Season Inspection
After long periods of non-use, or before periods of frequent use, do the following:
Check for damaged wires
Clean all filters
Check for leaks
natural_image
Diagram of a smartphone internal structure showing internal components (no text or labels)Replace batteries
Make sure nothing is blocking all air inlets and outlets
Troubleshooting
! SAFETY P RECAUTIONS
If ANY of the following conditions occurs, turn off your unit immediately!
• The power cord is damaged or abnormally warm
- You smell a burning odor
• The unit emits loud or abnormal sounds
- A power fuse blows or the circuit breaker frequently trips
• Water or other objects fall into or out of the unit
DO NOT ATTEMPT TO FIX THESE YOURSELF! CONTACT AUTHORIZED SERVICE PROVIDER IMMEDIATELY!
Common Issues
The following problems are not a malfunction and in most situations will not require repairs.
| Issue | Possible Causes |
| Unit does not turn on when pressing ON/OFF button | The Unit has a 3-minute protection feature that prevents the unit from overloading. The unit cannot be restarted within three minutes of being turned off. |
| The unit changes from COOL/HEAT mode to FAN mode | The unit may change its setting to prevent frost from forming on the unit.Once the temperature increases, the unit will start operating in the previously selected mode again. |
| The set temperature has been reached, at which point the unit turns off the compressor. The unit will continue operating when the temperature fluctuates again. | |
| The indoor unit emits white mist | In humid regions, a large temperature difference between the room's air and the conditioned air can cause white mist. |
| Both the indoor and outdoor units emit white mist | When the unit restarts in HEAT mode after defrosting, white mist may be emitted due to moisture generated from the defrosting process. |
| Issue | Possible Causes |
| The indoor unit makes noises | A rushing air sound may occur when the louver resets its position. |
| A squeaking sound may occur after running the unit in HEAT mode due to expansion and contraction of the unit's plastic parts. | |
| Both the indoor unit and outdoor unit make noises | Low hissing sound during operation: This is normal and is caused by refrigerant gas flowing through both indoor and outdoor units. |
| Low hissing sound when the system starts, has just stopped running, or is defrosting: This nois is normal and is caused by the refrigerant gas stopping or changing direction. | |
| Squeaking sound: Normal expansion and contraction of plastic and metal parts caused by temperature changes during operation can cause squeaking noises. | |
| The outdoor unit makes noises | The unit will make different sounds based on its current operating mode. |
| Dust is emitted from either the indoor or outdoor unit | The unit may accumulate dust during extended periods of non-use, which will be emitted when the unit is turned on. This can be mitigated by covering the unit during long periods of inactivit |
| The unit emits a bad odor | The unit may absorb odors from the environment (such as furniture, cooking, cigarettes, etc.) which will be emitted during operations. |
| The unit's filters have become moldy and should be cleaned. | |
| The fan of the outdoor unit does not operate | During operation, the fan speed is controlled to optimize product operation. |
| Operation is erratic, unpredictable, or unit is unresponsive | Interference from cell phone towers and remote boosters may cause the unit to malfunction. In this case, try the following:· Disconnect the power, then reconnect.· Press ON/OFF button on remote control to restart operation. |
NOTE: If problem persists, contact a local dealer or your nearest customer service center. Provide them with a detailed description of the unit malfunction as well as your model number.
Troubleshooting
When troubles occur, please check the following points before contacting a repair company.
| Problem | Possible Causes | Solution |
| Poor Cooling Performance | Temperature setting may be higher than ambient room temperature | Lower the temperature setting |
| The heat exchanger on the indoor or outdoor unit is dirty | Clean the affected heat exchanger | |
| The air filter is dirty | Remove the filter and clean it according to instructions | |
| The air inlet or outlet of either unit is blocked | Turn the unit off, remove the obstruction and turn it back on | |
| Doors and windows are open | Make sure that all doors and windows are closed while operating the unit | |
| Excessive heat is generated by sunlight | Close windows and curtains during periods of high heat or bright sunshine | |
| Too many sources of heat in the room (people, computers, electronics, etc.) | Reduce amount of heat sources | |
| Low refrigerant due to leak or long-term use | Check for leaks, re-seal if necessary and top off refrigerant | |
| SILENCE function is activated | SILENCE function can lower product performance by reducing operating frequency. Turn off SILENCE function. | |
| The unit is not working | Power failure | Wait for the power to be restored |
| The power is turned off | Turn on the power | |
| The fuse is burned out | Replace the fuse | |
| Remote control batteries are dead | Replace batteries | |
| The Unit's 3-minute protection has been activated | Wait three minutes after restarting the unit | |
| Timer is activated | Turn timer off | |
| The unit starts and stops frequently | There's too much or too little refrigerant in the system | Check for leaks and recharge the system with refrigerant. |
| Incompressible gas or moisture has entered the system. | Evacuate and recharge the system with refrigerant | |
| The compressor is broken | Replace the compressor | |
| The voltage is too high or too low | Install a manostat to regulate the voltage | |
| Poor heating performance | The outdoor temperature is lower than 7°C (44.5°F) | Use auxiliary heating device |
| Cold air is entering through doors and windows | Make sure that all doors and windows are closed during use | |
| Low refrigerant due to leak or long-term use | Check for leaks, re-seal if necessary and top off refrigerant | |
| Indicator lamps continue flashing | The unit may stop operation or continue to run safely. If the indicator lamps continue t flash or error codes appear, wait for about 10 minutes. The problem may resolve itself. If not, disconnect the power, then connect it again. Turn the unit on. If the problem persists, disconnect the power and contact your nearest customer service center. | |
| Error code appears in the window display of indoor unit: · E0, EI, E2... · PI, P2, P3... · F1, F2, F3... | ||
NOTE: If your problem persists after performing the checks and diagnostics above, turn off your unit immediately and contact an authorized service center.
CONTENTS
Handling the remote controller 2
Remote controller Specifications.... 3
Function buttons 5
Indicators on LCD.... 7
How to use the buttons 8
Auto operation 8
Cooling/Heating/Fan operation 8
Dehumidifying operation 9
Adjusting air flow direction.... 9
Timer operation 10
SLEEP/FRESH function 13
LED/FOLLOW ME function 14
TURBO/SELF CLEAN function 14
Handling the remote controller
Location of the remote controller.
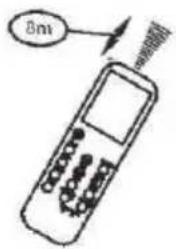
- Use the remote controller within a distance of 8 meters from the appliance, pointing it towards the receiver. Reception is confirmed by a beep.
CAUTIONS
- The air conditioner will not operate if curtains, doors or other materials block the signals from the remote controller to the indoor unit.
- Prevent any liquid from falling into the remote controller. Do not expose the remote controller to direct sunlight or heat.
- If the infrared signal receiver on the indoor unit is exposed to direct sunlight, the air conditioner may not function properly. Use curtains to prevent the sunlight from falling on the receiver.
If other electrical appliances react to the remote controller, either move these appliances or consult your local dealer.
Replacing batteries
The remote controller is powered by two dry batteries(R03/LR03X2) housed in the rear part and protected by a cover.
(1) Remove the cover by pressing and sliding off.
(2) Remove the old batteries and insert the new batteries, placing the(+) and (-) ends correctly.
(3) Reattach the cover by sliding it back into position.
NOTE: When the batteries are removed, the remote controller erases all programming. After inserting new batteries, the remote controller must be reprogrammed.
A CAUTIONS
- Do not mix old and new batteries or batteries of different types.
- Do not leave the batteries in the remote controller if they are not going to be used for 2 or 3 months.
- Do not dispose batteries as unsorted municipal waste. Collection of such waste separately for special treatment is necessary.
Handling the remote controller
Remote Controller Specifications!
| Model | RG36A11/BGEF |
| Rated Voltage | 3.0V(Dry batteries R03/LR03X2) |
| Signal Receiving Range | 8m |
| Environment | -5°C 60°C |
Performance Feature
- Operating Mode: AUTO, COOL, DRY, HEAT and FAN.
- Timer Setting Function in 24 hours.
- Indoor Setting Temperature Range : 17°C\~30°C.
- Full function of LCD (Liquid Crystal Display).
NOTE:
- Buttons design might be slightly different from the actual one you purchased depending on individual models.
- All the functions described are accomplished by the indoor unit. If the indoor unit has no this feature, there is no corresponding operation happened when press the relative button on the remote controller.
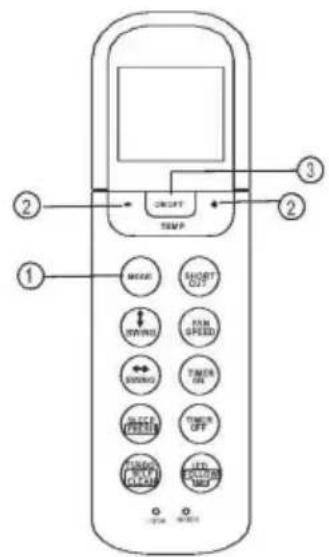
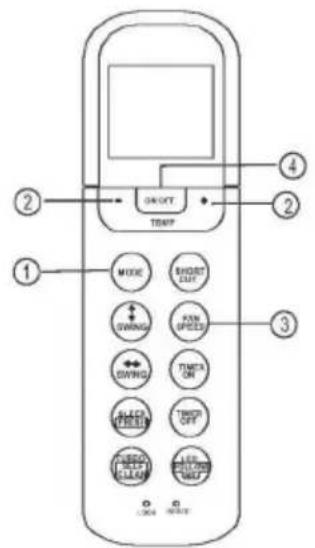
Function buttons
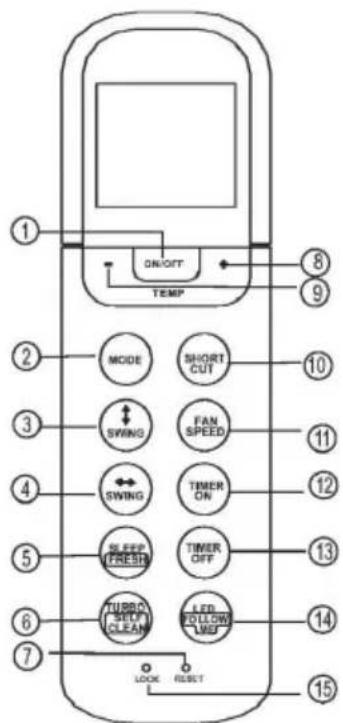
1. ON/OFF Button
Operation starts when this button is pressed and stops when this button is pressed again.
2. MODE Button
Each time the button is pressed, the operation mode is selected in a sequence of following:

NOTE-. Please do not select HEAT mode if the machine you purchased is cooling only type. Heat mode is not supported by the cooling only appliance.
3. Swing < Button
Used to stop or start horizontal louver movement or set the desired up/down air flow direction. The louver changes 6 degree in angle for each press. If keep pushing more than 2 seconds, the louver will swing up and down automatically.
4. Swing «» Button
Used to stop or start vertical louver movement and set the desired left/right air flow direction. The vertical louver changes 6 degree in angle for each press. And indoor unit displays 'VV' for one second. If holding down for more than 2 seconds, the vertical louver swing feature is activated. The indoor unit displays 'III', flashes four times, then the temperature setting reverts back. If the swing feature is stopped, it displays 'LC' and remains on for 3 seconds.
NOTE: For some units, the indoor units display 'ON', when the swing feature is activated, and display 'OF' when the swing feature is stopped.
5. SLEEP/FRESH(optional) Button
Active/Disable SLEEP function. If flushing more than 2 seconds, the 'FRESH' function will be activated, pushing more than 2 seconds again to disable.
NOTE: While the unit is running under SLEEP mode, it would be cancelled if press the MODE, FAN SPEED or ON/OFF button.
Function buttons

6.TURBO/SELF CLEAN Button:
Active/Disable TURBO function. If pushing more than 2 seconds, the 'SELF CLEAN' function will be activated, pushing more than 2 seconds again to disable.
7. RESET Button:
When you press the recessed RESET button, all current settings are cancelled and the control will return to the initial settings.
8.UP Button (+)
Push this button to increase setting temperature in the range of 17^ C\~ 30^ C.
9. DOWN Button( . ))
Push this button to decrease setting temperature in the range of 17^ C\~ 30^ C.
10. SHORTCUT(MEMORY SHORTCUT) Button
• Used to restore the current settings or resume previous settings.
- On the first time connecting to the power, if push the SHORTCUT button, the unit will operate on AUTO mode, 24°C, and fan speed is Auto.
- Push this button when remote controller is on, the system will automatically revert back to the previous settings including operating mode, setting temperature, fan speed level and sleep feature(if activated). And transmit the signals to the unit.
- If push this button when remote controller is off, the system will only resume the previous settings and will not transmit the signals to the unit. And the sleep feature is disable.
- If pushing more than 2 seconds, the system will automatically restore the current operation settings including operating mode,
11.FAN SPEED Button
Used to select the fan speed in four steps:

12.TIMER ON Button
Press this button to initiate the auto-on time sequence. Each press will increase the auto-timed setting in 30 minutes increments. When the setting time displays 10H, each press will increase the auto-timed setting 60 minutes increments. To cancel the auto-timed program, simply adjust the auto-on time to 0.0.
13.TIMER OFF Button
Press this button to initiate the auto-off time sequence. Each press will increase the auto-timed setting in 30 minutes increments. When the setting time displays 10H, each press will increase the auto-timed setting 60 minutes increments. To cancel the auto-timed program, simply adjust the auto-off time to 0.0.
14.LED/FOLLOW ME Button
Disable/Active indoor screen Display. When pushing more than 2 seconds, the ' FOLLOW ME ' function will be activated, pushing more than 2 seconds again to disable.
15. LOCK Button
When you press the recessed LOCK button, all current settings are locked in and the remote controller does not accept any operation except that of the LOCK. Press again to cancel the LOCK mode.
Indicators on LCD
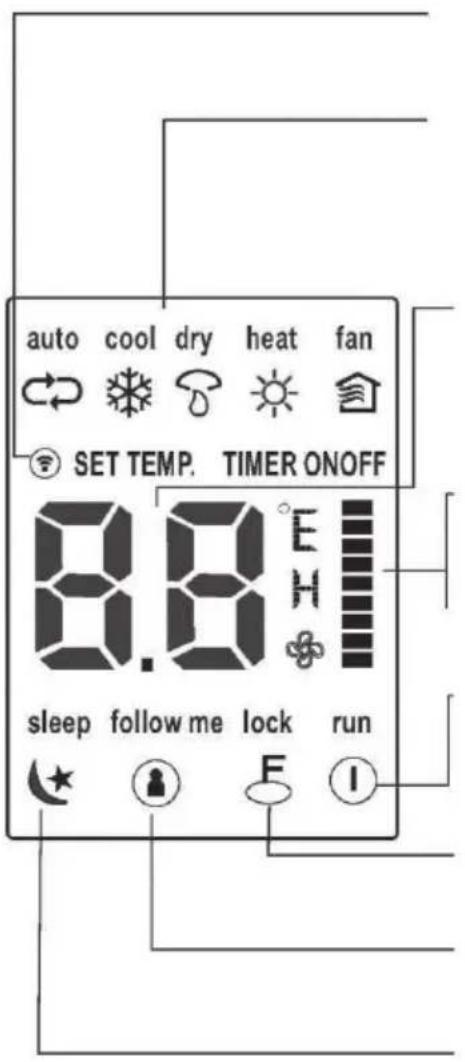
Transmission Indicator
This transmission indicator lights when remote controller transmits signals to the indoor unit.
Mode display
Displays the current operation mode. Including auto(○), cool( * ), dry( ▲ ), heat(※ ) (Not applicable to cooling only models), fan( ) and back to auto(○ ).
-Temp./Timer display
Displays the temperature setting(17°C\~30°C). When you set the operating mode to FAN, no temperature setting is displayed. And if in the TIMER mode, shows the ON and OFF settings of the TIMER.
"Fan speed display
Displays the selected fan speed, AUTO(no display) and three fan speed levels " = " (LOW) " | " (MED) " " (HIGH) can be indicated. The fan speed is AUTO when the operating mode is either AUTO or DRY.
-ON/OFF display
Displayed by pressing the ON/OFF button. Press the ON/OFF button again to remove.
Lock Display
Displayed when LOCK mode is activated.
FOLLOW ME Display
Displayed when FOLLOW ME function is activated.
. Sleep Display
Displayed under sleeping operation. Press the SLEEP button again to remove.
Note:
All indicators shown in the figure are for the purpose of clear presentation. But during the actual operation only the relative functional signs are shown on the display window.
How to use the buttons!
Auto operation
Ensure the unit is plugged in and power is available. The OPERATION indicator on the display panel of the indoor unit starts flashing.
-
Press the MODE button to select Auto.
-
Press the UP/DOWN button to set the desired temperature. The temperature can be set within a range of 17^ 30^ in 1^ increments.
-
Press the ON/OFFbutton to start the air conditioner.
NOTE
- In the Auto mode, the air conditioner can logically choose the mode of Cooling, Fan, and Heating by sensing the difference between the actual ambient room temperature and the setting temperature on the remote controller.
- In the Auto mode, you can not switch the fan speed. It has already been automatically controlled.
- If the Auto mode is not comfortable for you, the desired mode can be selected manually.
Cooling /Heating/Fan operation
Ensure the unit is plugged in and power is available.
- Press the MODE button to select COOL, HEAT(cooling & heating models only) or FAN mode.
- Press the UP/DOWN buttons to set the desired temperature. The temperature can be set within a range of 17^ C\~ 30^ C in 1^ C increments.
- Press the FAN button to select the fan speed in four steps- Auto, Low, Med, or High.
- Press the ON/OFF button to start the air conditioner.
NOTE
In the FAN mode, the setting temperature is not displayed in the remote controller and you are not able to control the room temperature either. In this case, only step 1, 3 and 4 may be performed.
Dehumidifying operation
Ensure the unit is plugged in and power is available. The OPERATION indicator on the display panel of the indoor unit starts flashing.
- Press the MODE button to select DRY mode.
- Press the UP/DOWN buttons to set the desired temperature. The temperature can be set within a range of 17^ C\~ 30^ C in 1^ C increments.
- Press the ON/OFF button to start the air conditioner.
NOTE
In the Dehumidifying mode, you can not switch the fan speed. It has already been automatically controlled.
Adjusting air flow direction
Use the SWING " and SWING wo buttons to adjust the desired airflow direction.
-
When push the SWING V button, the horizontal louver changes 6 degree in angle for each push. If pushing more than 2 seconds, the louver will automatically swing up and down.
-
When push the SWING w> button, the vertical louver changes 6 degree in angle for each push. If pushing more than 2 seconds, the louver will automatically swing left and right.
NOTE: When the horizontal/vertical louver swing or move to a position which would affect the cooling or heating effect of the air conditioner, it would automatically change the swing/moving direction.
Timer operation
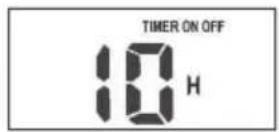
Press the TIMER ON button can set the auto-on time of the unit. Press the TIMER OFF button can set the auto-off time of the unit.
To set the Auto-on time.
- Press the TIMER ON button. The remote controller shows TIMER ON, the last Auto-on setting time and the signal "h" will be shown on the LCD display area. Now it is ready to reset the Auto-on time to START the operation.
- Push the TIMER ON button again to set desired Auto-on time. Each time you press the button, the time increases by half an hour between 0 and 10 hours and by one hour between 10 and 24 hours.
- After setting the TIMER ON, there will be a one second delay before the remote controller transmits the signal to the air conditioner. Then, after approximately another 2 seconds, the signal "h" will disappear and the set temperature will re-appear on the LCD display window.
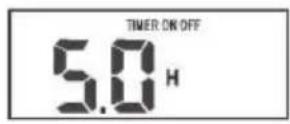
To set the Auto-off time.
- Press the TIMER OFF button. The remote controller shows TIMER OFF, the last Auto-off setting time and the signal "h" will be shown on the LCD display area. Now it is ready to reset the Auto-off time to stop the operation.
- Push the TIMER OFF button again to set desired Auto-off time. Each time you press the button, the time increases by half an hour between 0 and 10 hours and by one hour between 10 and 24 hours.
- After setting the TIMER OFF, there will be a one second delay before the remote controller transmits the signal to the air conditioner. Then, after approximately another 2 seconds, the signal "h" will disappear and the set temperature will re-appear on the LCD display window.
CAUTION
• The effective operation time set by the remote controller for the timer function is limited to the following settings: 0.5, 1.0, 1.5, 2.0, 2.5, 3.0, 3.5, 4.0, 4.5, 5.0, 5.5, 6.0, 6.5, 7.0, 7.5, 8.0, 8.5, 9.0, 9.5, 10, 11, 12, 13, 14, 15, 16, 17, 18, 19, 20, 21, 22, 23 and 24.
Example of timer setting
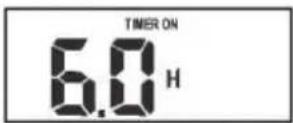
TIMER ON
(Auto-on Operation)
The TIMER ON feature is useful when you want the unit to turn on automatically before you return home. The air conditioner will automatically start operating at the set time.
Example:
To start the air conditioner in 6 hours.
- Press the TIMER ON button, the last setting of starting operation time and the signal "h" will show on the display area.
- Press the TIMER ON button to display "6:0h" on the TIMER ON display of the remote controller.
- Wait for 3 seconds and the digital display area will show the temperature again. The "TIMER ON" indicator remains on and this function is activated.
flowchart
graph LR
    A["On"] --> B["Stop"]
    B --> C["Start"]
    style A fill:#f9f,stroke:#333
    style B fill:#ccf,stroke:#333
    style C fill:#cfc,stroke:#333
    note1["Set: 2 hours later after setting"] -.-> note2["10 hours later after setting"]
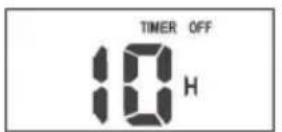
TIMER OFF
(Auto-off Operation)
The TIMER OFF feature is useful when you want the unit to turn off automatically after you go to bed. The air conditioner will stop automatically at the set time.
Example:
To stop the air conditioner in 10 hours.
- Press the TIMER OFF button, the last setting of stopping operation time and the signal "h" will show on the display area.
- Press the TIMER OFF button to display "10h" on the TIMER OFF display of the remote controller.
- Wait for 3 seconds and the digital display area will show the temperature again. The "TIMER OFF" indicator remains on and this function is activated.
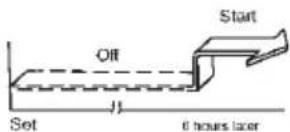
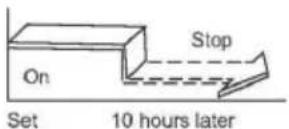
COMBINED TIMER
(Setting both ON and OFF timers simultaneously)
(On — Stop — Start operation)
This feature is useful when you want to stop the air conditioner after you go to bed, and start it again in the morning when you wake up or when you return home.
Example:
To stop the air conditioner 2 hours after setting and start it again 10 hours after setting.
- Press the TIMER OFF button.
- Press the TIMER OFF button again to display 2.0h on the TIMER OFF display.
- Press the TIMER ON button.
- Press the TIMER ON button again to display 10h on the TIMER ON display.
- Wait for 3 seconds and the digital display area will show the temperature again. The "TIMER ON OFF" indicator remains on and this function is activated.
flowchart
graph TD
    A["Start"] --> B["Off"]
    B --> C["Set"]
    C --> D["2 hours later after setting"]
    D --> E["5 hours later after setting"]
    E --> F["Stop"]

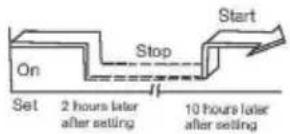
(Off — Start — Stop operation)
This feature is useful when you want to start the air conditioner before you wake up and stop it after you leave the house.
Example:
To start the air conditioner 2 hours after setting, and stop it 5 hours after setting.
- Press the TIMER ON button.
- Press the TIMER ON button again to display 2.0h on the TIMER ON display.
- Press the TIMER OFF button.
- Press the TIMER OFF button again to display 5.0h on the TIMER OFF display.
- Wait for 3 seconds and the digital display area will show the temperature again. The "TIMER ON OFF" indicator remains on and this function is activated.
SLEEP/FRESH function
Press this button to initiate SLEEP function. And if keep pressing this button more than 2 seconds, the FRESH function is initiated.
Sleep function can maintain the most comfortable temperature and save energy. This function is available on COOL, HEAT or AUTO mode only. For the detail, see "Sleep operation" in "USER'S MANUAL"
When the FRESH function is initiated, the Ionizer/Plasma Dust Collector (depending on models) is energized and will help to remove pollen and impurities from the air.
LED/FOLLOW ME function
- Press this button less than 2nds will initiate LED function. And if keep pressing this button more than 2nds, the FOLLOW ME function is initiated.
- When the Follow Me function is activated, the remote display is actual temperature at its location. The remote control will send this signal to the air conditioner every 3 minutes interval until press the FOLLOW ME button again.
- The Follow Me function is not available under DRY and FAN mode.
- Switch the operation mode or turn off the unit will cancel the Follow Me function automatically.
TRUBO/SELF CLEAN function
- Press this button less than 2nds will initiate TURBO function. And if keep pressing this button more than 2nds, the SELF CLEAN function is initiated.
- Turbo function enables the unit to reach the preset temperature at cooling or heating operation in the shortest time (if the indoor unit has no this function, there is no corresponding operation happened when press Turbo button.)
• Under SELF CLEAN mode, the air conditioner will automatically clean and dry the Evaporator and keep it as fresh for the next operation.
European Disposal Guidelines 5
This appliance contains refrigerant and other potentially hazardous materials. When disposing of this appliance, the law requires special collection and treatment.
Do not dispose of this product as household waste or unsorted municipal waste.
When disposing of this appliance, you have the following options:
- Dispose of the appliance at designated municipal electronic waste collection facility.
- When buying a new appliance, the retailer will take back the old appliance free of charge.
• The manufacturer will take back the old appliance free of charge. - Sell the appliance to certified scrap metal dealers.
Special notice
Disposing of this appliance in the forest or other natural surroundings endangers your health and is bad for the environment. Hazardous substances may leak into the ground water and enter the food chain.
JAMSTVENI LIST
VIVAX
HR
za klima uređaj
JAMSTVO
Broj jamstva
Tip uređaja
Vanjska Jedinica
Unutarnja J.1
Unutarnja J.2
Unutarnja J.3
Unutarnja J.4
Datum prodaje
Broj računa

M.P.
OPĆI PODACI
Kupac
Adresa
Poštanski broj
Grad
Telefon
MONTAŽA KLIMA UREĐAJA
Servis / Montazer
Datum montaže

M.P.