ACP-09CIFM25AEVI - Air-conditioner Vivax - Free user manual and instructions
Find the device manual for free ACP-09CIFM25AEVI Vivax in PDF.

User questions about ACP-09CIFM25AEVI Vivax
0 question about this device. Answer the ones you know or ask your own.
Ask a new question about this device
Download the instructions for your Air-conditioner in PDF format for free! Find your manual ACP-09CIFM25AEVI - Vivax and take your electronic device back in hand. On this page are published all the documents necessary for the use of your device. ACP-09CIFM25AEVI by Vivax.
USER MANUAL ACP-09CIFM25AEVI Vivax
natural_image
Symbol of a trash bin crossed out by two diagonal lines (no text or labels)SIGURNOSNE MJERE PREDOSTROŽNOSTI
Da bi spriječili ozljeđivanje korisnika ili drugih ljudi i materijalnu štetu, morate slijediti sljedeće upute. Nepravilno rukovanje uslijed ignoriranja uputa može uzrokovati ozljede ili oštećenja.
text_image
One-five One-four One-three One-twin Vanjska jedinicaLED zaslon
text_image
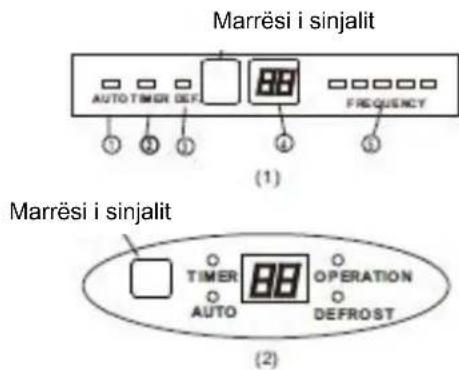
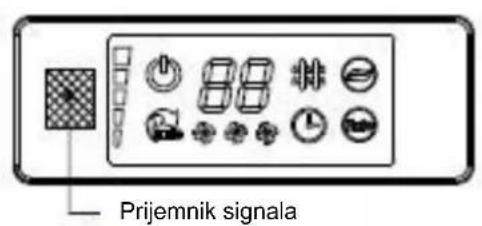
Prijamnik signala AUTO TIMER CLK FREQUENCY ① ② ③ ④ ⑤ (1)Prijamnik signala
text_image
TIMER AUTO OPERATION DEFROST (2)VAŽNO:
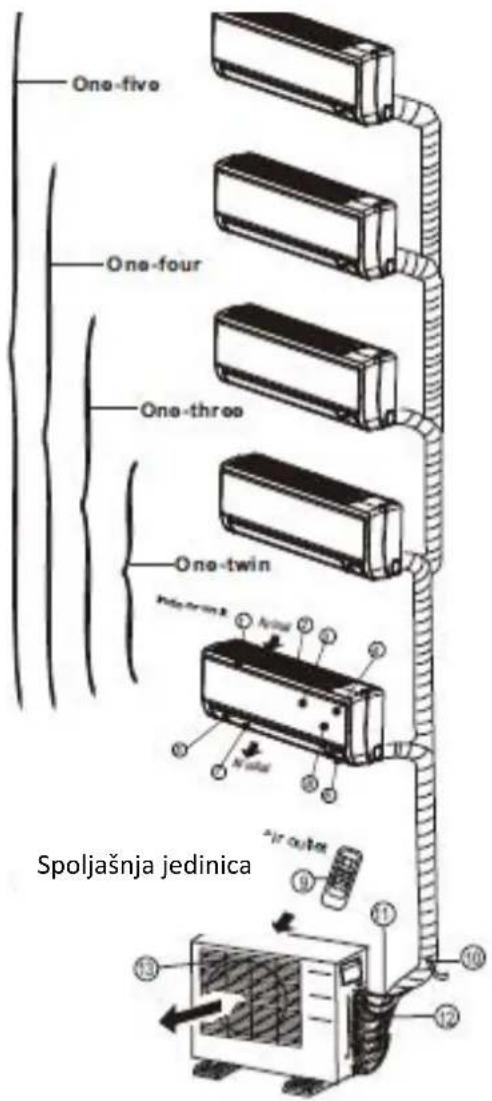
- Kod multi-split klima uređaja, vanjska jedinica može odgovarati različitim unutarnjim jedinicama. Sve slike u ovim uputama su radi pojašnjenja. Vaš klimatski uređaj može se malo razlikovati. Presudan je stvarni oblik.
- Na sljedećim stranicama vidjet ćete par različitih vrsta unutarnjih jedinica koje mogu odgovarati vanjskoj jedinici.
Unutarnja jedinica
- Prednja ploča
- Prednji ulaz zraka
- Zračni filter (unutrašnji)
- Izlaz zraka
- Horizontalna rešetka za protok zraka
- Vertikalna rešetka za protok zraka (unutarnja)
- Zaslon
- LED zaslon
- Daljinski upravljač
- Tipka za ručno upravljanje (iza prednje ploče)
Outdoor unit
text_image
One-five One-four One-three One-twin Air inlet Air outlet Vanjska jedinicaZaslon
text_image
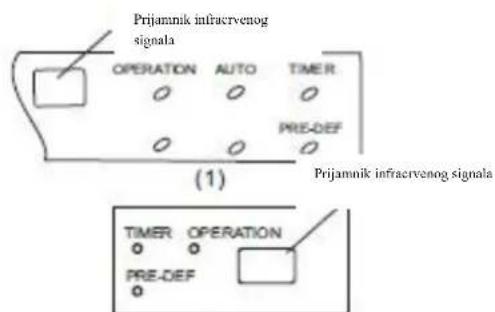
Prijamnik infracrvenog signala OPERATION AUTO TIMER PRE-DEF (1) Prijamnik infracrvenog signala TIMER OPERATION PRE-DEF (2)- Okvir prednje ploče
- Prednja ploča
- Zračni filter
- Horizontalna rešetka za protok zraka
- Vertikalna rešetka za protok zraka
- Senzor sobne temperature
- Zaslon
- Prijamnik infracrvenog signala
- Daljinski upravljač
Vanjska jedinica
text_image
One-five One-four One-three One-twin ① Air inlet ② ③ ④ ⑤ ⑥ ⑦ ⑧ Air outlet ⑨ Vanjska jedinicaLED zaslon

text_image
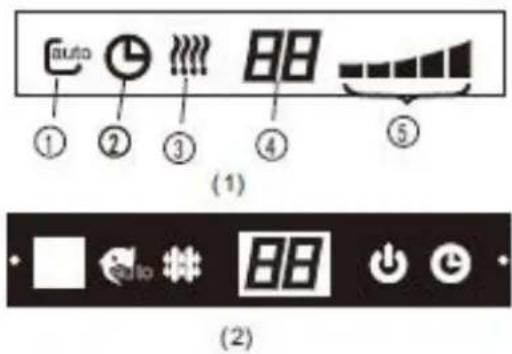
auto ① ② ③ ④ ⑤ (1) (2)Unutarnja jedinica
- Okvir prednje ploče
- Prednja ploča
- Zračni filter
- Horizontalna rešetka protoka zraka
- Vertikalna rešetka protoka zraka
- Senzor sobne temperature
- Zaslon
- Daljinski upravljač
Vanjska jedinica
text_image
One-five One-four One-three One-twin Air outlet Vanjska jedinicaZaslon
BILJEŠKA: Zaslon na klimatskom uređaju koji ste kupili trebao bi izgledati otprilike ovako:
text_image
run ion timer det. (1)Unutarnja jedinica
- Okvir ploče
- Stražnja rešetka za ulaz zraka
- Prednja ploča
- filter za čišćenje zraka & zračni filter(sa stražnje strane)
- Horizontalna rešetka
- LCD zaslon
- Vertikalna rešetka
- Tipka za ručno upravljanje (iza)
- Držač daljinskog upravljača
Vanjska jedinica
text_image
run auto timer lon defrost Temperature 88(4)

natural_image
Pure graphical toolbar icons without any text or symbols(5)

text_image
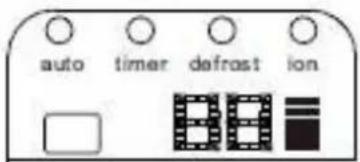
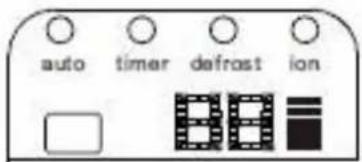
auto timer defrost ion(6)

(7)


OPERATION prikaz
text_image
One-four One-three One-twin Outdoor unitLED zaslon
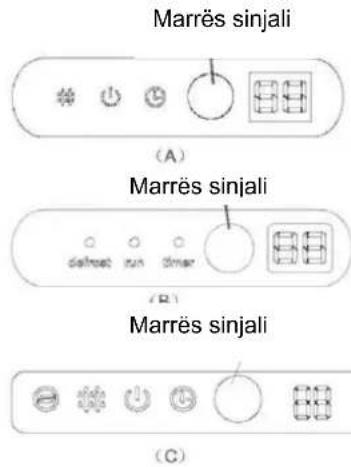
Prijamnik signala
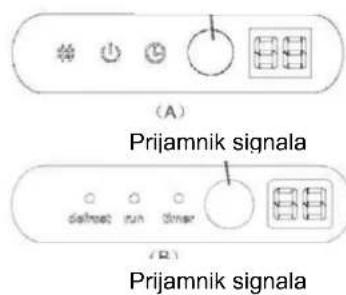
text_image
(A) Prijamnik signala defrost run timer (B)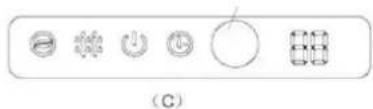
text_image
(C)


Unutarnja jedinica
- Prednja ploča
- Ulaz zraka
- Zračni filter
- Izlaz zraka
- Horizontalna rešetka za protok zraka
- Vertikalna rešetka za protok zraka(unutra)
- Zaslon
- Daljinski upravljač
NAPOMENA: Stvarni oblik unutarnje jedinice koju ste kupili može biti malo drugačija što se tiče prednje ploče i zaslona.
Vanjska jedinica
DEFROST indication lamp
text_image
One-five One-four One-three One-twin ① ② ③ ④ ⑤ ⑥ ⑦ ⑧ ⑨ Air inlet ⑩ ⑪ ⑫ ⑬ Vanjska jedinicaLED zaslon

natural_image
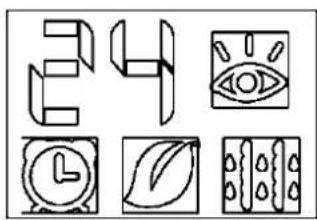
Six abstract geometric icons arranged in a grid: 3D block, eye, clock, leaf, and patterned panels (no text or symbols)Unutarnja jedinica
- Prednja ploča
- Ulaz zraka
- Zračni filter(unutra)
- Izlaz zraka
- Horizontalna rešetka za protok zraka(izvan)
- Horizontalna rešetka za protok zraka(unutra)
- Vertikalna rešetka za protok zraka
- Zaslon
- Tipka za ručno upravljanje i prijamnik
- Inteligentno oko za detekciju (samo kod nekih modela)
Vanjska jedinica
text_image
One-five One-four One-three One-twinZaslon
Prijamnik infracrvenog signala
text_image
Diagram of a device control panel with labeled buttons and indicatorsUnutarnja jedinica
text_image
One-five One-four One-three One-twinZaslon
NAPOMENA: Zaslon na klimatskom uređaju koji ste kupili trebao bi izgledati otprilike ovako:
text_image
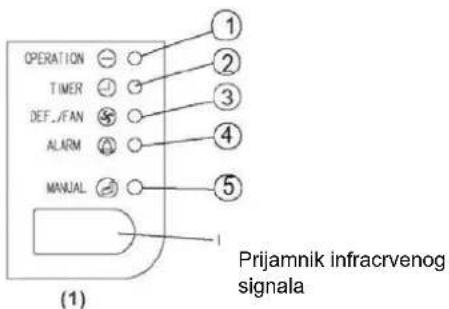
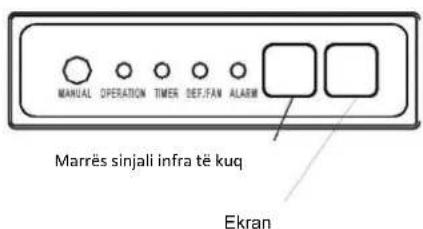
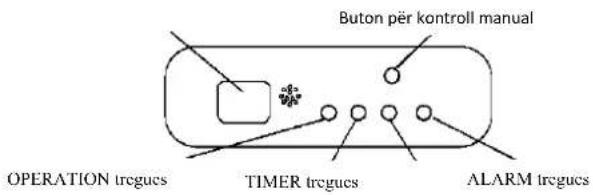
OPERATION TIMER DEF./FAN ALARM MANUAL ① ② ③ ④ ⑤ Prijamnik infracrvenog signala (1)Unutarnja jedinica
text_image
One-five One-four One-three One-twin ① ② ③ ④ ⑤ ⑥ ⑦ ⑧ ⑨Zaslon
text_image
MANUAL OPERATION TIMER DEF.FAN ALARM prijamnik infracrvenog signala ZaslonUnutarnja jedinica
text_image
One-five ④ One-four One-three One-twin ⑧ ⑤ ⑥ ⑦Zaslon
natural_image
Simple line drawing of a rectangular container with handles and a central knob, no text or symbols presentTipka za ručno upravljanje
Tipka za ručno upravljanje
Model A

text_image
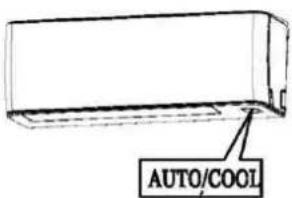
AUTO/COOLTipka za ručno upravljanje
Model B
natural_image
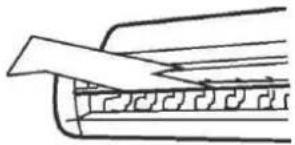
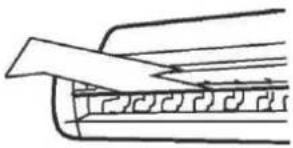
Diagram of a mechanical component with directional arrows indicating movement or force (no text or symbols)Za vrijeme hlađenja
Postavite rešetku horizontalno.
natural_image
Simple line drawing of a folded paper or sheet with a diagonal edge (no text or symbols)Za vrijeme grijanja
Postavite rešetku prema dolje (vertikalno).
natural_image
Pure technical diagram showing a mechanical component with an arrow indicating direction (no text or symbols)natural_image
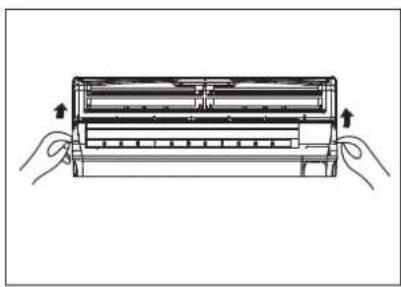
Illustration of two hands holding a rectangular device with internal components, no text or symbols present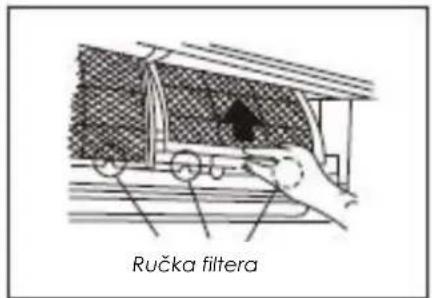
text_image
Ručka filtera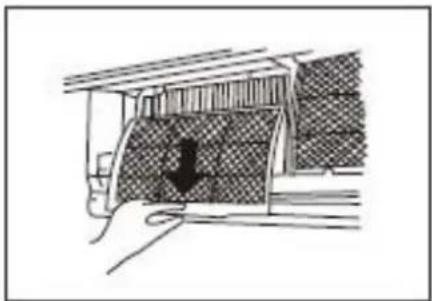
natural_image
Diagram of a car undercarriage with a downward arrow indicating force or movement (no text or symbols present)Čišćenje rešetke, kućišta i daljinskog upravljača
natural_image
Illustration of two hands holding a grid-based object, possibly an abacus or calculator (no text or symbols visible)
natural_image
Diagram of a car interior with hand placement and a highlighted section (no text or symbols)natural_image
Illustration of hands installing or adjusting a grid-like structure on a device panel (no text or symbols visible)SI.A
natural_image
Diagram of a device with an open panel and internal components, showing a magnified inset (no text or symbols)SI.B
natural_image
Illustration of a hand using a handheld device to interact with a tablet (no text or symbols present)SI.C

natural_image
Simple line drawing of a hand using a tool to interact with a grid-patterned surface (no text or symbols)SI.D
natural_image
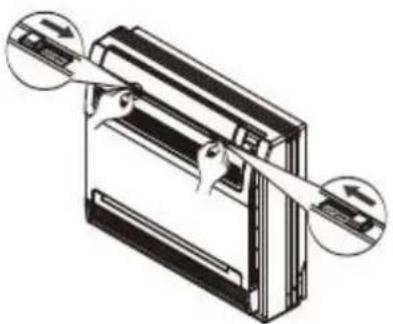
Illustration of hands operating a mechanical device with no visible text or symbolsSpojnice kod otvora za izlaz zraka
SI.F2
text_image
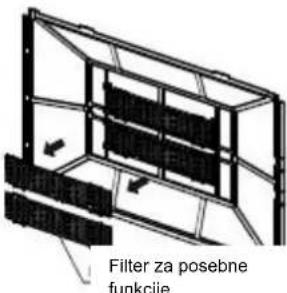
Filter za posebne funkcieSI.F3
natural_image
Simple line drawing of a spray gun applying material to a grid-patterned surface (no text or symbols)SI.F4

natural_image
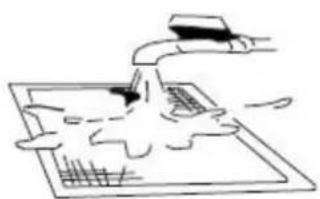
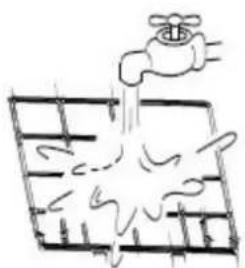
Simple line drawing of a faucet pouring water into a grid-patterned surface (no text or symbols)SI.F5
text_image
AUTO COOL DRY HEAT FAN SET TEMP. 8.8°F ON OFFPrikaz načina rada
flowchart
graph TD
    A["Start"] --> B["Off"]
    B --> C["Set"]
    C --> D["2 hours later after setting"]
    D --> E["5 hours later after setting"]
text_image
One-five One-four One-three One-twin Spoljašnja jedinicaLED displej
text_image
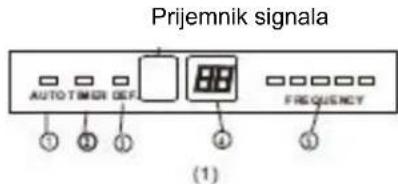
Prijemnik signala AUTO TIMER DEF FREQUENCY ① ② ③ ④ ⑤ (1)Prijemnik signala
text_image
TIMER AUTO OPERATION DEFROST (2)VAŽNO:
- Kod multi-split klima uređaja, spoljašnja jedinica može da odgovara različitim unutrašnjim jedinicama. Sve slike u ovim uputstvima su radi objašnjenja. Vaš klima uređaj može malo da se razlikuje. Presudan je stvarni oblik.
- Na sledećim stranicama videćete nekoliko različitih vrsta unutrašnjih jedinica koje mogu odgovarati spoljašnjoj jedinici.
Unutrašnja jedinica
- Prednja ploča
- Prednji ulaz vazduha
- Zračni filter (unutrašnji)
- Izlaz vazduha
- Horizontalna rešetka za protok vazduha
- Vertikalna rešetka za protok vazduha (unutrašnja)
- Ekran
- LED displej
- Daljinski upravljač
- Taster za ručno upravljanje (iza prednje ploče)
Spoljašnja jedinica
- Rashladna priključna cev, odvodna cev, električne instalacije
- Zaustavni ventil
- Izlaz vazduha
EKRAN
AUTO indikatorska lampica
text_image
One-five One-four One-three One-twin Spoljašnja jedinica Air inlet Air outletEkran
text_image
Prijemnik infracervenog signala OPERATION AUTO TIMER PRE-DEF (1) Prijemnik infracervenog signala TIMER OPERATION PRE-DEF (2)- Okvir prednje ploče
- Prednja ploča
- Filtar za vazduh
- Horizontalna rešetka za protok vazduha
- Vertikalna rešetka za protok vazduha
- Senzor sobne temperature
- Ekran
- Prijemnik infracrvenog signala
- Daljinski upravljač
Spoljašnja jedinica
text_image
One-a-five One-four One-three One-twin ① Air inlet ② ③ ④ ⑤ ⑥ ⑦ Air outlet ⑧ ⑨ ⑩ ⑪ Spoljašnja jedinicaLED displej
text_image
auto ① ② ③ ④ ⑤(1)

text_image
User interface toolbar with icons for zoom, refresh, battery, and control buttons(2)
Unutrašnja jedinica
- Okvir prednje ploče
- Prednja ploča
- Filtar za vazduh
- Horizontalna rešetka protoka vazduha
- Vertikalna rešetka protoka vazduha
- Senzor sobne temperature
- Displej
- Daljinski upravljač
Vanjska jedinica
- Odvodna cev, rashladna priključna cev
- Priključni kabl
- Zaustavni ventil
- Poklopac ventilatora

-
AUTO indikatorska lampica
Svetli za vreme AUTO rada. -
TIMER indikatorska lampica Svetli za vreme rada TIMER-a.
-
DEFROST indikatorska lampica (samo za modele za hlađenje i grejanje): Svetli kada klima uređaj pokrene funkciju automatskog odmrzavanja ili kada se aktivira funkcija kontrole toplog vazduha za vreme grejanja.
4. DIGITAL DISPLAY indikatorska lampica
text_image
One-five One-four One-three One-twin Spoljašnja jedinica Air outletEkran
text_image
run ion timer def.(1)
Unutrašnja jedinica
- Okvir ploče
- Stražnja rešetka za ulaz vazduha
- Prednja ploča
- Filtar za čišćenje vazduha & vazdušni filtar (sa stražnje strane)
- Horizontalna rešetka
- LCD displej
- Vertikalna rešetka
- Taster za ručno upravljanje (iza)
- Držač daljinskog upravljača
Spoljašnja jedinica
- Odvodna cev, rashladna priključna cev.
- Priključni kabl
- Zaustavni ventil
- Poklopac za ventilator
text_image
Prijemnik signala(2)
text_image
88 Ion Custo Turbo(3)
text_image
run auto timer lon defrost Temperature 88(4)

text_image
Toolbar with icons for audio, sound, audio, lock, and folder functions(5)
text_image
auto timer defrost ion(6)

(7)


OPERATION indikatorska lampica
text_image
One-four One-three One-twin Outdoor unitLED displej
Prijemnik signala
text_image
(A) Prijemnik signala delnet run timer ( B ) Prijemnik signala


Unutrašnja jedinica
- Prednja ploča
- Ulaz vazduha
- Filter
- Izlaz vazduha
- Horizontalna rešetka za protok vazduha
- Vertikalna rešetka za protok vazduha(unutra)
- Displej
- Daljinski upravljač
text_image
One-five One-four One-three One-twin Spoljašnja jedinicaLED displej
natural_image
Six abstract geometric icons including 3D shapes, eye, clock, leaf, and paintbrushes (no text or symbols)Nazivi delova
text_image
One-five One-four One-three One-twinUnutrašnja jedinica
- Rešetka za protok vazduha (za izlaz vazduha)
- Ulaz vazduha (sa zračnim filterom)
- Daljinski upravljač
- Instalacijski deo
- Displej
- Priključna cev
Vanjska jedinica
- Odvodna cev, rashladna priključna cev
- Priključni kabl
- Zaustavni ventil
- Kućište ventilatora
-
OPERATION indikatorska lampica Ovaj indikator svetli kada uređaj radi.
-
TIMER indikatorska lampica Svetli tokom rada TIMER-a.
-
DEFROST indikatorska lampica (samo za modele za hlađenje i grejanje) ili Fan only indikatorska lampica (samo modeli za hlađenje): Svetli kada klima uređaj automatski počne sa odleđivanjem za vreme grejanja ili kada je odabran način rada FAN ONLY (samo ventilator).
Taster za ručno upravljanje
Kada vam daljinski upravljač ne radi ili su vam baterije potrošene, onda koristite ovaj taster za ručno upravljanje. Kada ga pritisnete jednom, pokrenućete prisilno AUTO način rada.
text_image
Diagram of a device control panel with labeled buttons and indicatorsNazivi delova
Podni i stojeći klima uređaji (s konzolom)
text_image
One-five One-four One-three One-twin ① ② ③ ④ ⑤ ⑥ ⑧ ⑨ ⑩Displej
text_image
One-five One-four One-three One-twin ① ② ③ ④ ⑤ ⑥ ⑦ ⑧ ⑨Displej
text_image
MANUAL OPERATION TIMER DEPITAN ALARMPrijemnik infraervenog
signala
Displej
Unutrašnja jedinica
- Izlaz vazduha
- Ulaz vazduha
- Filtar
- Razvodno upravljački ormar
- Električni sklop
- Odvodna cev
Spoljašnja jedinica
- Odvodna cev, rashladna priključna cev
- Priključni kabl
- Zaustavni ventil
- Kućište ventilatora
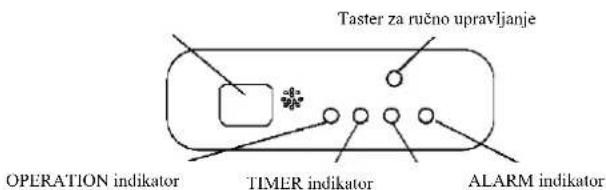
1. OPERATION indikatorska lampica
Svetli kada uređaj radi.
2. TIMER indikatorska lampica
Svetli za vreme rada TIMER-a.
3. DEF./FAN indikatorska lampica
Svetli kada klima uređaj automatski počne sa odleđivanjem za vreme grejanja (jedino kod modela za hlađenje i grejanje) ili je izabran način rada FAN ONLY - samo ventilator (samo kod modela za hlađenje).
4. ALARM indikatorska lampica
text_image
One-five ④ One-four One-three One-twin ⑧ ⑤ ⑥ ⑦Displej

text_image
Taster za ručno upravljanje OPERATION indikator TIMER indikator ALARM indikatornatural_image
Simple line drawing of a rectangular container with handles and a pointer, no text or symbols presentTaster za ručno upravljanje
Taster za ručno
Model A

text_image
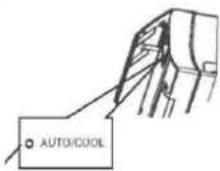
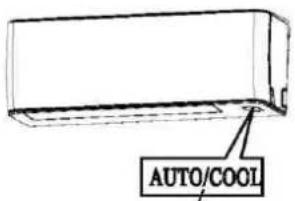
AUTO/COOLTaster za ručno upravljanje
NAPOMENA: Uređaj mora da bude isključen pre upotrebe tastera za ručnu kontrolu. Ako je uređaj uključen, nastavite pritiskati taster za ručnu kontrolu dok se uređaj ne isključi.
- Otvorite i podignite prednju ploču i uočićete taster za ručno upravljanja (vidi Model A)
Kod nekih modela, taster za ručno upravljanja nalazi se na dnu jedinice. (vidi Model B). - Jedan pritisak tastera za ručnu kontrolu će aktivirati prisilni automatski način rada. Ako pritisnete taster dva puta tokom 5 sekundi, uređaj će započeti prisilno hlađenje.
- Čvrsto zatvorite ploču u prvobitan položaj.
NAPOMENA: Za kanalno-plafonske, kasetne, plafonsko-podne i podnostojće klima uređaje, pogledajte na prethodne stranice radi upotrebe tastera za ručno upravljanje.
Podešavanje smera protoka vazduha
text_image
Raspon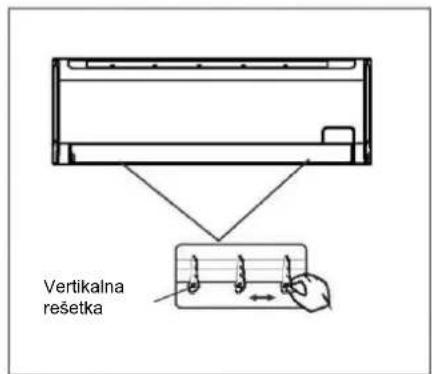
text_image
Vertikalna resetka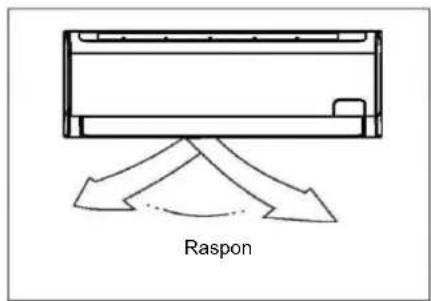
text_image
Raspon- Pravilno podesite smer protoka vazduha, inače može doći do neprijatnosti kao i neujednačenosti sobne temperature.
- Podesite horizontalnu/vertikalnu rešetku pomoću daljinskog upravljača. Kod nekih modela može se samo ručno podesiti vertikalna rešetka.
Za postavljanje vertikalnog protoka vazduha:
- Koristite ovu funkciju dok je uređaj u upotrebi. Koristite daljinski upravljač za podešavanje smera protoka vazduha.
- Horizontalna rešetka može da se pomera u koracima od 6 stepeni ili automatski kreće gore-dole.
- Za više detalja, pogledajte uputstva za upotrebu daljinskog upravljača
Kod nekih modela, vertikalna rešetka podešava se ručno - pomerite vertikalnu rešetku (levo-desno) kako biste podesili protok vazduha u željenom smeru.
VAŽNO:
Ne stavljate prste u ulazne i izlazne otvore zbog opasnosti od ventilatora koji se okreće velikom brzinom i može da vas povredi.
OPREZ
- Na duži vremenski period, ne ostavljajte klima uređaj s protokom vazduha prema dolje u načinu rada Hlađenje ili Isušivanje jer može da dodje do kondenzacije vode na površini vodoravne rešetke koja će da se sliva na pod ili namještaj.
- Ne pomerajte ručno vodoravnu rešetku osim ako nije neophodno. Uvek koristite daljinski upravljač.
- Ako je klima uređaj uključen odmah pošto je isključen, vodoravnu rešetku nije moguće pomeriti otprilike 10 sekundi.
- Nagib vodoravne rešetke ne bi trebao biti usko postavljen, jer efikasnost načina rada HLAĐENJE ili GREJANJE može da bude umanjena zbog ograničenog protoka vazduha.
- Ne koristite klima uređaj sa vodoravnom rešetkom u zatvorenom položaju.
- Kada je klima uređaj spojen na napajanje (početno napajanje), vodoravna rešetka će desetak sekundi proizvoditi škripav zvuk, što je normalno.
Kanalno-plafonski klima uređaj
Slede saveti kako podesiti smer strujanja vazduha kada se delovi otvora za izlaz vazduha (prodato odvojeno) koriste sa unutrašnjom jedinicom.
Hlađenje
natural_image
Diagram of a mechanical component with directional arrows indicating motion or force (no text or symbols)Za vreme hlađenja postavite rešetku horizontalno.

natural_image
Pure technical line drawing of a mechanical component without any text, numbers, or symbolsZa vreme grejanja
postavite rešetku prema dole (vertikalno).

natural_image
Pure technical diagram showing a mechanical component with an arrow indicating direction (no text or symbols)NAPOMENA : Način rada grejanja sa horizontalnim smerom strujanja vazduha uvelike će povećati razliku u sobnoj temperaturi.

Oprez

natural_image
Illustration of two hands holding a rectangular electronic device with internal components (no text or symbols)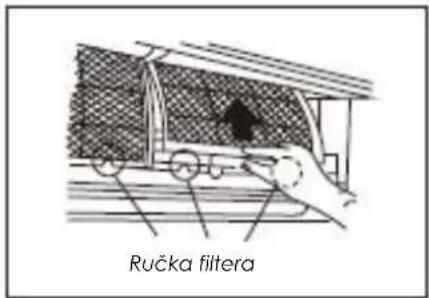
text_image
Ručka filtera
natural_image
Diagram of a car interior with a downward arrow indicating a movement or force (no text or symbols present)Čišćenje rešetke, kućišta i daljinskog upravljača
- Isključite uređaj pre čišćenja. Uređaj brišite mekom, suvom krpom. Ne koristite izbeljivač ili abrazive.
NAPOMENA: Pre čišćenja, unutrašnji uređaj mora da bude isključen iz struje.
OPREZ
natural_image
Two hand-drawn illustrations of a traditional abacus with beads, no text or symbols present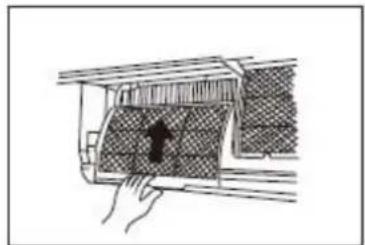
natural_image
Hand placing a component into a car interior with a handle (no text or symbols visible)4. Izvadite filter za osvežavanje vazduha (filtri po
izboru: plazma sakupljač prašine/Silver Ion filter /Bio filter /Vitamin C filter) iz njihovih okvira.
natural_image
Illustration of hands installing or adjusting a grid-like structure with tools, no text or symbols presentSI.A
natural_image
Technical line drawing of a mechanical assembly with an inset showing a close-up of a component (no text or symbols present)SI.B
natural_image
Simple line drawing of a hand holding a device next to a screen (no text or symbols)SI.C
natural_image
Simple line drawing of a hand using a tool to clean or brush on a surface, with no text or symbols present.SI.D
natural_image
Technical line drawing of a mechanical assembly with hands operating a frame (no text or symbols)natural_image
Simple line drawing of a spray gun spraying liquid onto a grid-patterned surface (no text or symbols)SI.F4
natural_image
Simple line drawing of a faucet spraying water into a grid-patterned surface (no text or symbols)SI.F5
2. Skinite filtar vazduha
Lagano pritisnite spojnice na levoj i desnoj strani filtra a zatim ih povucite prema gore.(vidite sliku F2)
3. Skinite filtar za posebne funckije
Držite umetak okvira i skinite spojnice sa 4 mesta. (vidite sliku F3)
3. FAN (Ventilator) taster
Koristi se za biranje brzine ventilatora u četiri koraka:

4. SLEEP (Spavanje) taster
Aktivirati/Deaktivirati sleep funkciju. Može da zadrži najprijatniju temperaturu a istovremeno da štedi energiju. Ova funkcija dostupna je isključivo u COOL, HEAT ili AUTO načinu rada.
text_image
ON/OFF MODE FAN SLEEP THY-UP SHORT CLE TIMER ON "WIN LIFT" SHWING DIRECT ① ② ③Funkcija odvlaživanja
Uređaj je uključen u struju. Indikator operacija na ekranu unutrašnjeg uređaja počinje svetluca.
flowchart
graph TD
    A["Start"] --> B["Off"]
    B --> C["Set"]
    C --> D["2 hours later after setting"]
    D --> E["5 hours later after setting"]
natural_image
Symbol of a trash bin crossed out by two diagonal lines (no text or numbers present)text_image
User interface toolbar with icons for battery, phone, refresh, and function buttons(2)
Внатрешна единица
text_image
run auto timer lon defrost Temperature 88(4)

natural_image
Pure graphical toolbar icons without any text or symbols(5)

text_image
auto timer defrost ion(6)

(7)


OPERATION приказ
text_image
One-four One-three One-twin Outdoor unit Air inlet Air outlet Air outletLED ekran
natural_image
Six abstract geometric icons arranged in a grid: 3D block, eye, clock, leaf, and paintbrush (no text or symbols)Внатрешна единица
text_image
One-five One-four One-three One-twinЕкран
text_image
Diagram of a device control panel with labeled buttons and indicatorsВнатрешна единица
text_image
One-five One-four One-three One-twin 11 8 9 10 3 4 5 6Екран
text_image
One-five One-four One-three One-twin ① ② ③ ④ ⑤ ⑥ ⑦ ⑧ ⑨Екран
text_image
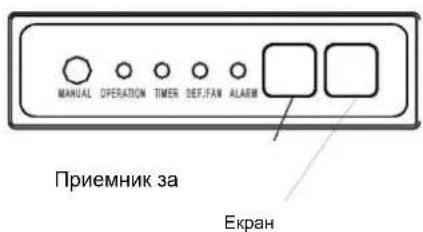
MANUAL OPERATION TIMER DEF/FAN ALARM Приемник за ЕкранВнатрешна единица
text_image
One-five ④ One-four One-three One-twin ⑧ ⑤ ⑥ ⑦Екран
text_image
Копче за рачно управување OPERATION индикатор TIMER индикатор ALARM индикатор PRE-DEF pokazatelj (modeli za hlađenje i grijanje) ili pokazuje fan only način rada (samo kod modela za hlađenje)Внатрешна единица
natural_image
Diagram of a mechanical component with directional arrows indicating movement or force (no text or symbols)За време на ладење
natural_image
Pure technical line drawing of a mechanical component without any text, numbers, or symbolsЗа време на греење
natural_image
Pure technical diagram showing a curved mechanical component with an arrow indicating direction (no text or symbols)natural_image
Illustration of two hands holding a rectangular electronic device with internal components (no text or symbols)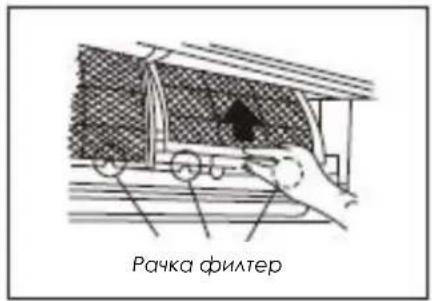
natural_image
Diagram of a car interior with a downward arrow indicating airflow or movement (no text or symbols present)natural_image
Two hand-drawn illustrations of a grid-based object, possibly a calculator or electronic device, with no visible text or symbols.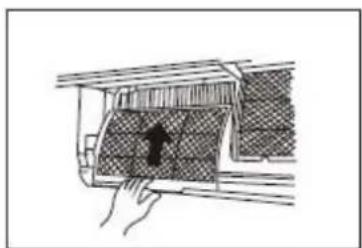
natural_image
Diagram of a hand holding a car interior with a highlighted section (no text or symbols)natural_image
Illustration of hands installing or adjusting a grid-like structure on a device panel (no text or symbols visible)Сл.А

natural_image
Diagram of a device with an open panel and internal components, showing a magnified inset (no text or symbols)Сл.В

natural_image
Illustration of a hand using a handheld device to interact with a tablet (no text or symbols present)Сл.С
natural_image
Simple line drawing of a faucet spraying water onto a grid-patterned surface (no text or symbols)Сл.Д
Касетен клима уред
natural_image
Illustration of hands operating a mechanical device with no visible text or symbolsnatural_image
Simple line drawing of a spray gun applying material to a grid-patterned surface (no text or symbols)Сл.F4

natural_image
Simple line drawing of a faucet spraying water into a grid (no text or symbols)Сл.F5
text_image
AUTO COOL DRY HEAT FAN SET TEMP. 8.8°F ON OFFflowchart
graph TD
    A["Start"] --> B["Off"]
    B --> C["Set"]
    C --> D["2 hours later after setting"]
    D --> E["5 hours later after setting"]
natural_image
Symbol of a trash bin crossed out by two diagonal lines (no text or numbers present)MASA SIGURIE
text_image
One-five One-four One-three One-twin Njësia e jashtmeLED ekrani
text_image
Marrësi i sinjalit AUTO TIMER DEF. (1) Marrësi i sinjalit TIMER AUTO OPERATION DEFROST (2)E RENDESISHME:
text_image
One-five One-four One-three One-twin Air inlet Air outlet Njësia e jashtmeEkran
text_image
Prijamnik infracvenog signala OPERATION AUTO TIMER PRE-DEF (1) Prijamnik infracvenog signala TIMER OPERATION PRE-DEF(2)
text_image
One-five One-four One-three One-twin Air inlet Air outlet Njësia e jashtmeLED ekrani
text_image
auto ① ② ③ ④ ⑤ (1) (2)Njësia e brendshme
text_image
One-five One-four One-three One-twin Njësia e jashtmeEkran
text_image
Marrës sinjali(2)

text_image
88 Ion Castro Turbo(3)

text_image
run auto timer lon defrost Temperature 88(4)

natural_image
Pure graphical toolbar icons without any text or symbols(5)
text_image
auto timer defrost ion(6)

(7)


OPERATION tregues
DEFROST operation tregues
text_image
One-four One-three One-twin Outdoor unitED ekran
text_image
Marrës sinjali (A) Marrës sinjali defreat run timer (B) Marrës sinjali (C)


Njësia e brendshme
text_image
One-five One-four One-three One-twin Njësia e jashtmeLED ekran
natural_image
Six abstract geometric icons arranged in a grid: 3D block, eye, clock, leaf, and patterned panels (no text or symbols)Njësia e brendshme
text_image
One-five One-four One-three One-twinEkran
text_image
Diagram of a device control panel with labeled buttons and indicatorsNjësia e brendshme
text_image
One-five One-four One-three One-twinEkran
text_image
Diagram of a boat's side panel with numbered compartments and control buttons(4)

text_image
⑤ ① ② ③ ④ ⑥ WUX τtext_image
One-five One-four One-three One-twin ① ② ③ ④ ⑤ ⑥ ⑦ ⑧ ⑨ekran
text_image
MANUAL OPERATION TIMER DEF.FAN ALARM Marrës sinjali infra të kuq EkranNjësia e brendshme
text_image
One-five ④ One-four One-three One-twin ⑧ ⑤ ⑥ ⑦Ekran
text_image
Buton për kontroll manual OPERATION tregucs TIMER tregucs ALARM tregucsnatural_image
Simple line drawing of a rectangular container with handles and a small circular object inside, no text or symbols present.Buton për kontroll
Buton për kontroll
Model A
text_image
AUTO/COOLnatural_image
Diagram of a mechanical component with directional arrows indicating movement or force (no text or symbols)Gjatë kohës që ftoh
Vendoseni grilën horizontalisht.
natural_image
Pure technical line drawing of a mechanical component without any text, numbers, or symbolsnatural_image
Pure technical diagram showing a mechanical component with an arrow indicating direction (no text or symbols)natural_image
Illustration of two hands holding a rectangular device with internal components, no text or symbols present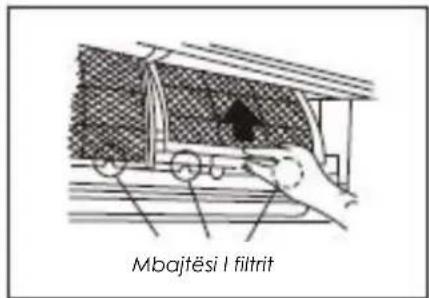
natural_image
Diagram of a car undercarriage with a downward arrow indicating force or movement (no text or symbols present)PAJISJE KLIME NE MUR
natural_image
Two hand-drawn illustrations of a grid-based object, possibly a calculator or electronic device, with no visible text or symbols.
natural_image
Diagram of a hand holding a car interior with a highlighted section (no text or symbols)natural_image
Illustration of hands installing or adjusting a grid-like structure on a device panel (no text or symbols visible)Fig.A
natural_image
Technical diagram of a device with internal components and an inset view showing a mechanical assembly (no text or symbols)Fig.B

natural_image
Illustration of a hand using a handheld device to interact with a tablet (no text or symbols present)Fig.C

natural_image
Simple line drawing of a hand using a tool to interact with a grid-patterned surface (no text or symbols)Fig.D
natural_image
Technical line drawing of a mechanical component or housing with internal features (no text or symbols)Fig.E3
natural_image
Diagram of a server rack with two circular arrows indicating directional movement (no text or symbols)Fig.F1
PAJISJE KLIME TAVAN-DYSHEME
Për modelet <36000Btu/h
natural_image
Illustration of hands operating a mechanical device with no visible text or symbolsnatural_image
Simple line drawing of a spray gun applying material to a grid-patterned surface (no text or symbols)Fig.F4
natural_image
Simple line drawing of a faucet spraying water into a grid (no text or symbols)Fig.F5
2. Hiqni filtrin e ajrit
natural_image
Technical line drawing of a mechanical or electronic component with no visible text or symbolsFig. G1

natural_image
Technical diagram of a refrigerant or air conditioner unit with internal components and a magnified inset showing internal structure (no text or symbols)Fig.G2
natural_image
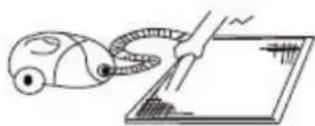
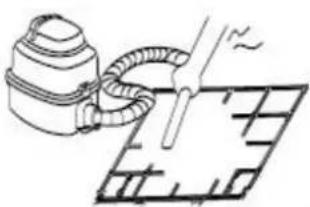
Simple line drawing of a vacuum cleaner emitting a pipe or hose, with no text or symbols present.Fig.G3
natural_image
Simple line drawing of a faucet pouring liquid into a grid (no text or symbols)Fig.G4
KLIME E KANALIZUAR NE TAVAN
text_image
AUTO COOL DRY HEAT FAN SET TEMP. 8.8°F ON OFFShfaqje mode
Shfaqet duke shtypur ON / OFF butonin.
text_image
③ ON/OFF MODE FAN SLEEP TEMP SHORT OUT IM/ROW IM/ROW SIVING DIRECT ②Funksionet automatike
flowchart
graph TD
    A["Start"] --> B["Off"]
    B --> C["Set"]
    C --> D["2 hours later after setting"]
    D --> E["5 hours later after setting"]
COOL/HEAT/FAN MENYRA E PUNES
text_image
One-five One-four One-three One-twin Spoljašnja jedinicaLED displej
Prijemnik signala
text_image
AUTO TIMER DEF FREQUENCY ① ② ③ ④ ⑤(1)
Prijemnik signala
text_image
TIMER AUTO OPERATION DEFROST(2)
VAŽNO:
- Kod multi-split klima uređaja, spoljašnja jedinica može da odgovara različitim unutrašnjim jedinicama. Sve slike u ovim uputstvima su radi objašnjenja. Vaš klima uređaj može malo da se razlikuje. Presudan je stvarni oblik.
- Na sljedećim stranicama videćete nekoliko različitih vrsta unutrašnjih jedinica koje mogu odgovarati spoljašnjoj jedinici.
Unutrašnja jedinica
- Prednja ploča
- Prednji ulaz vazduha
- Filter za vazduh (unutrašnji)
- Izlaz vazduha
- Horizontalna rešetka za protok vazduha
- Vertikalna rešetka za protok vazduha (unutrašnja)
- Ekran
- LED displej
- Daljinski upravljač
- Taster za ručno upravljanje (iza prednje ploče)
Spoljašnja jedinica
- Rashladna priključna cev, odvodna cev, električne instalacije
- Zaustavni ventil
- Izlaz vazduha
EKRAN
AUTO indikatorska lampica
Svetli tokom AUTO načina rada.
TIMER indikatorska lampica
text_image
One-five One-four One-three One-twin Spoljašnja jedinica Air inlet Air outletEkran

text_image
Prijemnik infracervenog signala OPERATION AUTO TIMER PRE-DEF (1) Prijemnik infracervenog signala TIMER OPERATION PRE-DEF (2)- Okvir prednje ploče
- Prednja ploča
- Filter za vazduh
- Horizontalna rešetka za protok vazduha
- Vertikalna rešetka za protok vazduha
- Senzor sobne temperature
- Ekran
- Prijemnik infracrvenog signala
- Daljinski upravljač
Spoljašnja jedinica
text_image
One-five One-four One-three One-twin Spoljašnja jedinica Air inlet Air outlet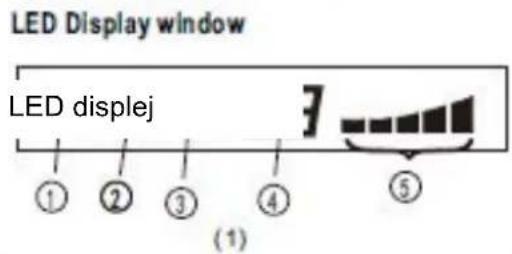
text_image
LED Display window LED displej ① ② ③ ④ ⑤ (1)
text_image
(2)Unutrašnja jedinica
- Okvir prednje ploče
- Prednja ploča
- Filter za vazduh
- Horizontalna rešetka protoka vazduha
- Vertikalna rešetka protoka vazduha
- Senzor sobne temperature
- Displej
- Daljinski upravljač
Vanjska jedinica
- Odvodna cev, rashladna priključna cev
- Priključni kabl
- Zaustavni ventil
- Poklopac ventilatora

-
AUTO indikatorska lampica Svetli za vreme AUTO rada.
-
TIMER indikatorska lampica Svetli za vreme rada TIMER-a.
-
DEFROST indikatorska lampica (samo za modele za hlađenje i grejanje): Svetli kada klima uređaj pokrene funkciju automatskog odmrzavanja ili kada se aktivira funkcija kontrole toplog vazduha za vreme grejanja.
-
DIGITAL DISPLAY indikatorska lampica Pokazuje trenutno postavljenu temperaturu. Samo kada radi u načinu rada FAN, pokazuje stvarnu temperaturu. I pokazuje kod grške ili zaštitni kod.
-
OPERATION indikatorska lampica Ova lampica svetli kada kompresor radi i pokazuje trenutnu radnu frekvenciju.
Nazivi delova
Unutrašnja jedinica
text_image
One-five One-four One-three One-twin Spoljašnja jedinica Air outlet 10 11 12 13Ekran
text_image
run ion timer def.(1)
Unutrašnja jedinica
- Okvir ploče
- Zadnja rešetka za ulaz vazduha
- Prednja ploča
- Filtar za čišćenje vazduha & vazdušni filtar (sa stražnje strane)
- Horizontalna rešetka
- LCD displej
- Vertikalna rešetka
- Taster za ručno upravljanje (iza)
- Držač daljinskog upravljača
Spoljašnja jedinica
- Odvodna cev, rashladna priključna cev.
- Priključni kabl
- Zaustavni ventil
- Poklopac za ventilator
text_image
Prijemnik signala(2)

text_image
88 Ion Turbo(3)

text_image
run auto timer lon defrost Temperature 88(4)

natural_image
Row of simple icons including a grid, bar, camera, and leaf (no text or symbols)(5)
text_image
auto timer defrost ion(6)

(7)


OPERATION indikatorska lampica
text_image
One-four One-three One-twin Outdoor unitLED displej
Prijemnik signala

text_image
(A) Prijemnik signala detnet run timer (B)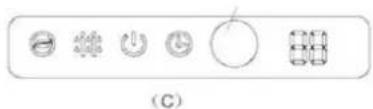
text_image
(C)


Unutrašnja jedinica
- Prednja ploča
- Ulaz vazduha
- Filter
- Izlaz vazduha
- Horizontalna rešetka za protok vazduha
- Vertikalna rešetka za protok vazduha(unutra)
- Displej
- Daljinski upravljač
text_image
One-five One-four One-three One-twin Spoljašnja jedinicaLED displej
natural_image
Six abstract line drawings including geometric shapes, a stylized eye, a clock, a leaf, and a grid of dots (no text or symbols)Unutrašnja jedinica
- Prednja ploča
- Ulaz vazduha
- Filter vazduha (unutra)
- Izlaz vazduha
- Horizontalna rešetka za protok vazduha (spolja)
- Horizontalna rešetka za protok vazduha (unutra)
- Vertikalna rešetka za protok vazduha
- Displej
- Taster za ručno upravljanje i prijemnik
- Inteligentno oko za detekciju (samo kod nekih modela)
Spoljašnja jedinica
text_image
One-five One-four One-three One-twinDisplej
Prijemnik infracrvenog signala

text_image
Diagram of a device control panel with labeled buttons and indicatorsUnutrašnja jedinica
- Rešetka za protok vazduha (za izlaz vazduha)
- Ulaz vazduha (sa zračnim filterom)
- Daljinski upravljač
- Instalacijski dio
- Displej
- Priključna cijev
Vanjska jedinica
text_image
One-five One-four One-three One-twin 11 8 9 10Displej
text_image
One-five One-four One-three One-twin ① ② ③ ④ ⑤ ⑥ ⑦ ⑧ ⑨Displej

text_image
MANUAL OPERATION TIMER DEF/FAN ALARMPrijemnik infraervenog
signala
Displej
Unutrašnja jedinica
- Izlaz vazduha
- Ulaz vazduha
- Filter
- Razvodno upravljački ormar
- Električni sklop
- Odvodna cev
Spoljašnja jedinica
text_image
One-five ④ One-four One-three One-twin ⑧ ⑤ ⑥ ⑦Displej
text_image
Taster za ručno upravljanje OPERATION indikator TIMER indikator ALARM indikatornatural_image
Simple line drawing of a rectangular container with handles and a pointer, no text or symbols presentTaster za ručno upravljanje
Taster za ručno

Model A
text_image
AUTO/COOLTaster za ručno upravljanje
NAPOMENA: Uređaj mora da bude isključen prije upotrebe tastera za ručnu kontrolu. Ako je uređaj uključen, nastavite pritiskati taster za ručnu kontrolu dok se uređaj ne isključi.
- Otvorite i podignite prednju ploču i uočićete taster za ručno upravljanja (vidi Model A)
Kod nekih modela, taster za ručno upravljanja nalazi se na dnu jedinice. (vidi Model B). - Jedan pritisak tastera za ručnu kontrolu će aktivirati prisilni automatski način rada. Ako pritisnete taster dva puta tokom 5 sekundi, uređaj će započeti prisilno hlađenje.
- Čvrsto zatvorite ploču u prvobitan položaj.
NAPOMENA: Za kanalno-plafonske, kasetne, plafonsko-podne i podnostojće klima uređaje, pogledajte na prethodne stranice radi upotrebe tastera za ručno upravljanje.
natural_image
Diagram of a mechanical component with directional arrows indicating motion or force (no text or symbols)Za vrijeme hlađenja postavite rešetku horizontalno.
natural_image
Pure technical line drawing of a mechanical component without any text, numbers, or symbolsZa vreme grijanja
postavite rešetku prema dolje (vertikalno).

natural_image
Pure technical diagram showing a mechanical component with an arrow indicating direction (no text or symbols)natural_image
Diagram of two hands holding a rectangular device with internal components, no text or symbols present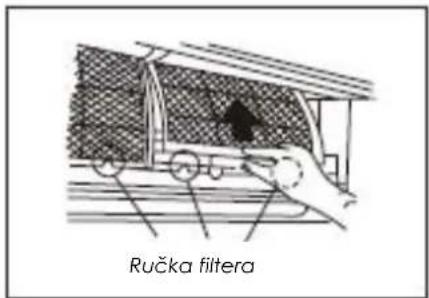
text_image
Ručka filtera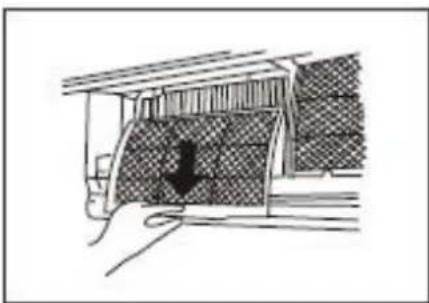
natural_image
Diagram of a mechanical component with a downward arrow indicating force or direction (no text or symbols present)Čišćenje rešetke, kućišta i daljinskog upravljača
natural_image
Two hand-drawn illustrations of a traditional abacus with beads and fingers, no text or symbols present.
natural_image
Hand holding a car with a checkmark inside, no visible text or symbols- Izvadite filter za osvežavanje vazduha (filteri po izboru: plazma sakupljač prašine/Silver Ion filter /Bio filter /Vitamin C filter) iz njihovih okvira.
(Instalacija i metod vađenja filtera za osvježavanje vazduha zavise od modela - vidi slike označene s © i s © na lijevoj strani.
natural_image
Diagram showing hands installing a grid on a device panel, with no visible text or symbolsSI.A
natural_image
Technical diagram of a device with an inset showing internal components (no text or symbols visible)SI.B
natural_image
Simple line drawing of a hand holding a vacuum cleaner next to a screen (no text or symbols)SI.C
natural_image
Simple line drawing of a hand pouring liquid into a tray with a ruler and grid lines (no text or symbols)SI.D
natural_image
Technical line drawing of a mechanical assembly with hands operating a component (no text or symbols visible)natural_image
Simple line drawing of a vacuum tube connected to a grid plane with a tool (no text or symbols)SI.F4

natural_image
Simple line drawing of a faucet spraying water into a grid (no text or symbols)SI.F5
2. Skinite filtar vazduha
Lagano pritisnite spojnice na lijevoj i desnoj strani filtera a zatim ih povucite prema gore.(vidite sliku F2)
3. Skinite filter za posebne funckije
3. FAN (Ventilator) Taster
Koristi se za biranje brzine ventilatora u četiri koraka:

4. SLEEP (Spavanje) Taster
Aktivirati/Deaktivirati sleep funkciju. Može zadržati najudobniju temperaturu te istovremeno štediti energiju. Ova funkcija dostupna je isključivo na COOL, HEAT ili AUTO načinu rada.
NAPOMENA: Dok je uređaj u funkciji na SLEEP načinu rada, isto bi se poništilo kada bi se pritisnuo taster MODE, FAN SPEED ili ON/OFF.
5. UP (Gore) Taster (^)
Pritisnite ovaj taster za povećanje unutrašnje temperature za 1°C do 30°C.
DOWN (Dolje) Taster (^)
Pritisnite ovaj taster za smanjenje unutrašnje temperature za 1°C do 17°C.
6. TIMER ON Taster
Pritisnite ovaj taster za namještanje vremena automatskog pokretanja uređaja. Svaki pritisak tastera će povećati postavku automatske sinhronizacije za 30 minuta. Kada postavljeno vrijeme prikaže 10, svaki idući pritisak tastera će povećati postavku automatske sinhronizacije za 60 minuta. Za poništavanje programa automatske sinhronizacije, jednostavno podesite vrijeme automatskog pokretanja programa na 0.0.
7. TIMER OFF Taster
Pritisnite ovaj taster za namještanje vremena za automatsko gašenje uređaja. Svaki pritisak tastera će povećati postavku automatske sinhronizacije za 30 mintuta. Kada postavljeno vrijeme prikaže 10, svaki idući pritisak tastera će povećati postavku automatske sinhronizacije za 60 minuta. Za poništavanje programa automatske sinhronizacije, jednostavno podesite vrijeme automatskog pokreatanja programa na 0.0.
8. DIRECT Taster
text_image
AUTO COOL DRY HEAT FAN SET TEMP. 8.8°F ON OFFPrikaz načina rada
Prikazuje trenutni način rada. Uključujući auto( ), cool( ), dry( ), heat ) (Nije primjenjivo za uređaje specijalizovane isključivo za hlađenje), fan( ) i nazad do auto( ).

Indikator prijenosa
text_image
ON/OFF MODE FAN TE VIP SHORT CLE" TIMER ON "WIN TLET" SLEEP SHWING DIRECTO ① ② ③Funkcija odvlaživanja
Osigurajte da je uređaj uključen u struju. Indikator operacija na ekranu unutrašnjeg uređaja počinje svjetlucati.
text_image
ON/OFF SHORT-CLT MODE TEMP FAN 1 2 TURNOFF SLEEP FRESH SWIND RECFunkcija programatora
flowchart
graph TD
    A["Start"] --> B["Off"]
    B --> C["Set"]
    C --> D["2 hours later after setting"]
    D --> E["5 hours later after setting"]
Sociable remark....2
SAFETY PRECAUTIONS
Warning 3
Caution 4
OPERATING INSTRUCTIONS
Identification of parts....5
Operating temperature....17
Manual operation....17
Airflow direction control 18
How the air conditioner works 20
CARE AND MAINTENANCE
Care and maintenance 23
OPERATION TIPS
Operation tips ....29
TROUBLESHOOTING TIPS
Troubleshooting tips ....31

CAUTION
- Contact an authorised service technician for repair or maintenance of this unit.
- Contact the installer for installation of this unit.
- The air conditioner is not intended for use by young children or invalids without supervision.
- Young children should be supervised to ensure that they do not play with the air conditioner.
- If the power cord is to be replaced, replacement work shall be performed by authorised personnel only.
- Installation work must be performed in accordance with the national wiring standards by authorised personnel only.
When using this air conditioner in the European countries, the follow information must be followed:
DISPOSAL: Do not dispose this product as unsorted municipal waste. Collection of such waste separately for special treatment is necessary.
It is prohibited to dispose of this appliance in domestic household waste.
For disposal, there are several possibilities:
A) The municipality has established collection systems, where electronic waste can be disposed of at least free of charge to the user.
B) When buying a new product, the retailer will take back the old product at least free of charge.
C) The manufacture will take back the old appliance for disposal at least free of charge to the user.
D) As old products contain valuable resources, they can be sold to scrap metal dealers.
Wild disposal of waste in forests and landscapes endangers your health when hazardous substances leak into the ground-water and find their way into the food chain.
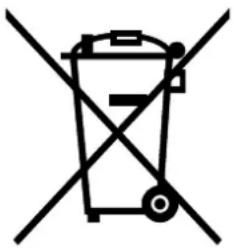
natural_image
Symbol of a trash bin crossed out by two diagonal lines (no text or numbers present)
To prevent injury to the user or other people and property damage, the following instructions must be followed. Incorrect operation due to ignoring of instructions may cause harm or damage.
■ The seriousness is classified by the following indications.
| WARNING | This symbol indicates the possibility of death or serious injury. |
| CAUTION | This symbol indicates the possibility of injury or damage to property. |
■ Meanings of symbols used in this manual are as shown below.
| Never do this. | |
| Always do this. |
WARNING
Connect with the power properly.
- Otherwise, it may cause electric shock or fire due to excess heat generation.
Do not modify power cord length or share the outlet with other appliances
- It may cause electric shock or fire due to heat generation.
Always ensure effective grounding.
- No groundiasse electric shock.
Disconnect the power if strange sounds, smell, or smoke comes from it.
- It may cause fire and electric shock.
Use the correctly rated breaker or fuse.
- There is risk of fire or electric shock.
Do not operate or stop the unit by switching on or off the power.
- It may cause electric shock or fire due to heat generation.
Do not operate with wet hands or in damp environment.
- It may cause electric shock.
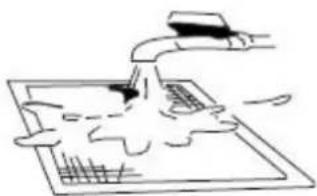
Do not allow water to run into electric parts.
- It may cause failure of machine or electric shock.
Do not drink water drained from air conditioner.
- It contains contaminants and could make you sick.
Do not use the power cord close to heating appliances
- It may cause fire and electric shock.
Do not damage or use an unspecified power cord.
- It may cause electric shock or fire.
Do not direct airflow at room occupants only.
• This could damage your health.
Always install circuit breaker and a dedicated power circuit.
- No installation may cause fire and electric shock.
Do not open the unit during operation.
- It may cause electric shock.
Do not use the power cord near flammable gas or combustibles, such as gasoline, benzene, thinner, etc.
- It may cause an explosion or fire.
① Ventilate room before operating air conditioner if there is a gas leakage from another appliance.
- It may cause explosion, fire and, burns.
Do not disassemble or modify unit.
- It may cause failure and electric shock.
CAUTION
When the air filter is to be removed, do not touch the metal parts of the unit.
- It may cause an injury.
When the unit is to be cleaned, switch off, and turn off the circuit breaker.
- Do not clean unit when power is on as it may cause fire and electric shock, it may cause an injury.
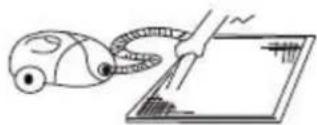
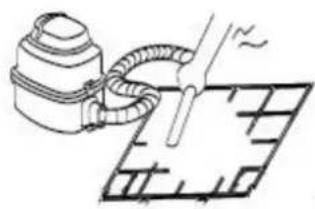
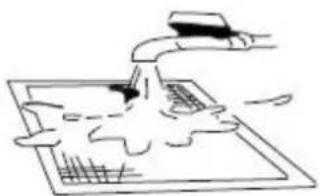
Stop operation and close the window in storm or hurricane.
● Operation with windows opened may cause wetting of indoor and soaking of household furniture.
Do not use strong detergent such as wax or thinner. Use a soft cloth for cleaning.
● Appearance may be deteriorated due to change of product color or scratching of its surface.
Do not place heavy object on the power cord and take care so that the cord is not compressed.
- Do not operate your air conditioner in a wet room such as a bathroom or laundry room.
This appliance can be used by children aged from 8 years and above and persons with reduced physical, sensory or mental capabilities or lack of experience and knowledge if they have been given supervision or instruction concerning use of the appliance in a safe way and understand the hazards involved. Children shall not play with the appliance. Cleaning and user maintenance shall not be made by children without supervision.
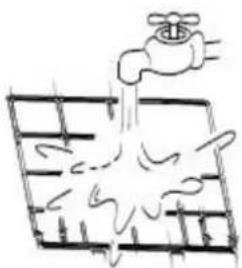
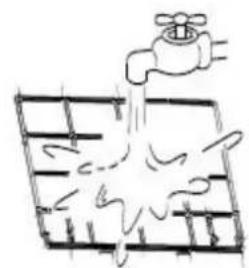
Do not clean the air conditioner with water.
● Water may enter the unit and degrade the insulation. It may cause an electric shock.
Do not put a pet or house plant where it will be exposed to direct air flow.
● This could injure the pet or plant.
Do not place obstacles around air-inlets or inside of air-outlet.
- It may cause failure of appliance or accident.
① Ensure that the installation bracket of the outdoor appliance is not damaged due to prolonged exposure.
- If bracket is damaged, there is concern of damage due to falling of unit.
Use caution when unpacking and installing. Sharp edges could cause injury.
● Children should be supervised to ensure that they do not play with the appliance.
This appliance is not intended for use by persons (including children) with reduced physical, sensory or mental capabilities, or lack of experience and knowledge, unless they have been given supervision or instruction concerning use of the appliance by a person responsible for their safety.
Ventilate the room well when used together with a stove, etc.
• An oxygen shortage may occur.
Do not use for special purposes.
- Do not use this air conditioner to preserve precision devices, food, pets, plants, and art objects. It may cause deterioration of quality, etc.
Turn off the main power switch when not using the unit for a long time.
- It may cause failure of product or fire.
Always insert the filters securely. Clean filter once every two weeks.
● Operation without filters may cause failure.
If water enters the unit, turn the unit off and disconnect the power, contact a qualified service technician.
● There is danger of fire or electric shock.
If the supply cord is damaged, it must be replaced by the manufacturer, its service agent or similarly qualified persons in order to avoid a hazard.
Identification of parts
Indoor unit
text_image
One-five One-four One-three One-twin Outdoor unitLED Display panel
text_image
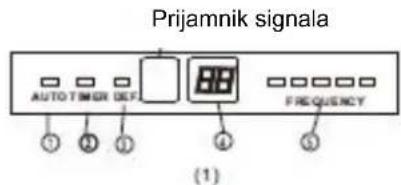
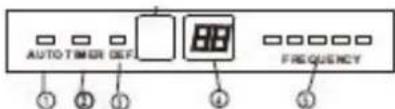
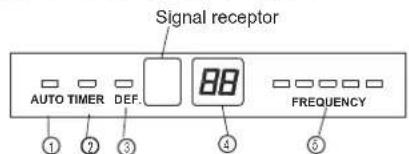
Signal receptor AUTO TIMER DEF. 88 FREQUENCY ① ② ③ ④ ⑤(1)
Signal receptor
text_image
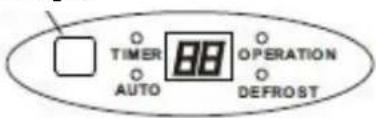
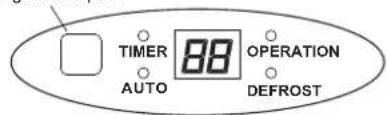
TIMER AUTO 88 OPERATION DEFROST(2)
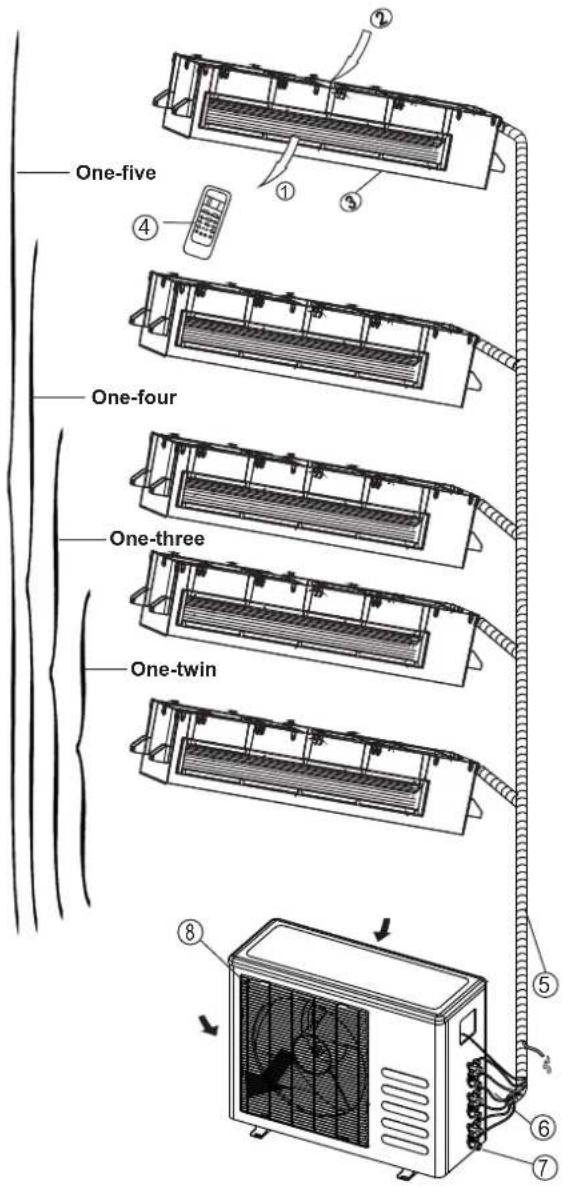
IMPORTANT:
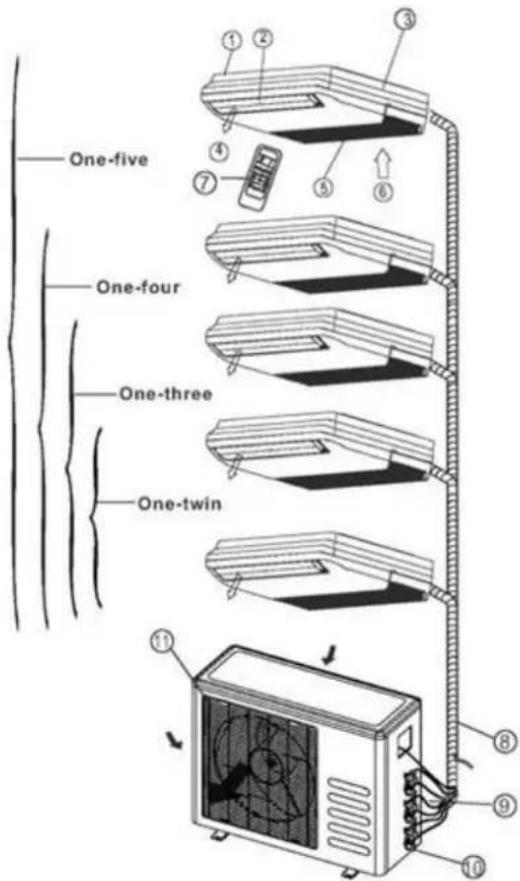
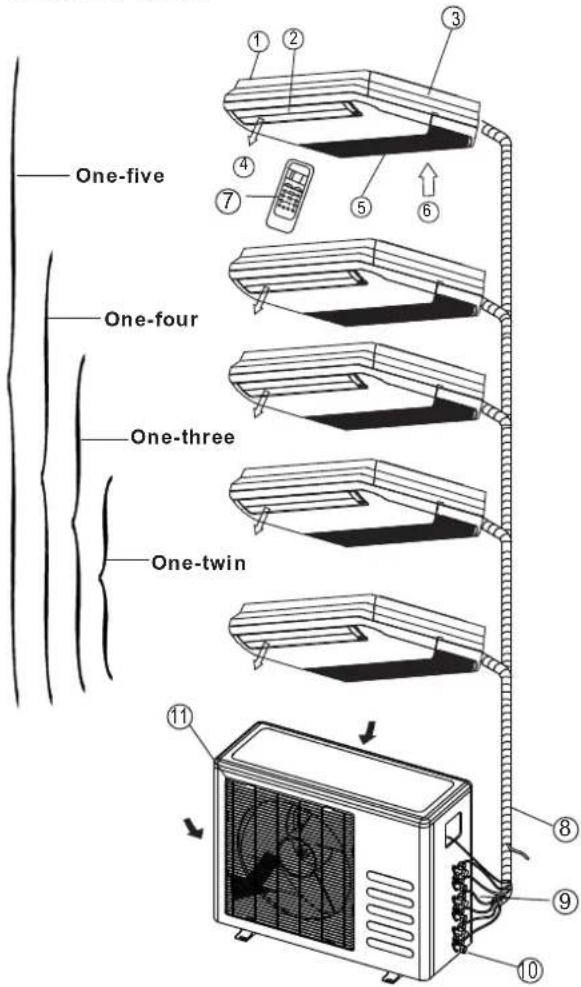
- For multi-split type air conditioner, one outdoor unit can match different types of indoor units. So all the pictures in this manual are for explanation purpose only. Your air conditioner may be slightly different. The actual shape shall prevail.
● The following pages introduce several kinds of indoor units matching with the outdoor units.
Indoor unit
- Front panel
- Top air intake
- Air filter(Inside)
- Air outlet
- Horizontal air flow louver
- Vertical air flow louver(Internal)
- Display panel
- LED display window
- Remote controller
- Manual control button(Behind the front panel)
Outdoor unit
- Refrigerant connecting pipe, drain hose and electric wiring
- Stop valve
- Air outlet
Display panel
AUTO indication lamp
Lights up during the Auto operation.
TIMER indication lamp
Lights up during Timer operation.
DEFROST indication lamp
(For Cooling & Heating models only): Lights up when the air conditioner starts defrosting automatically or when the warm air control feature is activated in heating operation.
DIGITAL DISPLAY indication lamp
Displays the current setting temperature. Only when the air conditioner is in FAN operation, it displays the actual room temperature. And displays the malfunction code or protection code.
OPERATION indication lamp
This indicator appears only when the compressor is in operation and indicates the current operating frequency.
Identification of parts
Indoor unit
text_image
One-five One-four One-three One-twin Air inlet Air outlet Outdoor unitDISPLAY PANEL
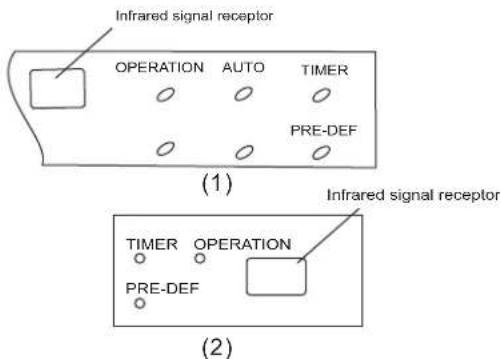
text_image
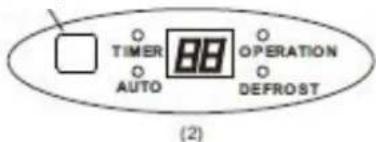
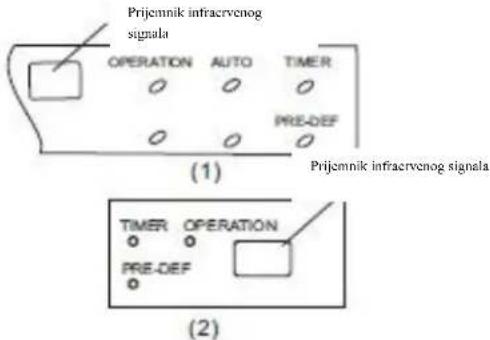
Infrared signal receptor OPERATION AUTO TIMER PRE-DEF (1) Infrared signal receptor TIMER OPERATION PRE-DEF (2)Indoor unit
① Front panel frame
② Front panel
③ Air filter
④ Horizontal air flow grille
⑤ Vertical air flow louver
⑥ Room temperature sensor
⑦ Display panel
⑧ Infrared signal receiver
⑨ Remote controller
Outdoor unit
⑩ Drain hose, refrigerant connecting pipe
⑪ Connective cable
⑫ Stop valve
⑬ Fan hood
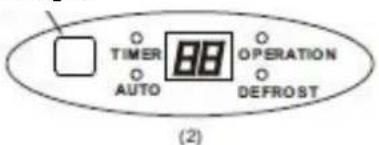
DISPLAY PANEL
OPERATION indicator:
The indicator flashes once every second after power is on and illuminates when the air conditioner is in operation.
TIMER indicator:
The indicator illuminates when TIMER is set ON.
PRE-DEF. Indicator (For cooling& heating model only):
This indicator illuminates when the air conditioner starts defrosting automatically or when the Anti-cold air function is activated in heating operation.
AUTO indicator:
This indicator flashes when the air conditioner is in AUTO operation.
Identification of parts
Indoor unit

text_image
One-five One-four One-three One-twin Air inlet Air outlet Outdoor unitLED Display window
text_image
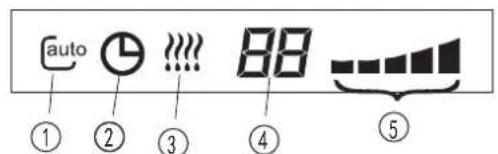
auto ① ② ③ ④ ⑤(1)
text_image
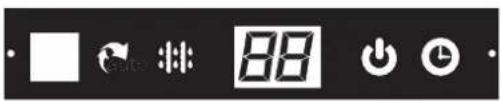
Digital display control buttons including timer, refresh, and play icons with a numeric display showing '88'(2)
Indoor unit
① Front panel frame
② Front panel
③ Air filter
④ Horizontal air flow grille
⑤ Vertical air flow louver
⑥ Room temperature sensor
⑦ Display panel
⑧ Remote controller
Outdoor unit
⑨ Drain hose, refrigerant connecting pipe
⑩ Connective cable
⑪ Stop valve
⑫ Fan hood
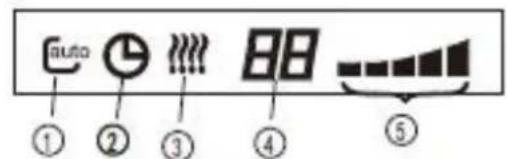
LED DISPLAY WINDOW
① AUTO indication lamp
Lights up during the Auto operation.
② TIMER indication lamp
Lights up during Timer operation.
③ DEFROST indication lamp
(For Cooling & Heating models only):
Lights up when the air conditioner starts
defrosting automatically or when the warm air
control feature is activated in heating operation.
④ DIGITAL DISPLAY indication lamp
Displays the current setting temperature. Only when the air conditioner is in FAN operation, it displays the actual room temperature. And displays the malfunction code or protection code.
⑤ OPERATION indication lamp
This indicator appears only when the compressor is in operation and indicates the current operating frequency.
Identification of parts
Indoor unit
text_image
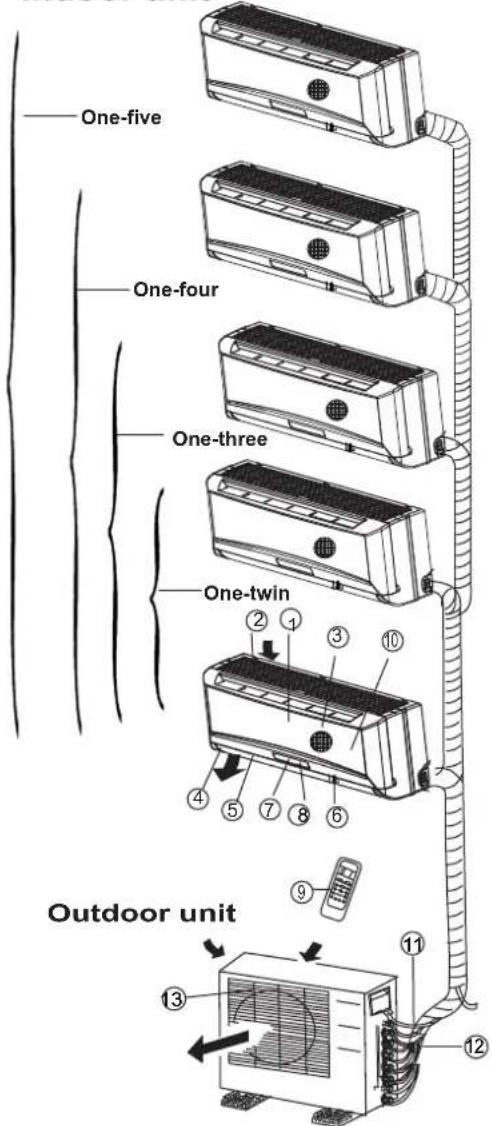
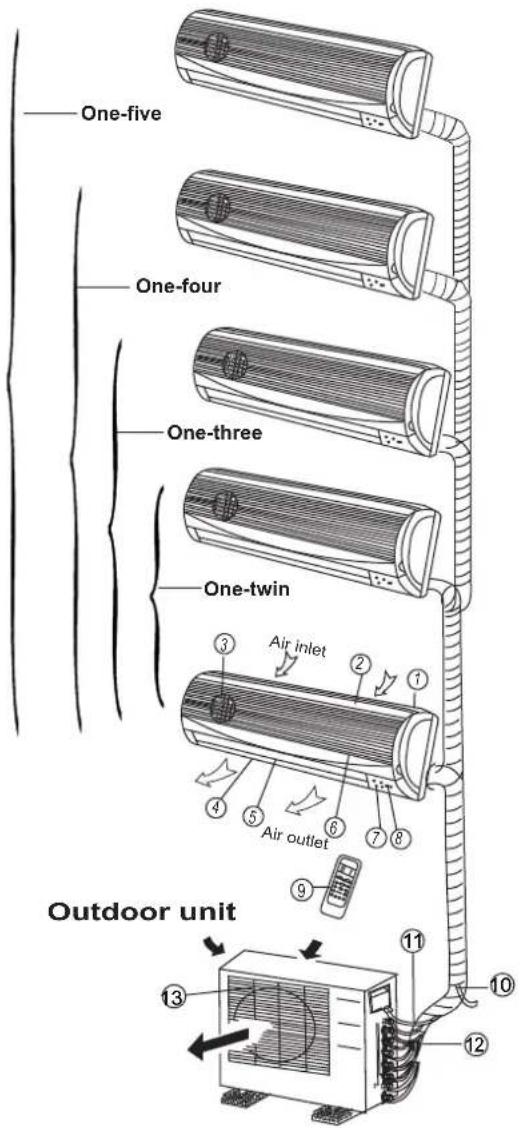
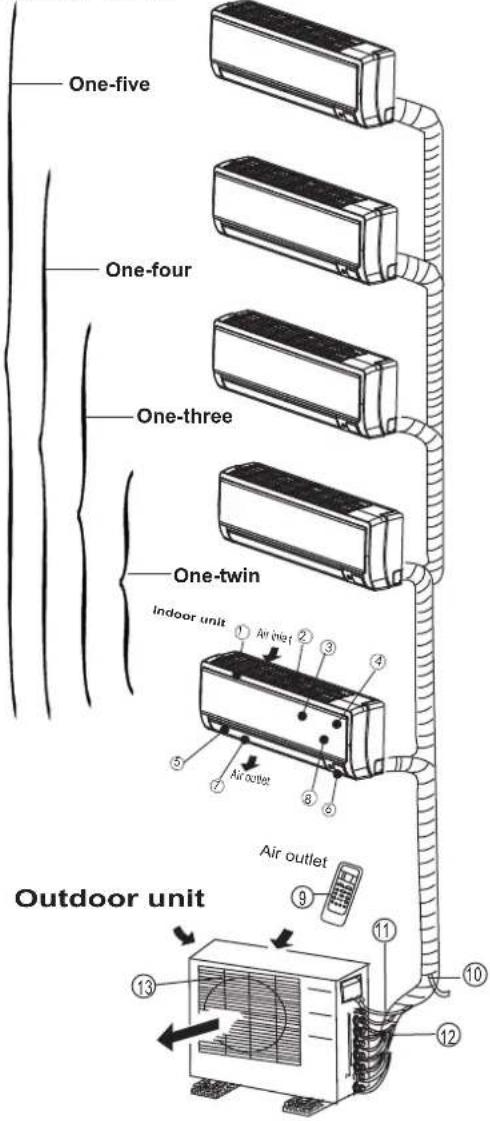
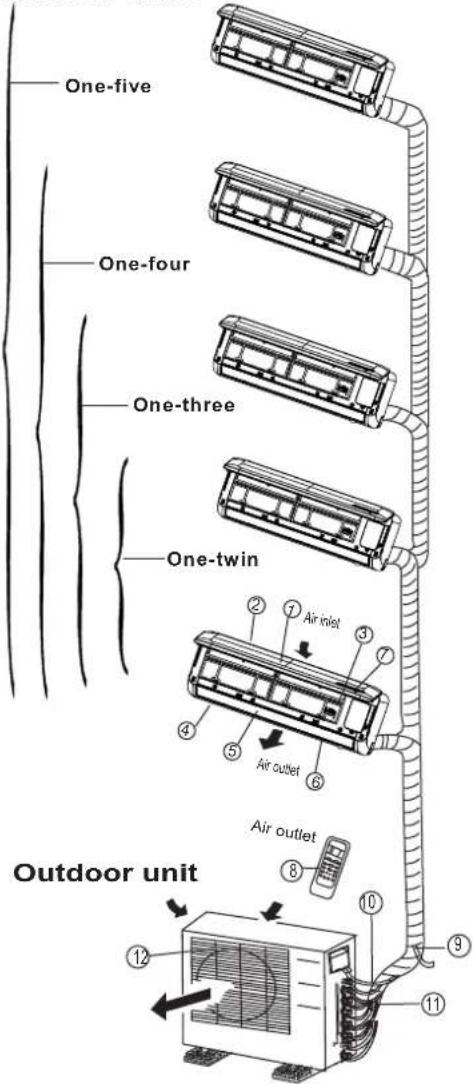
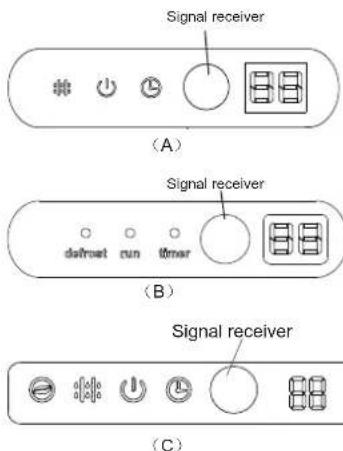
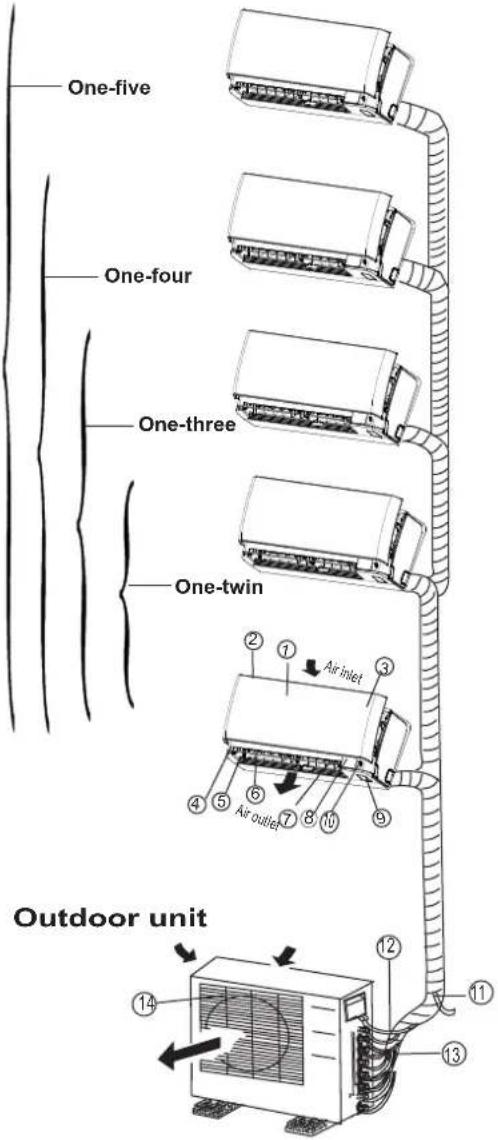
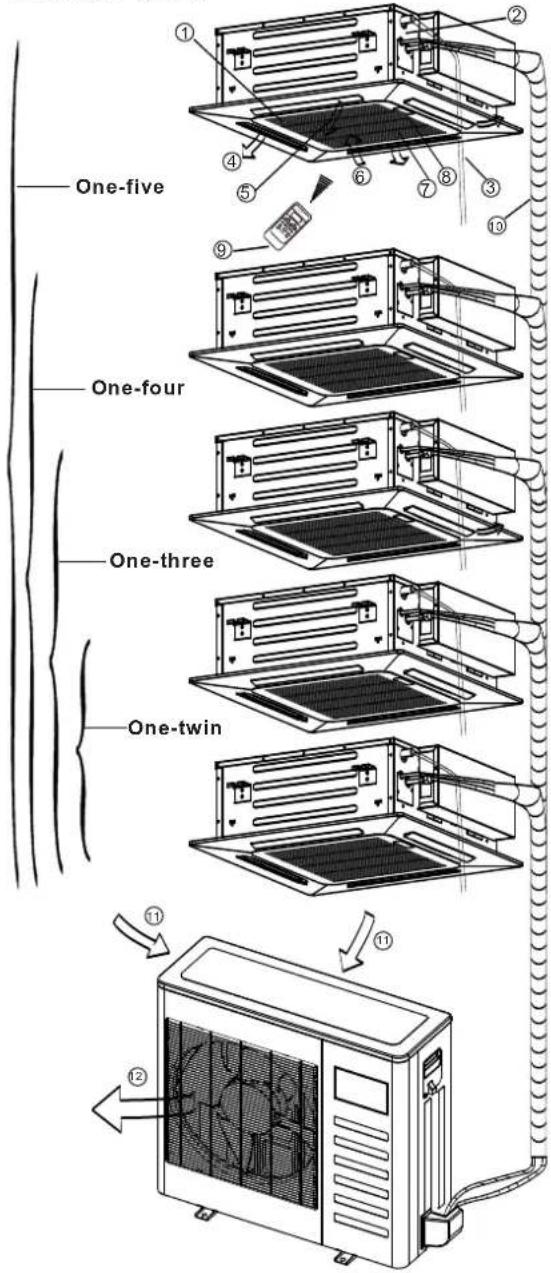
One-five One-four One-three One-twin Indoor unit ① Air inlet ② ③ ④ ⑤ Air outlet ⑥ ⑦ ⑧ Air outlet Air outlet Outdoor unit ⑨ ⑪ ⑫ ⑬ ⑭ ⑮ ⑯Display window
NOTE: The display window on the air conditioner you purchased may look like one of the following:
text_image
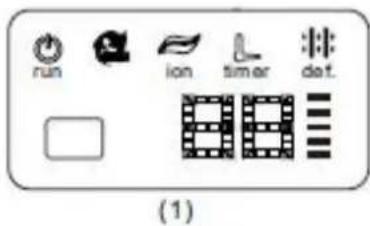
run ion timer def.(1)
Indoor unit
- Panel frame
- Rear air intake grille
- Front panel
- Air Purifying filter & Air filter(behind)
- Horizontal louver
- LCD display window
- Vertical louver
- Manual control button (behind)
- Remote controller holder
Outdoor unit
- Drain hose, refrigerant connecting pipe
- Connective cable
- Stop valve
- Fan hood
text_image
Signal receptor(2)
text_image
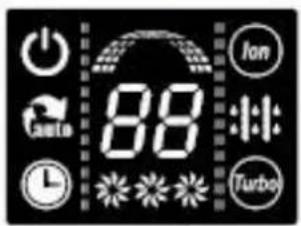
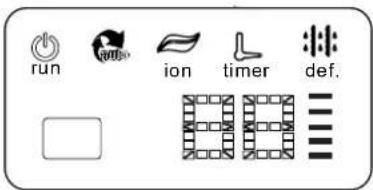
power auto 88 Ion Turbo(3)
text_image
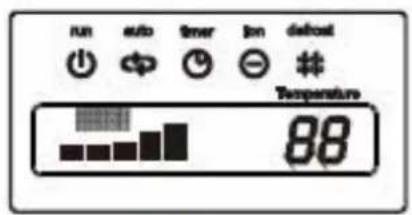
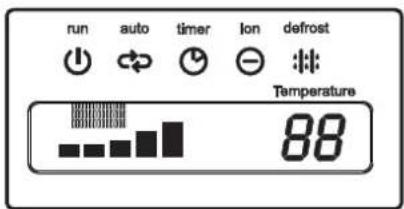
run auto timer lon defrost Temperature 88(4)

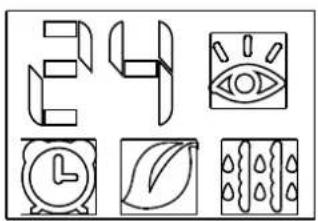
natural_image
Row of eight simple icons or symbols arranged horizontally (no text or labels)(5)
text_image
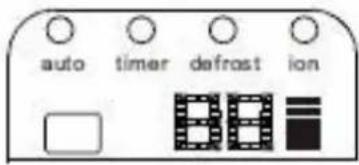
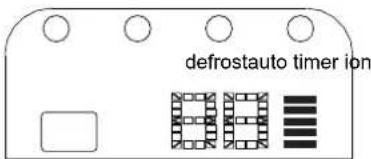
defrostauto timer ion(6)

(7)

OPERATION display
Displayed when the air conditioner is in operation.

AUTO operation display
Displayed during Auto operation.

DEFROST operation display
(For Heating & Cooling model only): Displayed when the air conditioner starts defrosting automatically or when the warm air control feature is activated in heating operation.

TIMER display
Displayed during Timer operation.

CLEAN AIR display(optional)
Displayed when CLEAN AIR feature is activated.

TURBO operation display
Displayed when select TURBO function on cooling operation or on heating operation.

DIGITAL DISPLAY
Displays the current setting temperature when the air conditioner is in operation.

FAN SPEED display
Displayed the selected fan speed: LOW( ), MED( ) and HIGH( ).

Frequency indication lamp
This display is separated into five zones. The zones illuminate based on the compressor current frequency. For example, higher frequency will illuminate more zones.
Identification of parts
Indoor unit
text_image
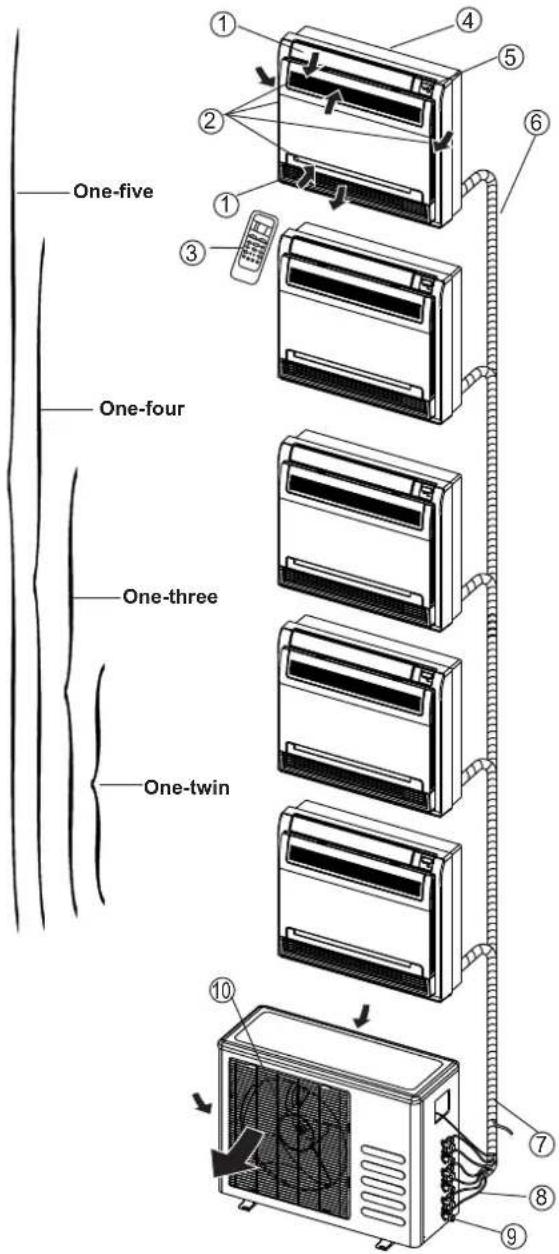
One-five One-four One-three One-twin Outdoor unit ② ⑦ Air inlet ③ ⑦ ④ ⑤ Air outlet ⑥ ⑧ Air outlet ⑩ ⑪ ⑨LED Display window
text_image
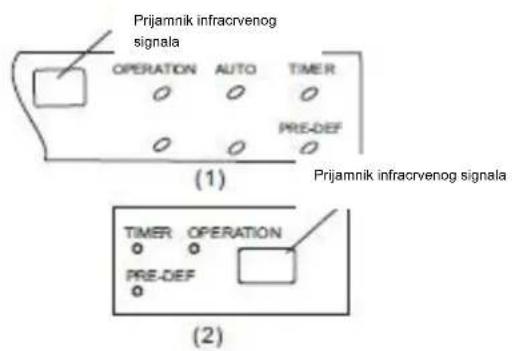
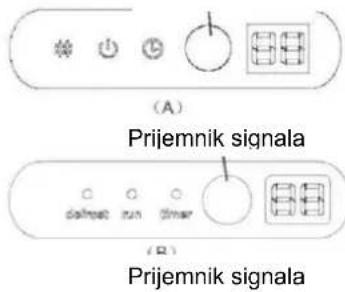
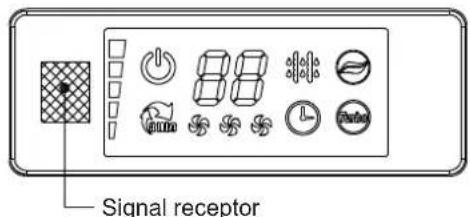
Signal receiver (A) Signal receiver defset run timer (B) Signal receiver (C)Indoor unit
- Front panel
- Air inlet
- Air filter
- Air outlet
- Horizontal air flow grille
- Vertical air flow louver(inside)
- Display panel
- Remote control
NOTE: The actual shape of the indoor unit you purchased may may be slight different on front panel and display window.
Outdoor unit
- Drain hose, refrigerant connecting pipe
- Connective cable
- Stop valve
- Fan hood
NOTE:
All the pictures in this manual are for explanation purposes only. Your air conditioner may be slightly different. The actual shape shall prevail.
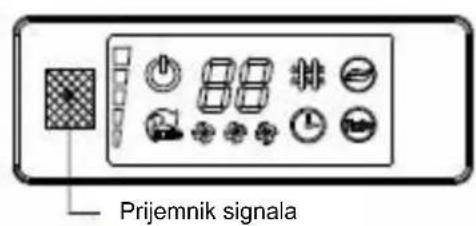
Indication lamp on LED Display window

ION indication lamp(optional function)
This lamp illuminates when Clean Air feature is activated.

DEFROST indication lamp
(Enabled on cooling & heating models only): Lights up when the air conditioner starts defrosting automatically or when the warm air control feature is activated in heating operation.

OPERATION indication lamp
This lamp illuminates when the air conditioner is in operation.

TIMER indication lamp
Lights up during Timer operation.

Temperature indicator
- Displays the temperature settings when the air conditioner is operational.
• Displays the malfunction code.
Identification of parts
Indoor unit
text_image
One-five One-four One-three One-twin Outdoor unit 1 2 3 4 5 6 7 8 9 10 11 12 13 14LED Display window
natural_image
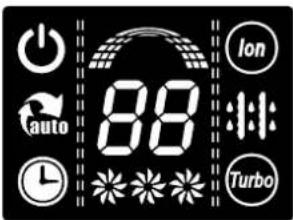
Six abstract line drawings arranged in a 2x2 grid: abstract shapes, eye, clock, leaf, and textured surfaces (no text or symbols)Indoor unit
- Front panel
- Air inlet
- Air filter(inside)
- Air outlet
- Horizontal air flow grille(outside)
- Horizontal air flow grille(inside)
- Vertical air flow louver
- Display panel
- Manual control button and receiver
- Intelligent eye detector(on some models)
Outdoor unit
- Drain hose, refrigerant connecting pipe
- Connective cable
- Stop valve
- Fan hood
NOTE:
All the pictures in this manual are for explanation purposes only. Your air conditioner may be slightly different. The actual shape shall prevail.
Indication lamp on LED Display window

TEMPERATURE indication lamp
Displays the temperature settings when the air conditioner is operational. Displays the malfunction code. Displays the actual room temperature on Fan only mode.

INTELLIGENT EYE indication lamp (Optional)
Lights up during Intelligent eye operation except when the machine is defrosting. This indication lamp continues flashing when the unit detects human activity.

TIMER indication lamp
Lights up during Timer operation.

ION indication lamp(optional)
Lights up when Clean Air feature is activated.

DEFROST indication lamp
(Enabled on cooling & heating models only): Lights up when the air conditioner starts defrosting automatically or when the warm air control feature is activated in heating operation.
Identification of parts
Floor and standing type(console) Indoor unit
text_image
One-five One-four One-three One-twinDisplay panel
text_image
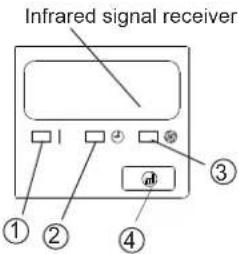
Infrared signal receiver ① ② ③ ④Indoor unit
- Air flow louver (at air outlet)
- Air inlet(with air filter in it)
- Remote controller
- Installation part
- Display panel
- Connecting pipe
Outdoor unit
- Drain hose, refrigerant connecting pipe
- Connective cable
- Stop valve
- Fan hood
DISPLAY PANEL:
① OPERATION indication lamp
This indicator illuminates when the unit is operational.
② TIMER indication lamp
Lights up during Timer operation.
③ DEFROST indication lamp(Cooling & Heating models only) or Fan only indication lamp (Cooling only type): Lights up when the air conditioner starts defrosting automatically in heating operation or fan only mode is selected.
④ Temporary button
This button is used to operate the unit temporarily in case you misplace the remote controller or its batteries are exhausted. One press of the manual control button will lead to the forced AUTO operation. If press the button twice within five seconds, the unit will operate under forced COOL operation. The forced COOL operation is used for testing purposes only, please do not choose it unless it is necessary.
Identification of parts
Floor and standing type(console) Indoor unit
text_image
One-five One-four One-three One-twin 11 3 4 5 6 8 9 10Display panel
NOTE: The display window on the air conditioner you purchased may look like one of the following:
text_image
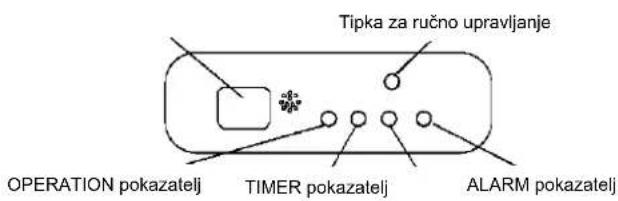
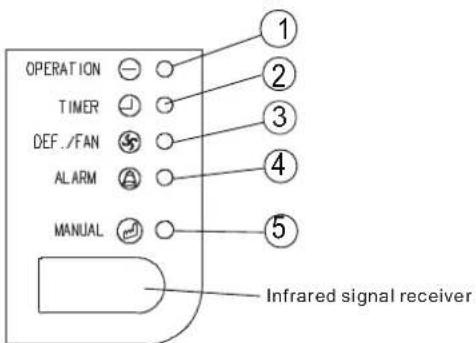
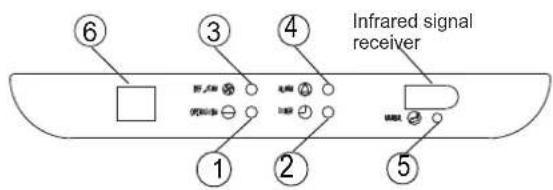
OPERATION TIMER DEF./FAN ALARM MANUAL Infrared signal receiver(1)
Indoor unit
- Indoor unit
- Air flow louver (at air outlet)
- Installation part
- Air out
- Air inlet(with air filter in it)
- Air in
- Remote controller
Outdoor unit
- Drain hose, refrigerant connecting pipe
- Connective cable
- Stop valve
- Fan hood
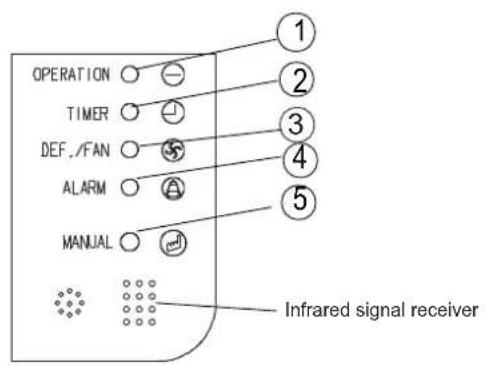
DISPLAY PANEL:
① OPERATION indication lamp
This indicator illuminates when the unit is operational.
② TIMER indication lamp
Lights up during Timer operation.
③ DEF./FAN indication lamp
Lights up when the air conditioner starts defrosting automatically in heating operation (applicable to cooling & heating models only) or fan only mode is selected(applicable to cooling only models).
④ AIARM indication lamp
Flashes when malfunction occurs.
text_image
OPERATION TIMER DEF./FAN ALARM MANUAL Infrared signal receiver(2)
text_image
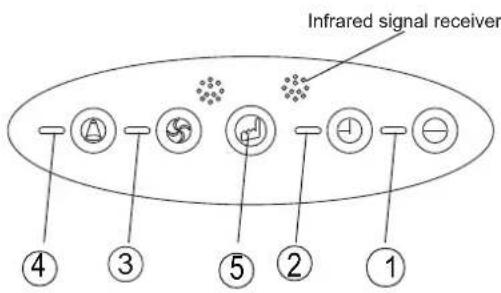
Infrared signal receiver ④ ③ ⑤ ② ①(3)
text_image
Infrared signal receiver ① ② ③ ④ ⑤ ⑥(4)
text_image
⑤ ① ② ③ ④ ⑥ M2010 ℃/V 150Ω 100Ω 100mA 2.0A ℃(5)
⑤ Temporary button
This button is used to operate the unit temporarily in case you misplace the remote controller or its batteries are exhausted. One press of the manual control button will lead to the forced AUTO operation. If press the button twice within five seconds, the unit will operate under forced COOL operation. The forced COOL operation is used for testing purposes only, please do not choose it unless it is necessary.
⑥ Temperature Display
Displays the current setting temperature while the unit is operating.
Identification of parts
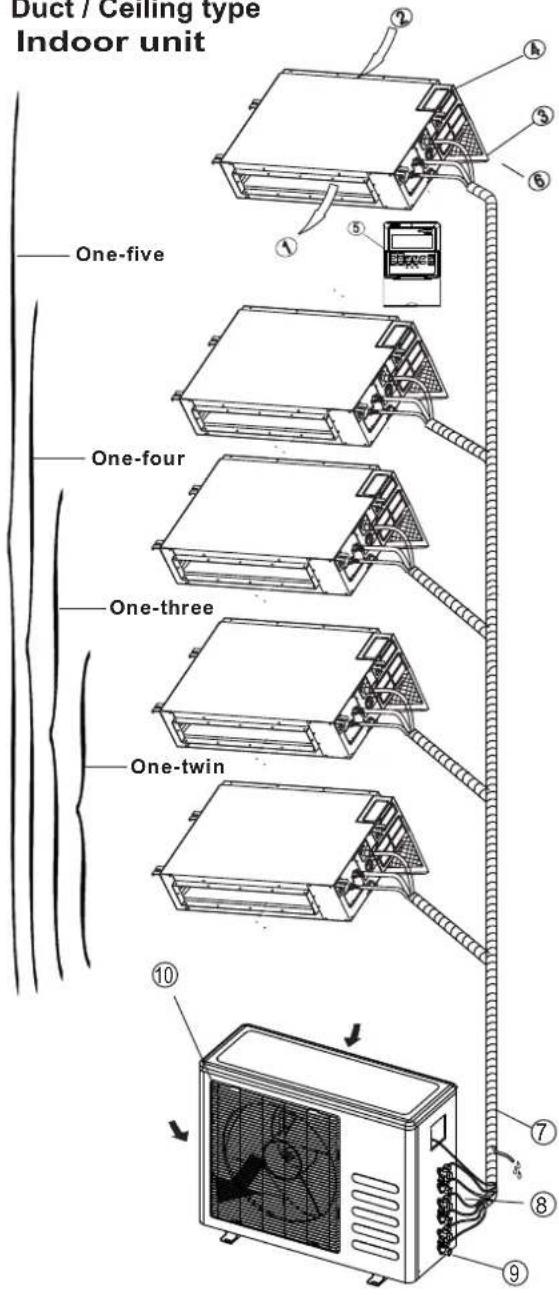
Duct / Ceiling type
Indoor unit
text_image
Duct / Ceiling type Indoor unit One-five One-four One-three One-twin 10 7 8 9Display panel
text_image
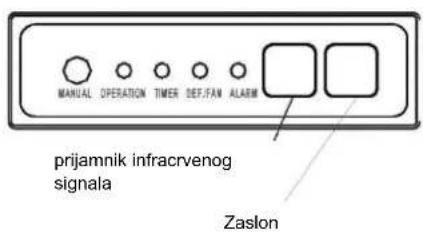
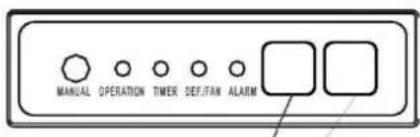
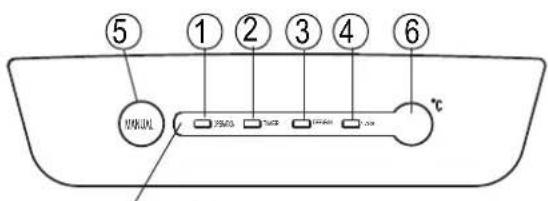
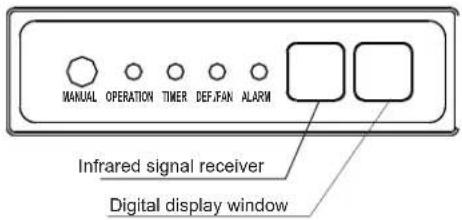
MANUAL OPERATION TIMER DEF.FAN ALARM Infrared signal receiver Digital display windowIndoor unit
- Air outlet
- Air inlet
- Air filter
- Electric control cabinet
- Wire controller
- Drain pipe
Outdoor unit
- Drain hose, refrigerant connecting pipe
- Connective cable
- Stop valve
- Fan hood
DISPLAY PANEL:
① OPERATION indication lamp
This indicator illuminates when the unit is operational.
② TIMER indication lamp
Lights up during Timer operation.
③ DEF./FAN indication lamp
Lights up when the air conditioner starts defrosting automatically in heating operation (applicable to cooling & heating models only) or fan only mode is selected(applicable to cooling only models).
④ AIARM indication lamp
Flashes when malfunction occurs.
⑤ MANUAL button
This button is used to operate the unit temporarily in case you misplace the remote controller or its batteries are exhausted. One press of the manual control button will lead to the forced AUTO operation. If press the button twice within five seconds, the unit will operate under forced COOL operation. The forced COOL operation is used for testing purposes only, please do not choose it unless it is necessary.
Identification of parts
Duct type
Indoor unit
text_image
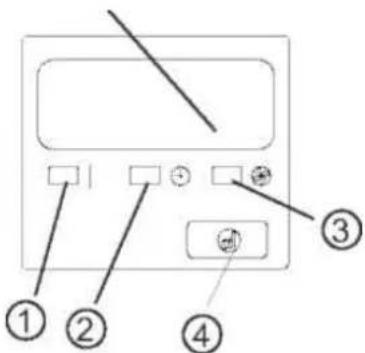
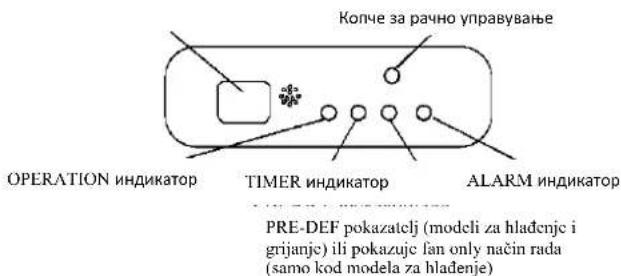
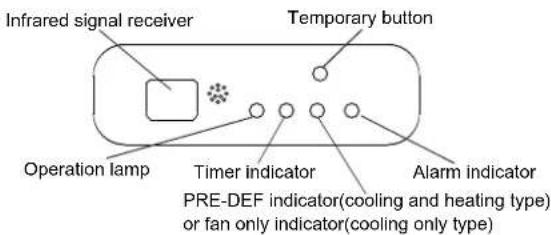
One-five One-four One-three One-twin ① ② ③ ④ ⑤ ⑥ ⑦ ⑧Display panel
text_image
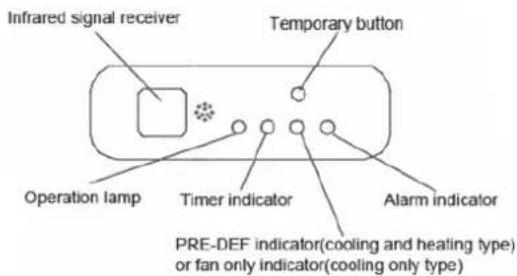
Infrared signal receiver Temporary button Operation lamp Timer indicator Alarm indicator PRE-DEF indicator(cooling and heating type) or fan only indicator(cooling only type)Indoor unit
- Air outlet
- Air inlet
-
Air filter
-
Remote controller
Outdoor unit
- Drain hose, refrigerant connecting pipe
- Connective cable
- Stop valve
- Fan hood
DISPLAY PANEL:
① OPERATION lamp
This indicator illuminates when the unit is operational.
② TIMER indication lamp
Lights up during Timer operation.
③ PRE-DEF./FAN indication lamp
Lights up when the air conditioner starts defrosting automatically in heating operation (applicable to cooling & heating models only) or fan only mode is selected(applicable to cooling only models).
④ AIARM indication lamp
Flashes when malfunction occurs.
⑤ TEMPORARY button
This button is used to operate the unit temporarily in case you misplace the remote controller or its batteries are exhausted. One press of the manual control button will lead to the forced AUTO operation. If press the button twice within five seconds, the unit will operate under forced COOL operation. The forced COOL operation is used for testing purposes only, please do not choose it unless it is necessary.
Identification of parts
Compact four-way cassette type Indoor unit
text_image
One-five One-four One-three One-twin 11 12Display panel
text_image
Infrared signal receiver Temporary button Operation lamp Timer indicator Alarm indicator PRE-DEF indicator(cooling and heating type) or fan only indicator(cooling only type)Indoor unit
- Air flow louver(at air outlet)
- Drain pump(drain water from indoor unit)
- Drain pipe
- Air outlet
- Air filter(inside air-in grill)
- Air inlet
- Air-in grill
- Display panel
- Remote controller
- Refrigerant pipe
Outdoor unit
-
Air inlet
-
Air outlet
DISPLAY PANEL:
① OPERATION lamp
This indicator illuminates when the unit is operational.
② TIMER indication lamp
Lights up during Timer operation.
③ PRE-DEF./FAN indication lamp
Lights up when the air conditioner starts defrosting automatically in heating operation (applicable to cooling & heating models only) or fan only mode is selected(applicable to cooling only models).
④ AIARM indication lamp
Flashes when malfunction occurs.
⑤ TEMPORARY button
This button is used to operate the unit temporarily in case you misplace the remote controller or its batteries are exhausted. One press of the manual control button will lead to the forced AUTO operation. If press the button twice within five seconds, the unit will operate under forced COOL operation. The forced COOL operation is used for testing purposes only, please do not choose it unless it is necessary.
NOTE: This manual does not include Remote Controller Operations, see the <
Operating temperature
| ModeTemperature | Cooling operation | Heating operation | Drying operation |
| Room temperature | 17°C32 62C(°F~90°F) | 0°C30 2°C(3 °F~86°F) | 17°C~32°C(62°F~90°F) |
| Outdoor temperature | 0°C~50°C(32°F~122°F) | -15°C~24°C(5°F~76°F) | 0°C~50°C(32°F~122°F) |
| (-15°C~50°C/ 5°F~122°F: For the models with low temperature cooling system ) | |||
| NOTE:1. Optimum performance will be achieved within these operating temperatures.If air conditioner is used outside of the above conditions, certain safety protection features might come into operation and cause the unit to function abnormally.2. If the air conditioner operates in a room whose relative humidity is less than 80% the surface of the air conditioner may attract condensation. Please sets the vertical air flow louver to its maximum angle (vertically to the floor), and set HIGH fan mode.Suggestion:For the unit adopts an Electric Heater, when the outside ambient temperature is below 0°C(32°F), we strongly recommend you to keep the machine plugged in order to guarantee it running smoothly. | |||
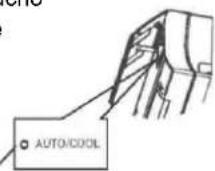
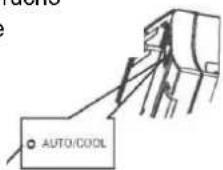
Manual operation
Manul operation can be used temporarily in case you can not find the remote controller or test running purpose or maintenance necessary.

text_image
Manual control button Manual control button AUTO/COOL Model A AUTO/COOL Manual control button Model BNOTE: The unit must be turned off before operating the manual control button. If the unit is operational, continue pressing the manual control button until the unit is off.
① Open and lift the front panel up will see the manual control button(see Model A)
For some models, the manual control button is located at the bottom of the unit(see Model B).
② One press of the manual control button will lead to the forced AUTO operation. If press the button twice within five seconds, the unit will operate under forced COOL operation.
③ Close the panel firmly to its original position.
NOTE: For DUCT and CEILING type, CASSETTE type, CEILING and FLOOR type and FLOOR and STANDING type, please refer to the previous pages to operate the Manual button.
Airflow direction control
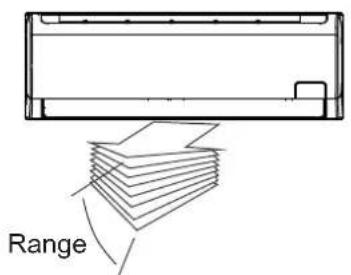
text_image
Range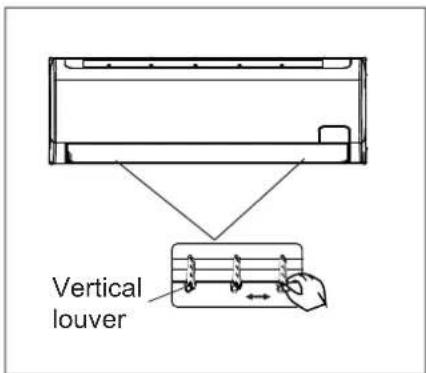
text_image
Vertical louver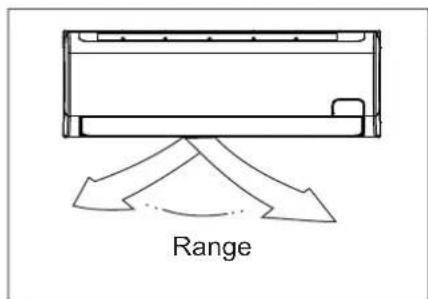
text_image
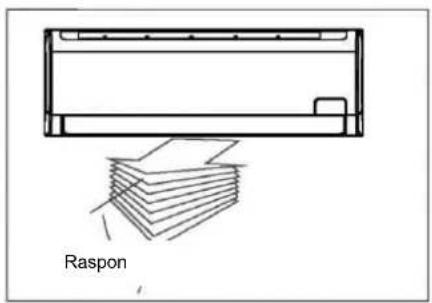
Range- Adjust the air flow direction properly otherwise it might cause discomfort or cause uneven room temperatures.
- Adjust the horizontal/vertical louver using the remote controller. For some models, the vertical louver can only be adjusted manually.
To set the horizontal/vertical air flow direction
- Perform this function while the unit is in operation.
- Use the remote controller to adjust the air flow direction. The vertical/horizontal louver changes 6 degree in angle for each press, or swing up and down automatically. Please refer to the ‘REMOTE CONTROLLER OPERATION MANUAL’ for details.
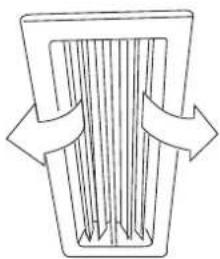
- For some models, the vertical louver can only be adjusted manually. Move the deflector rod manually to adjust the air flow in the direction you prefer.
IMPORTANT: Do not put your fingers into the panel of blower and suction side. The high-speed fan inside may cause danger.

CAUTION
- Do not operate the air conditioner for long periods with the air flow direction set downward in cooling or dehumidifying mode. Otherwise, condensation may occur on the surface of the horizontal louver causing moisture to drop on to the floor or on furnishings.
- Do not move the horizontal louver manually unless it is necessary. Always use the remote controller.
- When the air conditioner is started immediately after it was stopped, the horizontal louver might not move for approximately 10 seconds.
- Open angle of the horizontal louver should not be set too small, as COOLING or HEATING performance may be impaired due to too restricted air flow area.
- Do not operate unit with horizontal louver in closed position.
- When the air conditioner is connected to power (initial power), the horizontal louver may generate a sound for 10 seconds, this is a normal operation.
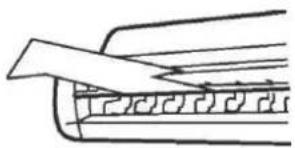
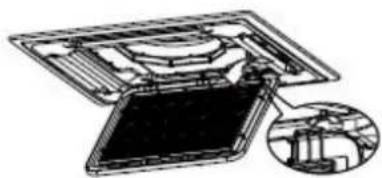
Duct-Ceiling Type
The following is how to adjust the air flow direction when the air outlet parts (sold separately) is used with the indoor unit.
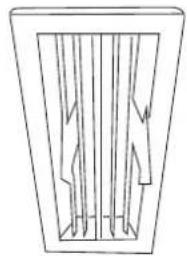
Cooling
To effectively cool the whole room, please adjust the louver horizontally.
natural_image
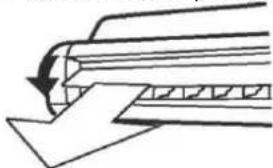
Simple line drawing of a container with internal vertical lines and two arrows indicating flow (no text or symbols)Heating
To effectively heat the bottom of the room please set the louver downwards.
natural_image
Simple line drawing of a rectangular frame with vertical internal lines and arrows, no text or symbols present.Ceiling-Floor Type
Auto-swing
Press SWING button, the louver will swing up and down(left and right) automatically.
Manual Swing
Adjust the louver to achieve better cooling/heating effects when cooling/heating.
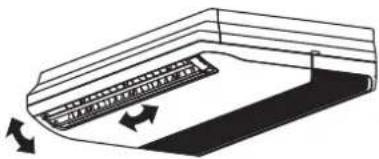
natural_image
Diagram of a curved mechanical component with directional arrows indicating motion (no text or symbols)When cooling
Adjust the louver horizontally.
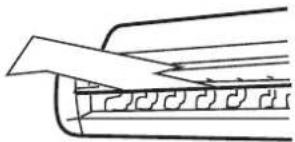
natural_image
Pure technical line drawing of a mechanical component without any text, numbers, or symbolsWhen heating
Adjust the louver downwards (vertically).

natural_image
Pure technical diagram of a mechanical component with no text or symbolsNOTE : The heating operation with horizontal air out let will increase the difference of the room temperature.
| Notice Notice the louver direction | Choose horizontal outlet mode when cooling operationUnder cooling operation ,the air flow down will cause condensing dew on the air outlet and louver surface. |
How the air conditioner works
text_image
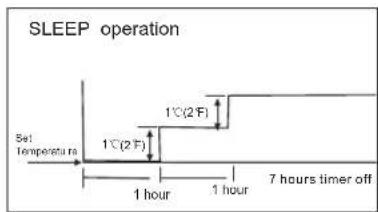
SLEEP operation Set Temperature 1°C(2 F) 1°C(2 F) 1 hour 1 hour 7 hours timer offCooling
flowchart
graph TD
    A["Set Temperature"] --> B["1 hour"]
    B --> C["1 hour"]
    C --> D["1 c(2 F)"]
    D --> E["1 c(2 F)"]
    E --> F["7 hours timer off"]
Heating
AUTO operation
- When you set the air conditioner in AUTO mode, it will automatically select cooling, heating(cooling /heating models only), or fan only operation depending on what temperature you have selected and the room temperature.
- The air conditioner will control room temperature automatically round the temperature point set by you.
- If the AUTO mode is uncomfortable, you can select desired conditions manually.
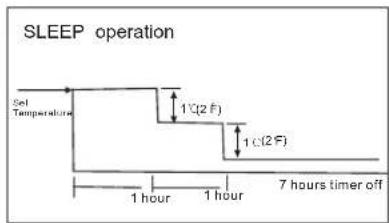
SLEEP operation
- When you push SLEEP button on remote controller during cooling, heating(cooling only type without), or AUTO operation, the air conditioner will automatically increase (cooling) or decrease (heating) 1°C(2°F) per hour.
- The set temperature will be steady 2 hours later. And the air conditioner will be timer off in 7 hours.
- The fan speed will be automatically controlled.
- This feature can maintain the most comfortable temperature and save more energy for you.
DRYING operation
- The fan speed will be automatically controlled under dry operation.
- During the dry operation, if the room temperature is lower than 10 °C(50 F), the compressor stops operation and restarts until the room temperature is above 12 °C(54 F).
Operation mode selection
While simultaneously operating two indoor units or more, make sure the operation modes will not conflict with each other. The heat mode claims precedence over all other modes. If the unit initially started operates under heat mode, the other units can operate under heat mode only.
For example: If the unit initially started operates under cool(or fan) mode, the other units can operate under any mode except heat. If one of the unit selects heat mode, the other operating units will stop operation and display "P5" (For the units with display window only) or the Auto and Operation indication light flash rapidly, the Defrost indication light turn off, the Timer indication light remain on (For the units without display window), or the Defrost and Alarm indication light (if applicable) illuminate, the Operation indication light flashes rapidly and the Timer indication light turns off ( For the Floor and standing type).
Optimal operation
To achieve optimal performance, please note the following:
- Adjust the air flow direction correctly so that it is not directed on people.
- Adjust the temperature to achieve the highest comfort level. Do not adjust the unit to excessive temperature levels.
- Close doors and windows on COOL or HEAT modes, or performance may be reduced.
- Use TIMER ON button on the remote controller to select a time you want to start your air conditioner.
- Do not put any object near air inlet or air outlet, as the efficiency of the air conditioner may be reduced and the air conditioner may stop running.
- Clean the air filter periodically, otherwise cooling or heating per formance may be reduced.
- Do not operate unit with horizontal louvre in closed position.
Suggestion: For the unit adopts an Electric Heater, when the outside ambient temperature is below 0^(32 F) , we strongly recommend you to keep the machine plugged in order to guarantee it running smoothly.
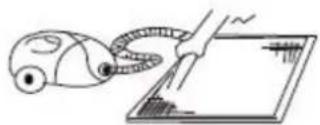
Care and maintenance
natural_image
Illustration of two hands holding a rectangular device with internal components, no text or symbols present
text_image
Filter Handle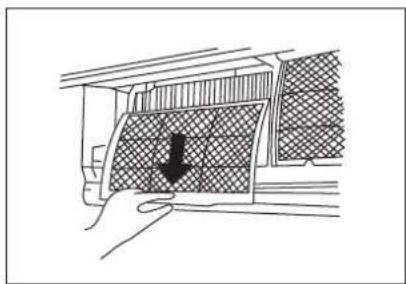
natural_image
Diagram showing a hand pressing down a curved panel with a downward arrow indicating force or movement (no text or symbols present)Cleaning the Grille, Case and Remote Controller
- Turn the system off before cleaning. To clean, wipe with a soft, dry cloth. Do not use bleach or abrasives.
NOTE: Supply power must be disconnect before cleaning the indoor unit.
CAUTIONS
- A cloth dampened with cold water may be used on the indoor unit if it is very dirty. Then wipe it with a dry cloth.
- Do not use a chemically treated cloth or duster to clean the unit.
- Do not use benzine, thinner, polishing powder, or similar solvents for cleaning. These may cause the plastic surface to crack or deform.
- Never use water hotter than 40 °C(104°F) to clean the front panel, it could cause deformation of discoloration.
■ WALL-MOUNTED TYPE
Cleaning the air filter
A clogged air filter reduces the cooling efficiency of this unit. Please clean the filter once every 2 weeks.
- Lift the indoor unit panel up to an angle until it stops with a clicking sound.
- Take hold of the handle of the air filter and lift it up slightly to take it out from the filter holder, then pull it downwards.
-
Remove the Active Carbon & Dust Filter from the indoor unit.
-
Clean the it once two weeks.
- Clean the it with a vacuum cleaner or water, then dry it up in cool place.
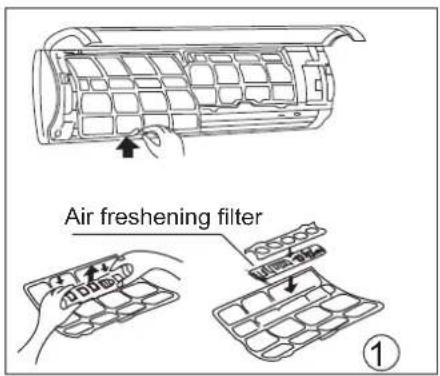
text_image
Air freshening filter ①
text_image
Air freshening filter ②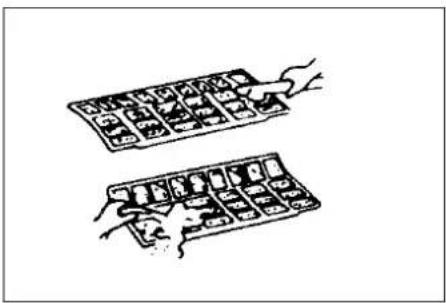
natural_image
Illustration of two hands inserting a grid into an abacus (no text or symbols)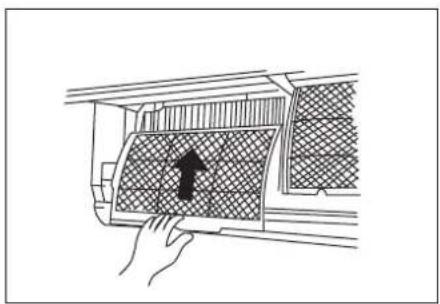
natural_image
Line drawing of a hand placing a textured panel with an arrow symbol (no text or labels)4. Remove the Air Freshening Filter(Optional filter:
Plasma Dust collector/Silver Ion filter /Bio filter /Vitamin C filter) from its support frame.
(The installation and removing method of the air freshening filter is different depending on the models, see the pictures marked ① and ② on the left.
- Clean the air freshening filter at least once a month, and replace it every 4-5 months.
-
Clean it with vacuum cleaner, then dry it in cool place.
-
Install the air freshening filter back into position.
-
Insert the upper portion of air filter back into the unit taking care that the left and right edges line up correctly and place filter into position.
Maintenance
If you plan to idle the unit for a long time, perform the following:
(1) Operate the fan for about half a day to dry the inside of the unit.
(2) Stop the air conditioner and disconnect power. Remove the batteries from the remote controller.
(3) The outdoor unit requires periodic maintenance and cleaning. Do not attempt to do this yourself. Contact your dealer or servicer.
Checks before operation
- Check that the wiring is not broken off or disconnected.
- Check that the air filter is installed.
- Check if the air outlet or inlet is blocked after the air conditioner has not been used for a long time.

Caution
- Do not touch the metal parts of the unit when removing the filter. Injuries can occur when handling sharp metal edges.
- Do not use water to clean inside the air conditioner. Exposure to water can destroy the insulation, leading to possible electric shock.
- When cleaning the unit, first make sure that the power and circuit breaker are turned off.
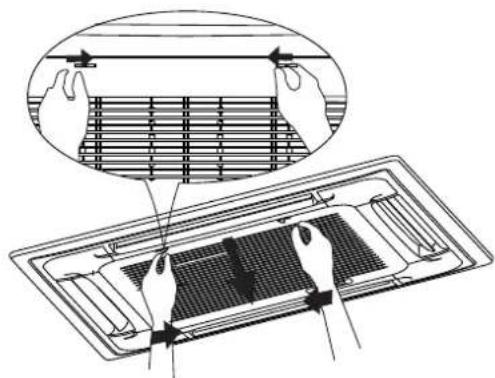
natural_image
Technical illustration of a ventilation grating system with hands installing components (no text or symbols present)Fig. A
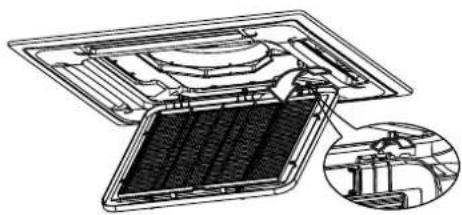
natural_image
Technical diagram of a mechanical assembly with internal components and an inset view (no text or labels)Fig.B
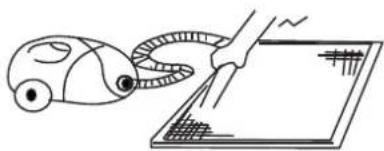
natural_image
Simple line drawing of a robotic arm interacting with a screen (no text or symbols)Fig. C

natural_image
Simple line drawing of a hand using a computer to interact with a laptop (no text or symbols)Fig. D
■ CASSETTE TYPE
- Open the air-in grill
Push the grill switches towards the middle simultaneously as indicated in Fig. A. Then pull down the air-in grill.
Cautions: The control box cables, which are originally connected with the main body electrical terminators must be pulled off before doing as indicated above.
- Take out the air-in grill (together with the air filter shown in Fig. B). Pull the air-in grill down at 45° and lift it up to take out the grill.
- Dismantle the air filter
- Clean the air filter(Vacuum cleaner or pure water may be used to clean the air filter. If the dust accumulation is too heavy, please use soft brush and mild detergent to clean it and dry out in cool place).
■ DUCT AND CEILING TYPE
- Open the air-in grill
Push the grill switches towards the middle simultaneously as indicated in follow figure sketch. Then pull down the air-in grill.
Cautions: The control box cables, which are originally connected with the main body electrical terminators must be pulled off before doing as indicated above.
- Take out the air-in grill.
- Dismantle the air filter
-
Clean the air filter (Vacuum cleaner or pure water may be used to clean the air filter. If the dust accumulation is too heavy, please use soft brush and mild detergent to clean it and dry out in cool place).
-
The air-in side should face up when using vacuum cleaner. (See Fig. C)
- The air-in side should face down when using water. (See Fig. D)
Cautions : Do not dry out the air filter under direct sunshine or with fire.
- Re-install the air filter
- Install and close the air-in grill in the reverse order of step 1 and 2 and connect the control box cables to the corresponding terminators of the main body.
Note: High-static Pressure Parvis Split Type has no air filter.
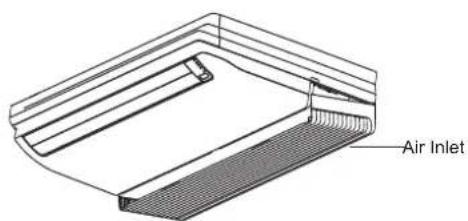
text_image
Air InletFig.E1
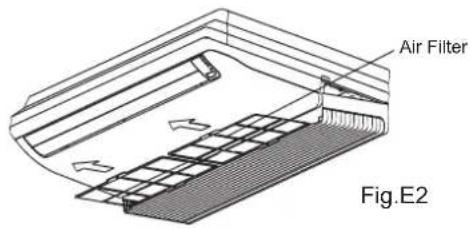
text_image
Air Filter Fig.E2
natural_image
Technical line drawing of a structural component with internal channels and directional arrows (no text or symbols)Fig.E3
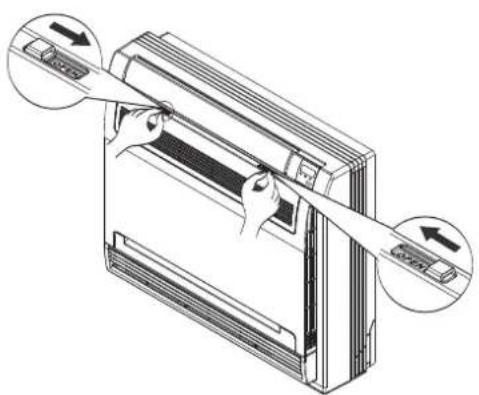
natural_image
Diagram of a server rack with two arrows indicating directional movement (no text or symbols present)Fig.F1
■ CEILING AND FLOOR TYPE
For ≤36000Btu/h models
- Open the air intake (see Fig.E1).
- Take out the air filter(see Fig.E2).
- Clean the air cleaning filter with water or vacuum cleaner, then dry it in cool place.
- Re-install the air filter in the reverse order of Fig.E2.
For ≥48000Btu/h models
- Directly pull out the air filter from air inlet as indicated in Fig.E3.
- Clean the air cleaning filter with water or vacuum cleaner, then dry it in cool place.
- Re-install the air filter in the reverse order of Fig.E3.
■ FLOOR AND STANDING TYPE(Console)
- Open the front panel.(Refer to Fig. F1)
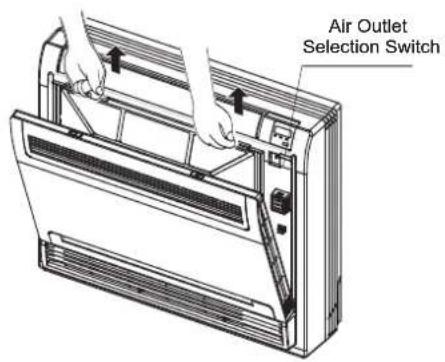
text_image
Air Outlet Selection SwitchFig.F2
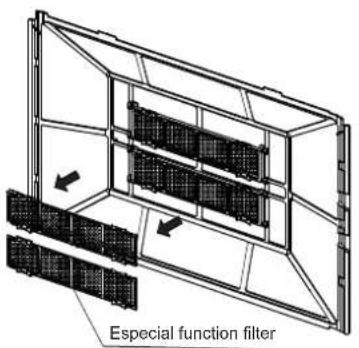
text_image
Especial function filterFig.F3
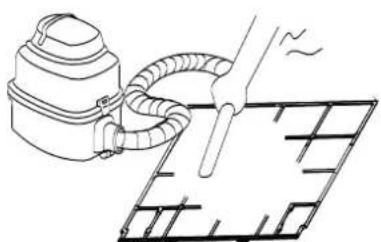
natural_image
Line drawing of a vacuum cleaner emitting exhaust air onto a grid-patterned surface (no text or symbols)Fig.F4
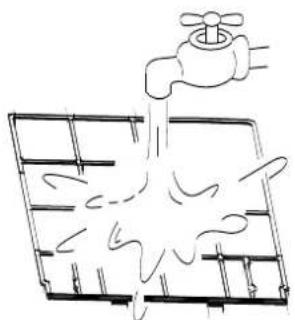
natural_image
Simple line drawing of a faucet pouring water into a grid-patterned container (no text or symbols)Fig.F5
2. Remove the air filter
Press the claws on the right and left of the air filter down slightly, then pull upward.(Refer to Fig.F2)
3. Take off the especial function filter
Hold the tabs of the frame, and remove the claws in 4 places. (Refer to Fig. F3)
(The expecial function filter can be renewed by washing it with water once every 6 months. We recommend replacing it once every 3 years.)
4. Clean the air filter
Vacuum cleaner or pure water may be used to clean the air filter. If the dust accumulation is too heavy, please use soft brush and mild detergent to clean it and dry out in cool place.
The air-in side should face up when using vacuum cleaner.(see Fig.F4)
The air-in side should face down when using water (see Fig. F5).
5. Set the air filter and the especial function filter as they were and close the front panel.
Operation without air filters may result in troubles as dust will accumulate inside the indoor unit.
CAUTION:
Do not dry the air filter by heat or under the direct sunlight.
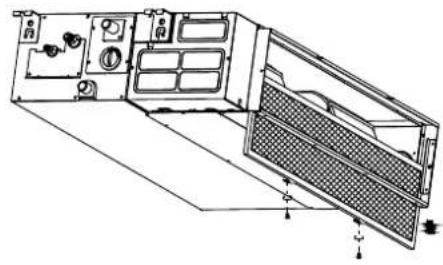
natural_image
Technical line drawing of a mechanical or electronic device with internal components and mounting holes (no text or symbols)Fig.G1
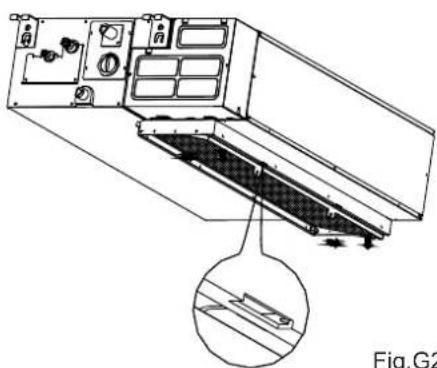
natural_image
Technical line drawing of a mechanical device with internal components and a magnified inset showing a detail (no text or symbols)Fig.G2
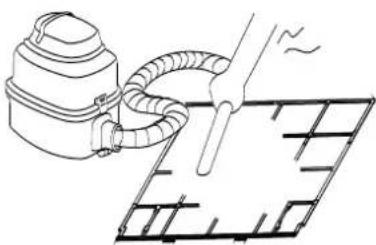
natural_image
Line drawing of a vacuum cleaner emitting exhaust from a grid-patterned surface (no text or symbols)Fig.G3
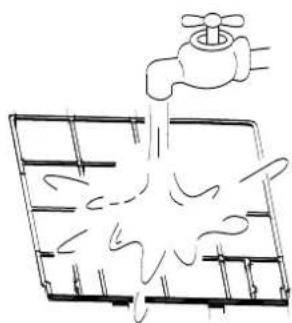
natural_image
Simple line drawing of a faucet pouring liquid into a grid (no text or symbols)Fig.G4
■ DUCT /CEILING TYPE
- For the unit is a rear ventilated one, please remove the screws (2 pieces) fixed on the filter and take down the filter away from the unit. See Fig.G1.
- For the unit is a descensional ventilated one, please push the filter up slightly to let the position retainer escape away from the flange fixed holes, and take off the filter according to the arrow direction shows in the Fig.G2.
- Clean the air filter. Vacuum cleaner or pure water may be used to clean the air filter. If the dust accumulation is too heavy, please use soft brush and mild detergent to clean it and dry out in cool place.
- The air-in side should face up when using vacuum cleaner.(see Fig.G3) The air-in side should face down when using water (see Fig. G4).
Maintenance
If you plan to idle the unit for a long time, perform the following:
- Clean the indoor unit and air filter.
- Select FAN only mode, let the indoor fan run for a while to dry the inside of the unit.
- Disconnect the power supply and remove battery from the remote control.
- Check components of the outdoor unit periodically. Contact a local dealer or a customer service centre if the unit requires servicing.
Note: Before you clean the air conditioner, be sure to switch the unit off and disconnect the power supply plug.
When the air conditioner is to be used again:
- Use a dry cloth to wipe off the dust accumulated on rear air intake grille, in order to avoid the dust blowing out from the indoor unit.
- Check that the wiring is not broken off or disconnected.
- Check that the air filter is installed.
- Check if the air outlet or inlet is blocked after the air conditioner has not been used for a long time.
Operation Tips
The following events may occur during normal operation.
1. Protection of the air conditioner. Compressor protection
- The compressor can't restart for 3 minutes after it stops.
- The unit is designed not to blow cold air on HEAT mode, when the indoor heat exchanger is in one of the following three situations and the set temperature has not been reached.
A) When heating has just starting.
B) Defrosting.
C) Low temperature heating.
Anti-cold air (Cooling and heating models only)
- The indoor or outdoor fan stop running when defrosting (Cooling and heating models only).
Defrosting (Cooling and heating models only)
- Frost may be generated on the outdoor unit during heat cycle when outdoor temperature is low and humidity is high resulting in lower heating efficiency of the air conditioner.
- During this condition air conditioner will stop heating operation and start defrosting automatically.
- The time to defrost may vary from 4 to 10 minutes according to the outdoor temperature and the amount of frost buildup on the outdoor unit.
2. A white mist coming out from the indoor unit
- A white mist may generate due to a large temperature difference between air inlet and air outlet on COOL mode in an indoor environment that has a high relative humidity.
- A white mist may generate due to moisture generated from defrosting process when the air conditioner restarts in HEAT mode operation after defrosting.
3. Low noise of the air conditioner
- You may hear a low hissing sound when the compressor is running or has just stopped running. This sound is the sound of the refrigerant flowing or coming to a stop.
- You can also hear a low "squeak" sound when the compressor is running or has just stopped running. This is caused by heat expansion and cold contraction of the plastic parts in the unit when the temperature is changing.
-
A noise may be heard due to louver restoring to its original position when power is first turned on.
-
Dust is blown out from the indoor unit.
This is a normal condition when the air conditioner has not been used for a long time or during first use of the unit.
- A peculiar smell comes out from the indoor unit.
This is caused by the indoor unit giving off smells permeated from building material, from furniture, or smoke.
- The air conditioner turns to FAN only mode from COOL or HEAT (For cooling and heating models only) mode.
When indoor temperature reaches the temperature setting on air conditioner, the compressor will stop automatically, and the air conditioner turns to FAN only mode. The compressor will start again when the indoor temperature rises on COOL mode or falls on HEAT mode (For cooling and heating models only) to the set point.
-
Dripping water may generate on the surface of the indoor unit when cooling in a high relatively humidity (relative humidity higher than 80%). Adjust the horizontal louver to the maximum air outlet position and select HIGH fan speed.
-
Heating mode (For cooling and heating models only)
The air conditioner draws in heat from the outdoor unit and releases it via the indoor unit during heating operation. When the outdoor temperature falls, heat drawn in by the air conditioner decreases accordingly. At the same time, heat loading of the air conditioner increases due to larger difference between indoor and outdoor temperature. If a comfortable temperature can't be achieved by the air conditioner, we suggest you use a supplementary heating device.
- Auto-restart function
Power failure during operation will stop the unit completely.
For the unit without Auto-restart feature, when the power restores, the OPERATION indicator on the indoor unit starts flashing. To restart the operation, push the ON/OFF button on the remote controller. For the unit with Auto-restart feature, when the power restores, the unit restarts automatically with all the previous settings preserved by the memory function.
- Lightning or a car wireless telephone operating nearby may cause the unit to malfunction.
Disconnect the unit with power and then re-connect the unit with power again. Push the ON/OFF button on the remote controller to restart operation.
| Stop the air conditioner immediately if one of the following faults occur. Disconnect the power and contact the nearest customer service center. | |
| Trouble | If the E(0,1......) or P(0,1......) code appears on the LED(LCD)window, disconnect the power and contact the service people. |
| Fuse blows frequently or circuit breaker trips frequently. | |
| Other objects or water penetrate the air conditioner. | |
| The remote controller won't work or works abnormally. | |
| Other abnormal situations. | |
| Malfunctions | Cause | What should be done? |
| Unit does not start | Power cut | Wait for power to be restored. |
| Unit may have become unplugged. | Check that plug is securely in wall receptacle. | |
| Fuse may have blown. | Replace the fuse. | |
| Battery in Remote controller may have been exhausted. | Replace the battery. | |
| The time you have set with timer is incorrect. | Wait or cancel timer setting. | |
| Unit not cooling or heating (Cooling/ heating models only) room very well while air flowing out from the air conditioner | Inappropriate temperature setting. | Set temperature correctly. For detailed method please refer to "Remote controller instruction" section. |
| Air filter is blocked. | Clean the air filter. | |
| Doors or Windows are open. | Close the doors or windows. | |
| Air inlet or outlet of indoor or outdoor unit has been blocked. | Clear obstructions away first, then restart the unit. | |
| Compressor 3 minutes protection has been activated. | Wait. | |
| If the trouble has not been corrected, please contact a local dealer or the nearest customer service center. Be sure to inform them of the detailed malfunctions and unit model. | ||
Notes: Do not attempt to repair the unit yourself.
Always consult an authorised service provider.
CONTENTS
Handling the remote controller.... 2
Remote controller Specifications 3
Function buttons.... 4
Indicators on LCD 6
How to use the buttons.... 7
Auto operation 7
Cooling/Heating/Fan operation.... 7
Dehumidifying operation.... 8
Adjusting air flow direction 8
Timer operation 9
SLEEP function.... 12
Handling the remote controller

text_image
AmLocation of the remote controller.
- Use the remote controller within a distance of 8 meters from the appliance, pointing it towards the receiver. Reception is confirmed by a beep.

CAUTIONS
- The air conditioner will not operate if curtains, doors or other materials block the signals from the remote controller to the indoor unit. - Prevent any liquid from falling into the remote controller. Do not expose the remote controller to direct sunlight or heat.
If the infrared signal receiver on the indoor unit is exposed to direct sunlight, the air conditioner may not function properly. Use curtains to
- prevent the sunlight from falling on the receiver. If other electrical appliances react to the remote controller, either move these appliances or consult your local dealer.
Replacing batteries
The remote controller is powered by two dry batteries(R03/LR03X2) housed in the rear part and protected by a cover.
(1) Remove the cover by pressing and sliding off.
(2) Remove the old batteries and insert the new batteries, placing the(+) and (-) ends correctly.
(3) Reattach the cover by sliding it back into position.
(4)
NOTE: When the batteries are removed, the remote controller erases all programming. After inserting new batteries, the remote controller must be reprogrammed.

CAUTIONS
- Do not mix old and new batteries or batteries of different types.
- Do not leave the batteries in the remote controller if they are not going to be used for 2 or 3 months.
- Do not dispose batteries as unsorted municipal waste. Collection of such waste separately for special treatment is necessary.
Remote Controller Specifications!
| Model | RG52C1/BG(C)E. |
| Rated Voltage | 3.0V(Dry baeries R03/LR03X2) |
| Signal Receiving Range | 8m (when using 3.0 voltage, it gets 11m) |
| Environment | -5°C~ 60°C |
Performance Feature!
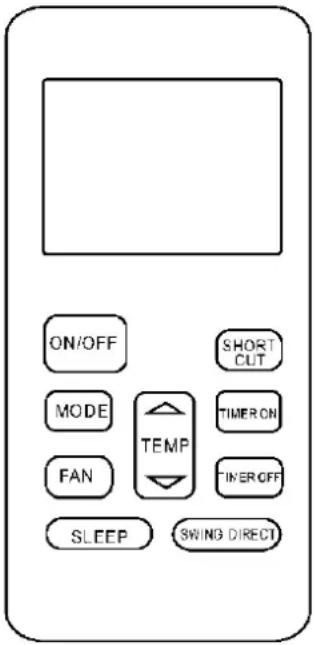
text_image
ON/OFF SHORT OUT MODE TEMP TIMER ON FAN TIMER OFF SLEEP SWING DIRECTNOTE:
Buttons design might be slightly different from the actual one you purchased depending on individual models.
All the functions described are accomplished by the indoor unit. If the indoor unit has no this feature, there is no corresponding operation happened when press the relative button on the remote controller.
Function buttons
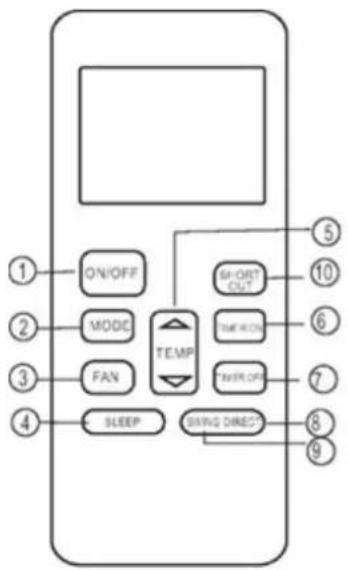
flowchart
graph TD
    A["1 ON/OFF"] --> B["2 MODE"]
    B --> C["3 FAN"]
    C --> D["4 SLEEP"]
    D --> E["5 SHORT OUT"]
    E --> F["6 TIME ON"]
    F --> G["7 TIMER OFF"]
    G --> H["8 GIVING DIRECT"]
    H --> I["9"]
    style A fill:#f9f,stroke:#333
    style B fill:#ccf,stroke:#333
    style C fill:#cfc,stroke:#333
    style D fill:#fcc,stroke:#333
    style E fill:#cff,stroke:#333
    style F fill:#ffc,stroke:#333
    style G fill:#cfc,stroke:#333
    style H fill:#fcc,stroke:#333
    style I fill:#cfc,stroke:#333
1. ON/OFF Button
Operation starts when this button is pressed and stops when this button is pressed again.
2. MODE Button
Each time the button is pressed, the operation mode is selected in a sequence of following:

flowchart
graph LR
    A["AUTO"] --> B["COOL"]
    B --> C["DRY"]
    C --> D["HEAT"]
    D --> E["FAN"]
NOTE: Heat mode is for Cooling & Heating models only.
3. FAN Button
Used to select the fan speed in four steps:

4. SLEEP Button
Active/Disable sleep function. It can maintain the most comfortable temperature and save energy. This function is available on COOL, HEAT or AUTO mode only.
NOTE: While the unit is running under SLEEP mode, it would be cancelled if MODE, FAN SPEED or ON/OFF button is pressed.
5. UP Button( ^ )
Push this button to increase the indoor temperature setting in 1^ C increments to 30^ C.
DOWN Button( ^ )
Push this button to decrease the indoor temperature setting in 1^ C increments to 17^ C.
6. TIMER ON Button
Press this button to initiate the auto-on time sequence. Each press will increase the auto-timed setting in 30 minutes increments. When the setting time displays 10, each press will increase the auto-timed setting 60 minutes increments. To cancel the auto-timed program, simply adjust the auto-on time to 0.0.
7. TIMER OFF Button
Press this button to initiate the auto-off time sequence. Each press will increase the auto-timed setting in 30 minutes increments. When the setting time displays 10, each press will increase the auto-timed setting 60 minutes increments.
To cancel the auto-timed program, simply adjust the auto-off time to 0.0
8. DIRECT Button
Used to change the louver movement and set the desired up/down air flow direction. The louver changes 6^ in angle for each press.
9. SWING Button
Pressing the button less than 2 seconds to activate the horizontal louver swing up and down automatically. Pressing the button long to activate the vertical louver swing left and right automatically.
NOTE: The left and right swinging of vertical louver function is only for some models.
10. SHORTCUT Button
- Used to restore the current settings or resume previous settings.
- On the first time connecting to the power, if push the SHORTCUT button, the unit will operate on AUTO mode, 26^ , and fan speed is Auto.
- Push this button when remote controller is on, the system will automatically revert back to the previous settings including operating mode, setting temperature, fan speed level and sleep feature(if activated). And transmit the signals to the unit.
- If push this button when remote controller is off, the system will only resume the previous settings and will not transmit the signals to the unit. And the sleep feature is disable.
- If pushing more than 2 seconds, the system will automatically restore the current operation settings including operating mode, setting temperature, fan speed level and sleep feature(if activated).
Indicators on LCD
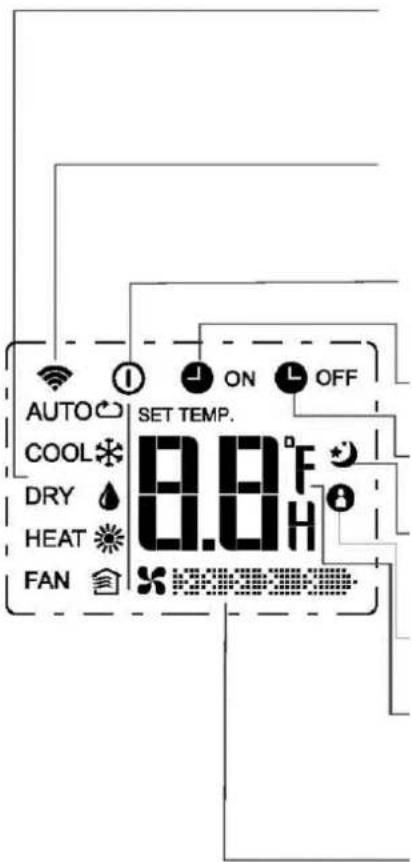
text_image
AUTO COOL DRY HEAT FAN SET TEMP. 8.0°F 8.0H ON OFFMode display
Displays the current operation mode. Including auto( ), cool( ), dry( ), heat ) (Not applicable to cooling only models), fan( and back to auto( ).
Transmission Indicator
This transmission indicator lights when remote controller transmits signals to the indoor unit.
ON/OFF display
Displayed by pressing the ON/OFF button. Press the ON/OFF button again to remove.
TIMER ON display
Displayed when TIMER ON time is set.
TIMER OFF display
Displayed when TIMER OFF time is set.
"Sleep Display
Displayed under sleeping operation. Press the SLEEP button again to remove.
FOLLOW ME Display(on some models)
Displayed when FOLLOW ME function is activated.
Temp./Timer display
Displays the temperature setting(17°C\~30°C). When you set the operating mode to FAN, no temperature setting is displayed. And if in the TIMER mode, shows the ON and OFF settings of the TIMER.
Fan speed display
Displays the selected fan speed, AUTO(no display) and three fan speed levels (L50W)
(MED) "F" (OH) can be indicated. The fan speed is AUTO when the operating mode is either AUTO or DRY.
Note:
All indicators shown in the figure are for the purpose of clear presentation. But during the actual operation only the relative functional signs are shown on the display window.
How to use the buttons!
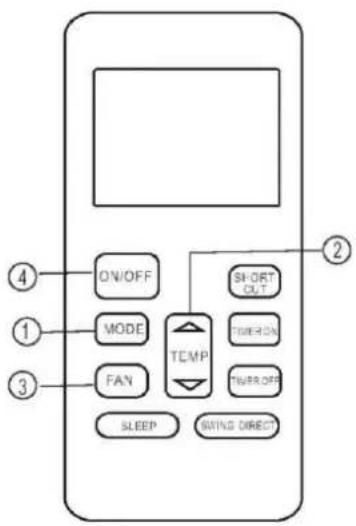
flowchart
graph TD
    A["ON/OFF"] --> B["MODE"]
    B --> C["FAN"]
    C --> D["SLEEP"]
    D --> E["SWING DIRECT"]
    F["SHORT OUT"] --> G["TURRY ON"]
    G --> H["TURRY OFF"]
    I["2"] --> J["TEMP"]
    K["4"] --> L["1"]
    M["3"] --> N["2"]
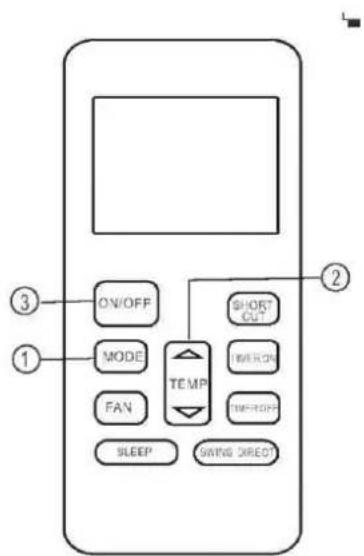
text_image
ON/OFF MODE FAN SLEEP SHORT OUT TEMP THERON THEROFF SWING DIRECT ① ② ③Auto operation
Ensure the unit is plugged in and power is available. The OPERATION indicator on the display panel of the indoor unit starts flashing.
-
Press the MODE button to select Auto.
-
Press the UP/DOWN button to set the desired temperature. The temperature can be set within a range of 17^ C\~ 30^ C in 1^ C increments.
-
Press the ON/OFF button to start the air conditioner.
NOTE
-
In the Auto mode, the air conditioner can logically choose the mode of Cooling, Fan, and Heating by sensing the difference between the actual ambient room temperature and the setting temperature on the remote controller.
-
In the Auto mode, you can not switch the fan speed. It has already been automatically controlled.
-
If the Auto mode is not comfortable for you, the desired mode can be selected manually.
Cooling /Heating/Fan operation
Ensure the unit is plugged in and power is available.
-
Press the MODE button to select COOL, HEAT(cooling & heating models only) or FAN mode.
-
Press the UP/DOWN buttons to set the desired temperature. The temperature can be set within a range of 17^ 30^ in 1^ increments.
-
Press the FAN button to select the fan speed in four steps- Auto, Low, Med, or High.
-
Press the ON/OFF button to start the air conditioner.
NOTE
In the FAN mode, the setting temperature is not displayed in the remote controller and you are not able to control the room temperature either. In this case, only step 1, 3 and 4 may be performed.
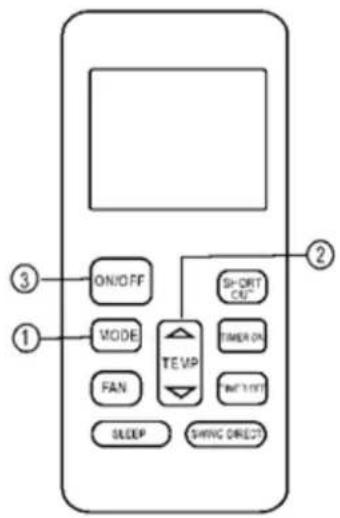
text_image
ON/OFF MODE FAN TE VIP SHORT CLE" TIMER ON "WIN TLET" SLEEP SHWING DIRECTO ① ② ③Dehumidifying operation
Ensure the unit is plugged in and power is available. The OPERATION indicator on the display panel of the indoor unit starts flashing.
- Press the MODE button to select DRY mode.
- Press the UP/DOWN buttons to set the desired temperature. The temperature can be set within a range of 17^ C\~ 30^ C in 1^ C increments.
- Press the ON/OFF button to start the air conditioner.
NOTE
In the Dehumidifying mode, you can not switch the fan speed. It has already been automatically controlled.
Adjusting air flow direction
Use the SWING and DIRECT button to adjust the desired airflow direction.
- When push the DIRECT button, the horizontal louver changes 6 degree in angle for each push.
- When push the SWING button less than 2 seconds, the louver will swing up and down automatically. When push the SWING button long, the louver will swing left and right automatically.
NOTE: When the louver swing or move to a position which would affect the cooling or heating effect of the air conditioner, it would automatically change the swing/moving direction.

text_image
ON/OFF SHORT-CLT MODE TEMP FAN TURSDR SLEEP FRESH SWIND SREC ① ②Timer operation
Press the TIMER ON button can set the auto-on time of the unit. Press the TIMER OFF button can set the auto-off time of the unit.
To set the Auto-on time.
- Press the TIMER ON button. The remote controller shows TIMER ON, the last Auto-on setting time and the signal "H" will be shown on the LCD display area. Now it is ready to reset the Auto-on time to START the operation.
- Push the TIMER ON button again to set desired Auto-on time. Each time you press the button, the time increases by half an hour between 0 and 10 hours and by one hour between 10 and 24 hours.
- After setting the TIMER ON, there will be a one second delay before the remote controller transmits the signal to the air conditioner. Then, after approximately another 2 seconds, the signal "h" will disappear and the set temperature will re-appear on the LCD display window.
To set the Auto-off time.
- Press the TIMER OFF button. The remote controller shows TIMER OFF, the last Auto-off setting time and the signal "H" will be shown on the LCD display area. Now it is ready to reset the Auto-off time to stop the operation.
- Push the TIMER OFF button again to set desired Auto-off time. Each time you press the button, the time increases by half an hour between 0 and 10 hours and by one hour between 10 and 24 hours.
- After setting the TIMER OFF, there will be a one second delay before the remote controller transmits the signal to the air conditioner. Then, after approximately another 2 seconds, the signal "H" will disappear and the set temperature will re-appear on the LCD display window.

CAUTION
When you select the timer operation, the remote controller automatically transmits the timer signal to the indoor unit for the specified time. Therefore, keep the remote controller in a location where it can transmit the signal to the indoor unit properly.
The effective operation time set by the remote controller for the timer function is limited to the following settings: 0.5, 1.0, 1.5, 2.0, 2.5, 3.0, 3.5, 4.0, 4.5, 5.0, 5.5, 6.0, 6.5, 7.0, 7.5, 8.0, 8.5, 9.0, 9.5, 10, 11, 12, 13, 14, 15, 16, 17, 18, 19, 20, 21, 22, 23 and 24.
Example of timer setting
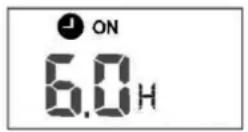
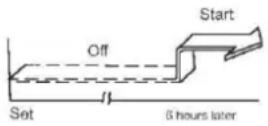
TIMER ON
(Auto-on Operation)
The TIMER ON feature is useful when you want the unit to turn on automatically before you return home. The air conditioner will automatically start operating at the set time.
Example:
To start the air conditioner in 6 hours.
- Press the TIMER ON button, the last setting of starting operation time and the signal "H" will show on the display area.
- Press the TIMER ON button to display "6.0H on the TIMER ON display of the remote controller.
- Wait for 3 seconds and the digital display area will show the temperature again. The "TIMER ON" indicator remains on and this function is activated.
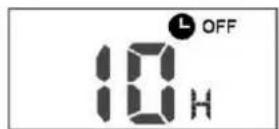
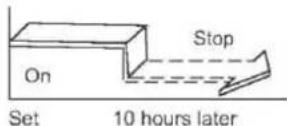
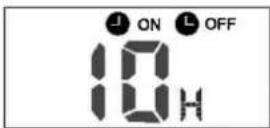
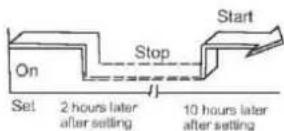
TIMER OFF
(Auto-off Operation)
The TIMER OFF feature is useful when you want the unit to turn off automatically after you go to bed. The air conditioner will stop automatically at the set time.
Example:
To stop the air conditioner in 10 hours.
- Press the TIMER OFF button, the last setting of stopping operation time and the signal "H" will show on the display area.
- Press the TIMER OFF button to display "10H" on the TIMER OFF display of the remote controller.
- Wait for 3 seconds and the digital display area will show the temperature again. The "TIMER OFF" indicator remains on and this function is activated.
COMBINED TIMER
(Setting both ON and OFF timers simultaneously)
(On — Stop — Start operation)
This feature is useful when you want to stop the air conditioner after you go to bed, and start it again in the morning when you wake up or when you return home.
Example:
To stop the air conditioner 2 hours after setting and start it again 10 hours after setting.
- Press the TIMER OFF button.
- Press the TIMER OFF button again to display 2.0H on the TIMER OFF display.
- Press the TIMER ON button.
- Press the TIMER ON button again to display 10H on the TIMER ON display.
- Wait for 3 seconds and the digital display area will show the temperature again. The "TIMER ON OFF" indicator remains on and this function is activated.

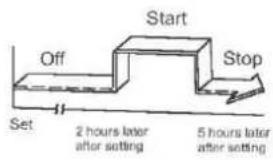
flowchart
graph TD
    A["Start"] --> B["Off"]
    B --> C["Set"]
    C --> D["2 hours later after setting"]
    D --> E["5 hours later after setting"]
(Off — Start — Stop operation)
This feature is useful when you want to start the air conditioner before you wake up and stop it after you leave the house.
Example:
To start the air conditioner 2 hours after setting, and stop it 5 hours after setting.
- Press the TIMER ON button.
- Press the TIMER ON button again to display 2.0H on the TIMER ON display.
- Press the TIMER OFF button.
- Press the TIMER OFF button again to display 5.0H on the TIMER OFF display.
- Wait for 3 seconds and the digital display area will show the temperature again. The "TIMER ON OFF" indicator remains on and this function is activated.
NOTE: The timer setting(TIMER ON or TIMER OFF) that in sequence occurs directly after the set time will be activated first.
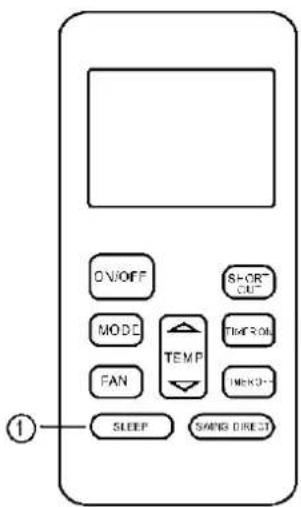
text_image
ON/OFF MODE FAN SLEEP SHORT OUT TEMP TIME OUT IMENO SPRING DIRECTSLEEP/FRESH function
- The sleep function enables the unit to automatically increase(cooling) or decrease(heating) 1^ per hour for the first two hours, then hold steady for the next 5 hours, after that the unit will stop operation. It can maintain the most comfortable temperature and save energy. NOTE: The SLEEP function is only available under Cooling, Heating and AUTO operations.
CONTENTS
- SAFETY PRECAUTION 2
- SUMMARIZE .... 2
- FUNCTION SUMMARY.... 2
- NAME AND FUNCTION OF INDICATORS ON THE WIRE CONTROLLER.... 3
- INSTALLATION METHOD 4
- NAME AND OPERATION OF THE BUTTON ON THE WIRE CONTROLLER....4
- USING METHOD....6
- This manual gives detailed description of the precautions that should be brought to your attention during operation.
- In order to ensure correct service of the wired controller please read this manual carefully before using the unit.
- For convenience of future reference, keep this manual after reading it.
- The wired controller will reset to factory setting with auto mode, auto fan and 24°C(76°F) setting temperature when the air conditioner restarts after power failure.
And this may cause inconsistent displays on the wired controller and on the air conditioner. You need to readjust the running status through the wired controller.
1. SAFETY PRECAUTIONS
The following contents are stated on the product and the operation manual, including usage, precautions against personal harm and property loss, and the methods of using the product correctly and safely. After fully understanding the following contents (identifiers and icons), read the text body and observe the following rules.
Identifier description
| Identifier | Meaning |
| Warning | Means improper handling may lead to personal death or severe injury |
| Caution | Means improper handling may lead to personal injury or property loss. |
| [Note]: 1. “Harm” means injury, burn and electric shock which need long-term treatment but need no hospitalization2. “Property loss” means loss of properties and materials. | |
Icon description
| Icon | Meaning | |
 | It indicates forbidding. The forbidden subject-matter is indicated in the icon or by images or characters aside. | |
 | It indicates compulsory implementation. The compulsory subject-matter is indicated in the icon or by images or characters aside. | |
Warning
 Warning Warning | Delegate installation | Please entrust the distributor or professionals to install the unit. The installers must have the relevant know-how. Improper installation performed by the user without perm ission may cause fire, electric,shock, personal injury or water leakage. |
 UsageWarning UsageWarning | Forbid | Do not spray flammable aerosol to the wire controller directly. Otherwise, fire may occur. |
| Forbid | Do not operate with wet hands or let water enter the wire controller. Otherwise, electric shock may occur. |
2. SUMMARIZE
Usage condition:
- Power supply: 5V DC.
- Operation temperature:
-15^(-5^) +43^(+109^). - Operation humidity: 40%-90%, RH.
3. FUNCTION SUMMARY
Main function:
- Connecting to indoor unit by A, B, C, D, E termina.;
- Button setting action mode.
- LCD display.
- Timer for rest time.
4. NAME AND FUCTION OF INDICATORS ON THE CONTROLLER
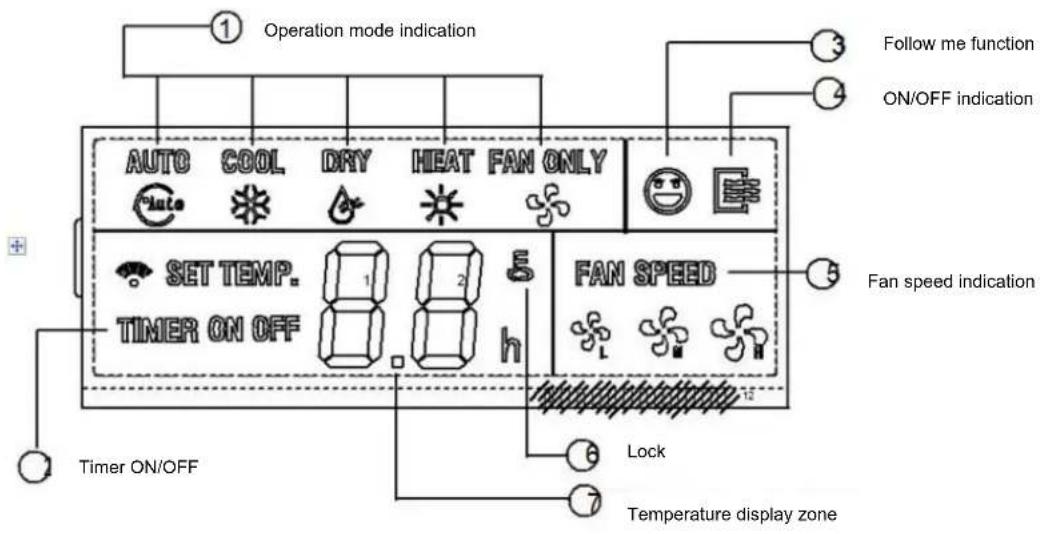
text_image
Operation mode indication AUTO COOL DRY HEAT FAN ONLY SET TEMP. TIMER ON OFF FAN SPEED Timer ON/OFF Lock Temperature display zone Follow me function ON/OFF indication Fan speed indication1. Operation mode indication:
When press "MODE" button, the following mode can be selected in circle. Auto→Cool →Dry→Heat→Fan only→Auto. For cooling only model, heat mode is skipped.
2. Timer :
When adjust setting on time or only on time is set, the "ON" is lighted. When adjust setting off time or only off time is set, the "OFF" is lighted. If on and off timer are both set, the "ON" and "OFF" are both lighted.
3. Follow me function:
There is a temperature sensor inside the wire controller, after setting temperature, it will compare the two temperatures, and the space of wire controller will be the same as setting temperature. It is available under cooling, heating, auto mode.
4. ON/OFF indication :
When it is on, the icon display, otherwise it is extinguished.
5. Fan speed indication :
There are four fan modes : low, middle, high, auto. For some models, no middle fan then the middle fan is seen as high speed.
6. Lock:
When the " LOCK " button is pressed, the icon appear and other buttons is unable, press again, the icon disappear.
7. Temperature display zone:
Generally it displays setting tempera-ture, it can be adjusted by press temperature button ▲ and ▼. But in fan mode, no display here.
5. INSTALLATION METHOD
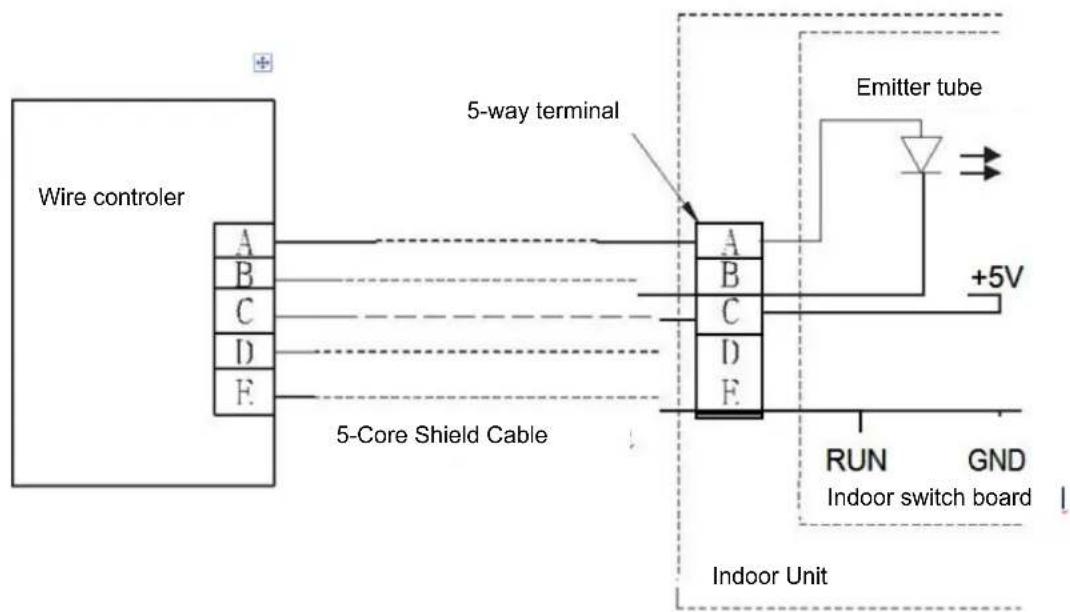
flowchart
graph TD
    A["Wire controller"] --> B["5-Way terminal"]
    B --> C["5-Core Shield Cable"]
    C --> D["Indoor Unit"]
    D --> E["Emitter tube"]
    E --> F["RUN"]
    E --> G["GND"]
    style A fill:#f9f,stroke:#333
    style D fill:#ccf,stroke:#333
    style E fill:#cfc,stroke:#333
    style F fill:#fcc,stroke:#333
    note right of B: 5-Way terminal
    note left of D: Indoor switch board
When a wire controller is needed, a small 5-way terminal should be added, fix an infrared emitter with gumwater near the receiver on the switch board. Connect its anode and cathode to A and B, and +5V, GND, RUN to C, D, E on the switch board.
6. NAME AND OPERATION OF THE BUTTON ON THE WIRE CONTROLLER
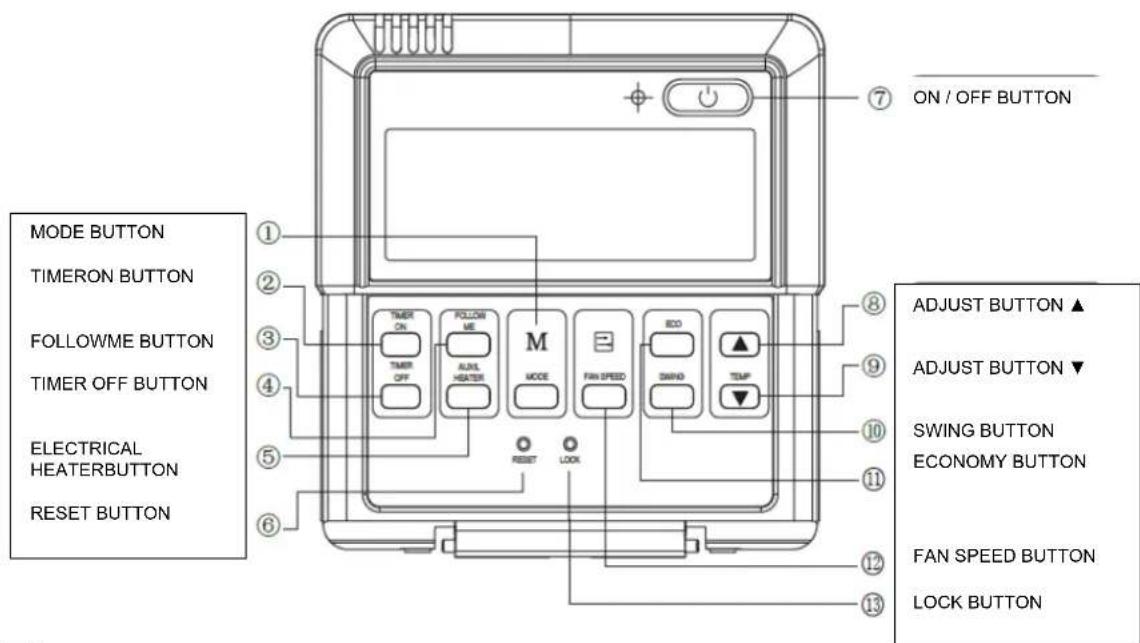
text_image
MODE BUTTON TIMERON BUTTON FOLLOWME BUTTON TIMER OFF BUTTON ELECTRICAL HEATERBUTTON RESET BUTTON ① ② ③ ④ ⑤ ⑥ ⑦ ON / OFF BUTTON ⑧ ⑨ ⑩ ADJUST BUTTON ▲ ADJUST BUTTON ▼ SWING BUTTON ECONOMY BUTTON ⑪ ⑫ FAN SPEED BUTTON LOCK BUTTON ⑬ ⑬ RESET LOCKNOTE
All the pictures in this manual are for explanation purpose only. There may be slightly different from the wire controller you purchased(depend on model). The actual shape shall prevail.
1. Mode botton:
When press this botton, the operation mode change as the following sequence:

Remark: For the cooling only model, the heating mode is skipped.
2. Timer on button :
Press this button, timer on function is active. Then every press, the time increase 0.5h, after 10h, 1h increase-ment after each press. If cancel this Function, just set it to "0.0".
3. Timer off button:
Press this button, timer off function is active. Then every press, the time increase 0.5h, after 10h, 1h increase-ment after each press. If cancel this function, just set it to "0.0".
4.Follow me button :
When under cool, heat and auto mode, press this button, follow me function is active. Pressing the ON/OFF button or MODE button will not cancel the Follow me feature. This function is disable when the unit is off or under DRY or FAN mode. Pressing the FOLLOW ME button again will cancel the follow me feature.
5.Electrical heater button :
If press this button in heat mode, electri-cal heater function become ineffective.
6. Reset button(hidden):
Use a 1mm stick to press in the little hole, then the current setting is canceled. The wire controller enter into original state.
7.ON/OFF button:
When in off state, press this button, the indicator is on, the wire controller enter into on state, and send setting information to in door Pcb. When in on state, press this button, the indicator is off, and send instruction. If timer on or timer off has been set, it cancel this setting then send instruction to stop the machine.
8. Adjust button ▲:
Set indoor temperature up. If press and hold on, it will increase at 1^ C( 2^ F) per 0.5 second.
9. Adjust button ▼ :
Set indoor temperature down. if press and hold on, it will decrease at 1^(2^) per 0.5 second.
10. Swing button:
First press, start swing function; second press, stop swing. (Match to some model with swing function).
11. Economy operation button :
press this button, the indoor unit operates in economy mode, press again, exit this mode (it may be ineffective for some models)
12. Fan speed button:
press this button consecutively, the fan speed will circle as follow:

13. Lock button(hidden):
When you push the LOCK button, all current settings are locked in and the wire controller does not accept any operation except that of the LOCK button. Use the lock mode when you want to prevent setting from being changed accidentally or play fully. Push the LOCK button again when you want to cancel the LOCK mode.
7. USING METHOD
AUTOMATIC OPERATION
Connect to power, indoor operation lamp flash.
- Press "MODE" button, select "AUTO"
- Press the button "▲" and "▼", set temperature you want, generally it is among 17°C(62°F)\~30°C(88°F);
- Press "ON/OFF" button, operation lamp is on, the air-conditioner work in auto mode, indoor fan is auto, and can not be changed. Auto is displayed on LCD. Press ON/OFF button again to stop.
- Economy operation is valid in auto mode.
- In event of power interruption such as a blackout, the air conditioner stops once. But it restarts automatically and performs previous operation when the power supply is resumed.
- Press "MODE" button, select "COOL", "HEAT" or "FAN ONLY" mode.
- Press temperature adjust button to select setting temp.
- Press "FAN SPEED" button to select high/mid/low/auto.
- Press "ON/OFF" button, indoor unit operation lamp on, it works in selected mode. Press "ON/OFF" button again, it stops to work.
Remark: When in fan mode, no tempera-ture can be set.
DRY OPERATION
- Press "MODE" button, select "DRY" mode.
- Press temperature adjust button to select setting temp.
- Press "ON/OFF" button, indoor unit operation lamp on, it works in dry mode. Press ON/OFF button again, it stops to work.
- In dry mode, economy operation and fan speed are ineffective.
TIMER SETTING
Timer on only:
- Press "TIME ON" button, it displays "SET" on LCD, and displays "H" and "ON", it is waiting for timer on setting.
- Press "timer" on button repeatedly to adjust time setting.
- If press this button and hold on, the time will increase at 0.5h, after 10h, it increase at 1h.
- After setting 0.5 second, the wire controller send timer on information, it is finished.
Timer off only:
- Press "TIME OFF" button, it displays "SET" on LCD, and displays "H" and ON, it is waiting for timer on setting.
- Press "TIME OFF" button repeatedly to adjust time setting.
- If press this button and hold on, the time will increase at 0.5h, after 10h, it increase at 1h.
- After setting 0.5 second, the wire controller send timer off information, it is finished.
TIMER ON AND TIMER OFF BOTH
- Set timer on time as the correspond-ing step1 and 2.
- Set timer off time as the correspond-ing step1 and 2.
- Timer off time must be longer than timer on time.
- 0.5 second after setting, the wire controller send information.the setting is finished.
CHANGE TIMER
If there is a need of changing timer time, press corresponding button to revise it. If cancel timer, change timer time to 0.0.
NOTE
The timer time is relative time, that is delay after setting time (i, e: setting time is 8:05 A,M). So when imer is set, the standard time can not be adjusted.
8. TECHNICAL INDICA-TION AND REQUIRE-MENT
EMC and EMI comply with the CE certification requirements.
JAMSTVENI LIST
VIVAX
HR
za klima uređaj
JAMSTVO
Broj jamstva
Tip uređaja
Vanjska Jedinica
Unutarnja J.1
Unutarnja J.2
Unutarnja J.3
Unutarnja J.4
Datum prodaje
Broj računa

M.P.
OPĆI PODACI
Kupac
Adresa
Poštanski broj
Grad
Telefon
MONTAŽA KLIMA UREĐAJA
Servis / Montazer
Datum montaže

M.P.