
Vigor Plus LR 600 - Uncategorized FAKIR - Free user manual and instructions
Find the device manual for free Vigor Plus LR 600 FAKIR in PDF.


| Product Type | Cylinder vacuum cleaner |
| Brand | Fakir |
| Model | Vigor Plus LR 600 |
| Power Consumption | 600 W |
| Bag Capacity | 3 L |
| Cable Length | 8 m |
| Filtration System | HEPA washable filter |
| Noise Level | 75 dB |
| Weight | 5.5 kg |
| Dimensions (LxWxH) | 400 x 300 x 250 mm |
| Suction Control | Electronic variable suction |
| Accessories Included | Floor nozzle, crevice tool, upholstery tool |
| Dusting Brush | Built-in |
| Tube Material | Metal |
| Wheels | Yes, with swivel castors |
| Parking System | Horizontal and vertical parking |
| Automatic Cord Rewind | Yes |
| Filter Cleaning | Washable under running water |
| Energy Class | A |
| Repairability Index | 8/10 |
Frequently Asked Questions - Vigor Plus LR 600 FAKIR
User questions about Vigor Plus LR 600 FAKIR
0 question about this device. Answer the ones you know or ask your own.
Ask a new question about this device
Download the instructions for your Uncategorized in PDF format for free! Find your manual Vigor Plus LR 600 - FAKIR and take your electronic device back in hand. On this page are published all the documents necessary for the use of your device. Vigor Plus LR 600 by FAKIR.
USER MANUAL Vigor Plus LR 600 FAKIR
natural_image
Exterior view of a modern air purifier with control panel and display (no visible text or symbols)VIGOR PLUS

Bedienungsanleitung
Ionenluftreiniger

Instruction manual
Ionic air purifier

Instrukcja obsługi
Technische Daten
premium | Vigor Plus
Art. Nr.: 67 41 006
natural_image
Simple line drawing of an open box with a black upward arrow on top (no text or symbols)
Hinweis!
natural_image
Line drawing of a car interior showing engine compartment and fan (no text or symbols)natural_image
Pure technical line drawing of a mechanical component without any text, numbers, or symbolsDE
natural_image
Line drawing of a small boat with visible hull, hull, and side rotor (no text or symbols)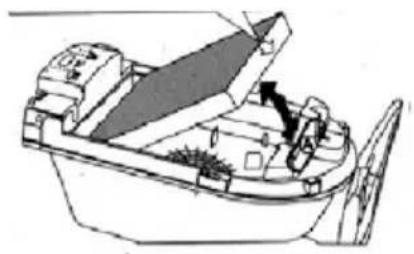
natural_image
Technical line drawing of a boat's internal structure showing handle, hull, and side panel (no text or labels)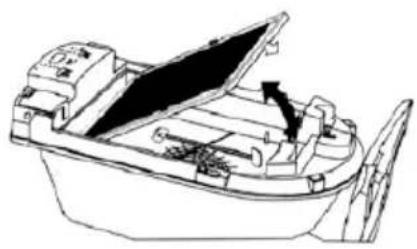
natural_image
Line drawing of a small boat with open lid and side compartments (no text or symbols)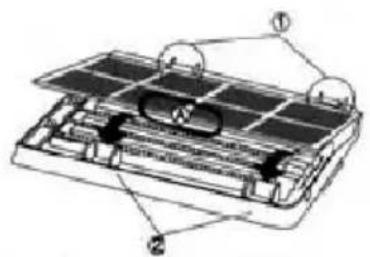
natural_image
Technical diagram of a battery pack with labeled components (no text or symbols present)natural_image
Line drawing of various household appliances including a refrigerator, washing machines, and a digital display unit (no text or symbols)natural_image
Technical line drawing of a boat's side profile and interior layout (no text or symbols)Filter austauschen
natural_image
Two grayscale images labeled 'd' and 'e', showing hands interacting with objects (no text or symbols present)natural_image
Symbol of a waste bin with crossed lines indicating no waste, and a solid black rectangle below (no text or labels)
Thank you for purchasing this Fakir Vigor Plus Ionic Air Purifier, which has been designed and manufactured to give you many years of trouble-free service.
You may already be familiar with using a similar product, but do please take time to read these instructions - they have been written to ensure you get the very best from your purchase.
Safety is important
For yours and others safety please read the instructions before using the appliance. Please keep this instruction in a safe place for the further use. If you pass the appliance on, pass on the instructions too. Remove all packaging, but keep it until you are satisfied that the appliance is working.
This appliance is not designed to be used by persons (including children) with limited physical, sensory or mental capacities or by persons lacking in experience and/or knowledge, unless they are supervised by someone who is responsible for their safety or have received instructions on how to use the appliance.
Keep this information in a safe place for future reference.
Safety instructions
This instruction booklet describes the safety precaution to be observed during operation and serious consequences from improper operation.
- This machine uses 230 V AC 50 Hz. Over voltage may cause fire hazard or electric shock.
- To prevent electric shock, do not dismantle, repair or modify this product. In case of malfunction
contact authorized Fakir Service.
- Do not use in places where flammable and explosive materials are stored.
- Do not subject to direct sunlight or near high temperature objects. Internal temperature rise in serious case may cause fire, in mild case deformation of outer shell. Stop operation when temperature exceeds 40°C.
- Do not allow foreign objects into the machine. High voltage inside the machine may cause electric shock. Children should not be allowed to touch or play with this machine to avoid accident.
- Do not place machine in the shower or places where water may wet the machine to prevent electric shock.
- Do not use fabrics or other materials to cover this machine. Obstructed air inlet and outlet cause abnormal operation of this machine that may lead to fire or other accident.
- To prevent interference and distortion, it should be at least 1 meter away from computer, television or radio.
- For safety reason and to prevent fire or electric shock, unplug the machine from electricity socket under following conditions:
When you do not use the machine temporarily for a long period.
When cleaning, servicing the machine or during the replacement of filter materials.
When you move the machine
WARNING: If the power cord or the plug of the appliance is damaged, do not use the appliance. Apply to an authorized Fakir Service.
Product specification
Model: Vigor Plus ionic air purifier
Voltage: 230 V AC 50Hz
Power: 80 W
Ion output: ≥ 2 × 10^6 / cm^3
Active oxygen output: ≤ 0,05ppm
UV spectrum: ≥20μw/cm² (at 10cm distance)
Dust removal rate: %99,97
Noise level: Silent mode 20dB,
Low mode 35dB, Medium mode 45dB, High mode 52dB
Air volume: 3.0m^3/min
Dimension: 343x255x610mm
Weight: 6850g
Applicable area: 70m²
Usage life: 7 Years
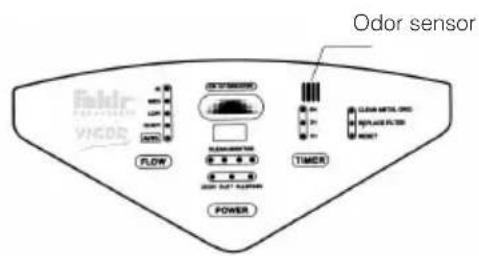
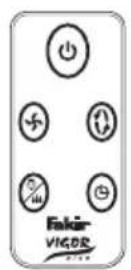
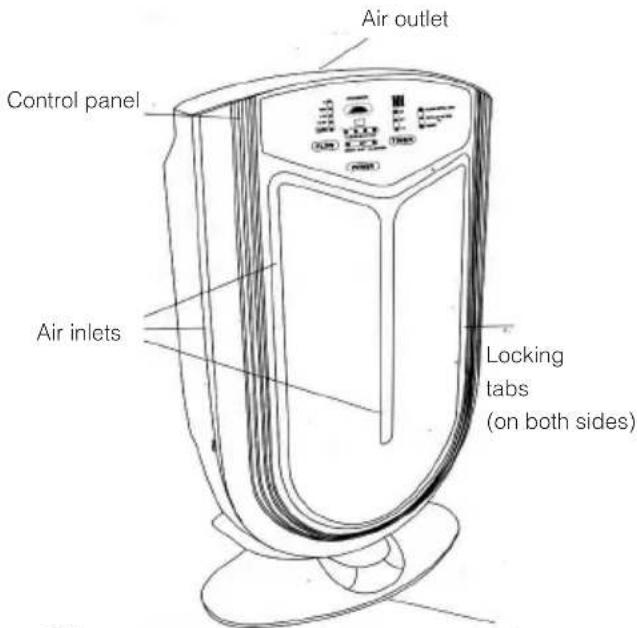
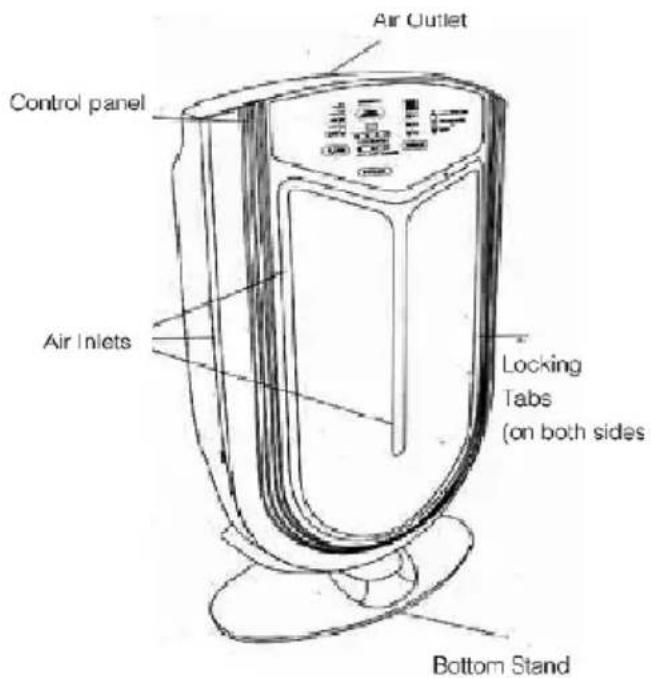
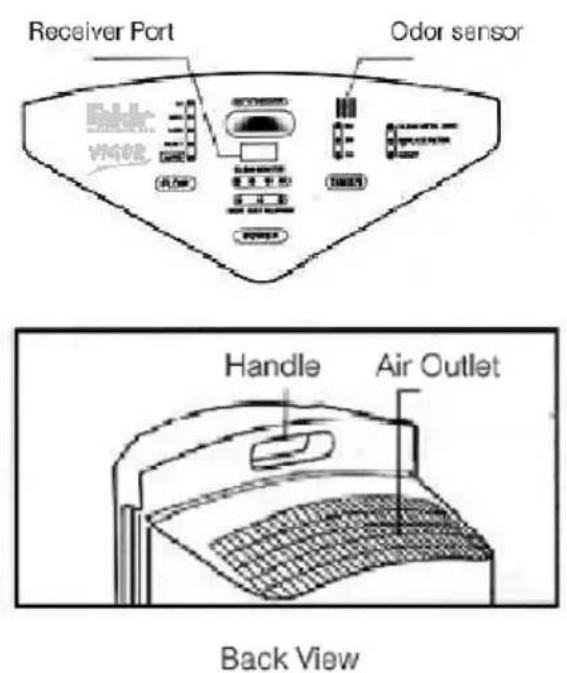
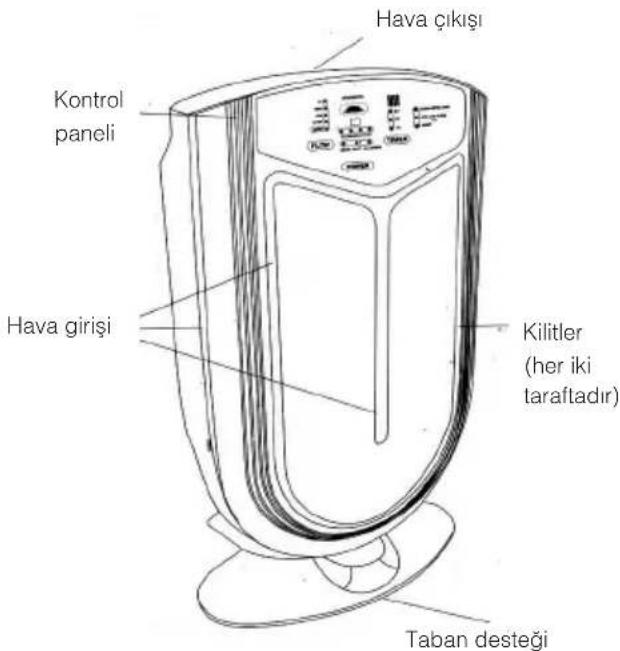
Bottom stand
Dust sensor Odor sensor
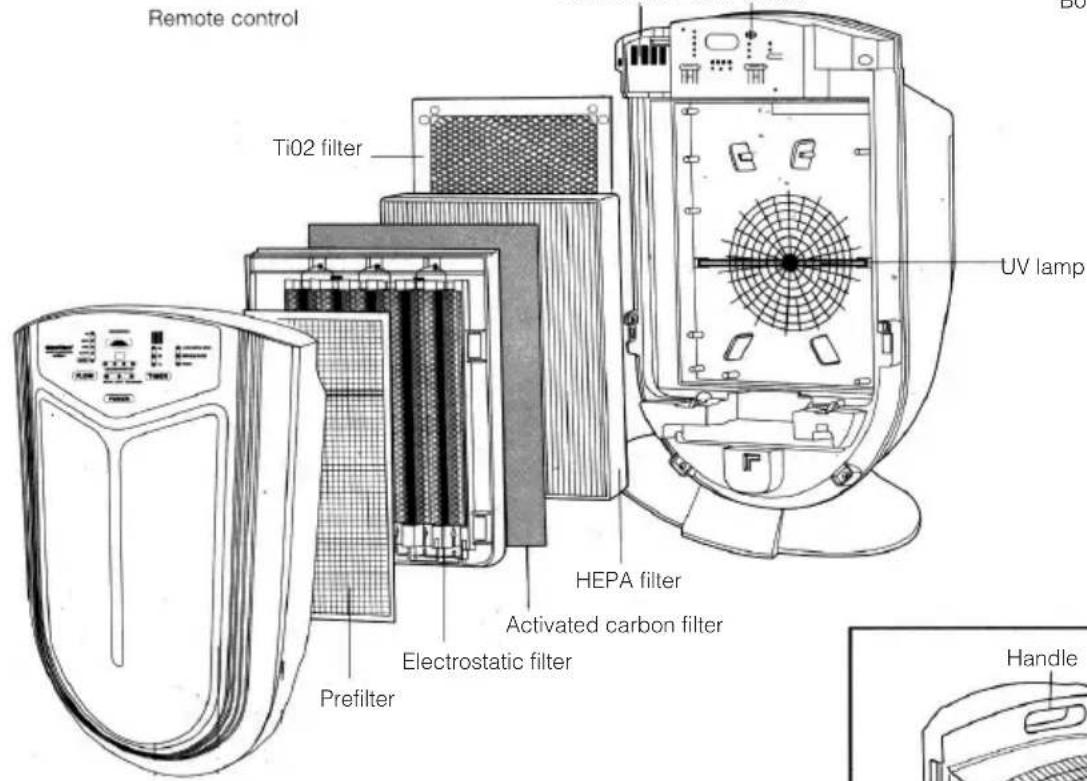
Front cover
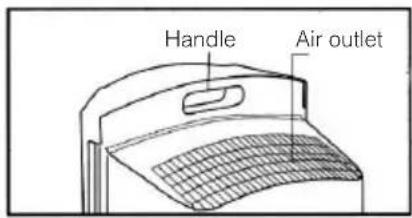
Back view
Indicators
Negative ion indicator
During the process when negative ions are generated, the blue indicator will gradually change from bright to dim and from dim back to bright every 5 seconds.
Odor indicator
The odor indicator will glow whenever the odor sensor detects odor (such as indoor smoke)
Dust and irritant indicator
The dust-and-irritant indicator will glow whenever dust or other irritants are detected.
Air quality surveillance
Whenever odor, dust or irritants are detected, the air quality surveillance function will indicate the level of pollution. When pollution is severe, all LED will glow.
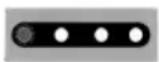
No pollution detected
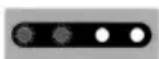
Some pollution detected
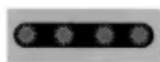
Severe pollution detected
How to use
Before use
- Please open windows for air ventilation before plugging in the unit. Strive to maintain an environment of fresh indoor air.
- After plugging in, the unit sensor will retain a memory of the existing indoor air condition (The existing indoor air condition will be input as “Clean Air”).
- Once started, the odor indicator will blink as it memorizes the existing fresh air condition. After two minutes, the
indicator will die off to indicate an end of memorization. Whenever the unit is unplugged, all memorized content will be erased.
- If the unit is turned on two minutes after plugging in, the odor sensor indicator will not blink.
- When smoke, make up or spray that contains alcohol is present, please ventilate and freshen the air before closing Windows.
- The unit will not be able to operate effectively if it is plugged while indoor air is polluted.
- Sometimes sensor is not as sensitive when first purchased or after being unplugged for over a week. Its sensitivity will recover after one or two days of operation.
Operating
Place the device at least with a distance of 30 cm to the wall and where children cannot touch within a short range of distance.
How to start
Plug into a proper socket. Press the POWER ON/OFF button. The device starts operating as the negative ion UV indicator is on. Press POWER ON/OFF again and the device will stop working.
Fan models
This device has five different fan models to choose from. Please choose a proper level of circulations according to indoor air quality and room size. As your press FAN, the fan mode will change according to the number of times you press the button. The LED will show the
following sequence of modes:

Automatic operation
Keep pressing FAN button until the device runs under automatic operation (the LED will show AUTO).
Under automatic operation, the device automatically switches to the proper running modes (MED or LOW) according to the level of odor, dust or irritants in the air as detected by the sensor. As the air is purified, the device will automatically switches back to LOW or QUIET modes.
Timer ON/OFF
Press TIMER button to set the operation timing.
Under the TIMER function, the operation timing will be set according to the number of times you press the TIMER button. The LED will show the following sequence of timing:

flowchart
graph LR
    A["1 Hour 2 Hour 8 Hour"] --> B["→"]
Ion-UV On/Off
Press ION-UV button to set the operation of ion
ON/OFF
FLOW Air flow
AUTO Automatic Operation
TIMER Time setting
ION-UV Ion Lamp
Cleaning and maintenance
Before cleaning and maintenance please turn off and unplug the device. Cleaning and maintenance every 2 to 3 months are recommended.
Disassembling the device
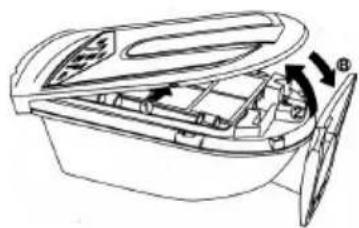
Carefully lay down the device with its front facing up, take down the device according to the following 4 steps (Put the device back together with the same steps but with opposite sequence):
1. Take down the front cover
Please attach firmly at the connecting locations.
- Press the locking tabs on both sides of the device.
• Gently lift up the front cover.
natural_image
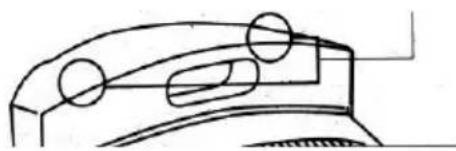
Line drawing of a boat's internal compartments and hull (no text or symbols)When assembling
- Firmly reconnect the front cover back to its original position.
• Make sure the two locking tabs reattached immovably.
natural_image
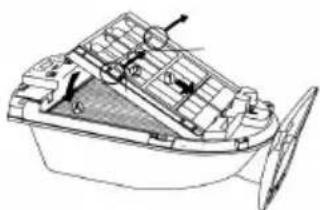
Pure technical line drawing of a mechanical component without any text, numbers, or symbols2. Take down the plasma dust collector
- Push the plasma dust collector towards the bottom of the device.
- Hold the two tabs and lift up the dust collector.
natural_image
Line drawing of a small boat with internal compartments and structural elements (no text or symbols)When assembling
- Push the plasma collector towards the bottom of the device.
- Insert into position A
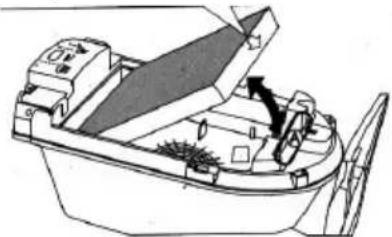
3. Take down the HEPA filter
Do not reverse the front and back of the filter
- Immerge your hand into position A and pull out the filter.
natural_image
Line drawing of a boat's interior structure showing hull, hull, and structural components (no text or symbols)- When replacing the filter, please install the filter with the exact front-and-back direction as indicated on the sides of the filter. Do not reverse the front and back of the filter.
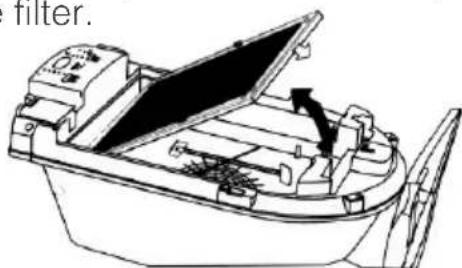
4. Removing the TiO _2 filter
- Hold the clips of both sides to pull out the filter.
natural_image
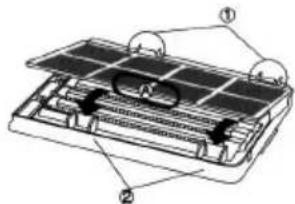
Line drawing of a small boat with a filter mechanism, showing structural components and an arrow indicating flow direction (no text or symbols)5. Take down the front filter
- Hold position A and lift up the front filter
When assembling
- Attach the filter to the connecting locations on the side
- Fasten the filter on the connection locations.
Cleaning and maintenance
1) Unit front cover
Can be cleaned with flowing water Please use a soft cloth to clean and avoid scraping off the paint on the cover. Avoid cleaning with hot water or rubbing with excess force.
Otherwise damage or deformation could be resulted.
2) Front filter
Can be cleaned with flowing water. Do not clean with hot water.
3) Dust sensor cover
Use wring dry cloth to rub off all dust on the sensor cover.
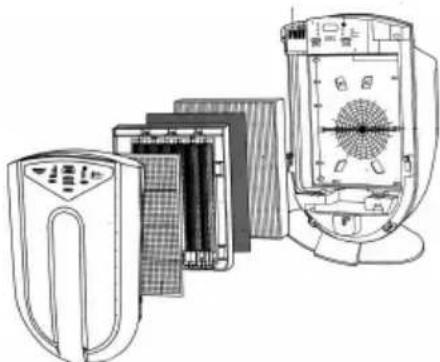
Use a vacuum cleaner to eliminate the dust on the filter.
natural_image
Technical line drawing of a portable air conditioner unit with internal components (no text or symbols)Unit body
Take down UV lamp before cleaning. Use wring dry cloth to rub and clean.
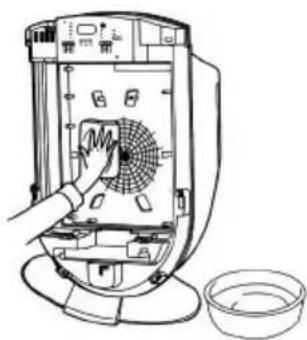
natural_image
Line drawing of a kitchen appliance with a hand cleaning the interior and a bowl nearby (no text or symbols)Cleaning and maintenance of the plasma dust collector
- Take out the plasma dust collector and the front filter.
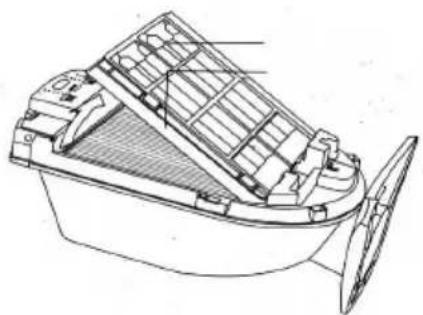
natural_image
Technical line drawing of a small boat with internal structural components (no text or symbols)- Take down the plasma dust collector.
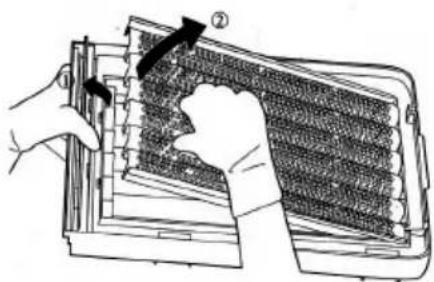
natural_image
Diagram of a hand inserting a component into a device with arrows indicating direction (no text or symbols present)Warning: Please wear protective gloves to avoid any cut on your fingers.
3. Clean the plasma dust collector
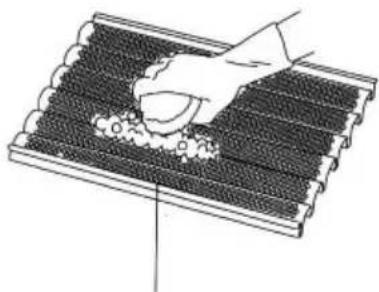
natural_image
Illustration of a hand pressing down on a grid-like structure with small circular elements (no text or symbols)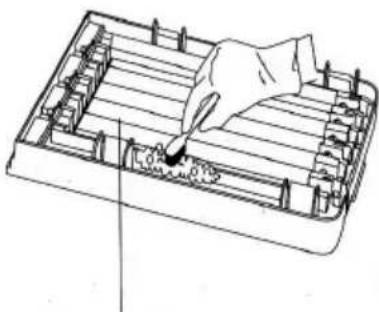
natural_image
Technical line drawing of a mechanical component with a hand operating a tool (no text or symbols)Use mild detergent that is of neutral acidity. Use a scouring pad or toothbrush to clean the dust collector.
Achieve better result with warm water (below 40^ C).
If it is hard to eliminate all dirt, presoak with diluted detergent and then use a toothbrush to scrub.
- Please beware not to damage any wiring while cleaning the dust collector. In case if any electrical discharge is broken, the device will lose part of or all of its dust collection function.
- Any broken wire should be thrown away instead of being left inside the unit. Otherwise, short, circuit or high-voltage spark would be resulted. Also, the circuit control of the device would be affected.
- Please contact authorized Fakir Service for electrical discharge wire.
- Please do not clean using acidic or alkaline detergent that can create rust on the surface of device.
4. Clean and dry
• After cleaning, please completely dry the unit before use. Otherwise, it could cause electrical shock or malfunction.
- If the front cover of the plasma dust collector is not properly installed, no electricity will be connected.
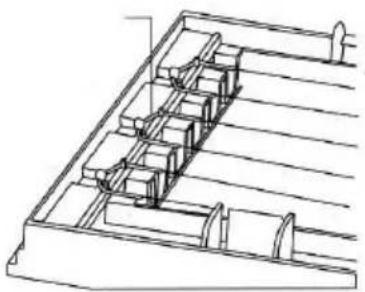
- Please make sure the plastic wrap for the electrical discharge wire is located at its proper position.
natural_image
Technical line drawing of a mechanical assembly with multiple components and grooves (no text or symbols)Replacing filters
- Please change filter when the FILTER REPLACE indicator is glowing.
- Please refer to page 7 on how to replace filters.
Replacing UV Lamp
- The life span of UV lamp is about 5.000 hours. Replace UV lamp when it is damaged or when no blue light is observed.
• Take down the front cover, plasma dust collector and filters before replacing the UV lamp (refer to page 7 on how to disassemble).
- Softly twist the UV lamp, remove the lamp tube from its position, and insert a lamp tube of the same model.
Reinstalling
• After cleaning and replacing filters, reinstate the PIN CLEAN and FILTER REPLACE indicators. Otherwise the
two indicators would remaining glowing after turning on the unit.
- While reinstalling, the unit should remain plugged in with the socket but being turned off.
- The FILTER READY button is inside the unit (cannot be reached with finger). Please use a toothpick or other sharp object to push the FILTER READY button.
How to reinstate
1. PIN CLEAN Indicator
- When the unit is turned off, the reinstating process for PIN CLEAN indicator is done by pushing both the FILTER READY and the TIME buttons at the same time.
2. FILTER REPLACE Indicator
- When the unit is turned off, the reinstating process for FILTER REPLACE indicator is done by pushing both the FILTER READY and the FLOW buttons at the same time.
Cleaning Steps
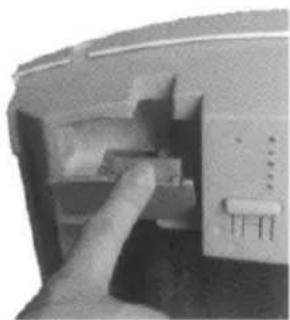
- Take down the front cover of the unit and the dust sensor cover.
natural_image
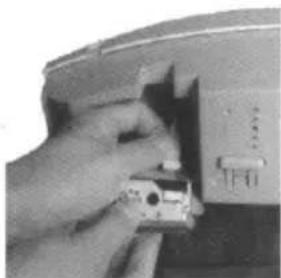
Close-up of a hand inserting a component into a device (no visible text or symbols)- Take out the dust and irritant sensor, carefully unplug the connecting cord and make notes of the plugging direction at the same time.
natural_image
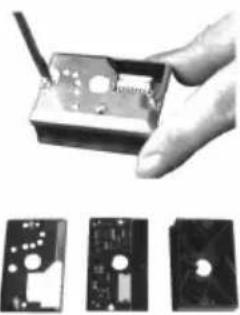
Close-up of a hand inserting a small electronic component into a device (no visible text or symbols)- Unscrew the sensor cover using a small screwdriver, take out the cover and the sensor.
a. Cover
b. Sensor
c. Sensor box
natural_image
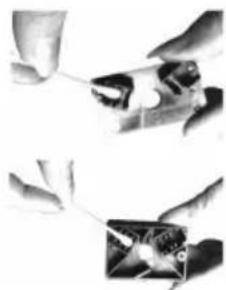
Hand holding a small electronic device with a probe inserted, alongside three close-up views of the same circuit board (no text or symbols visible)- Thoroughly clean the sensor (especially the emitter, receiver and the transparent part) and the sensor box.
a. Cleaning the sensor
b. Cleaning the sensor box
- Put back the sensor correctly after cleaning, make sure the plugging direction is correct.
natural_image
Two black-and-white images showing hands holding a tool and a close-up of a small object (no visible text or symbols)Frequently asked questions
Air quality Surveillance
There is only one LED glowing all the time with the air quality surveillance function.
- Indoor air has been clean the whole time
- For testing purpose, dust either caused by a cigarette or a dusty cloth can be created near the irritant sensor. If the level of pollution goes up, then the unit should be operating properly.
- The irritant sensor could be too far away from any irritant for it to detect. Please locate the unit closer to smoker or other source of pollution.
The air quality surveillance indicator always has two LED glowing.
- Possibly because the room is not under a closed environment and pollution keep coming in from the outside. Or, there has been pollution created indoor (e.g. smoking) the whole time. It takes some time to achieve a clean environment with only one indicator LED on.
The air quality surveillance function keeps switching back and forth frequently.
- Sometimes the irritant sensor is affected by cell phone or other wireless equipment. When using cell phone or other wireless equipment, please stay away from the unit.
Dust and irritant sensor The dust and irritant sensor keeps blinking.
- Since the top of the sensor accumulates more dust, which decreases the
efficiency of the sensor. Please refer to page 8 for the cleaning of the sensor.
Odor sensor
The odor sensor does not work.
- Please let the sensor retain in memory a fresh air condition (refer to page 4 on details under before use)
- When first purchased or when the unit has been unplugged for over a week, the sensor will not be as sensitive. After 1 or 2 days of operation, the sensor will regain its sensitivity.
Filter
Why is it so hard for the filter to get rid of dust and odor?
- Have the front and back of the filter been mistakenly reversed?
- The filter has been saturated with serious amount of dust. Please replace the filter.
Plasma dust collector
Why is it so difficult to eliminate dust and odor?
- The electrical discharge wires or the plasma dust collector already gets too dirty. Please refer to page 10 on how to clean and maintain.
- Has any electrical discharge wire been disconnected or broken? Please fix it or contact the distributor for additional purchase.
Cannot turn on the unit
Why is the unit not working even after turning it on?
- Has the plug been loosened or disconnected with the socket? Please check the plug?
Has the unit been properly reassembled after being cleaned?
Please confirm. The unit will not operate if the plasma dust collector or the front cover is not properly installed?
Liability
Fakir will accept no liability for damages resulting from failure to comply with the operating instructions.
Fakir cannot assume any liability in case the appliance is used for other purposes than its intended use or handled, repaired or serviced improperly.
Unauthorized use
The examples of unauthorized use listed here can result in malfunctions, damage to the appliance or personal injury: This appliance is not designed to be used by persons (including children) with limited physical, sensory or mental capacities or by persons lacking in experience and/or knowledge, unless they are supervised by someone who is responsible for their safety or have received instructions on how to use the appliance. Children should be supervised to ensure that they do not play with the appliance.
Children should be supervised to ensure that they do not play with the appliance. Electric appliances are not toys for children! Therefore, use and store the appliance away from the reach of children. Children do not recognize the danger involved with handling an electric appliance. Do not let the power cord dangle from the appliance. Keep packaging films away from children - danger of suffocation!
Usage area
This appliance is suitable for places; home. Do not use appliance for other than intended use and never use this appliance outdoors.
CE Declaration of Conformity
This appliance fulfills the requirements of the Appliance and Product Safety Law (GPSG) and the EU Directives 2014/30/EU “Electromagnetic Compatibility” and 2014/35/EU “Low-Voltage Directive.” The appliance bears the CE mark on the rating plate.
Disposal
If the service life of the device has ended, in particular if functional disturbances occur, make the worn-out device unusable by cutting through the power cable. Dispose of the device according to the environmental regulations applicable in your country.
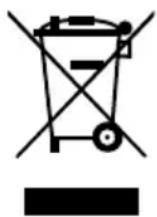
Electrical waste must not be disposed of together with household waste. Bring the worn-out device to a collection center. The packaging of the device consists of recycling-capable materials. Place these, sorted out according to material, in the collectors provided, so that recycling can be carried out on them.

For advice on recycling, refer to your local authority or your dealer.
This appliance complies with the WEEE Directive 2012/19/EU.
Dispatch
Send the appliance in the original package or a similar, well-padded package to prevent damage to the appliance.
Wprowadzenie
natural_image
Line drawing of a boat's internal compartments and hull, showing no text or symbolsMontaż
natural_image
Pure technical line drawing of a mechanical component without any text, numbers, or symbolsnatural_image
Line drawing of a small boat with internal compartments and structural elements (no text or symbols)Montaż
natural_image
Technical line drawing of a boat's internal structure showing hull, hull, and deck components (no text or labels)natural_image
Line drawing of a small boat with open lid and internal compartments (no text or symbols)natural_image
Technical diagram of a solar panel structure with labeled components (no text or symbols present)Montaż
natural_image
Technical line drawing of a device with exploded view showing internal components (no text or symbols)Obudowa urządzenia
natural_image
Line drawing of a kitchen appliance with a hand cleaning the interior and a bowl nearby (no text or symbols)natural_image
Technical line drawing of a boat's internal structure with no visible text or symbolsnatural_image
Diagram of a hand inserting or removing a component into a device (no text or symbols visible)natural_image
Illustration of a hand pressing down on a grid-like structure with small circular elements (no text or symbols)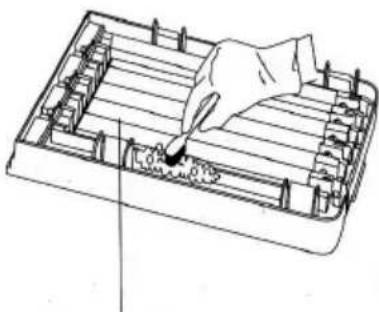
natural_image
Technical line drawing of a mechanical component with a hand operating a tool (no text or symbols present)natural_image
Technical line drawing of a mechanical assembly with no visible text or symbolsWymiana filtrów
1. Wskaznik PIN CLEAN
2. Wskaznik FILTER REPLACE
natural_image
Close-up of a hand inserting a component into a device (no visible text or symbols)natural_image
Close-up of a hand inserting a small electronic component into a device (no visible text or symbols)natural_image
Hand holding a small electronic device with a probe inserted, alongside three close-up views of the same circuit board (no visible text or symbols)natural_image
Two black-and-white images showing hands holding a tool and a close-up of a small object (no text or symbols visible)Uzaktan kumanda
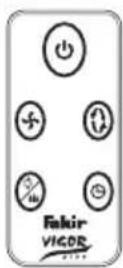
natural_image
Line drawing of a mechanical device with internal components and directional arrows (no text or symbols)Birleştirirken,
natural_image
Pure technical line drawing of a mechanical component without any text, numbers, or symbols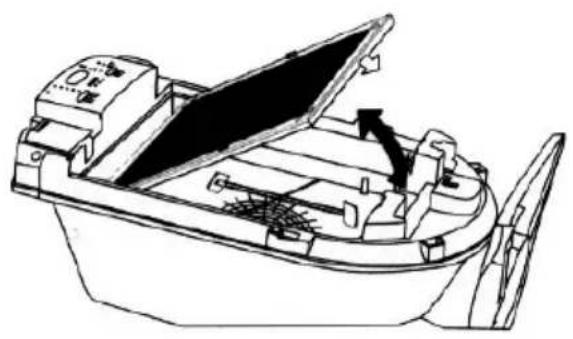
natural_image
Line drawing of a small boat with open lid and internal compartments, showing structural details (no text or symbols)Birleştirirken,
natural_image
Technical line drawing of a boat's interior structure showing handle, hull, and structural components (no text or labels)Birleştirirken,
natural_image
Exploded view diagram of a portable air conditioner unit showing internal components and ventilation system (no text or labels)Cihaz Gövdesi
natural_image
Line drawing of a kitchen appliance with a hand inserting a fan into the interior (no text or symbols)natural_image
Technical line drawing of a boat's internal structure showing structural components (no text or labels)2. Elektrostatik toz filtresini ön filtreden ayırınız.
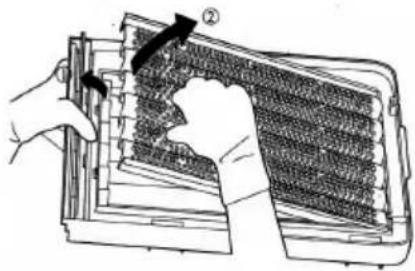
natural_image
Illustration of hands installing or adjusting a grid-like structure inside a device casing (no text or symbols visible)natural_image
Illustration of a hand placing food into a grid-like container with granular contents (no text or symbols)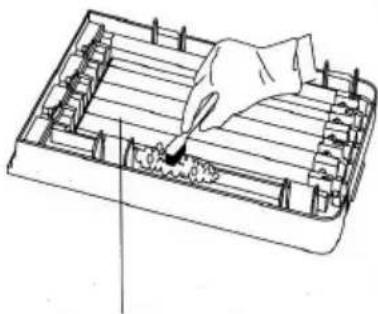
natural_image
Line drawing of a hand using a tool to press or install electronic components on a circuit board (no text or symbols)natural_image
Technical line drawing of a mechanical assembly with stepped components (no text or symbols)natural_image
Close-up of a hand inserting a small electronic component into a device (no visible text or symbols)natural_image
Close-up of a hand inserting a small electronic device into a device (no visible text or symbols)natural_image
Hand holding a small electronic device with a probe inserted (no visible text or symbols)
natural_image
Two black-and-white images showing hands using a tool to apply a component; no visible text or symbols.CE


- VIGOR PLUS
- Technische Daten
- premium | Vigor Plus
- Hinweis!
- DE
- Safety is important
- Keep this information in a safe place for future reference.
- Safety instructions
- Product specification
- Indicators
- Negative ion indicator
- Odor indicator
- Dust and irritant indicator
- Air quality surveillance
- How to use
- Before use
- Operating
- How to start
- Fan models
- Automatic operation
- Timer ON/OFF
- Ion-UV On/Off
- Cleaning and maintenance
- Disassembling the device
- Take down the front cover
- When assembling
- Take down the plasma dust collector
- Take down the HEPA filter
- Removing the TiO _2 filter
- Take down the front filter
- 1) Unit front cover
- 2) Front filter
- 3) Dust sensor cover
- Unit body
- Clean the plasma dust collector
- Clean and dry
- Replacing filters
- Replacing UV Lamp
- Reinstalling
- How to reinstate
- PIN CLEAN Indicator
- FILTER REPLACE Indicator
- Cleaning Steps
- Frequently asked questions
- There is only one LED glowing all the time with the air quality surveillance function.
- The air quality surveillance indicator always has two LED glowing.
- The air quality surveillance function keeps switching back and forth frequently.
- Dust and irritant sensor The dust and irritant sensor keeps blinking.
- Odor sensor
- The odor sensor does not work.
- Filter
- Why is it so hard for the filter to get rid of dust and odor?
- Plasma dust collector
- Cannot turn on the unit
- Why is the unit not working even after turning it on?
- Liability
- Unauthorized use
- Usage area
- CE Declaration of Conformity
- Disposal
- Dispatch
- Wprowadzenie
- Montaż
- Obudowa urządzenia
- Wymiana filtrów
- Wskaznik PIN CLEAN
- Wskaznik FILTER REPLACE
- Birleştirirken,
- Cihaz Gövdesi
- Elektrostatik toz filtresini ön filtreden ayırınız.
Brand : FAKIR
Model : Vigor Plus LR 600
Category : Uncategorized