
Aroma Solo - Coffee maker FAKIR - Free user manual and instructions
Find the device manual for free Aroma Solo FAKIR in PDF.


| Product Type | Coffee Maker |
| Brand | Fakir |
| Model | Aroma Solo |
| Power | 1200-1300 W |
| Voltage | 220-230 V AC, 50 Hz |
| Water Tank Capacity | 410 ml (14 oz) |
| Cord Length | 75 cm |
| Coffee Modes | Regular and Bold |
| Filter Type | Permanent metal filter (2 filters included) |
| Drip Tray | Removable with water drain cap |
| Cup Installation Grid | Adjustable for cups or thermos |
| Material | Plastic and metal |
| Weight | Approx. 1.5 kg |
| Dimensions (approx.) | 25 x 20 x 30 cm |
| Safety Features | Auto shut-off, boil-dry protection, overheat protection |
| Cleaning | Descaling with vinegar solution; dishwasher-safe accessories |
| Intended Use | Household only |
| Warranty | 2 years (typical) |
| Certification | CE mark, complies with EU directives |
Frequently Asked Questions - Aroma Solo FAKIR
User questions about Aroma Solo FAKIR
0 question about this device. Answer the ones you know or ask your own.
Ask a new question about this device
Download the instructions for your Coffee maker in PDF format for free! Find your manual Aroma Solo - FAKIR and take your electronic device back in hand. On this page are published all the documents necessary for the use of your device. Aroma Solo by FAKIR.
USER MANUAL Aroma Solo FAKIR
natural_image
Exterior view of a Fakir brand coffee maker with black and silver casing (no visible text or symbols on the device itself)AROMA SOLO
DE Kaffeemaschine
EN Coffee Machine
TR Kahve Makinası
RU Кофеварка
natural_image
3D illustration of a medical device with a circular vent and attached clip, no text or symbols present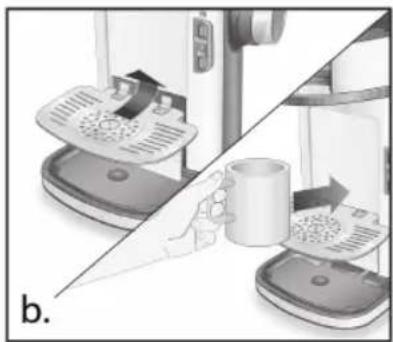
natural_image
Diagram showing a hand pressing down on a device with a magnified view of the next step (no text or symbols present)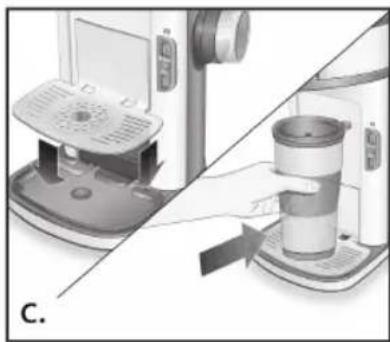
natural_image
Diagram showing a device being processed into a coffee maker, with no visible text or symbols.natural_image
Diagram of a coffee maker's internal structure showing two stages of feeding and pouring (no text or labels)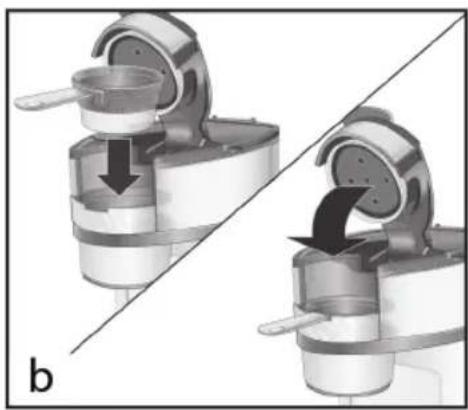
natural_image
Mechanical assembly diagram showing two stages of a device with arrows indicating motion (no text or symbols)natural_image
Illustration of a printer with a power outlet connected to a wall-mounted cable (no text or symbols visible)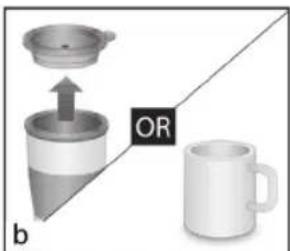
natural_image
Diagram showing a coffee maker with an arrow pointing to its lid, a coffee cup, and a mug labeled 'OR' (no text or symbols on the objects themselves)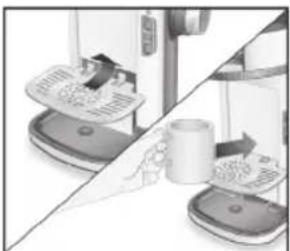
natural_image
Illustration of a kitchen appliance with a hand holding a mug and a paper airplane, no visible text or symbols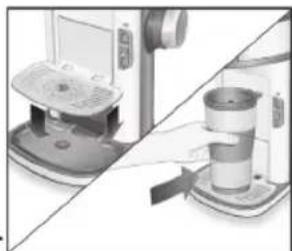
natural_image
Two-panel image showing a kitchen appliance and a coffee maker with a side view of the cup (no text or symbols visible)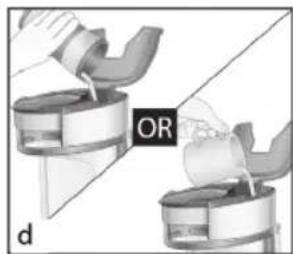
natural_image
Diagram showing two mechanical components with a hand holding a bracket, labeled 'd' and 'OR', no readable text or symbols present.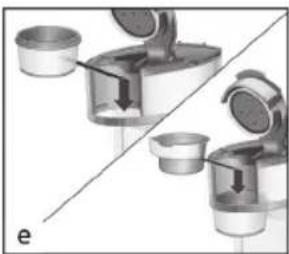
natural_image
Diagram showing two mechanical components with arrows indicating movement or force, no text or symbols present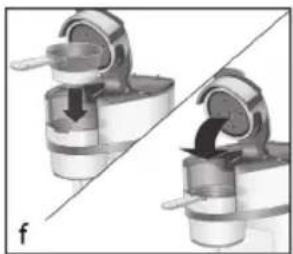
natural_image
Mechanical assembly diagram showing two stages of a valve or pump mechanism (no text or symbols)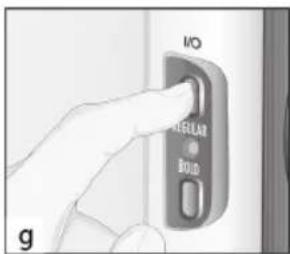
DE
HINWEIS!
natural_image
Laboratory setup with a white wine jar labeled 'WHITE VINEGAR' and a digital brush on top (no other text or symbols visible)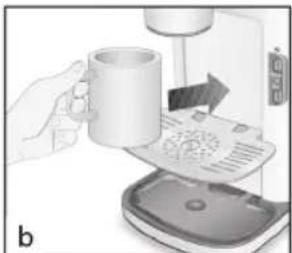
natural_image
Illustration of a hand pouring coffee into a digital kitchen machine (no text or symbols visible)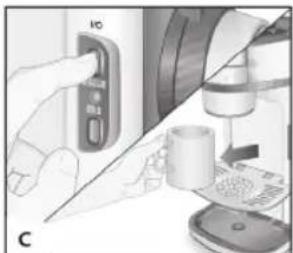
natural_image
Illustration of a hand holding a device with a control panel, alongside a close-up of a mechanical device (no visible text or symbols)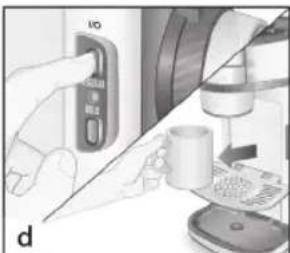
natural_image
Illustration of a hand holding a device with a control panel and a mug, next to a computer setup (no visible text or symbols)natural_image
Hand using a kitchen mixer machine to press or spread food (no visible text or symbols)natural_image
Illustration of a hand using a pipette to clean water from a sink (no text or symbols)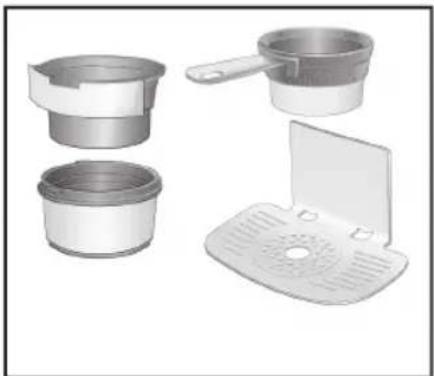
natural_image
Illustration of various kitchen utensils including a cup holder, a bowl, and a tray (no text or symbols)
HINWEIS!
On the Operating Instructions....20
Meanings of the Symbols 20
Liability 20
EC Conformity Declaration....21
Intended Use 21
Unauthorized Use....21
Safety is Important....22
Security Warnings 22
Unpacking....23
Box Contents 24
Introducing the Appliance 25
Technical Specifications 26
Introducing the Control Panel 26
Regular Coffee Mode 26
Bold Coffee Mode 26
Placing the Thermos / Cup to the Appliance....27
Filling the Water Tank....27
Placing Coffee in the Filter....28
Placing the Coffee Filter into the Appliance 28
Use of The Appliance 29
Cleaning and Maintenance....30
Troubleshooting 32
Recycling 33
Shipping....33
EN
Dear Customer,
We hope you'll enjoy your product and we thank you for choosing Fakir Hausgeräte, who has its signature on innovative technologies.
We hope you to get the best out of Fakir AROMA SOLO Coffee Machine produced with high quality and technology. Therefore, before using the product, we kindly ask you to read this User Guide carefully and keep it for future reference.
On the Operating Instructions
These operating instructions are intended to enable the safe and proper handling and operation of the appliance. Read these operating instructions carefully before using the appliance for your safety and others'.
Meanings of the Symbols
In this manual, you will see the symbols below.

WARNING!!
This sign indicates dangers that can result in risk of in jury or death.

ATTENTION!
Indicates notices of risks that can result in damage to the appliance.
NOTE!
Emphasizes tips and other useful information in the operating manual.

Danger of Burn!
Failure to do so may result in injury or damage to the appliance.
Liability
In case of any damage that may occur as a result of use not in compliance with the instructions in this manual and the appliance is used in a place outside of its own area of use, and is repaired elsewhere other than the authorized services of Fakir, Fakir Elektrikli Ev Aletleri Dış Tic. A.Ş. does not assume any responsibility.
EC Conformity Declaration
This device fully complies with the 2014/30/EU Electromagnetic Compatibility and 2014/35/EU Voltage Directives. The appliance bears the CE mark on the rating plate.
Fakir reserves the right to change the design and equipment.
Intended Use
Product model is designed for household use. It is not suitable for business or industrial use. In case of any failure arising from otherwise use, our authorized services will provide out of warranty service.
Unauthorized Use
In cases of unauthorized use specified below, the appliance may be damaged or cause injuries;
- This appliance can be used by children aged from 8 years and above and persons with reduced physical, sensory or mental capabilities or lack of experience and knowledge if they have been given supervision or instruction concerning use of the appliance in a safe way and understand the hazards involved.
- Cleaning and maintenance shall not be carried out by children without supervision.
- Keep the packing materials away from the children. Choking risk!
- Children younger than 3 years shall be kept away from the appliance if they are not supervised constantly.
- This appliance may be used by persons (including children) with limited physical, sensory or mental capabilities, or with limited experience and/or knowledge, only under the supervision of a person responsible for their safety, or in accordance with the instructions of that person.
- Children shall be supervised to ensure that they do not play with the appliance.
- This appliance shall not be used for play.
- Children older than 3 years and younger than 8 years may switch the appliance on and off only if they are under supervision or are informed of the safe use of the appliance and if they understand the hazards that may be caused by the appliance. In this respect, it is a prerequisite for the appliance to be in normal usage position or
EN
that it is installed properly.
- Children older than 3 years and younger than 8 years shall not plug the appliance to the electrical outlet, adjust the appliance, and do not perform any cleaning or maintenance operations.
- The appliance shall not be used without supervision.
Safety is Important
Read these operating instructions carefully before using the appliance for your safety and others'. Keep this manual in a safe place for future use. If you pass the appliance on, pass on the manual too. Remove all the packages; however, keep them until you are sure that the appliance is working.
Security Warnings
- Please read the user manual before you use the appliance.
- Before using, check that the mains voltage corresponds to the ratio of the appliance.
- Do not immerse the appliance in water or any other liquid.
- Wait for the appliance to cool down before cleaning.
- Do not unplug the appliance from the cord.
- Strict observance is required especially when the appliance will be used around children.
- Improper use of the appliance may cause severe burns.
- Never place the appliance on hot surfaces.
- Do not operate the appliance with a damaged cord or plug. If the cable or the appliance is damaged, it must be replaced by an Authorized Fakir service.
- Do not allow the cable to dangle from the table or counter, or contact any hot surfaces.
- Do not use this product other than its intended use. The appliance is only suitable for household use.
- To prevent damage to the appliance, do not use any accessories other than those supplied with the appliance.
-
Do not fill the water tank with anything other than cold water.
-
Do not move the appliance while it is filled with hot water.
- Unplug the appliance when it is not in use.
- Do not allow the coffee machine to operate without water in order to prevent damage to the heating elements.
- Do not use the appliance other than its intended purpose. This appliance should only be used to prepare coffee and hot water.
- Do not leave the appliance unattended during use.
- Always operate the appliance with its cover closed, otherwise there is a danger of burning injuries.
- Place the appliance on a flat, firm surface before use.
- Do not fill the water tank above the maximum line.
- Faults caused by calcification or user error are not covered by the warranty.

Danger of Burn!
- This appliance produces hot water and can be converted into water vapour when operating. Take care not to come into contact with hot steam
Unpacking
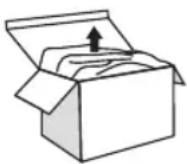
Unpack the appliance and before starting to use it check for damages and malfunctions. If there is any malfunction or damage to the equipment, do not use the appliance and get in contact with Fakir Authorized Service.
- Repair works shall only be undertaken by Fakir authorized service. Repairs that are inadequate or carried out by unauthorized personnel may pose harm to the user.
-Do not punch a hole or a tear on the section where the on/off button is.
EN

WARNING!!
Never use a defective appliance.
NOTE!
Keep the packaging for storage and future transports.
NOTE!
Keep this user manual for future use.
Box Contents
Appliance
Service list
Instruction Book
Introducing the Appliance
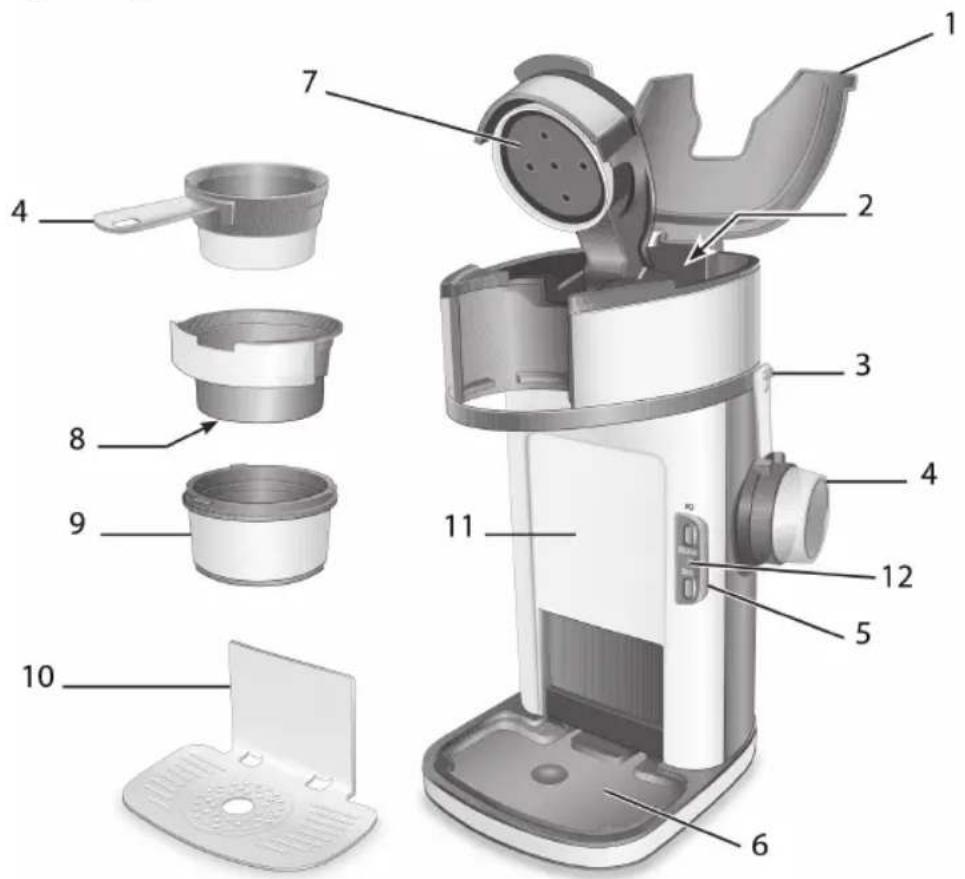
- Water tank cap
- Water tank
- Coffee filter hanging hook
- Coffee filter with handle
- Control Panel (REGULAR -BOLD)
- Drip tray
- Hot water drain cap
- Second coffee filter
- Funnel
- Cup installation / lifting grid
- Appliance main body
- Indicator light
EN
Technical Specifications
Power : 1200-1300W
Voltage : 220-230 V AC, 50 Hz
Useful life : 7 Years
Water tank capacity: 410 ml
Cord length : 75 cm
Introducing the Control Panel
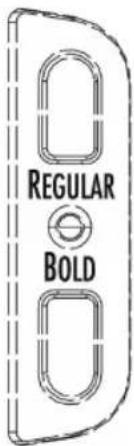
There are two options in control panel. If you press any one, the appliance operates automatically.
Regular Coffee Mode
When you select Regular mode, the water becomes hot and when it is boiled, it starts to flow through the filter. The water continues to flow until the water in the tank runs out.
Maximum coffee filtering time: It changes from 120-130 seconds.
Bold Coffee Mode
When you choose Bold coffee mode, the water becomes hot and when it is boiled it starts to flow through the filter. It continues to flow with 15-second cycles until the water in the water tank runs out.
Maximum coffee filtering time: It changes from 210-230 seconds.
In the Regular mode coffee flows continuously through the filter, and in the Bold mode it flows for 15 seconds, then waits for 15 seconds, thus completing the flow with 15-second cycles. This ensures that your coffee is brewed at a better quality and its aroma is spread much better.
In Bold mode, your coffee will be more strong and more intense as it takes longer to filter and brew the coffee.
NOTE!
The thickness of the coffee, and its brand and the quality of the water affect the taste of coffee. You can change the water ratio and amount of your coffee according to your taste.
Placing the Thermos / Cup to the Appliance
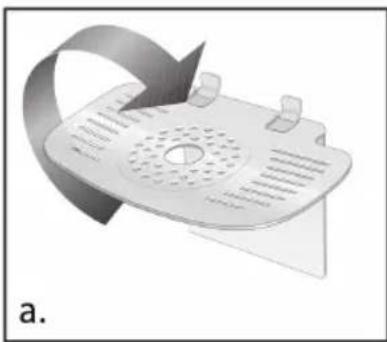
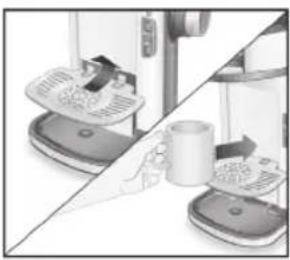
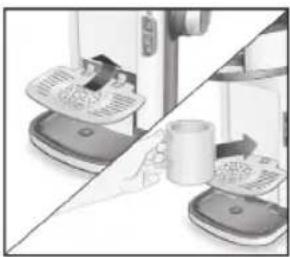
Depending on the size of the cup you will use, you need to adjust the size of the cup installation / lifting grid.
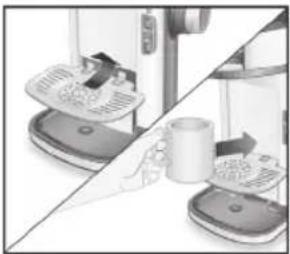
a. Remove the grid if you are going to use the cup. Turn it over.
b. Attach the hooks on the grill to the body of the appliance as shown in the figure below.
Thus, the coffee will flow more smoothly into the cup.
c. If you are going to use thermos, you do not need to adjust.
natural_image
3D illustration of a medical device with a circular vent and attached clip, no text or symbols present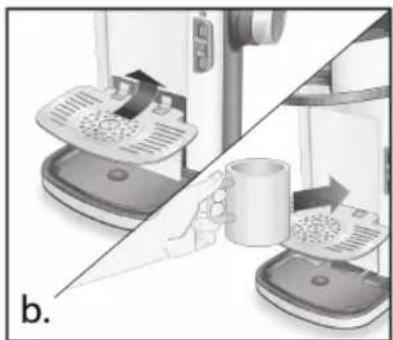
natural_image
Diagram showing a hand pressing down on a device with a mug, alongside a side view of a machine (no text or symbols present)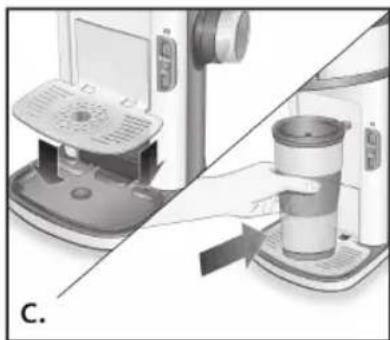
natural_image
Diagram showing a coffee machine being processed with a cup, no text or symbols presentFilling the Water Tank
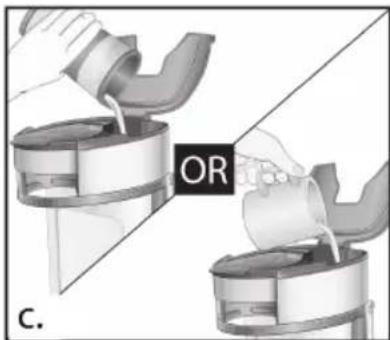
a. Choose the cup or thermos your are going to use.
b. Put the desired amount of water inside.
c. Open the cap of the water tank and drain the water.
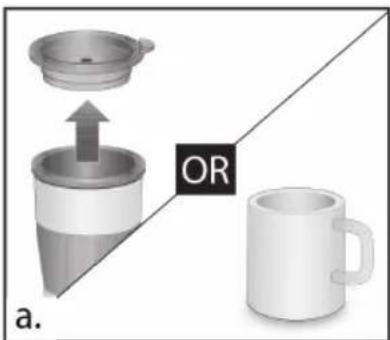
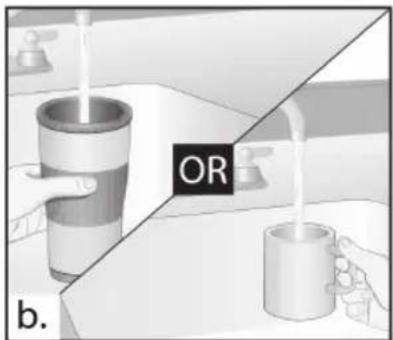

WARNING!!
The water tank consists of two levels. 8 oz (minimum 250 ml) and MAX (maximum 14 oz = 410 ml) as indicated in the water tank. Do not fill the water tank under minimum level of 250 ml and more than maximum level of 410 ml.
EN
Placing Coffee in the Filter
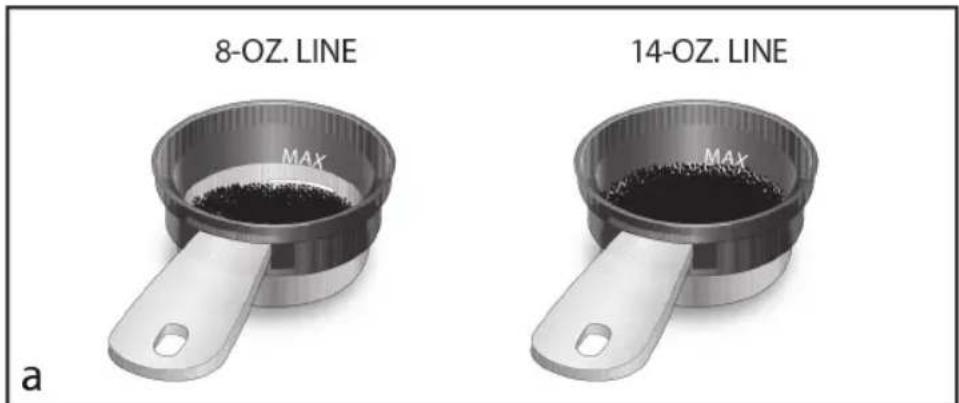
Place the desired amount of coffee into the coffee filter with handle which is appropriate with the water ratio of the coffee.
- If you want to prepare small size coffee, fill the water tank with at least 250 ml (8 oz) of water, fill the coffee to the line inside the metal filter as shown in the figure below.
- If you want to prepare a large size coffee, fill the water tank with a maximum of 410 ml (14 oz) of water. Fill the whole of the metal filter as follows until it reaches the plastic part.

WARNING!!
The amount of coffee used must not exceed the metal container of the coffee filter.
NOTE!
You can change the amount of coffee and the ratio of water according to your taste.
Placing the Coffee Filter into the Appliance
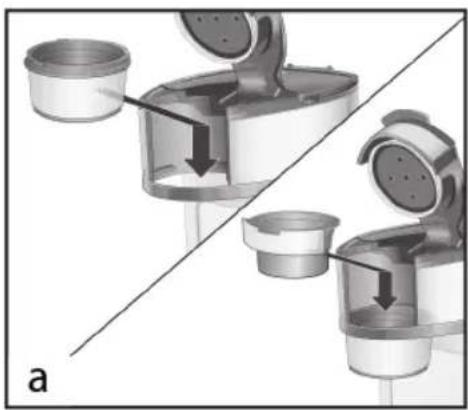
a. Place the coffee filter chamber and then the second coffee filter in the appliance as shown in the figure below.
b. Place the coffee filter with the handle to the appliance.
natural_image
Diagram of a coffee maker's internal processing steps, showing two stages with arrows indicating flow direction (no text or symbols)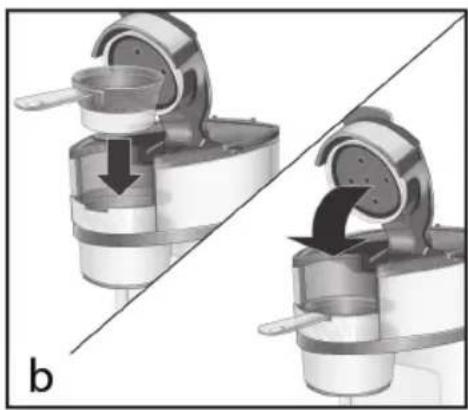
natural_image
Mechanical assembly diagram showing two stages of a device with arrows indicating motion (no text or symbols)Use of The Appliance
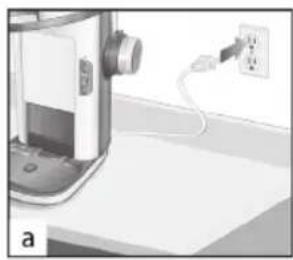
a. Place the appliance on a flat and firm surface. Plug in the appliance.
b. Choose the cup or thermos your are going to use.
c. Adjust the size of the cup installation grid according to the selected thermos or cup.
d. Pour as mush as water as you desire in the water tank. (amount of water should be between 250 ml and 410 ml)
e. Place the coffee filter chamber and the second filter in the appliance.
f. Place the appropriate amount of coffee in the filter with the handle and place it in the appliance.
g. Make the REGULAR or BOLD selection and press the button.
The appliance will start and automatically turns off at the end of the process.
natural_image
Illustration of a printer with a cable inserted into a power outlet (no text or symbols visible)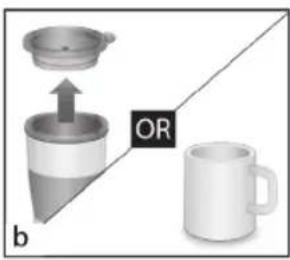
natural_image
Illustration of kitchen appliances including a blender and a mug, with no visible text or symbols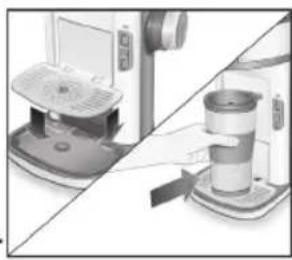
natural_image
Two laboratory devices: a desktop and a glass with a lid, both connected by a tool (no visible text or symbols)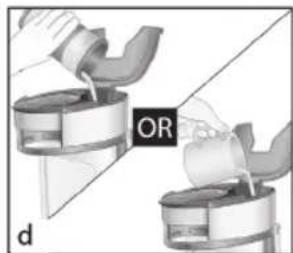
natural_image
Diagram showing two mechanical components with a labeled section 'OR' (no text or symbols on the components themselves)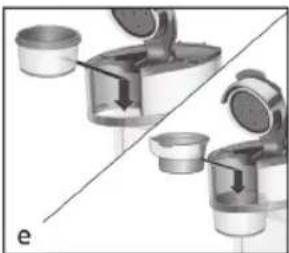
natural_image
Diagram of two mechanical components with arrows indicating movement or assembly (no text or symbols)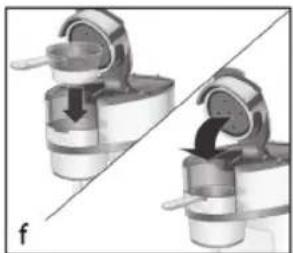
natural_image
Mechanical assembly diagram showing two stages of a mechanical component with arrows indicating motion (no text or symbols)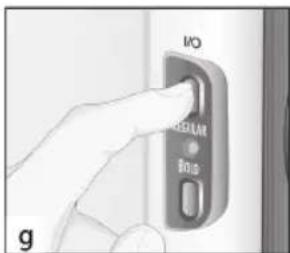
EN
NOTE!
It is recommended to operate the appliance filled with water after every first use and every coffee production. Thus, the appliance will remain clean before and after each use.
NOTE!
If you start the appliance with water for the first time and rinse the cup with hot water, your coffee will be hotter.

ATTENTION!
The indicator lamp will flash for 5 seconds and it will turn off automatically if the appliance is operating without any water. In this case you need to add water to the water tank.
Cleaning and Maintenance
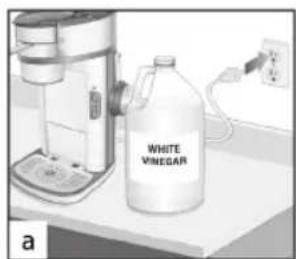
a. Put 125 ml of water and 125 ml of vinegar into the water tank of the appliance. Insert its plug.
b. Place the cup on the appliance.
c. Select REGULAR or BOLD mode from the appliance and operate the appliance for 30 seconds and stop again by pressing the same button. Wait for 30 minutes. Operate the appliance and wait for it to turn off automatically.
d. Place an empty cup again to the appliance. Fill the water tank of the appliance with water and restart the appliance. Repeat this process several times until the smell of vinegar goes away.
natural_image
Laboratory setup with a white wine jar and a digital kitchen unit (no visible text or symbols)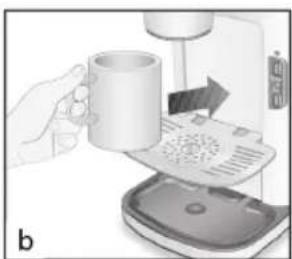
natural_image
Illustration of a hand using a mug to press a coffee machine, with no visible text or symbols.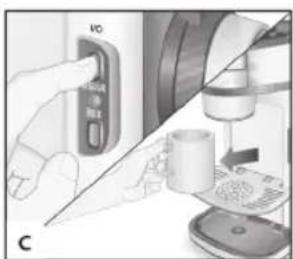
natural_image
Illustration of a hand using a device to interact with a laptop and mouse (no text or symbols visible)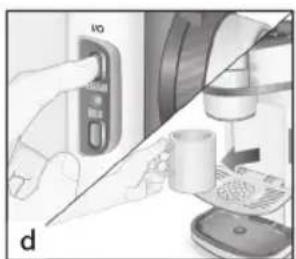
natural_image
Illustration of a hand using a device to interact with a laptop and coffee cup (no text or symbols visible)Cleaning the Main Body of the Appliance
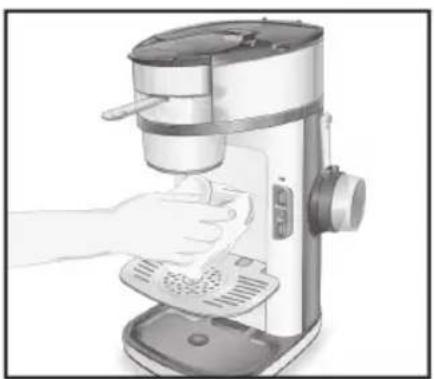
Wipe the appliance with a damp soft cloth and dry it.

WARNING!!
Never immerse the appliance in water or keep it under running water. Do not use strong, abrasive chemicals and cloths.
natural_image
Illustration of a hand using a kitchen mixer machine to press or<|rotate_right|> (no text or symbols visible)Cleaning the Accessories of the Appliance
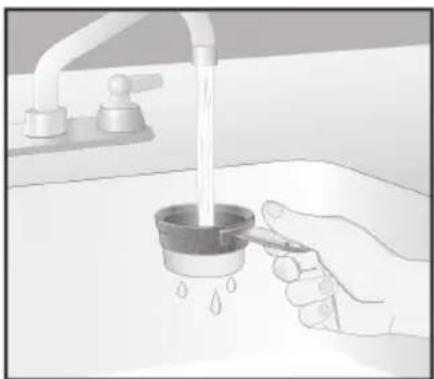
You can clean the accessories of the appliance (the filter chamber, the filter with handle, the second filter and the cup installation / lifting grid) under the running water. Dry and place them to the appliance.
natural_image
Illustration of a hand using a pipette to clean water from a sink (no text or symbols)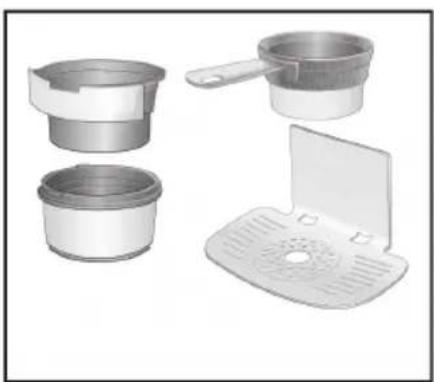
natural_image
Illustration of four different kitchen utensils or containers, including a lid and side cups (no text or symbols visible)
NOTE!
Any component of your appliance is washable in a dishwasher.
Cleaning the Collection Chamber
Remove the water inside the drip tray with a cloth and dry it. It is recommended to clean it regularly, otherwise it may damage the appliance.
EN
Storage
If it is not going to be used for a long time, clean the appliance and make sure it is dry. Pack the appliance in order to prevent dust intervention. After packing, place it at a dry and well ventilated place. Keep it out of a direct sunlight, away from animals and in a place out of the reach of the children.
NOTE!
Before you call Customer Service, check whether you can correct the problem/ fault yourself.
For this purpose, please see the "TROUBLESHOOTING" section. If you can not resolve the problem/error, please call Customer Service: Before calling please make ready the model name and product serial number. You can find this information on the TYPE LABEL of your product. Help Line: (+90 212) 444 0 241
Troubleshooting
Your appliance is processed via Quality Control against any malfunction.
| Problem Possible | Cause Remedy | |
| Coffee taste is not good | Coffee machine can be dirty Clean the machine | |
| The thickness of the coffee used is not appropriate. | Check the thickness of the coffee. | |
| The quality of the water used is not good. | Check the quality of the water that is used. | |
| Water drains from under the appliance | The drip tray is full. Clean the drip tray. | |
| No coffee flows and indicator light is flashing | No water in the water tank Fill the water | tank with water |
| The ratio of water to coffee is high. | Coffee amount is less | Increase the amount of coffee |
| Water amount is high | Reduce water in the water tank | |
| The ratio of water to coffee is less | Coffee amount is high | Reduce the amount of the coffee. |
| Water amount is less | Reduce the amount of water in the water tank. | |
| Coffee overflows from the cup | The amount of water in the water tank is more than the placed cup size | Adjust the size of the cup used. |
Recycling
If your device comes to an end of its lifetime, cut the power cord to make sure it cannot be used.
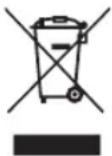
Electrical waste must not be disposed of together with household waste. Dispose of the device according to the environmental regulations applicable in your country.
The packaging of the device consists of recycling-capable materials. Throw out them in suitable recycling bins.

This appliance complies with AEEE Regulation.
Shipping
Carry the appliance in the original package or a similar, well-padded package to prevent damage to the appliance. Keep the original package.
NOT / NOTES
Türkçe
TR
natural_image
3D illustration of a medical device with a circular vent and attached clip, no text or symbols present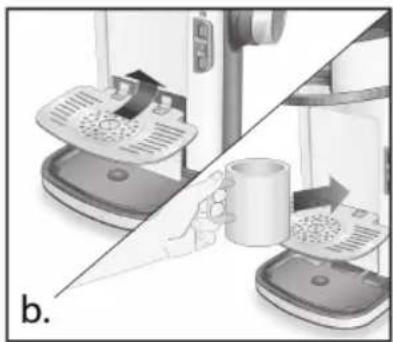
natural_image
Diagram showing a hand pressing down on a device with a magnified view of the next step (no text or symbols present)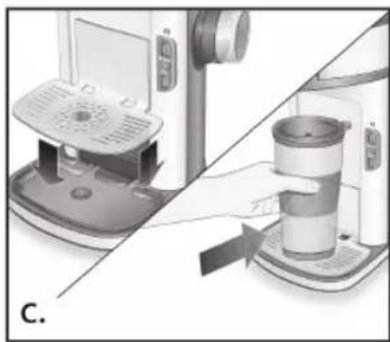
natural_image
Diagram showing a device being processed into a coffee maker, with no visible text or symbolsnatural_image
Diagram of a coffee maker's internal processing steps, showing two stages with arrows indicating flow direction (no text or symbols present)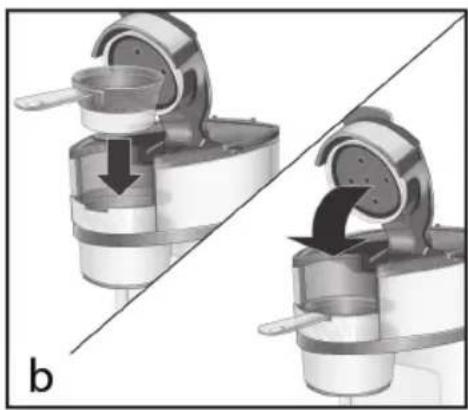
natural_image
Mechanical assembly diagram showing two stages of a device with arrows indicating motion (no text or symbols)Cihazın Kullanımı
natural_image
Illustration of a printer with a cable inserted into a power outlet (no text or symbols visible)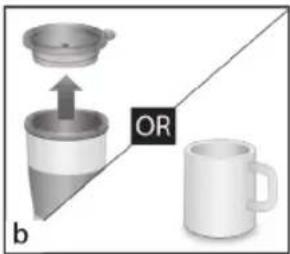
natural_image
Illustration of kitchen appliances including a blender and a mug, with no visible text or symbols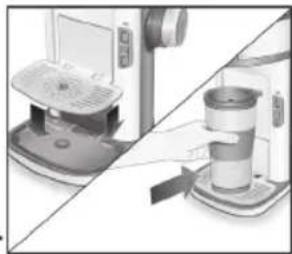
natural_image
Two industrial devices: a desktop and a coffee maker, both connected by a belt (no visible text or symbols)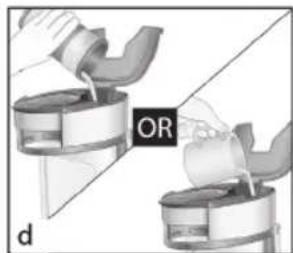
natural_image
Diagram showing two mechanical components with a labeled section 'OR' (no text or symbols on the components themselves)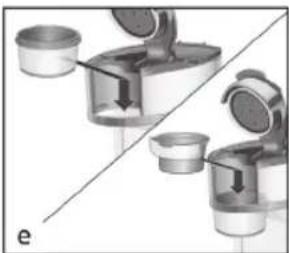
natural_image
Diagram of two mechanical components with arrows indicating movement or assembly (no text or symbols)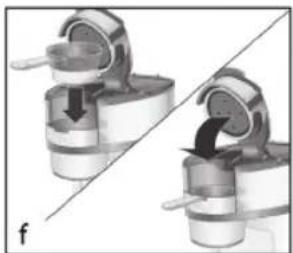
natural_image
Mechanical assembly diagram showing two stages of a valve or pump mechanism with directional arrows (no text or labels)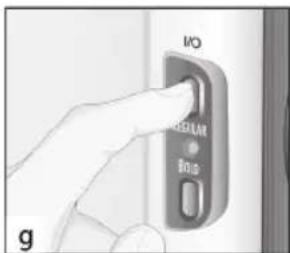
TR
NOT!
natural_image
Laboratory setup with a white wine jar labeled 'WHITE VINEGAR' and a digital kitchen unit (no visible text beyond label)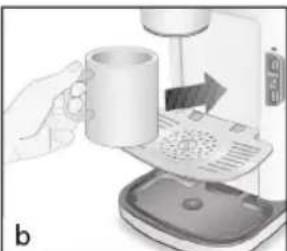
natural_image
Illustration of a hand using a mug to press a coffee machine, with no visible text or symbols.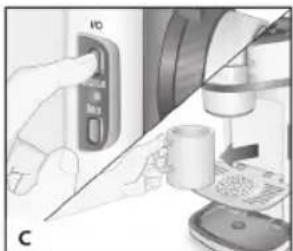
natural_image
Illustration of a hand holding a device labeled 'VO' and a mug, next to a microscope (no text or symbols visible)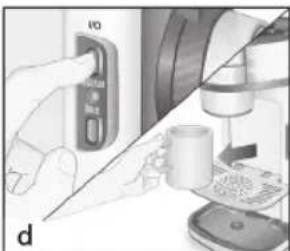
natural_image
Illustration of a hand using a microscope to interact with a device (no text or symbols visible)natural_image
Illustration of a hand using a pipette to clean water from a sink (no text or symbols)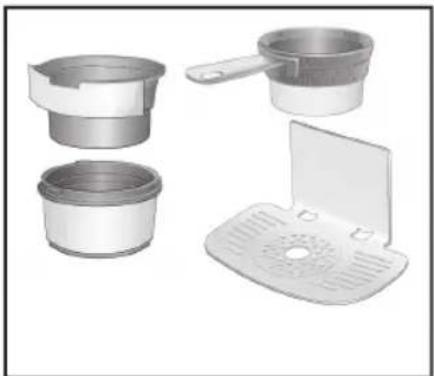
natural_image
Exploded view of a kitchen sink and drawer assembly (no text or symbols visible)
NOT!
natural_image
3D illustration of a medical device with a circular vent and attached clip, no text or symbols present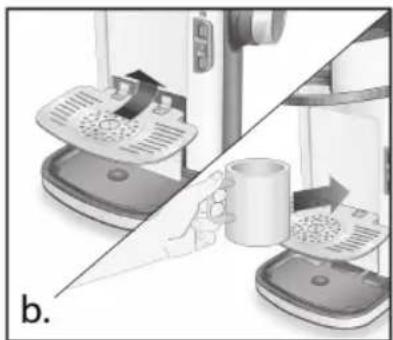
natural_image
Diagram showing a hand pressing down on a device with a mug, alongside a side view of a machine (no text or symbols present)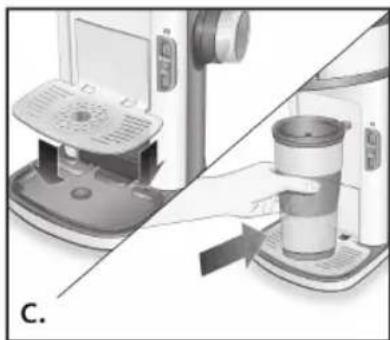
natural_image
Diagram showing a coffee machine being processed with a cup, no text or symbols presentnatural_image
Diagram of a coffee maker's internal structure showing two stages of feeding and pouring (no text or labels)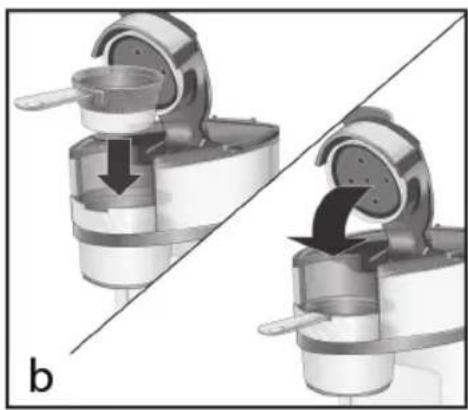
natural_image
Mechanical assembly diagram showing two stages of a device with arrows indicating motion (no text or symbols)Эксплуатация
natural_image
Illustration of a printer with a power outlet connected to a wall-mounted cable (no text or symbols visible)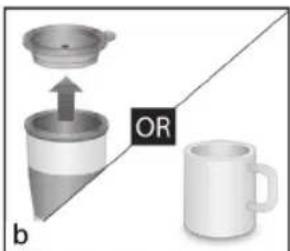
natural_image
Diagram showing a coffee maker with an arrow pointing to its lid, and a mug on the side, labeled 'b' (no text or symbols in the diagram itself)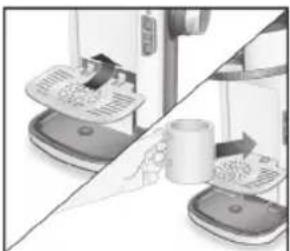
natural_image
Illustration of a kitchen appliance with a hand holding a mug and a paper airplane, no visible text or symbols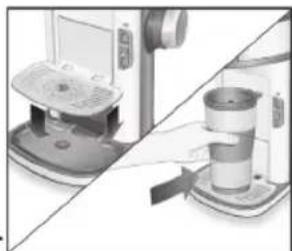
natural_image
Two-panel image showing a kitchen appliance and a coffee maker with a side view of the cup (no text or symbols visible)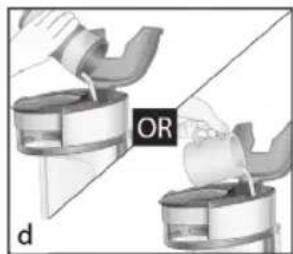
natural_image
Diagram showing two mechanical components with a hand operating a valve, labeled 'OR' and 'd' (no text or symbols on the components themselves)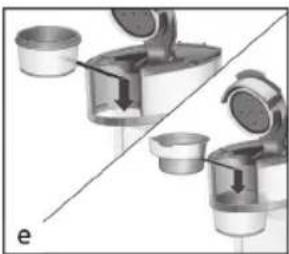
natural_image
Diagram showing two mechanical components with arrows indicating movement or force, no text or symbols present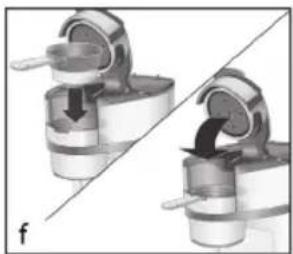
natural_image
Mechanical assembly diagram showing two stages of a valve or pump mechanism (no text or symbols)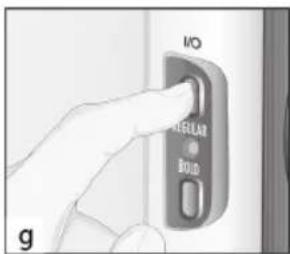
RU
ПРИМЕЧАНИЕ!
natural_image
Illustration of a white wine jar and a digital kitchen unit on a counter (no text or symbols visible)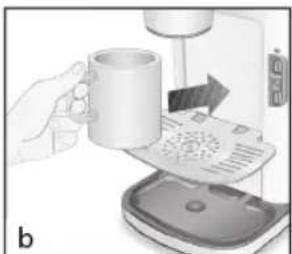
natural_image
Illustration of a hand pouring liquid into a mug using a machine (no text or symbols visible)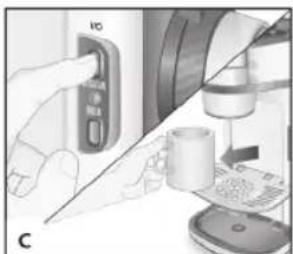
natural_image
Illustration of a hand using a device to interact with a laptop and a paper cup (no text or symbols visible)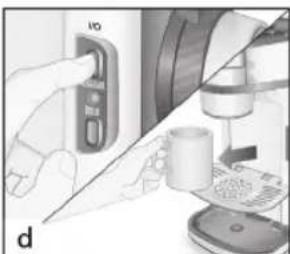
natural_image
Illustration of a hand inserting a device into a device with a mug, next to a computer (no text or symbols visible)natural_image
Illustration of a hand using a tool to clean water from a sink with a pipe, no text or symbols present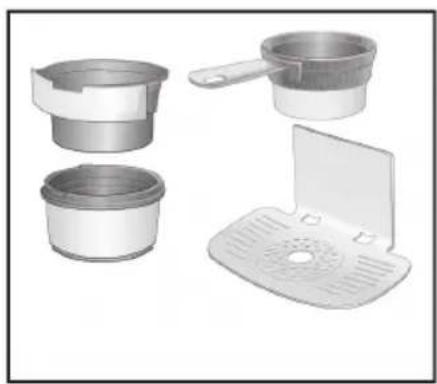
natural_image
Illustration of four different kitchen or cleaning equipment components (no text or symbols visible)
ПРИМЕЧАНИЕ!
natural_image
3D rendering of a medical device with a perforated plate and surrounding connectors (no text or symbols visible)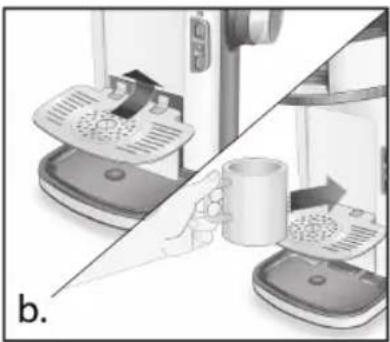
natural_image
Diagram showing a kitchen appliance with a hand holding a mug and a tray, alongside a close-up of its interior (no text or symbols visible)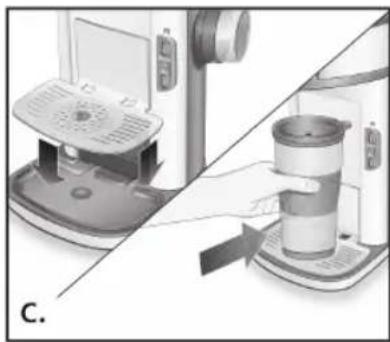
natural_image
Diagram showing a coffee machine being processed with a coffee cup, no text or symbols presentملء خزان الماء
natural_image
Diagram of a coffee maker with two cups and a lid, showing internal components and a diagonal line (no text or symbols)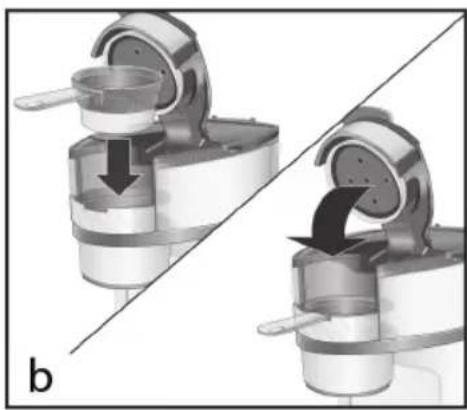
natural_image
Mechanical assembly diagram showing two stages of a device with arrows indicating motion (no text or symbols)استخدام الجهاز
natural_image
Illustration of a printer with a power outlet connected to a paper sheet (no text or symbols visible)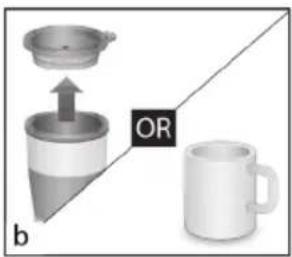
natural_image
Illustration of a hand using a laptop to clean food items, with no visible text or symbols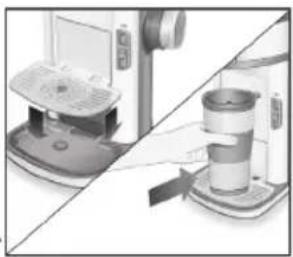
natural_image
Two-panel image showing a device with a lid and a cup, connected by a diagonal line (no text or symbols visible)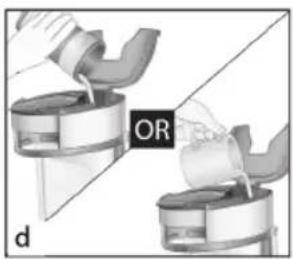
natural_image
Diagram showing two mechanical components with a labeled section 'OR' (no text or symbols on the components themselves)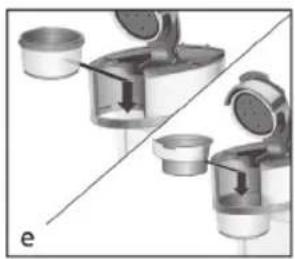
natural_image
Diagram of two identical mechanical devices with liquid-filled cups, connected by a diagonal line (no text or symbols)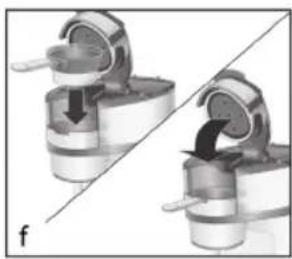
natural_image
Mechanical assembly diagram showing two stages of a mechanical component with arrows indicating motion (no text or symbols)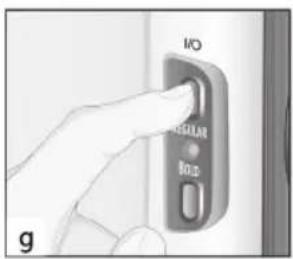
ملاحظة
natural_image
Illustration of a white wine jar and a digital kitchen unit (no text or symbols visible)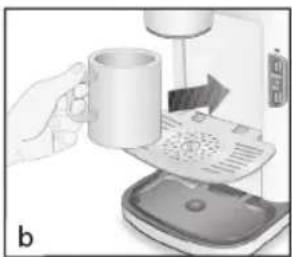
natural_image
Illustration of a hand pouring a mug into a machine with a paper filter (no text or symbols visible)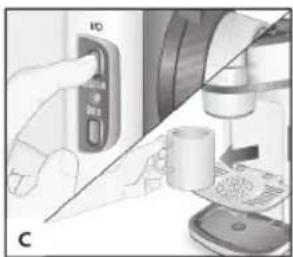
natural_image
Illustration of a hand operating a device with a control panel and a mug, no visible text or symbols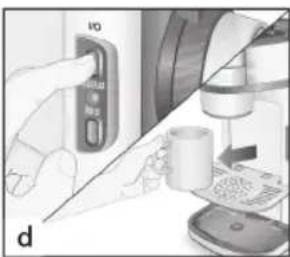
natural_image
Illustration of a hand using a device to interact with a coffee machine (no text or symbols visible)تنظيف هيكل الجهاز
natural_image
Illustration of a hand using a kitchen mixer machine to clean food (no text or symbols visible)تنظيف ملحقات الجهاز
natural_image
Illustration of a hand using a pipette to clean water from a sink (no text or symbols)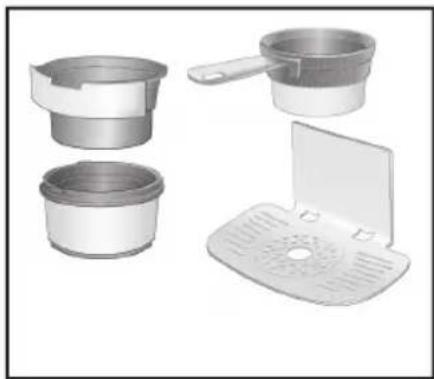
natural_image
Illustration of four different kitchen or cleaning equipment components, including a cup holder, lid, and base plate (no text or symbols)ملاحظة
Fakir customer service/
Kundenservice:
Rights to make changes are reserved.
Subject to revision
92 06 994 - 9911




- AROMA SOLO
- DE
- HINWEIS!
- EN
- Dear Customer,
- On the Operating Instructions
- Meanings of the Symbols
- WARNING!!
- ATTENTION!
- NOTE!
- Danger of Burn!
- Liability
- EC Conformity Declaration
- Intended Use
- Unauthorized Use
- Safety is Important
- Security Warnings
- Unpacking
- Box Contents
- Technical Specifications
- Introducing the Control Panel
- Regular Coffee Mode
- Bold Coffee Mode
- Placing the Thermos / Cup to the Appliance
- Filling the Water Tank
- Placing Coffee in the Filter
- Placing the Coffee Filter into the Appliance
- Use of The Appliance
- Cleaning and Maintenance
- Cleaning the Main Body of the Appliance
- Cleaning the Accessories of the Appliance
- Cleaning the Collection Chamber
- Storage
- Troubleshooting
- Recycling
- Shipping
- NOT / NOTES
- Türkçe
- TR
- Cihazın Kullanımı
- NOT!
- Эксплуатация
- RU
- ПРИМЕЧАНИЕ!
Brand : FAKIR
Model : Aroma Solo
Category : Coffee maker