
BP6310C - Metal Lathe BLAUPUNKT - Free user manual and instructions
Find the device manual for free BP6310C BLAUPUNKT in PDF.

| Product Type | Metal Lathe |
| Brand | Blaupunkt |
| Model | BP6310C |
| Power Supply | Battery 2.0Ah Li-Ion |
| Charging Time | 1 hour |
| Weight | 3.46 kg |
| Variable Speed | 0-450 RPM (low), 0-1650 RPM (high) |
| Max Torque | 38 Nm |
| Chuck Type | Keyless Jacobs 13mm |
| Electric Brake | Yes |
| Clutch Settings | 21+1 torque settings |
| Battery Capacity | 2.0Ah Li-Ion |
| Warranty | 3 years (excluding batteries) |
| Safety Features | Wear eye, ear, hand protection; use RCD; avoid wet conditions |
| Maintenance | Clean with dry cloth, store in dry place, do not disassemble battery |
| Repairability | Service by qualified personnel only; use identical replacement parts |
Frequently Asked Questions - BP6310C BLAUPUNKT
User questions about BP6310C BLAUPUNKT
0 question about this device. Answer the ones you know or ask your own.
Ask a new question about this device
Download the instructions for your Metal Lathe in PDF format for free! Find your manual BP6310C - BLAUPUNKT and take your electronic device back in hand. On this page are published all the documents necessary for the use of your device. BP6310C by BLAUPUNKT.
USER MANUAL BP6310C BLAUPUNKT
natural_image
Black and white photo of a Blaupunkt Lithium-ion DNA9 electric drill press tool (no visible text or symbols on the device body)Enjoy it.
Cordless combi-drill
Drehzahl-Vorwahl
Power Tools – General Safety Guidelines
This guidance is general guidance for all electrical power tools and accessories such as chargers, other advice specific to the supplied power tool is contained in the relevant section of this manual. Failure to adhere to the following may result in electric shock or serious injury.
- Wear Protective Equipment: Ensure you wear all personal protective equipment as directed in this manual.
- Eye Protection: Always wear eye protection. Any power tool can throw foreign objects into your eyes and cause permanent eye damage. ALWAYS wear safety goggles (not glasses) that comply with EU safety standard EN166. Everyday glasses have only impact resistant lenses. They ARE NOT safety glasses.
• Hand Protection: Always wear suitable gloves compliant with EU safety standard EN388
• Hearing Protection: Always wear suitable hearing protection compliant with EU safety standard EN352
- Dust Masks: Always wear a dust mask compliant with EN149/EN405 suitable for the material you are working with.
- Before each use: You must inspect the condition of the tool. If any damage is found you must not use the tool and have it repaired by a suitably qualified person.
- Check Working Area: Check your work area to ensure it is clear of hazards and people, always maintain a tidy area while working to reduce risk of injury.
- Wet and Damp: Electrical tools must not be used in wet, damp conditions or during rain, neither should they be left or stored outside. Never touch the plug or operate the machine with wet hands.
- Dress properly: Do not wear loose clothing or jewellery. Keep your hair, clothing and gloves away from moving parts. Loose clothes, jewellery or long hair can be caught in moving parts.
• Take Regular Breaks: Tiredness can result in loss of concentration and makes working with tools dangerous.
- Adults Only: Power tools are designed for use by able bodied ADULTS only. If you are in any way unsure of your ability to use the tool – do not use it.
- Training: Never use a power tool unless you have undertaken formal training in its use, there are often unforeseen factors that may put you or others in danger.
- Loaning Tools: Only loan tools to people you are sure are trained to use them. Always provide the instruction manual along with the tool.
• Medicines and Drugs: Never operate tools or machinery if you are taking medication that may leave you drowsy, or if you are under influence of alcohol or illegal drugs.
- Store in a Safe Place: When not in use or once you have finished using, Power tools must always be stored in a safe place away from damp/water and not accessible to children or others. In between breaks or tasks it is important to ensure that tools are placed in a safe location.
- For Intended Use Only: Power tools should be used for their intended use only – always check the manual if unsure.
- Dust: If devices are provided for the connection of dust extraction and collection facilities, ensure these are connected and properly used. Use of dust collection can reduce dust related hazards.
- Water: Do not expose power tools to rain or wet conditions. Water entering a power tool will increase the risk of electric shock.
- Explosion Hazard: Do not operate power tools in explosive atmospheres, such as in the presence of flammable liquids, gases or dust. Power tools create sparks which may ignite the dust or fumes.
• Service: Have your power tool serviced by a qualified repair person using only identical replacement parts. This will ensure that the safety of the power tool is maintained.
Electrical Tools – General Safety Guidelines
These are still relevant if you have purchased a battery tool and it is supplied with a battery charger.
- Use an RCD: For safe operation it is always necessary to use and RCD device which will protect you in the case of an electrical emergency.
- Operating voltage: Before putting the tool into operation, make sure that the voltage stated on the rating plate is the same as that of your electricity supply.
- Extension cables: Always ensure a cable is does not become a trip hazard by routing it safely to your work location. Do not walk, ride or place objects on the cable as it will result in damage. It is important that you are aware of the location of an extension cable whenever you are working to prevent accidents. Always protect power cables from sharp edges, heat and oil. Do not allow the cable to become knotted or kinked.
- If the extension cord becomes damaged: Pull the plug immediately from the socket outlet, do not touch the cable until you have done so.
Battery Tools – General Safety Guidelines
These guidelines are relevant for all tools supplied with a battery.
- Battery Acid Hazard: If accidental damage occurs to the battery or it is used under abusive conditions, liquid may be ejected from the battery; avoid contact. Liquid ejected from the battery may cause irritation or burns.
- If Contact Occurs, quickly flush with water. If liquid contacts eyes flush with water for a minimum of 10 minutes and seek medical help. Inform the medical staff that the liquid is a 25 - 35% solution of potassium hydroxide.
- Connecting A Battery: Before connecting a battery to a power tool always ensure that the on/off switch is locked in the off position. Unintentional activation of the tool may result in serious personal injury.
- Transporting The Tool: Always remove the battery before transporting the tool when transporting the tool to avoid unintentional activation.
- Charger: Recharge only with the charger specified by the BLAUPUNKT. A charger that is suitable for one type of battery pack may create a risk of fire when used with another battery pack.
- Correct Battery: Use BLAUPUNKT power tools only with BLAUPUNKT battery packs. Use of any other battery packs may create a risk of injury and fire.
- Short Circuit Hazard: When battery pack is not in use, keep it away from other metal objects, like paper clips, coins, keys, nails, screws or other small metal objects that can make a connection from one terminal to another. Shorting the battery terminals together may cause burns or a fire.
- Do Not Open: Never attempt to open the battery pack for any reason. If the plastic housing of the battery pack breaks open or cracks, immediately discontinue its use and do not recharge it.
- Disposal: When the battery reaches the end of it's life or is disposed of for any other reason, it must not be disposed of in household waste. In order to protect the environment please take to your local waste recycling centre or other authorised collection and disposal facility.
Battery Tools – Charging The Battery
The following guidelines will ensure the lifetime of the battery and charger is not reduced.
- Charge Before Use: The battery pack for this tool has been shipped in a low charge condition. You should charge the battery pack fully before use.
- Charge Cycles: Batteries will not reach full charge the first time they are charged. Allow several cycles (operation followed by recharging) for them to become fully charged.
- Indicator Lights: The red LED on the front right hand side of the charger will illuminate to indicate charging is in progress. A green LED will illuminate when the battery is fully charged. If at any point during the charging process none of the LEDs are lit, remove the battery pack from the charger to avoid damaging the product. DO NOT insert another battery.
• Overcharging: Once the battery is charged and the green light is illuminated remove the battery immediately.
- Temperature: Do not charge batteries when the work area or the battery temperature is at or below 0^ or above 45^ .
- Charger Care: When charging more than one battery pack in succession allow at least 30 minutes for the charger to cool down before charging an additional battery.
Battery Tools – Battery Charge Level Lights
The battery is fitted with a charge level indicator so you can check the remaining power during use. To display the remaining charge press the button on the side of the battery and refer to the following table.
| Number of Lights Illuminated Charge Remaining | |
| 0 0 – 10 % | |
| 1 10 – 25 % | |
| 2 25 – 50 % | |
| 3 50 – 75 % | |
| 4 75 – 100 % | |
Two Speed Gear Setting
The drill is fitted with a 2 speed gear system allowing for high and low drilling speeds. To set the speed use the slider switch on the top of the drill.
• Use the low (1) speed for high power and torque applications.
• Use the high (2) speed for low power fast drilling applications.
- Do not attempt to adjust the speed setting while the drill is in use otherwise the gears will be damaged.
Drilling (Wood and other soft materials)
- If drilling in a small workpiece, make sure it is securely held in a vice or clamped to a secure platform such as a bench or table.
- Install the correct drill bit in the chuck. Rotate the chuck body to loosen or tighten the drill bit in the chuck. Never use the drill's power to rotate the chuck body.
- Select the rotation direction to clockwise using the button located above the trigger switch.
- Select the correct transmission speed. Use the slower speed for drilling large holes.
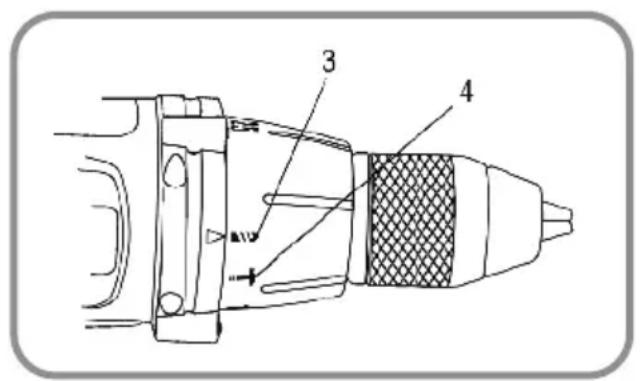
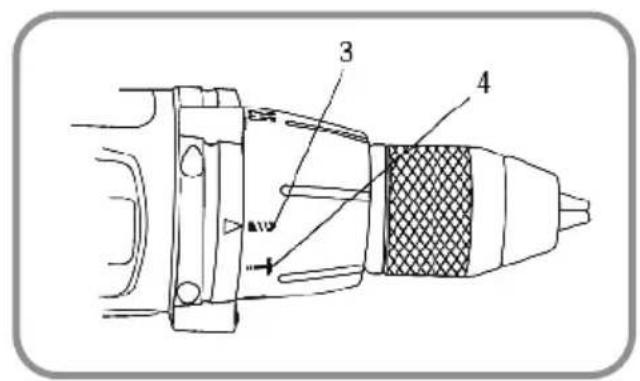
• Set the torque adjusting collar to the drilling position (Fig.2 (3)). - Slide the fully charged battery pack onto the base of the handle.
- Mark the drilling point with a centre punch when drilling in metal to prevent the drill bit from slipping off centre as you begin drilling.
- Place the drill bit at the location of the hole to be drilled and squeeze the trigger. The harder you squeeze, the faster the drill turns.
Drilling (Masonry)
- Follow drilling instructions as above but adjust the collar to the hammer position (Fig.2 (4))
• Use only drill bits suitable for masonry. - It is not recommended to use the hammer setting when drilling into wall and floor tiles as this may cause them to crack or shatter, instead use a specialist bit and use the standard drilling function as above.
Driving Screws
| Suggested Torque Settings | |
| 1-4 Driving small screws | |
| 5-8 Driving medium size screws into soft materials | |
| 9-14 Driving screws into soft and medium-density materials | |
| 15-21 Driving screws into hardwood |
- Install the correct screwdriver bit in the chuck. Use the largest bit size that will properly that the screw. Make sure the that sides of the bit are gripped by the chuck.
• Set the transmission speed to low speed. - Set the rotation directions to clockwise.
• Set the torque collar desired setting (Fig.1(1)) - Place the screwdriver bit into the screw and hold the bit firmly into the screw to prevent slippage and drive a test screw.
- After driving a test screw, adjust the torque setting up or down so the screw is driven to the desired depth without being over driven.
- Release the trigger immediately when the torque clutch begins to 'rattle'.
- Screws can be removed by reversing the direction of the rotation.
| Product Specifications | |
| Keyless Jacobs Chuck 13mm | |
| Variable Speed 0-450 RPM and 0-1650 RPM | |
| Max Torque 38nm | |
| Clutch 21+1 Torque Settings | |
| Electric Brake Yes | |
| Battery 2.0Ah Li-Ion | |
| Charge Time 1 Hour | |
| Weight 3.46 Kg | |
Symbols
The manual or rating plate on your tool may show symbols. These represent important information about the product or instructions on its use.
 | You must read the instruction manua Wear |  | footwear |
 | Product is compliant with CE safety standards |  | Wear ear protection |
 | Product is compliant with RoHS safety standards |  | Wear safety gloves |
 | General warning |  | Wear protective clothing |
 | Dispose of in compliance with WEEE standards |  | Wear safety mask |
 | Contains Lithium-Ion battery |  | Wear eye protection |
 | Product is double insulated |  | Wear head protection |
 | Fire hazard |  | Wear respiratory protection |
| Electrocution hazard |
DISPOSAL

Do not dispose of in general waste.
As stated in European Directive 2012/19/EU for Waste Electrical and Electronic Equipment, this product must be disposed of in an environmentally safe manner. We recommend taking it to a recycling facility.
Warranty
This product has 3 Years Warranty (except batteries) for manufacturing defects. The warranty period will be counted from the date of purchase of the product, according to purchase invoice. Product warranty only covers manufacturing defects, defects resulting from improper use, such as dropping, improper transportation, connection to the mains power supply not in compliance with the voltage specified in this manual, insertion of foreign objects and natural wear of parts and parts Such as plastic parts (caps, buttons, handles, latch locks, power cables, etc.) and metal parts (wires, motors, etc.).
Also not covered are damages due to agents of nature, lightning, food, sea, oxidation, humidity etc.). The product will lose its warranty if it presents defects, which after analysis by our technicians, are characterised as being improperly used, used for professional use or for the purpose for which it is not intended (according to the Owner's Manual). This warranty will be void if it is found that the device has been tampered with, has been repaired by a person or service not authorised by Blaupunkt. The guarantee is only valid with the receipt/invoice provided at purchase.
We undertake to provide the above-mentioned services within the warranty period only in places where it maintains an authorised service. Consumers not located near an authorised service centre are responsible for the costs and risks of transport to an authorised service.
Territorial Limitations: Any repair, replacement, or support of the Products provided under the Warranty (or any other support service offered in our sole discretion), shall be restricted to, and provided solely within, the Distribution Territory as then in effect on the date the Product is delivered to you. If you purchase a Product within a defined Distribution Territory and later transport the Product outside of the Distribution Territory, we cannot provide returns, warranty, out-of-warranty, or aftermarket support of any kind outside the Distribution Territory.
Natural 'wear and tear' is not covered under warranty.
This product is for domestic use only.
SAVE THESE INSTRUCTIONS
Imported and distributed by:
UNOLD AG
Mannheimer Straße 4
68766 Hockenheim
Tel.: 06205 9418 0
E-Mail: info@unold.de

- Enjoy it.
- Drehzahl-Vorwahl
- Power Tools – General Safety Guidelines
- Electrical Tools – General Safety Guidelines
- Battery Tools – General Safety Guidelines
- Battery Tools – Charging The Battery
- Battery Tools – Battery Charge Level Lights
- Two Speed Gear Setting
- Drilling (Wood and other soft materials)
- Drilling (Masonry)
- Driving Screws
- Symbols
- DISPOSAL
- Warranty
Brand : BLAUPUNKT
Model : BP6310C
Category : Metal Lathe