
Vostro 5502 - Laptop DELL - Free user manual and instructions
Find the device manual for free Vostro 5502 DELL in PDF.


User questions about Vostro 5502 DELL
0 question about this device. Answer the ones you know or ask your own.
Ask a new question about this device
Download the instructions for your Laptop in PDF format for free! Find your manual Vostro 5502 - DELL and take your electronic device back in hand. On this page are published all the documents necessary for the use of your device. Vostro 5502 by DELL.
USER MANUAL Vostro 5502 DELL
Setup and specifications guide
Notes, cautions, and warnings
NOTE: A NOTE indicates important information that helps you make better use of your product.
CAUTION: A CAUTION indicates either potential damage to hardware or loss of data and tells you how to avoid the problem.
WARNING: A WARNING indicates a potential for property damage, personal injury, or death.
Contents
Chapter 1: Set up your computer....5
Chapter 2: Chassis overview....7
Display view....7
Right view....8
Left view....8
Palm-rest view....9
Bottom view....10
Keyboard shortcuts....10
Chapter 3: System specifications....12
Processor....12
Chipset....13
Operating system....13
Memory....13
Storage....13
Ports and connectors....14
Audio....15
Video....15
Camera....15
Communications....16
Media-card reader....17
Power adapter....17
Battery....17
Dimensions and weight....18
Display....18
Keyboard....19
Touchpad....20
Touchpad gestures....20
Fingerprint reader (optional)....20
Security....20
Security Software....20
Computer environment....21
Chapter 4: Software....22
Downloading Windows drivers.... 22
Chapter 5: System setup....23
Boot menu....23
Navigation keys....23
Boot Sequence....24
BIOS setup....24
Overview....24
Boot configuration.... 25
Integrated Devices....26
Storage....27
Display....27
Connection options....28
Power management....28
Security....29
Password....30
Update and Recovery....32
System management....32
Keyboard....33
Pre-boot behavior....34
Virtualization support....35
Performance....35
System logs....36
Updating the BIOS in Windows 36
Updating BIOS on systems with BitLocker enabled....37
Updating the Dell BIOS in Linux and Ubuntu environments....37
Flashing the BIOS from the F12 One-Time boot menu....37
System and setup password....42
Assigning a system setup password....43
Deleting or changing an existing system setup password....43
Chapter 6: Getting help....44
Contacting Dell....44
Set up your computer
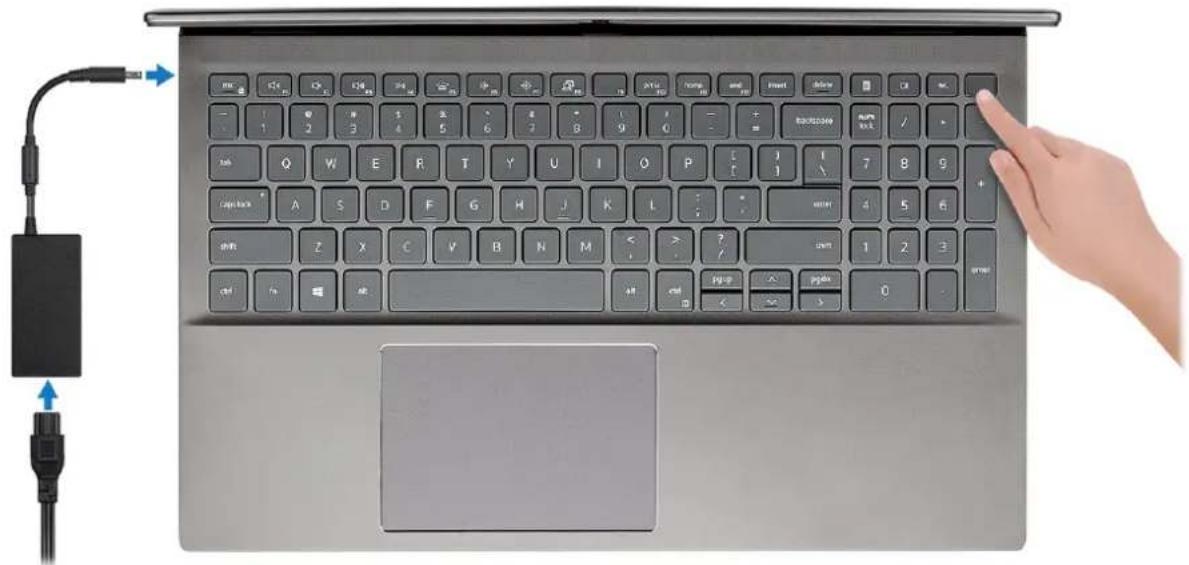
- Connect the power adapter, and press the power button.
text_image
Laptop keyboard with attached cable and power adapter, showing mouse pointer on keyboardNOTE: To conserve battery power, the battery might enter power-saving mode. Connect the power adapter and press the power button to turn on the computer.
NOTE: After the initial turn on and setup of the computer, the computer can subsequently turn on just by opening the display from a closed position.
- Finish operating system setup.
For Ubuntu:
Follow the on-screen instructions to complete the setup. For more information about installing and configuring Ubuntu, see the knowledge base articles SLN151664 and SLN151748 at www.dell.com/support.
For Windows: Follow the on-screen instructions to complete the setup. When setting up, it is recommended that you:
- Connect to a network for Windows updates.
NOTE: If connecting to a secured wireless network, enter the password for the wireless network access when prompted.
- If connected to the internet, sign in with or create a Microsoft account. If not connected to the internet, create an offline account.
-
On the Support and Protection screen, enter your contact details.
-
Locate and use Dell apps from the Windows Start menu—Recommended
Table 1. Locate Dell apps
| Dell apps Details | |
| My DellCentralized location for key Dell applications, help articles, and other important information about your computer. It alsonotifies you about the warranty status, recommended accessories, and software updates if available. | |
 | Dell Product RegistrationRegister your computer with Dell. |
 | Dell Help & SupportAccess help and support for your computer. |
 | SupportAssistProactively checks the health of your computer's hardware and software. i NOTE:Renew or upgrade your warranty by clicking the warranty expiry date in SupportAssist. |
 | Dell UpdateUpdates your computer with critical fixes and important device drivers as they become available. |
 | Dell Digital DeliveryDownload software applications including software that is purchased but not pre-installed on your computer. |
Chassis overview
Topics:
- Display view
- Right view
- Left view
- Palm-rest view
- Bottom view
- Keyboard shortcuts
Display view

text_image
1 2 3 4 5 D4LL 6- Microphone
- Camera shutter
- Camera
- Camera-status light
- Microphone
- Display
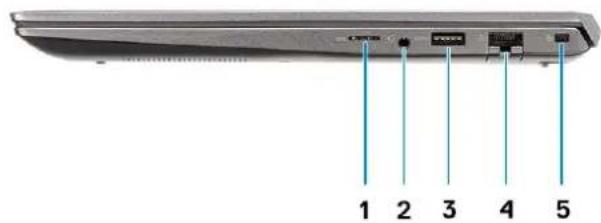
Right view
text_image
1 2 3 4 5- microSD card reader
- Universal audio jack port
- USB 3.2 Gen 1 Type-A port
- Network port
- Wedge-shaped lock slot
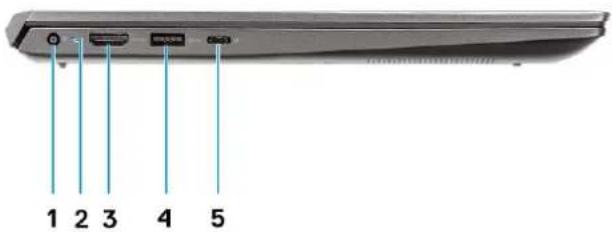
Left view
text_image
1 2 3 4 5- Power connector port
- Power LED
- HDMI 1.4b port
- USB 3.2 Gen 1 Type-A port
- USB 3.2 Gen 2 Type-C port with DisplayPort alt mode/Power Delivery
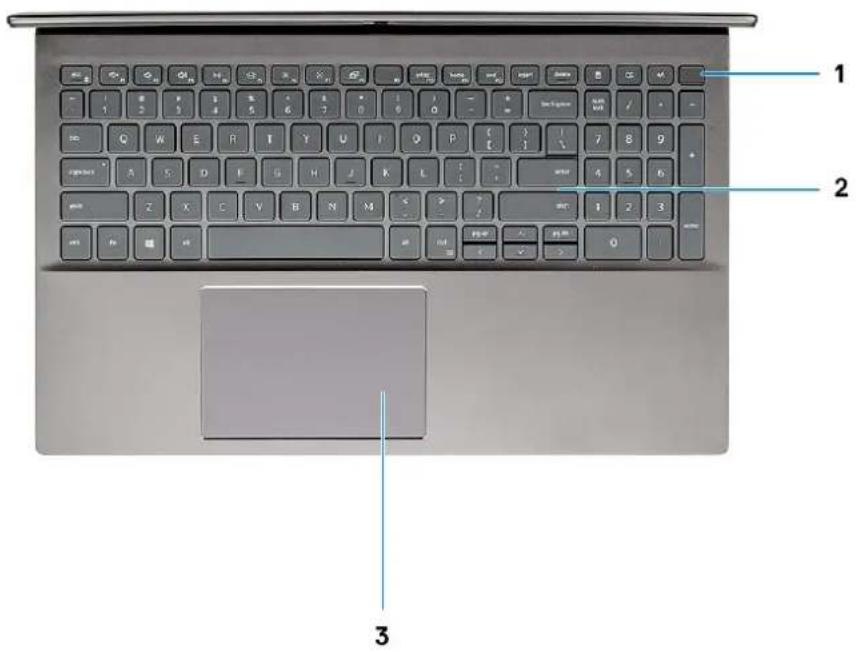
Palm-rest view
text_image
Laptop keyboard with labeled keys and a mouse pointer, showing front and back views with numbered annotations.- Power button with optional fingerprint reader
- Keyboard
- Touchpad
Bottom view
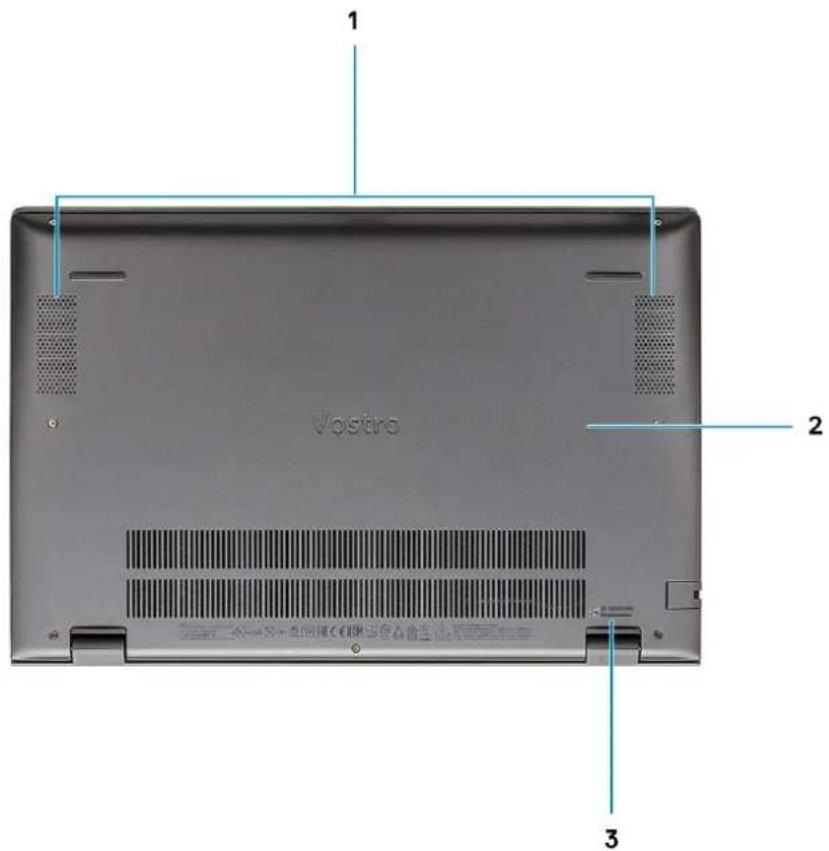
text_image
1 Vostro 2 3- Speakers
- Base cover
- Service tag label
Keyboard shortcuts

NOTE: Keyboard characters may differ depending on the keyboard language configuration. Keys that are used for shortcuts remain the same across all language configurations.
Table 2. List of keyboard shortcuts
| Keys Description | |
| Fn + Esc Toggle Fn-key lock | |
| Fn + F1 Mute audio | |
| Fn + F2 Decrease volume | |
| Fn + F3 Increase volume | |
| Fn + F4 Play/Pause | |
| Fn + F5 Keyboard backlight | i|NOTE: Not applicable for non-backlight keyboard. |
| Fn + F6 Decrease screen brightness | |
| Fn + F7 Increase screen brightness | |
| Fn + F8 External display | |
| Fn + F10 Print Screen | |
| Fn + F11 Home | |
| Fn + F12 End | |
| Fn + Right Ctrl Opens application menu |
System specifications

NOTE: Offerings may vary by region. The following specifications are only those required by law to ship with your computer. For more information about the configuration of your computer, go to Help and Support in your Windows operating system and select the option to view information about your computer.
Topics:
- Processor
- Chipset
- Operating system
- Memory
- Storage
- Ports and connectors
- Audio
- Video
- Camera
- Communications
• Media-card reader - Power adapter
- Battery
- Dimensions and weight
- Display
- Keyboard
- Touchpad
• Fingerprint reader (optional) - Security
- Security Software
• Computer environment
Processor
The following table lists the details of the processors supported by your Vostro 5502.
Table 3. Processor
| Description Option one Option | two Option three | ||
| Processor type | 11^th Generation Intel Core i3-115G4 | 11^th Generation Intel Core i5-1135G7 | 11^th Generation Intel Core i7-1165G7 |
| Processor wattage | 15 W 15 W 15 W | ||
| Processor core count | 2 4 4 | ||
| Processor thread count | 4 8 8 | ||
| Processor speed | 3 GHz to 4.1 GHz 2.4 GHz to 4.2 | GHz 2.8 GHz to 4.7 GHz | |
| Processor cache | 8 MB 8 MB 12 MB | ||
| Integrated graphics | Intel UHD Graphics Intel Iris X | ^e Graphics Intel Iris X | ^e Graphics |
Chipset
Table 4. Chipset
| Description Values | |
| Chipset | Integrated |
| Processor | 11^th Generation Intel Core i3/i5/i7 |
| DRAM bus width | 64-bit |
| Flash EPROM | 16 MB / 8 MB |
| PCIe bus | Up to Gen 3 |
Operating system
●Windows 10 Pro (64-bit)
- Ubuntu
Memory
Table 5. Memory specifications
| Description Values | |
| Slots | Two SO-DIMM slots |
| Type | DDR4 |
| Speed | 3200 MHz |
| Maximum memory | 32 GB |
| Minimum memory | 4 GB |
| Configurations supported | ●4 GB, 1 x 4 GB, DDR4, 3200 MHz●8 GB, 1 x 8 GB, DDR4, 3200 MHz●8 GB, 2 x 4 GB, Dual-Channel DDR4, 3200 MHz●12 GB, 1 x 4 GB + 1 x 8 GB, DDR4, 3200 MHz●16 GB, 1 x 16 GB, DDR4, 3200 MHz●16 GB, 2 x 8 GB, Dual-Channel DDR4, 3200 MHz●32 GB, 2 x 16 GB, Dual-Channel DDR4, 3200 MHz |
Storage
Your computer supports one of the following configurations:
●M.2 drive x1
- M.2 drive x2
The primary drive of your computer varies with the storage configuration. For computers with two M.2 drives, the SSD-1 M.2 drive is the primary drive.

NOTE: Vostro 5502 supports the following storage configurations:
●M.2 slot one: One PCIe Gen3 x4 NVMe solid-state drive (M.2 2230 or M.2 2280).
- M.2 slot two: One PCIe Gen3 x4 NVMe or SATA solid-state drive (M.2 2230 or M.2 2280) or one Intel Optane Memory H10 with solid state storage.
Table 6. Storage specifications
| Storage type Interface type Capacity | ||
| M.2 2230 solid-state drive Gen 3 PCIe x4 NVMe 128 GB, 256 GB, 512 GB | ||
| M.2 2280 solid-state drive Gen 3 PCIe x4 NVMe 256 GB, 512 GB, 1 TB, 2 TB | ||
| M.2 2280, PCIe QLC NVMe, solid-state drive Gen 3 PCIe x4 NVMe 512 GB | ||
| M.2 2280, PCIe NVMe, Intel Optane Storage Gen 3 PCIe x4 NVMe 512 GB |
Ports and connectors
Table 7. External ports and connectors
| Description Values | |
| External: | |
| Network | One RJ-45 port 10/100/1000 Mbps |
| USB | ●One USB 3.2 Gen 2 Type-C port with DisplayPort alt mode/Power Delivery●Two USB 3.2 Gen 1 Type-A ports |
| Audio | One Universal Audio Jack |
| Video | One HDMI 1.4b port |
| Media card reader | One microSD card reader |
| Docking port | Not supported |
| Power adapter port | One DC-in port |
| Security | One wedge-shaped lock |
Table 8. Internal ports and connectors
| Description Values | |
| Internal: | |
| M.2 | One M.2 2230 slot for Wi-Fi and Bluetooth cardOne M.2 2230/2280 slot for solid-state drive/Intel OptaneOne M.2 2280 slot for solid-state drive/Intel OptaneNOTE:To learn more about the features of different types of M.2 cards, see the knowledge base articleSLN301626.NOTE:Hybrid Optane SSD can only be installed in SSD slot two and does not support dual TG. |
Audio
Table 9. Audio specifications
| Description Values | ||
| Controller | Realtek ALC3204 | |
| Stereo conversion | Supported | |
| Internal interface | High definition audio | |
| External interface | Universal Audio Jack | |
| Speakers | Two | |
| Internal speaker amplifier | Supported (audio codec integrated) | |
| External volume controls | Keyboard shortcut controls | |
| Speaker output: | ||
| Average | 2 W | |
| Peak | 2.5 W | |
| Subwoofer output | Not supported | |
| Microphone | Dual-array microphones | |
Video
Table 10. Discrete graphics specifications
| Discrete graphics | ||
| Controller Memory size Memory Type | ||
| NVIDIA GeForce MX330 2 GB GDDR5 | ||
| NVIDIA GeForce MX350 2 GB GDDR5 | ||
Table 11. Integrated graphics specifications
| Integrated graphics | ||
| Controller Memory size Processor | ||
| Intel UHD Graphics Shared system memory 11 | ^th Generation Intel Core i3 | |
| Intel Iris X ^e Graphics Shared system memory 11 | ^th Generation Intel Cor i5/i7 | |
Camera
Table 12. Camera specifications
| Description Values | ||
| Number of cameras | One | |
| Type | HD RGB camera | |
| Location | Front camera | |
| Sensor type | CMOS sensor technology | |
| Resolution: | ||
| Still image | 0.92 megapixel | |
| Video | 1280 x 720 (HD) at 30 fps | |
| Diagonal viewing angle | 74.90 degrees | |
Communications
Ethernet
Table 13. Ethernet specifications
| Description Values | |
| Model number | Realtek RTL8111 |
| Transfer rate | 10/100/1000 Mbps |
Wireless module
Table 14. Wireless module specifications
| Description Values | |||
| Model number | Intel Wireless-AC 9462 Intel Wi-Fi | 6 AX201 Qualcomm QCA61x4A | |
| Transfer rate | Up to 433 Mbps Up to 2400 Mbps | Up to 867 Mbps | |
| Frequency bands supported | 2.4 GHz/5 GHz 2.4 GHz/5 GHz | 2.4 GHz/5 GHz | |
| Wireless standards | ●Wi-Fi 802.11a/b/g●Wi-Fi 4 (Wi-Fi 802.11n)●Wi-Fi 5 (Wi-Fi 802.11ac) | ●Wi-Fi 802.11a/b/g●Wi-Fi 4 (Wi-Fi 802.11n)●Wi-Fi 5 (Wi-Fi 802.11ac)●Wi-Fi 6 (Wi-Fi 802.11ax) | ●Wi-Fi 802.11a/b/g●Wi-Fi 802.11n●Wi-Fi 802.11ac |
| Encryption | ●64-bit/128-bit WEP●AES-CCMP●TKIP | ●64-bit/128-bit WEP●AES-CCMP●TKIP | ●64-bit/128-bit WEP●AES-CCMP●TKIP |
| Bluetooth | Bluetooth 5.0 Bluetooth 5.1 Bluetooth 5.0 | ||
Media-card reader
Table 15. Media-card reader specifications
| Description Values | |
| Type | One microSD card reader |
| Cards supported | Secure Digital (SD) |
Power adapter
Table 16. Power adapter specifications
| Description Values | |||
| Type | 45 W 65 W | ||
| Diameter (connector) | 4.5 mm x 2.9 mm 4.5 mm x 2.9 mm | ||
| Input voltage | 100 VAC x 240 VAC 100 VAC x 240 VAC | ||
| Input frequency | 50 Hz x 60 Hz 50 Hz x 60 Hz | ||
| Input current (maximum) | 1.30 A 1.60 A/1.70 A | ||
| Output current (continuous) | 2.31 A 3.34 A | ||
| Rated output voltage | 19.50 VDC 19.50 VDC | ||
| Temperature range: | |||
| Operating | 0°C to 40°C (32°F to 104°F) 0°C to 40°C | (32°F to 104°F) | |
| Storage | -40°C to 70°C (-40°F to 158°F) -40°C to | 70°C (-40°F to 158°F) | |
Battery
Table 17. Battery specifications
| Description Values | |||
| Type | 40 WHr, 3-cell Smart Lithium-ion 53 WHr, 4-cell Smart Lithium-ion | ||
| Voltage | 11.25 VDC 15.00 VDC | ||
| Weight (maximum) | 0.18 kg (0.40 lb) 0.24 kg (0.53 lb) | ||
| Dimensions: | |||
| Height | 5.75 mm (0.23 in.) | 5.75 mm (0.23 in.) | |
| Width | 184.10 mm (7.25 in.) | 239.10 mm (9.41 in.) | |
| Depth | 90.73 mm (3.57 in.) | 90.73 mm (3.57 in.) | |
| Temperature range: | |||
| Operating | 0°C to 35°C (32°F to 95°F) | 0°C to 35°C (32°F to 95°F) | |
| Storage | -40°C to 65°C (-40°F to 149°F) -40°C | to 65°C (-40°F to 149°F) | |
| Operating time Varies depending on operating conditions and can significantly reduce under certain power-intensive conditions. | Varies depending on operating conditions and can significantly reduce under certain power-intensive conditions. | ||
| Charging time (approximate) | 4 hours (when the computer is off)NOTE: Control the charging time, duration, start and end time, and so on, using the Dell Power Manager application. For more information on the Dell Power Manager, see, Me and My Dell on www.dell.com/ | 4 hours (when the computer is off)NOTE: Control the charging time, duration, start and end time, and so on, using the Dell Power Manager application. For more information on the Dell Power Manager, see, Me and My Dell on www.dell.com/ | |
| Coin-cell battery | 2032 2032 | ||
| Operating time Varies depending on operating conditions and can significantly reduce under certain power-intensive conditions. | Varies depending on operating conditions and can significantly reduce under certain power-intensive conditions. | ||
Dimensions and weight
Table 18. Dimensions and weight
| Description Values | ||
| Height: | ||
| Front | 14.15 mm (0.56 in.) | |
| Rear | 17.90 mm (0.70 in.) | |
| Width | 356.10 mm (14.02 in.) | |
| Depth | 234.50 mm (9.23 in.) | |
| Weight | 1.70 kg (3.75 lb)i|NOTE:The weight of your computer depends on the configuration ordered and the manufacturing variability. | |
Display
Table 19. Display specifications
| Description Values | ||
| Type | Full High Definition (FHD) Full High Definition (FHD) | |
| Panel technology | Wide Viewing Angle (WVA) Wide Viewing Angle (WVA) | |
| Luminance (typical) | 300 Nits 220 Nits | |
| Dimensions (Active area): | ||
Table 19. Display specifications (continued)
| Description Values | |||
| Height | 193.60 mm (7.62 in.) 193.60 mm (7.62 in.) | ||
| Width | 344.20 mm (13.55 in.) 344.20 mm (13.55 in.) | ||
| Diagonal | 396.24 mm (15.60 in.) 396.24 mm (15.60 in.) | ||
| Native resolution | 1920 x 1080 1920 x 1080 | ||
| Megapixels | 2 | 2 | |
| Color gamut | 72% NTSC typical 45% NTSC typical | ||
| Pixels per inch (PPI) | 142 142 | ||
| Contrast ratio (min) | 600:1 400:1 | ||
| Response time (max) | 35 ms 35 ms | ||
| Refresh rate | 60 Hz 60 Hz | ||
| Horizontal view angle | 85 +/- degrees (typical) 85 +/- degrees (typical) | ||
| Vertical view angle | 85 +/- degrees (typical) 85 +/- degrees (typical) | ||
| Pixel pitch | 0.18 mm 0.18 mm | ||
| Power consumption (maximum) | 6.20 W 4.20 W | ||
| Anti-glare vs glossy finish | Anti-glare Anti-glare | ||
| Touch options | No | No | |
Keyboard
Table 20. Keyboard specifications
| Description | Values |
| Type | Standard and backlit keyboard |
| Layout | QWERTY |
| Number of keys | United States and Canada: 101 keysUnited Kingdom: 102 keysJapan: 105 keys |
| Size | X=18.70 mm key pitchY=18.05 mm key pitch |
Touchpad
Table 21. Touchpad specifications
| Description Values | ||
| Resolution: | ||
| Horizontal | 3512 | |
| Vertical | 2442 | |
| Dimensions: | ||
| Horizontal | 115 mm (4.53 in.) | |
| Vertical | 80 mm (3.15 in.) | |
Touchpad gestures
For more information about touchpad gestures for Windows 10, see the Microsoft knowledge base article 4027871 at support.microsoft.com.
Fingerprint reader (optional)
Table 22. Fingerprint reader specifications
| Description Values | |
| Sensor technology | Capacitive |
| Sensor resolution | 500 PPI |
| Sensor area | 4.06 mm x 3.25 mm |
| Sensor pixel size | 80 x 64 Pixels |
Security
Table 23. Security specifications
| Features Specifications | |
| Trusted Platform Module (TPM) 2.0 Integrated on system board | |
| Fingerprint reader Optional | |
| Wedge-shaped lock slot Standard |
Security Software
Table 24. Security Software specifications
| Specifications |
| McAfee Small Business Security 30-day Trial |
| McAfee Small Business Security 12-month subscription, Digitally Delivered |
| McAfee Small Business Security 24-month subscription, Digitally Delivered |
| McAfee Small Business Security 36-month subscription, Digitally Delivered |
Computer environment
Airborne contaminant level: G1 as defined by ISA-S71.04-1985
Table 25. Computer environment
| Description Operating Storage | ||
| Temperature range | 0°C to 35°C (32°F to 95°F) -40°C to 65°C | (-40°F to 149°F) |
| Relative humidity (maximum) | 10% to 90% (non-condensing) 0% to 95% (non-condensing) | (non-condensing) |
| Vibration (maximum) * | 0.66 GRMS 1.30 GRMS | |
| Shock (maximum) | 110 G† 160 G† | |
| Altitude (maximum) | -15.2 m to 3048 m (4.64 ft to 5518.4 ft) -15.2 | m to 10668 m (4.64 ft to 19234.4 ft) |
* Measured using a random vibration spectrum that simulates user environment.
† Measured using a 2 ms half-sine pulse when the hard drive is in use.
Software
This chapter details the supported operating systems along with instructions on how to install the drivers.
Topics:
- Downloading Windows drivers
Downloading Windows drivers
- Turn on the notebook.
- Go to Dell.com/support.
- Click Product Support, enter the Service Tag of your notebook, and then click Submit.

NOTE: If you do not have the Service Tag, use the auto detect feature or manually browse for your notebook model.
- Click Drivers and Downloads.
- Select the operating system installed on your notebook.
- Scroll down the page and select the driver to install.
- Click Download File to download the driver for your notebook.
- After the download is complete, navigate to the folder where you saved the driver file.
- Double-click the driver file icon and follow the instructions on the screen.
System setup

CAUTION: Unless you are an expert computer user, do not change the settings in the BIOS Setup program. Certain changes can make your computer work incorrectly.

NOTE: Before you change BIOS Setup program, it is recommended that you write down the BIOS Setup program screen information for future reference.
Use the BIOS Setup program for the following purposes:
- Get information about the hardware installed in your computer, such as the amount of RAM and the size of the hard drive.
- Change the system configuration information.
- Set or change a user-selectable option, such as the user password, type of hard drive installed, and enabling or disabling base devices.
Topics:
- Boot menu
- Navigation keys
- Boot Sequence
- BIOS setup
- Updating the BIOS in Windows
- System and setup password
Boot menu
Press
The options are:
- UEFI Boot Devices:
- Windows Boot Manager
oUEFI Hard Drive
○Onboard NIC (IPV4)
○Onboard NIC (IPV6)
- Pre-Boot Tasks:
oBIOS Setup
o Diagnostics
oBIOS Update
○SupportAssist OS Recovery
- BIOS Flash Update - Remote
○Device Configuration
Navigation keys

NOTE: For most of the System Setup options, changes that you make are recorded but do not take effect until you restart the system.
Keys Navigation
Up arrow Moves to the previous field.
Down arrow Moves to the next field.
Enter Selects a value in the selected field (if applicable) or follow the link in the field.
Spacebar Expands or collapses a drop-down list, if applicable.
Tab Moves to the next focus area.
Esc
Moves to the previous page until you view the main screen. Pressing Esc in the main screen displays a message that prompts you to save any unsaved changes and restarts the system.
Boot Sequence
Boot sequence enables you to bypass the System Setup-defined boot device order and boot directly to a specific device (for example: optical drive or hard drive). During the Power-on Self-Test (POST), when the Dell logo appears, you can:
- Access System Setup by pressing F2 key
- Bring up the one-time boot menu by pressing F12 key.
The one-time boot menu displays the devices that you can boot from including the diagnostic option. The boot menu options are:
●Removable Drive (if available)
- STXXXX Drive
NOTE: XXXX denotes the SATA drive number.
●Optical Drive (if available)
●SATA Hard Drive (if available)
• Diagnostics
NOTE: Choosing Diagnostics, displays the SupportAssist diagnostics screen.
The boot sequence screen also displays the option to access the System Setup screen.
BIOS setup

NOTE: Depending on the tabletcomputerlaptop and its installed devices, the items listed in this section may or may not appear.
Overview
Table 26. Overview
| Option Description | |
| System Information | This section lists the primary hardware features of your computer.The options are:•System Information○BIOS version○Service Tag○Asset Tag○Manufacture Date○Ownership Date○Express Service Code○Ownership Tag |
Table 26. Overview
| Option Description | |
| Signed Firmware UpdateBatteryPrimaryBattery LevelBattery StateHealthAC AdapterProcessor InformationProcessor TypeMaximum Clock SpeedMinimum Clock SpeedCurrent Clock SpeedCore CountProcessor IDProcessor L2 CacheProcessor L3 CacheMicrocode VersionIntel Hyper-Threading Capable64-Bit TechnologyMemory ConfigurationMemory InstalledMemory AvailableMemory SpeedMemory Channel ModeMemory TechnologyDIMM_Slot 1DIMM_Slot 2Device InformationPanel TypeVideo ControllerVideo MemoryWi-Fi DeviceNative ResolutionVideo BIOS VersionAudio ControllerBluetooth DeviceLOM MAC AddressdGPU Video Controller |
Boot configuration
Table 27. Boot configuration
| Option Description | |
| Boot Sequence | Allows you to change the order in which the computer attempts to find an operating system.The options are:●Windows Boot Manager●UEFI Hard Drive●Onboard NIC (IPV4)●Onboard NIC (IPV6)i|NOTE: Legacy Boot mode is not supported on this platform. |
| Secure Boot | Secure Boot helps ensure your system boots using only validated boot software.Enable Secure Boot—By default, this option is disabled.i|NOTE: The system has to be in UEFI boot mode to enable Enable Secure Boot. |
| Secure Boot Mode | Changes to the Secure Boot operation mode modifies the behavior of Secure Boot to allow evaluation of UEFI driver signatures.The options are:●Deployed Mode—By default, this option is enabled.●Audit Mode |
| Expert Key Management | Allows you to enable or disable Expert Key Management.Enable Custom Mode—By default, this option is disabled.The Custom Mode Key Management options are:●PK—By default, this option is enabled.●KEK●db●dbx |
Integrated Devices
Table 28. Integrated device options
| Option Description | |
| Date/Time | Allows you to set the date and time. The change to the system date and time takes effect immediately. |
| Camera | Allows you to enable or disable camera.Enable Camera - This option is enabled by default. |
| Audio | Allows you to turn off all integrated audio. By default, the Enable Audio option is selected.Allows you to enable or disable the integrated audio or microphone and speaker separately. By default, the Enable Audio option is selected.The options are:Enable MicrophoneEnable Internal Speaker |
| USB Configuration | Allows you to enable or disable the internal or integrated USB configuration.The options are:●Enable USB Boot Support●Enable External USB PortBy default, all the options are enabled. |
| Disable USB4 PCIE Tunneling | By default the Disable USB4 PCIE Tunneling is disabled. |
Storage
Table 29. Storage options
| Option Description | |
| SATA/NVMe Operation | Allows you to set the operating mode of the integrated storage device controller.The options are:DisabledAHCI/NVMeRAID On—By default, the RAID On option is enabled. |
| Storage Interface | Allows you to enable or disable various drives on board.The options are:M.2 PCIe SSD-0M.2 PCIe SSD-1By default, all the options are enabled. |
| SMART Reporting | This field controls whether hard drive errors for integrated drives are reported during system startup. This technology is part of the Self Monitoring Analysis and Reporting Technology (SMART) specification. By default, theEnable SMART Reportingoption is disabled . |
| Drive Information | Provides information about drive type and device. |
Display
Table 30. Display options
| Option Description | |
| Display Brightness | Allows you to set the screen brightness when running on battery and AC power.The options are:•Brightness on battery power - By default, set to 50.•Brightness on AC power - By default, set to 100. |
| EcoPower | EcoPower increases the battery life by reducing the display brightness when appropriate.By default Enable EcoPower is enabled. |
| Full Screen Logo | Displays full screen logo when the image matches screen resolution.By default, all the option is disabled. |
Connection options
Table 31. Connection
| Option Description | |
| Integrated NIC | Integrated NIC controls the onboard LAN controller. It allows pre-OS and early operating system networking features to use any enabled NICs when UEFI networking protocols are installed and available.The options are:DisabledEnabledEnabled with PXE - This option is enabled by default. |
| Wireless Device Enable | Allows you to enable or disable the internal wireless devices.The options are:WLANBluetoothBoth the options are enabled by default. |
| Enable UEFI Network Stack | Allows you to control the onboard LAN controller. It allows pre-OS and early operating system networking features to use any enabled NICs when UEFI networking protocols are installed and available.Enable UEFI Network Stack - This option is enabled by default. |
Power management
Table 32. Power Management
| Option Description | |
| Battery Configuration | Allows the system to run on battery during peak power usage hours.The options are:Adaptive—enabled by defaultStandardExpressChargePrimarily AC UseCustomNOTE:If Custom Charge is selected, you can also configure Custom Charge Start and Custom Charge Stop. |
| Advanced Configuration | This option enables you to maximize the battery health.By default, theEnable Advanced Battery Charge Modeoption is disabled.NOTE:The user can charge battery using featureBeginning of Dayand Work Period.By default,Work Periodis disabled.Use ExpressCharge for accelerated battery charging. |
| Peak Shift | Allows the system to run on battery during peak power usage hours.Peak Shift- By default, this option is disabled. i NOTE: The user can:• Set Battery Threshold Min = 15, Max = 100• Prevent AC power between certain times of the day using Peak Shift Start, Peak Shift End, and Peak Shift Charge Start. |
| Thermal Management | Allows cooling of fans and the processor heat management to adjust system performance, noise, and temperature.The options are:•Optimized—enabled by default•Cool•Quiet•Ultra Performance |
| USB Wake Support | Wake on Dell USB-C Dock Allows you to connect a Dell USB-C Dock to wake the system from standby mode.By default, the option Wake on Dell USB-C Dock is enabled. i NOTE: These features are only functional when the AC power adapter is connected. If the AC power adapter is removed before Standby, the BIOS removes power from all USB ports to conserve battery power. |
| Block Sleep | This option enables you to block entering to sleep (S3) mode in operating system environment. By default, the Block Sleep option is disabled. i NOTE: When Block Sleep is enabled, the system does not go to sleep. Intel Rapid Start gets disabled automatically, and the operating system power option remains blank if it was set to Sleep. |
| Lid Switch | Allows you to disable the lid switch.The options are:•Enable Lid Switch—enabled by default•Power On Lid Open—enabled by default |
| Intel Speed Shift technology | Allows you to enable or disable the Intel Speed Shift Technology support. By default,Intel Speed Shift technology is enabled. Enabling this option allows the operating system to select appropriate processor performance. |
Security
Table 33. Security
| Option Description | |
| TPM 2.0 Security | Allows you to enable or disable the Trusted Platform Module (TPM).The options are:•TPM 2.0 Security On—This option is enabled by default.•PPI Bypass for Enable Commands●PPI Bypass for Disable Commands●PPI Bypass for Clear Command●Attestation Enable—This option is enabled by default.●Key Storage Enable—This option is enabled by default.●SHA-256—This option is enabled by default.●Clear●TPM State—This option is enabled by default. |
| SMM Security Mitigation | Allows you to enable or disable additional UEFI SMM Security Mitigation protection.SMM Security Mitigation - By default, this option is enabled. |
| Data Wipe on Next Boot | Allows BIOS to queue up data wipe cycle for storage devices connected to the motherboard on the next reboot.Start Data Wipe - By default, this option is disabled. i|NOTE: Secure Wipe operation deletes information in a way that it cannot be reconstructed. |
| Absolute | This field allows you to Enable, Disable, or Permanently Disable the BIOS module interface of the optional Absolute Persistence Module service from Absolute® Software.The options are:●Enabled—This option is enabled by default.●Disabled●Permanently Disable Absolute |
| UEFI Boot Path Security | Controls whether the system prompts the user to enter the admin password (if set) when booting to a UEFI boot path device from the F12 boot menu.The options are:●Never●Always●Always Except Internal HDD—This option is enabled by default.●Always Except Internal HDD&PXE |
Password
Table 34. Security
| Option Description | |
| Admin Password | Allows you to set, change, or delete the administrator (admin) password.The entries to set password are:Enter the old password:Enter the new password:Press Enter once you enter the new password and again press Enter to confirm the new password. i NOTE: Deleting the admin password deletes the system password (if set). The admin password can also be used to delete hard drive password. For this reason, you cannot set an admin password if a system password or hard drive password is set. Hence, an admin password has to be set first if the admin password has to be used with system password and/or hard drive password. |
| System Password | Allows you to set, change, or delete the system password.The entries to set password are:●Enter the old password:●Enter the new password:Press Enter once you enter the new password and again press Enter to confirm the new password. |
| Password Configuration | Allows you to configure a password.Upper Case When enabled, this field reinforces password must contain at least one Letter upper capital letter.Lower Case When enabled, this field reinforces password must contain at least one Letter lower capital letter.Digit When enabled, this field reinforces password must contain at least one-digit number.Special When enabled, this field reinforces password must contain at least one character special character.i|NOTE: These options by default are disabled.Minimum Defines the number of characters allowed for a password. Min = 4Characters |
| Password Bypass | Allows you to bypass the System password and the Internal hard drive password, when it is set, during a system restart.The options are:●Disabled—This option is enabled by default.●Reboot bypass |
| Password Changes | Allows you to change the system password and hard drive password without the need of administrator password.Enable Non-Admin Password Changes - By default, this option is disabled. |
| Admin Setup Lockout | Allows the administrator to control how the user can access BIOS setup.Enable Admin Setup Lockout - By default, this option is disabled.i|NOTE:If the admin password is set and Enable Admin Setup Lockoutis enabled, you cannot view the BIOS setup (using F2 or F12) without the admin password.If the admin password is set and Enable Admin Setup Lockoutis disabled, the BIOS setup can be entered and items that are viewed in Locked mode. |
| Master Password Lockout | Allows you to disable master password support.Enable Master Password Lockout - By default, this option is disabled.i|NOTE: The Hard Disk password has to be cleared before the settings can be changed. |
Update and Recovery
Table 35. Update and recovery
| Option Description | |
| UEFI Capsule Firmware Updates | Allows you to update the system BIOS through UEFI capsule update packages.Enable UEFI Capsule Firmware Updates - By default, this option is enabled. |
| BIOS Recovery from Hard Drive | Allows you to recover BIOS on the primary hard drive or USB drive in corrupted conditions.BIOS Recovery from Hard Drive - By default, this option is enabled. i NOTE: BIOS Recovery from hard drives is not available for Self-Encrypting Drives (SED). |
| BIOS Downgrade | Allows you to control flashing of the system firmware to previous versions.Allow BIOS Downgrade - By default, this option is enabled. |
| SupportAssist OS Recovery | Allows you to enable or disable the boot flow for SupportAssist OS Recovery if there are certain system errors.SupportAssist OS Recovery - By default, this option is enabled. i NOTE: If SupportAssist OS Recovery setup option is disabled, then all the automatic boot flow for SupportAssist OS Recovery tool is disabled. |
| BIOSConnect | Allows you to recover cloud service operating system if the main operating system and/or local service operating system fails to boot with the number of failures equal to or greater than the value specified by the Auto operating system Recovery Threshold setup.BIOSConnect - By default, this option is enabled. |
| Dell Auto OS Recovery Threshold | The Auto OS Recovery threshold setup options control the automatic flow for SupportAssist System Resolution Console and for Dell OS Recovery Tool.The options are:•Off•1•2 - Default•3 |
System management
Table 36. System management
| Option Description | |
| Service Tag | Displays the service tag of your computer. |
| Asset Tag | An Asset Tag is a string of 64 characters that are used by IT administrator to uniquely identify a particular system. On an asset tag is set, it cannot be changed. |
| AC Behavior | Allows you to enable or disable the computer from turning on automatically when an AC adapter is connected.Wake on ACBy default, this option is disabled. |
| Auto On Time | This setting allows a system to automatically power on for defined days/time.The options are:●Disabled - This option is enabled by default.●Every Day●Weekdays●Select Days |
Keyboard
Table 37. Keyboard
| Option Description | |
| Numlock Enable | Allows you to enable or disable Numlock function when the system boots.Enable NumlockThis option is enabled by default. |
| Fn Lock Options | Allows you to change the function key settings.Fn Lock ModeThis option is enabled by default.The options are:Lock Mode StandardLock Mode Secondary- This option is enabled by default. |
| Keyboard Illumination | Allows you to set keyboard illumination settings using hotkeys+during normal system operation.The options are:DisabledDimBright- This option is enabled by default.1|NOTE:The keyboard illumination brightness is set at 100%. |
| Keyboard BacklightTimeout on AC | This feature defines the timeout value for the keyboard backlight when an AC adapter is plugged in the system.The options are:5 seconds10 seconds- This option is enabled by default.15 seconds30 seconds1 minute5 minutes15 minutesNeveri|NOTE:If Neveris selected, the backlight stays on always when the system has AC adapter plugged in. |
| Keyboard BacklightTimeout on Battery | This feature defines the timeout value for the keyboard backlight when the system is running only on battery power.The options are:5 seconds10 seconds - This option is enabled by default.15 seconds30 seconds1 minute5 minutes15 minutesNeverNOTE: If Never is selected, the backlight stays on always when the system is running on battery power. |
Pre-boot behavior
Table 38. Pre-boot behavior
| Option Description | |
| Adapter Warnings | This option displays warning messages during boot when adapters with little power capacity are detected.●Enable Adapter Warnings—enabled by default |
| Warnings and Errors | This option causes the boot process to only pause when warnings and errors are detected rather than stop, prompt, and wait for user input. This feature is useful where the system is being remotely managed.Select one of the following options:●Prompt on Warnings and Errors—enabled by default●Continue on Warnings●Continue on Warnings and Errorsi|NOTE:Errors deemed critical to the operation of the system hardware always stop the system. |
| USB-C Warnings | This option enables or disables dock warning messages.Enable Dock Warning Messages — enabled by default. |
| Fastboot | This option allows you to configure the speed of UEFI boot process.Select one of the following options:●Minimal●Thorough—enabled by default●Auto |
| Extend BIOS POST Time | This option allows you to configure the BIOS POST load time.Select one of the following options:●0 seconds—enabled by default.●5 seconds●10 seconds |
| Mouse/Touchpad | This option defines how the system handles mouse and touchpad input.Select one of the following options:●Serial Mouse●PS/2 Mouse●Touchpad and PS/2 Mouse—enabled by default. |
Virtualization support
Table 39. Virtualization Support
| Option Description | |
| Intel Virtualization Technology | This option specifies whether the system can run on a Virtual Machine Monitor (VMM). By default, the Enable Intel Virtualization Technology (VT) option is enabled. |
| VT for Direct I/O | This option specifies whether the system can perform Virtualization technology for direct I/O; an Intel method for virtualization for memory map I/O. By default, the Enable Intel VT for Direct I/O option is enabled. |
Performance
Table 40. Performance
| Option Description | |
| Multi Core Support | This field specifies whether the process has one or all cores enabled. The default value is set to the maximum number of cores.•All Cores — This option is enabled by default.•1•2•3 |
| Intel SpeedStep | This feature allows the system to dynamically adjust processor voltage and core frequency, decreasing average power consumption and heat production.Enable Intel SpeedStep TechnologyThis option is enabled by default. |
| C-States Control | This feature allows you to enable or disable the ability of the CPU to enter and exit low-power states.Enable C-state controlThis option is enabled by default. |
| Enable Adaptive C-states for Discrete Graphics | This feature allows the system to dynamically detect high usage of discrete graphics and adjust system parameters for higher performance during that time period.Enable Adaptive C-states for Discrete GraphicsThis option is enabled by default. |
| Intel Turbo Boost Technology | This option allows you to enable or disable the Intel TurboBoost mode of the processor.Enable Intel Turbo Boost TechnologyThis option is enabled by default. |
| Intel Hyper-Threading Technology | This option allows you to enable or disable the HyperThreading in the processor.Enable Intel Hyper-Threading TechnologyThis option is enabled by default. |
System logs
Table 41. System Logs
| Option Description | |
| BIOS Event Log | Allows you to either keep and clear the BIOS event log.Clear BIOS Event LogThe options are:Keep- This option is enabled by default.Clear |
| Thermal Event Log | Allows you to either keep and clear the Thermal event log.Clear Thermal Event LogThe options are:Keep- This option is enabled by default.Clear |
| Power Event Log | Allows you to either keep and clear the Power event log.Clear Power Event LogThe options are:Keep- This option is enabled by default.Clear |
Updating the BIOS in Windows
It is recommended to update your BIOS (System Setup) when you replace the system board or if an update is available. For laptops, ensure that your computer battery is fully charged and connected to a power before initiating a BIOS update.

NOTE: If BitLocker is enabled, it must be suspended prior to updating the system BIOS, and then re enabled after the BIOS update is completed.
For more information about this subject, see Knowledge Article: How to Enable or Disable BitLocker with TPM in Windows.
- Restart the computer.
-
Go to Dell.com/support.
-
Enter the Service Tag or Express Service Code and click Submit.
-
Click Detect Product and follow the instructions on screen.
-
If you are unable to detect or find the Service Tag, click Choose from all products.
-
Choose the Products category from the list.

NOTE: Choose the appropriate category to reach the product page.
- Select your computer model and the Product Support page of your computer appears.
- Click Get drivers and click Drivers and Downloads.
The Drivers and Downloads section opens.
- Click Find it myself.
- Click BIOS to view the BIOS versions.
- Identify the latest BIOS file and click Download.
- Select your preferred download method in the Please select your download method below window, click Download File. The File Download window appears.
- Click Save to save the file on your computer.
- Click Run to install the updated BIOS settings on your computer.
Follow the instructions on the screen.
Updating BIOS on systems with BitLocker enabled

CAUTION: If BitLocker is not suspended before updating the BIOS, the next time you reboot the system it will not recognize the BitLocker key. You will then be prompted to enter the recovery key to progress and the system will ask for this on each reboot. If the recovery key is not known, this can result in data loss or an unnecessary operating system reinstall. For more information about this subject, see Knowledge Article: Updating the BIOS on Dell Systems With BitLocker Enabled
Updating the Dell BIOS in Linux and Ubuntu environments
If you want to update the system BIOS in a Linux environment, such as Ubuntu, see Update the Dell BIOS in a Linux or Ubuntu environment.
Flashing the BIOS from the F12 One-Time boot menu
Updating your system BIOS using a BIOS update .exe file that is copied to a FAT32 USB drive and booting from the F12 one time boot menu.
BIOS Update
You can run the BIOS update file from Windows using a bootable USB drive or you can also update the BIOS from the F12 One-Time boot menu on the system.
Most Dell systems built after 2012 have this capability and you can confirm by booting your system to the F12 One-Time Boot Menu to see if BIOS UPDATE is listed as a boot option for your system. If the option is listed, then the BIOS supports this BIOS update option.

NOTE: Only systems with BIOS Flash Update option in the F12 One-Time Boot Menu can use this function.
Updating from the One-Time Boot Menu
To update your BIOS from the F12 One-Time boot menu, you need:
- USB drive formatted to the FAT32 file system (key does not have to be bootable).
- BIOS executable file that you downloaded from the Dell Support website and copied to the root of the USB drive.
- AC power adapter that is connected to the system.
●Functional system battery to flash the BIOS.
Perform the following steps to run the BIOS update flash process from the F12 menu:

CAUTION: Do not power off the system during the BIOS update process. Powering off the system could make the system fail to boot.
-
From a power off state, insert the USB drive where you copied the flash into a USB port of the system.
-
Power on the system and press the F12 key to access the One-Time Boot Menu.
-
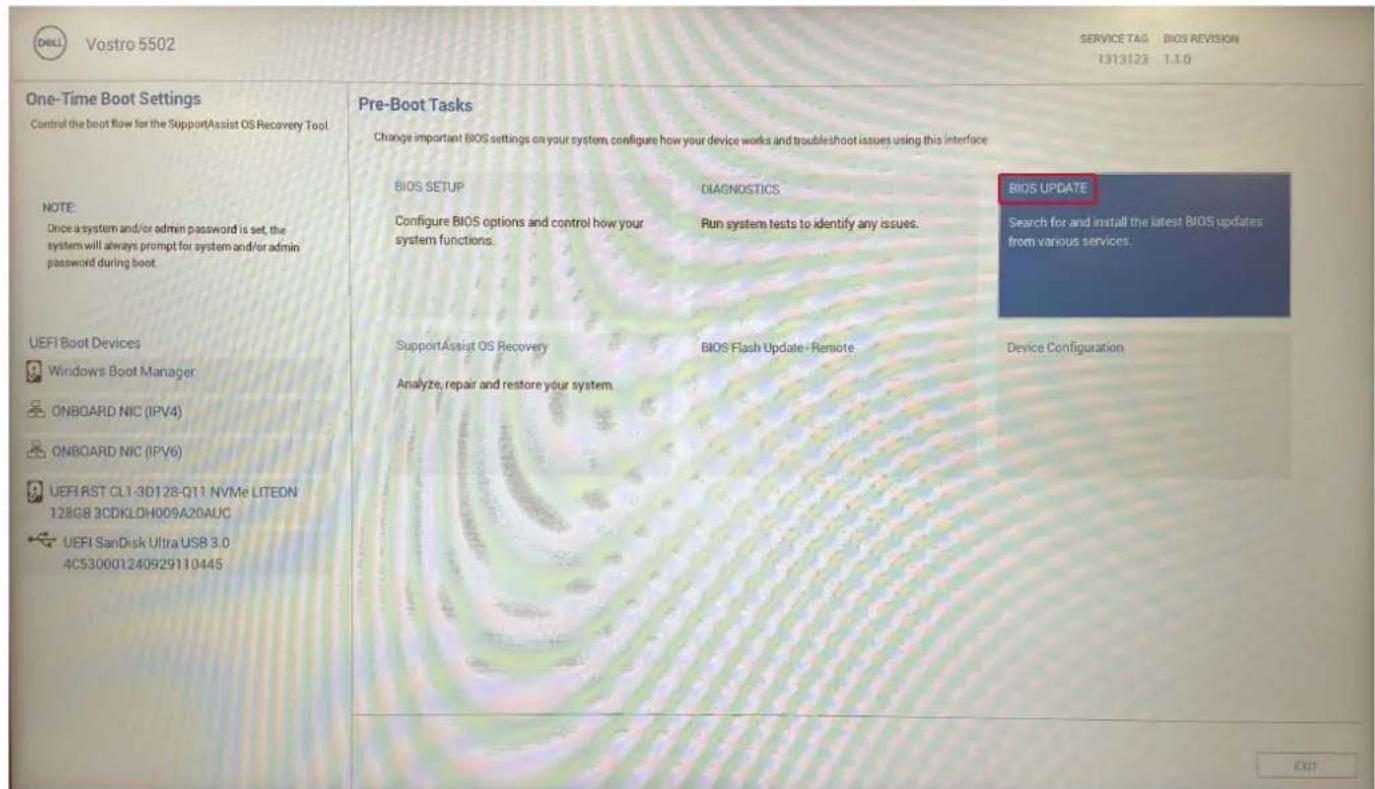
Select BIOS Update using the mouse or arrow keys then press Enter.
text_image
One-Time Boot Settings Control the boot flow for the SupportAssist OS Recovery Tool NOTE: Once a system and/or admin password is set, the system will always prompt for system and/or admin password during boot. UEFI Boot Devices Windows Boot Manager ONBOARD NIC (IPV4) ONBOARD NIC (IPV6) UEFIRST CL1-3D128-Q11 NVMe LITEON 128GB 3CDKLDH009A20AUC UEFI SanDisk Ultra USB 3.0 4C530001240929110445 Pre-Boot Tasks Change important BIOS settings on your system, configure how your device works and troubleshoot issues using this interface BIOS SETUP DIAGNOSTICS Configure BIOS options and control how your system functions. Run system tests to identify any issues. SupportAssist OS Recovery BIOS Flash Update - Remote Analyze, repair and restore your system. BIOS UPDATE Search for and install the latest BIOS updates from various services. Device ConfigurationThe Flash BIOS opens.
- Click Flash from file.
Flash BIOS
System BIOS Information
| System: | Vostro 5502 |
| Revision: | 1.1.0 |
| Vendor: | Dell |
| Power Status: | Okay |
Flash from file
| BIOS update file: | |
| System: | |
| Revision: | |
| Vendor: |
Options:
Cancel Update
- Select external USB device.
- Once the file is selected, double-click the flash target file and click Submit.
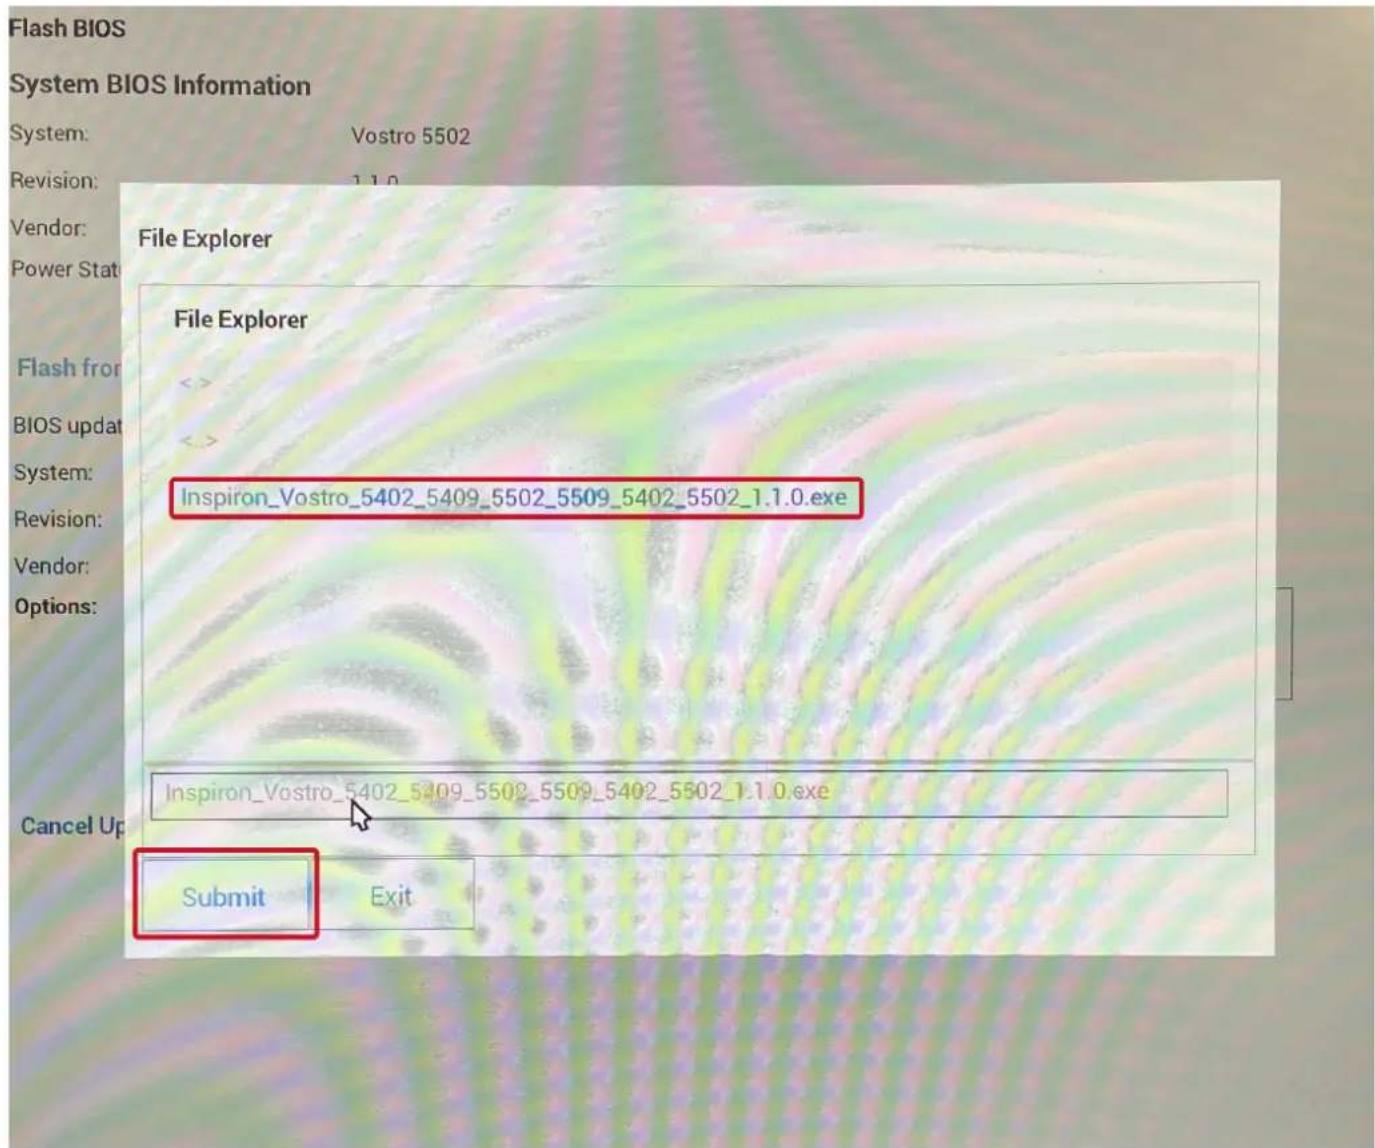
text_image
Flash BIOS System BIOS Information System: Vostro 5502 Revision: 1.1.0 Vendor: Power Stat File Explorer File Explorer <>_ <>_ Inspiron_Vostro_5402_5409_5502_5509_5402_5502_1.1.0.exe Inspiron_Vostro_5402_5409_5502_5509_5402_5502_1.1.0.exe Cancel Up Submit Exit- Click Update BIOS for the system to reboot and flash the BIOS.
Flash BIOS
System BIOS Information
System:
Vostro 5502
Revision:
1.1.0
Vendor:
Dell
Power Status:
Okay
Flash from file
BIOS update file:
\BIOS\Inspiron_Vostro_5402_5409_5502_5509_5402_5502_1.1.0\EXE\Inspiron_Vostro_5402_5409_5502_5509_5402_5502_1.1.0.exe
System:
Vostro 5502
Revision:
1.1.0
Vendor:
Dell Inc.
Options:
Update BIOS!
Cancel Update
- Click Confirm Update BIOS.
Flash BIOS
System BIOS Information
| System: | Vostro 5502 |
| Revision: | 1.1.0 |
| Vendor: | Dell |
| Power Status: | Okay |
Confirm Flash BIOS
Confirm Flash BIOS
You are going to update the BIOS!
Confirm Update BIOS!
Cancel Update
Cancel Update
Once complete, the system reboots and the BIOS update process is completed.
System and setup password
Table 42. System and setup password
| Password type Description | |
| System password Password that you must enter to log on to your system. | |
| Setup password Password that you must enter to access and make changes to the BIOS settings of your computer. | |
You can create a system password and a setup password to secure your computer.

CAUTION: The password features provide a basic level of security for the data on your computer.

CAUTION: Anyone can access the data stored on your computer if it is not locked and left unattended.

NOTE: System and setup password feature is disabled.
Assigning a system setup password
You can assign a new System or Admin Password only when the status is in Not Set.
To enter the system setup, press F2 immediately after a power-on or reboot.
- In the System BIOS or System Setup screen, select Security and press Enter. The Security screen is displayed.
- Select System/Admin Password and create a password in the Enter the new password field. Use the following guidelines to assign the system password:
●A password can have up to 32 characters.
- The password can contain the numbers 0 through 9.
- Only lower case letters are valid, upper case letters are not allowed.
- Only the following special characters are allowed: space, ("), (+), (.), (-), (.), (/), (;), ([), (), (]), (^).
-
Type the system password that you entered earlier in the Confirm new password field and click OK.
-
Press Esc and a message prompts you to save the changes.
- Press Y to save the changes. The computer reboots.
Deleting or changing an existing system setup password
Ensure that the Password Status is Unlocked (in the System Setup) before attempting to delete or change the existing System and Setup password. You cannot delete or change an existing System or Setup password, if the Password Status is Locked.
To enter the System Setup, press F2 immediately after a power-on or reboot.
- In the System BIOS or System Setup screen, select System Security and press Enter. The System Security screen is displayed.
- In the System Security screen, verify that Password Status is Unlocked.
- Select System Password, alter or delete the existing system password and press Enter or Tab.
- Select Setup Password, alter or delete the existing setup password and press Enter or Tab.

NOTE: If you change the System and/or Setup password, re enter the new password when prompted. If you delete the System and Setup password, confirm the deletion when prompted.
- Press Esc and a message prompts you to save the changes.
- Press Y to save the changes and exit from System Setup. The computer restarts.
Getting help
Topics:
- Contacting Dell
Contacting Dell

NOTE: If you do not have an active Internet connection, you can find contact information on your purchase invoice, packing slip, bill, or Dell product catalog.
Dell provides several online and telephone-based support and service options. Availability varies by country and product, and some services may not be available in your area. To contact Dell for sales, technical support, or customer service issues:
- Go to Dell.com/support.
- Select your support category.
- Verify your country or region in the Choose a Country/Region drop-down list at the bottom of the page.
- Select the appropriate service or support link based on your need.