
GTN38250MGCG - Tumble drier GRUNDIG - Free user manual and instructions
Find the device manual for free GTN38250MGCG GRUNDIG in PDF.


| Product Type | Tumble Dryer |
| Brand | Grundig |
| Model | GTN38250MGCG |
| Drying Technology | Condenser |
| Drum Capacity | 8 kg |
| Energy Efficiency Class | A++ |
| Dimensions (H x W x D) | 85 x 60 x 60 cm |
| Weight | 45 kg |
| Power Consumption | 2.5 kWh per cycle |
| Noise Level | 65 dB(A) |
| Number of Programs | 15 |
| Drying Programs | Cotton, Synthetics, Delicates, Wool, Mix, Shirts, Jeans, Sport, Bed & Bath, Time Dry, Gentle Dry, Cottons Eco, Refresh, Air Fluff, Anti-Allergy |
| Key Functions | Sensor Drying, Anti-Crease, Delay Start (1-24 h), Child Lock, Drum Light, Condenser Cleaning Indicator, Lint Filter Indicator |
| Maintenance | Clean lint filter after each cycle, clean condenser every 3 months |
| Safety Features | Child Lock, Overheat Protection, Water Overflow Protection |
| Spare Parts | Lint Filter (Part No. 123456), Condenser Unit (Part No. 789012), Door Seal (Part No. 345678) |
| Repairability Index | 8.5/10 |
| Colour | White |
| Power Supply | 230 V, 50 Hz |
Frequently Asked Questions - GTN38250MGCG GRUNDIG
User questions about GTN38250MGCG GRUNDIG
0 question about this device. Answer the ones you know or ask your own.
Ask a new question about this device
Download the instructions for your Tumble drier in PDF format for free! Find your manual GTN38250MGCG - GRUNDIG and take your electronic device back in hand. On this page are published all the documents necessary for the use of your device. GTN38250MGCG by GRUNDIG.
USER MANUAL GTN38250MGCG GRUNDIG
-
Please read this user manual first!......4
-
Important safety and environmental instructions.....5
2.1 General safety....5
2.1.1 Electrical safety......6
2.1.2 Product safety......7
2.2 Mounting over a washing machine....8
2.3 Intended use......9
2.4 Child safety....9
2.5 Compliance with the WEEE regulation and disposing of the waste product....10
2.6 Compliance with RoHS Directive:....10
2.7 Package information:......10
2.8 Technical specifications:......11
3 Your Dryer....12
3.1 Overview....12
3.2 Package Contents......13
4 Installation ....14
4.1 Appropriate installation location ....14
4.2 Removing the transportation safety assembly....14
4.3 Under counter installation ....15
4.4 Connecting to the drain......15
4.5 Adjusting the feet......16
4.6 Electrical connection......16
4.7 Transportation of the dryer ....16
4.8Warnings about sounds......16
4.9 Changing the illumination lamp17
5 Preparation ....18
5.1 Laundry suitable for drying in the dryer .....18
5.2 Laundry not suitable for drying in the dryer .....18
5.3 Preparing laundry for drying 18
5.4 Things to be done for energy saving....18
5.5 Correct load capacity......19
6 Operating the product......20
6.1 Control panel 20
6.2 Display Symbols .....20
6.3 Preparing the machine......21
6.4 Programme selection......21
6.5 Main programmes....21
6.6 Additional programmes .....21
6.7 Auxiliary functions....25
6.8 Warning symbols 25
6.9 Starting the programme .....26
6.10 Child Lock 26
6.11 Changing the programme after it has started....27
6.12 Cancelling the programme....28
6.13 End of programme .....28
7 Maintenance and cleaning ..... 29
7.1 Lint Filter / Loading Door Inner Surface.....29
7.2 Cleaning the sensors .....30
7.3 Draining the water tank .....30
7.4 Cleaning the filter drawer ....31
7.5 Cleaning the evaporator......33
8 Troubleshooting ....34
9 Electrical Connection ....36
9.1 Attention! 36
9.2 Electrical requirements .....36
9.3 Fitting a dif ferent plug ...... 36
9.4 Washer/dryer combination ...37
1. Please read this user manual first!
Thank you for choosing a Grundig appliance.
Please take some time to read this user manual before using your appliance, to ensure you know how to safely operate the controls and functions. Carefully follow all unpacking and installation instructions to ensure the appliance is correctly connected and fitted prior to use. Please write your product model and serial number on the last page of this user manual, and store in a safe location close to the appliance for easy future reference. This user manual may also be applicable for several other models. Differences between models will be listed.
If you have any questions or concerns, please call our contact centre or find help and information online at www.grundig.co.uk
natural_image
Simple line drawing of an open book with no text or symbols visibleRead the instructions.
Explanation of symbols
Throughout this user manual the following symbols are used:

Important information or useful hints about usage.

Warning for hazardous situations with regard to life and property.
Warning against electric shock.

Warning against hot surfaces.

Warning against fire hazard.

Packaging materials of the product are manufactured from recyclable materials in accordance with our National Environment Regulations.
Do not dispose of the packaging wastes with the domestic waste or other wastes, discard them to the dedicated collection points designated by the local authorities.
2. Important safety and environmental instructions
This section contains safety instructions that will help protect from risk of personal injury or property damage. Failure to follow these instructions shall void any warranty.
2.1 General safety
- The dryer can be used by children at and above 8 years old and by persons whose physical, sensory or mental capabilities were not fully developed or who lack experience and knowledge provided that they are supervised or trained on the safe usage of the product and the risks it brings out. Children should not play with the product. Cleaning and maintenance works should not be performed by children unless they are supervised by someone.
- Children of less than 3 years should be kept away unless continuously supervised.
- Adjustable feet should not be removed. The gap between the dryer and the floor should not be reduced with materials such as carpet, wood and tape. This will cause problems with the dryer.
- Always have the installation and repairing procedures carried out by the Authorised Service. Manufacturer shall not be held liable for damages that may arise from procedures carried out by unauthorised persons.
- Never wash the dryer by spraying or pouring water onto it! There is the risk of electric shock!
2.1.1 Electrical safety
 | Electrical safety instructions should be followed while electrical connection is made during the installation. |
 | The appliance must not be supplied through an external switching device, such as a timer,or connected to a circuit that is regularly switched on and off by utility. |
- Connect the dryer to a grounded outlet protected by a fuse at the value specified on the type label. Have the grounding installation performed by a qualified electrician. Our company shall not be liable for any damages that will arise when the dryer is used without grounding in accordance with the local regulations.
- The voltage and allowed fuse protection is stated on the type label plate.
- The voltage specified on the type label must be equal to your mains voltage.
- Unplug the dryer when it is not in use.
- Unplug the dryer from the mains during installation, maintenance, cleaning and repair works.
- Do not touch the plug with wet hands! Never unplug by pulling on the cable, always pull out by grabbing the plug.
- Do not use extension cords, multi-plugs or adaptors to connect the dryer to power supply in order to decrease the risk of fire and electric shock.
- Power cable plug must be easily accessible after installation.
| Damaged mains cable should be changed by an Authorised Service agent. | |
 | If the dryer is faulty, it must not be operated unless it is repaired by an authorised service agent! There is the risk of electric shock! |
2.1.2 Product safety
 | Points to be taken into consideration for fire hazard:Below specified laundry or items must not be dried in the dryer because of fire hazard.Unwashed laundry itemsItems soiled with oil, acetone, alcohol, fuel oil, ke-rosene, stain removers, turpentine, paraffin or sol-vents must be washed in hot water with plenty of detergent before being dried in the dryer. |
 | Below specified laundry or items must not be dried in the dryer due to the fire hazard:Garments or pillows bolstered with rubber foam (la-tex foam), shower caps, water resistant textiles, ma-terials with rubber reinforcement and rubber foam pads.Clothing cleaned with industrial chemicals.Items such as lighters, matches, coins, metal parts, needle etc. may damage the drum set or may lead to functional problems. Therefore check pockets off the laundry that you will load into your dryer.Never stop your dryer before the programme completes. If you must do this, remove all laundry quickly and lay them out to dissipate the heat. |
 | Clothes that are washed inadequately may ignite on their own and even may ignite after drying ends. |
- You must provide enough ventilation in order to prevent gases exiting from devices operating with other types of fuels including the naked flame from accumulating in the room due to the back fire effect.
 | Clothing that contains metal reinforcements should not be dried in the dryer. Dryer may be damaged if metal reinforcements come loose and break off during drying. |
 | Use softeners and similar products in accordance with the instructions of their manufacturers. |
 | Always clean the lint filter before or after each loading. Never operate the dryer without the lint filter installed. |
- Never attempt to repair the dryer by yourself. Do not perform any repair or replacement procedures on the product even if you know or have the ability to perform the required procedure unless it is clearly suggested in the operating instructions or the published service manual. Otherwise, you will be putting your life and others' lives in danger.
- There must not be a lockable, sliding or hinged door that may block the opening of the loading door in the place where your dryer is to be installed.
- Install your dryer in a suitable place that is dry, well ventilated and unlikely to get below 5 degrees Centigrade.
- Make sure that pets do not enter the dryer. Check the inside of the dryer before operating it.
- Do not lean on the loading door of your dryer when it is open, otherwise it may fall over.
- The lint must not be allowed to accumulate around the tumble dryer.
2.2 Mounting over a washing machine
- A fixing device should be used between the two machines when installing the dryer above a washing machine. The fitting device can be obtained through spare part suppliers.
- Total weight of the washing machine and the dryer -with full load- when they are placed on top of each other reaches to approx. 180 kilograms. Place the products on a solid floor that has sufficient load carrying capacity!

Washing machine cannot be placed on the dryer. Pay attention to the above warnings during the installation on your washing machine.
| Installation Table for Washing Machine and Dryer | |||||||
| Dryer Depth | Washing Machine Depth | ||||||
| 62 cm | 60 cm | 54 cm | 50 cm | 49 cm | 45 cm | cm 40 cm | |
| 54 cm | Can be stacked | Can be stacked | Cannot be stacked | ||||
| 60 cm Can | be stacked | Cannot be stacked | |||||
2.3 Intended use
- Dryer has been designed for domestic use. It is not suitable for commercial use and it must not be used out of its intended use.
- Use the dryer only for drying laundry that are marked accordingly.
- The manufacturer waives any responsibility arisen from incorrect usage or transportation.
- Original spare parts will be available to repair the dryer for a period of 10 years.
2.4 Child safety
- Packaging materials are dangerous for the children. Keep packaging materials away from children.
- Electrical products are dangerous for the children. Keep children away from the product when it is operating. Do not let them tamper with the dryer. Use the child-proof lock in order to prevent the children to tamper with the dryer.

Child-proof lock is on the control panel. (See Child lock)
- Keep loading door closed even when the dryer is not in use.
2.5 Compliance with the WEEE regulation and disposing of the waste product
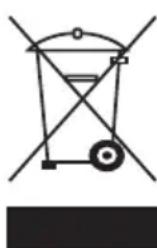
This product complies with EU WEEE Directive (2012/19/EU). This product bears a classification symbol for waste electrical and electronic equipment (WEEE).
This product has been manufactured with high quality parts and materials which can be reused and are suitable for recycling. Do not dispose of the waste product with normal domestic and other wastes at the end of its service life. Take it to the collection center for the recycling of electrical and electronic equipment. Please consult your local authorities to learn about these collection centers.
2.6 Compliance with RoHS Directive:
The product you have purchased complies with EU RoHS Directive (2011/65/EU). It does not contain harmful and prohibited materials specified in the Directive.
2.7 Package information
Packaging materials of the product are manufactured from recyclable materials in accordance with our National Environment Regulations. Do not dispose of the packaging materials together with the domestic or other wastes. Take them to the packaging material collection points designated by the local authorities.
2.8 Technical Specifications
EN
| Height (Min. / Max.) 84,6 cm / 86,6 cm* | |
| Width 59,7 cm | |
| Depth 57,8 cm | |
| Capacity (max.) 8 kg** | |
| Net weight (± 4 kg) 46 kg | |
| Width | See type label***Voltage |
| Rated power input | |
* Min. height: Height with adjustable feet are closed.
Max. height: Height with adjustable feet are opened maximum.
** Dry laundry weight before washing.
*** Type label is located behind the loading door.

Technical specifications of the dryer are subject to specification without notice to improve the quality of the product.

Figures in this manual are schematic and may not match the product exactly.

Values stated on markers on the dryer or in the other published documentation accompanying with the dryer are obtained in laboratory in accordance with the relevant standards. Depending on operational and environmental conditions of the dryer, these values may vary.
3. Your Dryer
3.1 Overview
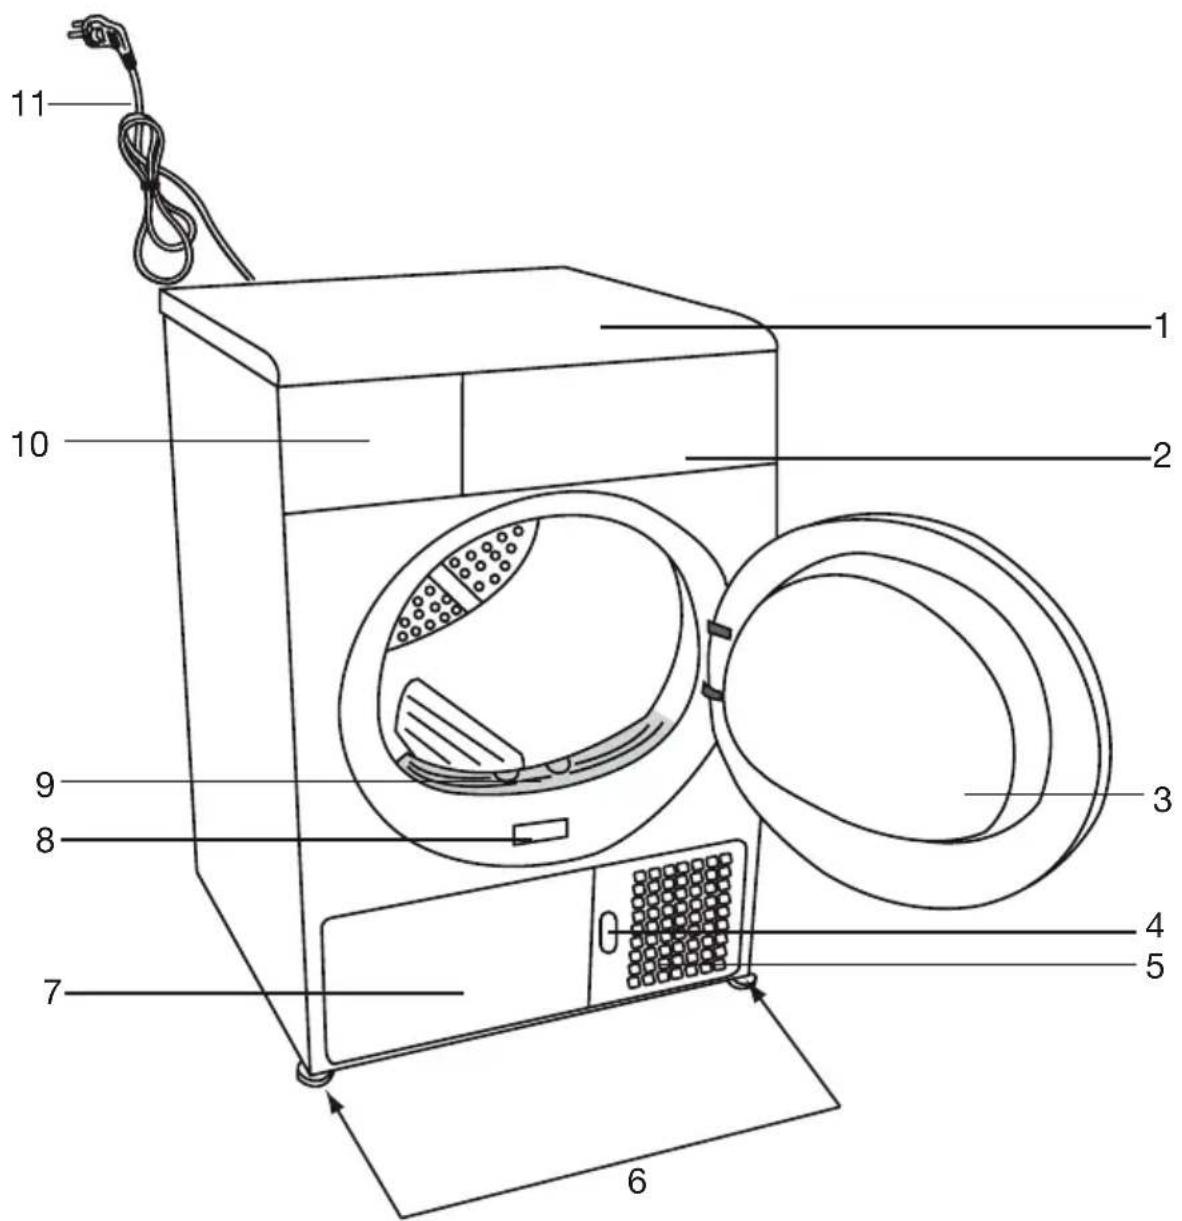
text_image
Diagram of a washing machine with numbered parts for identification- Top panel
- Control panel
- Loading door
- Kick plate opening button
- Ventilation grids
- Adjustable legs
- Kick plate
- Type label
- Lint filter
- Water tank drawer
- Power cord
3.2 Package Contents
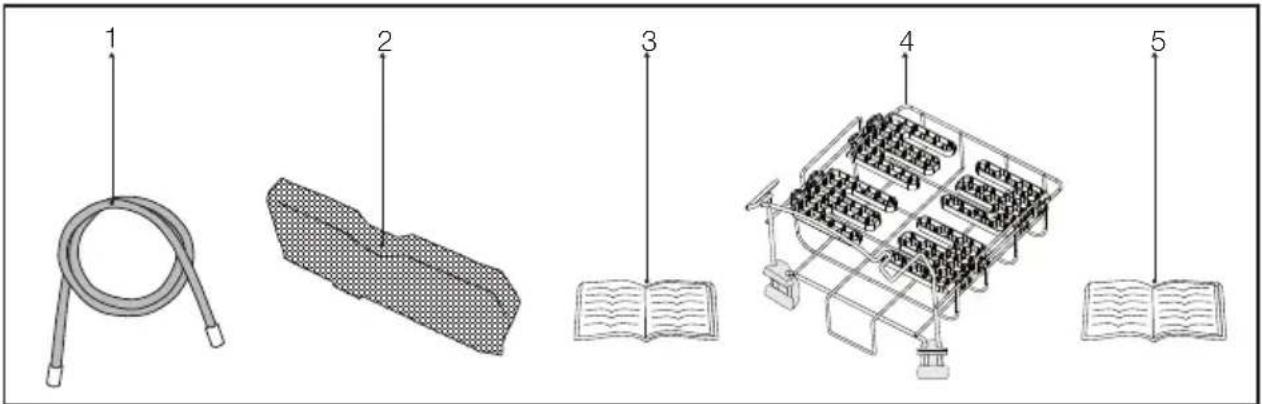
text_image
Diagram showing five labeled items: a coiled tube, a meshed rectangular block, an open book, and a multi-compartment electronic device.- Water drain hose *
- Filter drawer spare sponge*
- User Manual
- Drying basket*
- Drying basket user manual*
*It can be supplied with your machine depending on its model.
4. Installation
Before the calling the nearest Authorized Service for the installation of the dryer, ensure that electrical installation and water drain is appropriate referring to the user's manual.(See 4.4 Connecting to the drain and 4.6 Electrical connection) If they are not suitable, contact a qualified electrician and technician to make necessary arrangements.

Preparation of the dryer's location as well as the electrical and waste water installations is under customer's responsibility.

Prior to installation, visually check if the dryer has any defects on it. If the drier is damaged, do not have it installed. Damaged products cause risks for your safety.

Let your dryer wait for 12 hours before starting to use it.
4.1 Appropriate installation location
• Install the dryer on a stable and level surface.
- Dryer is heavy. Do not move it by yourself.
- Operate your dryer in a well ventilated, dust-free environment.
- The gap between the dryer and the surface should not be reduced by the materials such as carpet, wood and tape.
- Do not cover the ventilation grills of the dryer.
- There must not be a lockable, sliding or hinged door that may block the opening of the loading door in the place where your dryer is to be installed.
- Once the dryer is installed, it should stay at the same place where its connections have been made. When installing the dryer, make sure that its rear wall does not touch anywhere (tap, socket, etc.).
- Place the dryer at least 1 cm away from the edges of other furniture.
- Your dryer can be operated at temperatures between +5°C and +35°C. If the operating conditions fall outside of this range, operation of the dryer will be adversely affected and it can get damaged.
Do not place the dryer on the power cable.
4.2 Removing the transportation safety assembly

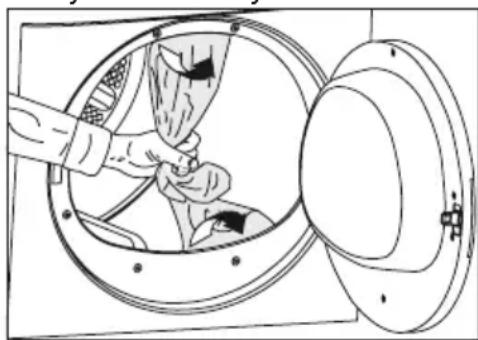
Remove the transportation safety assembly before using the dryer for the first time.
- Open the loading door.
- There is a nylon bag inside the drum that contains a piece of styrofoam. Hold it from its section marked with XX XX.
- Pull the nylon towards yourself and remove the transportation safety assembly.
natural_image
Diagram of a hand inserting a bag into a circular device, showing internal components (no text or symbols)
Check that no part of the transportation safety assembly remains inside the drum.
4.3 Under counter installation
- This product can be installed under a counter if the height of the counter is sufficient.

While using undercounter dryer, it should never be operated without undercounter installation part. For the appropriate undercounter installation part contact the Authorized Service.
| Dryer Depth 60 cm 54 cm | ||
| Stock number of under-bench installation part | 2979700200 | 2973600200 |
- Leave at least 1 cm of space around the sides and the rear wall of the dryer when installing it under a counter.

If installed under a countertop, drying durations can extend.
4.4 Connecting to the drain
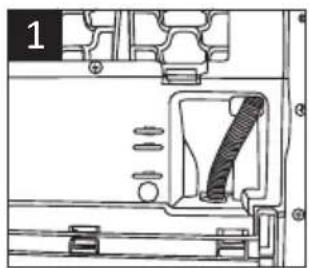
In products equipped with condenser unit, water accumulates in the water tank during the drying cycle. You should drain accumulated water after each drying cycle.
You can directly drain accumulated water through the water drain hose supplied with the product instead of periodically draining the water collected in the water tank.
Connecting the water drain hose
1-2 Pull hose at the behind of the dryer by hand in order to disconnect it from where it is connected. Do not use any tools to remove the hose.
3 Connect one end of the drain hose supplied with the dryer to the connection point from where you removed the hose of the product in previous step.
4 Connect the other end of the drain hose directly to the wastewater drain or to the washbasin.
natural_image
Technical line drawing of a mechanical assembly with no visible text or symbols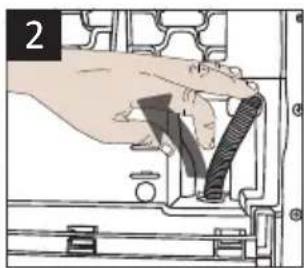
natural_image
Hand inserting a cable into a mechanical component (no text or symbols visible)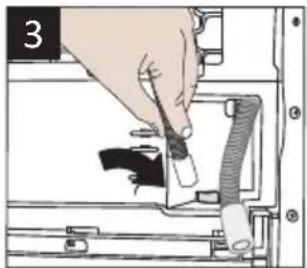
natural_image
Illustration of a hand using a tool to adjust or install a component, with no visible text or symbols.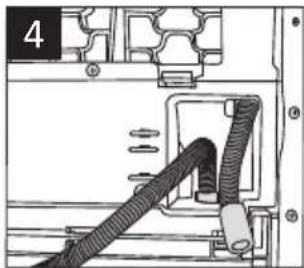
natural_image
Technical diagram of a mechanical assembly with coiled tubing and numbered components (no text or symbols)| Hose connection should be made in a safe manner. Your drain house will be flooded if the hose comes out of its housing during water discharge. | |
| Water drain hose should be attached to a height of maximum 80 cm. | |
| Make sure that the water drain hose is not stepped on and it is not folded between the drain and the machine. |
4.5 Adjusting the feet
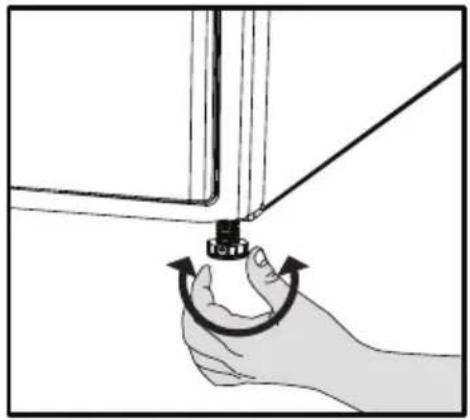
In order to ensure that the dryer operates more silently and vibration-free, it must stand level and balanced on its feet. Balance the machine by adjusting the feet.
- Turn the feet to left or right until the dryer stands level and firmly.
natural_image
Illustration of a hand holding a small mechanical component with rotational arrow indicating rotation (no text or symbols)
Never unscrew the adjustable feet from their housings.
4.6 Electrical connection
For specific instructions for electrical connection required during installation (see 2.1.1 Electrical Safety)
4.7 Transportation of the dryer
- Unplug the dryer before transporting it.
- Drain all water that has remained in the dryer.
If direct water drain connection is made, then remove the hose connections.

We recommend carrying the dryer in upright position. If it is not possible to carry the machine in the upright position, we recommend carrying it by tilting towards the right side when looked from the front.
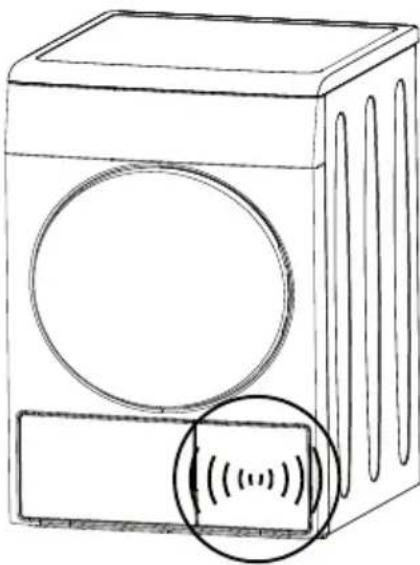
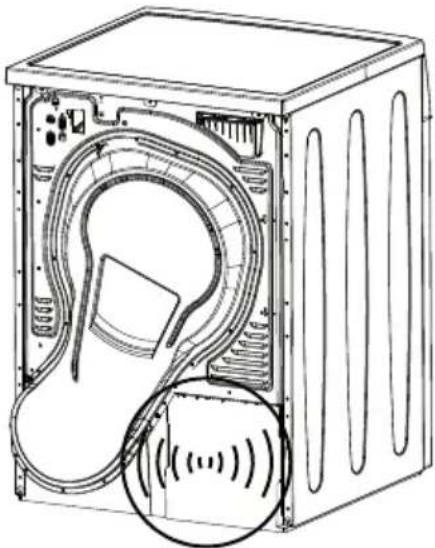
4.8 Warnings about sounds

It is normal to hear a metallic noise from the compressor sometimes during operation.
natural_image
Line drawing of a rectangular device with a circular lens and a circular button labeled (no text or symbols on the device itself)
Water collected during operation is pumped to water tank. It is normal to hear pumping noise during this process.
natural_image
Technical line drawing of a front view of a large industrial machine casing with internal components and a magnified inset showing sound waves (no text or symbols)4.9 Changing the illumination lamp
In case an illumination lamp is used in your laundry dryer. To change the Bulb/LED used for illumination of your tumble dryer, call your Authorized Service.
The lamp(s) used in this appliance is not suitable for household room illumination. The intended purpose of this lamp is to assist the user to place laundry in the tumble dryer in a comfortable way. The lamps used in this appliance have to withstand extreme physical conditions such as vibrations and temperatures above 50 °C.
5. Preparation
5.1 Laundry suitable for drying in the dryer
- Always obey the instructions given on the garment tags. Dry only the laundry having a label stating that they are suitable for drying in a dryer and make sure that you select the appropriate programme.
| LAUNDRY DRYING SYMBOLS | |||||||||||||
 | Drying Symbols |  Suitable for dryer Suitable for dryer |  No Iron No Iron |  Sensitive / Delicate dry Sensitive / Delicate dry |  Do not dry with dryer Do not dry with dryer |  Do not dry Do not dry |  Do not dry-clean Do not dry-clean | ||||||
| Drying Settings | At any temperature | At high temperature | At medium temperature | At low temperature | Without heating | Hang to dry | Lay to dry | Hang wet to dry | Lay in shadow to dry | Dry-cleanable | |||
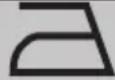
| IRON | Iron - | ||||||||||||
| Dry or Steam | Iron at high temperature | Iron at medium temperature | Iron at low temperature | Iron at low temperature | Do not iron | Iron without steam | |||||||
| Maximum temperature | 200 °C 150 | °C 110 | °C | ||||||||||
 | Iron - |  |  |  |  |  | ||
| IRON | Dry or Steam | Iron at high temperature | Iron at medium temperature | Iron at low temperature | Do not iron | Iron without steam | ||
| Maximum temperature | 200 °C 150 | °C 110 | °C | |||||
5.2 Laundry not suitable for drying in the dryer

Delicate embroidered fabrics, woolen, silk garments, delicate and valuable fabrics, airtight items and tulle curtains are not suitable for machine drying.
5.3 Preparing laundry for drying
- Laundry may be tangled with each other after washing.
Separate the laundry items before placing them into the dryer. - Dry garments having metal accessories such as zippers, inside out.
- Fasten the zippers, hooks and buckles and button sheets.
5.4 Things to be done for energy saving
Following information will help you use the dryer in an ecological and energy-efficient manner.
- Spin your laundry at the highest speed possible when washing them. Thus, the drying time is shortened and energy consumption is reduced.
-
Sort out the laundry depending on their type and thickness. Dry the same type of laundry together. For example thin kitchen towels and table clothes dries earlier than thick bathroom towels.
-
Follow the instructions in the user manual for programme selection.
- Do not open the loading door of the machine during drying unless necessary. If you must certainly open the loading door, do not to keep it open for a long time.
- Do not add wet laundry while the dryer is in operation
- Clean the lint filter before or after each drying cycle. (See 7.1 Lint Filter / Loading Door Inner Surface)
- Clean the filter periodically when there is visible air collection on it or when the symbol lights up, if there is a filter drawer cleaning warning symbol “ available.
(See 7.4 Cleaning the filter drawer)
- Ventilate the room, where the dryer is located, well during drying.
5.5 Correct load capacity
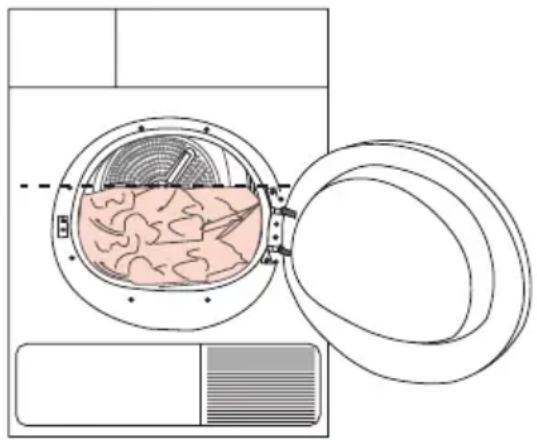
Follow the instructions in the "Programme selection and consumption table". Do not load more than the capacity values stated in the table.
natural_image
Diagram of a washing machine with internal organ structure and lid, showing no text or symbols
It is not recommended to load the dryer with laundry exceeding the level indicated in the figure. Drying performance will degrade when the machine is overloaded. Furthermore, dryer and the laundry can get damaged.
Following weights are given as examples.
| Laundry | Approximate weights (g)* |
| Cotton quit covers (double) | 1500 |
| Cotton quit covers (single) | 1000 |
| Bed sheets (double) | 500 |
| Bed sheets (single) | 350 |
| Large tablecloths | 700 |
| Small tablecloths | 250 |
| Tea napkins | 100 |
| Bath towels | 700 |
| Hand towels | 350 |
| Blouses | 150 |
| Cotton shirts | 300 |
| Shirts | 250 |
| Cotton dresses | 500 |
| Dresses | 350 |
| Jeans | 700 |
| Handkerchiefs (10 pieces) | 100 |
| T-Shirts | 125 |
* Dry laundry weight before washing.
6. Operating the product
6.1 Control panel
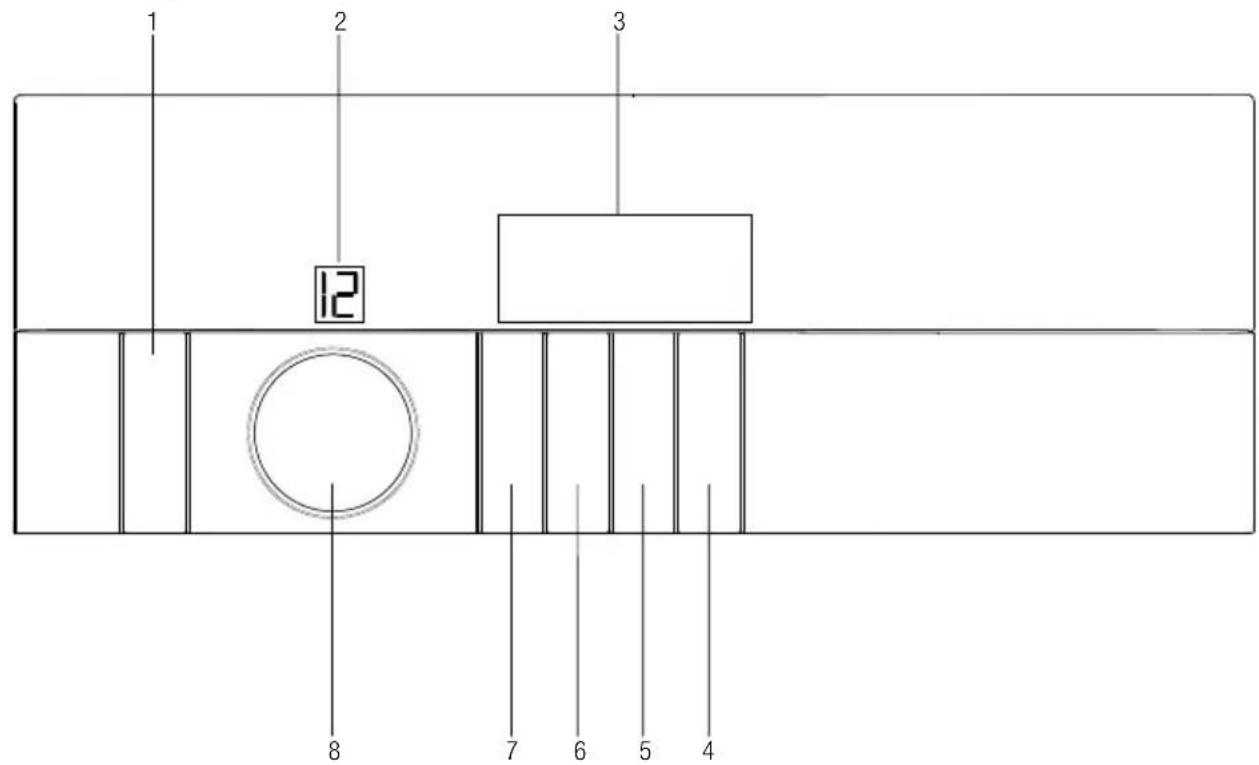
text_image
1 2 3 12 8 7 6 5 4- On/Off/Cancel button
- Programme number indicator
- Display
- Start / Pause button
- End time setting selection button
- Audio warning level / Child lock button
- Timer programmes selection button
- Programme selection knob
6.2 Display Symbols
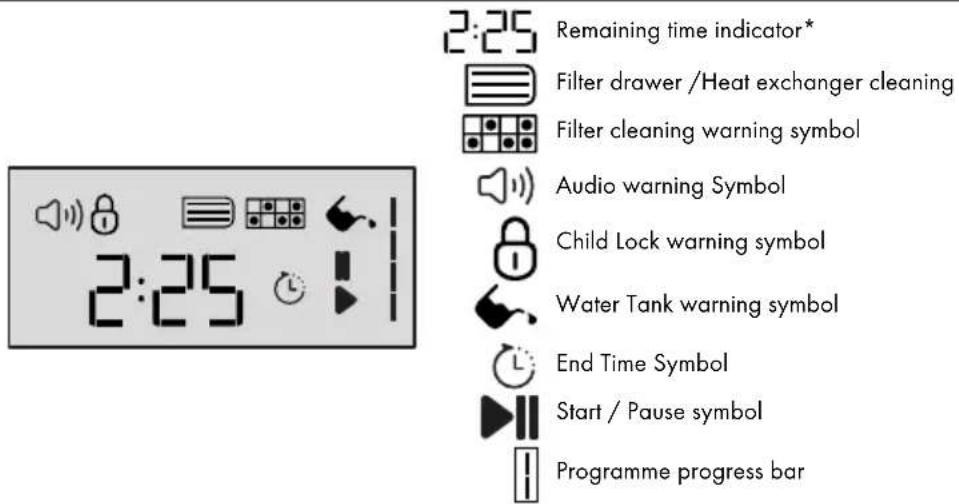
text_image
2:25 Remaining time indicator* Filter drawer /Heat exchanger cleaning Filter cleaning warning symbol Audio warning Symbol Child Lock warning symbol Water Tank warning symbol End Time Symbol Start / Pause symbol Programme progress bar*Time that appears on display indicates the remaining time until the end of the programme and changes according to the dampness level of the laundry and model of the dryer.
6.3 Preparing the machine
- Plug in the machine.
- Place the laundry in the machine.
- Press the On/off/cancel button for 1 second (long).
- When your machine is operated for the first time, it starts with the default programme (wardrobe dryness for cottons).

Pressing the On/Off/Cancel button does not necessarily mean the programme has started. Press Start/Pause button to start the programme.
6.4 Programme selection
- Decide the appropriate programme from the table below which includes drying levels.
- Select the desired programme with the Programme Selection knob.
| Extra Dry | Only the cotton laundry is dried at normal temperature. Thick and multi layered laundry (towels, linens, jeans and etc.) are dried in a way that they do not require ironing before being placed in the wardrobe. |
| Cottons Eco | Normal laundry (tablecloths, underwear and etc.) are dried in a way that they do not require ironing before being placed in the wardrobe. |
| Cupboard Dry | Normal laundry (E.g.: tablecloths, underwear) are dried in a way that they do not require ironing before placing in the drawers, but more than those in the ready to wear option. |
| Iron Dry | Normal laundry (shirts, dresses and etc.) are dried ready to be ironed. |

For further programme details, see, "Programme selection and consumption table".
6.5 Main programmes
Depending on the fabric type, the following main programmes are available:
- Cottons
Dry durable laundry with this programme. Dries at normal temperature. It is recommended to use for your cotton items (bed sheets, quilt covers, towels, bathrobes, etc.).
- Synthetics
Dry less durable laundry with this programme. Recommended for synthetics.
6.6 Additional programmes
For special cases, following additional programmes are available in the machine.

Additional programmes may differ according to the features of your machine.
- Bedding
Dry fiber quilts with 'machine-dryable' label only. Make sure you are loading the quilt in the correct way to avoid damages on the machine and the quilt. Take out the quilt cover before loading the quilt in the machine. Fold the quilt in two before loading.
- Do not load more than 1 double-size fiber quilt (200x200 cm). Do not dry items containing cotton such as quilts, pillows and etc.
- Do not dry items other than quilts such as carpets, rugs or mats. Permanent damage may arise in your machine.

To obtain better results from your dryer, your laundry must be washed with suitable programmes and spun at the recommended spin speeds in the washing machine.
- Shirts
This programme dries the shirts more sensitively and creases them less and thus, helps to iron them more easily.

There may be a little moisture on the shirts at the end of the programme. We recommend you not to leave the shirts in the dryer.
- Jeans
Use this programme to dry your jeans that are spun at high speeds in the washing machine.
- Sportswear
Use this programme to dry together the synthetic and cotton laundry items and the laundry items made of mixed fabrics.
- Wool refresh
Use this programme to ventilate and soften the woollen laundry that can be washed in the washing machine. Do not use to dry the laundry completely. Take out and ventilate the laundry immediately after the programme is over.
- Daily
This programme is used to dry cottons and synthetics daily, and lasts for 125 minutes.
- Shirts 30'
Use this programme to make 2 shirts ready for ironing in 30 minutes.
- Delicates
You can dry your highly delicate laundry (silk blouses, fine underwear, etc.) that are suitable for drying or laundry which is advised to be hand-washed at a lower temperature.

It is recommended to use a cloth bag to avoid certain delicate garments and laundry from getting creased or damaged. Take your laundry immediately out of the dryer and hang them after the programme ends in order to prevent them being creased.
- Freshen Up
Only ventilation is performed for 10 minutes without blowing hot air. You can air the clothes that have been kept in closed environments for a long time and deodorize unpleasant odours thanks to this programme.
- Timer programmes
You can select one of the 10 min., 20 min., 30 min., 40 min., 50 min., 60 min., 80 min., 100 min., 120 min., 140 min. and 160 min. timer programmes to achieve the desired final drying level at low temperatures.

With this programme, the machine dries for the time selected regardless of the dryness level.
Programme selection and consumption table
EN
| Programmes Capacity (kg) | Spin speed in washing machine (rpm) | Approximate amount of remaining humidity | Drying time (minutes) | |
| Cottons / Coloreds | ||||
 | Extra dry | 8 1000 % 60 | 215 | |
 | Cottons Eco | 8 / 4 1000 % 60 | 197 / 115 | |
 | Iron dry | 8 1000 % 60 | 145 | |
 | ts 30' | 0,5 1200 % 60 | 30 | |
 | ts | 1.5 1200 % 50 | 60 | |
 | ns | 4 1200 % 50 | 150 | |
 | ding | 2,5 1000 % 50 | 120 | |
 | rtswear | 4 1000 % 60 | 135 | |
 | y | 4 1200 % 50 | 125 | |
 | cates | 2 600 % 40 | 70 | |
 | l Refresh | 1,5 600 % 50 | 9 | |
 | thetics | |||
| [DBZA] | Cupboard dry | 4 800 % 40 | 70 | |
 | Iron dry | 4 800 % 40 | 60 | |
| [WKKB] | rgy consumption values | |||
 | grammes Capacity (kg) | Velocidad de centrifugado de la lavadora (rpm) | Approximate amount of remaining humidity | |
 | ||||
 | ||||
 | ons Eco* | 8 / 4 1000 % 60 | 1,96 / 1,06 | |
 | dry for cottons | 8 1000 % 60 | 1,5 | |
 | board dry for thetics | 4 800 % 40 | 0,75 | |
 | ||||
 | er consumption of the off-mode for the standard cotton programme at full load, PO(W) | 0,4 | ||
 | er consumption of the left-on mode for the standard cotton programme at full load, PL (W) | 1,0 | ||
 | ||||
 | Contains fluorinated greenhouse gases covered by the Kyoto Protocol. Hermetically sealed. R154a / 0,30 kg - GWP:1430 - 0,429 tCO2e | |||

„Cottons Eco programme“ used at full and partial load is the standard drying programme to which the information in the label and the fiche relates, that this programme is suitable for drying normal wet cotton laundry and that it is the most efficient programme in terms of energy consumption for cotton.
* : Energy Label standard programme (EN 61121:2012). All the filters must be cleaned prior to test series. All values given in the table have been fixed according to EN 61121:2012 Standard. These values may deviate from the values in the table according to the laundry type, laundry spin speed, environmental conditions and voltage fluctuations.
6.7 Auxiliary functions
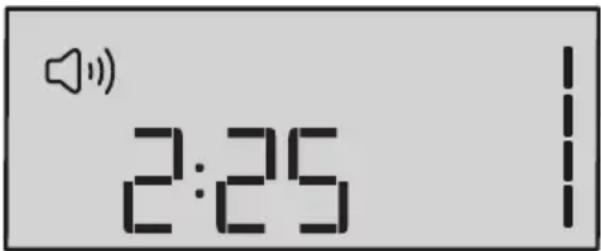
Audio Warning
The machine will give an audio warning when the programme comes to an end. Use the Audio Warning Level button to adjust the sound level.

You can change the sound level either before the programme starts or while the programme is in progress.
text_image
2:25Anti-creasing
A 2-hour anti creasing programme to prevent laundry from creasing will be activated if you do not take the laundry out after the programme has come to an end. This programme rotates the laundry in 10-minute intervals without heat to prevent creasing.
6.8 Warning symbols

Warning symbols may differ according to the model of your machine.
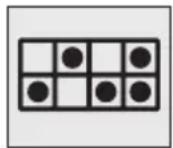
Lint filter cleaning
When the programme is completed, a warning symbol will appear to remind that the filter needs to be cleaned.

If the Filter Cleaning symbol in continuously, refer to "Troubleshooting" section.
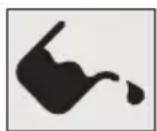
Water tank
When the programme is completed, a warning symbol will appear to remind that the water tank needs to be drained.
If the water tank becomes full while the programme is running, the warning symbol will start to flash and machine will pause. Drain the water in the water tank and press Start / Pause button to resume the programme. The warning symbol turns off and the programme resumes operating.
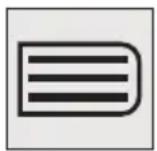
Cleaning the filter drawer
Warning symbol flashes with certain intervals to remind that the filter drawer needs to be cleaned.
End Time Setting
End Time Setting function allows you to delay the ending time of the programme up to 24 hours.
- Open the loading door and put the laundry in.
- Select the drying programme, spin speed and, if required, the auxiliary functions.
- Press End Time Setting selection button to set the desired End Time Setting symbol lights up on the display.(When the button is pressed and hold, End Time proceeds uninterruptedly).
- Press Start/Pause button. End Time Setting starts to count down. The “:” in the middle of the displayed End Time Setting will start to flash.

Additional laundry may be loaded / taken out during the End Time period. At the end of the End Time countdown process, End Time symbol disappears, drying process starts and the programme duration is displayed. The time on the display is the total of normal drying time and End Time.
Changing the End Time
If you want to change the time during countdown:
- Press On/Off/Cancel button for 3 seconds to cancel the programme. Restart the machine and repeat the End Time procedure for the desired time.
- When your machine is operated for the first time, it starts with the default programme (wardrobe dryness for cottons).
Cancelling End Time function
If you want to cancel the End Time countdown and start the programme immediately:
- Press On/Off/Cancel button for 3 seconds to cancel the programme.
- Press On/Off/Cancel button to start the programme you have previously selected.
6.9 Starting the programme
Press Start/Pause button to start the programme.
Start symbol will light up to indicate that the programme has started and “:” symbol in the middle of the remaining time will keep flashing.
6.10 Child Lock
Machine is equipped with a Child Lock which prevents interfering with the current programme flow by pressing any button. All buttons except the On/Off/Cancel button on the control panel are deactivated when the Child Lock is active.
In order to activate the Child Lock, press Audio Warning, Child Lock button for 3 seconds.
To start a new programme after the current programme is over or to interrupt the current programme, the Child Lock should be deactivated. Press the same button for 3 seconds again to deactivate the Child Lock.

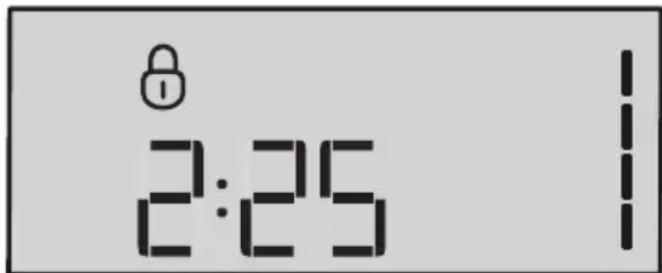
Lock symbol will appear on the display when the Child Lock is activated.
text_image
2:25
Child Lock is deactivated when the machine is switched off and on with On/Off/Cancel button.
When the Child Lock is activated:
Display symbols will not change even if the position of Programme Selection knob is changed while the machine is running or in halt.
If the Child Lock is deactivated after changing the position of the Programme Selection knob while the machine is running, the machine stops and new programme information is displayed.
6.11 Changing the programme after it has started
After the machine starts, you can change the selected programme and dry your laundry in a different programme.
- If you want to select Extra Dry programme instead of Iron Dry programme, for instance, press the Start / Pause button for 1 second to stop the programme.
- Select Extra Dry programme by turning the Programme Selection knob.
- Press the Start/Pause button to start the programme.
Adding / removing laundry in Pause mode
In order to add or take out laundry after the drying programme has started:
- Press Start/Pause button to switch the machine to Pause mode. Drying process will stop.
- While in Pause mode, open the loading door, add or take out laundry and close the loading door.
- Press the Start/Pause button to start the programme.

Any laundry added after the drying process has started may cause the clothes that are already dried in the machine intermingle with wet clothes and the result will be wet laundry after the drying process is over.
| You may repeat laundry adding or removing process as many times as you desire during drying. However, this process will increase the programme time and energy consumption since the drying process will be interrupted repeatedly. Therefore, it is recommended to add laundry before the drying programme has started. | |
| If you select a new programme by turning the Programme Selection knob while your machine is in Pause mode, then the current programme is aborted and new programme information is displayed. | |
| CAUTION: Do not touch the inner surface of the drum when adding or taking out laundry while a programme is running. Surfaces of the drum are hot. |
6.12 Cancelling the programme
If you want to stop drying and cancel the programme for any reason after the machine has started to run, press and hold the On/Off/Cancel button for 3 seconds.

CAUTION: As the inside of the machine will be excessively hot when you cancel the programme while the machine is running, activate the ventilation programme to cool it down.
6.13 End of programme
Lint Filter Cleaning and Water Tank warning symbols light up in the programme follow-up indicator when the programme comes to an end. The loading door can be opened and the machine becomes ready for a second cycle.
Press On/Off/Cancel button to switch off the machine.
| 2-hour Anti-creasing programme will be activated if the laundry is not taken out after the programme has come to an end. | |
| Clean the lint filter after each drying. (See "Lint Filter and Loading Door Inner Surface") | |
| Drain the water tank after each drying cycle. (See "Draining the water tank") |
7. Maintenance and cleaning
Service life of product extends and frequently experienced problems will be reduced if it is cleaned at regular intervals.
7.1 Cleaning Lint Filter / Loading Door Inner Surface
Lint and fiber released from the laundry to the air during the drying cycle are collected in the Lint Filter.
 | Such fiber and lint are generally formed during wearing and washing. |
 | Always clean the lint filter and the inner surfaces of the loading door after each drying process. |
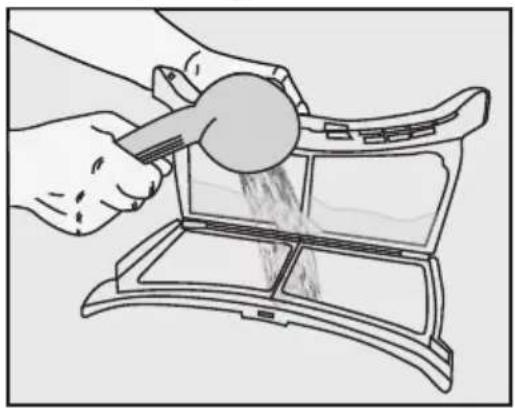
 | You can clean the lint filter housing with a vacuum cleaner. |
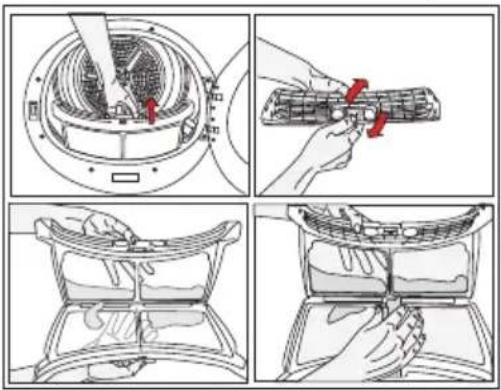
To clean the lint filter:
- Open the loading door.
- Remove the lint filter by pulling it up and open the lint filter.
- Clean lint, fiber, and cotton raveling by hand or with a soft piece of cloth.
- Close the lint filter and place it back into its housing.
text_image
Technical diagram showing four steps of a device cleaning or assembly process, with labeled components and directional arrows indicating movement.- A layer can build up on the filter pores that can cause clogging of the filter after using the dryer for a while. Wash the lint filter with warm water to remove the layer that builds up on the lint filter surface. Dry the lint filter completely before reinstalling it.
natural_image
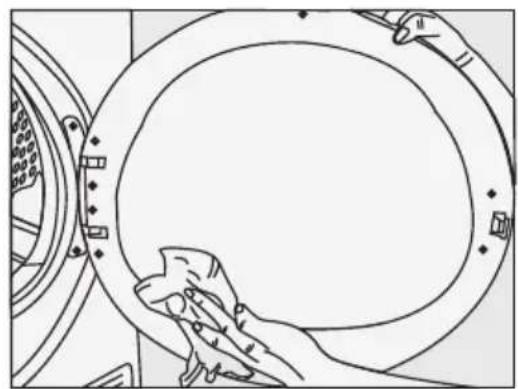
Illustration of hands using a tool to clean or prepare food items in a tray (no text or symbols visible)- Clean the entire inner surface of the loading door and loading door gasket with a soft damp cloth.
natural_image
Line drawing of a hand cleaning a circular mechanical component (no text or symbols)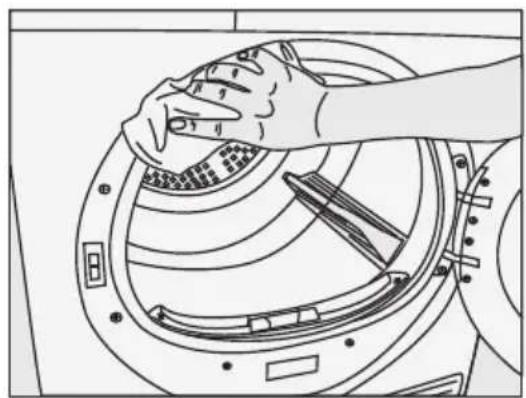
natural_image
Line drawing of hands cleaning a circular mechanical component with no visible text or symbols7.2 Cleaning the sensor
There are dampness sensors in the dryer that detect whether the laundry is dry or not.
To clean the sensors:
- Open the loading door of the dryer.
- Allow the machine to cool down if it is still hot due to the drying process.
- Wipe the metal surfaces of the sensor with a soft cloth, dampened with vinegar and dry them.
 | Clean metal surfaces of the sensors 4 times a year. |
 | Do not use metal tools when cleaning metal surfaces of the sensors. |
 | Never use solvents, cleaning agents or similar substances for cleaning due to the risk of fire and explosion! |
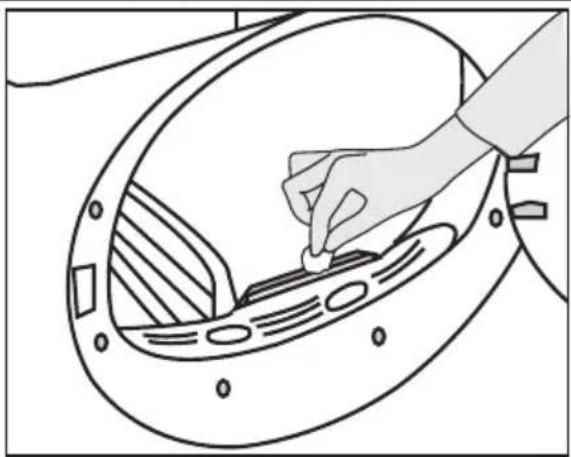
natural_image
Line drawing of a hand placing a small object into a circular component with internal patterns (no text or symbols)7.3 Draining the water tank
Dampness of the laundry is removed and condensed during drying process and the water that arise accumulates in the water tank. Drain the water tank after each drying cycle.
| Condensed water is not drinkable! | |
| Never remove the water tank when the program is running! |
If you forget to drain the water tank, the machine will stop during the subsequent drying cycles when the water tank is full and the Water Tank warning symbol will flash. If this is the case, drain the water tank and press Start/Pause button to resume the drying cycle.
To drain the water tank:
Pull the drawer and remove the water tank carefully.
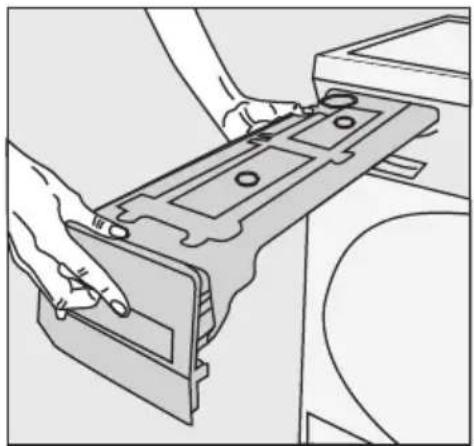
natural_image
Line drawing of hands installing or adjusting a mechanical component on a device (no text or symbols visible)- Drain the water in the tank.
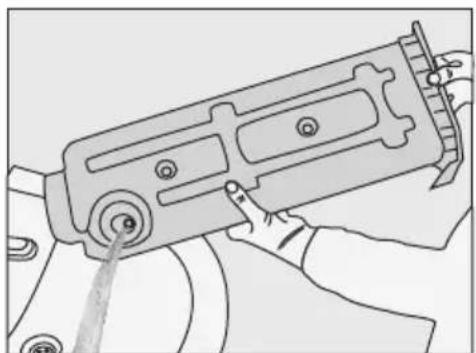
natural_image
Line drawing of a mechanical device with a lever and adjustment knob (no text or symbols)- If there is lint accumulation in the funnel of the water tank, clean it under running water.
- Place the water tank into its seat.

If the direct water draining is used as an option, there is no need to empty the water tank.
7.4 Cleaning the filter drawer
Lint and fiber that could not be captured by the lint filter are blocked in the filter drawer behind the kick plate. Clean the filter periodically when there is visible air collection on it or when the symbol lights up, if there is a filter drawer cleaning warning symbol “available. There is an one stage filter. This one stage filter is from sponge
To clean the filter drawer:
- Press the kick plate button to open the kick plate.
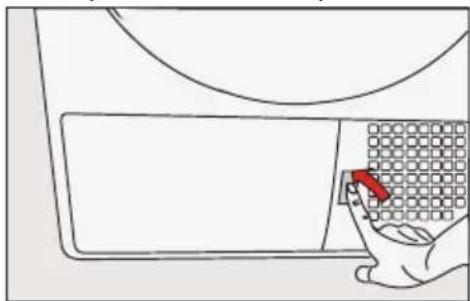
natural_image
Line drawing of a hand holding a cleaning tool next to a window with a grid-patterned panel (no text or symbols)- Remove the filter drawer cover by turning it in the direction of arrow.
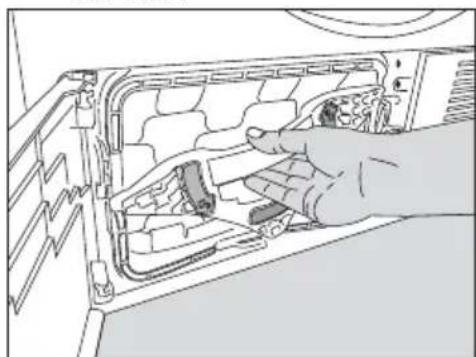
natural_image
Hand inserting a component into a device casing (no text or symbols visible)- Pull out the filter drawer.
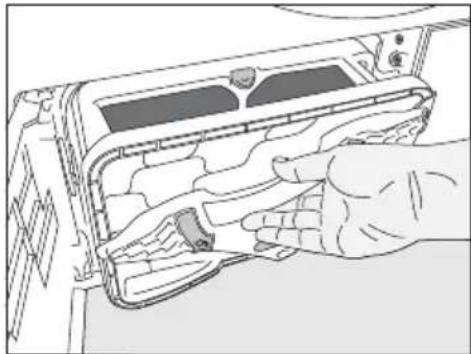
natural_image
Illustration of a hand inserting a device into a rack (no text or symbols visible)- Open the filter drawer by pressing the red button.
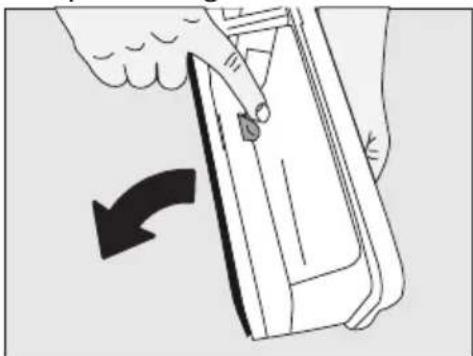
natural_image
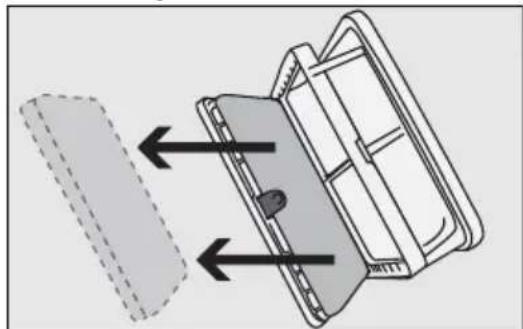
Illustration of a hand holding a rectangular object with a curved arrow indicating rotation (no text or symbols)• Take out the filter drawer sponge.
natural_image
Diagram of a device with internal components and directional arrows indicating movement or force (no text or symbols)- Wash the filter drawer sponge by hand to remove the fiber and lint on the surface. After washing the sponge, squeeze it by hand and remove the excess water. Well-dry the sponge before storing it.

It is not necessary to clean the sponge if lint and fiber accumulation on it is not significant.
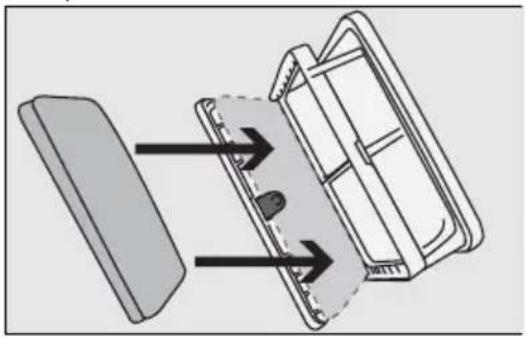
- Place the sponge back into its place.
natural_image
Diagram of a mechanical component with arrows indicating direction, no text or symbols present
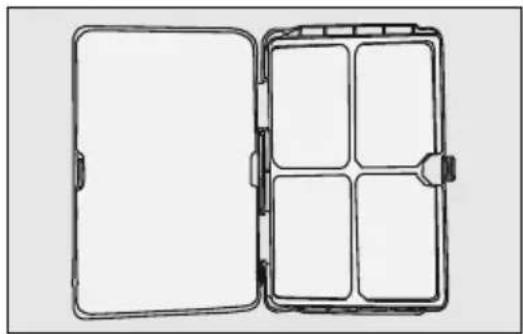
Please place the sponge carefully inside the frame of the filter cassette shown by arrows in order to avoid squeezing when filter drawer closed".:
natural_image
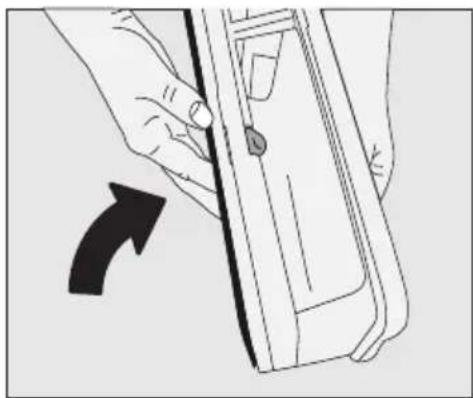
Line drawing of an open rectangular container with six compartments, no text or symbols present- Close the filter drawer as to lock the red button.
natural_image
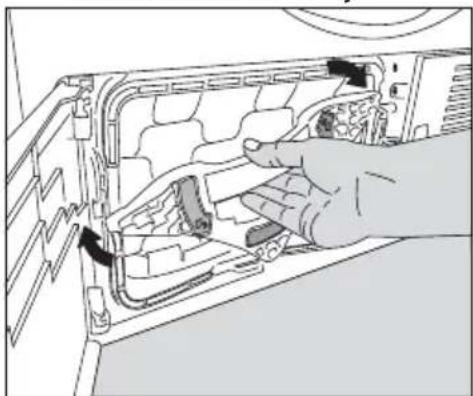
Illustration of a hand holding a device with an arrow indicating rotation (no text or symbols)- Place the filter drawer back into its place, turn the filter drawer cover in the arrow direction and close it securely.
natural_image
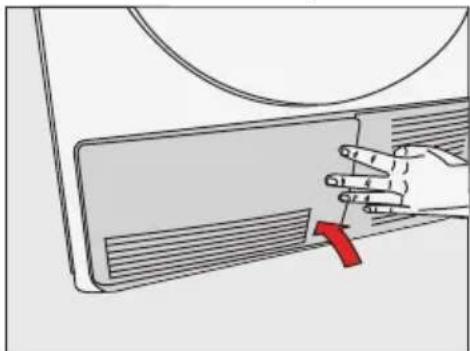
Illustration of a hand inserting a device into a computer case (no text or symbols visible)- Close the kick plate cover.
natural_image
Illustration of a hand pressing down on a computer monitor with a red arrow indicating the button (no text or symbols present)
Drying without the filter drawer sponge in place will damage the machine!

A dirty lint filter and filter drawer will cause longer drying periods and higher energy consumption.
7.5 Cleaning the evaporator
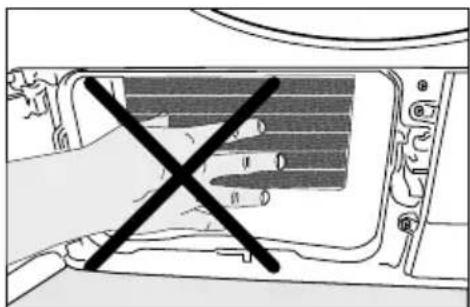
Clean the lint accumulated on the fins of the evaporator located behind the filter drawer with a vacuum cleaner.
natural_image
Diagram of a hand inserting a device into a device casing, with no visible text or symbols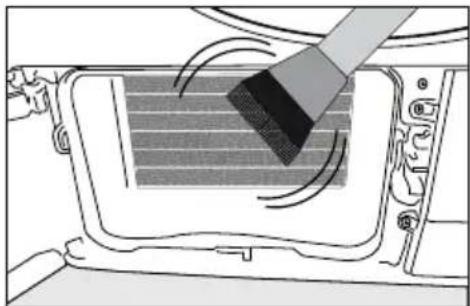
natural_image
Diagram of a car interior showing a brush applying material to a textured panel (no text or symbols)
CAUTION: You can also clean by hand provided that you wear protective gloves. Do not clean the evaporator with bare hands. Evaporator fins may hurt your hands.
8 Troubleshooting
Drying process takes too much time.
- Pores of the lint filter are clogged. >>> Wash the lint filter with warm water.
- Filter drawer may be blocked>>>clean the foam inside the filter drawer.
- Ventilation grids on the front side of the machine are blocked. >>> Remove the objects (if any) that block ventilation in front of the ventilation grids.
- Ventilation is not sufficient since the room where the machine is installed is very small. Open the door and window of the room to avoid the room temperature increase too much.
- Lime deposit has built up on the dampness sensor. >>> Clean the dampness sensor.
- Excessive laundry is loaded. >>> Do not load the dryer in excess.
- Laundry is not spun sufficiently. >>> Spin your laundry at a higher speed in your washing machine.
Laundry comes out wet at the end of drying.

After drying, the hot clothes feel damper than their actual dampness level.
- It is likely that the selected programme did not suit the laundry type.>>>Checking the care labels on clothes, select appropriate programme for the laundry type or use timer programmes in addition.
- Pores of the lint filter are clogged. >>> Wash the lint filter with warm water.
- Filter drawer may be blocked>>>clean the foam inside the filter drawer.
- Excessive laundry is loaded. >>> Do not load the dryer in excess.
- Laundry is not spun sufficiently. >>> Spin your laundry at a higher speed in your washing machine.
Dryer does not switch on or the programme does not start. Dryer does not start when it is set.
- It is not plugged in. >>> Make sure that the machine is plugged in.
- The loading door is ajar. >>> Make sure that the loading door is closed securely.
- Programme is not selected or the Start / Pause / Cancel button is not pressed. >>> Make sure that the programme is selected and the machine is not in Pause mode.
- Childproof Lock is activated. >>> Deactivate the Childproof Lock.
Programme is interrupted without any cause.
- Loading door is ajar. >>> Make sure that the loading door is closed securely.
- There was a power failure. >>> Press Start / Pause / Cancel button to start the programme.
• Water tank is full. >>> Drain the water tank.
| Laundry has shrunk, become felted or deteriorated. |
| A programme suitable for the laundry type is not used. >>> Check the garment tag and select a programme suitable for the fabric type. |
| Drum lighting does not turn on. (On models with lamp) |
| Dryer is not switched on with the On / Off button. >>> Make sure that the dryer is switched on. |
| Lamp is defective. >>> Call Authorized Service Agent to have the lamp replaced. |
| End/Anti-creasing symbol is on. |
| Anti-creasing programme is activated in order to prevent laundry that has remained in the machine from creasing. >>> Turn off the dryer and take out the laundry. |
| End symbol is on. |
| Programme is over. Turn off the dryer and take out the laundry. |
| Lint Filter Cleaning symbol is on. |
| Lint filter is not cleaned. >>> Clean the lint filter. |
| Lint Filter Cleaning symbol is flashing. |
| Filter housing is clogged with lints. >>> Clean the lint filter housing. |
| A deposit has built up on the lint filter pores that may cause clogging. >>> Wash the lint filter with warm water. |
| Filter drawer is clogged. >>> Clean the sponge and the filter cloth in the filter drawer. |
| Water leaks from the loading door |
| Lint has accumulated on the inner surfaces of the loading door and on the surfaces of the loading door gasket. >>> Clean the inner surfaces of the loading door and the surfaces of the loading door gasket. |
| Loading door opens spontaneously. |
| Loading door is ajar. >>> Push the loading door to close until you hear a locking sound. |
| Water Tank warning symbol is on/flashing. |
| Water tank is full. >>> Drain the water tank. |
| Water draining hose is bent. >>> If the product is connected directly to a wastewater drain, check the water drain hose. |
| Filter Drawer Cleaning warning symbol is flashing. |
| Filter drawer is not cleaned. >>> Clean the sponge and the filter cloth in the filter drawer. |

If you cannot eliminate the problem although you follow the instructions in this section, consult your dealer or the Authorized Service Agent. Never try to repair a nonfunctional product yourself.

In an event that you encounter an issue on any part on your appliance, you can ask for a replacement by contacting the authorized service with the appliance model number. Operating the appliance with non-authentic parts may lead the appliance to malfunction. Manufacturer and distributor are not liable for malfunctions resulting from using non-authentic parts.
9 Electrical Connection
Make sure that you have an earthed power outlet socket rated at 13 amps (minimum).
9.1 Attention!
When installed, the socket must be reachable after installation, or a separate switch (which can disconnect the two poles) must be used in the installation. Check for suitability.
For a permanent connection, a master switch with at least 3mm contact clearance and minimum 13 A rating must be used.
9.2 Electrical requirements
Before you insert the plug into the wall socket make sure that the voltage and the frequency shown in the rating label corresponds to your electricity supply.
We recommend that this appliance be connected to the mains supply via a suitable switched and fused socket in a readily accessible position.
Should the mains lead of the appliance become damaged or need replacing at any time, it must be replaced by a special purpose made mains lead which can only be obtained from an Authorised Service Agent.

Warning
This appliance must be earthed
If the fitted moulded plug is not suitable for your socket, then the plug should be cut off and an appropriate plug fitted.
The moulded plug on this appliance incorporates a 13A fuse. Should the fuse need to be replaced an ASTA approved BS1362 fuse of the same rating must be used. Do not forget to refit the fuse cover. In the event of losing the fuse cover, the plug must not be used until a replacement fuse cover has been fitted. Colour of the replacement fuse cover must be the same colour as that visible on the pin face of the plug. Fuse covers are available from any good electrical store.
In order to avoid hazards, damaged supply cord should be replaced by the manufacturer, its service agent or similarly qualified people.
A Do not operate without the top cover fitted. Risk of injury.

Important
9.3 Fitting a different plug
As the colours of the wires in the mains lead of this appliance may not correspond with the coloured markings identifying the terminals on your plug, proceed as follows:
1 Connect the green - yellow or green (earth) wire to the terminal in the plug marked 'E' or with the symbol or coloured green and yellow or green.
2 Connect the blue (neutral) wire to the terminal in the plug marked 'N' or coloured black.
3 Connect the brown (live) wire to the terminal in the plug marked 'L' or coloured red.
With the alternative plugs a 13 A fuse must be fitted either in the plug or adaptor or in the main fuse box. If in doubt contact a qualified electrician.
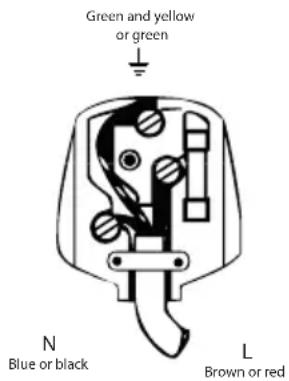
text_image
Green and yellow or green N Blue or black L Brown or red9.4 Washer/dryer combination
Do not stack washing machine on top of the tumble dryer. This would damage both appliances and guarantees would become void. It is also unsafe to stack an appliance on top of another without using a suitable and approved stacking kit obtained from specialist retailers.
| PRODUCT FICHE | ||
| Complying Commission Delegated Regulation (EU) No 392/2012 | ||
| Supplier name or trademark | Grundig | |
| Model name | GTN38250MGCW/GTN38250MGCBGTN38250MGCG | |
| Rated capacity (kg) | 8 | |
| Type of Tumble Dryer | Air Vented | - |
| Condenser | • | |
| Energy efficiency class (1) | A++ | |
| Annual Energy Consumption (kWh) (2) | 235 | |
| Type of Control | Automatic | • |
| Non-automatic | - | |
| Energy consumption of the standard cotton programme at full load (kWh) | 1,96 | |
| Energy consumption of the standard cotton programme at partial load (kWh) | 1,06 | |
| Power consumption of the off-mode for the standart cotton programme at full load, Po (W) | 0,4 | |
| Power consumption of the left-on mode for the standart cotton programme at full load, PL (W) | 1,0 | |
| The duration of the left on mode (min) | 30 | |
| Standard cotton programme (3) | ||
| Programme time of the standard cotton programme at full load, Tdry (min) | 197 | |
| Programme time of the standard cotton programme at partial load, Tdry1/2 (min) | 115 | |
| Weighted programme time of the standard cotton programme at full and partial load (Tj) | 150 | |
| Condensation efficiency class (4) | B | |
| Average condensation efficiency of the standard cotton programme at full load, Cdry | 85% | |
| Average condensation efficiency of the standard cotton programme at partial load, Cdry1/2 | 85% | |
| Weighted condensation efficiency of the standard cotton programme at full load and partial load, Ct | 85% | |
| Sound power level for the standard cotton programme at full load (5) | 65 | |
| Built-in | - | |
• : Yes - : No
(1) Scale from A+++ (most efficient) to D (least efficient)
(2) Energy consumption based on 160 drying cycles of the standard cotton programme at full and partial load, and the consumption of the low-power modes. Actual energy consumption per cycle will depend on how the appliance is used.
(3) "Cotton cupboard dry programme" used at full and partial load is the standard drying programme to which the information in the label and the fiche relates, that this programme is suitable for drying normal wet cotton laundry and that it is the most efficient programme in terms of energy consumption for cotton
(4) Scale from G (lest efficient) to A (most efficient)
(5) Weighted average value — L _WA expressed in dB(A) re 1 pW
Guarantee Details
Your new Grundig product is guaranteed against faulty materials, defective components or manufacturing defects. The guarantee starts from the date of original purchase of the product for a period of three (3) years unless Beko plc (the "Manufacturer") agrees to extend the guarantee for the product in writing. If you have any questions about the guarantee on your product (including how long it is valid), please contact your retailer or our Call Centre on 03332079920.
This guarantee does not in any way diminish or affect your statutory rights in connection with the product. This guarantee is in addition to your statutory rights as a consumer. If you have any question about these rights, please contact the retailer from which you purchased the product. In certain circumstances, it is possible that your statutory rights may offer additional or higher levels of protection than those offered under the terms of this guarantee.
What is covered by this guarantee?
- Repairs to the product required as a result of faulty materials, defective components or manufacturing defects.
• Functional replacement parts to repair a product. - The costs of a Grundig Approved Engineer to carry out the repair.
What is not covered?
• Transit and delivery damage.
- Cabinet or appearance parts, including but not limited to control knobs, flaps and handles.
- Accessories and/or consumable items including but not limited to ice trays, scrapers, cutlery baskets, filters and light bulbs.
• Repairs necessary as a direct or indirect result of:
- Accidental damage, misuse or abuse of a product.
- An attempted repair of a product by anyone other than a Grundig Approved Engineer (the "Engineer").
- Installation or use of a product where such installation or use fails to meet the requirements contained in this guarantee or the User Instructions Booklet.
- Repairs to a product operated at any time on commercial or non-residential household premises (unless we have previously agreed to the installation environment).
This guarantee is limited to the cost of repairing the product. To the extent permitted by law, Beko plc (the “Manufacturer”) does not accept and will not be held liable for any financial loss incurred in connection with the failure of any product to operate in accordance with the expected standards. Such financial loss includes but is not limited to loss arising from:
• Time taken off work.
- Damaged food, clothing or other items.
• Meals taken at restaurants or from takeaways.
- General compensation for inconvenience.
Important Notes
- Your product is designed and built for domestic household use only.
- The guarantee will automatically be void if the product is installed or is used in commercial or non-residential domestic household premises, unless we have previously agreed to the installation environment.
- The product must be correctly installed, located and operated in accordance with the instructions contained in the User Instructions Booklet provided with your product.
- Professional installation by a qualified Electrical Domestic Appliance Installer is recommended for all Washing Machines, Dishwashers and Electric Cookers (as incorrect installation may result in you having to pay for the cost of repairing the product).
- Gas Cookers must be professionally installed by a Gas Safe (or Gas Networks Ireland for Republic of Ireland) registered gas installer.
- This guarantee is given in respect of products purchased and used within the United Kingdom and the Republic of Ireland.
- This guarantee is effective from the initial date of purchase of a new product from an authorised retailer and will be void if the product is resold.
- This guarantee does not apply to graded sales (where the product is purchased as a "second").
- Possession of a copy of these terms and conditions does not necessarily mean that a product has the benefit of this guarantee. If you have any questions, please call our Call Centre on the number set out above.
- The Manufacturer reserves the right to terminate the guarantee if its staff or representatives are subjected to physical or verbal abuse in the course of carrying out their duties.
- Optional extras, where available (i.e. extendable feet) are supplied on a chargeable basis only.
Does Grundig offer replacements?
This is a repair-only guarantee. On occasion, the Manufacturer may at its sole discretion, replace your product with a new product instead of carrying out a repair. Where a replacement is offered, this would normally be an identical model, but when this is not possible, a model of similar specification will be provided. The Manufacturer will cover the costs and arrange for the delivery of the new product and for the return of the old product. Any costs related to disconnecting the faulty product and installing the replacement product will not be borne by the Manufacturer unless previously agreed to in writing. The original guarantee will continue to apply to the replacement product; the new product will not come with a new guarantee.
When will the repair take place?
Our Engineers work Monday to Friday 9.00am to 5.00pm. Appointments outside these hours may be possible at the sole discretion of the Manufacturer but cannot be guaranteed. Whilst our Engineers will endeavour to minimize inconvenience and to meet requests for specific timed appointments, this cannot be guaranteed. We will not be liable for delays or if it is unable to carry out a repair because a convenient appointment cannot be arranged.
Will there be any charge for the repairs?
It is your responsibility to provide evidence to the Engineer that your product is covered by this guarantee with a proof of purchase. The Manufacturer reserves the right to charge for the reasonable cost of any service call if:
- You cannot provide evidence that your product is covered by this guarantee.
- Where a service call has been made and the engineer finds that there is no fault with your product.
- That your product has not been installed or operated in accordance with the User Instructions Booklet.
- That the fault was caused by something other than faulty materials, defective components or manufacturing defects.
- For missed appointments.
Payment of these costs are due immediately upon the Engineer providing you with an invoice. The Manufacturer reserves the right to terminate the guarantee if you fail to pay the costs for the service call in a timely manner.
If you are a resident of the United Kingdom, this guarantee will be governed by English law and subject to the English Courts, save where you live in another part of the United Kingdom, in which case the law and courts of that location will apply.
If you are resident in the Republic of Ireland, this guarantee will be governed by Irish law and the Irish courts will have jurisdiction.
HOW TO OBTAIN SERVICE
Please keep your purchase receipt or other proof of purchase in a safe place; you will need to have it should the product require attention under guarantee.
It will be useful if you complete the details below, as it will help us assist you when requesting service (the model number is printed on the Instruction Booklet and the serial number is printed on the Rating Label affixed to the appliance). Recording of these details alone will not count as proof of purchase. A valid proof of purchase is required for under guarantee service.
The area around the product must be easily accessible to the Engineer without the need for cabinets or furniture being removed.
It is your responsibility to ensure our Engineers have a clean and safe environment to carry out any repairs.
Model No:
Serial No:
Retailer:
Date of purchase:
For service under guarantee simply telephone the appropriate number below
UK Mainland & Northern Ireland 0333 207 9920 or customerservice@support.grundig.co.uk
Republic of Ireland: 01 862 3411
Register your appliance at: grundig.co.uk/support/register
Before requesting service please check the troubleshooting guide in the Operating Instructions as a charge may be levied where no fault is found even though your product may still be under guarantee.
Service once the manufacturers guarantee has expired
If you have purchased an extended guarantee please refer to the instructions contained within the extended guarantee agreement document, otherwise please call the appropriate number above where service can be obtained at a charge.
Should you experience any difficulty in obtaining service contact the Grundig Customer Helpline on Tel: 0333 207 9920 or e-mail: customerservice@support.grundig.co.uk
This guarantee is provided by Beko plc. Beko House, 1 Greenhill Crescent, Watford, Herts, WD18 8QU. Beko plc is registered in England and Wales with company registration number 02415578.