
GT5410231CW - Tumble dryer GRUNDIG - Free user manual and instructions
Find the device manual for free GT5410231CW GRUNDIG in PDF.


| Product Type | Tumble dryer (condenser) |
| Brand | Grundig |
| Model | GT5410231CW |
| Energy Efficiency Class | A++ |
| Capacity (dry laundry) | 10 kg |
| Height (adjustable) | 84.6 - 86.6 cm |
| Width | 59.8 cm |
| Depth | 60.7 cm |
| Net Weight | 44 kg |
| Refrigerant Type | R290 (flammable) |
| Control Type | Electronic |
| Programs | Cottons, Cottons Eco, Cottons Iron dry, Synthetics, Mix, Towels, GentleCare, Daily, Timer, Jeans, Sports, Duvet, Shirts, Express, Hygienic Drying, Hygienic Refresh |
| Drum Light | Yes |
| Child Lock | Yes |
| End Time Delay | Up to 24 hours |
| Wrinkle Prevention | Yes (2 hours) |
| Odour Feature (ProScent) | Optional |
| Fiber Filters | Inner and outer filters |
| Condenser Cleaning | Every 6 months or when indicator flashes |
| Water Tank | Yes (4.5 L approx) with direct drain option |
| Power Consumption (Off-mode) | 0.5 W |
| Power Consumption (Standby) | 1.0 W |
| Noise Level | 64 dB(A) |
| Voltage / Frequency | 230-240 V / 50 Hz (typical) |
| Standard Warranty | 24 months (free standing); 10 years on Eco Inverter motor (registration required) |
Frequently Asked Questions - GT5410231CW GRUNDIG
User questions about GT5410231CW GRUNDIG
0 question about this device. Answer the ones you know or ask your own.
Ask a new question about this device
Download the instructions for your Tumble dryer in PDF format for free! Find your manual GT5410231CW - GRUNDIG and take your electronic device back in hand. On this page are published all the documents necessary for the use of your device. GT5410231CW by GRUNDIG.
USER MANUAL GT5410231CW GRUNDIG
natural_image
Simple line drawing of a T-shirt with wavy lines underneath (no text or symbols)GT541023CW
GT5410231CW
2960313001/EN//18/07/2023 11:56
Table of Contents
1 Please read this guide before!..... 3
2 Safety Instructions...... 4
2.1 Intended Use.... 4
2.2 Safety of Children, Vulnerable Persons and Pets .... 4
2.3 Electrical Safety.... 5
2.4 Transporting Safety...... 5
2.5 Installation Safety.... 6
2.6 Usage Safety...... 8
2.7 Maintenance and Cleaning Safety 10
2.8 Lighting Safety.... 10
3 Environmental instructions...... 11
3.1 Compliance with the WEEE Regulations and Waste Disposal ..... 11
3.2 Packaging Information...... 11
3.3 Standard Conformity and Test Information EU Declaration of Conformity.... 11
4 Technical Specifications ...... 12
5 General Appearance.... 13
5.1 Scope of Delivery.... 13
6 First Operation 14
7 Installation 14
7.1 Right Place for Installation ..... 14
7.2 Removing the Shipping Safety 15 Group....
7.3 Water Connection.... 15
7.4 Adjusting the Legs.... 16
7.5 Moving the Drying Machine ..... 16
7.6 Warnings Regarding the Noise..... 16
7.7 Replacing the Lighting Bulb ...... 16
7.8 Electrical Connection 17
8 Preparation.... 18
8.1 Laundry Suitable for Drying in 18 Drying Machine....
8.2 Laundry Not Suitable for Drying in 18 Drying Machine......
8.3 Preparing the Laundry to Be Dried 18
8.4 What to Do for Energy Saving...... 18
8.5 Correct Load Capacity 19
9 Running the Product 20
9.1 Control Panel 20
9.2 Symbols 20
9.3 Preparation of Drying Machine ..... 20
9.4 Program Selection and Consumption Chart.... 21
9.5 Auxiliary Functions 22
9.6 Warning Indicators.... 23
9.7 Starting the Program 24
9.8 Child Lock.... 24
9.9 Changing the Program After It Is 24 Started ....
9.10 Cancelling the Program.... 25
9.11 End of Program.... 25
9.12 Odour Feature 25
10 Maintenance and Cleaning...... 25
10.1 Fiber Filters (internal and external filters) / Cleaning of the Interior Surface of the Loading Door .....
10.2 Cleaning the Sensor.... 27
10.3 Emptying the Water Tank 27
10.4 Cleaning the Condenser 28
11 Troubleshooting 30
12 Product Information Voucher..... 33
13 GRUNDIG UK AND IRELAND 34 STANDARD MANUFACTURER GUARANTEE TERMS AND CON- DITIONS......
1Please read this guide before!
Dear Customer,
Thank you for choosing Grundig product. We hope you get the best efficiency from this product which has been manufactured with high quality and state of the art technology. Please make sure you read and understand this guide and supplementary documentation fully before using the product.
Observe all warnings and information herein. Therefore you can protect both yourself and your product against potential damages.
Keep the user's manual. Include this guide with the product if you hand it over to someone else.
Symbols in the user manual and on your machine:
 | Danger that may result with death or injury. |
 | Read the user's manual. |
 | Important information and useful hints about usage. |
 | Flammable material, warning of fire hazard. |
 | Warning against UV Radiation hazard. |
 | The product's packaging is made of recyclable materials, in accordance with the National Environment Legislation. |
 | Warning against hot surfaces. |
 | Warning against electrical hazard. |
| NOTICE | Danger that may cause material damage on the product or surrounding area. |
This product has been manufactured at modern facilities respectful to the environment without harming the nature.

2 Safety Instructions
- This section includes the information necessary to prevent the risk of personal injury or material damage. Our company shall not be held responsible for damages that may occur if these instructions are not observed.
• Always have the installation and repair work carried out by the manufacturer, an authorized service centre or a person recommended by the importer - Use original spare parts and accessories only.
- Do not repair or replace any component of the product unless it is clearly specified in the user's manual.
- Do not make technical modifications on the product.

2.1 Intended Use
- Product is designed only for household use. It is not intended for commercial use.
• The product is not designed for outdoor use. - Do not install or operate the product in areas where freezing is a possibility and/or areas vulnerable to external ef-
fects. Water frozen in the pump or the hoses may cause damages.
- Product can only be used to dry and ventilate laundry which are washed with water and drying machine safe.
2.2 Safety of Children, Vulnerable Persons and Pets
- This product may be used by children aged 8 years and older and persons with underdeveloped physical, sensory or mental capabilities or lack of experience and knowledge if they have been given supervision or instruction concerning safe use of the product and the hazards involved. Children should not tamper with the device. Cleaning and maintenance should not be carried out by children unless they are supervised.
• Children under 3 years of age should be kept away from the product unless they are constantly supervised.
• Electrical products are dangerous for children and pets. Children and pets should not play with, climb on or get inside the product.
- Keep the loading door of the product closed even when not operated.
- Cleaning and user maintenance operations should not be performed by children unless supervised.
- Keep the packaging materials away from children. There is risk of injury and suffocation.
- Keep all additives used with the product away from children.
- Before disposing of the product, cut the power cord and destroy the loading door for the safety of children.

2.3 Electrical Safety
- The product must not be plugged in during installation, maintenance, cleaning, repair and transportation.
- If the power cable is damaged, it must be replaced by a person designated by the manufacturer, authorized service centre or importer in order to avoid potential hazards.
-
Do not tuck the power cord under the product or to the rear of the product. Do not put heavy items on the power cord.
-
Power cord should not be kinked, pinched and should not come in contact with any heat source.
- Do not use an extension cord, multi-plug or adaptor to operate the product.
- The product should not be powered via an external switch such as a timer or should not be connected to a circuit that is regularly opened and closed with a tool.
- The plug should be easily accessible. If this is not possible, a mechanism that complies with the electrical legislation and that disconnects all terminals from the mains (fuse, switch, main switch, etc.) should be available on the electrical installation.
- Do not touch the plug with wet hands.
- When unplugging the appliance, don't hold the power cord, but the plug.

2.4 Transporting Safety
- Unplug the product, empty the water tank and if any, remove the water drain connections prior to transport.
- This product is heavy, do not handle it by yourself.
• Take required precautions against the risks of falling and tipping of the product. Do not crash or drop the product when transporting.
- Do not use the extruding parts of the product (such as the loading door) to move the product.
- Move the product in upright position. If it cannot be moved in upright position, transport via tilting to the right side when viewed from the front.

2.5 Installation Safety
- To make the product ready for installation, ensure that the electrical installation and water drain are appropriate by checking the information in the user's manual. If it is not suitable for installation, call a qualified electrician and plumber to make the necessary arrangements. These operations shall be undertaken by the customer.
- This product is designed for use at altitudes up to 2000 metres above sea level.
- Check for any damage on the product before installing it. Do not have the product installed if it is damaged.
- Do not ever remove the adjustable legs.
- Place the product on a clean, level and hard surface and balance with the help of the adjustable legs.
- The gap between the product and the floor should not be reduced via materials such as rugs, pieces of wood and bands. The ventilation holes under the base of the product should not be clogged with a rug.
- The product should be installed in such a way so as not to clog the ventilation holes.
• Install the product in an environment free of dust with good ventilation. - Do not install the product in close proximity to flammable and explosive materials and do not keep flammable and explosive materials near the product when it is in operation.
- The product should not be installed behind a lockable door, or a door with bolt where the product loading door cannot be completely opened, or a hinged door where the product hinge is faced against the door's hinges.
• Install the product in a place where periodic maintenance and cleaning can be done with ease.
- Place the product with its back surface facing the wall. (For models with heating).
- While placing the product, ensure that the back wall does not come in contact with any extrusion (a water tap, electrical outlet etc.).
- Place the product with at least 1 cm space between the product and the furniture edges.
- Follow the flue connection rules specified in the manual. (For models with flue).
- The discharged air should not be directed to a flue which is used to discharge the smoke of devices that use gas or other fuels. (For models with flue).
- The ventilation hose should not be connected to a heating stove or a chimney flue. (For models with flue).
- Plug the product to a grounded outlet protected with an appropriate fuse in align with the specified type and current rates. Have an expert electrician set grounding equipment.
Do not use the product without a grounding conforming with regional/national regulations.
- Plug the product in a grounded socket that conforms with the voltage, current and frequency values specified in the type label.
- Do not plug the product to loose, broken, dirty, greasy sockets or sockets that have come out of their seats or sockets with a risk of water contact.
- The new hose sets supplied with the product should be used. Do not re-use the old hose sets. Do not make attachments to the hoses.
- Place the power cord and hoses in such a way so as not to cause a risk of tripping over.
- Make sure that the hose does not slip or fold if you directly drain the water from the laundry that is generated by the condensation of the moisture. Otherwise, water leaking problem may occur.
- Do not wash the dryer with hose.
- To use the product on top of a washing machine, a fixing aperture should be used between two products. Have the fixing aperture installed by
the manufacturer, an authorized service centre or a person specified by the importer.
- Do not use the product without fixing it on floor-high ground, such as on a table or cabinet interior. When used without fixation, it can move and fall over time, damaging living things in the environment or the objects around it. The carrier floor must be solid and stable.
- When the product is placed on the washing machine, their combined weight when full could be around 180 kg. Place the products on a sturdy floor with an adequate load carrying capacity.
- Washing machine cannot be placed on top of the drying machine.
| Suitable Instalment Table for Washing Machine and Drying Machine | |
| Connection Kit Type Depth Size (DM: Drying Machine, WM: Washing Machine) | |
| Plastic - 54/60 cm with/without arch 60cm DM --> WM≥50 | cm / 54 cm DM --> WM≥45 cm |
| Plastic - 46 cm with/without arch 46 cm DM --> WM≥54 cm | |
| With Shelves - 60 cm 60cm DM --> WM≥50cm | |
| With Shelves - 54cm 54cm DM --> WM≥45cm | |

2.6 Usage Safety
- The maximum weight of dry laundry prior to washing is specified in “Technical Specifications” section.
- Do not dry the unwashed items in the drying machine.
-
Do not machine dry clothes exposed to substances like oil, acetone, alcohol, petroleum, kerosene, stain remover, turpentine, massage oil, explosives and combustibles, beeswax and beeswax remover, even if they have been washed.
-
If industrial chemicals are utilized for cleaning, the drying machine should not be used.
- Softener or similar products should be used as written in the softener instruction.
- Rubber foam (latex foam), shower bonnets, water resistant textiles, rubber supported materials, clothes with rubber foam pads, and pillows should not be dried in the drying machine.
- Yarn and fluffs dangling from filled and damaged parts can be dispersed in the machine and damage your machine in
the drying process. Check the seams of the laundry you are going to dry.
- The items with hair spray, with residue of hair product or similar materials should not be dried in the drying machine.
- Empty the pockets of the clothes and remove all items such as matches and lighters.
- Do not stop the drying machine before the completion of the drying cycle if you won't be able to remove all the items rapidly and to lay them down in such a way that heat will be dissipated.
- The last part of the drying machine cycle is conducted without heating (cooling cycle) in order to ensure that the items are kept at a temperature that will not harm the items.
- Laundry softeners or similar products should be used in align with the laundry softener instructions.
- Do not use the drying machine without the fiber filter.
- Do not allow fiber to accumulate around the drying machine.
- Do not operate the dryer with a damaged fiber filter. Otherwise, the machine may be damaged by the collected fluff
and your machine's drying performance may be adversely affected.
- Clean the fiber filters after each drying process.
• After washing the fiber filters, dry them. Do not use filters wet.
- To prevent back flow of gas to the room from the devices that consume other fuels, including open fire, appropriate ventilation should be provided (For models with flue).
- Do not operate the product together with heaters such as coal stove and gas heater and a chimney. Airflow can cause the flue to catch fire (For models with flue).
- Do not lean or sit on the loading door when it is open, the product may tip over.
- Do not get on the product.
- Do not place a source of flame (burning candles, cigarettes, etc.) on the product or in the vicinity of it. Do not keep flammable/explosive substances.
- Do not touch the drum as it revolves.
- During operation, the back wall of the product becomes very hot. Do not touch the back of the product during drying or
immediately after the completion of drying (For models with heating).
- Do not touch the inner surface of the drum while adding or removing clothes during a continuing programme. The drum surface is hot.
- Do not press the buttons with sharp objects such as forks, knives, with your nails etc.
- Do not operate the faulty or damaged product. Unplug the product (or turn off the fuse to which it is connected) and call the manufacturer, an authorized service agent or a person specified by the importer.
- Unplug the product when not in use.

2.7 Maintenance and Cleaning Safety
- Do not wash the product by spraying or pouring water on it. Do not use a pressure cleaner, steam cleaner, hose or pressurised gun to clean the product.
- Do not use sharp or abrasive tools to clean the product.
-
Do not use materials such as household cleaning agents, soaps, detergents, gas, gasoline, thinner, alcohol, wax, etc. to clean the product.
-
The fiber filter should be frequently cleaned. After each drying cycle, clean the fiber filter and the inner surface of the loading door.
- Clean the accumulated fiber on the fins of the evaporator behind the filter drawer with a vacuum cleaner. You can clean by hand, provided you wear protective gloves. Do not try to clean with bare hands. Evaporator fins may damage your hands (for products with heat pump).
- Due to fire and explosion hazard, do not use solutions, cleaning materials, steel wool or similar materials and tools to clean sensors.
- Clean the flue (For models with flue).
- Do not drink the condensed water. Condensed water is not potable water. This water can harm human and animal health if drunk.

2.8 Lighting Safety
- Contact an authorized service when you need to replace the LED/bulb used for lighting (for products with lighting).
3 Environmental instructions
3.1 Compliance with the WEEE Regulations and Waste Disposal

natural_image
Symbol of a trash bin crossed with no text or numbers, representing waste sorting or disposal (no text present)This product does not contain the dangerous and prohibited materials indicated in the "Regulation on The Control of Waste Electrical and Electronic Equipment" published by Ministry of Environment and Urbanisation of the Republic of Turkey. Complies with WEEE Regulation. This product was manufactured from recyclable and reusable high quality parts and materials. Therefore, do not dispose of this product with domestic and other wastes at the end of its life cycle. Take it to a collection point for recycling of electrical and electronic equipment. You can ask your local administration about these collection points. Help protect the environment and natural resources by delivering the used products for recycling.

Also R290 is a flammable refrigerant. Therefore ensure that the system and pipes are not damaged during operation and transportation. Keep the product away from possible heat sources, otherwise it may catch fire if damaged. Do not dispose of the product by throwing it into fire.
3.2 Packaging Information
The product's packaging is made of recyclable materials in accordance with the National Legislation. Do not dispose of the packaging waste with the household waste or other wastes, deliver it to the packaging collection areas specified by local authorities.
3.3 Standard Conformity and Test Information EU Declaration of Conformity

The development, manufacturing and sales phases of this product is conducted in conformity with the safety rules specified in all related instructions of the European Union

The development, manufacturing and sales phases of this product is conducted in conformity with the safety rules specified in all related instructions of the Great Britian.
4 Technical Specifications
| Height (adjustable) (cm) 84,6 * / 86,6 ** | |
| Width (cm) 59,8 | |
| Depth (cm) 60,7 | |
| Capacity (max.) (kg) 10 *** | |
| Net weight (±10%) (kg) 44 | |
| Voltage | See the type label****Power |
| Main Model Code |
* Min. height: Height with the adjustable legs closed.
** Max. height: Height with the adjustable legs opened at maximum height.
*** Weight of dry laundry before washing.
**** Type label is under the door on the drying machine.
In order to increase the drying machine's quality, the technical specifications may be changed without prior notice.
Figures in this manual are schematic and may not exactly match the product.
The values provided in the symbols on the drying machine or its accompanying documents are values obtained in the laboratory environment in accordance with the respective standards. These values may differ depending on the use and ambient conditions of the drying machine.

1 Upper table 2 Control Panel
3 Type label 4 Kickplate opening handle
5 Ventilation grills 6 Adjustable legs
7 For the models with tank located at the bottom, the water tank is inside the kickplate
9 Loading door 10 Power cord
11 Water tank drawer (for models with the tank on top)
5.1 Scope of Delivery

: User's Manual

: Filter drawer sponge*

: Odour capsule group*

: Water discharge hose*
8 Fiber filter

: Drying basket*

: Filter cloth*

: Water container*

: Brush*
*The optional accessory may not be available in the product.
6 First Operation
Remove the protective foil and adhesive advertising label if available in your product.

However, please do not remove the labels (e.g. type label) that appear after the lid is opened.
After the device is installed
- operate the machine for the first time according to user's manual.
7 Installation

Read the "Safety Instructions" first.
Before consulting the nearest Authorized Service for installing the drying machine, see the information in the user guide and make sure the electric and water utilities are as required. If it is not suitable for installation, call a qualified electrician and plumber to make the necessary arrangements.
It is customer's responsibility to prepare the location the drying machine shall be placed on and also have power and waste water installation prepared.

Check for any damages on the drying machine before installing it. If drying machine is damaged, do not get it installed. Damaged products cause a risk for your safety. Wait for 12 hours before operating your dryer after initial installation.
7.1 Right Place for Installation
NOTE: The product includes a cooling agent and if the product is operated right after it is transported, it may get damaged. After each time the product is moved, it shall be left to rest for 12 hours.
• Install the drying machine on a flat and stable surface.
- Dryer machine is heavy. Do not move it by yourself.
- Operate the drying machine in an environment free of dust with good ventilation.
- The gap between the drying machine and the floor should not be reduced via materials such as rugs, pieces of wood and bands.
- Do not block the ventilation grilles of the drying machine.
- There shall not be doors that can be locked, sliding doors or hinged doors near the installation environment of the drying machine that may block the loading door to be opened.
- Once the drying machine is installed, the connections must stay stable. While placing the drying machine, ensure that the back wall does not come in contact with any extrusion (a water tap, electrical outlet etc.).
- Place the drying machine with at least 1 cm space between the product and the furniture edges.
- Your drying machine is suitable to be operated between +5 °C and +35 °C. If operated outside this temperature range, your drying machine's operation may be compromised and get damaged.
- The drying machine should be placed with the back side facing a wall.

Do not place the drying machine on its power cord.

Ignore this warning if the product system does not contain R290*. The dryer has R290 refrigerant gas. R290 is an environmentally friendly but flammable cooling gas. Make sure the air intake of the dryer is open and well ventilated. Keep possible flame sources away from the dryer.
7.2 Removing the Shipping Safety Group
Remove the shipping safety group prior to first use of the product.

natural_image
Line drawing of a hand inserting a bag into a door, showing internal components and motion arrows (no text or symbols)NOTE: Do not leave an accessory or any parts of the shipping safety group inside the drum.
7.3 Water Connection
Instead of periodically draining the water accumulated in the water tank, you can discharge it directly via the water discharge hose supplied with the drying machine.
Connecting the water drainage hose
- Manually pull the end of the hose behind the dryer from where it is connected. Do not use a tool to remove the hose.

natural_image
Technical line drawing of a mechanical assembly with no visible text or symbols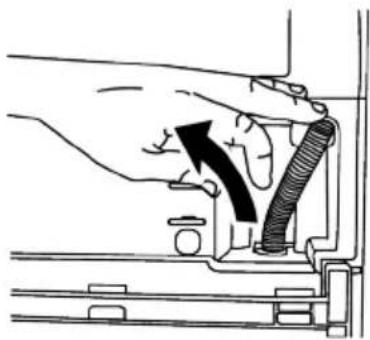
natural_image
Diagram of a hand inserting a flexible hose into a mechanical component (no text or symbols)- Insert one end of the water discharge hose supplied with the drying machine to where you have removed the hose of the drying machine.

natural_image
Line drawing of hands using a tool to adjust or install a mechanical component (no text or symbols visible)- Fix the other end of the water discharge hose directly to waste water drainage or a sink.

natural_image
Technical line drawing of a mechanical assembly with coiled tubing (no text or symbols)
Fix the water discharge hose at a maximum height of 80 cm.
Ensure that the water discharge hose does not get kinked, collapsed or pressed on between the discharge and the drying machine.
Hose connection should be made in such a way that it won't come out of its location. Leaked water may cause damage.
Do not extend the water drainage hose.
Check whether the water flows at an adequate rate or not. The drainage line should not be closed or clogged.
If an accessory package is provided with your product, check the detailed instructions.

7.4 Adjusting the Legs
Until the drying machine stands level and sturdy, adjust the legs by turning them left and right.

natural_image
Diagram showing two mechanical components with directional arrows indicating motion or force (no text or symbols)7.5 Moving the Drying Machine
- Drain the water in the drying machine completely.
- If the product is connected via direct discharge, remove the hose connections.

The drying machine is recommended to be moved in upright position. If it cannot be moved in upright position, transport via tilting to the right side when viewed from the front. Wait for 12 hours prior to operating the drying machine.
7.6 Warnings Regarding the Noise
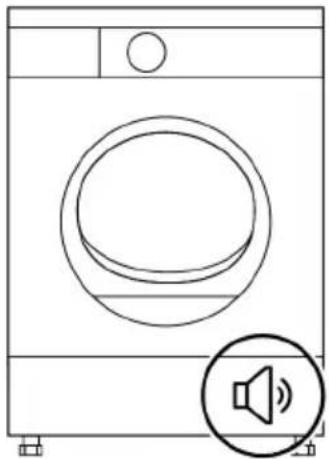
While the product is being operated, it is normal for a metallic noise to come from the compressor from time to time.
The water that accumulates while the product is being operated, is pumped to the water tank via the pump. It is normal to hear pumping sounds from the product during this operation.
natural_image
Line drawing of a washing machine with speaker icon (no text or symbols)7.7 Replacing the Lighting Bulb
If your drying machine has drum lighting lamp;
Consult the authorized service to replace the bulb/LED used in lighting your drying machine. The bulb in this product is not suitable for home lighting. The intended use of this lamp is to ensure safely loading the laundry to the drying machine. The
lamps used in this appliance should be resistant to inappropriate physical conditions such as temperatures over 50 °C.
7.8 Electrical Connection
Make sure that you have an earthed power outlet socket rated at 13 amps (minimum).
Attention!
When installed, the socket must be reachable after installation, or a separate switch (which can disconnect the two poles) must be used in the installation. Check for suitability.
For a permanent connection, a master switch with at least 3mm contact clearance and minimum 13 A rating must be used.
Electrical requirements
Before you insert the plug into the wall socket make sure that the voltage and the frequency shown in the rating label corresponds to your electricity supply.
We recommend that this appliance be connected to the mains supply via a suitable switched and fused socket in a readily accessible position.
Should the mains lead of the appliance become damaged or need replacing at any time, it must be replaced by a special purpose made mains lead which can only be obtained from an Authorised Service Agent

This appliance must be earthed If the fitted moulded plug is not suitable for your socket, then the plug should be cut off and an appropriate plug fitted.
The moulded plug on this appliance incorporates a 13A fuse. Should the fuse need to be replaced an ASTA approved BS1362 fuse of the same rating must be used. Do not forget to refit the fuse cover. In the event of losing the fuse cover, the plug must not be used until a replacement fuse cover has been fitted. Colour of the replacement fuse cover must be the same colour as that visible on the pin face of the plug. Fuse covers are available from any good electrical store. In order to avoid hazards, damaged supply cord should be replaced by the manufacturer, its service agent or similarly qualified people.

Do not operate without the top cover fitted. Risk of injury.
Fitting a different plug
As the colours of the wires in the mains lead of this appliance may not correspond with the coloured markings identifying the terminals on your plug, proceed as follows:
- Connect the green - yellow or green (earth) wire to the terminal in the plug marked 'E' or with the symbol or coloured green and yellow or green.
- Connect the blue (neutral) wire to the terminal in the plug marked 'N' or coloured black.
- Connect the brown (live) wire to the terminal in the plug marked 'L' or coloured red.
With the alternative plugs a 13 A fuse must be fitted either in the plug or adaptor or in the main fuse box. If in doubt contact a qualified electrician.

8 Preparation
Read the "Safety Instructions" first!
8.1 Laundry Suitable for Drying in Drying Machine
Laundry that are not drying machine safe may damage the appliance and the laundry during drying. Follow the instructions on the labels of the laundry to be dried. Only dry the laundry with the “drying machine safe” labels by choosing the suitable programs.
8.2 Laundry Not Suitable for Drying in Drying Machine
- Undergarments with metal supports should not be dried in drying machine. If these metal supports get loose and ripped from the garment, they may damage the machine.
- Delicate embroidery textiles, woollen and silk garments, garments manufactured from delicate and valuable textiles, non breathing garments and tulle curtains should not be dried in drying machine.
- Pay attention to the drying symbols on the label on the laundry. Dry laundry with the label or symbol that says it is suitable for drying in the dryer.

Cannot be
cined in
tumble dryer

Can be dried at high temperature.

Can be dried at medium temperature.

Can be dried at low temperature.

Laundry suitable for tumbie dryer.
Washer/dryer combination
Do not stack washing machine on top of the tumble dryer. This would damage both appliances and guarantees would become void. It is also unsafe to stack an appliance on top of another without using a suitable and approved stacking kit obtained from specialist retailers.
8.3 Preparing the Laundry to Be Dried
Items such as coins, metal parts, needles, nails, screws, stones etc. may damage the drum group of the product or may cause functional operation issues. Therefore check all laundry that will be loaded to the product.
- Dry the laundry with metal accessories such as zippers by turning them inside out.
- Close the zippers, hooks and clasps, button up the covers' buttons, tie textile belts and apron belts.
8.4 What to Do for Energy Saving
Use the highest possible spinning cycle as you wash the laundry. Therefore you can reduce the drying period and reduce energy consumption. Sort the laundry based on their types and thickness. Dry same types of laundry together. For instance thin kitchen towels and table cloths dry faster than thick bathroom towels.
- Follow the recommendations in the user's manual for program selection.
- During drying do not open the loading door unless necessary. If you are required to open the loading door, do not keep it open for too long.
- Do not add wet laundry as the drying machine operates.
- Clean the Fiber Filter before and after each drying session.
- For models with condensation, be sure to clean the condenser regularly at least once a month or after 30 drying sessions.
- Make sure the filters are clean. Refer to maintenance and cleaning section for details.
- For models with flue, follow the flue connection rules specified in the guides and clean the flue.
- During drying session, properly ventilate the environment where the drying machine is located.
- In models with heat pump, check the condenser at least every six months and clean it if it is dirty.
- If you are using environment friendly filter, you are not required to clean the filter after every cycle. When the environment friendly icon is lit on the screen, change the filter cloth.
8.5 Correct Load Capacity

natural_image
Abstract black-and-white graphic with a circular frame and an open oval, containing stylized mountain silhouettes (no text or symbols)If the laundry in the product exceed maximum loading capacity, it may not operate as intended and may cause material damage or product damage. For each program, follow the maximum loading capacity. Below you can see the laundry and their approximate weight.
Duvet Cover Set: 1000-1500 g
Flat Sheet: 350-500 g
Table Cover: 250-700 g
Towel: 350-700 g
Dress: 350-500 g
Denim Trousers: 500-700 g
T-shirt: 125-200 g
Blouse: 150-250 g
Shirt: 200-300 g
9 Running the Product
9.1 Control Panel

1 On/Off/Programme selection button. 2 Dryness level selection button.
3 Drum light and wrinkle prevention selection button.
4 Audible warning and child lock selection button.
5 Low temperature selection button. 6 Time program selection button.
7 End time selection button. 8 Start / Standby selection button.
9.2 Symbols

9.3 Preparation of Drying Machine
- Plug the drying machine.
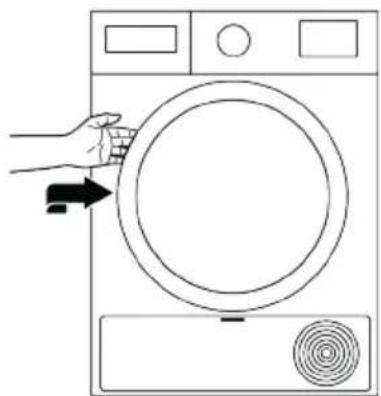
- Open the loading door.
natural_image
Line drawing of a hand pressing down on a circular washing machine with a spiral button (no text or symbols)- Place the laundry in the drying machine without jamming them.

natural_image
Line drawing of a washing machine with hands inserting a cup into a basin (no text or symbols)- Push and close the loading door.

natural_image
Line drawing of a hand pressing down on a circular washing machine with a spiral pattern (no text or symbols)- Ensure that no laundry is jammed to the loading door.
- Do not close the loading door with force.
- Select the desired program by using On/Off program selection button and the machine will turn on.
- Selecting the program with the On/Off program selection button does not mean that the program will get started. Press Start / Standby button to start the program.
9.4 Program Selection and Consumption Chart
| Programs Program Definition | Capacity (kg) | Approx. humidity left | Drying Time (min) | ||
| Cottons | You can dry your heat-resistant cotton textiles with this program. A drying setting suitable for the thickness of the products to be dried and the desired level of dryness should be selected. | 10 1000 | 250 | ||
| Cottons Eco | It dries single layer, casual cotton textiles in the most economical way. | 10 1000 | 239 | ||
| Cottons Iron dry | Single layer, daily used cotton textiles are dried as slightly damp, ready to be ironed. | 10 1000 | 179 | ||
| Synthetics | You can dry all your synthetic textiles with this program. A drying setting suitable for the level of dryness you desire should be selected. | 4 800 | 70 | ||
| Mix | Use it to dry the synthetic and cotton laundry that do not bleed colour together. Sports - fitness garments can be dried with this program. | 4 1000 | 110 | ||
| Towels | Use it to dry towels such as kitchen towels, hand towels and bathrobes. | 5 1000 | 175 | ||
| GentleCare | Dries shirts and delicate garments and causes less wrinkles for easy ironing. | 2 1200 | 50 | ||
| Daily | You can dry both your cotton and synthetic daily garments with this program. Sports - fitness garments can be dried with this program. | 4 1000 | 110 | ||
| Timer Programme | You can select the timer programs from 10 minutes to 160 minutes to achieve the desired final drying level under low temperature. In this program, the dryer dries for the time set regardless of the dryness of the laundry. | --- | |||
| Jeans | Use to dry denim clothes spun in the high speed in the washing machine. | 4 1200 | 125 | ||
| Sports | You can dry your multilayered and water/wind-proof functional textile products made of synthetic, cotton or mixed fabrics used for outdoor activities and outdoor sports in this program. | 2 1000 | 135 | ||
| Duvet | You can dry your feather filled and fiber filled textiles that are drying machine safe in one piece. In this program you can dry double size quilts, pillows and coats in single piece. Turn clothes such as coats, jackets inside out for drying. | -800 | 165 | ||
| Shirts | Dries shirts and delicate garments and causes less wrinkles for easy ironing. | 1,5 120 | 0 50 | ||
| Express | Use this program to get 2 shirts ready for iron-ing. | 0,5 120 | 0 30 | ||
| Hygienic Drying | It is the program in which you can dry your washed textile products you want to provide with extra hygiene (baby clothes, underwear, towels, etc.). It provides high hygiene for your textiles via high heat effect. | 5 800 | 200 | ||
| Hygienic Refresh | You can use this program to provide hygiene to your under-worn dry laundry that you do not want to wash. It provides high hygiene for your dry textiles via high heat effect. | 1,5 - 120 | |||
| Energy consumption values | |||||
| Programs Capacity (kg) | Spin speed of the washing machine (rpm) | Approx. humidity left | Energy consumption value kWh | ||
| Cottons Eco* 10 1000 60% 2,45 | |||||
| Cotton Ironing Dry 10 1000 60% | 2,15 | ||||
| Synthetic Wardrobe Dry 4 800 40% 0,70 | |||||
 | "Cotton Economic Dryness program" is a standard drying program that may be utilized with full or half load and where the information is provided on the product label or the receipt. This program is the most efficient one in terms of energy consumption for drying normal wet cotton loads. | ||||
 | If you are regularly drying a maximum 10 kg of cotton laundry, in order to prevent the drying machine to stop operation during a program due to water tank being filled completely, it is recommended to connect the water discharge hose. (See "Connecting the water drainage hose) | ||||
| *Energy Label standard programme EN 61121 All the values in the table are determined according to the EN 61121 standard. Consumption values may vary from the values in the chart depending on laundry type, spin speed, ambient conditions and voltage levels. | |||||
9.5 Auxiliary Functions
Dryness Level
Dryness level button is used for adjusting the desired dryness level. Program time may change depending on the selection.

You can activate this function only prior to operation of program.
Wrinkle Prevention
You can turn on and off the wrinkle prevention function by pressing the wrinkle prevention selection button. If you will not take the laundry out immediately after the programme has been completed, you may use Wrinkle prevention function to prevent wrinkling of your laundry.
Audible Warning
Drying machine makes an audible warning when the program is completed. Press the "Audible Warning" button if you do not want audible warning. When you press the audible warning button, its light goes off and it does not sound when the program is completed.

You can select this function before the program starts or after the program has started.
Low Temperature
You can activate this function only prior to operation of program. If you want to dry your laundry at a lower temperature, you can activate this function. Once activated, the program will be extended.
End Time
You can delay the end time of the program up to 24 hours with end time function.
- Open the loading door and place the laundry.
- Select the drying program.
- Press the End Time selection button and set the delay time you wish. End Time LED turns on. (When the button is continuously pressed, End Time proceeds non-stop).
- Press the Start / Pause button. End Time countdown begins. The ":" sign in the middle of displayed delay time flashes.

You can add or remove laundry within end time. Displayed time is the sum of normal drying time and end time. End Time LED turns off at the end of countdown, the drying starts and the drying LED turns on.
Changing the End Time
If you want to change the duration during the countdown:
-
Cancel the program by turning On / Off / Program selection button after pressing the Start / Standby selection button.
-
Select the desired program and repeat the End Time selection process.
Cancelling the End Time Function
If you want to cancel the end time count-down and start the program immediately:
- Cancel the program by turning On / Off / Program selection button after pressing the Start / Standby selection button.
- Select the desired program and press the Start / Standby button.

When you activate the end time function in your dryer, your machine rotates periodically to prevent wrinkles and the odour of moisture. Only the engine power supply will be activated during the wrinkle prevention phase. In addition, if you do not open the lid of your machine or make any interventions, the anti-wrinkle function will be activated after the program is finished.
Drum Light
You can turn on and off the drum light by pressing this button. The light turns on when the button is pressed and turns off after a certain time.
9.6 Warning Indicators
Warning indicators may vary depending on the model of your drying machine.
Filter cleaning
When the program is completed, the warning indicator for filter cleaning turns on.
Water tank
If the water tank fills up while the program is continuing, the warning indicator starts flashing and the machine goes to standby. In this case, empty the water tank and start the program by pressing the Start / Standby button. Warning indicator turns off and program resumes.
Cleaning of filter drawer/heat exchanger
Warning symbol flashes periodically to remind that filter drawer must be cleaned.
9.7 Starting the Program
Press the Start/Standby button to start the program.
Start/Standby and Drying indicators turn on to show that program has started.
9.8 Child Lock
The drying machine has a child lock which prevents the program flow from being affected when the buttons are pressed during a program. When the Child Lock is activated, all buttons on the panel except the On/Off program selection button are deactivated.
-
Press the Audible Warning button for 3 seconds in order to activate the child lock.
-
When the Child Lock is activated, the child lock warning indicator on the screen turns on.
When the child lock is active;
When the drying machine operates or is in standby state the indicator symbols will not change upon changing the position of the program selection button.
-
The child lock has to be deactivated to be able to start a new program after the current program is finished or to be able to interfere with the current program.
-
To deactivate the child lock, keep the same button pressed for 3 seconds again.

When the drying machine is operated and the child lock is active, if the program selection button is turned, a double beeping noise will be heard. If the child lock is deactivated before the program selection button is turned to its original place, the program will be terminated because the program selection button will be displaced.
9.9 Changing the Program After It Is Started
You can change the program you selected to dry your laundry with a different program after the drying machine starts running.
- For example, turn the On/Off/Program Selection button to select the Extra Dry program in order to select the Extra Dry program instead of Ironing Dryness after pressing the Start / Standby selection button.
- Press the Start/Standby button to start the program.
Adding and removing clothes during standby state
If you want to add or remove clothes to/from the drying machine after the drying program has started:
- Press the Start/Standby button to put the drying machine in Standby state. The drying operation stops.
- Open the loading door while in Standby state, and close the door after you remove or add laundry.
- Press the Start/Standby button to start the program.

Adding laundry after the drying operation starts may cause the dried laundry inside the drying machine to mix with wet laundry and leave the laundry damp at the end of operation.
Adding or removing laundry during drying may be repeated as many times as you wish. But this operation continuously interrupts the drying operation and thus increases program time and energy consumption. So, it is recommended to add laundry before the program starts. If a new program is selected by turning the program selection button while the drying machine is in standby state the running program terminates.
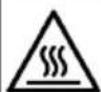
Do not touch the inner surface of the drum while adding or removing clothes during a continuing program. The drum surface is hot.
9.10 Cancelling the Program
If you want to cancel the program and terminate the drying operation for any reason after the drying machine starts running, turn the On/Off/Program Selection button after pressing the Start / Standby selection button; and the program terminates.
10 Maintenance and Cleaning

Read the "Safety Instructions" first!
If it is cleaned regularly, the life of the product will be extended and common problems will be reduced.
10.1 Fiber Filters (internal and external filters) / Cleaning of the Interior Surface of the Loading Door
The hair and fibers that are separated from the laundry during drying process is collected by the Fiber Filter.

The inside of the drying machine shall be extremely hot when you cancel the program during machine operation, so run the refreshing program to allow it to cool down.
9.11 End of Program
When the program ends, the LEDs of End/Wrinkle Prevention and Fiber Filter Cleaning Warning on the program follow-up indicator turn on. Loading door can be opened and drying machine is ready for another operation.
Turn the On/Off/Program Selection button to On/Off position in order to turn the drying machine off.

If the wrinkle prevention mode is active and the laundry is not removed after the program is completed, the wrinkle prevention function activates for 2 hours to prevent the laundry inside the machine to get wrinkled. The program turns the laundry with 10-minute intervals to prevent them from wrinkling.
9.12 Odour Feature
If your drying machine has odour feature, read the ProScent user's manual to use this feature.
After each drying cycle, clean the fiber filter and the inner surface of the loading door.
NOTE: Your drying machine has 2 fiber filters with one placed inside the other. Do not operate the product without the fiber filters.
To clean the fiber filters:
-
Open the loading door.
-
Hold the first part (inner filter) of the two part fiber filter and remove it by pulling it upwards.

natural_image
Line drawing of a hand pressing down on a mechanical component (no text or symbols)- Remove the second part (outer filter) by pulling it upwards.

natural_image
Line drawing of a hand pressing down on a curved mechanical component (no text or symbols)
Ensure that hair, fiber and cotton balls do not fall into the open slot where the filters are installed.
- Open both of the fiber filters (outer and inner filters) and remove the fibers with your hands or with the brush on the air deflector. You can also clean the hair in the filters with a vacuum cleaner.

natural_image
Two-step line drawings showing hands installing or adjusting a mechanical component, no text or symbols present.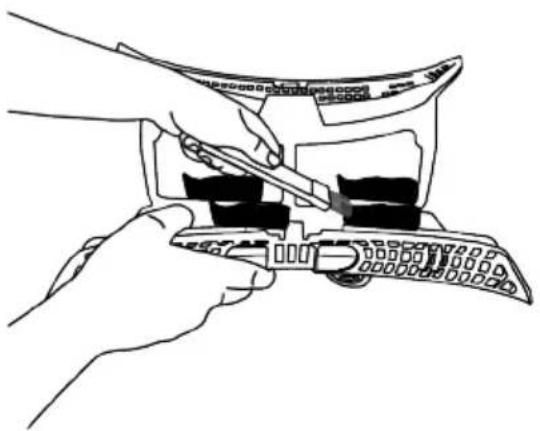
natural_image
Line drawing of hands using a tool to adjust or install a mechanical component (no text or symbols visible)- Clean both filters under running water in reverse direction of fiber accumulation with your hand or with a soft brush. Dry the filters before placing them back.

natural_image
Illustration of two hands using a showerhead to lift a device (no text or symbols present)
natural_image
Illustration of hands using a tool to adjust or install a device (no text or symbols visible)- Insert the fiber filters on one another and place them back in their place.

natural_image
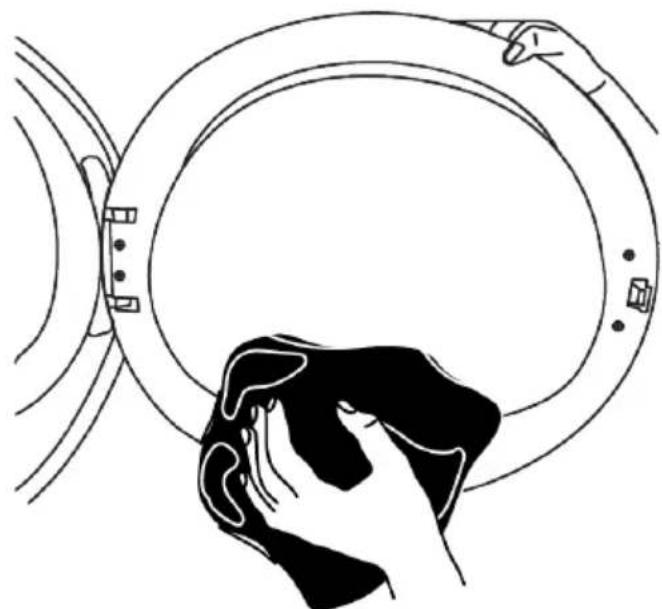
Line drawing of a front-mounted air conditioner unit with two side panels (no text or symbols)- Clean all the inner surfaces of the loading door and its gasket with a soft damp cloth or the brush on the air deflector.
natural_image
Line drawing of a hand cleaning a circular object with a magnified inset (no text or symbols)
natural_image
Line drawing of a hand using a tool to clean the interior of a circular device with a three-blade fan (no text or symbols)
natural_image
Line drawing of a hand cleaning a circular object with a black tool, no text or symbols present10.2 Cleaning the Sensor
The drying machine has humidity sensors that detect whether the laundry is dry or not.
To clean the sensors:
-
Open the drying machine loading door.
-
If the machine is still hot due to drying operation, wait until it cools.
-
Clean the metal surfaces of the sensor with a soft cloth dampened with vinegar and then dry.
- Clean the metal surfaces of the sensor 4 times a year.

natural_image
Line drawing of a hand holding a small object through a curved surface, with no visible text or symbolsNOTE: Do not use metal tools to clean the sensor's metal surfaces.

Due to fire and explosion hazard, do not use solutions, cleaning materials or similar materials to clean sensors.
10.3 Emptying the Water Tank
During drying, the moisture is removed from the laundry and condensed, then the water is accumulated in the water tank. Empty the water tank after each drying session.

Condensed water is not potable water! Do not ever remove the water tank while the program is running!
If you forget to empty the water tank, during the next drying sessions the machine will stop operating when the water tank completely fills and a Water Tank warning icon will blink. In this case empty the water tank and to continue drying operation, press the Start / Standby button.
To drain the water tank:
- Pull the water tank out from its drawer carefully.

natural_image
Line drawing of hands installing a door panel with three switches (no text or symbols)- Remove the water in the water tank.

natural_image
Line drawing of a hand pressing down on a device panel with a small inset showing a mouse (no text or symbols)-
If fiber is accumulated in the funnel on the water tank, remove it under running water.
-
Place back the water tank.

If direct discharge option is used, water tank is not required to be drained.
10.4 Cleaning the Condenser
The hair and the fiber that are not collected by the fiber filter accumulates on the metal surface of the condenser behind the air deflector. These fibers should be cleaned regularly.
If the condenser cleaning icon is blinking, check the metal surface. Clean the fiber, if there is any. It must be checked at least every 6 months.
- Open the kickplate by pulling its handle.

natural_image
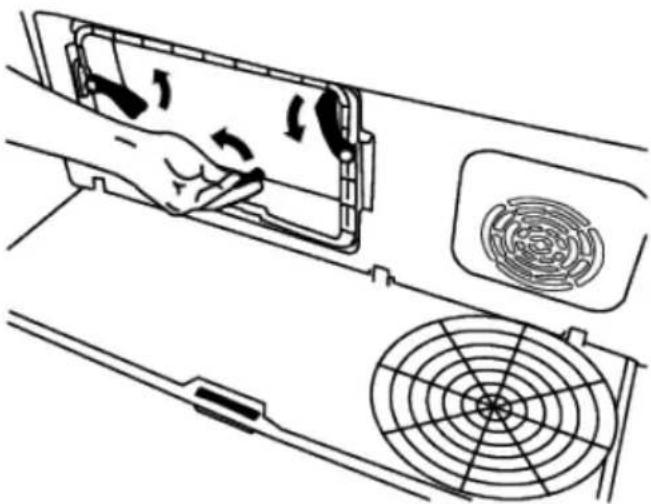
Line drawing of a hand holding a device with a circular component, showing a downward arrow (no text or symbols)- Move the latches to open the air deflector lid.
natural_image
Technical line drawing of a hand inserting air filters into a fan, showing internal components and airflow direction (no text or symbols)- Pull the brush to the left to remove it. You can use the cleaning brush to clean the fiber accumulated on filter, metal surface of condenser and loading door.

The cleaning brush is inside the manual bag. You can get your brush from the manual bag and insert it to its place on the air deflector to store it.

natural_image
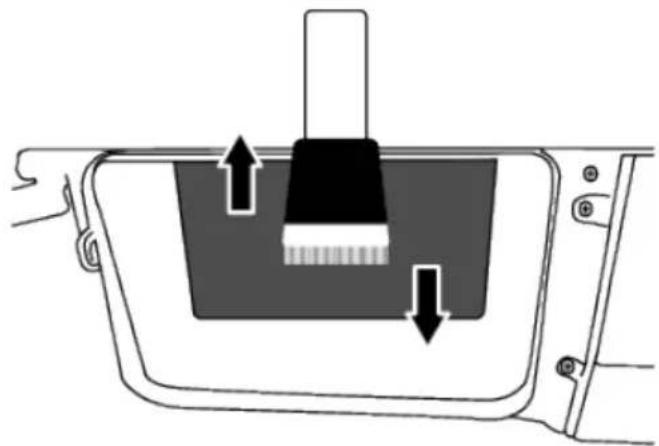
Illustration of a hand holding a pen inside a device frame with lock and lever mechanism (no text or symbols)Clean the fiber on the metal surface of the condenser with damp cloth or with the brush on the air deflector in up - down direction. Do not clean in left - right direction since it will damage the metal plates of the condenser.
You can also use a vacuum cleaner with a brush for cleaning. If the vacuum cleaner does not have a brush, it is not recommended to be used for condenser cleaning
natural_image
Diagram of a mechanical component with arrows indicating force or movement, no text or symbols present
natural_image
Illustration of a hand holding a pen inside a device panel with arrows indicating direction (no text or symbols)After cleaning the filter, door and the condenser, drag the brush to the right and lock it in its place.
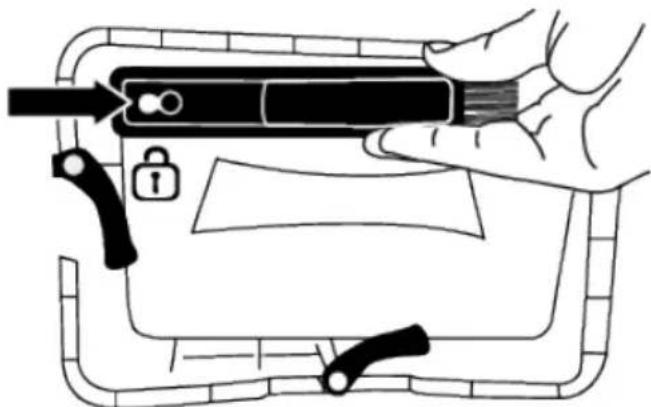
After the cleaning process is completed, place the air deflector cover to its place, close the latches by moving them and close the kickplate.

natural_image
Line drawing of a hand holding a device with an arrow pointing to a circular component (no text or symbols)NOTE: You can clean by hand, provided you wear protective gloves. Do not try to clean with bare hands. The condenser fins may damage your hands. Cleaning from left to right may damage the condenser fins. This may lead to drying issues.

natural_image
Illustration of a hand pressing down on a vehicle door panel with a circular mark containing an 'X' symbol (no text or labels)
When the air deflector cover is removed, it is normal to have water at the plastic section in front of the condenser.
If you see fiber accumulation on the fan cover and the kickplate, remove it with a cloth.

natural_image
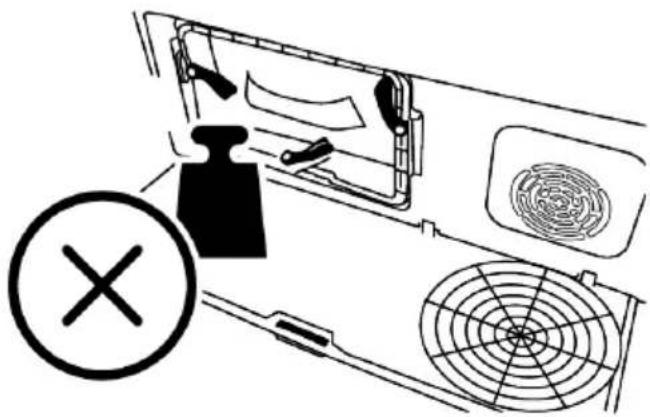
Diagram of a car interior showing a hand operating the wheel with motion lines indicating speed or airflow (no text or symbols present)Do not put weight on the kickplate when it is open.
natural_image
Diagram of a refrigerator interior with fan and ventilation system, no text or symbols present
Do not use abrasive materials or steel wool to clean the drum.
11 Troubleshooting
Drying operation takes too long.
- Fiber filter (interior and exterior filters) pores may be clogged. >>> Wash the fiber filters with warm water and dry.
- Front side of the condenser may be clogged. >>> Clean the front side of the condenser.
- The ventilation grills in front of the machine may be closed. >>> Remove any object in front of the ventilation grills that blocks ventilation.
- Ventilation may be inadequate because the area where the machine is installed is too small. >>> Open the door or windows to prevent the room temperature from rising too much.
- If there is a humidity sensor, a lime layer may have accumulated on the humidity sensor. >>> Clean the humidity sensor.
- Excessive amount of laundry might be loaded. >>> Do not load the drying machine excessively.
- Laundry might not have been spun adequately. >>> Perform a higher speed spinning on the washing machine.
Clothes come out damp after drying.
- A program not suitable for the laundry type may have been used.>>> Check the maintenance labels on the clothes and select a program suitable for the clothes' type or use extra time programs.
- Fiber filter (interior and exterior filters) pores may be clogged. >>> Wash the filters with warm water and dry.
- Front side of the condenser may be clogged. >>> Clean the front side of the condenser.
- Excessive amount of laundry might be loaded. >>> Do not load the drying machine excessively.
- Laundry might not have been spun adequately. >>> Perform a higher speed spinning on the washing machine.
Drying machine does not turn on or program cannot be started. Drying machine does not run after it is configured.
- Power plug might be unplugged. >>> Make sure the power plug is plugged in.
- Loading door might be open. >>> Make sure that the loading door is properly closed.
- A program might not be set or Start / Standby button might not be pressed. >>> Make sure that the program is set and it is not in Standby position.
- Child lock may be activated. >>> Turn off the child lock.
Program terminated prematurely for no reason.
- Loading door might not be closed properly. >>> Make sure that the loading door is properly closed.
- There might be a power outage. >>> Press the Start / Standby / Cancel button to start the program.
- Water tank may be full. >>> Empty the water tank.
Clothes have shrunk, hardened or spoiled.
- A program not suitable with the laundry type might have been used. >>> Check the maintenance labels on the clothes and select a program suitable for the clothes.
Water drips from the loading door.
- Fibers might have gathered on the inner surfaces of the loading door and on the surfaces of the loading door gasket. >>> Clean the inner surfaces of the loading door and the loading door gasket surfaces.
Loading door opens by itself.
- Loading door might not be closed properly. >>> Push the loading door until the closing sound is heard.
Water tank warning symbol is on/flashing.
- Water tank may be full. >>> Empty the water tank.
- Water discharge hose might have folded. >>> If the product is connected directly to the water discharge check the water discharge hose.
The lighting inside the drying machine does not turn on (in models with lamp).
- The drying machine might not have been turned on by the On/Off button. >>> Check that the drying machine is turned on.
- Lamp might be malfunctioning. >>> Contact Authorized Service to replace the lamp
Anti-Crease icon or light is lit.
- Anti-Crease program that prevents the laundry in the dryer from creasing may be activated. >>> Turn the drier off and remove the laundry.
Fiber filter cleaning icon is lit
- Fiber filter (interior and exterior filters) may be unclean. >>> Wash the filters with warm water and dry.
- A layer may be formed in the fiber filter pores that leads to clogging. >>> Wash the filters with warm water and dry.
- A layer may be formed in the fiber filter (inner and outer filters) pores that leads to clogging. Wash the filters with warm water and dry.
- Fiber filters may not be inserted. >>> Insert the interior and exterior filters to their places.
- Environmentally-friendly filter cloth may not be installed on the plastic part and the front of the condenser may have been clogged.>>>Install the environmentally-friendly filter to the plastic part and place it in the filter housing.
- Environmentally-friendly filter may not have been replaced although the warning symbol is illuminated. >>> Replace your filter.
An audible warning is heard from the machine.
- Fiber filters may not be inserted. >>> Insert the interior and exterior filters to their places.
- Filters of the machine may not have been installed.>>> Install the fiber filters (internal and external) or the environmentally-friendly filter to their housing.
Condenser warning icon is flashing.
- Condenser front side may be clogged with fibers. >>> Clean the front side of the condenser.
- Fiber filters may not be inserted. >>> Insert the interior and exterior filters to their places.
The lighting inside the drying machine turns on (in models with lamp).
- If the drying machine is plugged to the power outlet, the On/Off button is pressed and the door is open; the light turns on. >>> Unplug the drying machine or bring the On/Off button to Off position.
The steam symbol is flashing (In products with steam function).
- There may not be enough water in the machine for the program. >>> Run in a program without cycle steam function.
Steam programs aren't starting. (In products with steam function)
- There may not be enough water in the machine for the program >>> Run in a program without cycle steam function.
Wrinkle level does not decrease in the wrinkle program (In products with steam function)
- The amount of laundry maybe higher than recommended. >>>Load desired amount of laundry.
- The time of steam application may be low. >>> Select longer time for steam application.
- At the end of the program, laundry might have been left in the machine for a long time. >>>At the end of the program, immediately remove the laundry and hang them on a rope.
The odour in the laundry does not decrease in the deodorization program (In products with deodorization function).
- The amount of laundry maybe higher than recommended. >>>Load desired amount of laundry.
- The time of steam application may be low. >>> Select longer time for steam application
Wi-Fi icon flashes continuously (for models featuring HomeWhiz Function).
The product may not be connected to the wireless network. >>>Connect to the network following the instructions. There may be a problem on the network where the product is connected. >>>Check it. The product may not be connecting to the network due to proximity.
If you see "F L t" on the screen, check the steps below.
- The filters may be dirty. >>> Clean the inner and outer filters or replace the eco-friendly filter.
-
In the door area, if you are using the inner and outer dual filters. >>> Make sure that both filters are installed.
-
If you are using the eco-friendly filter feature, make sure that the filter cloth is attached to the plastic part. >>>Insert the filter cloth into the plastic part if it is not inserted.
- Front side of the condenser may be dirty. >>> Open and check the kick zone and make sure it is clean.
- Check out the Maintenance and Cleaning section.

If the problem persists after following the instructions in this section, contact your vendor or an Authorized Service. Never try to repair your product yourself.
If you experience a problem with any part of your device, you can request a replacement by consulting the nearest authorised service with the device model number.
12 Product Information Voucher
| It complies with the Statutory Commission Regulation (EU) No 392/2012. | ||
| Supplier name or trademark GRUNDIG | ||
| Model name | 7188235930-GT541023CW /7188237470-GT5410231CW | |
| Normal capacity (kg) 10 | ||
| Drying Machine type | With flue - | |
| With condenser | • | |
| Energy efficiency class (1) A++ | ||
| Annual Energy Consumption (kWh) (2) 281.9 | ||
| Control type | Automatic • | |
| Manual - | ||
| Energy consumption (kWh) in standard cotton program at full load 2,45 | ||
| Energy consumption (kWh) in standard cotton program at partial load 1,20 | ||
| Energy consumption in "Closed Mode" PO (W) 0,50 | ||
| Energy consumption in "On" mode P L (W) 1,00 | ||
| "On" mode duration (min) 30 | ||
| Standard Cotton program (3) • | ||
| Duration of standard cotton program at full load, Tdry (min) 239 | ||
| Duration of standard cotton program at partial load, Tdry 1/2 (min) 130 | ||
| Weighted duration of standard cotton program at partial and full load (T t) | 177 | |
| Condensation efficiency class (4) | B | |
| Average condensation efficiency of standard cotton program at full load, C dry | 87% | |
| Average condensation efficiency of standard cotton program at par-tial load, C dry1/2 | 87% | |
| Weighted condensation efficiency of standard cotton program at full and partial load, C t | 87% | |
| Product volume level (5) | 64 | |
| Under-the-counter use | - | |
- Yes / - No
(1) From Efficiency class A+++ (highest yield) to D (lowest efficiency)
(2) In the standard cotton wardrobe program, it is the energy consumption value calculated by taking into account low power modes based on 160 drying cycles under full and half load conditions. The energy consumption value per real cycle depends on the use of the dryer.
(3) "Cotton wardrobe program" is a standard drying program that may be utilized with full or half load and where the information is provided on the product label or the receipt. This program is the most efficient one in terms of energy consumption for drying normal wet cotton loads.
(4) From efficiency class G (lowest efficiency) to A (highest efficiency)
(5) Weighted average value - L WA unit dB(A) is expressed with re 1 pW.
13GRUNDIG UK AND IRELAND STANDARD MANUFACTURER GUARANTEE TERMS AND CONDITIONS
Your new Grundig product is guaranteed against faulty materials, defective components or manufacturing defects.
The standard guarantee starts from the date of original purchase of the product, and lasts for a period of twenty four (24) months unless Beko plc (the "Manufacturer") agrees to extend the guarantee for the product in writing. If you have purchased a Built-In/integrated product, the standard guarantee starts from the date of original purchase of the product, and lasts for a period of thirty six (36) months unless Beko plc (the "Manufacturer") agrees to extend the guarantee for the product in writing. If you have registered Built-In/integrated product within 90 days of purchase by completing the online registration form, then the standard 36-month guarantee will be extended to 60 months, under the same terms and conditions as detailed below.
If you have any questions about the guarantee on your product (including how long it is valid), please contact your retailer or our contact centre on 0333 207 9920 (UK and Northern Ireland) or 01 691 0203 (Republic of Ireland)
This guarantee does not in any way diminish or affect your statutory rights in connection with the product. This guarantee is in addition to your statutory rights as a consumer. If you have any questions about these rights, please contact the retailer from which you purchased the product. In certain circumstances, it is possible that your statutory rights may offer additional or higher levels of protection than those offered under the terms of this guarantee.
What is covered by this guarantee?
- Repairs to the product required as a result of faulty materials, defective components or manufacturing defects.
- Functional replacement parts to repair a product.
- The costs of a Beko Approved Engineer to carry out the repair.
What is not covered?
• Transit and delivery damage.
- Cabinet or appearance parts, including but not limited to control knobs, flaps and handles.
- Accessories and/or consumable items including but not limited to ice trays, scrapers, cutlery baskets, filters and light bulbs.
- Repairs necessary as a direct or indirect result of:
- Accidental damage, misuse or abuse of a product.
- An attempted repair of a product by anyone other than a Beko Approved Engineer (the "Engineer").
- Installation or use of a product where such installation or use fails to meet the requirements contained in this guarantee or the User Instructions Booklet.
- Repairs to a product operated at any time on commercial or non-residential household premises (unless we have previously agreed to the installation environment).
This guarantee is limited to the cost of repairing the product. To the extent permitted by law, the Manufacturer does not accept and will not be held liable for any financial loss incurred in connection with the failure of any product to operate in accordance with the expected standards. Such financial loss includes but is not limited to loss arising from:
- Time taken off work.
• Damaged food, clothing or other items. - Meals taken at restaurants or from takeaways.
- General compensation for inconvenience.
Important Notes
- Your product is designed and built for domestic household use only.
- The guarantee will automatically be void if the product is installed or is used in commercial or non-residential domestic household premises, unless we have previously agreed to the installation environment.
- The product must be correctly installed, located and operated in accordance with the instructions contained in the User Instructions Booklet provided with your product.
- Professional installation by a qualified Electrical Domestic Appliance Installer is recommended for all Washing Machines, Dishwashers and Electric Cookers (as incorrect installation may result in you having to pay for the cost of repairing the product).
- Gas Cookers must be professionally installed by a Gas Safe (or Gas Networks Ireland for Republic of Ireland) registered gas installer.
- This guarantee is given in respect of products purchased and used within the United Kingdom and the Republic of Ireland.
- This guarantee is effective from the initial date of purchase of a new product from an authorised retailer and will be void if the product is resold.
- This guarantee does not apply to graded sales (where the product is purchased as a "second").
- Possession of a copy of these terms and conditions does not necessarily mean that a product has the benefit of this guarantee. If you have any questions, please call our Call Centre on the number set out above.
- The Manufacturer reserves the right to terminate the guarantee if its staff or representatives are subjected to physical or verbal abuse in the course of carrying out their duties.
- Optional extras, where available (i.e. extendable feet) are supplied on a chargeable basis only.
Does Grundig offer replacements?
This is a repair-only guarantee. On occasion, the Manufacturer may at its sole discretion, replace your product with a new product instead of carrying out a repair. Where a replacement is offered, this would normally be an identical model but when this is not possible, a model of similar specification will be provided. The Manufacturer will cover the costs and arrange for the delivery of the new product and for the return of the old product. Any costs related to disconnecting the faulty product and installing the replacement product will not be borne by the Manufacturer unless previously agreed to in writing. The original guarantee will continue to apply to the replacement product; the new product will not come with a new guarantee.
When will the repair take place?
Our Engineers work Monday to Friday 9.00am to 5.00pm. Appointments outside these hours may be possible at the sole discretion of the Manufacturer but cannot be guaranteed. Whilst our Engineers will endeavour to minimize inconvenience and to meet requests for specific timed appointments, this cannot be guaranteed. We will not be liable for delays or if it is unable to carry out a repair because a convenient appointment cannot be arranged.
Will there be any charge for the repairs?
It is your responsibility to provide evidence to the Engineer that your product is covered by this guarantee with a proof of purchase. The Manufacturer reserves the right to charge for the reasonable cost of any service call if:
- You cannot provide evidence that your product is covered by this guarantee.
- Where a service call has been made and the engineer finds that there is no fault with your product.
- That your product has not been installed or operated in accordance with the User Instructions Booklet.
- That the fault was caused by something other than faulty materials, defective components or manufacturing defects.
- For missed appointments.
Payment of these costs are due immediately upon the Engineer providing you with an invoice. The Manufacturer reserves the right to terminate the guarantee if you fail to pay the costs for the service call in a timely manner.
If you are a resident of the United Kingdom, this guarantee will be governed by English law and subject to the English Courts, save where you live in another part of the United Kingdom, in which case the law and courts of that location will apply.
If you are resident in the Republic of Ireland, this guarantee will be governed by Irish law and the Irish courts will have jurisdiction.
This guarantee is provided by Beko plc. Beko House, 1 Greenhill Crescent, Watford, Hertfordshire. WD18 8QU.
Beko plc is registered in England and Wales with company registration number 02415578.
GRUNDIG UK AND IRELAND ECO INVERTER MOTOR GUARANTEE TERMS AND CONDI-TIONS
This 10-year guarantee relates to Grundig products that feature the Eco Inverter Motor.
The Eco Inverter Motor guarantee terms and conditions are in addition to our Standard guarantee terms and conditions detailed in the previous section.
In order to activate the 10 year guarantee you MUST register the appliance within 90 days of the original purchase date. You can register by first visiting registermygrundig.co.uk and by following the online instructions.
Grundig Free standing appliances come with a 24-month parts and labour guarantee as standard.
Grundig Built-in/integrated appliances come with a 36-month parts and labour guarantee as standard, which can be extended to a 60 months parts and labour guarantee by registering within 90 days of the original purchase date.
To make a claim against your Grundig Eco Inverter Motor Guarantee (the "Guarantee"), all customer and product details must be registered with Beko plc using the procedure outlined below.
- This extra 7 or 8 years (or 5 years for Built-in appliances registered within 90 days of the original purchase date) Guarantee is only effective after the expiration of the standard manufacturer's guarantee.
- It is only valid for the Eco Inverter motors of selected washing machines, washer-dryers, tumble dryers and dishwashers. It does not cover any labour charge or any other components of the product. In addition, it is only valid for one replacement of the Eco Inverter motor during the extra 7 or 8 years (or 5 years for Built-in appliances registered within 90 days of the original purchase date) guarantee period.
- To activate your guarantee, you MUST register your appliance within 90 days of the original purchase date, by visiting registermygrundig.co.uk.
- Customers will receive a unique reference code as proof of guarantee validation, which must be quoted at the time of a claim being made.
-
Any repair/replacement of the Eco Inverter motor must only be carried out by an authorised Grundig Service Agent (the "Service Agent").
-
Labour for the repair/replacement of the Eco Inverter motor is not included in this guarantee and is chargeable directly by the Service Agent.
- Any additional components fitted to the product at any time will not be covered by this guarantee and will be chargeable directly by the Service Agent.
- The guarantee is not transferable and cannot be exchanged for cash.
- There are no alternative or additional offers to this Guarantee.
- The guarantee is exclusive of the manufacturer's standard guarantee
- The Terms and Conditions shown above are in addition to the standard terms and conditions of your product guarantee. Please read and refer to such Terms and Conditions when making any claim.
- We may use the information you provide for marketing purposes and to analyse your purchasing preferences. We may keep your information for a reasonable period for these purposes in accordance with the applicable Data Protection Laws and General Data Protection Regulations (GDPR). You can opt into this service during the registration process. Further details are available at http://www.Grundig.co.uk/cookie-and-privacy.
• These Terms and Conditions are governed by the laws of England and Wales; manufacturer: Beko plc, Beko House, 1 Greenhill Crescent, Watford WD18 8QU. Company Registration Number: 02415578.
HOW TO OBTAIN SERVICE FOR YOUR APPLIANCE
Please keep your purchase receipt or other proof of purchase details in a safe place; you will need to have this documentation available should the product require attention under guarantee.
Please take a few moments to complete the details below, as you will need this information when you call us, or to use our online services. When you call us you may be required to input your serial number into your telephone keypad. For help please visit grundig.co.uk/support/model-finder
- The product model number is printed on the Operating Instruction Booklet / User guide.
- The product model and serial number is printed on the Rating Label affixed to the appliance.
- The Retailer (Purchased from) and Date of purchase will be printed on your purchase receipt or other proof of purchase paperwork
Recording of these details alone will not count as proof of purchase. A valid proof of purchase is required for requesting service under guarantee.
| Model number | Serial number Purchased from Date of purchase | ||
For service under guarantee or for product advice please call our Contact centre
Before requesting service please check the troubleshooting guide in the Operating Instructions booklet, as a charge may be levied where no fault is found, and even though your product may still be under guarantee.
After arranging service the area around the product must be easily accessible to the Engineer, without the need for cabinets or furniture to be removed or moved.
It is your responsibility to ensure our Engineers have a clean and safe environment to carry out any repairs.
Please have your Model number and Serial number available when you call us, as you may be required to input your serial number into your telephone keypad during your call.
UK Mainland & Northern Ireland:
0333 207 9920
Landline or mobile calls to 0333 numbers cost no more than calls to geographic numbers 01 or 02, and are charged at the basic rate. Calls from landlines and mobiles are included in free call packages but please check with your telephone service provider for exact call charges.
Republic of Ireland:
01 691 0203
Service once the manufacturers guarantee has expired
If you have purchased an extended guarantee please refer to the instructions contained within the extended guarantee agreement document, otherwise please call us using the appropriate number above, where service can be obtained at a charge.
Should you experience any difficulty in obtaining service please call us on 0333 207 9920 or 01 691 0203
Contact us though our website
Send us a secure message through our online contact us form. Please visit our website, click Contact Us and choose a product support topic from the list of options. Complete the required details and click send message.
Product registrations
For UK registrations please visit registermygrundig.co.uk and for the Republic of Ireland please call 01 514 3552†.

- Table of Contents
- 1Please read this guide before!
- Dear Customer,
- Safety Instructions
- Intended Use
- Safety of Children, Vulnerable Persons and Pets
- Electrical Safety
- Transporting Safety
- Installation Safety
- Usage Safety
- Maintenance and Cleaning Safety
- Lighting Safety
- Environmental instructions
- Compliance with the WEEE Regulations and Waste Disposal
- Packaging Information
- Standard Conformity and Test Information EU Declaration of Conformity
- Technical Specifications
- Scope of Delivery
- First Operation
- Installation
- Right Place for Installation
- Removing the Shipping Safety Group
- Water Connection
- Connecting the water drainage hose
- Adjusting the Legs
- Moving the Drying Machine
- Warnings Regarding the Noise
- Replacing the Lighting Bulb
- Electrical Connection
- Attention!
- Electrical requirements
- Fitting a different plug
- Preparation
- Laundry Suitable for Drying in Drying Machine
- Laundry Not Suitable for Drying in Drying Machine
- Washer/dryer combination
- Preparing the Laundry to Be Dried
- What to Do for Energy Saving
- Running the Product
- Control Panel
- Symbols
- Preparation of Drying Machine
- Auxiliary Functions
- Dryness Level
- Wrinkle Prevention
- Audible Warning
- Low Temperature
- End Time
- Changing the End Time
- Cancelling the End Time Function
- Drum Light
- Warning Indicators
- Filter cleaning
- Water tank
- Cleaning of filter drawer/heat exchanger
- Starting the Program
- Child Lock
- Changing the Program After It Is Started
- Adding and removing clothes during standby state
- Cancelling the Program
- Maintenance and Cleaning
- Fiber Filters (internal and external filters) / Cleaning of the Interior Surface of the Loading Door
- End of Program
- Odour Feature
- To clean the fiber filters:
- Cleaning the Sensor
- To clean the sensors:
- Emptying the Water Tank
- To drain the water tank:
- Cleaning the Condenser
- Troubleshooting
- Drying operation takes too long.
- Clothes come out damp after drying.
- Drying machine does not turn on or program cannot be started. Drying machine does not run after it is configured.
- Program terminated prematurely for no reason.
- Clothes have shrunk, hardened or spoiled.
- Water drips from the loading door.
- Loading door opens by itself.
- Water tank warning symbol is on/flashing.
- The lighting inside the drying machine does not turn on (in models with lamp).
- Anti-Crease icon or light is lit.
- Fiber filter cleaning icon is lit
- An audible warning is heard from the machine.
- Condenser warning icon is flashing.
- The lighting inside the drying machine turns on (in models with lamp).
- The steam symbol is flashing (In products with steam function).
- Steam programs aren't starting. (In products with steam function)
- Wrinkle level does not decrease in the wrinkle program (In products with steam function)
- The odour in the laundry does not decrease in the deodorization program (In products with deodorization function).
- Wi-Fi icon flashes continuously (for models featuring HomeWhiz Function).
- If you see "F L t" on the screen, check the steps below.
- 13GRUNDIG UK AND IRELAND STANDARD MANUFACTURER GUARANTEE TERMS AND CONDITIONS
- What is covered by this guarantee?
- What is not covered?
- Important Notes
- Does Grundig offer replacements?
- When will the repair take place?
- Will there be any charge for the repairs?
- GRUNDIG UK AND IRELAND ECO INVERTER MOTOR GUARANTEE TERMS AND CONDI-TIONS
- HOW TO OBTAIN SERVICE FOR YOUR APPLIANCE
- For service under guarantee or for product advice please call our Contact centre
- UK Mainland & Northern Ireland:
- 207 9920
- Republic of Ireland:
- 691 0203
- Service once the manufacturers guarantee has expired
- Contact us though our website
- Product registrations
Brand : GRUNDIG
Model : GT5410231CW
Category : Tumble dryer