
C01 - Microphone SAMSON - Free user manual and instructions
Find the device manual for free C01 SAMSON in PDF.


| Product Type | Large-diaphragm studio condenser microphone |
| Brand | Samson |
| Model | C01 |
| Capsule | 19 mm diaphragm, 3 microns thickness |
| Polar Pattern | Hypercardioid |
| Frequency Response | 20 Hz – 18 kHz |
| Sensitivity | -33 dB/Pa |
| Max SPL | 136 dB |
| Power Requirement | 48V phantom power (via XLR cable) |
| Connector | 3-pin XLR (balanced) |
| Weight | 480 g |
| Dimensions (H x W x D) | 180 x 54 x 54 mm |
| Included Accessories | Swivel mount, XLR cable |
| Applications | Vocals, acoustic instruments, overheads, studio |
| Maintenance | Clean with a dry cloth; avoid humidity; store in case |
| Safety | Do not expose to water, do not disassemble, use on stable stand |
| Repairability | Repair only by authorized center; return number required |
Frequently Asked Questions - C01 SAMSON
User questions about C01 SAMSON
0 question about this device. Answer the ones you know or ask your own.
Ask a new question about this device
Download the instructions for your Microphone in PDF format for free! Find your manual C01 - SAMSON and take your electronic device back in hand. On this page are published all the documents necessary for the use of your device. C01 by SAMSON.
USER MANUAL C01 SAMSON
natural_image
White SAMSON USB studio condenser device with mesh grille and green indicator light (no text or symbols on body)Owner's Manual
SAMSON®

SAMSON

YouTube

facebook.
Table of Contents
Introduction. 5
C01U Features 6
Installing the C01U 7
Getting Started with MAC OS X 8
Getting Started with Windows 7 & Vista . . . . . . . . . . . . . . . . . . . . . . . . . . . . . . . . . . . . . . . . . . . . . . . . . . . . . . . . . . 9
Getting Started with Windows XP....10
Operating the C01U.... 11
Using the Optional SP01 Shock-Mount 13
C01U Specifications....14
Introduction
Congratulations on your purchase of the Samson C01U studio condenser. The C01U features a large, 19mm ultra thin diaphragm capsule with an onboard high quality Analog-to-Digital converter and USB output. The C01U is perfect for recording your music, or any acoustic audio source on your favorite DAW (Digital Audio Workstation). Just plug in the supplied USB cable, launch your DAW and start recording. The C01U faithfully reproduces a variety of sound sources including vocals, acoustic instruments and overhead cymbals, to name a few. The extended frequency and fast transient response ensures an accurate reproduction with linear characteristics from bottom to top.
In these pages, you'll find a detailed description of the features of the C01U Studio Condenser Microphone, as well as step-by-step instructions for its setup and use, and full specifications. You'll also find a warranty card enclosed—please don't forget to fill it out and mail it in so that you can receive online technical support and so we can send you updated information about these and other Samson products in the future.
With proper care and adequate air circulation, your C01U will operate trouble free for many years. We recommend you record your serial number in the space provided below for future reference.
Serial number: ____
Date of purchase: ____
Should your unit ever require servicing, a Return Authorization number (RA) must be obtained before shipping your unit to Samson. Without this number, the unit will not be accepted. Please call Samson at 1-800-3SAMSON (1-800-372-6766) for a Return Authorization number prior to shipping your unit. Please retain the original packing materials and if possible, return the unit in the original carton and packing materials.
C01U Features

natural_image
Line drawing of a SAMSON USB studio condenser microphone with no text or symbols on the device itself• Professional Large Diaphragm, Studio Condenser USB Microphone
- Compatible with Mac and PC computers; no special drivers or external power supplies are required
- The extremely detailed sound reproduction makes it ideal for recording vocals, acoustic instruments and just about any other sound source.
• High Quality AD converter with 16 Bit, 48K sampling rate.
• 19mm Capsule with 3-micron diaphragm.
• Hyper Cardioid pick-up pattern.
• Solid Die Cast construction.
• Swivel Stand Mount and 10 foot USB cable included.
Installing the C01U
Installing the C01U is a simple procedure that takes just a few minutes. Since the C01U is USB compliant, you can use either a MAC or PC, connect the included USB cable and plug and play. You will be able to control your C01U using the standard audio interface controls in the MAC or Windows operating system. You will find detailed instructions on setting up with MAC OS and Windows in the following sections of this manual.
Since it is possible to adjust the level of the signal from the operating system preferences, and in your recording software, it's a good idea to be familiar with these controls in the MAC or Windows operating system. Therefore, we recommend that you follow the section Getting Started with Windows 7 & Vista, Windows XP, or Getting Started with MAC OS X.
Getting Started with MAC OS X
The following example is for setting up the C01U in MAC OS X.
- Plug in microphone. The LED will light to indicate it is receiving USB power. The MAC will recognize the USB audio device and automatically install a universal driver.
- To select the C01U as the computers audio input, open the System Preferences from the dock or the main Apple Menu (figure 1).
- Next open the Sound preference (figure 2).
- Now, click in the Input tab and select SAMSON C01U (figure 3).
- To set the gain of the microphone, adjust the Input volume slider at the bottom of the Sound dialog box.
At this point you can begin using your microphone with most any audio recording software, but you need to select it as an input device within the DAW. When selecting the input just look for and select the SAMSON C01U.
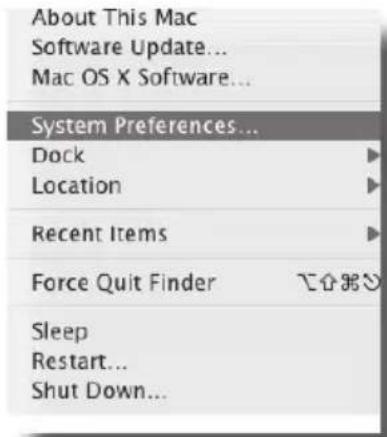
Figure 1

Figure 2

Figure 3
Getting Started with Windows 7 & Vista
The following example is for setting up the C01U in Windows 7 and Vista.
- The first time you plug the C01U into a USB port, Windows 7 or Vista will install the universal drivers for that port. A balloon will pop up, telling you the computer has found the C01U.
- When it is finished installing the drivers, a balloon pop up will say "Your device is installed and ready to use."
Note: This balloon will only pop up when you first plug the device into a particular USB port. - To set the C01U as your default device for recording, or to change its settings, click the Start button, click Control Panel and then click Sound. Under the Recording tab, you can select the SAMSON C01U from the menus and use the Set Default button to set it as the default device (figure 1).
- To set the gain of the microphone, click the Properties button, and then select the Levels tab. You can choose to view the Microphone volume level as either a percentage or in dB, by right clicking on the number box (figure 2).

Figure 1

Figure 2
Getting Started with Windows XP
The following example is for setting up the C01U in Windows XP with Service Pack 2. Other versions may vary slightly.
- Plug in microphone. The LED will light to indicate it is receiving USB power. Windows will recognize the USB audio device and automatically install the universal drivers (figure 1). NOTE: This balloon will not appear next time you plug it in, as the microphone drivers are already installed.
The C01U is now recognized as a Windows audio device under the name Samson C01U. Each additional C01U will have a number added, such as Samson C01U (2), and so on. To set it as the default device and change computer-controlled gain, access control panel.
- Access Sounds and Audio Devices through Control Panel (figure 2).
- Select Samson C01U as Sound recording Default device under the Audio tab. The default device is used in simple programs like those for teleconferencing or Sound Recorder. In most pro audio programs you can select which device (or multiple devices) to use within the program itself. To set computer-controlled gain, click the Volume button (figure 3).
- The Wave In window sets the computer-controlled gain or mutes the microphone. The gain is from -62 dB to +48 dB (figure 4).

Figure 1
Pick a category

Figure 2

Figure 3
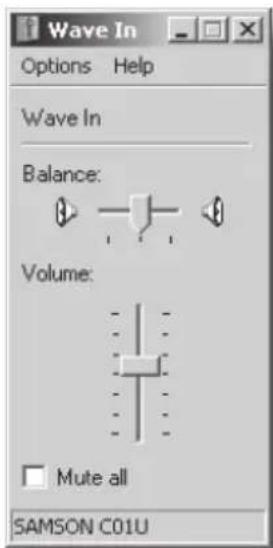
Figure 4
Operating the C01U
Powering the C01U
The C01U is a condenser microphone, and like all condenser microphones, it has internal electronics that require an active power supply. Traditional studio condensers are almost always powered by a Phantom Power supply which is usually derived from the mixing console. The C01U receives its power from the USB bus. Simply connect the microphone to the computers USB port and the microphone is ready to operate. The C01U features a power on LED, which will illuminate when USB power is present.
Polar Pattern
The most important characteristic of any microphone is its directionality or "pick-up pattern". There are three basic categories of pick up patterns; omni, bi and unidirectional. Omni mics pick up sound from all directions, bidirectional (figure 8) mics pick up the sound directly in front and back of the microphone while rejecting the sound on the left and right sides, and unidirectional (cardioid) mics pick up the sound in front of the microphone.
While omni and bidirectional microphones are very useful for a variety of applications, the majority of “miking” situations in recording and live sound require unidirectional or cardioid microphones. The unidirectional nature allows for better separation of instruments in the studio and more control over feedback in live sound reinforcement. The C01U condenser’s pick-up pattern is hyper-cardioid, which offers even more side-to-side rejection. When positioned correctly the hyper-cardioid pick-up pattern allows you to pick up more of the sound you want and less of the sound you don’t want.
Microphone Placement
In order to maximize the sound quality, you must pay careful attention to the placement of your C01U and how it is positioned for the instrument or vocalist that you are miking. All microphones, especially unidirectional or cardioid microphones, exhibit a phenomenon known as “proximity effect.” Very simply put, proximity effect is a resulting change in the frequency response of a microphone based on the position of the mic capsule relative to the sound source. Specifically, when you point a cardioid mic directly at the sound source (on axis) you will get the best frequency response, however when you start pointing the microphone slightly away (off axis) you will notice the low frequency response dropping off and the microphone will start to sound thinner.
For most vocal applications you'll want to position the microphone directly in front of the artist. The same may be true for miking instruments, however, you can make some pretty amazing equalization adjustments by slightly changing the angle of the capsule to the sound source. This can be a very useful technique in capturing the optimum sound of drum set, acoustic guitar, piano or other instruments in a live room or sound stage. Experimentation and experience are the best teachers in getting good sounds, so plug in!
Operating the C01U
Setting Up the Signal Level
In your digital audio workstation (DAW), create a mono audio track, and set it to the Left channel of the C01U (the Right channel should be ignored). Arm the track for recording, and adjust the input gain by using the software control in your computer's operating system and/or digital audio workstation. To set a good level on the mic, set the C01U up in front of the desired sound source and slowly raise the input trim control until you see the CLIP or Peak indicator in your DAW light up. Then, turn the input trim control down until the indicator does not light any more.
P-Popping
P-Popping is that annoying pop that you can get when the microphone diaphragm gets a blast of air from a vocalist pronouncing words with the letter "P" included. There are a few ways to deal with the problem including using an external pop filter. Some famous engineers have relied on an old nylon stocking over a bent clothes hanger, which actually works very well. You can also try placing the microphone slightly off axis (on a slight angle) from the vocalist. This can often solve the problem without using an external pop filter.
Stand Mounting the C01U
The C01U can be mounted to a standard microphone stand using the included swivel mount adapter. If you are using a U.S. 5/8" mic stand, you will need to remove, by unscrewing, the Euro stand adapter. Simply screw the swivel adapter on to your mic stand or boom arm. Now, loosen the thumbscrew and adjust the microphone to the desired angle. Once set, tighten the thumbscrew to secure the microphone in place.
Using the Optional SP01 Shock-Mount
Using the Optional SP01 "Spider" Shock-Mount
For additional isolation the C01U can be fitted on the optional SP01 "Spider" shock mount. Follow the steps below the to install the SP01.
- First, screw the SP01 shock mount onto your mic stand or boom arm. If you're using a US 5/8" mic stand or boom, remove the Euro adapter.
- Remove the C01U swivel mount by rotating the threaded collar counterclockwise as shown in figure 1.
• Install the C01U into the SP01 by fitting the microphone into the center of the web, positioning the C01U onto the bottom mounting plate. - Secure the SP01 by reinstalling the threaded collar, rotating clockwise until tight. (Figure 2)
- Now, loosen the thumb screw to adjust the angle of the microphone and position the C01U to the desired location. Once set, tighten the thumbscrew to secure the microphone in place.
Note: Be careful not to cross thread or over tighten the threaded collar or thumb screw.


C01U Specifications
C01U Specifications
Frequency Response 20\~18000 HZ
Polar pattern
Hyper-cardioid
Element type
Back condenser type
Diaphragm thickness 3 microns
Sensitivity
-33 dB/Pa
SPL
136 dB
Weight
1.06 lbs. (.48 kg)
Dimensions
Height: 7" (180 mm)
Width: 2.125" (54 mm)
Depth: 2.125" (54 mm)
Shipping Weight
2.5 lbs.(1.15 Kg)
Specifications subject to change without notice.

line
| Time | Frequency Response | | ---- | ------------------ | | 20 | -20 | | 50 | -18 | | 100 | -15 | | 200 | -10 | | 500 | -5 | | 1K | 0 | | 2K | 5 | | 5K | 10 | | 10K | 15 | | 20K | 20 |
radar
| Angle | Value | |-------|-------| | 0° | 5 | | 45° | 10 | | 90° | 15 | | 135° | 20 | | 180° | 25 | | 225° | 20 |THIS DEVICE COMPLIES WITH PART 15 OF THE FCC RULES CLASS B. OPERATION IS SUBJECT TO THE FOLLOWING TWO CONDITIONS: (1) THIS DEVICE MUST NOT CAUSE HARMFUL INTERFERENCE, AND (2) THIS DEVICE MUST ACCEPT ANY INTERFERENCE RECEIVED INCLUDING INTERFERENCE THAT MAY CAUSE UNDESIRED OPERATION. SUITABLE FOR HOME OR OFFICE USE.
Table des matières
Introduction. 17
natural_image
Line drawing of a SAMSON USB studio condenser microphone with no text or symbols on the device itselfFigure 1

Figure 2

Figure 3
Figure 1

Figure 2
Figure 2
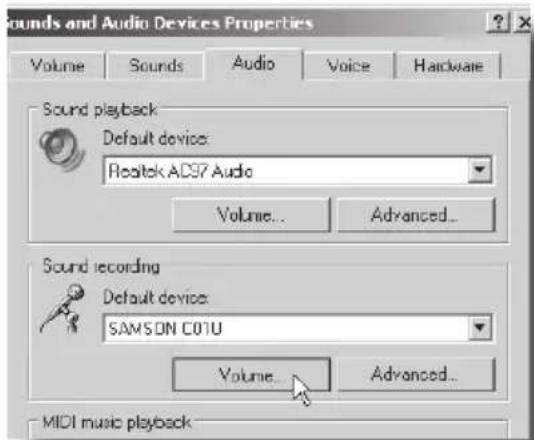
Figure 3

Figure 4
Utilisation du C01U
natural_image
Line drawing of a SAMSON USB studio condenser with a clasp and speaker grille (no text or symbols on the device itself)Abb. 1

Abb. 2
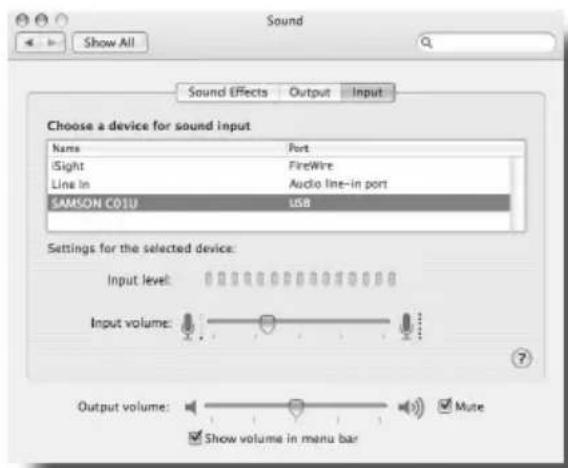
Abb. 3
Abb. 1

Abb. 2
Abb. 2

Abb. 3
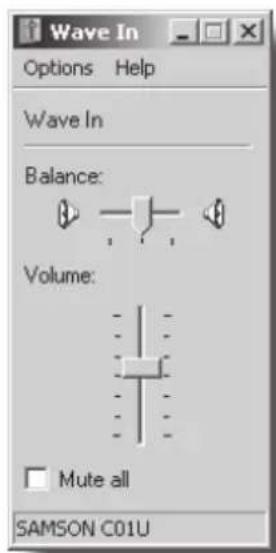
Abb. 4
C01U betreiben
natural_image
Line drawing of a SAMSON USB studio condenser microphone with no text or symbols on the device itselfFigura 1

Figura 2

Figura 3
Figura 1

Figura 2
Figura 2
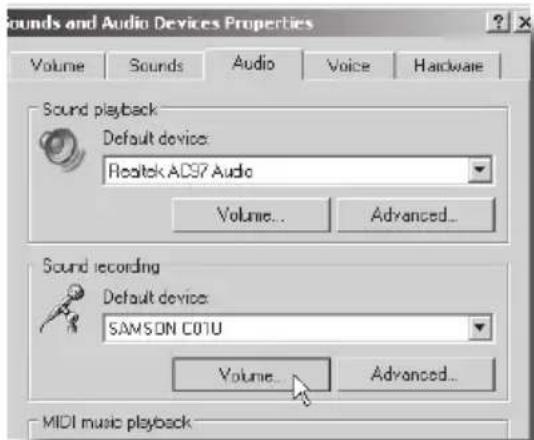
Figura 3

Figura 4
Uso del C01U
Encendido del C01U

natural_image
Line drawing of a SAMSON USB studio condenser with a handle and top panel (no text or symbols on the device itself)Figura 1

Figura 2

Figura 3
Figura 1
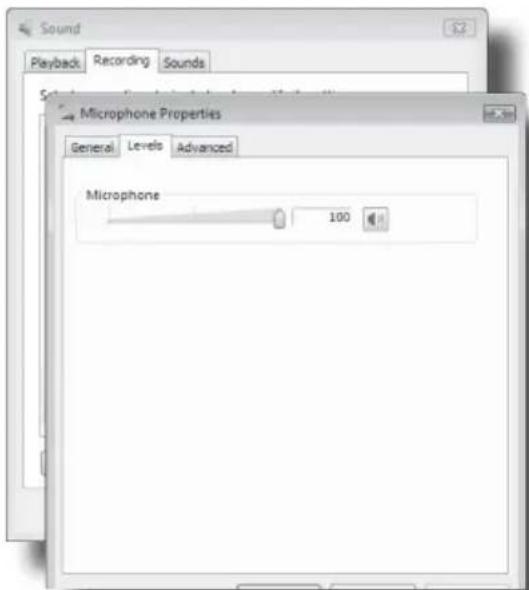
Figura 2
Figura 2

Figura 3
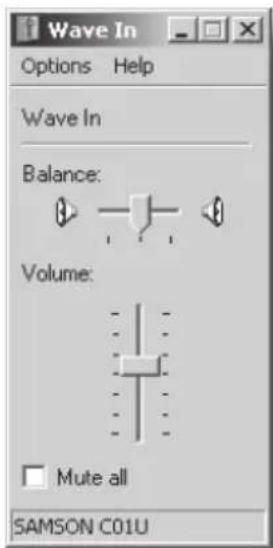
Figura 4
Utilizzo del C01U
Specifiche del C01U
Specifiche del C01U
- Table of Contents
- Introduction
- C01U Features
- Installing the C01U
- Getting Started with MAC OS X
- Getting Started with Windows 7 & Vista
- Getting Started with Windows XP
- Operating the C01U
- Powering the C01U
- Polar Pattern
- Microphone Placement
- Setting Up the Signal Level
- P-Popping
- Stand Mounting the C01U
- Using the Optional SP01 Shock-Mount
- Using the Optional SP01 "Spider" Shock-Mount
- C01U Specifications
- Table des matières
- Utilisation du C01U
- C01U betreiben
- Uso del C01U
- Encendido del C01U
- Utilizzo del C01U
- Specifiche del C01U
Brand : SAMSON
Model : C01
Category : Microphone