
Quartet - Hi-Fi System Apogee - Free user manual and instructions
Find the device manual for free Quartet Apogee in PDF.


| Product Type | Professional Audio Interface and Studio Control Center |
| Brand | Apogee |
| Model | Quartet |
| Connectivity | USB 2.0 High Speed |
| Power Supply | External DC 9-16V, 30W |
| Bit Depth / Sample Rate | 24-bit / 44.1-192 kHz |
| Analog Input Channels | 4 (combo XLR/TRS) |
| Digital Input Channels | 8 via ADAT/SMUX optical |
| Output Channels | 6 line/speaker + stereo headphone |
| Microphone Preamps | 4, gain up to 75 dB |
| Phantom Power | Yes (48V, switchable per channel) |
| Headphone Output | Independent, on right side panel |
| Speaker Outputs | Up to 3 stereo sets (5.1 surround compatible) |
| Displays | 2 full-color OLED screens |
| Touchpads | 6 single-function + 3 assignable |
| Controller Knob | Push-button for mute, rotary for level |
| Low Latency Mixing | Yes via Maestro 2 mixer |
| Software Control | Apogee Maestro 2 |
| Compatible Operating Systems | Mac OS X 10.6.8, 10.7.4 or later (Intel Mac) |
| System Requirements | Intel Mac 1.5 GHz, 2 GB RAM (4 GB recommended) |
| Dimensions (approximate) | Not specified in manual, typical desktop unit |
| Weight (approximate) | Not specified in manual, typical ~1.5 kg |
| Care and Cleaning | Wipe with dry cloth; no user-serviceable parts inside |
| Safety | FCC Class A, CE, VCCI, C-Tick |
| Spare Parts / Repairability | Contact Apogee support for RMA; no user replaceable parts |
Frequently Asked Questions - Quartet Apogee
User questions about Quartet Apogee
0 question about this device. Answer the ones you know or ask your own.
Ask a new question about this device
Download the instructions for your Hi-Fi System in PDF format for free! Find your manual Quartet - Apogee and take your electronic device back in hand. On this page are published all the documents necessary for the use of your device. Quartet by Apogee.
USER MANUAL Quartet Apogee
natural_image
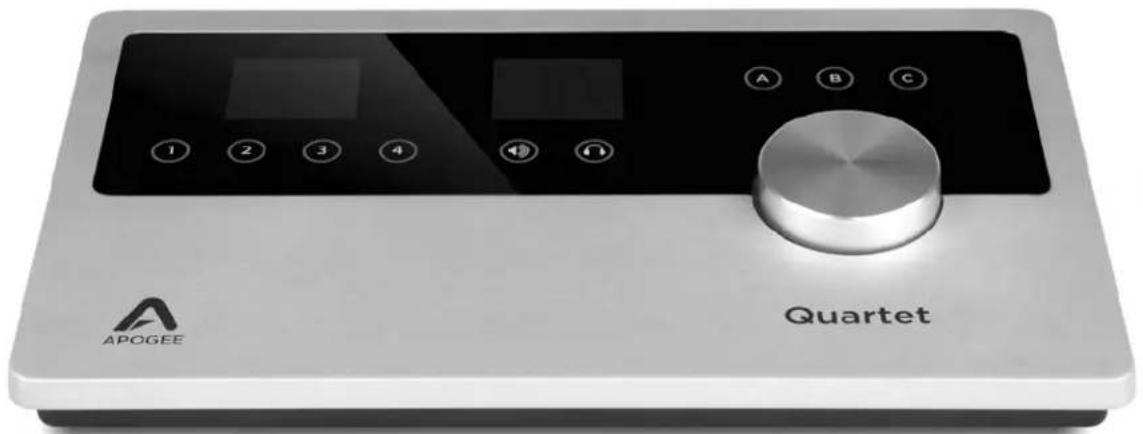
Front view of a Quartet audio recording device with control knobs and a rotary knob (no visible text or symbols on the device body)Apogee Quartet
User's Guide
V1, September, 2012
Contents
QuickStart 6
Introduction 6
Quartet 6
Professional audio interface and studio control center for Mac 6
What you can do with Quartet: 6
Package contents 7
The following items are included in the Quartet box: 7
Software, firmware and the Quartet User's guide are available online only. 7
Please download the latest installer here: 7
Quartet panel tour 8
Top panel 8
Rear panel 9
Side panel 9
Display and touchpad tour 10
Input display and touchpads 10
Output display and touchpads 10
Connecting to your Mac 11
System Requirements 11
Install Quartet Software 11
Choosing Quartet for Mac Sound I/O 12
Connect to Headphones or Speakers 13
Check Audio Playback in iTunes 13
Adjusting Volume 14
Speaker Output level 14
Contents - Apogee Quartet User's Guide
Headphone Output level 15
Configuring the Input 16
Open Apogee Maestro 2 software and select the Input tab. 16
Operation 17
Controller Knob 17
Quartet's OLED Displays 17
Adjusting Input & Output Levels 18
Input level 18
Speaker Output level 19
Headphone Output level 20
Multiple Speaker Set Operation 21
2 Speaker Sets 22
3 Speaker Sets 23
Custom Output Routing 24
Assignable Touchpads 25
Mute outputs 26
Dim outputs 26
Sum to Mono 27
Engage Speaker Set 27
Clear Meters 28
MIDI Input/Output 29
To setup a MIDI device with Quartet: 30
OS X System Preferences 31
OS X Audio MIDI Setup 31
Setting Sample Rate 32
Maestro 2 33
Contents - Apogee Quartet User's Guide
Devices Sidebar 33
Device Icon & ID Button 34
Input Tab Window 35
Output Tab Window 36
Device Settings Tab Window 38
Output Routing Tab Window 39
System Setup Window 41
Menu Bar Menus 42
Low Latency Mixing 45
Maestro Low Latency mixing 45
Maestro Low Latency mixing (continued) 46
Working with the Maestro Mixer 48
Do I need the Maestro Mixer? 48
Recording software settings 48
Software monitoring 48
Playback mix 49
Maestro Output Routing Tab 49
Maestro Mixer Settings 50
Applications 51
Using Quartet with Logic 51
Using Quartet with Logic (continued) 52
Using Quartet with Logic (continued) 53
Using Quartet with Logic (continued) 54
Using Quartet with GarageBand 55
Using Quartet with Avid Pro Tools (9 or greater) 56
Using Quartet with Ableton Live 57
Using Quartet with Apple Final Cut Pro 58
Contents - Apogee Quartet User's Guide
Using Quartet with Steinberg Nuendo 59
Troubleshooting 60
Further Troubleshooting Resources 62
Apogee Website 62
Apogee Support 62
Apogee Product Repair 62
Specifications 63
System Requirements: 64
Warranty & Notifications 65
Registration and Warranty Information 65
Service Information 66
Warnings 66
Copyright Notice 66
Software Notice 67
Declarations of Conformity 67
Industry Canada Notice 68
Declaration of Conformity - CE 68
Declaration of Conformity – Japan 68
Declaration of Conformity – Australia 68
QuickStart
Introduction
Thank you for purchasing Quartet. This QuickStart guide describes how to set up Quartet with your Mac, connect speakers or headphones to play back music and connect mics and instruments to record your own creations with Apple's Logic Pro or Avid's Pro Tools.
Quartet
Professional audio interface and studio control center for Mac
For over 25 years, Apogee has been an award-winning industry leader in digital recording. Quartet expands upon this award-winning legacy with next generation sound quality and groundbreaking new features that will raise the bar for the personal recording studio. With Quartet, you have a powerful studio tool that's easy to use and designed to deliver a difference you can hear.
Quartet features the very latest in Apogee conversion and mic preamp technology. Compact and simple to use, Quartet lets you capture your best take anywhere with ease and without compromise.
What you can do with Quartet:
- Record up to 4 analog inputs simultaneously (microphone, line-level or instrument)
- Connect up to 8 additional inputs digitally via ADAT/SMUX optical for a total of 12 inputs
- Connect and power any compatible MIDI USB device
- Connect up to 3 sets of powered monitors
• Mix and monitor in 5.1 surround - Record with any popular audio software on a Mac; Logic Pro, Final Cut, GarageBand, Pro Tools, Ableton Live, or any Core Audio compatible application
Package contents
The following items are included in the Quartet box:
- Quartet
- QuickStart Guide
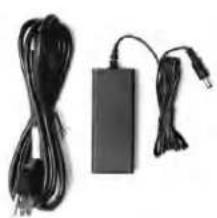
• Power Supply - USB 2.0 Cable
natural_image
Front view of a Quartet audio recording device with control buttons and display (no readable text beyond branding)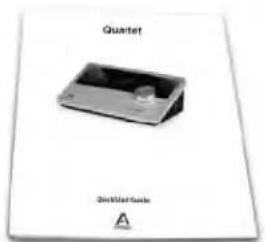
natural_image
Coiled black cables and a black rectangular electronic device with wires (no visible text or symbols)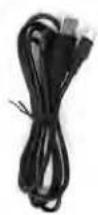
USB 2.0 CableQuickStart
Software, firmware and the Quartet User's guide are available online only. Please download the latest installer here:
http://www.apogeedigital.com/downloads
Quartet panel tour
Top panel
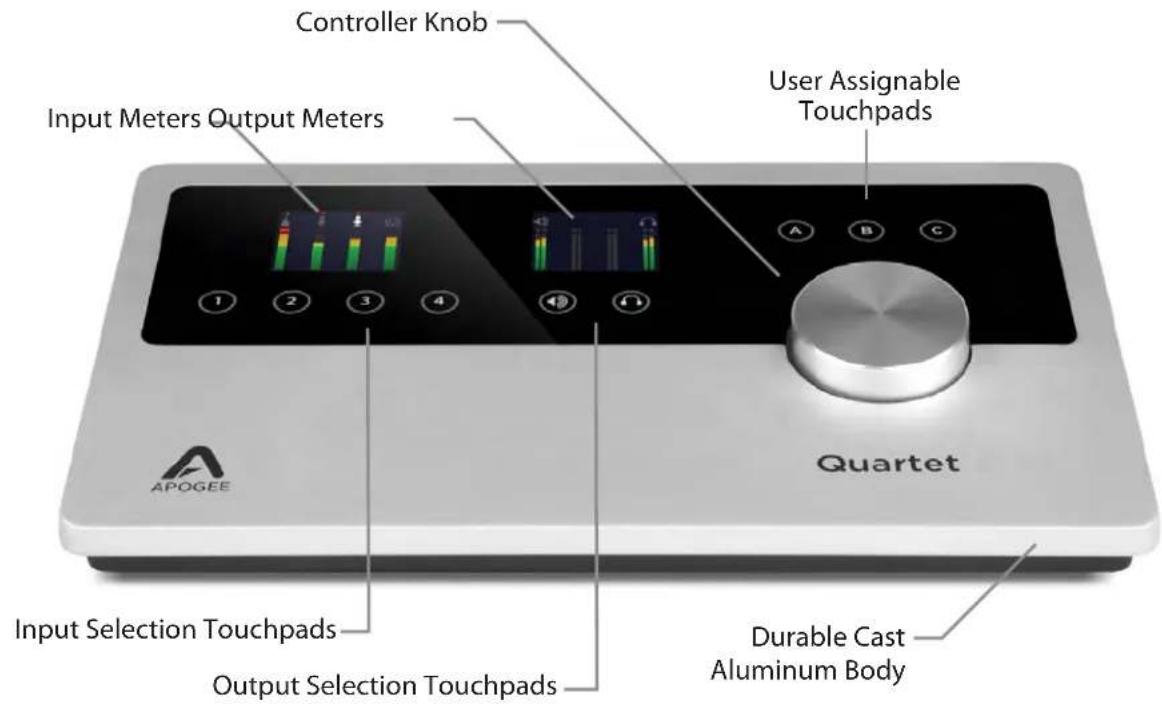
Quartet panel tour
QuickStart - Apogee Quartet User's Guide
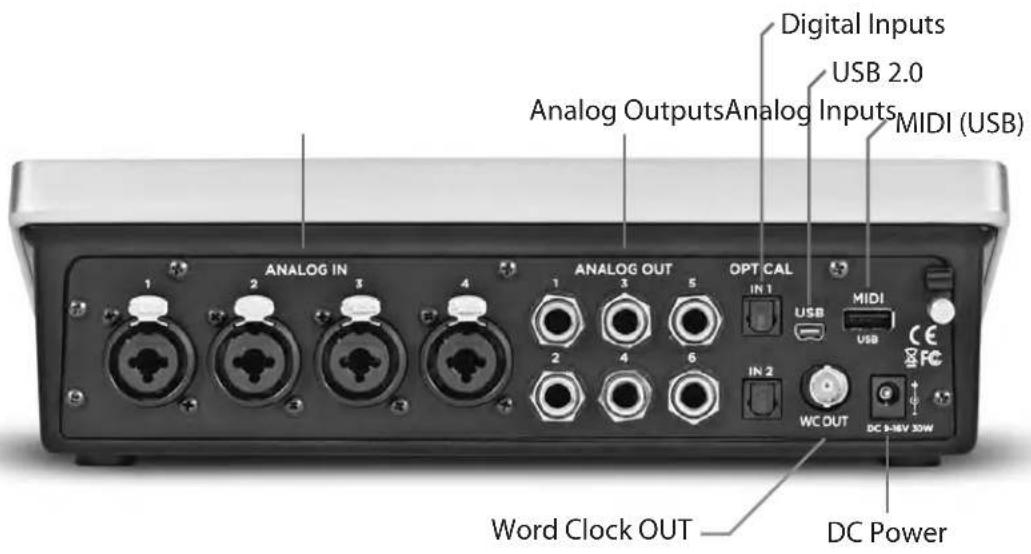
Rear panel
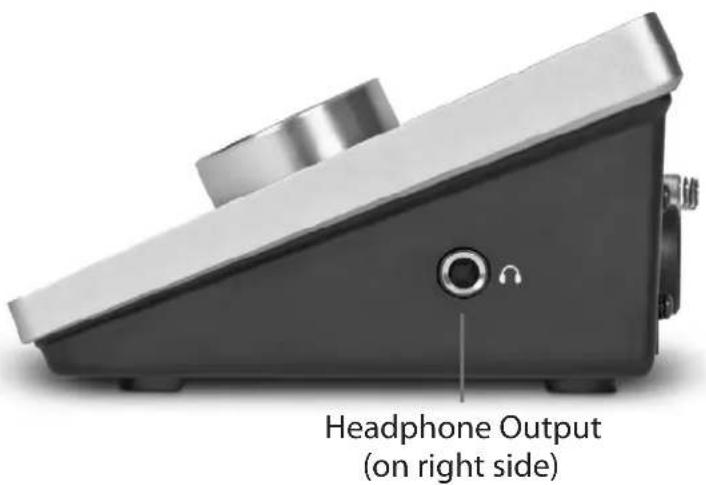
Side panel
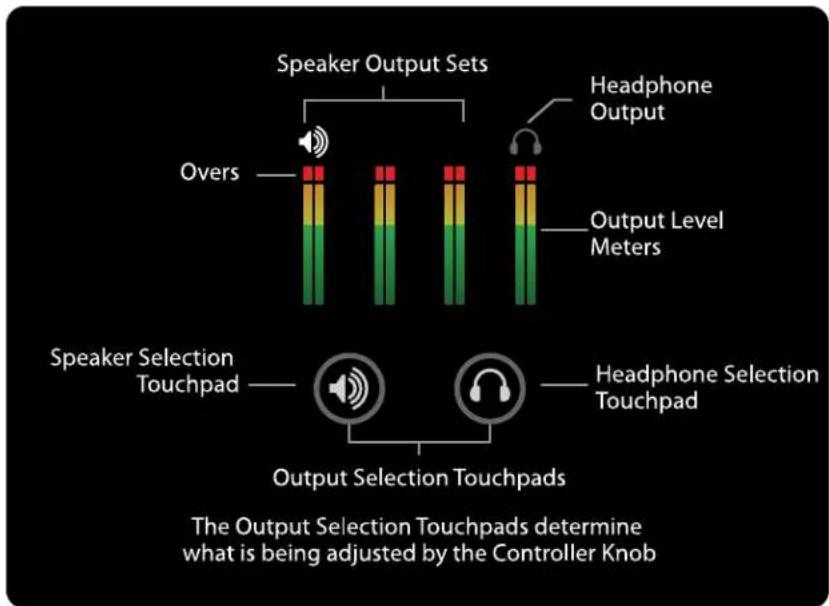
Display and touchpad tour
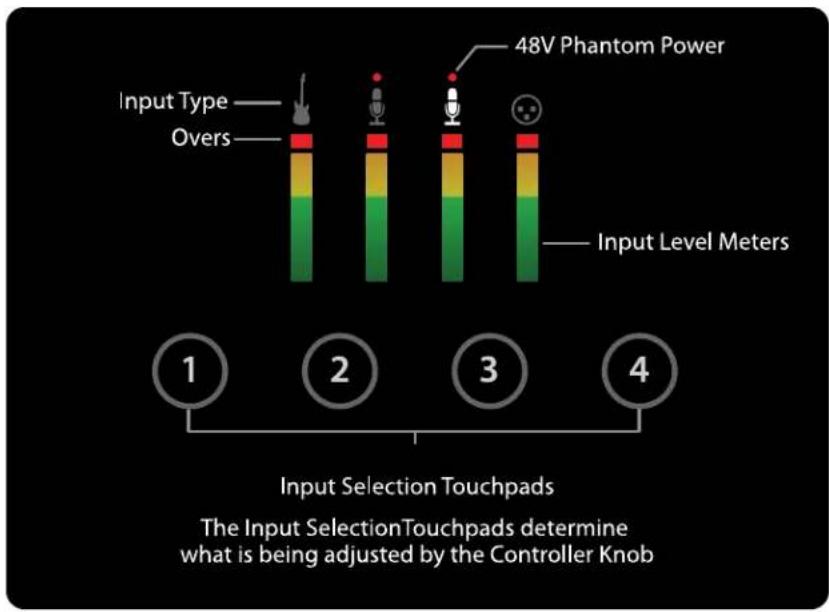
Input display and touchpads
Output display and touchpads
Connecting to your Mac
System Requirements
• Intel Mac 1.5 GHz or faster
• Mac OS X 10.6.8, 10.7.4 or greater
• 2 GB minimum RAM, 4 GB recommended
Install Quartet Software
- Remove the protective film from the front panel, otherwise the Touchpads will not work.
- Connect Quartet's Power Supply to the DC power input on the rear panel of Quartet and the appropriate IEC cable to a wall outlet.
- Connect Quartet's USB port to a USB port on your Mac using the supplied USB 2.0 cable.
- Go to http://www.apogeedigital.com/downloads
- Locate and download the latest Quartet Installer package.
- Once you have downloaded the package, double-click the open box icon to run the installer.
- You will be required to restart your computer after the install is complete.
Quartet is powered through the external power supply but must also be connected to your Mac via USB in order to power on. Once both connections are made, Quartet's OLEDs and Touchpads will illuminate, indicating that it is powered on.
QuickStart - Apogee Quartet User's Guide
Choosing Quartet for Mac Sound I/O
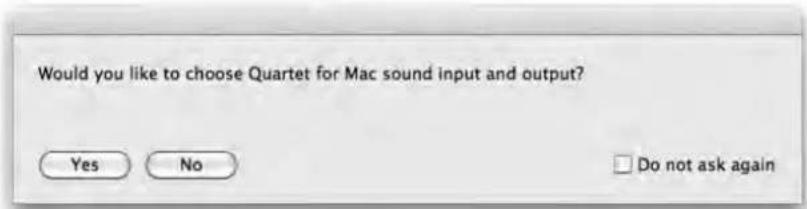
After connecting Quartet to your Mac, a dialog box will prompt you to choose Quartet for Mac sound input and output. Click Yes.
QuickStart - Apogee Quartet User's Guide
Connect to Headphones or Speakers
Connect headphones to the headphone output on the right side of Quartet.
Connect Quartet's 1/4" speaker outputs 1-2 to the inputs (balanced or unbalanced) of your active (powered) studio monitors or amplifier.
Check Audio Playback in iTunes
To verify Quartet's output, open iTunes (found in your Mac's Applications folder), choose a song, and click Play.
Adjusting Volume

Speaker Output level
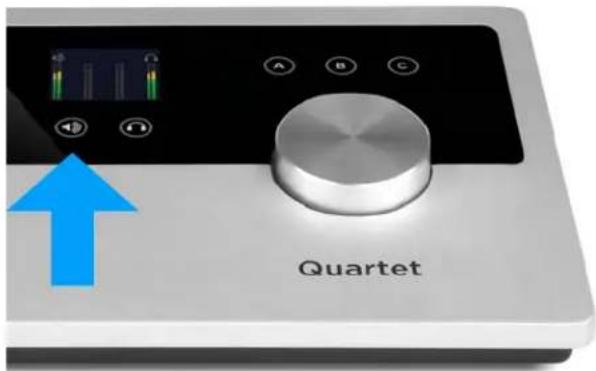
To change Quartet's speaker output level (i.e the listening level of connected speakers), press the Speaker Selection Touchpad to select the appropriate stereo output.
natural_image
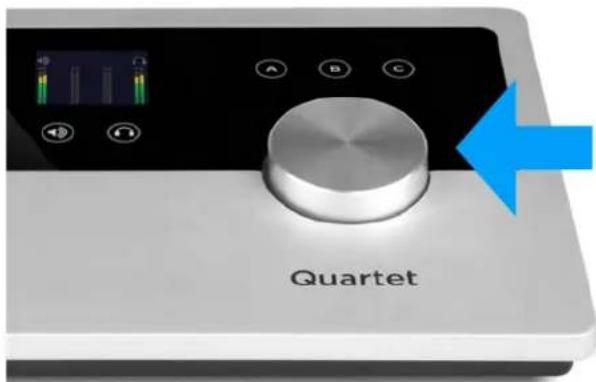
Close-up of a Quartet audio recording device with a knob and control buttons, no visible text or symbols on the device itself.Now, turn the Controller Knob to the desired listening level. The hardware Controller Knob operates in parallel with any software level controls.
QuickStart - Apogee Quartet User's Guide

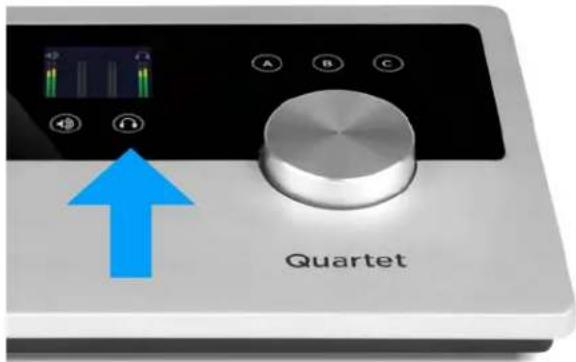
Headphone Output level
natural_image
Close-up of a Quartet audio recording device with a blue upward arrow and control buttons (no readable text beyond branding)To change Quartet's headphone output level (i.e the listening level of connected headphones), press the Headphone Selection Touchpad to select the headphone output.
natural_image
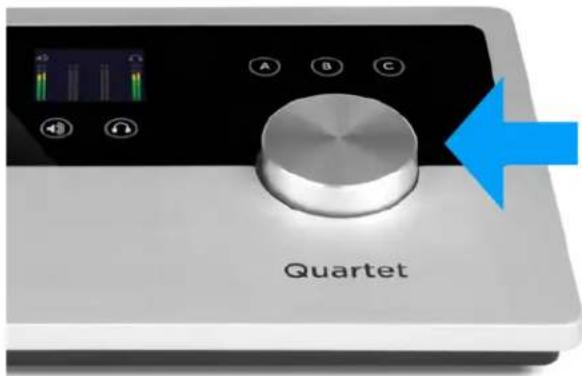
Close-up of a Quartet audio recording device with a knob and control buttons, no visible text or symbols on the device itself.Now, turn the Controller Knob to the desired listening level. The hardware Controller Knob operates in parallel with any software level controls.
QuickStart - Apogee Quartet User's Guide
Configuring the Input
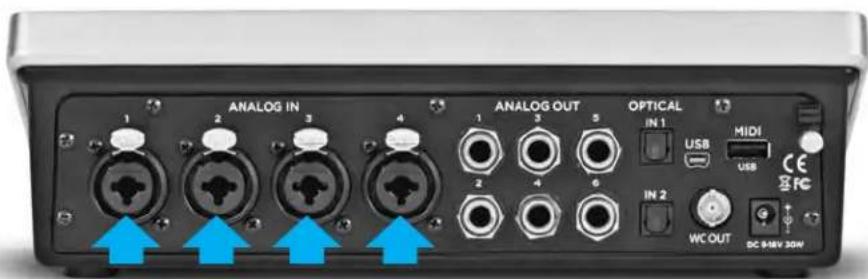
Connect a microphone or instrument to one of the combo jacks on the rear panel
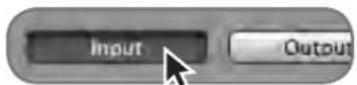
Open Apogee Maestro 2 software and select the Input tab.
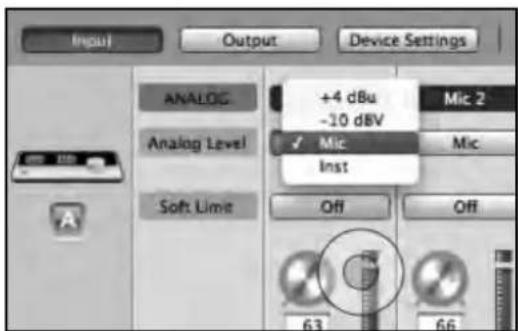
Select the Analog Level setting that corresponds to the device you have connected to Quartet's input(s). For example, if you have a microphone connected to the XLR input of channel 1, select "Mic" from the Analog Level menu on channel 1
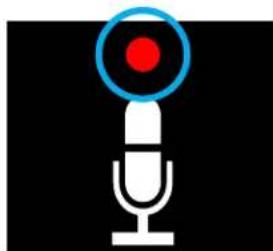
Note: If you are using a condenser microphone that requires phantom power, select the 48V box on the Input tab of the appropriate channel in Maestro 2. Phantom power is indicated on Quartet's display by a red dot above the microphone icon.
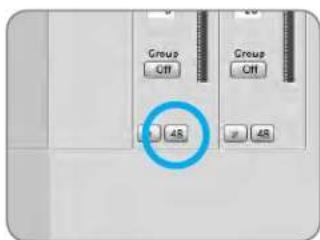
48V Phantom power button in Maestro
natural_image
Simple icon of a microphone with a red dot on top and blue ring, set against black background (no text or symbols)48V Phantom power indicator on OLED Display
Operation - Apogee Quartet User's Guide
Operation
Controller Knob
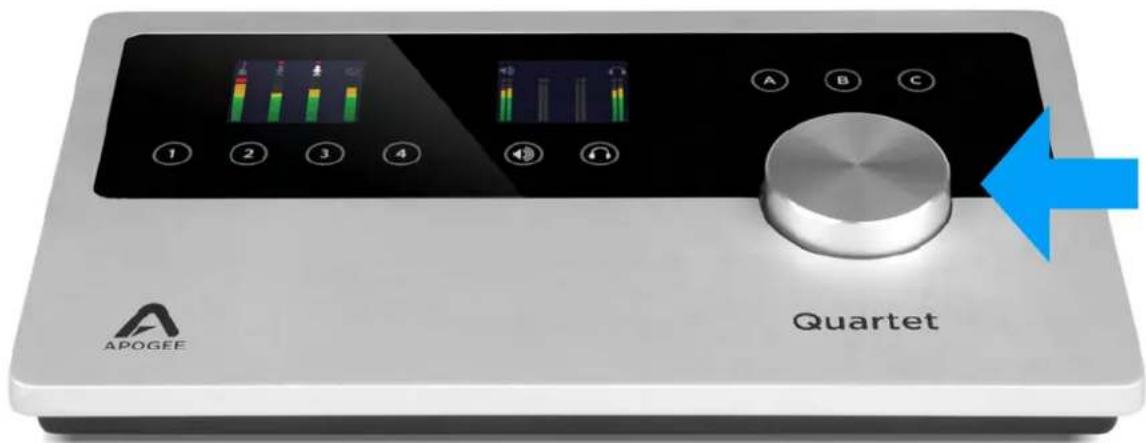
Quartet's Controller Knob allows you to easily adjust the levels of all inputs and outputs and also provides a quick and easy way to mute the outputs. By default, the Knob Push Button is assigned to mute all outputs. Alternatively, you can assign it in Apogee's Maestro 2 software to mute only the speaker or only the headphone outputs.
Quartet's OLED Displays
Quartet's input and output OLED display provide full color metering and visual feedback.
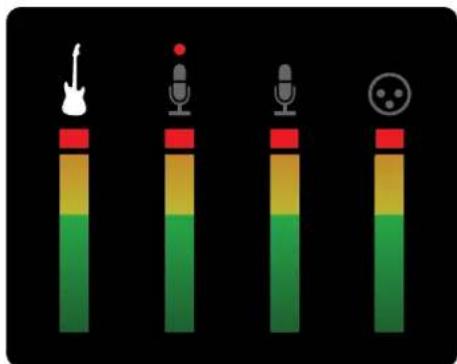
natural_image
Four stacked vertical bars with colored segments (green, yellow, red, white, red) and icons above each bar, set against a black background (no text or symbols)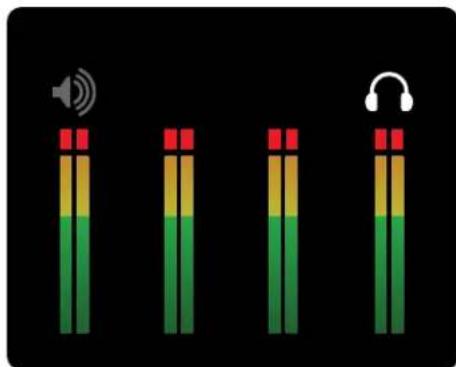
natural_image
Four vertical stacks of colored blocks with red and yellow segments, each with a speaker icon above (no text or symbols)Input display - Home view Output display - Home view
Adjusting Input & Output Levels
Input level
To change Quartet's input level (i.e the preamp gain of microphones and instruments):
1) Press the Touchpad corresponding to the desired input.
The ring around the selected icon will be brighter than the others after you select it.
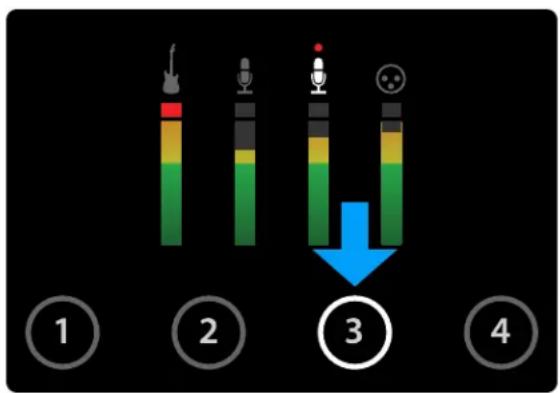
2) Turn the Controller Knob until the desired recording level is obtained.
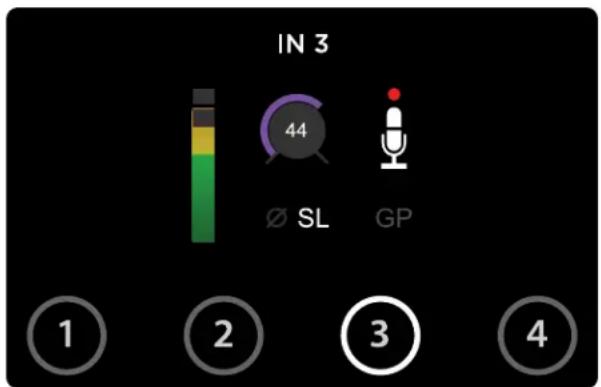
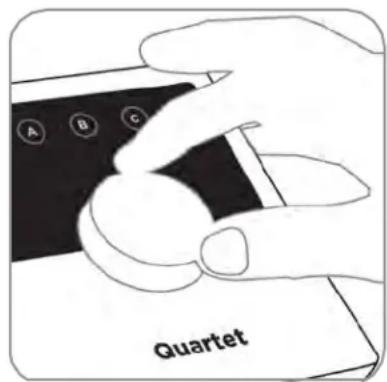
The controller knob operates in parallel with Maestro's input controls.
Operation - Apogee Quartet User's Guide
Speaker Output level
To change Quartet's speaker output level (i.e the listening level of connected speakers):
1) Press the speaker output Touchpad.
The ring around the selected icon will be brighter than the others after you select it.
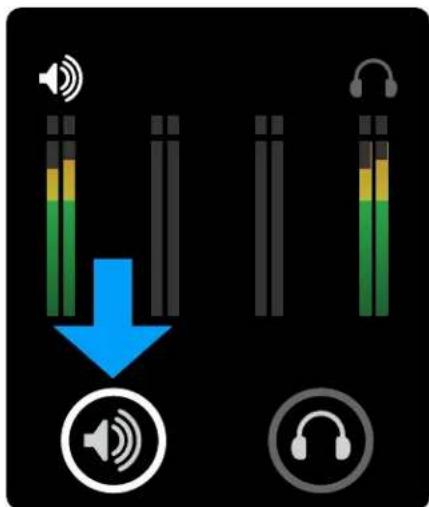
2) Turn the controller knob to the desired listening level.
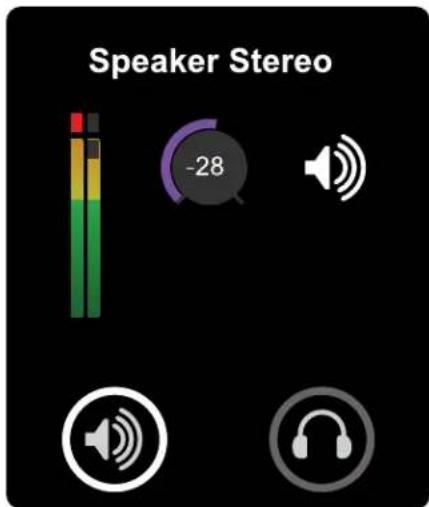
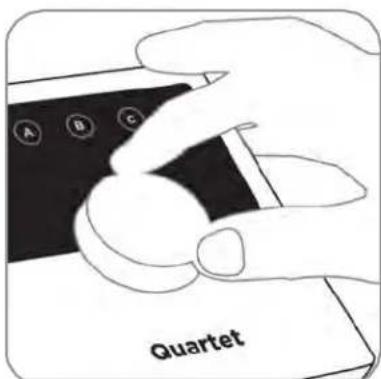
The controller knob operates in parallel with any software output controls on the Mac.
Operation - Apogee Quartet User's Guide
Headphone Output level
To change Quartet's headphone output level (i.e the listening level of connected headphones): 1) Press the headphone output Touchpad.
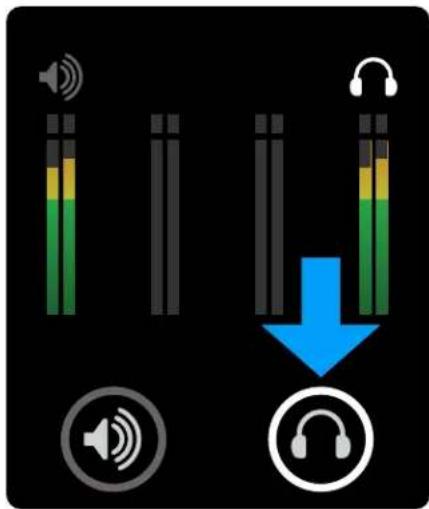
2) Turn the controller knob to the desired listening level.
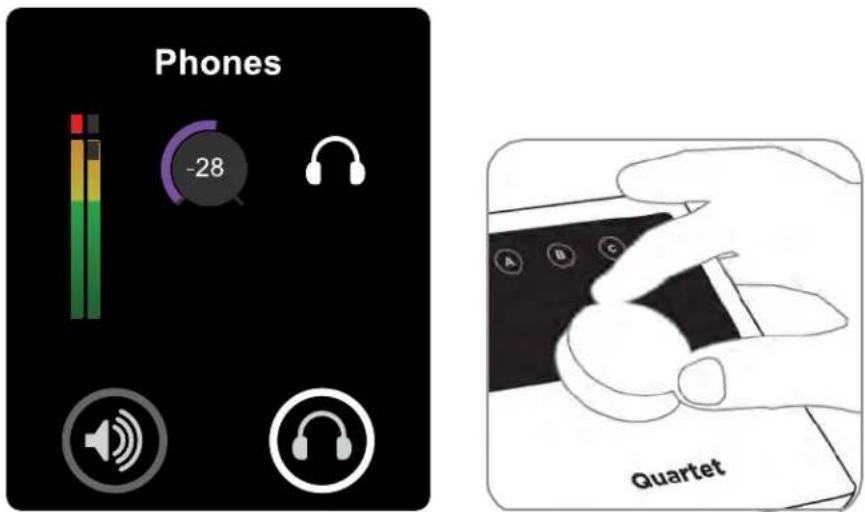
The controller knob operates in parallel with Maestro's headphone control.
Operation - Apogee Quartet User's Guide
Multiple Speaker Set Operation
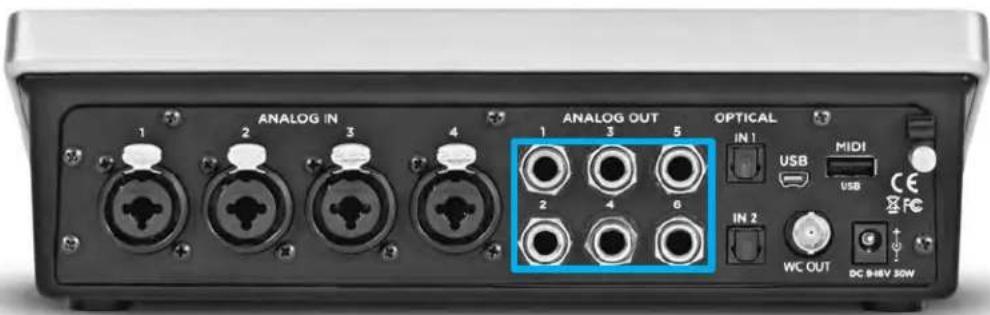
Quartet's Speaker Set functionality allows you to connect up to 3 stereo speaker sets, each of which can be individually selected for playback output. To set up:
1) Connect your primary pair of speakers to Quartet's ANALOG OUT 1-2
2) Connect your second and third pairs (if equipped) to Quartet's ANALOG OUT 3-4 and 5-6 respectively.
3) On the Output Tab of Maestro 2 (found in the applications folder on your Mac), select either "2 Speaker Sets" or "3 Speaker Sets" in the output format drop-down menu.
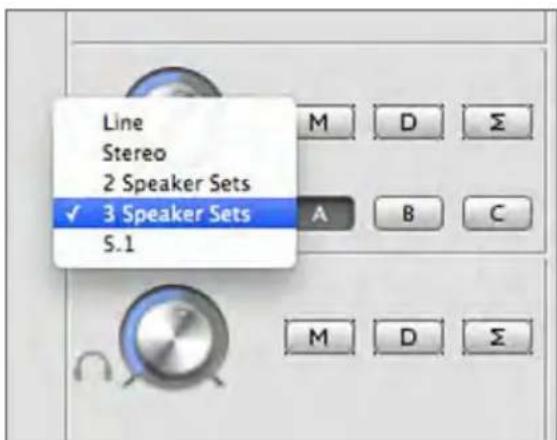
Selecting one of the multiple speaker set options automatically changes the routing on the Output Routing page to reflect the speaker set configuration.
Operation - Apogee Quartet User's Guide
2 Speaker Sets
When the "2 Speaker Sets" option is selected, Software Outputs 1-2 are routed to Hardware Outputs 1-2 and 3-4. (as shown in the Routing tab below)
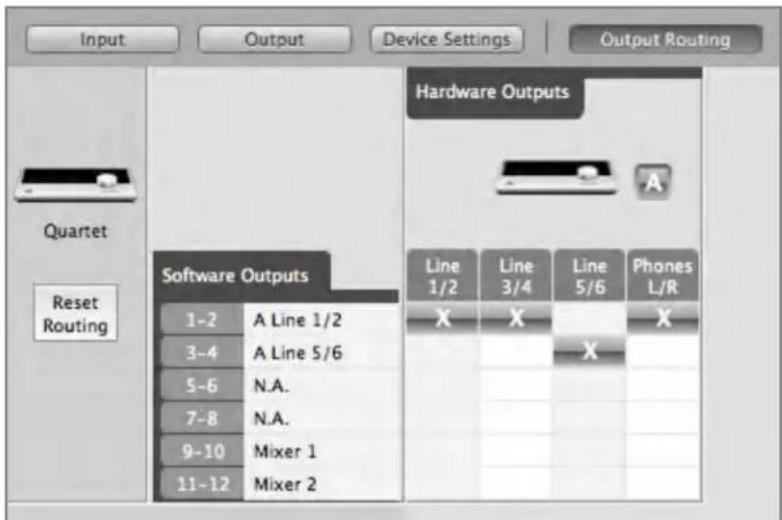
In the Maestro Output Tab, the A and B buttons to the right of the output control knob become active. The C button remains inactive.
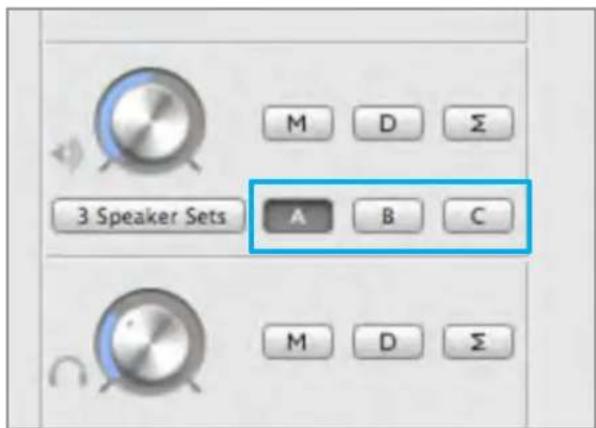
Clicking button A sends the main output signal to the speakers connected to Quartet's ANALOG OUT 1-2 and mutes ANALOG OUT 3-4.
Clicking button B sends the main output signal to the speakers connected to Quartet's ANALOG OUT 3-4 and mutes ANALOG OUT 1-2.
Operation - Apogee Quartet User's Guide
3 Speaker Sets
When the "3 Speaker Sets" option is selected, Software Outputs 1-2 are routed to Hardware Outputs 1-2, 3-4, and 5-6. (as shown in the Routing tab below)
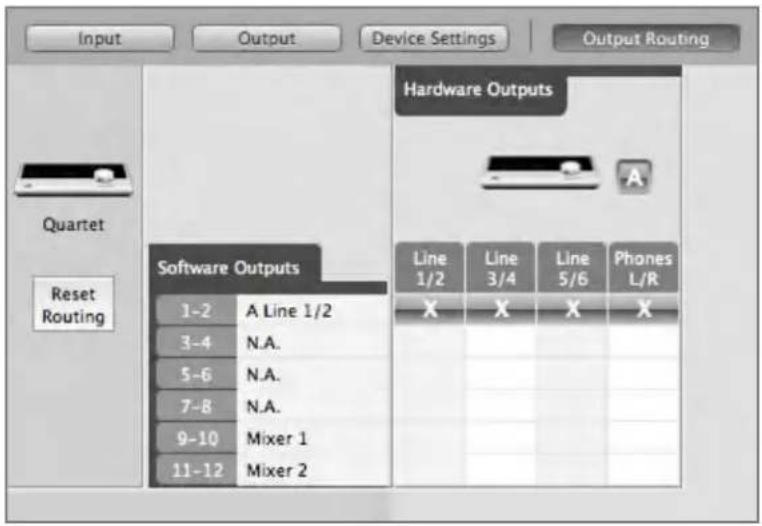
In the Maestro Output Tab, the A, B, and C buttons to the right of the output control knob become active.
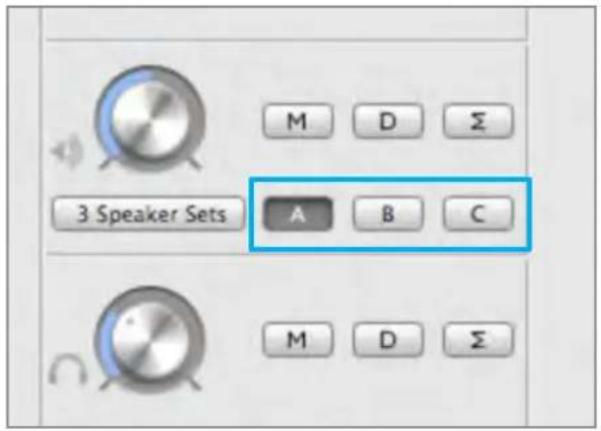
Clicking button A sends the main output signal to the speakers connected to Quartet's ANALOG OUT 1-2 and mutes ANALOG OUT 3-4 and 5-6.
Clicking button B sends the main output signal to the speakers connected to Quartet's ANALOG OUT 3-4 and mutes ANALOG OUT 1-2 and 5-6.
Clicking button C sends the main output signal to the speakers connected to Quartet's ANALOG OUT 5-6 and mutes ANALOG OUT 1-2 and 3-4.
Operation - Apogee Quartet User's Guide
Custom Output Routing
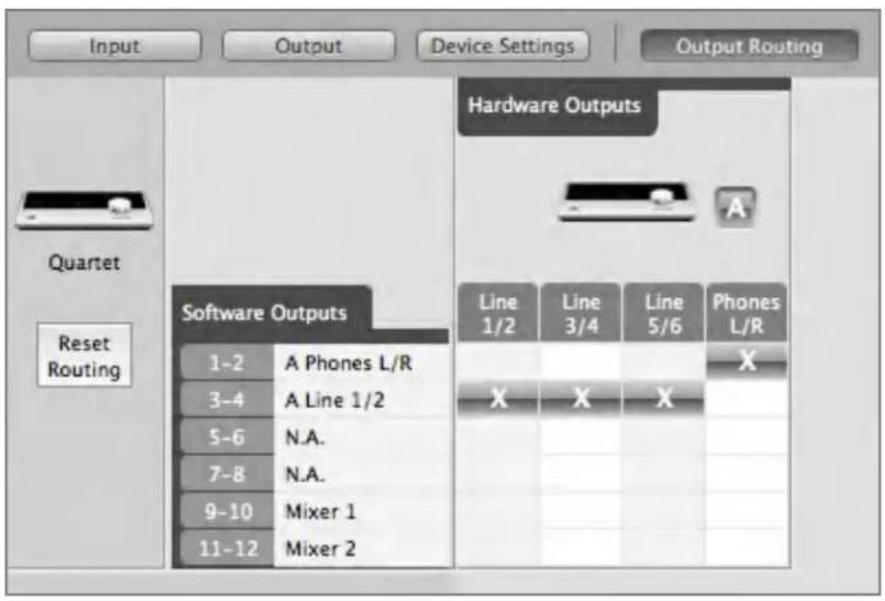
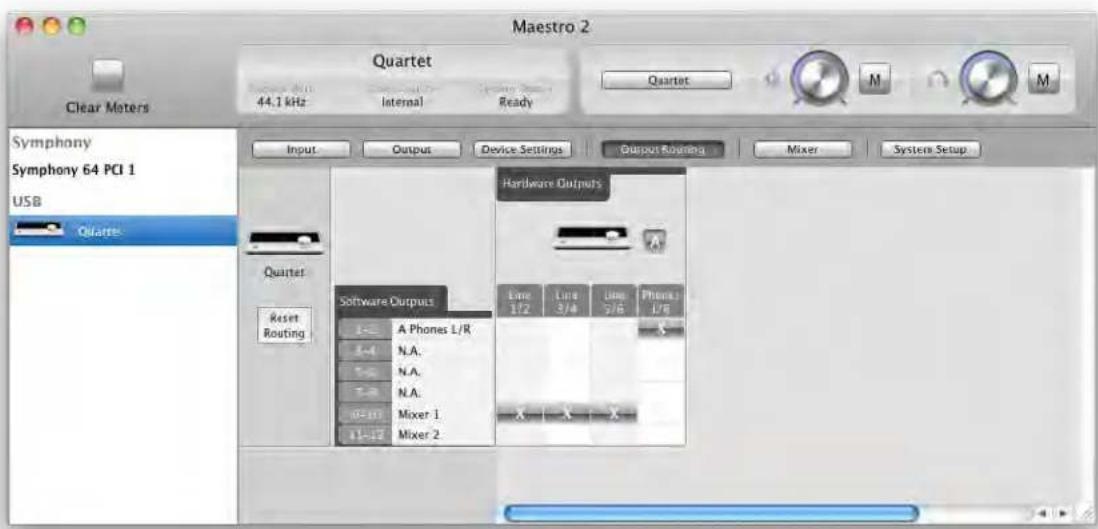
The Output Routing can be freely changed if you have a unique setup. For instance, if you wish to listen to your DAW's Software Outputs 3-4 and toggle between 3 different speaker sets, you can manually route Software Output 3-4 to Hardware Outputs 1-2, 3-4, and 5-6. (as shown in the Routing tab below)
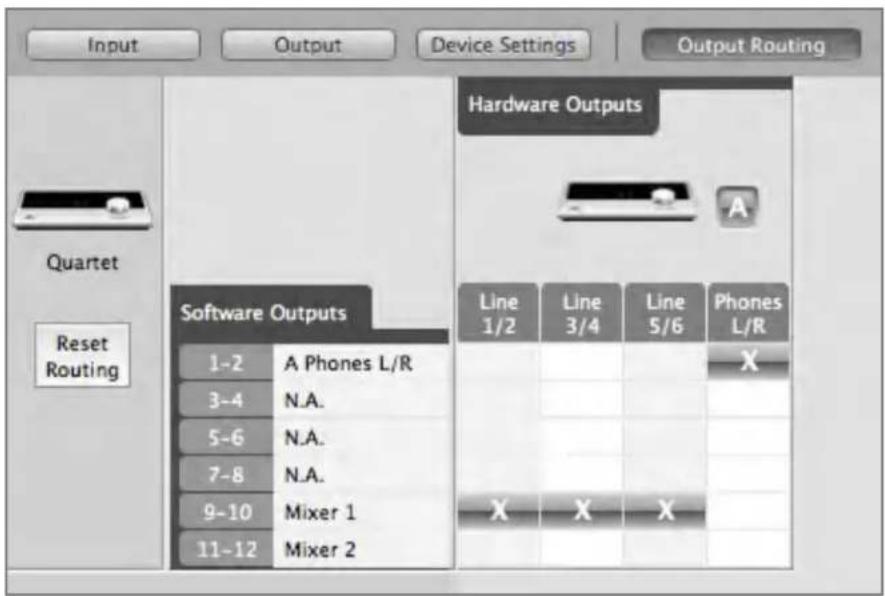
To use Speaker Sets while monitoring through the low latency mixer, route Mixer 1 (or Mixer 2) to hardware outputs as shown below.
Operation - Apogee Quartet User's Guide
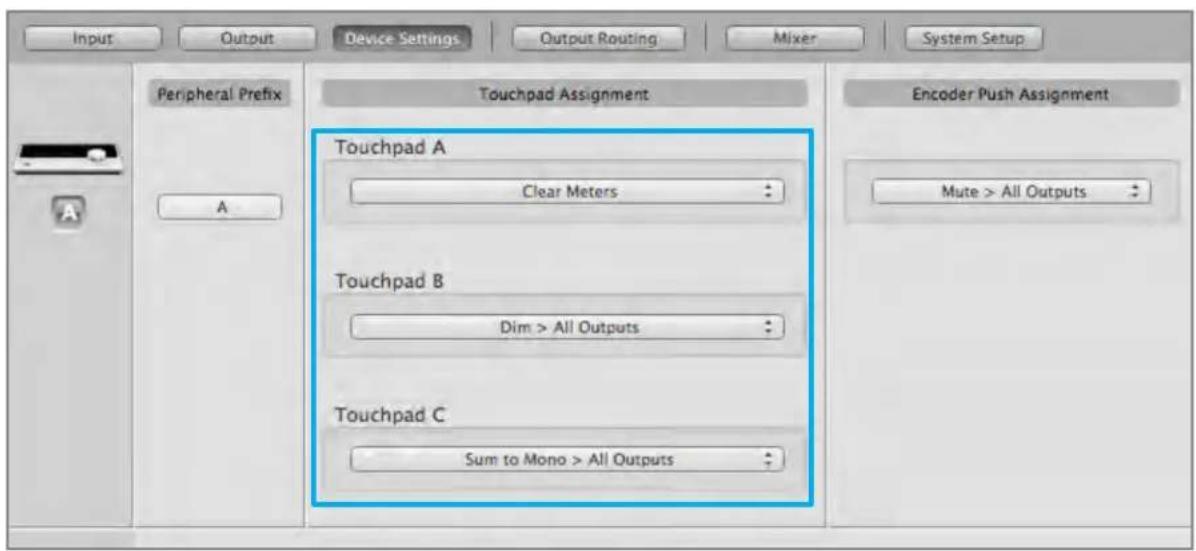
Assignable Touchpads
Quartet's three assignable Touchpads can be setup for quick access to Output functions. Use them to mute or dim the outputs, sum to mono, clear meters or switch between multiple speaker sets with a single touch.
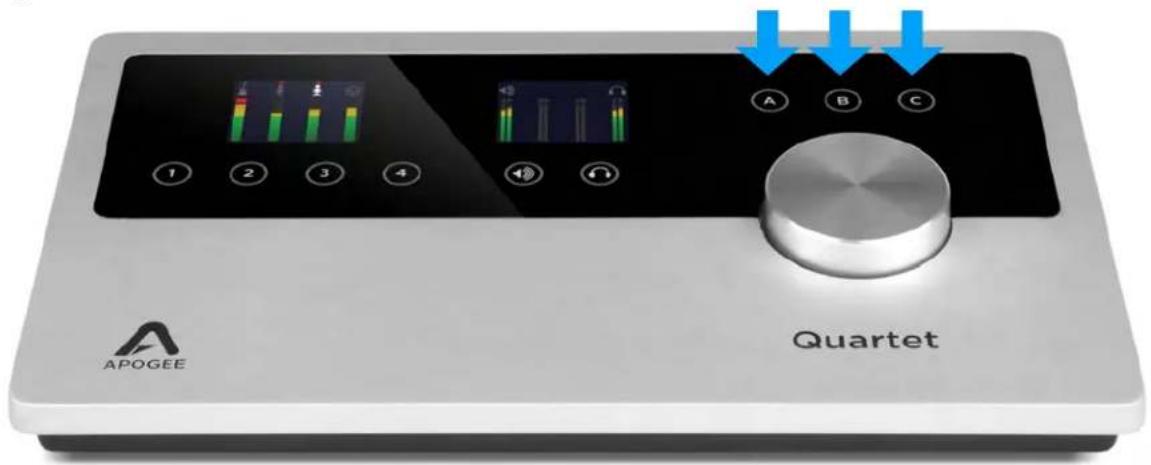
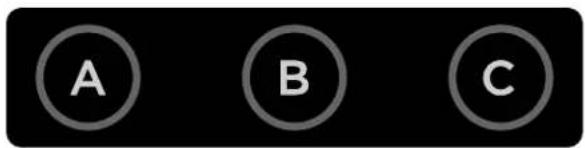
Assigning functions to the Touchpads is easily done in the Device Settings tab of Maestro.
Operation - Apogee Quartet User's Guide
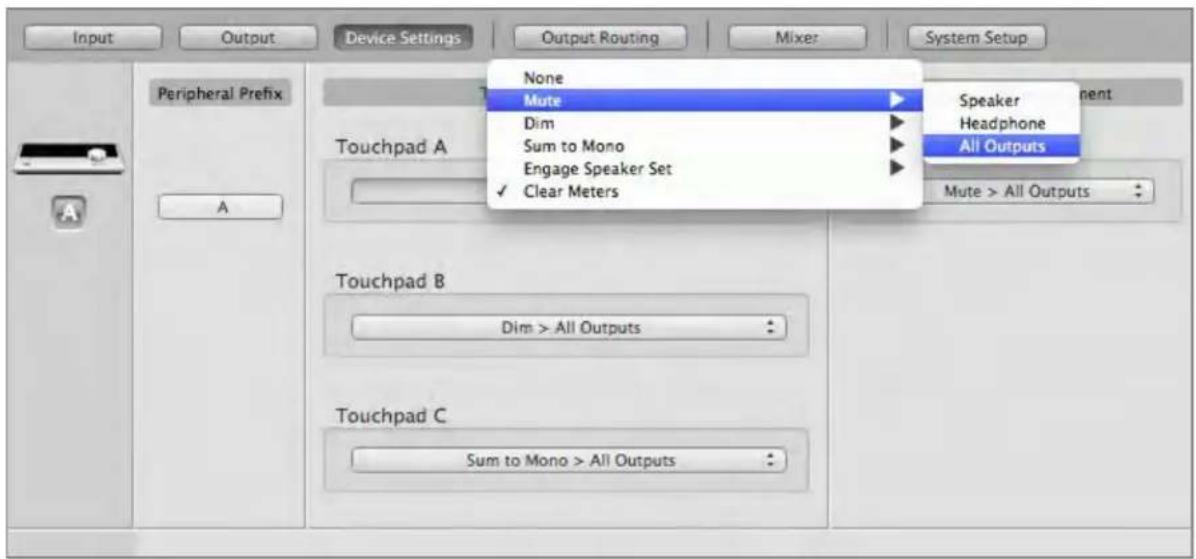
Mute outputs
You can assign one of the three Touchpads to mute the Speaker, Headphone or All Outputs.
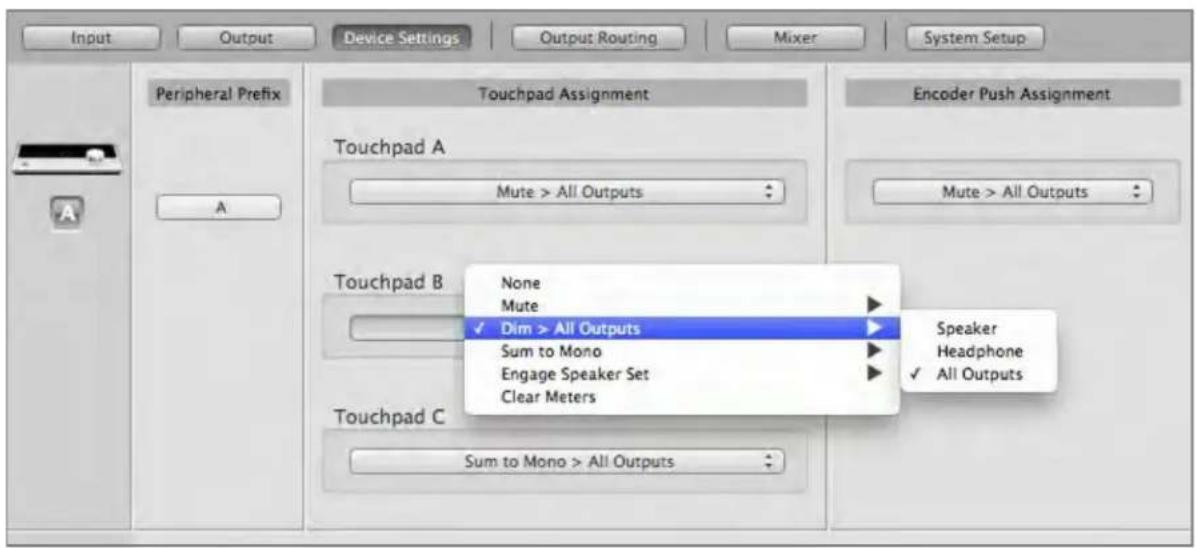
Dim outputs
The Dim function lowers the output volume by 15 dB. This function is convenient when you want to briefly lower the playback volume without completely muting the output.
Operation - Apogee Quartet User's Guide
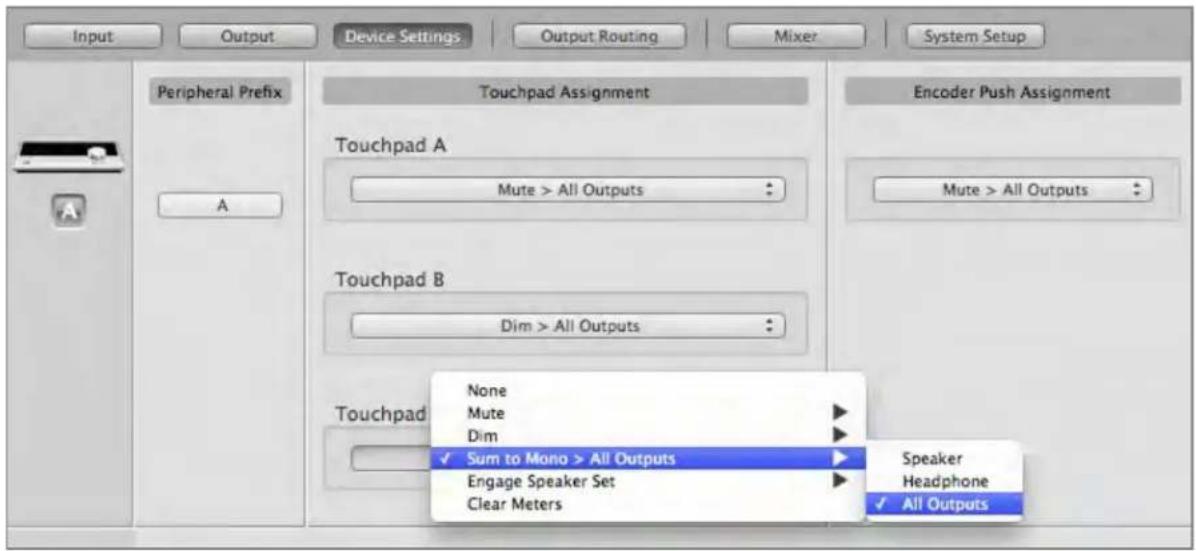
Sum to Mono
The Sum to Mono function is used to examine phase relationships on stereo tracks. When engaged, the left and right output signals are combined and phase errors between the two become exponentially more noticeable.
Engage Speaker Set
When the output format (found in Maestro's Output Tab) is set to either "2 Speaker Sets" or "3 Speaker Sets", you can assign the Touchpads to engage a particular speaker sets.
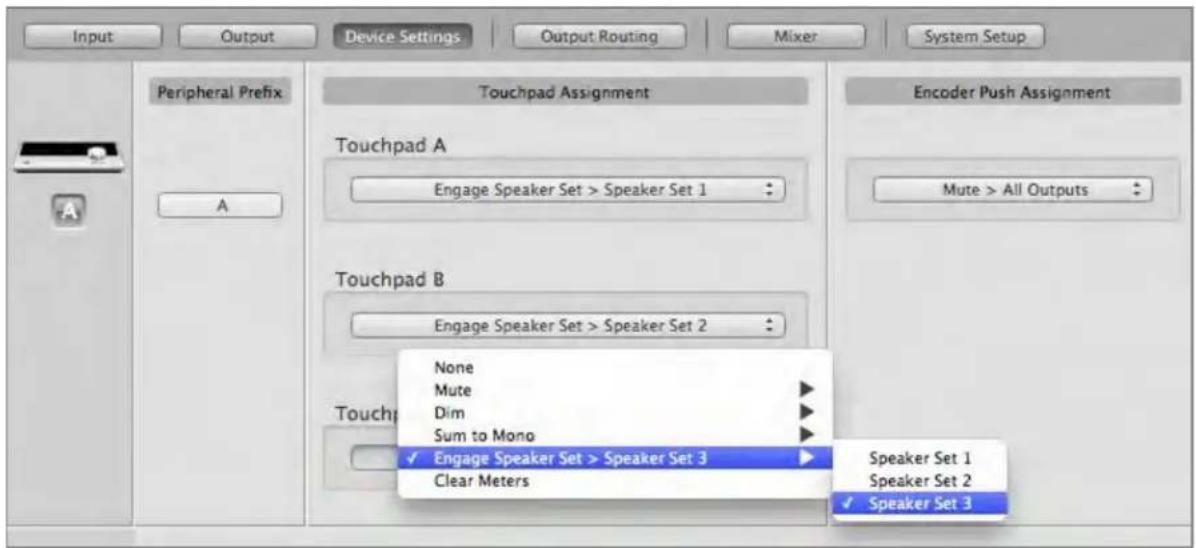
Operation - Apogee Quartet User's Guide
Clear Meters
The Clear Meters function will remove any peak and over indicators in Maestro 2 and OLED meters on Quartet's front panel. If "Peak Hold" or "Over Hold" (in the System Setup tab) is set to Infinite, all indicators will remain illuminated until "Clear Meters" is engaged.
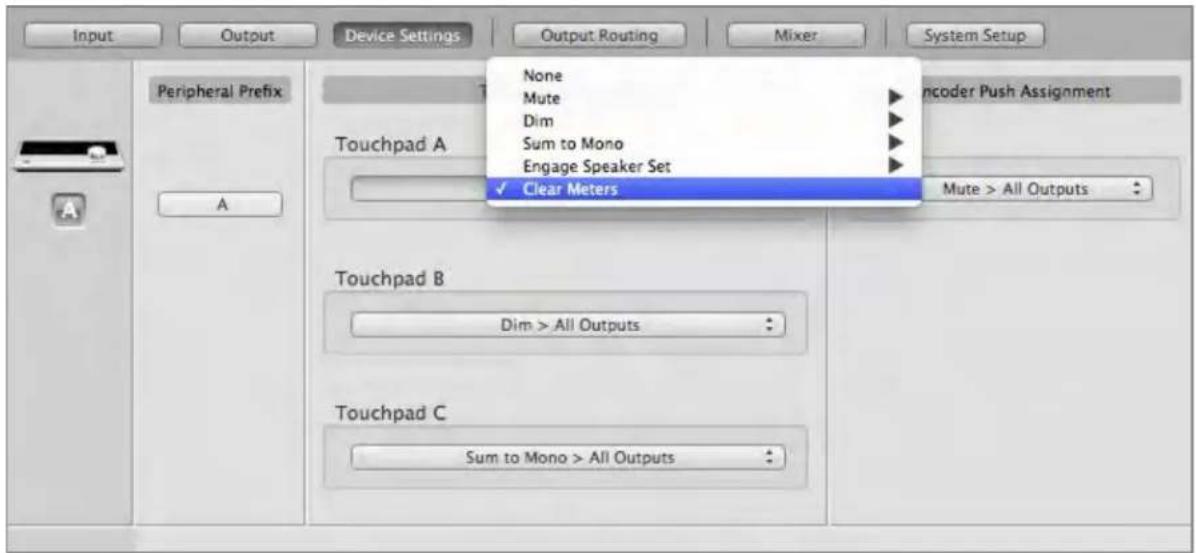
Operation - Apogee Quartet User's Guide
MIDI Input/Output
Quartet's USB MIDI input/output provides a MIDI connection between class compliant Core MIDI devices such as keyboards and other controllers and Apple's Mac OS X.
A class-compliant MIDI device works with Core MIDI without the need to install drivers or other additional software. To confirm that your MIDI device is class-compliant:
- Using a standard USB cable, connect the device directly to a Mac.
- On the Mac, open Audio MIDI Setup, found in the Applications > Utilities folder.
- In Audio MIDI Setup, choose Window > Show MIDI Window.
- Verify that the MIDI device is detected in the MIDI window. Click Rescan MIDI if the device isn't initially detected.
- If the device is detected, it's class-compliant and will be available to MIDI software.
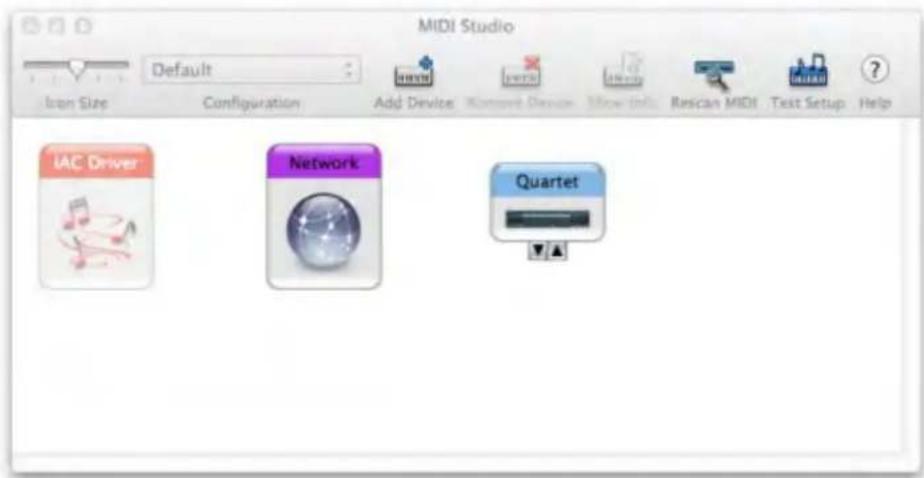
Operation - Apogee Quartet User's Guide
To setup a MIDI device with Quartet:
Using a standard USB cable, connect the device's USB MIDI connector to Quartet's rear panel MIDI USB connector.
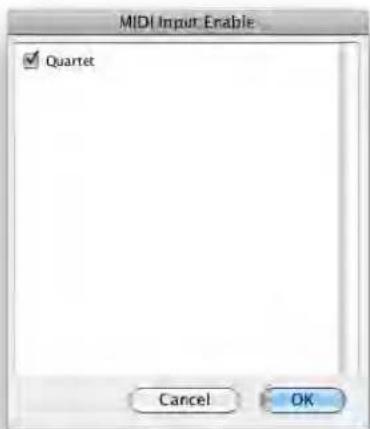
In your MIDI software, look for Quartet as a MIDI source/destination. For example, in Logic choose Window > Environment. In the Environment window, choose Clicks & Ports in the upper left hand corner. Quartet should appear in the Physical Input list.
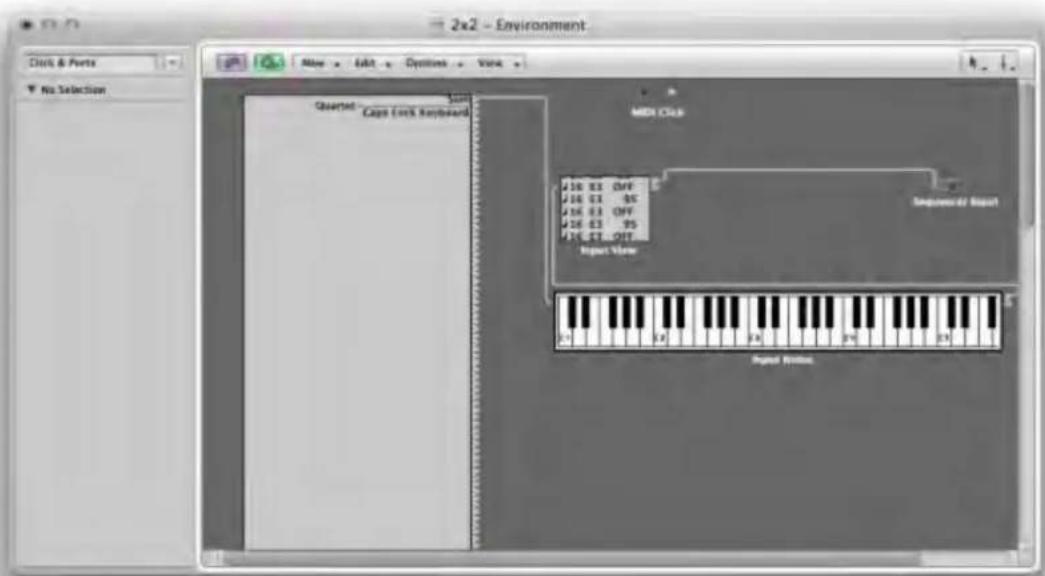
In Pro Tools, choose Setup > MIDI > Input Devices and verify that Quartet appears and is checked.
Operation - Apogee Quartet User's Guide
OS X System Preferences
The OS X System Preferences Sound window provides settings to choose Quartet for Mac sound input and output. If you've already selected Quartet for Mac sound I/O from the automatic dialog box that appeared when you first connected the device, you don't need to do anything else.
Go to the Apple menu > System Preferences. Open the Sound preference window by clicking on the speaker icon.
Click on the Output tab and select Quartet in the Device window.
Click on the Input tab and select Quartet in the Device window.
OS X Audio MIDI Setup
OS X Audio MIDI Setup is found in Applications > Utilities and provides control of Quartet's sample rate and output level, as well as settings to choose Quartet for Mac sound input and output. To control Quartet's output level and muting from AMS or from the Mac keyboard, set Default Output to Quartet.
Setting Sample Rate
Quartet operates at all standard sample rates between 44.1 kHz and 192 kHz. In most cases, the sample rate is set by the audio application with which Quartet is communicating. For example, when using Quartet with GarageBand, Quartet's sample rate is automatically set to 44.1 kHz, to match the GarageBand song's sample rate. For those audio applications that don't include a sample rate setting, such as iTunes, Quartet's sample rate may be set in Audio MIDI Setup or on the System Setup tab of Maestro 2.
Maestro 2 - Apogee Quartet User's Guide
Maestro 2
Apogee's Maestro 2 software provides the most complete control of Quartet, including:
• Control of all settings
• Store/recall of configurations
- Low latency mixing
Devices Sidebar
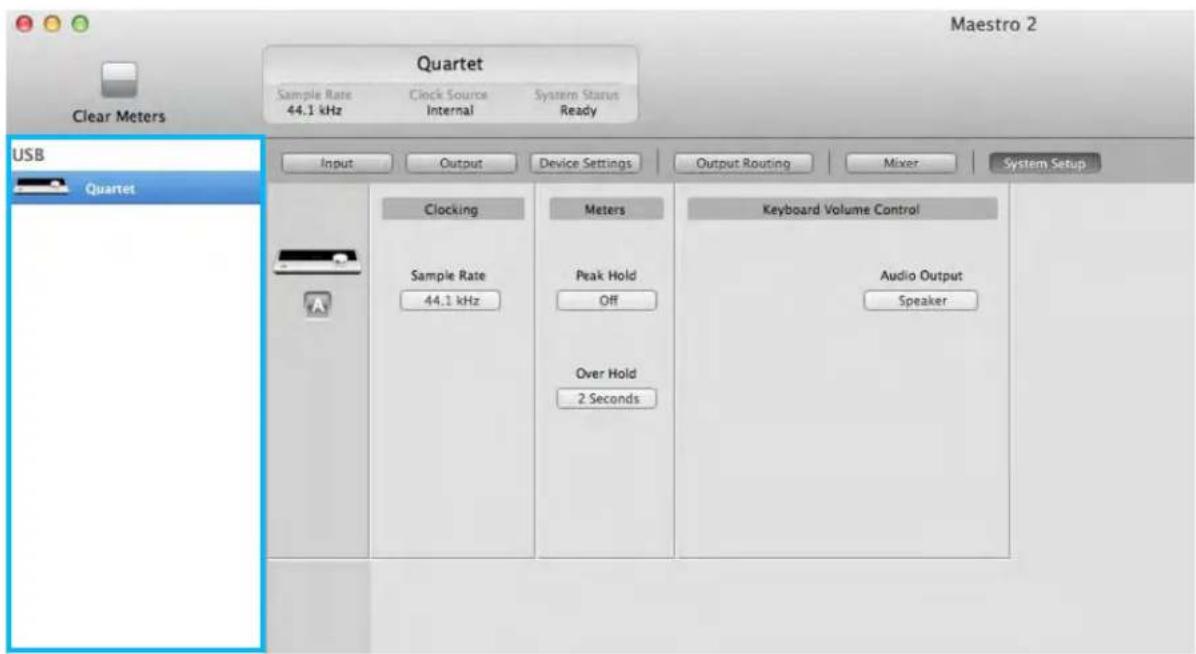
Any Maestro-compatible Apogee interfaces connected to the host computer are displayed in the Devices sidebar, regardless of whether the connection is made via Symphony PCI card, USB or FireWire. Hardware settings are displayed by first selecting one or more interfaces in the Devices sidebar and then clicking on a tab.
Device Icon & ID Button
A device icon and ID button is placed adjacent to each row of parameters to identify the hardware unit to which the row belongs. By clicking on the ID button, the corresponding hardware unit's front panel will illuminate. Each hardware unit is assigned a Peripheral Prefix (A-Z, found in Maestro's Device Settings tab window) which is displayed on the ID button.
Input Tab Window
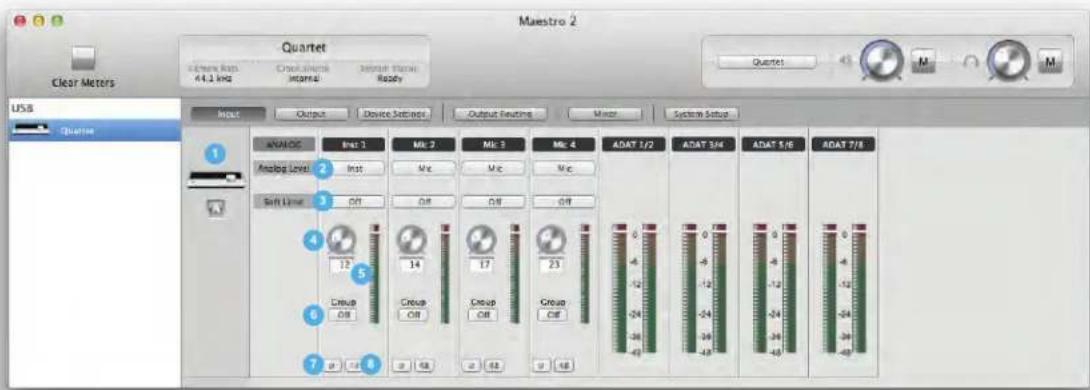
-
Device Icon & ID Button - see the description above.
-
Analog Level - Use this menu to select mic, instrument, or line input.
-
Soft Limit - Use this menu to engage Soft Limit. Soft Limit is Apogee's proprietary analog process for taming transients before A/D conversion. By gently rounding transients in a transparent manner, it's possible to maximize level BEFORE the A/D conversion stage.
Soft Limit is most effective with signals with large transients such as drums, percussion and plucked instruments. Soft Limit may not be the appropriate choice for signals such as bass or organ.
-
Input Level - The gain of each input is controlled with these software knobs. The gain level is indicated in the value box below the knob.
-
Analog Input Meter - This meter displays the level of the analog input after A/D conversion.
-
Group On/Off - Use this drop down menu to assign inputs to 1 of 2 groups. When inputs are assigned to a group, the adjustment of any grouped Input Level changes all Input Levels in the group. This is useful when recording stereo sources such as a piano. If a gain offset is present between inputs when a Group is assigned, this offset is preserved.
-
Phase - Check this box to reverse the polarity of the input signal. Under certain circumstances, when two mics are used on one source, reversing the polarity of one mic may result in a fuller sound. For example, when top and bottom mic'ing a snare drum, a fuller sound is obtained when the polarity of the bottom mic is reversed.
-
48 V / Phantom Power- Engage this button for 48 volts phantom power on the XLR connections. Condenser mics require phantom power to operate.
Output Tab Window
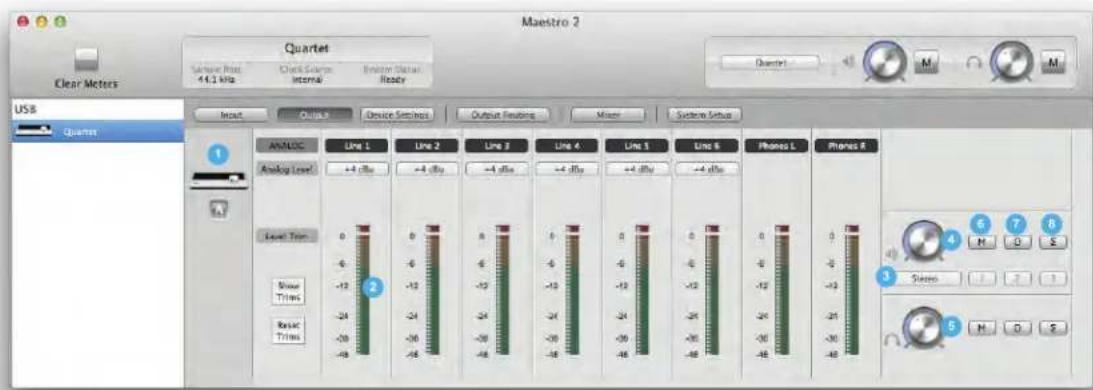
- Device Icon & ID Button - see the description above.
- Analog Output Meter - This meter displays the level of the analog output before D/A conversion, in the range -48 to 0 dBFS.
- Analog Out Format - This drop down menu sets the format of the analog outputs:
Line: all six analog outputs are configured as line outputs; monitor functions such as level control, Mute, Dim and Sum to Mono are disengaged.
Stereo: Outputs 1-2 are configured as speaker outputs (with all monitor functions available) while outputs 3-6 are configured as line outputs.
2 Speaker Sets: Outputs 1-4 are configured as two pairs of stereo outputs. Switch between the stereo pairs with the Speaker Select buttons (or using the top panel Touchpads).
3 Speaker Sets: All six outputs are configured as three pairs of stereo outputs. Switch between the stereo pairs with the Speaker Select buttons (or using the top panel Touchpads).
5.1: All six outputs are configured as speakers outputs, suitable for connection to a 5.1 speaker system.
-
Speaker Out Level - When Analog Out Format is set to Stereo, 2 or 3 Speaker Sets or 5.1, this knob controls the speaker output level.
-
Headphone Level - This knob controls the output level of the right side headphone output.
-
Mute - Click "M" to mute the speaker (or headphone) output.
Quartet's top panel Touchpads may be set to engage Mute on the Speaker outputs, the headphone outputs or both at the same time. See Device Settings Tab Window.
- Dim - Click "D" (for Dim) to lower the speaker (or headphone) output level by 15 dB. This function is a convenient way to briefly lower the playback volume in the speakers or headphones in order to hold a conversation without completely muting the output.
Quartet's top panel Touchpads may be set to engage Dim on the Speaker outputs, the headphone outputs or both at the same time. See Device Settings Tab Window.
- Sum to Mono - Click "Σ" to sum the left and right channels of the speaker (or headphone) outputs to mono. At many points of the production process, this function is useful to check mono compatibility. For example, when recording with a stereo pair of mics, it's always a good idea to sum both channels
Maestro 2 - Apogee Quartet User's Guide
to mono and check for unevenness in the frequency range caused by phase cancellation and reinforcement of particular frequencies. If the sound changes significantly or sounds "hollow" when summed to mono, this may indicate phase issues caused by a less than optimal mic placement. When mixing, it's also a good idea to check mono compatibility. Beyond questions of phase, any masking caused by overlapping frequencies is most easily heard when listening in mono. Try starting a mix with Sum to Mono engaged - once you have something that sounds good, then disengage Sum to Mono and revel at the beautiful stereo mix you've created!
Quartet's top panel Touchpads may be set to engage Sum to Mono on the Speaker outputs, the headphone outputs or both at the same time. See Device Settings Tab Window.
Device Settings Tab Window
- Device Icon & ID Button - see the description above.
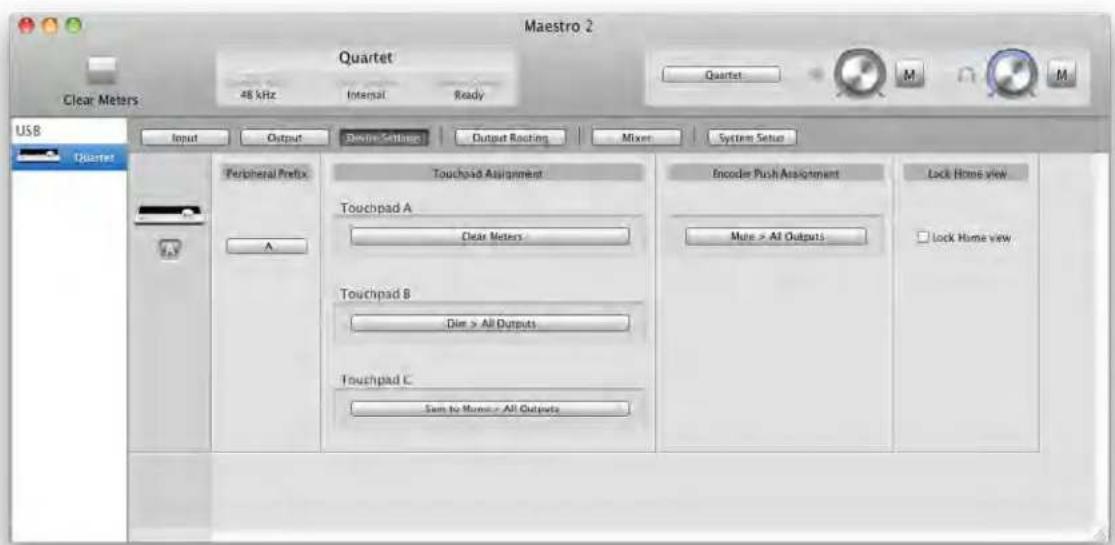
- Peripheral Prefix - Use this drop down menu to assign a letter prefix (A-Z) to each peripheral device displayed in the Devices Sidebar. The letter prefix is included in all graphic representations of the peripheral as well as I/O labels in Maestro and Core Audio compatible applications.
- Touchpad Assignment - Use these menus to select the parameter controlled by the user assignable touchpads.
- Encoder Push Assignment - Use this menu to select the action when clicking the top panel Controller Knob.
- Lock Home view - When Lock Home view is checked, the OLED display doesn't jump to the Detail view when the Controller knob is turned. If Lock Home view is not checked, the OLED display shows details for the selected input or output when the Controller knob is turned.
Maestro 2 - Apogee Quartet User's Guide
Output Routing Tab Window
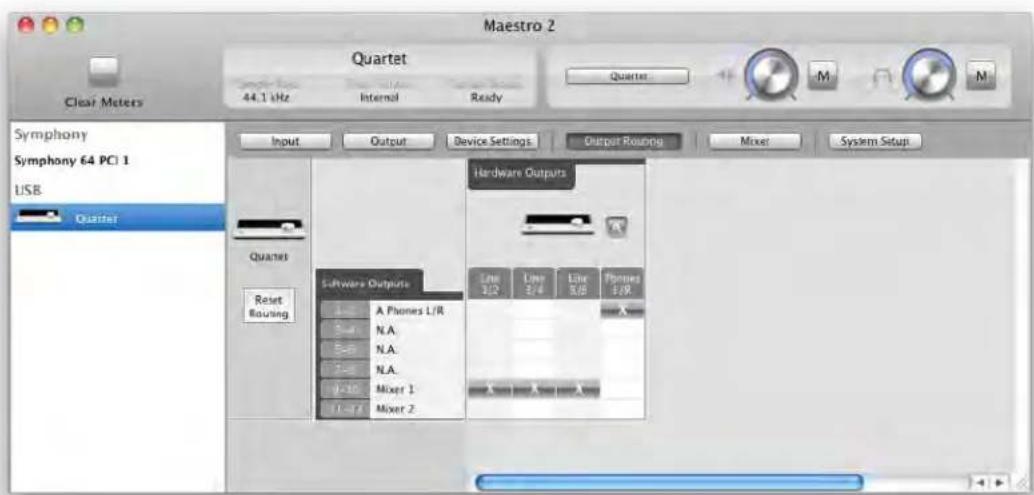
In the Maestro Output Routing tab, route Mixer 1 (or Mixer 2) to Line 1/2. If Analog Out Format is set to 2 or 3 Speaker Sets, route Mixer to all the analog outputs in use, as shown below.
Mixer Tab Window
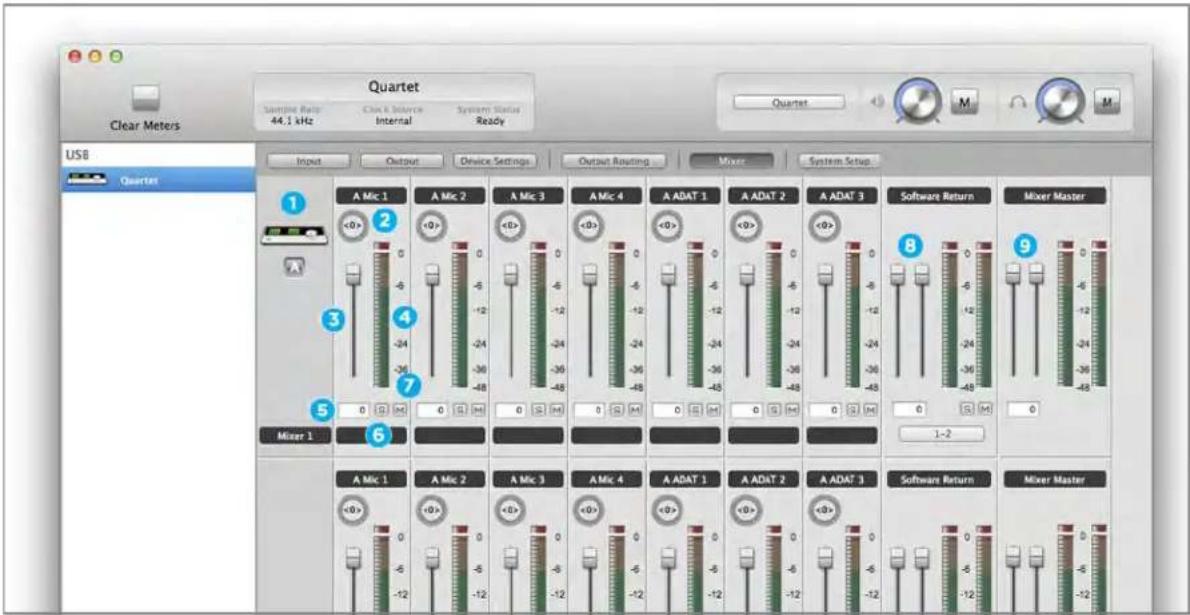
Use the Mixer Tab Window to adjust the Mix of input and output signals as well as configure Low Latency Mixing. Learn more about Low Latency Mixing.
-
Device Icon & ID Button - see the description above.
-
Pan - This rotary knob pans the input signal between the left and right sides of the Maestro mixer's stereo output.
-
Input Level fader - This slider sets the level of the input signal in the Maestro mixer's stereo output.
-
Meter - This bargraph style meter displays the pre-fader input level.
-
Input Level value Window - The Input Level fader value is displayed in this window. Fader values between 6 and -48 may be directly entered.
-
Solo - This button mutes all other channels whose Solo buttons are not engaged.
-
Mute - This button mutes the input channel.
-
Software Return Fader - This stereo input channel provides level control, metering, and mute/solo functions for the signal from the software application containing playback. Match your recording software application's mixer output and the Software Return menu selection. In most cases, the recording software mixer output and Maestro's Software Return will be set to 1-2.
-
Mixer Master - This is the level control and meter for the mixer's output.
System Setup Window
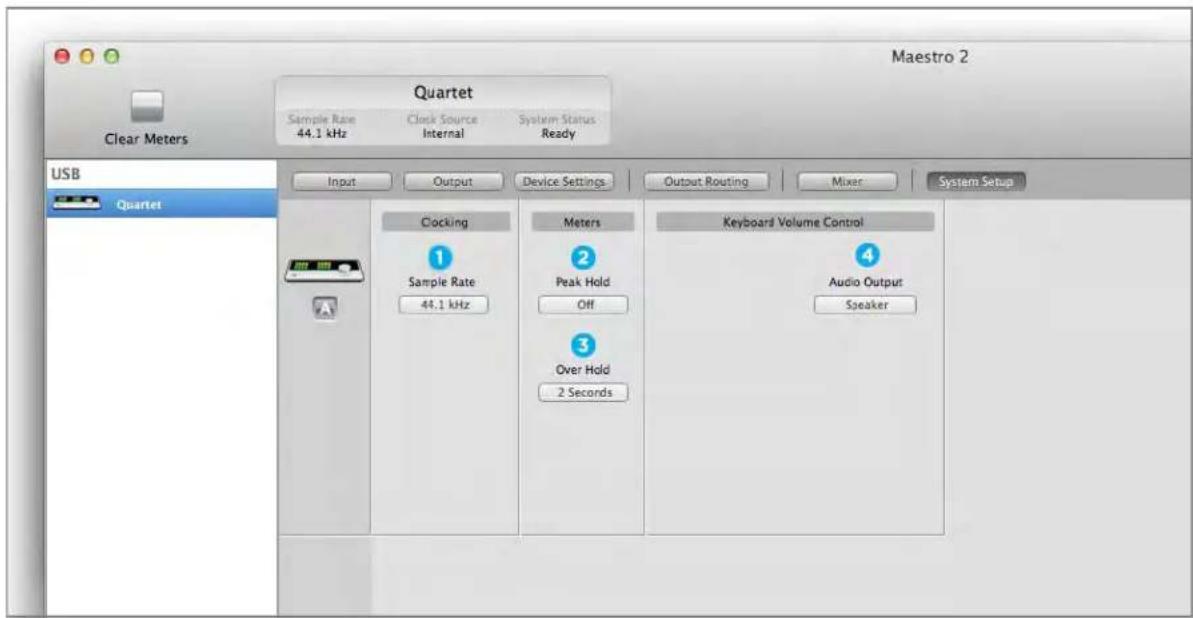
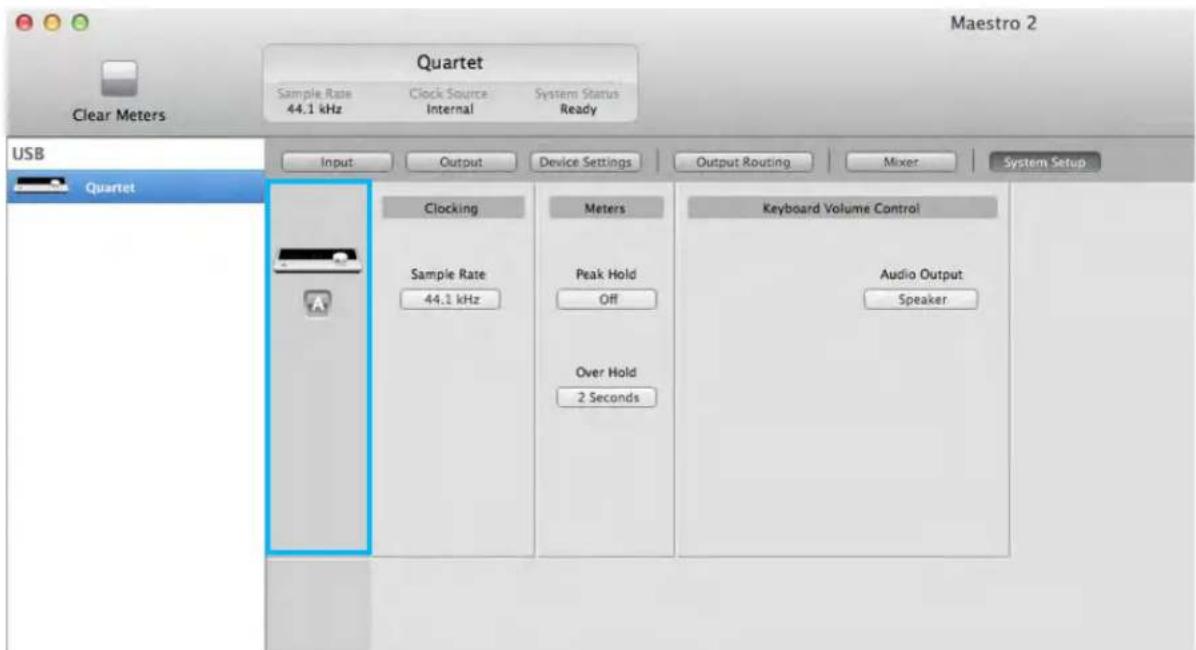
- Sample Rate - This drop down selects the sample rate. Under certain circumstances, (for example, when a DAW session is open) this setting will be overridden by software sample rate settings.
The following settings determine the behavior of the front panel and Maestro software level meters. - Peak Hold - This pop-up menu sets the time that peak indications are held on software and front panel meters.
- Over Hold - This pop-up menu sets the time that over indications are held on software and front panel meters.
- Keyboard Volume Control - The Audio Output drop down menu sets the hardware output that's controlled by the Mac keyboard volume control
Menu Bar Menus
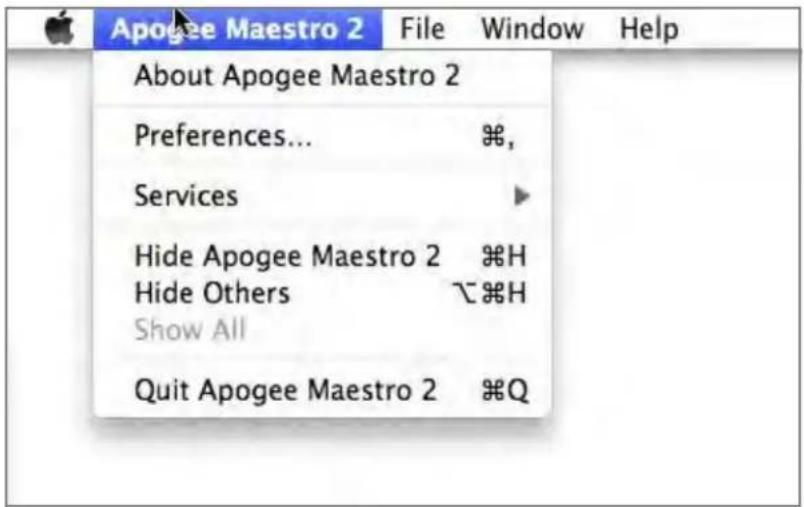
About Apogee Maestro - Choose this menu item to display version information.
Preferences - Choose this menu item to display Maestro's Preference panel.
Check Launch Maestro automatically when connecting a device to launch Maestro when the Mac is started.
Check Display Pop-ups to show top panel encoder adjustments.
Hide Apogee Maestro 2 - Choose this menu item to hide the Maestro application.
Hide Others - Choose this menu item to hide all other open applications.
Show All - If any open applications have been hidden, choose this menu item to reveal all open applications.
Quit Apogee Maestro 2 - Choose this menu item to quit Maestro.
Maestro 2 - Apogee Quartet User's Guide
Menu Bar Menus (continued)
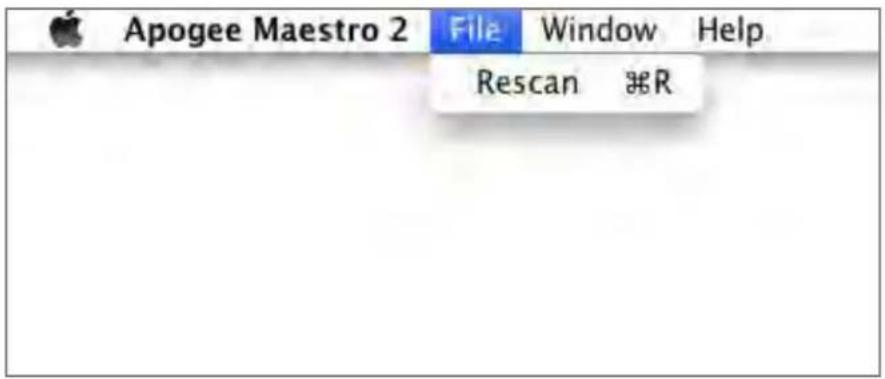
Rescan - Choose this menu item to re-initialize the link between Maestro software and Apogee hardware connected to the Mac, in the case where the hardware is correctly connected and powered on but not detected in Maestro.
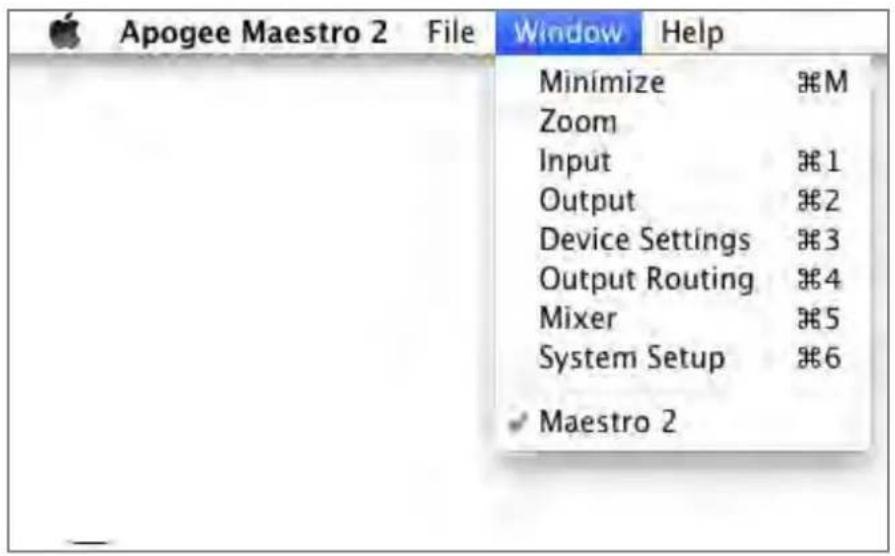
Minimize - Choose this menu item to minimize the Maestro window to the OS X Dock.
Zoom - Choose this menu item to maximize the size of the Maestro window.
Open any of the currently active tabs by typing Command + number.
Maestro 2 - Apogee Quartet User's Guide
Menu Bar Menus (continued)
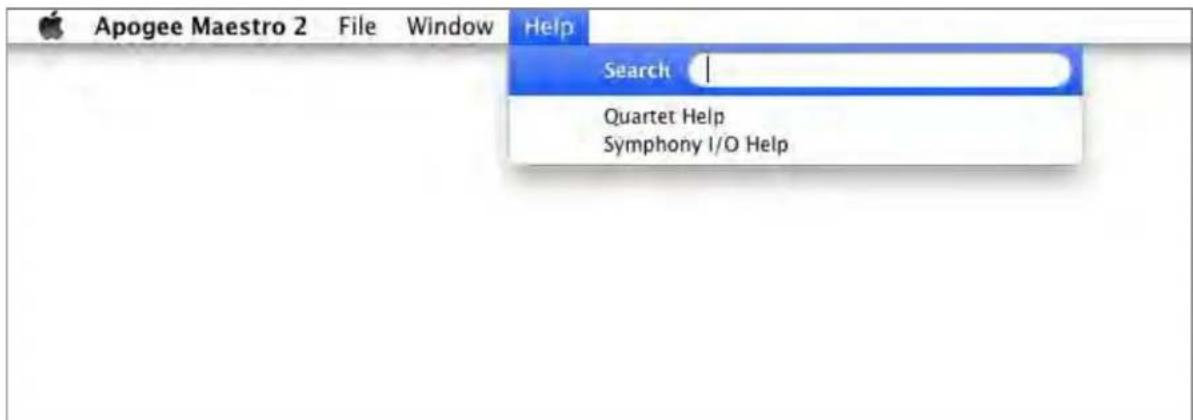
Help - Choose this menu item to open Maestro Help for any Apogee hardware devices connected to your Mac
Maestro 2 - Apogee Quartet User's Guide
Low Latency Mixing
While recording, if you notice a delay between the moment you play or sing a note and when you hear it in your headphones you are experiencing latency. Maestro's low latency mixer may help and can be configured by clicking the Mixer tab in Maestro.
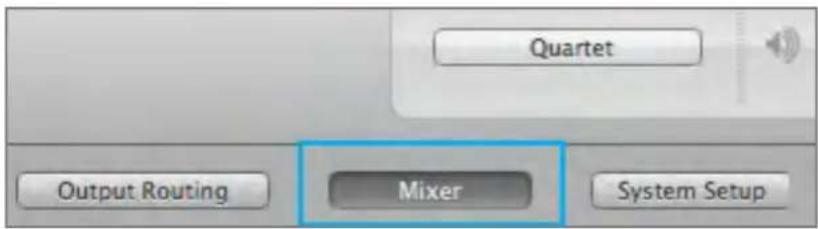
Maestro Low Latency mixing
A bit of background information concerning latency and computer-based digital recording setups will help you better understand these functions.
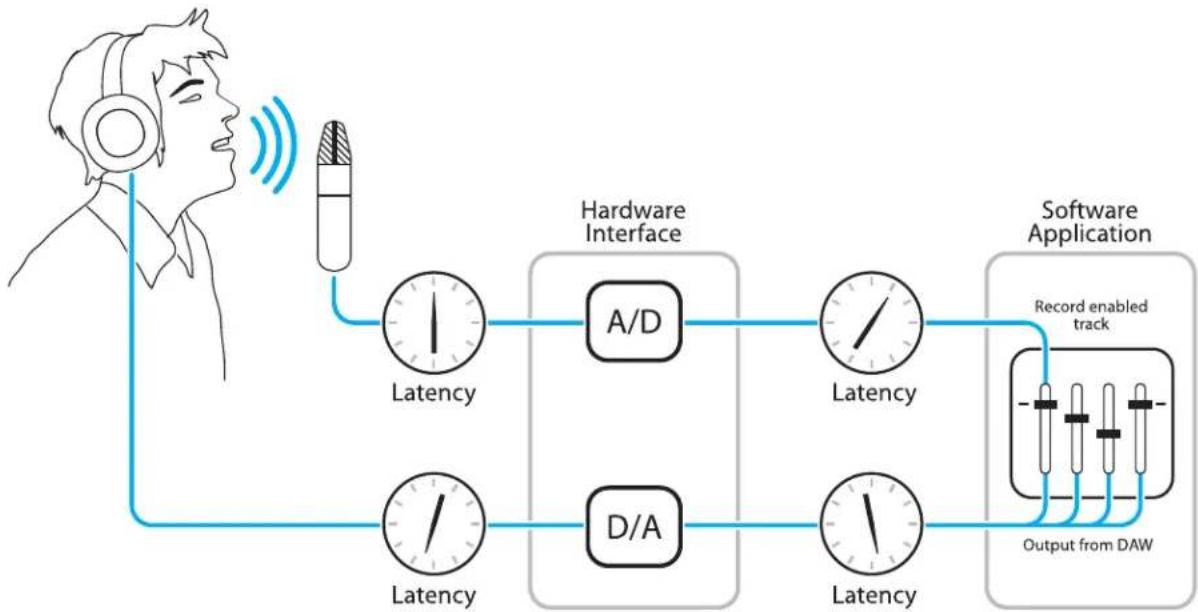
When recording with most computer-based digital audio applications, the delay between the input and output of the recording system often disturbs the timing of the musicians performing. This delay, known as latency, means that the musician hears the notes played a few milliseconds after having actually played them. As anyone who has spoken on a phone call with echo knows, relatively short delays can confuse the timing of any conversation, spoken or musical.
Maestro Low Latency mixing (continued)
flowchart
graph LR
    A["User"] --> B["Headphones"]
    B --> C["Hardware Interface"]
    C --> D["Software Application"]
    D --> E["Record enabled track"]
    E --> F["Output from DAW"]
    C --> G["A/D"]
    C --> H["D/A"]
    C --> I["Latency"]
    C --> J["Latency"]
Figure A
To illustrate the effect of latency, Figure A depicts the typical signal path of a vocal overdub session. A vocalist sings into a microphone, which is routed to an analog to digital converter, then to the audio software application for recording. In the software application, the vocalist's live signal is mixed with the playback of previously recorded tracks, routed to a digital to analog converter, and finally to the vocalist's headphones. A slight delay accumulates at each conversion stage, while a much greater amount of delay occurs through the software application, resulting in the vocalist hearing his performance in headphones delayed by several milliseconds.
Maestro Low Latency mixing (continued)
flowchart
graph LR
    A["User"] --> B["Audio Input"]
    B --> C["Hardware Interface"]
    C --> D["A/D"]
    C --> E["D/A"]
    D --> F["Low Latency Mixer"]
    E --> F
    F --> G["Software Application"]
    G --> H["Record enabled track"]
    H --> I["Output from DAW"]
    I --> J["Latency"]
    J --> C
    style A fill:#f9f,stroke:#333
    style G fill:#ccf,stroke:#333
Figure B
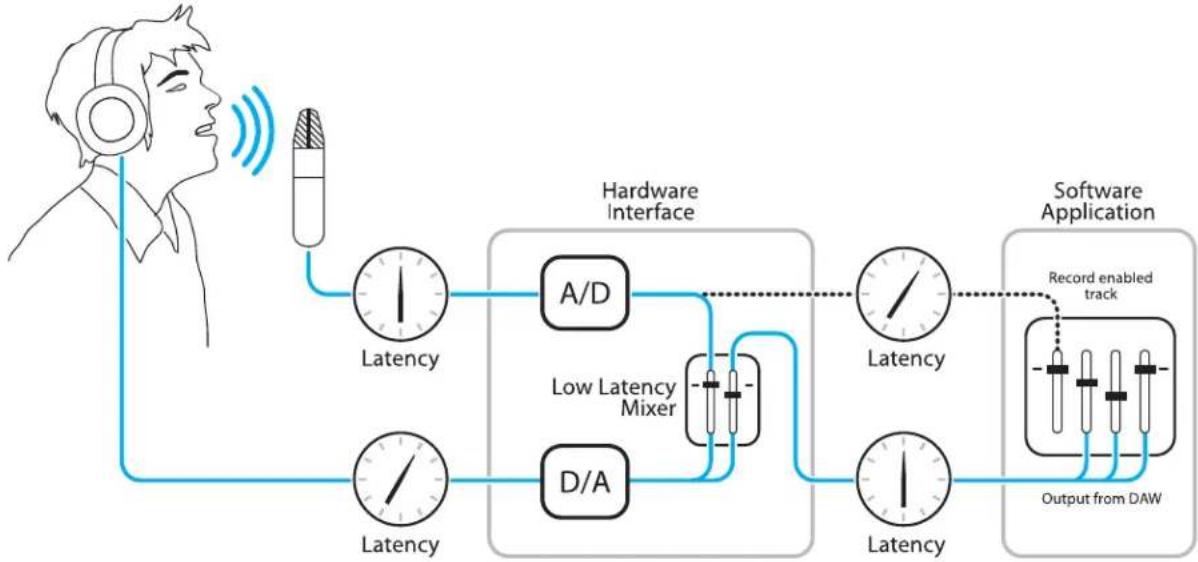
By routing the hardware input directly to the hardware output and mixing in playback as shown in Figure B, it's possible to provide the vocalist a headphone monitoring signal with a much shorter delay.
First, the signal being recorded (in this case, a vocal mic) is split just after the A/D stage and routed to both the software application for recording and directly back to the hardware outputs without going through the latency-inducing software. This creates a low latency path from mic to headphones. Next, a stereo mix of playback tracks is routed to the low latency mixer and combined with the hardware input(s). This allows the performer to hear himself while listening to playback tracks without a confusing delay in order to comfortably record overdubs.
Note that the software application's mixer is used to set a stereo mix of playback tracks while the low latency mixer is used to set the balance between the stereo playback mix and the hardware inputs.
Working with the Maestro Mixer
Do I need the Maestro Mixer?
The Maestro mixer serves to provide a low latency monitoring mix while recording. Therefore if you're using Quartet to listen to iTunes or audio from another program, there's no need to use the mixer.. It's possible that the latency of your particular recording system is low enough to be unnoticed. The system latency is determined by the recording software's buffer setting; if your Mac is powerful enough, it's possible to set the buffer to a lower value (shorter latency) without encountering clicks and pops in the audio output. If the latency doesn't pose a problem while recording, there's no need to employ the low latency mixer.
Recording software settings
Before using the Maestro mixer, it's necessary to change a few settings in your recording software.
Software monitoring
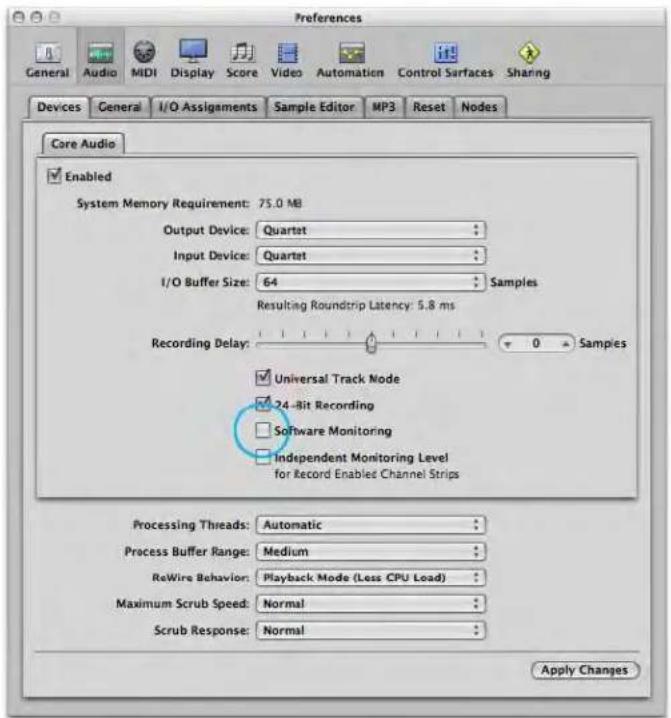
Because the signal to be recorded is monitored through the Maestro mixer, the outputs of software tracks actively recording should be muted - after all, that's the source of the latency. Most software applications provide an option to turn off software monitoring of recording tracks. In Logic Pro, for example, the software monitoring option is found in the same Audio preferences window used to select Quartet as the hardware device (Logic Pro menu > Preferences > Audio). Uncheck the Software Monitoring box.
Maestro 2 - Apogee Quartet User's Guide
Playback mix
In your recording software, set up a mix of all playback tracks and route it to the first pair of outputs. If a master fader controls the global output of the mix, it's suggested to set the fader to 0 dB.
Maestro Output Routing Tab
In the Maestro Output Routing tab, route Mixer 1 (or Mixer 2) to Line 1/2. If Analog Out Format is set to 2 or 3 Speaker Sets, route Mixer to all the analog outputs in use, as shown below.
Maestro 2 - Apogee Quartet User's Guide
Maestro Mixer Settings
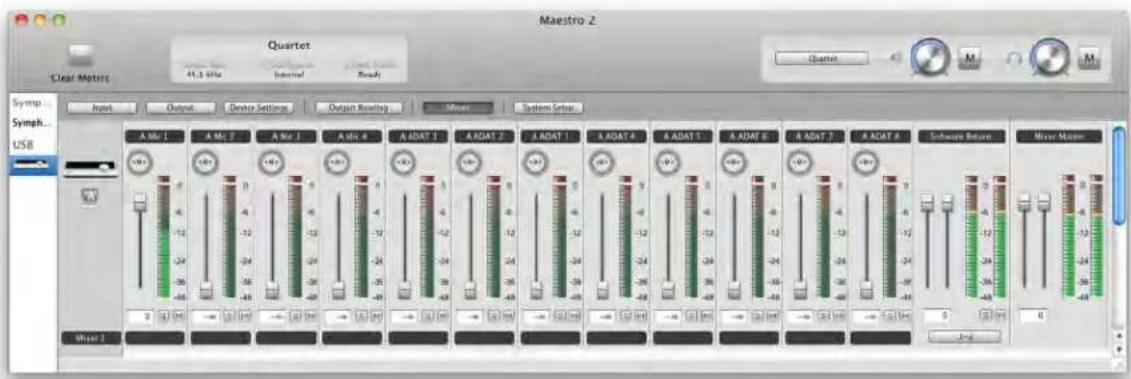
Now select the desired input (Line, Mic or Instrument) and set the Input Level on the Input tab; the signal should be displayed on both the Mixer Input and Mixer Master meters. If the Mixer Input's Over LED lights, reduce the input gain in Maestro Input tab. If the Mixer Master's Over LEDs light, reduce the Input fader.
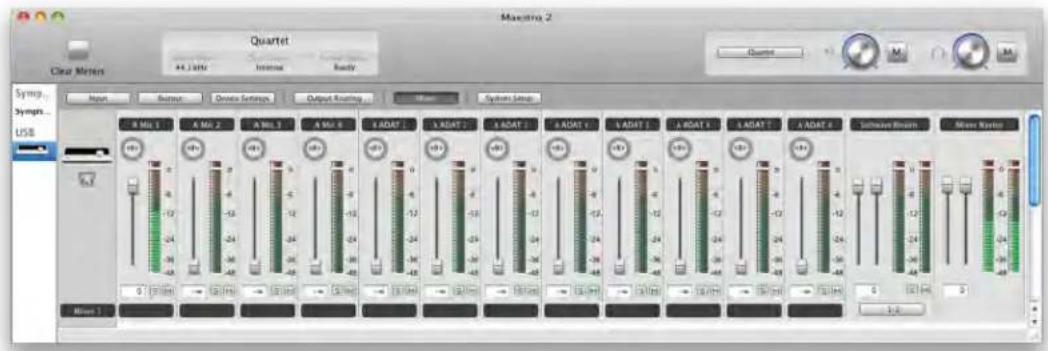
Now start playback in your recording software. The playback signal should be displayed on the Software Return and Mixer Master's meters. Use the Software Return and Input faders to establish your desired balance between the input and playback signals. If you've found a good balance but the Mixer Master's Over LEDs light, reduce the Mixer Master fader.
Software Setup - Apogee Quartet User's Guide
Software Setup
Using Quartet with Logic

IMPORTANT NOTE!
The Apogee Control Panel within Logic is not compatible with Quartet.
Go to the Logic Pro or Logic Express menu and choose Preferences > Audio.
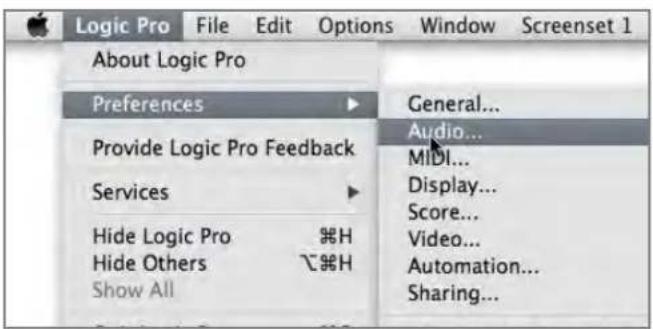
In the Core Audio pane of the Device tab, select Quartet for Output Device and Input Device.
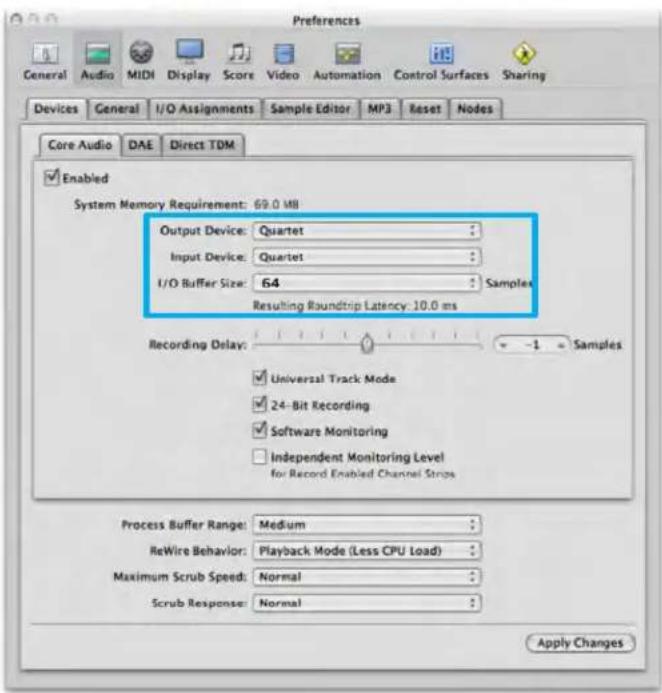
Set the I/O Buffer Size to 64. Click Apply Changes at the bottom of the Preferences window.
Software Setup - Apogee Quartet User's Guide
Using Quartet with Logic (continued)
By selecting Quartet input and output labels in Logic, the labels you see in Logic's Channel Strip input and output slots correspond exactly to Quartet's hardware inputs and outputs, making I/O assignment much easier.
- In Logic, choose Options > Audio > I/O Labels.
- Select the labels in the Provided by Driver column.
- Close the I/O Labels window.
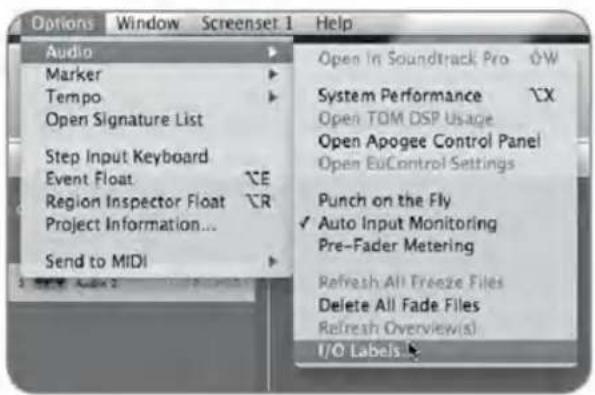
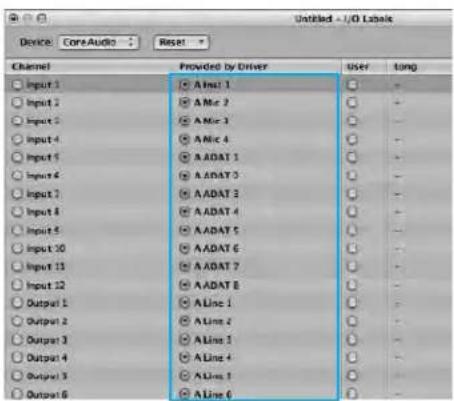
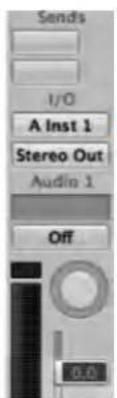

Now Input 1 has the label A Inst 1

Select these labels so Logic's Channel Strip input and output slots correspond exactly with Quartet's hardware inputs and outputs.
Software Setup - Apogee Quartet User's Guide
Using Quartet with Logic (continued)
Now close the Logic Pro Preferences window and select
New > Empty Project > from the File Menu.
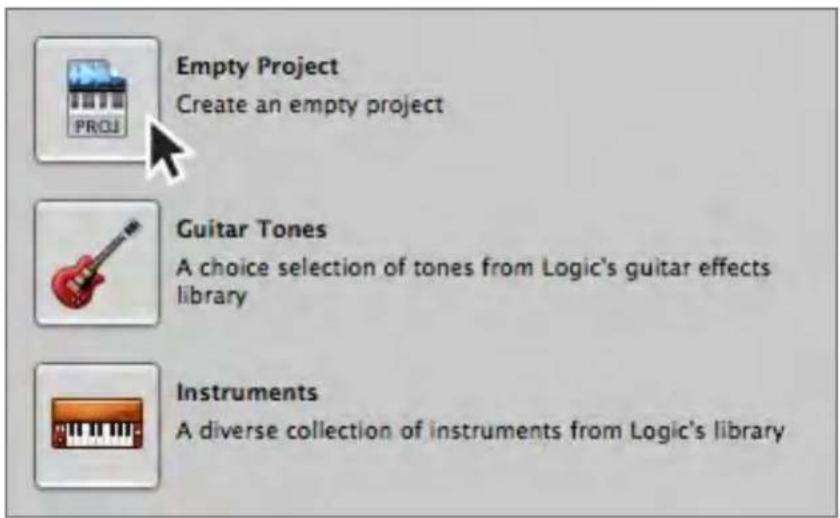
If you are recording a single microphone or instrument, make the following selections in the New Tracks dialog box:
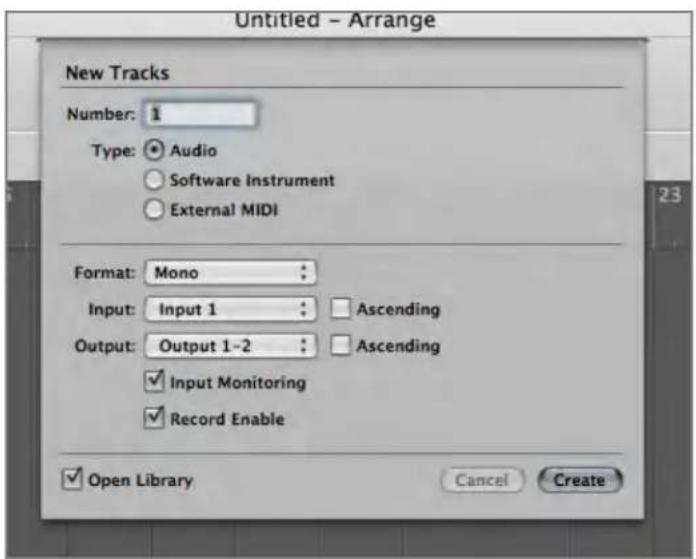
Number: 1
Type: Audio
Format: Mono
Input: Input 1
Output: 1-2
Check the Input Monitoring checkbox
Check the Record Enable checkbox
Software Setup - Apogee Quartet User's Guide
Using Quartet with Logic (continued)
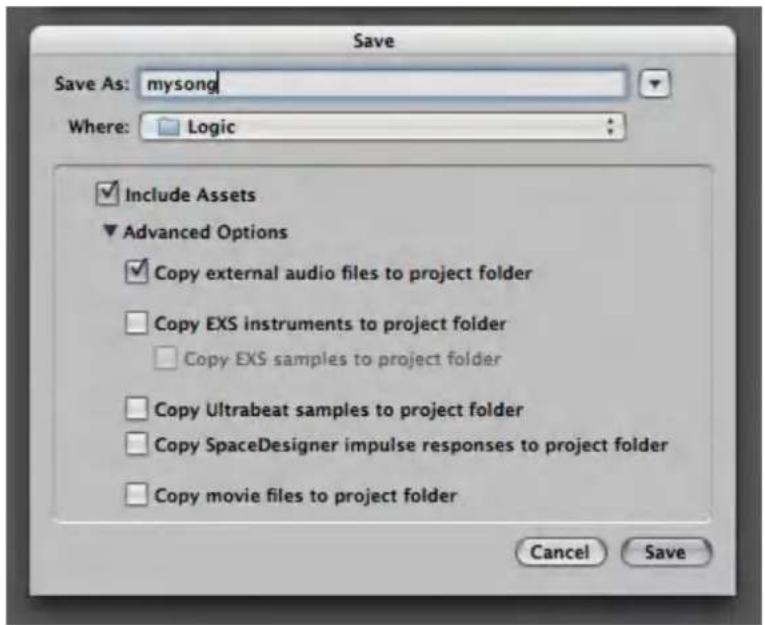
Logic will now ask you to name the project and save in on your hard drive.
Click the Record button in the transport control at the bottom of the Logic window.

You're now recording with Quartet!
Using Quartet with GarageBand

IMPORTANT NOTE!
The Apogee Control Panel within GarageBand is not compatible with Quartet.
If you don't have Quartet connected when you launch GarageBand, when you connect the device, the following message will appear.
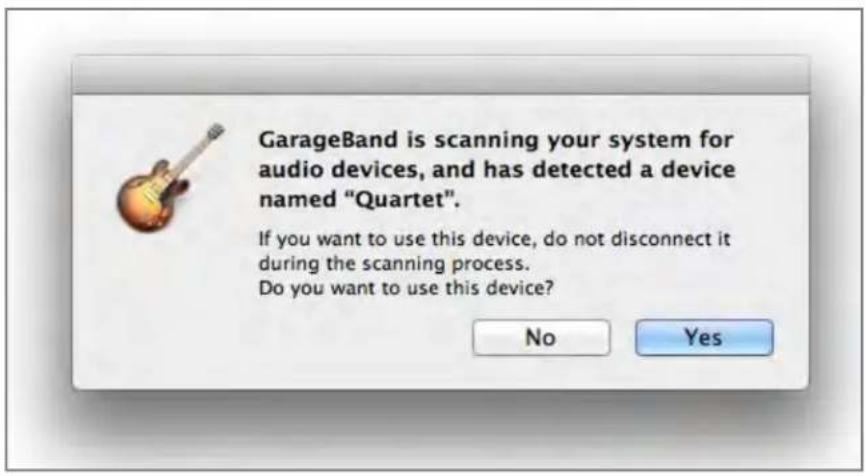
If you have Quartet connected when you launch GarageBand:
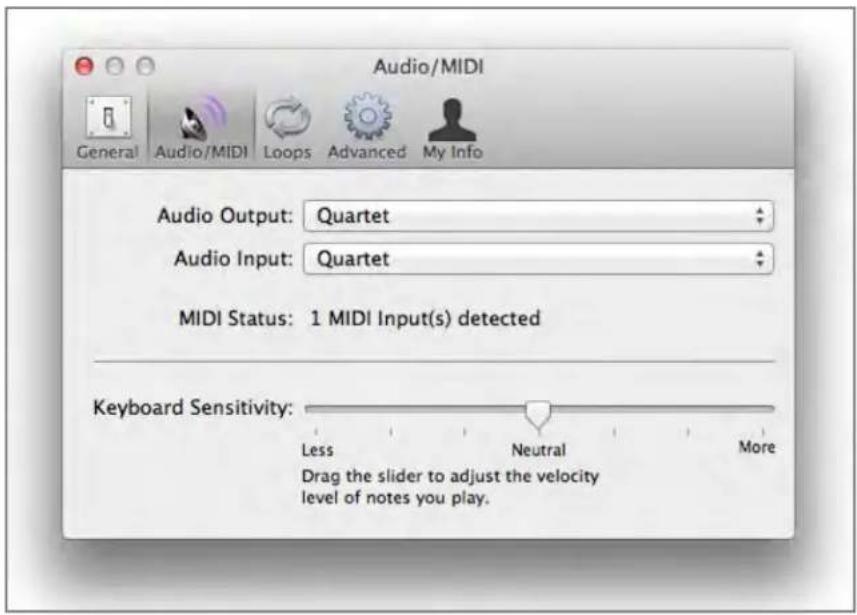
- Choose GarageBand > Preferences.
- Choose Quartet USB for Audio Output and Audio Input
Using Quartet with Avid Pro Tools (9 or greater)
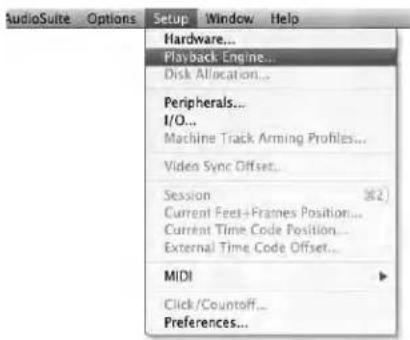
Choose Setup menu > Playback Engine.
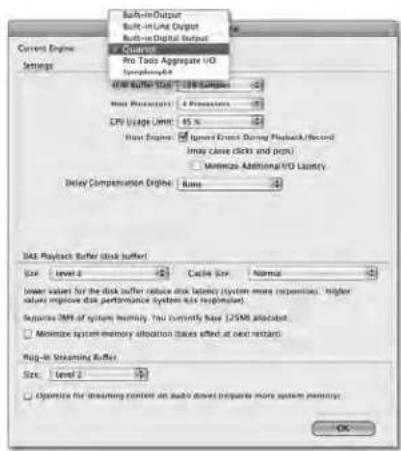
Choose Quartet for Current Engine.
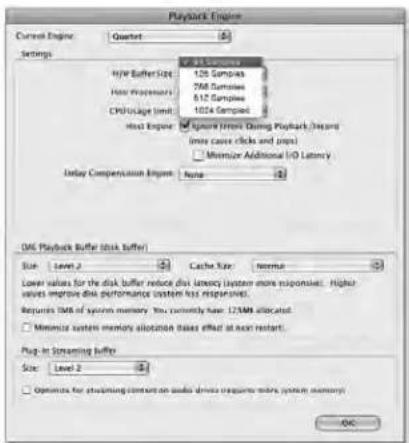
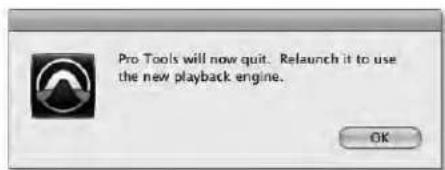
Set the Buffer Size to 64. Click OK.
Using Quartet with Ableton Live
Choose Live > Preferences
Click on the Audio tab. Select CoreAudio in the Driver Type menu. Select Quartet in both the Audio Input Device and Audio Output Device menus. Set Buffer Size to 128. Close the Preferences window after making settings.
Using Quartet with Apple Final Cut Pro
Choose Final Cut Pro > Audio/Video Settings.
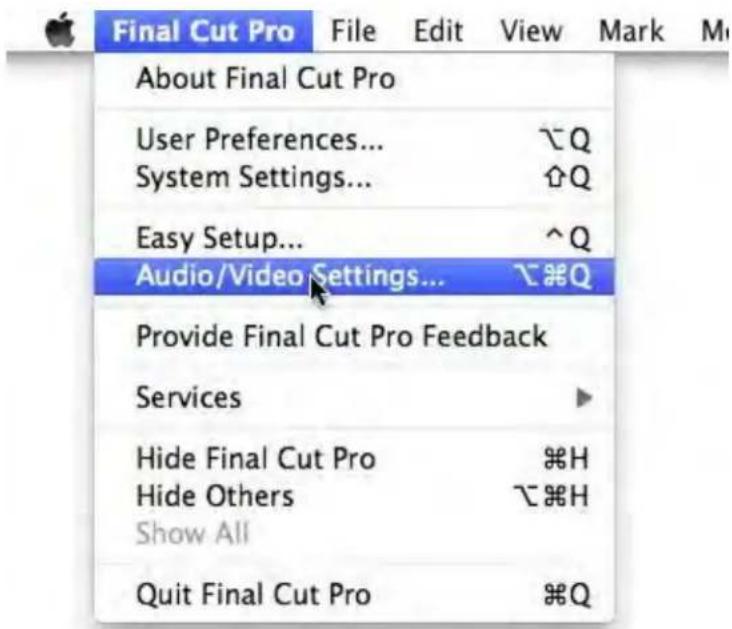
Click on the A/V Devices tab. Select Quartet in the Audio menu. Click OK.
Using Quartet with Steinberg Nuendo
Choose Devices > Device Setup
In the Devices window, click on VST Audio System. Select Quartet in the ASIO menu.
Once Quartet is recognized by Nuendo, select Quartet in the Devices window. Click on Control Panel.
In the ASIO Settings pop-up, set Buffer Size to 128 and click OK.
In the Device Setup window, click OK.
Troubleshooting

Looking for answers? Ask the knowledgebase
www.apogeedigital.com/knowledgebase
Quartet FAQs
Q: When I press the Speaker touchpad, nothing happens. Why?
A: When the Analog Out Format is set to Line, the Speaker touchpad is disabled.
Q: I've connected my guitar, but I'm not getting any input. What should I check?
A: On the Input tab of Maestro, be sure to set Analog Level to Instrument (Inst).
Q: I'm not getting any output from audio software applications. What should I check?
A: If you have chosen Mixer for the output then the Software Return fader must be raised to send audio software outputs to Quartet's outputs.
Q: I want Maestro to open automatically each time I connect Quartet. What should I set?
A: Open Maestro > Preferences and check the Launch Maestro automatically when connecting a device checkbox.
Q: Are the headphone and line outputs independent from the Main outs?
A: Yes! Headphone outputs may be independently routed from software outputs 1-2, 3-4, 5-6 or 7-8. Speaker and headphone output levels are set independently.
Q: How do I reset Quartet?
A: To reset Quartet unplug the USB cable, hold down Multi-Function Controller knob, reconnect the USB cable and maintain the controller in the down position until the unit has completely initialized.
Troubleshooting - Apogee Quartet User's Guide
Symptom: The audio quality is compromised (distortion, choppy audio, "buzzy" audio).
Solution: There are several remedies for audio that is distorted, choppy or otherwise compromised:
- Hot-plug Quartet
- Toggle sample rate (in your DAW or, in the case of iTunes, Audio MIDI Setup)
- Reload DAW driver (for example, in Logic choose Logic Pro > Preferences > Audio. Click on the Devices tab, then the Core Audio tab. Uncheck Enabled, then re-check it.
- In iTunes, stop then re-start audio playback.
Symptom: Quartet isn't recognized in System Preferences, Maestro or my DAW application.
Solution: Here are the steps, in order, to check if Quartet isn't recognized: Open System Profiler by choosing About This Mac under the Apple menu and clicking More Info...
- In System Profilers Contents column, open the Hardware disclosure triangle and click USB.
- Find Quartet USB in the USB Device Tree and click on it to display the device's properties. Verify that the properties are the same as shown below:
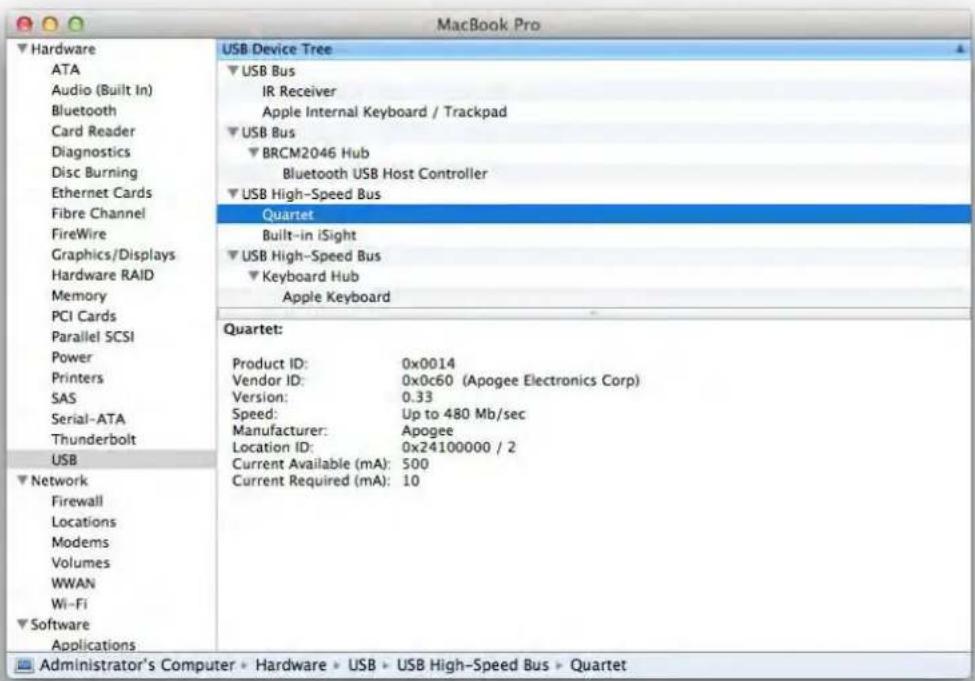
If Quartet doesn't appear in the USB Device Tree
- Hot-plug Quartet
- Try a different USB cable or try a different USB port on your Mac.
Troubleshooting - Apogee Quartet User's Guide
Further Troubleshooting Resources
If you still haven't found a resolution to your issue, Apogee provides a wide range of resources
Apogee Website
For any questions concerning product information, please visit our website: www.apogeedigital.com For more technical information, including FAQs, User Guides and downloads, please visit the support section: www.apogeedigital.com/support/
Apogee Support
Apogee's Support department may be contacted via email, telephone or Live chat. In order to provide you with the most efficient technical support, we ask you to register your Apogee product before contacting us, at: apogeedigital.com/account.php. Also, it's best to have the Apogee product on-hand and operational when calling Support.
Phone support is available from 7am to 7pm (19h00) Pacific Standard Time at: +1 (310) 584-9394 Live chat is available from 10am to 4pm (16h00) Pacific Standard Time - please go to support.apogeedigital.com
Fax Apogee Support at: +1 310 584-9385
Apogee Product Repair
If, for some reason, your Apogee product requires repair, please contact Apogee Support to obtain a Return Materials Authorization (RMA).
Apogee Technical Support:
www.apogeedigital.com/support/
Any Apogee product shipped to us without a clearly indicated RMA number must be refused delivery.
Specifications
| Features | Quartet |
| Computer Connectivity | USB 2.0 High Speed |
| Roundtrip Latency performance | 32 buffer @ 96kHz = 3.6 ms64 buffer @ 44.1kHz = 5.8 ms |
| Power | Supplied DC power supply) |
| Bit resolution/sample rate | 24-bit/44.1-192kHz |
| Input Channels | 4 Analog, 8 ADAT/SMUX Optical |
| Output Channels | 8 6 Line/Speaker output + stereo headphone outputs |
| Speaker Outputs | Balanced |
| Independent Headphone Out | √ |
| Microphone Preamps | 4 |
| Microphone Preamp Gain | up to 75dB |
| Line Level Input | +4 dBu, -10 dBV |
| OLED Display | 2 |
| Touch Pads | 6 single function, 3 software assignable |
| Metering | Full Color OLED |
| Phantom Power | √ |
Specifications - Apogee Quartet User's Guide
| Phase Invert | √ |
| Soft Limit | √ |
| Group Inputs | 2 groups |
| Mute Outputs | √ |
| Sum to Mono | √ |
| Dim Outputs | √ |
| Core Audio Compatible | √ |
System Requirements:
• Computer: Intel Mac 1.5GHz or faster
• Memory: 2 GB RAM minimum, 4 GB recommended
• OS: 10.6.8, 10.7.4 or greater
- Connection: Any available USB port on a Mac
• Power: DC Power supply included
Warranty & Notifications
Registration and Warranty Information
To receive free tech support, important information and product updates first...
Register your new Apogee product here:
www.apogeedigital.com/register/
If you do so, Apogee can contact you with any update information. As enhancements and upgrades are developed, you will be contacted at the registration address. Firmware updates are free for the first year of ownership unless otherwise stated.
APOGEE ELECTRONICS CORPORATION warrants this product to be free of defects in material and manufacture under normal use for a period of 12 months. The term of this warranty begins on the date of sale to the purchaser. Units returned for warranty repair to Apogee or an authorized Apogee warranty repair facility will be repaired or replaced at the manufacturer's option, free of charge.
ALL UNITS RETURNED TO APOGEE OR AN AUTHORIZED APOGEE REPAIR FACILITY MUST BE PREPAID, INSURED AND PROPERLY PACKAGED, PREFERABLY IN THEIR ORIGINAL BOX.
Apogee reserves the right to change or improve design at any time without prior notification. Design changes are not implemented retroactively, and the incorporation of design changes into future units does not imply the availability of an upgrade to existing units. This warranty is void if Apogee determines, in its sole business judgment, the defect to be the result of abuse, neglect, alteration or attempted repair by unauthorized personnel. The warranties set forth above are in lieu of all other warranties, expressed or implied, and Apogee specifically disclaims any and all implied warranty of merchantability or of fitness for a particular purpose. The buyer acknowledges and agrees that in no event shall the company be held liable for any special, indirect, incidental or consequential damages, or for injury, loss or damage sustained by any person or property, that may result from this product failing to operate correctly at any time.
USA: Some states do not allow for the exclusion or limitation of implied warranties or liability for incidental or consequential damage, so the above exclusion may not apply to you. This warranty gives you specific legal rights, and you may have other rights which vary from state to state.
Service Information
The Quartet contains no user-serviceable components; refer to qualified service personnel for repair or upgrade. Your warranty will be voided if you tamper with the internal components. If you have any questions with regard to the above, please contact Apogee.
In the event your Quartet needs to be upgraded or repaired, it is necessary to contact Apogee prior to shipping, and a Return Materials Authorization (RMA) number will be assigned. This number will serve as a reference for you and helps facilitate and expedite the return process. Apogee requires that shipments be pre-paid and insured — unless otherwise authorized in advance.
IMPORTANT: ANY SHIPMENT THAT IS NOT PRE-PAID OR IS SENT WITHOUT AN RMA NUMBER WILL NOT BE ACCEPTED.
Warnings
FCC warning
This equipment has been tested and found to comply with the limits for a Class A digital device, pursuant to Part 15 of the FCC rules. These limits are designed to provide reasonable protection against harmful interference when operated in a commercial environment. This equipment generates, uses, and can radiate radio frequency energy and, if not installed and used in accordance with the instruction manual, may cause harmful interference to radio communications. Operation of this equipment in a residential area is likely to cause harmful interference, in which case the user will be required to take whatever measures necessary to correct the interference at his own expense.
Copyright Notice
Quartet is a computer-based device, and as such contains and uses software in ROMs. This software, and all related documentation, including this User's Guide contain proprietary information which is protected by copyright laws. All rights are reserved. No part of the software and its related documentation may be copied, transferred, or modified. You may not modify, adapt, translate, lease, distribute, resell for profit or create derivative works based on the software and its related documentation or any part thereof without prior written consent from Apogee Electronics Corporation, U.S.A.
Software Notice
Redistribution and use in source and binary forms, with or without modification, are permitted provided that the following conditions are met:
- Redistributions of source code must retain the above copyright notice, this list of conditions and the following disclaimer.
- Redistributions in binary form must reproduce the above copyright notice, this list of conditions and the following disclaimer in the documentation and/or other materials provided with the distribution. THIS SOFTWARE IS PROVIDED BY THE COPYRIGHT HOLDERS AND CONTRIBUTORS "AS IS" AND ANY EXPRESS OR IMPLIED WARRANTIES, INCLUDING, BUT NOT LIMITED TO, THE IMPLIED WARRANTIES OF MERCHANTABILITY AND FITNESS FOR A PARTICULAR PURPOSE ARE DISCLAIMED. IN NO EVENT SHALL THE COPYRIGHT OWNER OR CONTRIBUTORS BE LIABLE FOR ANY DIRECT, INDIRECT, INCIDENTAL, SPECIAL, EXEMPLARY, OR CONSEQUENTIAL DAMAGES (INCLUDING, BUT NOT LIMITED TO, PROCUREMENT OF SUBSTITUTE GOODS OR SERVICES; LOSS OF USE, DATA, OR PROFITS; OR BUSINESS INTERRUPTION) HOWEVER CAUSED AND ON ANY THEORY OF LIABILITY, WHETHER IN CONTRACT, STRICT LIABILITY, OR TORT (INCLUDING NEGLIGENCE OR OTHERWISE) ARISING IN ANY WAY OUT OF THE USE OF THIS SOFTWARE, EVEN IF ADVISED OF THE POSSIBILITY OF SUCH DAMAGE.
Declarations of Conformity
This device complies with Part 15 of the FCC Rules. Operation is subject to the following two conditions:
- This device may not cause harmful interference
- This device must accept any interference received, including interference that may cause undesired operation.
This equipment has been tested and found to comply with the limits of a Class B digital device, pursuant to Part 15 of the FCC Rules. These limits are designed to provide reasonable protection against harmful interference in a residential installation. This equipment generates, uses and can radiate radio frequency energy and, if not installed and used in accordance with the instructions, may cause harmful interference to radio communications. If this equipment does cause harmful interference to radio or television reception, which can be determined by turning the equipment off and on, the user is encouraged to try to correct the interference by one or more of the following measures:
- Re-orient or relocate the receiving antenna.
- Increase the separation between the equipment and receiver.
- Connect the equipment into an outlet on a different circuit from that to which the receiver is connected.
- Consult the dealer or an experienced radio/TV technician for help.
NOTE: The use of non-shielded cable with this equipment is prohibited.
CAUTION: Changes or modifications not expressly approved by the manufacturer responsible for compliance could void the user's authority to operate the equipment.
Warranty & Notifications - Apogee Quartet User's Guide
Apogee Electronics Corp.
1715 Berkeley Street
Santa Monica, CA 90404, USA
Industry Canada Notice
Declaration of Conformity – CE
Apogee Electronics Corporation hereby declares that the product, the Quartet, to which this declaration relates, is in material conformity with the following standards or other normative documents:
• EN50081-1/EN55022; 1995
• EN50082-1/IEC 801-2, 3, 4; 1992
following the provisions of:
• 73/23/EEC – Low Voltage Directive
89/336/EEC - EMC Directive
Declaration of Conformity – Japan
Apogee Electronics Corporation hereby declares that Quartet, to which this declaration relates, is in material conformity with the VCCI Class A standard.
Declaration of Conformity – Australia
Apogee Electronics Corporation hereby declares that the Quartet is in material conformity with AN/NZS standard requirements.


- Apogee Quartet
- User's Guide
- Contents
- QuickStart 6
- Introduction 6
- Package contents 7
- Quartet panel tour 8
- Operation 17
- Maestro 2 33
- Contents - Apogee Quartet User's Guide
- Low Latency Mixing 45
- Applications 51
- Using Quartet with Steinberg Nuendo 59
- Troubleshooting 60
- Specifications 63
- Warranty & Notifications 65
- Registration and Warranty Information 65
- QuickStart
- Introduction
- Quartet
- Professional audio interface and studio control center for Mac
- What you can do with Quartet:
- Package contents
- The following items are included in the Quartet box:
- Quartet panel tour
- Top panel
- Display and touchpad tour
- Connecting to your Mac
- System Requirements
- Install Quartet Software
- Choosing Quartet for Mac Sound I/O
- Connect to Headphones or Speakers
- Check Audio Playback in iTunes
- Adjusting Volume
- Speaker Output level
- Headphone Output level
- Configuring the Input
- Operation
- Controller Knob
- Quartet's OLED Displays
- Adjusting Input & Output Levels
- Input level
- Multiple Speaker Set Operation
- Speaker Sets
- Speaker Sets
- Custom Output Routing
- Assignable Touchpads
- Mute outputs
- Dim outputs
- Sum to Mono
- Engage Speaker Set
- Clear Meters
- MIDI Input/Output
- To setup a MIDI device with Quartet:
- OS X System Preferences
- OS X Audio MIDI Setup
- Setting Sample Rate
- Maestro 2
- Apogee's Maestro 2 software provides the most complete control of Quartet, including:
- Devices Sidebar
- Device Icon & ID Button
- Input Tab Window
- Output Tab Window
- Maestro 2 - Apogee Quartet User's Guide
- Device Settings Tab Window
- Output Routing Tab Window
- Mixer Tab Window
- System Setup Window
- Menu Bar Menus
- Menu Bar Menus (continued)
- Low Latency Mixing
- Maestro Low Latency mixing
- Working with the Maestro Mixer
- Do I need the Maestro Mixer?
- Recording software settings
- Software monitoring
- Playback mix
- Maestro Output Routing Tab
- Maestro Mixer Settings
- Software Setup
- Using Quartet with Logic
- IMPORTANT NOTE!
- Using Quartet with Logic (continued)
- Number: 1
- Using Quartet with GarageBand
- Using Quartet with Avid Pro Tools (9 or greater)
- Using Quartet with Ableton Live
- Choose Live > Preferences
- Using Quartet with Apple Final Cut Pro
- Using Quartet with Steinberg Nuendo
- Choose Devices > Device Setup
- Troubleshooting
- Looking for answers? Ask the knowledgebase
- Quartet FAQs
- Symptom: The audio quality is compromised (distortion, choppy audio, "buzzy" audio).
- Symptom: Quartet isn't recognized in System Preferences, Maestro or my DAW application.
- Further Troubleshooting Resources
- Apogee Website
- Apogee Support
- Apogee Product Repair
- Specifications
- System Requirements:
- Warranty & Notifications
- Registration and Warranty Information
- ALL UNITS RETURNED TO APOGEE OR AN AUTHORIZED APOGEE REPAIR FACILITY MUST BE PREPAID, INSURED AND PROPERLY PACKAGED, PREFERABLY IN THEIR ORIGINAL BOX.
- Service Information
- Warnings
- FCC warning
- Copyright Notice
- Software Notice
- Declarations of Conformity
- Industry Canada Notice
- Declaration of Conformity – CE
- Declaration of Conformity – Japan
- Declaration of Conformity – Australia
Brand : Apogee
Model : Quartet
Category : Hi-Fi System