
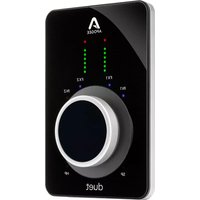
One - Hi-Fi System Apogee - Free user manual and instructions
Find the device manual for free One Apogee in PDF.


| Product Type | Portable USB Audio Interface |
| Computer Connectivity | USB 2.0 High Speed |
| Sample Rate | 44.1, 48, 88.2, 96 kHz |
| Bit Depth | 24-bit |
| Input Channels | 2 analog inputs (1 XLR mic, 1/4" instrument) |
| Output Channels | Stereo headphone/speaker output (1/8") |
| Microphone Preamps | 2 |
| Microphone Preamp Gain | Up to 62 dB |
| Phantom Power | Yes (48V, selectable) |
| Built-in Microphone | Yes, omnidirectional |
| Metering | LED segments on device, software meters in Maestro |
| Power Options | USB bus power via Mac; external DC power supply or 2 AA batteries for iPad |
| Battery Life (AA) | Playback: ~3h40min (NiMH), Recording: ~2h10min (NiMH) |
| Compatible Software | Core Audio compatible (GarageBand, Logic Pro X, Pro Tools, Ableton Live, etc.) |
| Control Software | Apogee Maestro (Mac and iOS) |
| Roundtrip Latency | 4.4 ms at 96 kHz (32 buffer), 7.0 ms at 44.1 kHz (64 buffer) |
| Breakout Cable | Included: XLR mic input and 1/4" instrument input |
| Weight | Approx. 0.5 lbs (0.23 kg) |
| Dimensions (H x W x D) | Approx. 1.5 x 4.5 x 6.0 inches (38 x 114 x 152 mm) |
| Warranty | 12 months limited warranty |
| Registration | Recommended at www.apogeedigital.com/register |
Frequently Asked Questions - One Apogee
User questions about One Apogee
0 question about this device. Answer the ones you know or ask your own.
Ask a new question about this device
Download the instructions for your Hi-Fi System in PDF format for free! Find your manual One - Apogee and take your electronic device back in hand. On this page are published all the documents necessary for the use of your device. One by Apogee.
USER MANUAL One Apogee
natural_image
Two APOGEE phone devices with control knobs and speaker lights, one white and one black (no visible text or symbols on device surfaces)Apogee ONE: For Mac and iPad & Mac
User's Guide
Spring 2016
Contents
Overview 3....
Introduction 3
Package contents 4
ONE panel tour 5
Getting Started ....7
Connecting to your Mac 7
Connecting to your iPad 9
Adjusting Input & Output Levels 11
Maestro Software 12
Maestro for Mac 13
Maestro for iOS 20
Operation 25
Using ONE's built-in mic 25
What sample rate should I record at? 25
Can I record my session on my Mac's (startup) hard drive? 25
How do I set a recording level? 26
What is phantom power? 26
How do I set the input control of my powered speakers? 27
How do I set my software's I/O buffer? 27
Maestro Low Latency Mixing 28
Software Setup 30
Additional Support....37
Specifications....38
Warranty & Notifications ....39
Registration and Warranty Information 39
Introduction
Thank you for purchasing ONE. This User's Guide describes how to set up ONE with your Mac or iOS device, connect headphones to play back music and record your own creations with the built-in mic, an external mic or an electric instrument.
ONE for Mac and ONE for iPad & Mac
The Swiss Army Knife for Personal Recording and Audio Production.
Apogee ONE is an all-in-one portable, USB audio interface that gives you everything you need to make professional recordings on the go. Connect a microphone, guitar or use ONE's exceptional built-in omnidirectional microphone to easily capture your music without compromise. ONE even lets you record with a microphone (built-in or external) and guitar simultaneously. Using Apogee's industry-leading AD/DA conversion and mic preamp technology, ONE produces pristine music, podcast, and voice-over recordings while also delivering studio quality sound to your headphones for precision mixing or hi-fi listening. With an intuitive controller knob and seamless compatibility with Mac OS X and iOS, ONE is easy for anyone to use and works great with GarageBand, Logic Pro X, Pro Tools, Ableton or any Core audio compatible application. ONE is made for Mac and iOS, so it is compatible with the latest iOS devices using the iOS Connection Kit.
Legendary Sound Quality
Why Apogee ONE is the best choice for your studio
Apogee is an award-winning industry leader in digital recording technology with over 30 years of experience. Preferred by recording pros around the world, Apogee products like ONE, Duet, Quartet, Ensemble and Symphony I/O have been instrumental in creating countless GRAMMY® and OSCAR® winning recordings and have set the industry standard in professional recording for over two decades.
Package contents
The following items are included in the ONE for Mac box:
• ONE for Mac (silver)
- Breakout cable with:
• 1 XLR Mic input
• 1 1/4" Instrument input
- Microphone stand clip
- USB cable
- QuickStart guide

ONE

USB cable
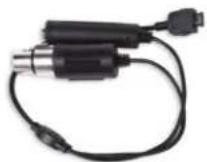
Breakout cable
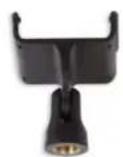
Microphone stand clip

QuickStart guide
The following items are included in the ONE for iPad & Mac box:
• ONE for iPad & Mac (black)
- Breakout cable with:
• 1 XLR Mic input
• 1 1/4" Instrument input
- Microphone stand clip
- USB cable
- QuickStart guide
- PSU + adapters
- Lightning cable


USB cable
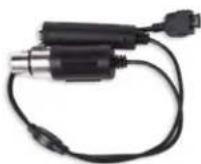
Breakout cable

Microphone stand clip


natural_image
Product photo of a black electrical plug, cable, charging socket, and two UK-style plugs (no visible text or symbols)Lightning cable Power Supply + adapters
Software, firmware and the ONE User's Guide are available online only. Please register your product and download the latest installer here:
www.apogeedigital.com/support
ONE panel tour

Built-in Microphone
ONE's built-in microphone capsule is located at the top of the front panel. When using the built-in microphone, orient the capsule towards the sound source being recorded.
Input/Output Selection Indicator
These indicators show the input or output selected for level adjustment using the multi-function Controller Knob.
Input/Output Level Meters
These meters display the input level when any input is selected or the output level when the output is selected for level adjustment using the Controller Knob.
Multi-function Controller Knob
ONE's multi-function controller knob allows you to easily switch between Inputs and Outputs as well as adjust their levels.
1/8" Stereo Headphone/Speaker Output
ONE's 1/8" stereo output may be connected to headphones or powered speakers. To connect to powered speakers, use an adaptor cable with a stereo 1/8" connector on one end and the appropriate mating connector for the powered speakers on the other end.
Mic/Instrument Input
This port is for connecting ONE's breakout cable, which includes one female XLR connector and one female 1/4" connector.
USB
ONE utilizes a single USB connector to interface with Mac devices and iOS devices. To connect to Mac, use the provided cable that terminates in a USB "A" type connector. To connect to an iOS device, use the cable that terminates in the Lightning connector.
DC Power
When connecting to an iOS device, connect the DC power supply to the ONE. When connecting to a Mac, ONE is easily powered by any available USB port and there's no need to connect a DC power supply.
External Power
When connecting to a Mac, both versions of ONE are easily powered by any available USB port; there's no need to connect an external DC power supply.
When connected to iPad, iPod Touch, or iPhone, external power is required. Here are the options for DC power:
ONE for Mac (Silver)
- Connect ONE for Mac's power supply (sold separately) to power ONE for Mac and charge the iOS device.
ONE for iPad & Mac (black)
- Connect ONE's for iPad & Mac's power supply (included) to power ONE for iPad & Mac and charge the iOS device.
- Install two AA batteries (not included) in ONE for iPad & Mac's battery compartment as shown to the right. The iOS device runs from its internal battery while ONE for iPad & Mac runs from the AA batteries. This allows the entire system to be completely mobile.
To install 2 AA batteries, use a coin or screwdriver to remove ONE for iPad & Mac's battery compartment door. Orient the 2 batteries as shown below so that the batteries' minus (-) terminals are installed against the compartment's springs. Once batteries are installed, replace the compartment door.

natural_image
Close-up of a black APOGEE battery pack with two cylindrical batteries and a logo (no visible text or symbols on the main body)
When powering ONE for iPad & Mac from two AA batteries, it is highly recommended to use NiMH rechargeable batteries for the best battery life when recording and playing back audio. Approximate battery life is shown below for minimal and maximum load conditions when using standard and rechargeable NiMH batteries.
| Standard AA | Rechargeable NiMH AA | |
| Playback from iTunes (minimal load) | 2 hours, 40 minutes (See Note Below) | 3 hours, 40 minutes |
| Recording - max load | 30 minutes | 2 hours, 10 minutes |
About 5-10 minutes before ONE for iPad & Mac shuts down, the level meters' red LEDs will flash to warn of the approaching loss of power under most conditions. (see Note 1 below).
After changing batteries, it is necessary to power cycle ONE for iPad & Mac by removing and then re-inserting the USB connector.
Note - Max load condition is as follows: Input 1 set to Ext 48v Mic with a 10mA phantom power load, Input 2 accepts a 1kHz tone at -1 dBfs, output set to maximum. Unit is set to 96kHz sample rate.
Getting Started
Connecting to your Mac
System Requirements
• Computer: Intel Mac 1.5GHz or faster
• Memory: 2 GB RAM minimum, 4 GB recommended
- OS: 10.6.8 or greater
- Connection and power: Any available USB port on a Mac
- USB bus powered; DC power optional
Install ONE Software
- Connect ONE's USB port to a USB port on your Mac using the supplied USB 2 cable.
- Go to http://www.apogeedigital.com/downloads.php.
- Download the latest ONE for Mac or ONE for iPad & Mac software installer.
- Once you have downloaded the package, double-click the Apogee icon to run the firmware updater.
- After the firmware update has completed, double-click the open-box icon to run the software installer.
- You will be required to restart your computer after the install is complete.
Choosing ONE as the Mac's Sound I/O
After connecting ONE, installing the software and restarting your Mac, a dialog box will prompt you to choose ONE for Mac sound input and output. Click Yes.

Connect to Headphones or Speakers
Connect headphones to the 1/8" output jack on ONE's front panel.
Alternatively, you can connect ONE's output to speakers by using an adapter cable. The cable should go from a stereo 1/8" connection (from ONE) to two separate connectors suitable for your speakers (1/4", RCA, etc.).
Configuring ONE's Inputs on Mac

ONE's two inputs may be configured in the following manner:
- Internal (built-in) microphone + 1/4" instrument
- External (XLR) microphone + 1/4" instrument
- External 48V (XLR) microphone + 1/4" instrument

natural_image
Close-up of a black handheld device with two connected cables and a red probe, no visible text or symbols.When using an XLR microphone or 1/4" instrument, connect to ONE's breakout cable.

Open Apogee Maestro software (found in your Mac's Applications folder), and select the Input tab.
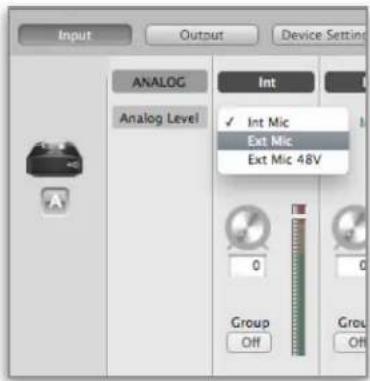
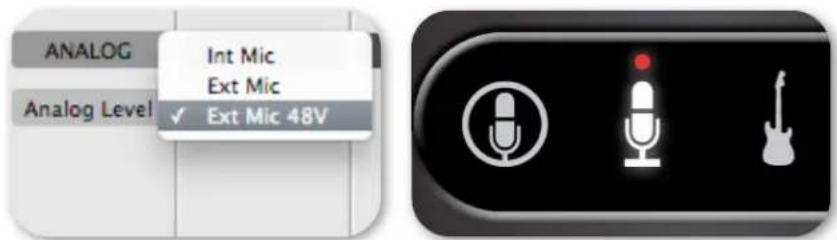
Select the Analog Level setting that corresponds to the microphone source you'd like to record. For example, if you have a microphone connected to the XLR connection on the breakout cable, select Ext Mic from the Analog Level menu on channel 1. If you would like to utilize ONE's built-in microphone, select Int Mic. Channel 2's source is always the 1/4" Instrument input.
Note: If you are using a condenser microphone that requires phantom power, select Ext Mic 48V. Phantom power is indicated on ONE's display by a red dot above the microphone icon.
Connecting to your iPad
System Requirements
- Any iPad, iPhone, iPod Touch equipped with a Lightning port
- Connection: ONE Lightning iOS cable (optional 30-pin iOS cable sold separately)
- iOS version: 6.0 or greater
• Power supply or two AA batteries (black model only) required
Install Maestro from App Store
There is a separate Maestro app that only runs in iOS devices. This is required for control of your ONE when connected to an iPad, iPhone or iPod Touch. Here's how to download and install this special iOS version of Maestro:
- Connect ONE to your iPad/iPhone using the Lightning iOS cable.
- Connect the external power supply to ONE or insert 2 AA batteries (black model only).
Note: The iPad will not charge when using ONE's battery power. - On the iPad/iPhone, open Settings and choose General > About > ONE, then choose "Find App for Accessory".
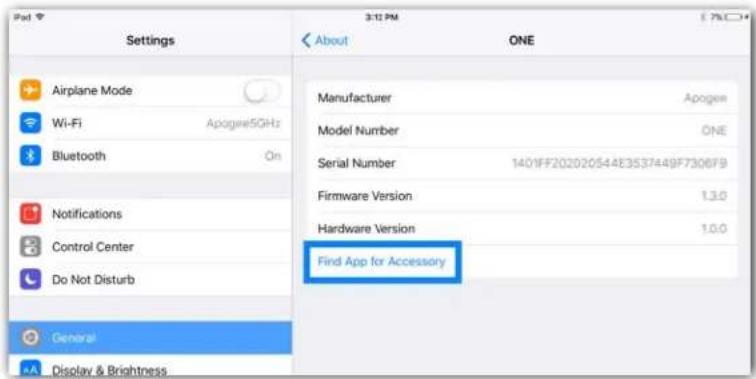
The App Store will open and navigate automatically to the Apogee Maestro app.

- Once you've signed in to the App Store, click INSTALL to download Apogee Maestro. Note: it's possible to record through the built-in microphone and play back audio without installing Maestro.
Connect to Headphones or Speakers
Connect headphones to the 1/8" output jack on ONE's front panel.
Alternatively, you can connect ONE's output to speakers by using an adapter cable. The cable should go from a stereo 1/8" connection (from ONE) to two separate connectors suitable for your speakers (1/4", RCA, etc.).
Configuring ONE's Inputs on iPad

ONE's inputs may be configured in the following manner:
- Internal (built-in) microphone + 1/4" instrument
- External (XLR) microphone + 1/4" instrument
- External 48V (XLR) microphone + 1/4" instrument
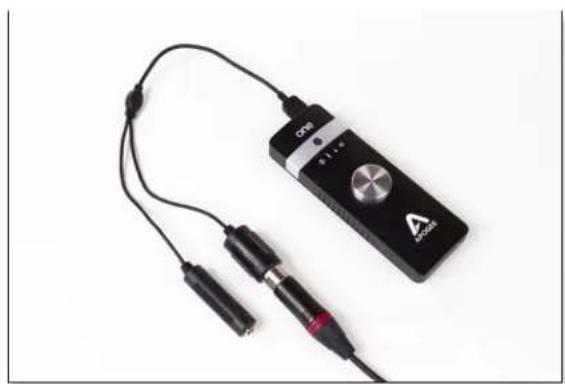
When using an XLR microphone or 1/4" instrument, connect to ONE's breakout cable.
natural_image
Close-up of a black CTR device connected to two black cables with red connectors (no visible text or symbols)Open Apogee Maestro app, choose ONE from the main menu and select the Input tab.


Select the Analog Level setting that corresponds to the input source you'd like to record. For example, if you have a microphone connected to the XLR connection on the breakout cable, select Ext Mic from the Analog Level menu on channel 1. If you would like to utilize ONE's built-in microphone, select Int Mic. By default, the 1/4" instrument input is the selected source for Channel 2.
Note: If you are using a condenser microphone that requires phantom power, select Ext Mic 48V. Phantom power is indicated on ONE's display by a red dot above the microphone icon.


natural_image
Three audio and media control icons on a black button (no text or symbols)Adjusting Input & Output Levels
Input level
To change ONE's input level (i.e the preamp gain of microphones and instruments):
- Push the Controller Knob until the built-in microphone, external microphone or instrument icon is lit on ONE's display.

natural_image
Close-up of a hand pressing a button on a silver remote control device (no visible text or symbols)
natural_image
Close-up of a black electronic device control panel with icons for speaker, microphone, and sound wave (no text or symbols visible)- Turn the Controller Knob until the desired recording level is obtained.

natural_image
Close-up of a hand pressing a button on a remote control device (no visible text or symbols)
natural_image
Close-up of a black control panel with icons for speaker, microphone, sound wave, and a green indicator (no text or symbols)The controller knob operates in parallel with Maestro's input controls.
Note: You will not hear your input until you enable software monitoring from a recording application or engage the low latency mixer in Apogee's Maestro control panel (see page 28 for more info).
Output level
- Push the Controller Knob until the Speaker icon is lit on ONE's display.

natural_image
Close-up of a hand pressing a button on a silver remote control device (no visible text or symbols)
natural_image
User interface control panel with audio and sound icons (no text or symbols)- Turn the controller knob to the desired listening level.

natural_image
Close-up of a hand pressing a button on a silver remote control device (no visible text or symbols)The controller knob operates in parallel with any software output controls.
Maestro - Apogee ONE User's Guide
Maestro Software

Mac OS
ios
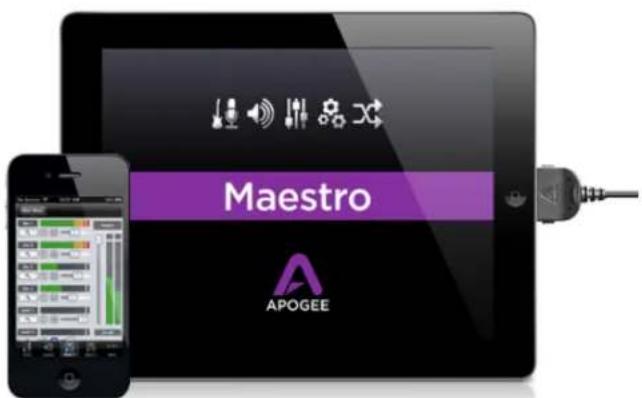
Apogee Maestro is the first audio interface control application made for Mac and iOS*. Featuring a single window design, and multiple tab interface for quick access to all device and system settings.
There are two versions of Maestro, each provides full control over the settings of your Apogee interface.
Maestro for Mac is free and can be downloaded from the Apogee Web site under the Support page, and Maestro for iOS is available for free on the Apple iOS App Store.
*The iOS Connection Kit (sold separately) is required with the silver ONE for Mac to work with an iOS device.
Maestro for Mac
Input
Input Tab

-
Device Icon & ID Button - A device icon and ID button is placed adjacent to each row of parameters to identify the hardware unit to which the row belongs. By clicking on the ID button, the corresponding hardware unit's front panel will illuminate. Each hardware unit is assigned a Peripheral Prefix (A-Z, found in Maestro's Device Settings tab window) which is displayed on the ID button.
-
Analog Level - Use this pop-up menu to select the source for Input 1 - the built-in mic (Int Mic), an external mic connected to the breakout cable's XLR connector (Ext Mic), or an external mic that requires phantom power connected to the XLR connector (Ext Mic 48v).
-
Input Gain - The gain of each input is controlled with these software knobs. The gain level is indicated in the value box below the knob.
-
Analog Input Meter - This meter displays the level of the analog input after A/D conversion.
-
Group On/Off - This button groups the gain setting of both inputs so that ONE's multi-function knob or one software gain knob controls both input gains simultaneously. If a gain offset is present between inputs when Group is set to On, this offset is preserved.
Output
Output Tab

- Device Icon & ID Button - see the Input tab description.
- Analog Output Meter - This meter displays the level of the analog output before D/A conversion, in the range -48 to 0 dBFS.
- Output Selection - This pop-up menu selects the output source that is sent to the speaker outputs.
A. Select Out 1-2 to send software outputs directly to the hardware output - when this setting is selected, the low latency mixer is removed from the signal path.
B. Select Mixer to send the output of the low latency mixer to the hardware output.
- Output Level - This knob controls the speaker output level.
- Mute - Click this button to mute the output.
Mixer
Mixer Tab

- Device Icon & ID Button - see the Input tab description.
- Pan - This rotary knob pans the input signal between the left and right sides of the Maestro mixer's stereo output.
- Input Level Fader - This slider sets the level of the input signal in the Maestro mixer's stereo output.
- Meter - This bar-graph meter displays the pre-fader input level.
-
Input Level Value Window - The Input Level fader value is displayed in this window. Fader values between 6 and -48 may be directly entered.
-
Solo - This button mutes all other channels whose Solo buttons are not engaged.
- Mute - This button mutes the input channel.
- Software Return Fader - This stereo input channel provides level control, metering, and mute/ solo functions for the signal from the software providing playback.
- Mixer Master (Output) - This is the level control and meter for the mixer's output.
- Mixer Channel Label - Text box for labeling your input channels with custom names.
Device Settings
Device Settings Tab
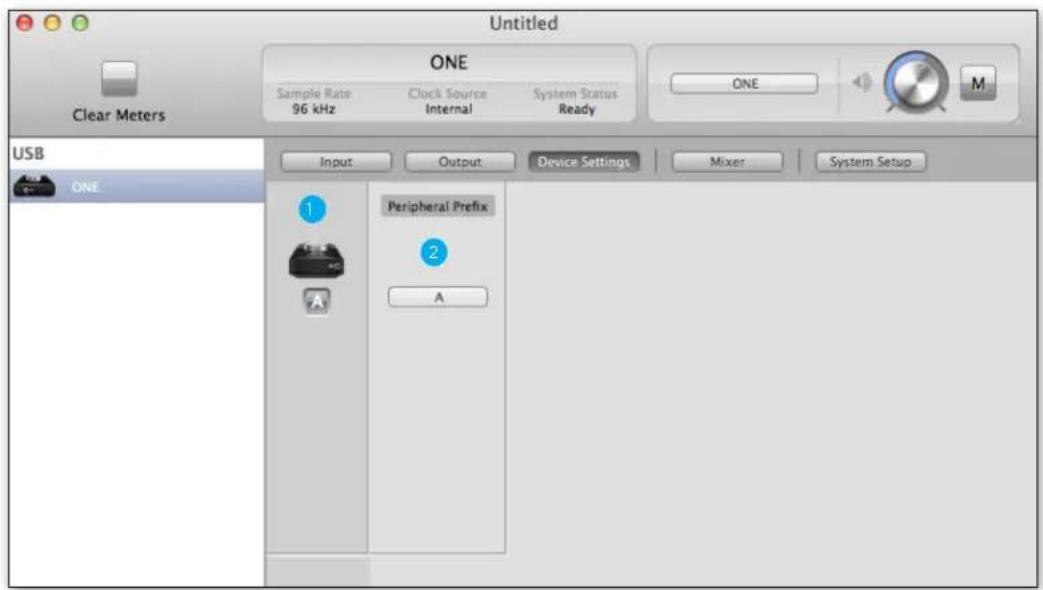
-
Device Icon & ID Button - see the Input tab description.
-
Peripheral Prefix - Use this pop-up menu to assign a letter prefix (A-Z) to each peripheral device displayed in the Devices Sidebar. The letter prefix is included in all graphic representations of the peripheral as well as I/O labels in Maestro and Core Audio compatible applications.
System Setup - Tool Bar
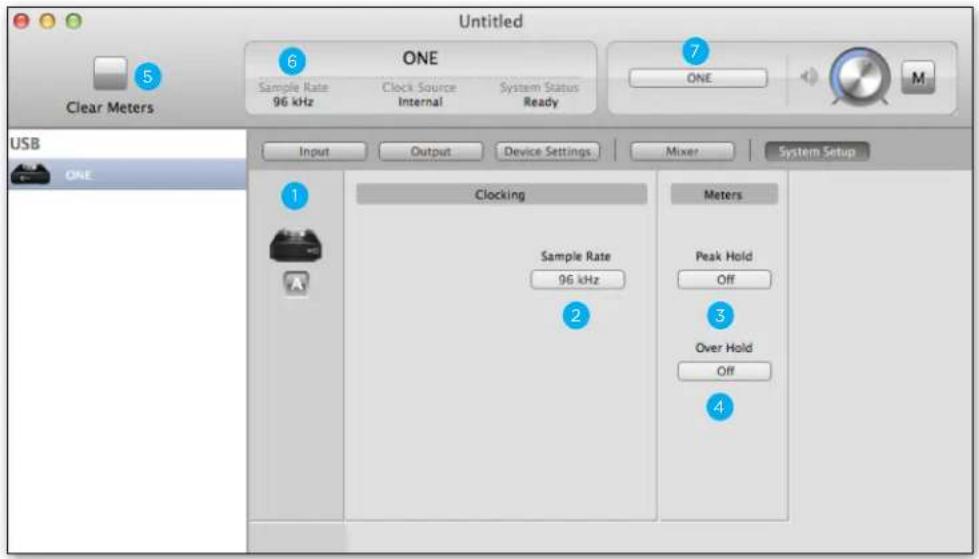
System Setup
- Device Icon & ID Button - see the Input tab description.
- Sample Rate - This pop-up menu selects the sample rate. In most cases, the sample rate is set by the audio application with which ONE is communicating. For example, when using ONE with GarageBand, ONE's sample rate is automatically set to 44.1 kHz to match the GarageBand song's sample rate. For those audio applications that don't include a sample rate setting, such as iTunes, ONE's sample rate may be set in Audio MIDI Setup or on the System Setup tab of Maestro.
Toolbar
- Clear Meters - this button clears all held peak and over indications on all hardware and software meters.
-
System Status - this window displays ONE's sample rate, clock source and system status. When multiple Apogee interfaces are connected, the System Status of the selected interface is displayed.
-
Peak Hold - This pop-up menu sets the time that peak indications are held on software and front panel meters.
-
Over Hold - This pop-up menu sets the time that over indications are held on software and front panel meters.
-
Toolbar Monitor Controls - These controls offer convenient access to ONE's Speaker/headphone volume control and mute. When multiple Apogee interfaces are connected, it's possible to choose which interface's controls are displayed in the Monitor selection pop-up menu.
Menu Bar Menus

About Apogee Maestro - Choose this menu item to display version information.
Preferences - Choose this menu item to display Maestro's Preference panel. Check Launch Maestro automatically when connecting a device to launch Maestro when the Mac is started. Check Display Pop-ups to show top panel encoder adjustments.
Hide Apogee Maestro 2 - Choose this menu item to hide the Maestro application.
Hide Others - Choose this menu item to hide all other open applications.
Show All - If any open applications have been hidden, choose this menu item to reveal all open applications.
Quit Apogee Maestro 2 - Choose this menu item to quit Maestro.

Rescan - Choose this menu item to re-initialize the link between Maestro software and Apogee hardware connected to the Mac in the case where the hardware is correctly connected and powered on but not detected in Maestro.
Menu Bar Menus (continued)

Minimize - Choose this menu item to minimize the Maestro window to the OS X Dock.
Zoom - Choose this menu item to maximize the size of the Maestro window.
Open any of the currently active tabs by typing Command + number.

Help - Choose this menu item to open Maestro Help for any Apogee hardware devices connected to your Mac.
Maestro for iOS
Main Menu

- Apogee Device - Select device in use to access Maestro tab windows.
- Register Product - Register product into Apogee's database for quality support.
- Knowledge Base - Support portal with answers to frequently asked questions about Apogee products.
Input Tab on iOS

-
Analog Level - Use this pop-up menu to select the source for Input 1 - the built-in mic (Int Mic), an external mic connected to the breakout cable's XLR connector (Ext Mic), or an external mic that requires phantom power connected to the XLR connector (Ext Mic 48v).
-
Input Gain - The gain of each input is controlled with these software knobs. The gain level is indicated in the value box below the knob. Modify gain by 1 dB by touching the “-” or “+” buttons.
-
Analog Input Meter - This meter displays the level of the analog input after A/D conversion.
-
Group On/Off - This button groups the gain setting of both inputs so that ONE's multi-function knob or a single software gain knob controls both input gains simultaneously. If a gain offset is present between inputs when Group is set to On, this offset is preserved.
Output Tab on iOS

- Analog Output Meter - This meter displays the level of the analog output before D/A conversion, in the range -48 to 0 dBFS.
- Output Selection - This pop-up menu selects the output source that is sent to the speaker outputs.
A. Select Out 1-2 to send software outputs directly to the hardware output - when this setting is selected, the low latency mixer is removed from the signal path.
B. Select Mixer to send the output of the low latency mixer to the hardware output.
- Output Level - This knob controls the speaker output level. Touch the “-” or “+” buttons to change the speaker output level by 1 dB.
- Mute - Click this button to mute the output.
Mixer Tab on iOS
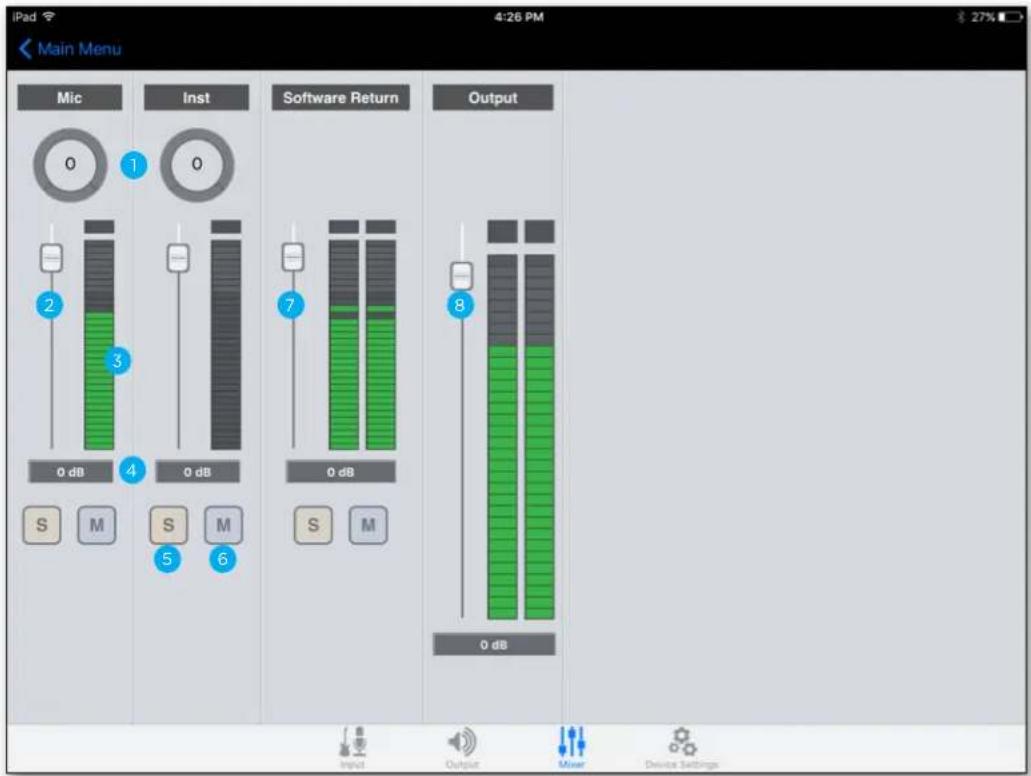
- Pan - This rotary knob pans the input signal between the left and right sides of the Maestro mixer's stereo output.
- Input Level Fader - This slider sets the level of the input signal in the Maestro mixer's stereo output.
- Meter - This bar-graph meter displays the pre-fader input level.
-
Input Level Value Window - The Input Level fader value is displayed in this window. Fader values between 6 and -48 may be directly entered.
-
Solo - This button mutes all other channels whose Solo buttons are not engaged.
- Mute - This button mutes the input channel.
- Software Return Fader - This stereo input channel provides level control, metering, and mute/ solo functions for the signal from the software providing playback.
- Mixer Master (Output) - This is the level control and meter for the mixer's output.
Device Settings Tab on iOS
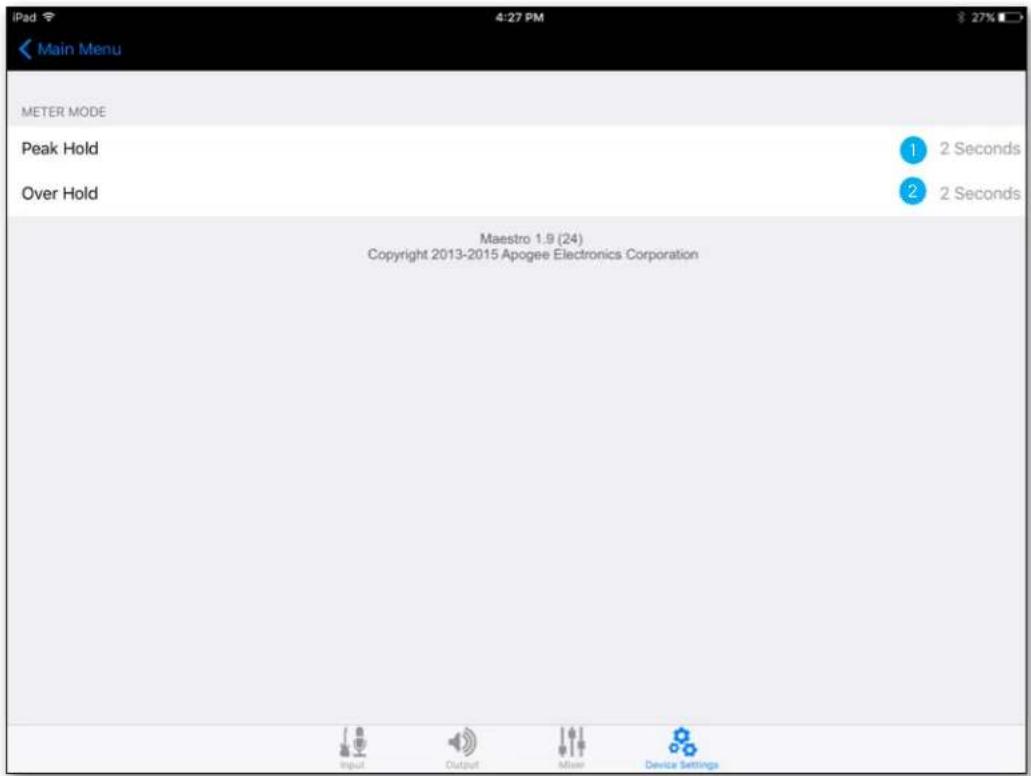
-
Peak Hold - This pop-up menu sets the time that peak indications are held on software and front panel meters. On Mac, this setting is found in the System Setup tab.
-
Over Hold - This pop-up menu sets the time that over indications are held on software and front panel meters. On Mac, this setting is found in the System Setup tab.
Operation
In this section you'll find answers to questions that might arise while you're recording with ONE on your Mac.
Using ONE's built-in mic
The ONE includes a built-in mic for those instances when you want to record quickly and easily - to preserve an inspiration, capture an ambience or record a conversation. Once you've selected Int Mic as ONE's active input in Maestro, here are a few hints for getting a great sound.
Placement - ONE's built-in mic has been designed to provide a clear, precise sound even when it's sitting on a desk and the source is off-axis (meaning that the sound source isn't at a right angle to ONE's top panel). By changing the angle of ONE to the sound source, it's possible to vary the amount of presence in the captured sound. For the most present and direct sound, use the included mic stand clip to mount ONE on a mic stand, and position ONE approximately 12-18" from the sound source.
What sample rate should I record at?
ONE offers a choice of four sample rates, 44.1, 48, 88.2 and 96kHz. So, what's the best sample rate to record your project at? It's a good idea to avoid unnecessary sample rate conversion stages, so the answer is determined by the sample rate of media on which you plan to distribute your recording. If the final distribution media is CD, record at 44.1kHz. If the media is video or TV, most often 48 kHz is the best choice. ONE also operates a 88.2-96kHz sample rate, in the case where you're recording in a session started at these rates. If you're part of a larger production chain, and aren't sure, ask whomever is responsible for assembling the final product - they'll undoubtedly appreciate the forethought.
Can I record my session on my Mac's (startup) hard drive?
It's an accepted "best practice" of most audio software providers that audio files should be recorded on a hard drive other than the Mac's Startup drive (i.e. the drive on which the operating system is installed). You can probably get away with recording a few tracks to your computer's Startup disk, but for the best performance of your ONE recording system, record onto a separate ATA/IDE, SATA, or FireWire drive whose spindle speed is at least 7200 RPM.
How do I set a recording level?
Once your microphone or instrument is connected, your audio software is configured and you've created a new recording track, just how do you set the input gain for a proper recording level in your audio software? There's no simple answer, but with a few guidelines and a bit of experience, you'll find the perfect recording level for any situation.
When setting the recording level, here are a few guidelines you'll want to think about:
- Digital overs (where ONE's Over indicators light) should be avoided.
- The recording level shouldn't be so low that the underlying noise becomes a significant part of the total signal.
- It's best to strive for some consistency in the level of a recorded track. In other words, try not to radically adjust the recording level from one take to the next - you'll appreciate some consistency when it's time to mix.
Given these guidelines, it's a better strategy to set your recording levels rather conservatively to avoid unexpected overs. In the early days of 16-bit digital audio, it was important to set a higher level to maintain the greatest dynamic range, but that's simply not necessary with a 24-bit system. In other words, it's better to "undershoot" the level than overshoot and have digital overs.
Just how much to undershoot the gain setting is determined by the nature of the sound being recorded. As a general rule, instruments such as bass and organ have a more consistent level than percussive instruments, such as a tambourine, and may be recorded at a higher level. Also, the performer's skill and playing style can dictate more or less caution when setting levels. As you gain experience, you'll be able to more accurately set a good recording level while avoiding digital overs.
When using ONE's built-in mic, it's inevitable that manipulation of the top panel encoder will be heard over the mic. In this instance, use a software control panel (described on page 12) to set input gain and output level.
What is phantom power?
Phantom power (also known as 48V) is a DC voltage necessary to power condenser microphones such as the Neumann U87 or AKG 414. If you're connecting a condenser mic to ONE, be sure to select Ext 48V Mic in the Maestro Control Input menu.
Through a bit of electronic trickery, phantom power is supplied to the mic via the same cable used to transmit the audio signal from the mic. There are a few precautions to take when using phantom power: don't connect a ribbon mic when phantom power is on, and mute headphones or speakers before toggling 48V on or off.
How do I set the input control of my powered speakers?
Most powered speakers offer an input volume control, often labelled as input sensitivity. Rather than describe an overly complicated method for setting this control, the easiest way to determine the right setting is to note where you generally set ONE's output level. If you find yourself rarely turning the output past a very low output level (say, -35 dB), decrease the input sensitivity on the speaker.
If, on the other hand, you find yourself setting ONE for full output and the speakers aren't loud enough, increase the input sensitivity. Ideally, ONE's output should be at 0 dB when you're listening at your absolute maximum desired volume.
How do I set my software's I/O buffer?
The I/O Buffer setting found in most audio software is one of the most crucial, but often ignored, settings in a Mac-based recording system.
When choosing a buffer setting, a compromise between the latency through the application and the amount of computer processor power accessible to the application must be made. A lower buffer setting results in lower latency but less available processing power. If the application can't access enough processor power, processor overruns may occur, resulting in audible clicks and pops or error messages that interrupt playback and recording.
A higher buffer setting, on the other hand, results in a greater amount of accessible processor power (i.e. less chance of overruns) but increases the latency. Determining the best setting requires some trial-and-error in order to find the best compromise.
Keep in mind that as tracks and plug-ins are added to a software session, processor requirements increase. Thus, the buffer setting that works during the early stages of a session might result in processor overruns during later stages. The best strategy is to set the buffer to a lower setting during recording and accept certain limitations on plug-in usage, and then raise the buffer during mixing to utilize the computer's full processor power when latency isn't an issue. With the processing power of today's Macs, you may find that adjustment of the buffer isn't necessary, and you can leave it at a setting for low latency and still access a sufficient amount of processing power when adding tracks and plug-ins. If you do encounter clicks, pops or software errors, don't hesitate to experiment with the buffer setting.
Maestro Low Latency Mixing
While recording, if you notice a delay between the moment you play or sing a note and when you hear it in your headphones you are experiencing latency. With Maestro's low latency mixer, you can set up a signal path to hear yourself with minimal latency. These instructions are for a Mac, but can be done on an iPad, iPhone, or iPod Touch using similar settings.
How to set up a session using the Low Latency Mixer
- In your audio software, turn off software monitoring.
- In GarageBand, this is done by clicking on the Monitoring button in the Track (if not displayed, choose Track > Show Monitoring for Real Instrument Tracks in GarageBand's menu bar).
- In Logic's menu bar, choose Logic Pro > Preferences > Audio and uncheck the Software Monitoring checkbox.
- In your audio software, set up a mix of all playback tracks and route the mix to Out 1-2. It's suggested to set the audio software Master fader to 0 dB.

- In the Maestro Output tab window, set the Output Selection to Mixer. This sends the output of Maestro's low latency mixer to ONE's output, rather than sending your audio software's output directly to ONE's output.
- In the Maestro Mixer tab window, set the Input, Software Return and Mixer Master faders to 0. Output from your audio software should now be displayed in the Software Return meters and audible at ONE's output.
- After configuring ONE's inputs, the input signal should be displayed in the Mixer Input meters and audible at ONE's output.
- Use the Mixer's Input and Software Return faders to establish a balance between the input and playback signals. If you've found a good balance but the Mixer Master's Over indicators light, reduce the Mixer Master fader.
When recording with most computer-based digital audio applications, the delay between the input and output of the recording system often disturbs the timing of the musicians performing. This delay, known as latency, means that the musician hears the notes played a few milliseconds after having actually played them. As anyone who has spoken on a phone call with echo knows, relatively short delays can confuse the timing of any conversation, spoken or musical.
Maestro Low Latency mixing (continued)

flowchart
graph LR
    A["User"] --> B["Headphones"]
    B --> C["Hardware Interface"]
    C --> D["Software Application"]
    D --> E["Output from DAW"]
    C --> F["A/D"]
    C --> G["D/A"]
    D --> H["Latency"]
    D --> I["Latency"]
    D --> J["Latency"]
    D --> K["Latency"]
    style A fill:#f9f,stroke:#333
    style D fill:#ccf,stroke:#333
Figure A
To illustrate the effect of latency, Figure A depicts the typical signal path of a vocal overdub session. A vocalist sings into a microphone, which is routed to an analog to digital converter, then to the audio software application for recording. In the software application, the vocalist's live signal is mixed with the playback of previously recorded tracks, routed to a digital to analog converter, and finally to the vocalist's headphones. A slight delay accumulates at each conversion stage, while a much greater amount of delay occurs through the software application, resulting in the vocalist hearing his performance in headphones delayed by several milliseconds.

flowchart
graph LR
    A["User"] --> B["Antenna"]
    B --> C["Latency"]
    C --> D["Hardware Interface"]
    D --> E["A/D"]
    D --> F["D/A"]
    E --> G["Low Latency Mixer"]
    F --> H["Low Latency Mixer"]
    G --> I["Latency"]
    H --> J["Latency"]
    I --> K["Software Application"]
    J --> K
    K --> L["Record enabled track"]
    L --> M["Output from DAW"]
Figure B
By routing the hardware input directly to the hardware output and mixing in playback as shown in Figure B, it's possible to provide the vocalist a headphone monitoring signal with a much shorter delay. First, the signal being recorded (in this case, a vocal mic) is split just after the A/D stage and routed to both the software application for recording and directly back to the hardware outputs without going through the latency-inducing software. This creates a low latency path from mic to headphones. Next, a stereo mix of playback tracks is routed to the low latency mixer and combined with the hardware input(s). This allows the performer to hear himself while listening to playback tracks without a confusing delay in order to comfortably record overdubs.
Note that the software application's mixer is used to set a stereo mix of playback tracks while the low latency mixer is used to set the balance between the stereo playback mix and the hardware inputs.
Software Setup
Mac OS: Using ONE with Logic


- In the Logic Pro menu bar, choose Preferences > Audio. In the Preferences window, click the Devices tab, then click the Audio tab.
- In the Core Audio pane, set Output Device and Input Device to ONE.
- Set the I/O Buffer Size to 64.
-
Click Apply Changes at the bottom of the Preferences window.
-
Choose File > New, then click on Empty Project and click Choose.
Mac OS: Using ONE with Logic (continued)

- Click Record using a microphone or line input; To record a single microphone or instrument
Set Input to Input 1;
Set Output to Output 1-2;
Click "I want to hear my instrument as I play and record"
Set Number of tracks to create to 1
-
Click Create.
-
In Logic's transport control, click
Record to begin recording with ONE!

Mac OS: Using ONE with Avid Pro Tools (9 or greater)

- In Pro Tools menu bar, choose Setup >Playback Engine.

- Set Playback Engine to ONE.
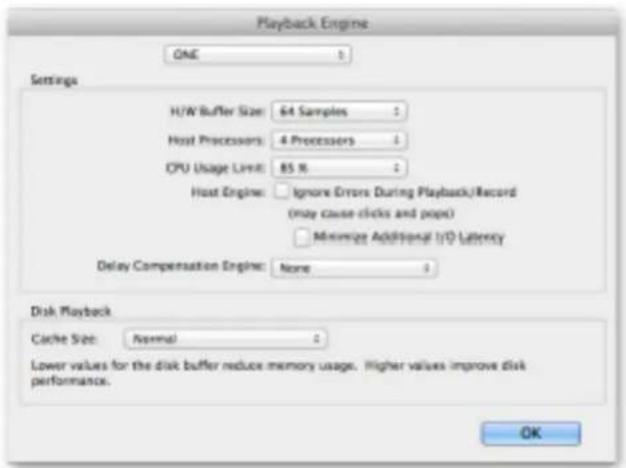
- Set the H/W Buffer Size to 64.
- Click OK.
- When the "Selecting this playback engine..." dialog appears, click Yes.
Mac OS: Using ONE with Ableton Live

- Choose Live > Preferences.
Click on the Audio tab.
-
Select CoreAudio in the Driver Type menu.
-
Select ONE in both the Audio Input Device and Audio Output Device menus.
-
Set Buffer Size to 128.
-
Close the Preferences window after making settings.
Mac OS: Using ONE with GarageBand


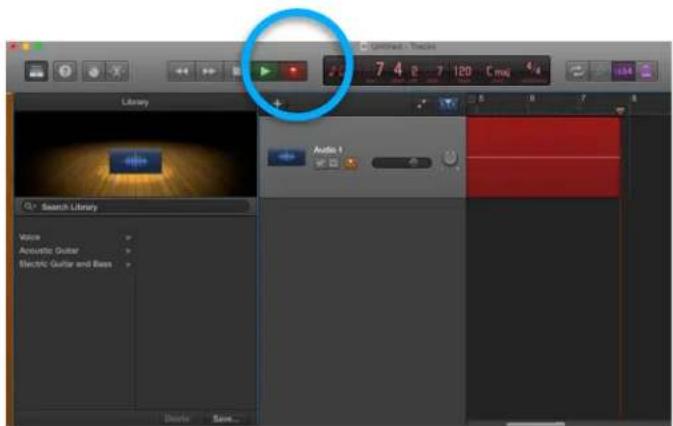
- Double-click on the GarageBand icon to open the application.
- Highlight New Project, then select Empty Project to create an audio recording track with no effects.
-
Click "Choose"
-
Select "Record using a microphone or line input."
- Select "Input" 1
- Click "I want to hear my instrument as I play and record."
-
Click Create
-
Select GarageBand > Preferences
- Select "ONE" as the Output Device and Input Device
CAUTION - if you engage Input while your speakers are turned up you could experience feedback!
- Select Track Audio 1
- Click the Record button in the Transport Controls
Mac OS: Using ONE with Cubase/Nuendo

- In the Cubase menu bar, choose Devices > Device Setup.
- In the Devices Column, click VST Audio System.
- Select ONE in the ASIO Driver pop-up menu.

- In the Devices Column, click ONE.
- In the Show As column, customize the IO labels to your preference.
- If "Inactive" appears in the State column for any I/O, proceed to step 11.

- In the Cubase Device Setup window, click Control Panel.
- Set Buffer Size to 64.
- Uncheck the Set Device Attenuation to 0 dB box.
- Click Close.
Operation - Apogee ONE User's Guide
Mac OS: Using ONE with Cubase/Nuendo (continued)
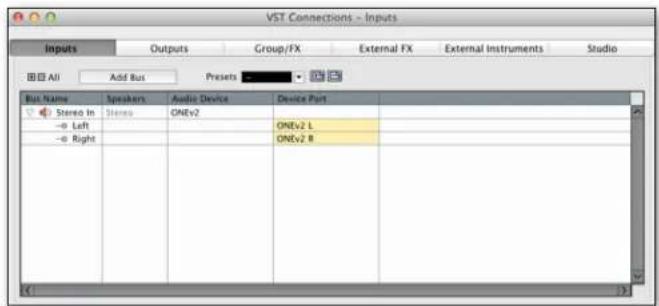
- In the Add Input Bus window, set Configuration to Stereo and click Add Bus.


- Choose Devices > VST Connections.
- Click the Inputs tab.
- Click Add Bus.

- Click the Outputs tab.
- Click Add Bus.
- In the Add Output Bus window, set Configuration to Stereo and click Add Bus.
Additional Support
For more information:
• Apogee KnowledgeBase and FAQs
• Apogee Product Registration
• How to contact Apogee Technical Support
Visit: http://www.apogeedigital.com/support/
Specifications
Features
ONE
| Computer Connectivity | USB 2.0 High Speed |
| Roundtrip Latency Performance | 32 buffer @ 96kHz = 4.4 ms64 buffer @ 44.1kHz = 7.0 ms |
| Power | USB Bus Power, Optional DC Power Supply (Sold Separately) |
| Bit Resolution/Sample Rate | 24-bit/44.1-96kHz |
| Input Channels | 2 Analog Inputs |
| Output Channels | Stereo Headphone Output |
| Microphone Preamps | 2 |
| Microphone Preamp Gain | Up to 62dB |
| Metering | LED Segments |
| Phantom Power | √ |
| Group Inputs | √ |
| Mute Outputs | √ |
| Core Audio Compatible | √ |
Warranty & Notifications
Registration and Warranty Information
To receive free tech support, important information and product updates first...
Register your new Apogee product here:
www.apogeedigital.com/register/
If you do so, Apogee can contact you with any update information. As enhancements and upgrades are developed, you will be contacted at the registration address. Firmware updates are free for the first year of ownership unless otherwise stated.
APOGEE ELECTRONICS CORPORATION warrants this product to be free of defects in material and manufacture under normal use for a period of 12 months. The term of this warranty begins on the date of sale to the purchaser (proof of purchase in the form of a receipt may be required). Units returned for warranty repair to Apogee or an authorized Apogee warranty repair facility will be repaired or replaced at the manufacturer's option, free of charge.
ALL UNITS RETURNED TO APOGEE OR AN AUTHORIZED APOGEE REPAIR FACILITY MUST BE PREPAID, INSURED AND PROPERLY PACKAGED, PREFERABLY IN THEIR ORIGINAL BOX.
Apogee reserves the right to change or improve design at any time without prior notification. Design changes are not implemented retroactively, and the incorporation of design changes into future units does not imply the availability of an upgrade to existing units. This warranty is void if Apogee determines, in its sole business judgment, the defect to be the result of abuse, neglect, alteration or attempted repair by unauthorized personnel. The warranties set forth above are in lieu of all other warranties, expressed or implied, and Apogee specifically disclaims any and all implied warranty of merchantability or of fitness for a particular purpose. The buyer acknowledges and agrees that in no event shall the company be held liable for any special, indirect, incidental or consequential damages, or for injury, loss or damage sustained by any person or property, that may result from this product failing to operate correctly at any time.
Warranty Exclusions
• Used products purchased through a third party or online.
- Products with missing or defaced serial numbers.
- Products damaged by environmental factors, such as oxidation and/or damages caused by natural disaster.
- Units that have NOT been opened by user within the one year warranty period.
• Physical Damages which include, but not limited to the following:
- Unauthorized modifications
- Misuse, neglect or improper assembly
- Transport damages due to improper packaging or carrier
- Burns resulting from faulty or failed electric power
- Missing/bent parts
- Cracked components
- Liquid/water damage
USA: Some states do not allow for the exclusion or limitation of implied warranties or liability for incidental or consequential damage, so the above exclusion may not apply to you. This warranty gives you specific legal rights, and you may have other rights which vary from state to state.
Service Information
Your Apogee product contains no user-serviceable components; refer to qualified service personnel for repair or upgrade. Your warranty will be voided if you tamper with the internal components. If you have any questions with regard to the above, please contact Apogee.
In the event your Apogee product needs to be upgraded or repaired, it is necessary to contact Apogee prior to shipping, and a Return Merchandise Authorization (RMA) number will be assigned.
Warnings
FCC warning
This equipment has been tested and found to comply with the limits for a Class A digital device, pursuant to Part 15 of the FCC rules. These limits are designed to provide reasonable protection against harmful interference when operated in a commercial environment. This equipment generates, uses, and can radiate radio frequency energy and, if not installed and used in accordance with the instruction manual, may cause harmful interference to radio communications. Operation of this equipment in a residential area is likely to cause harmful interference, in which case the user will be required to take whatever measures necessary to correct the interference at his own expense.
Copyright Notice
ONE is a computer-based device, and as such contains and uses software in ROMs. This software, and all related documentation, including this User's Guide contain proprietary information which is protected by copyright laws. All rights are reserved. No part of the software and its related documentation may be copied, transferred, or modified. You may not modify, adapt, translate, lease, distribute, resell for profit or create derivative works based on the software and its related documentation or any part thereof without prior written consent from Apogee Electronics Corporation, U.S.A.
Software Notice
Redistribution and use in source and binary forms, with or without modification, are permitted provided that the following conditions are met:
- Redistributions of source code must retain the above copyright notice, this list of conditions and the following disclaimer.
- Redistributions in binary form must reproduce the above copyright notice, this list of conditions and the following disclaimer in the documentation and/or other materials provided with the distribution.
THIS SOFTWARE IS PROVIDED BY THE COPYRIGHT HOLDERS AND CONTRIBUTORS "AS IS" AND ANY EXPRESS OR IMPLIED WARRANTIES, INCLUDING, BUT NOT LIMITED TO, THE IMPLIED WARRANTIES OF MERCHANTABILITY AND FITNESS FOR A PARTICULAR PURPOSE ARE DISCLAIMED. IN NO EVENT SHALL THE COPYRIGHT OWNER OR CONTRIBUTORS BE LIABLE FOR ANY DIRECT, INDIRECT, INCIDENTAL, SPECIAL, EXEMPLARY, OR CONSEQUENTIAL DAMAGES (INCLUDING, BUT NOT LIMITED TO, PROCUREMENT OF SUBSTITUTE GOODS OR SERVICES; LOSS OF USE, DATA, OR PROFITS; OR BUSINESS INTERRUPTION) HOWEVER CAUSED AND ON ANY THEORY OF LIABILITY, WHETHER IN CONTRACT, STRICT LIABILITY, OR TORT (INCLUDING NEGLIGENCE OR OTHERWISE) ARISING IN ANY WAY OUT OF THE USE OF THIS SOFTWARE, EVEN IF ADVISED OF THE POSSIBILITY OF SUCH DAMAGE.
Declarations of Conformity
This device complies with Part 15 of the FCC Rules. Operation is subject to the following two conditions:
- This device may not cause harmful interference
-
This device must accept any interference received, including interference that may cause undesired operation.
This equipment has been tested and found to comply with the limits of a Class B digital device, pursuant to Part 15 of the FCC Rules. These limits are designed to provide reasonable protection against harmful interference in a residential installation. This equipment generates, uses and can radiate radio frequency energy and, if not installed and used in accordance with the instructions, may cause harmful interference to radio communications. If this equipment does cause harmful interference to radio or television reception, which can be determined by turning the equipment off and on, the user is encouraged to try to correct the interference by one or more of the following measures: -
Re-orient or relocate the receiving antenna.
- Increase the separation between the equipment and receiver.
-
Connect the equipment into an outlet on a different circuit from that to which the receiver is connected.
-
Consult the dealer or an experienced radio/TV technician for help.
NOTE: The use of non-shielded cable with this equipment is prohibited.
CAUTION: Changes or modifications not expressly approved by the manufacturer responsible for compliance could void the user's authority to operate the equipment.
Apogee Electronics Corp.
1715 Berkeley Street
Santa Monica, CA 90404, USA
Industry Canada Notice
Declaration of Conformity – CE
Apogee Electronics Corporation hereby declares that the product, the ONE, to which this declaration relates, is in material conformity with the following standards or other normative documents:
• EN50081-1/EN55022; 1995
• EN50082-1/IEC 801-2, 3, 4; 1992
following the provisions of:
• 73/23/EEC – Low Voltage Directive
89/336/EEC - EMC Directive
Declaration of Conformity – Japan
Apogee Electronics Corporation hereby declares that ONE, to which this declaration relates, is in material conformity with the VCCI Class A standard.
Declaration of Conformity – Australia
Apogee Electronics Corporation hereby declares that the ONE is in material conformity with AN/NZS standard requirements.

APOGEE
www.apogeedigital.com

Designed in California Built in the U.S.A.*

Certified Green Business
^1 Apogoo products are built in the U.S.A. using domestic and foreign parts and components.


- Apogee ONE: For Mac and iPad & Mac
- Contents
- Overview 3....
- Getting Started ....7
- Maestro Software 12
- Operation 25
- Additional Support....37
- Specifications....38
- Warranty & Notifications ....39
- Introduction
- ONE for Mac and ONE for iPad & Mac
- The Swiss Army Knife for Personal Recording and Audio Production.
- Legendary Sound Quality
- Why Apogee ONE is the best choice for your studio
- Package contents
- The following items are included in the ONE for Mac box:
- The following items are included in the ONE for iPad & Mac box:
- ONE panel tour
- Built-in Microphone
- Input/Output Selection Indicator
- Input/Output Level Meters
- Multi-function Controller Knob
- 1/8" Stereo Headphone/Speaker Output
- Mic/Instrument Input
- USB
- DC Power
- External Power
- ONE for Mac (Silver)
- ONE for iPad & Mac (black)
- Getting Started
- Connecting to your Mac
- System Requirements
- Install ONE Software
- Choosing ONE as the Mac's Sound I/O
- Connect to Headphones or Speakers
- Configuring ONE's Inputs on Mac
- Connecting to your iPad
- Install Maestro from App Store
- Adjusting Input & Output Levels
- Input level
- Output level
- Maestro Software
- Maestro for Mac
- Input
- Output
- Mixer
- Device Settings
- System Setup - Tool Bar
- System Setup
- Toolbar
- Menu Bar Menus
- Menu Bar Menus (continued)
- Maestro for iOS
- Input Tab on iOS
- Output Tab on iOS
- Mixer Tab on iOS
- Device Settings Tab on iOS
- Operation
- Using ONE's built-in mic
- What sample rate should I record at?
- Can I record my session on my Mac's (startup) hard drive?
- How do I set a recording level?
- What is phantom power?
- How do I set the input control of my powered speakers?
- How do I set my software's I/O buffer?
- Maestro Low Latency Mixing
- Maestro Low Latency mixing (continued)
- Software Setup
- Mac OS: Using ONE with Logic
- Mac OS: Using ONE with Logic (continued)
- Mac OS: Using ONE with Avid Pro Tools (9 or greater)
- Mac OS: Using ONE with Ableton Live
- Mac OS: Using ONE with GarageBand
- Mac OS: Using ONE with Cubase/Nuendo
- Operation - Apogee ONE User's Guide
- Mac OS: Using ONE with Cubase/Nuendo (continued)
- Additional Support
- For more information:
- Specifications
- Warranty & Notifications
- Registration and Warranty Information
- Register your new Apogee product here:
- www.apogeedigital.com/register/
- ALL UNITS RETURNED TO APOGEE OR AN AUTHORIZED APOGEE REPAIR FACILITY MUST BE PREPAID, INSURED AND PROPERLY PACKAGED, PREFERABLY IN THEIR ORIGINAL BOX.
- Warranty Exclusions
- Service Information
- Warnings
- FCC warning
- Copyright Notice
- Software Notice
- Declarations of Conformity
- Industry Canada Notice
- Declaration of Conformity – CE
- Declaration of Conformity – Japan
- Declaration of Conformity – Australia
- APOGEE
Brand : Apogee
Model : One
Category : Hi-Fi System