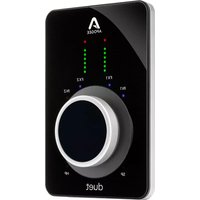
Duet 3 - Hi-Fi System Apogee - Free user manual and instructions
Find the device manual for free Duet 3 Apogee in PDF.


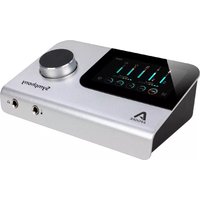
| Product Type | USB Audio Interface |
| Brand | Apogee |
| Model | Duet 3 |
| Dimensions (W x D x H) | 200 mm x 130 mm x 50 mm |
| Weight | 0.8 kg |
| Power Source | Bus-powered via USB-C or external power supply |
| Sample Rates | Up to 192 kHz |
| Bit Depth | Up to 24-bit |
| Analog Inputs | 2 x combo XLR/TRS (mic/line/instrument) |
| Analog Outputs | 4 x TRS (balanced) |
| Headphone Output | 1 x TRS (stereo) |
| Digital Connectivity | USB-C (USB 2.0 compatible) |
| MIDI I/O | 1 x MIDI In, 1 x MIDI Out (via breakout cable) |
| Operating System Compatibility | macOS, Windows, iOS (via Camera Connection Kit) |
| Main Functions | Recording, mixing, monitoring, playback |
| Maintenance | Clean with a soft, dry cloth; avoid solvents |
| Safety Precautions | Do not expose to moisture, extreme temperatures, or magnetic fields |
| Spare Parts Availability | Contact Apogee support for replacement parts |
| Repairability | Serviceable by authorized technicians only |
| Warranty | 1 year limited warranty |
| General Information | Professional-grade audio interface with Apogee conversion quality |
Frequently Asked Questions - Duet 3 Apogee
User questions about Duet 3 Apogee
0 question about this device. Answer the ones you know or ask your own.
Ask a new question about this device
Download the instructions for your Hi-Fi System in PDF format for free! Find your manual Duet 3 - Apogee and take your electronic device back in hand. On this page are published all the documents necessary for the use of your device. Duet 3 by Apogee.
USER MANUAL Duet 3 Apogee
User's Guide
September 2011
Duet User's Guide
Table of Contents
Package Contents 2
Introducing Duet 3
Quick Start Guide 4-7
System Requirements 4
Install Apogee Software Package 4
Connect FireWire cable 4
Select Duet in System Preferences 5
Connect Headphones 5
Using Duet with GarageBand 6
Using Duet with Logic Pro 7
Operation 8-11
Top Panel Encoder 8
Control Panel Options 9
OS X System Preferences 10-11
OS X Audio MIDI Setup 10-11
Maestro 12-25
Maestro Control – Levels 12-13
Maestro Control – Advanced 14
Maestro Control – Advanced: Out Muting 14-15
Maestro Control – Advanced: MIDI Controllers 16-17
Maestro Control – Low Latency Mixing 18-19
Maestro Mixer 20-21
Maestro Preferences – Duet Preferences 22
Maestro Menu by Menu 24-25
Maestro 2 26-35
Devices Sidebar, Device Icon & ID Button 26
Input Tab Window 27
Output Tab Window 28
Device Settings Tab Window 29
Mixer Tab Window 30
System Setup Window, Menu Bar Menus 31
Menu Bar Menus 32
Low Latency Mixing 33
Maestro Mixer Settings 34-35
Connecting Your Duet: 36-40
Monitors and Headphones 36
Instrument and Mic 37
Instrument and Instrument 38
Mic and Mic 39
Powered Monitors 40
Connecting to a Home Stereo 41
Troubleshooting 42
Core Audio Applications Guide 43-45
Using Duet with Apple Soundtrack Pro 43
Using Duet with Mainstage 43
Using Duet with Final Cut Pro 44
Using Duet with Ableton Live 44
Using Duet with MOTU Digital Performer 45
Using Duet with Steinberg Nuendo 45
Features & Specifications 46
System Requirements 46
Notifications 47-49
Registration and Warranty Information 48
Service Information 48
Declarations of Conformity 49
Duet – User's Guide
Package Contents
The following items should be included in your Duet package:
- Duet
• 1 meter FireWire cable - Duet's breakout cable

natural_image
White duet brand electronic device with a metallic knob and dotted-line control buttons (no readable text or symbols)Duet

natural_image
Coiled white cable with two connectors against a black background (no text or symbols visible)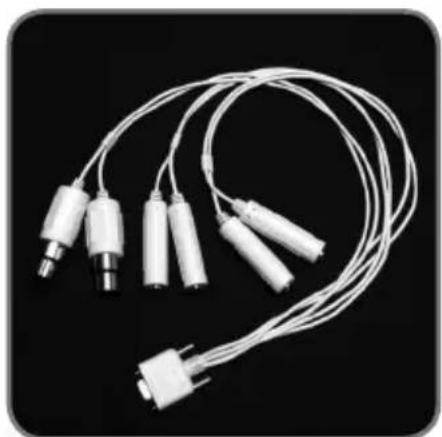
natural_image
Close-up of white medical electrophysiological test tubes with terminal connectors, no visible text or symbolsDuet's breakout cable1 meter FireWire cable
Introducing Duet
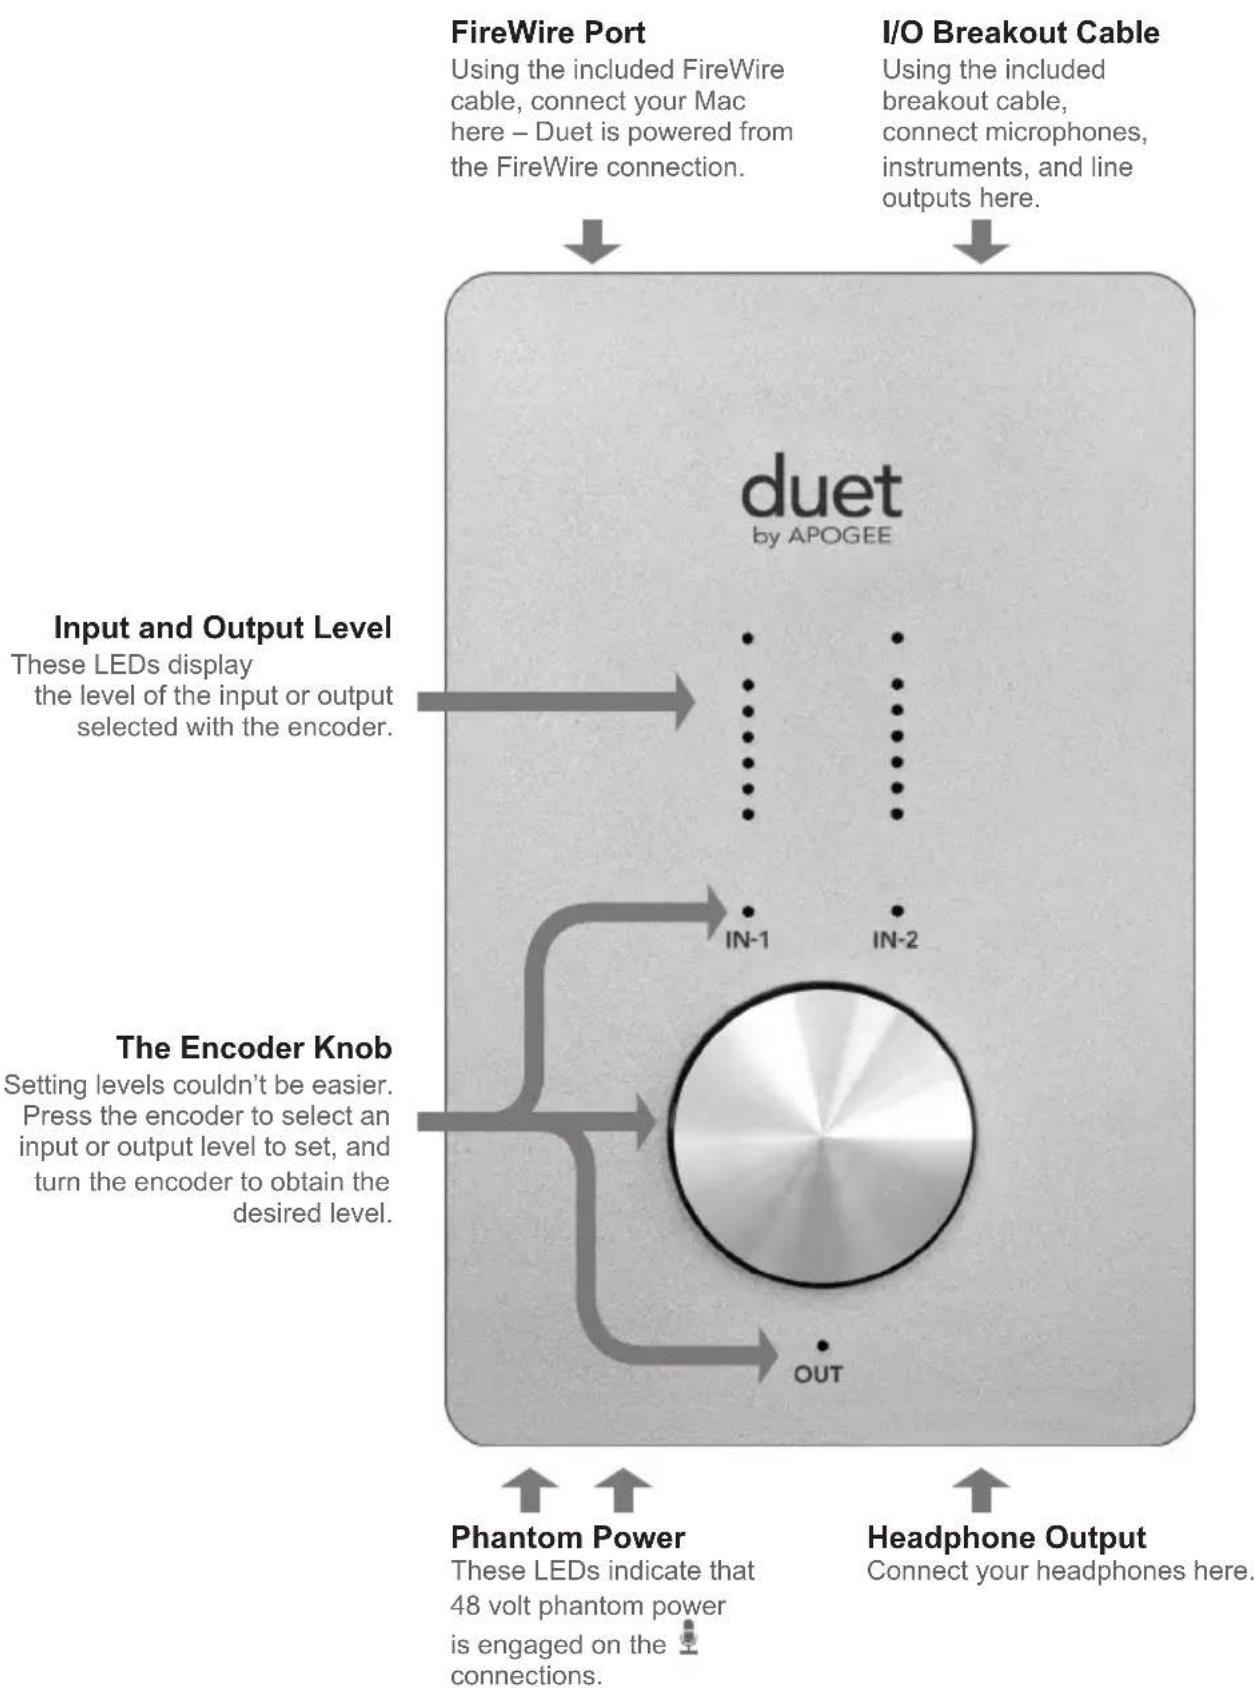
flowchart
graph TD
    A["FireWire Port"] --> B["Using the included FireWire cable, connect your Mac here – Duet is powered from the FireWire connection."]
    C["I/O Breakout Cable"] --> D["Using the included breakout cable, connect microphones, instruments, and line outputs here."]
    E["Input and Output Level"] --> F["These LEDs display the level of the input or output selected with the encoder."]
    G["The Encoder Knob"] --> H["Setting levels couldn't be easier. Press the encoder to select an input or output level to set, and turn the encoder to obtain the desired level."]
    I["Phantom Power"] --> J["48 volt phantom power is engaged on the connections."]
    K["Headphone Output"] --> L["Connect your headphones here."]
Duet – User's Guide
Quick Start Guide
System Requirements
Mac G4 1GHz or faster, PPC or Intel CPU, 1 GB RAM minimum, 2 GB recommended, OS X : 10.4.11 or greater must be installed, 10.5.3 or greater highly recommended.

Install Apogee Software Package
Download the "Duet Software Installer" from: http://www.apogeedigital.com/downloads.php and follow the on-screen instructions.
When the installation is complete you will be required to restart your Mac.
Connect FireWire cable

natural_image
Black-and-white photo of a laptop connected to a portable electronic device labeled 'iamp', with a hand holding the cable (no visible text or symbols on device or background)
After restarting your Mac, connect Duet's FireWire port to a FireWire 400 port on your Mac using the provided cable.
If you Mac has Firewire 800 ports only, connect Duet using a FW400 to FW800 cable. Note that, in this case, the FW800 port runs at the FW400 speed.

As Duet is powered through the FireWire connection, the OUT LED should light immediately.
Quick Start Guide


natural_image
Close-up of a hand holding a screwdriver next to a CD-ROM device with headphones (no visible text or symbols)
Choose Duet for Mac Sound I/O
After connecting Duet to your Mac, the dialog box shown at the left will appear. Click Yes to choose Duet for Mac sound output and input.
This selection may also be made in the System Preferences > Sound > Output pane.

Connect Headphones
Now, connect a pair of headphones to Duet's headphone output, open iTunes, and initiate playback of an audio selection. Playback should be audible in the connected headphones and displayed on Duet's top panel meters.
Duet – User's Guide
Quick Start Guide
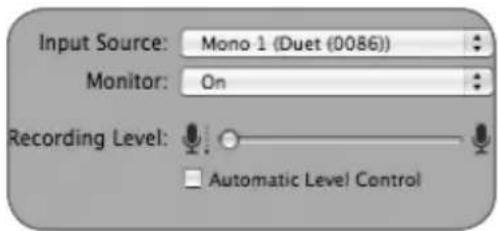


Using Duet with GarageBand 4.0.0 or greater recommended
In GarageBand, choose GarageBand > Preferences, click on the Audio/Midi icon and set Audio Output and Audio Input to Duet. Click on the Advanced icon and set Audio Resolution to Better or Best.
Choose Track > New Basic Track...
Double click the new track's header to view the Track Info pane; in this pane, set Input Source to Mono 1 (Duet); set Monitor to On.
To open GarageBand's Apogee Duet control panel, click on the Edit button next to the Input Source menu.
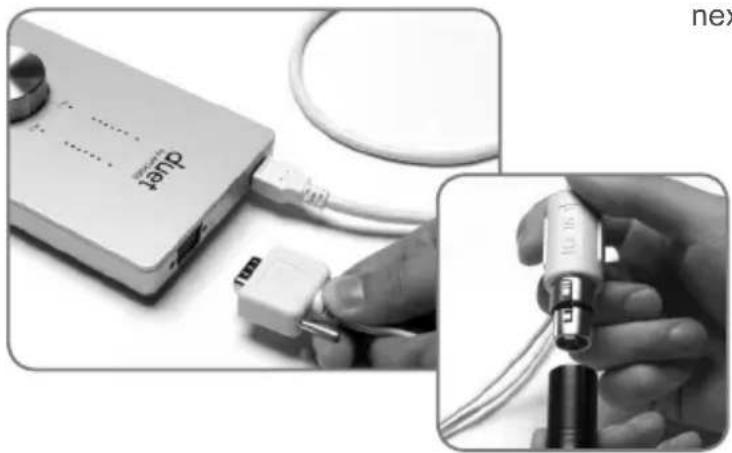
natural_image
Close-up of a medical device connected to a cable with a connector, alongside a close-up of hands holding a medical tool (no visible text or symbols)Connect the provided breakout cable to Duet's I/O connection, and connect a mic to the IN-1 XLR connector.
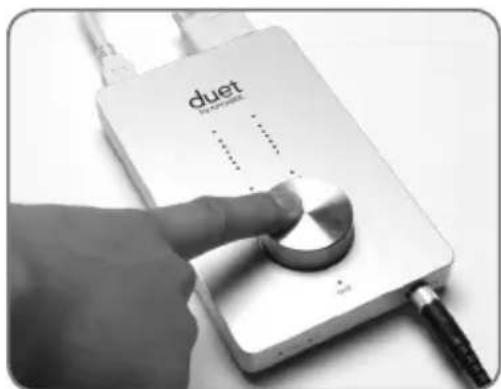
Click the center of the top panel encoder until the IN-1 LED lights, then turn the encoder to obtain a proper recording level on the record-enabled track.

You're now ready to record!
Quick Start Guide

Using Duet with Logic Pro/Express 8.0.5 for higher recommended
Under the Logic Pro menu, choose Preferences > Audio. Click on the Device tab, then on the Core Audio tab.
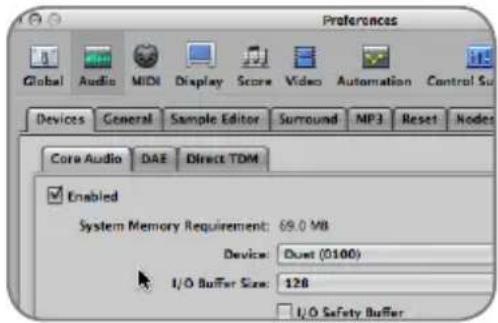
In the Core Audio pane, select Duet in the Device menu. Select 128 in the I/O Buffer Size menu.
| Device ▼ | View ▼ | |
| CoreAudio | Driver's I/O Labe | |
| ○ Input 1 ○ Input 2 ○ Output 1 ○ Output 2 | ● XLR 1 ● XLR 2 ● Out L ● Out R | |
Choose Audio > I/O Labels under the Options menu. Option-click on the first radio button under the Driver's I/O Labels column. Now, Duet's hardware labels appear in the input and output selections of your Logic session.

To control Duet directly from your Logic session, choose Audio > Open Apogee Control Panel under the Options menu.
If you're using another CoreAudio-compatible audio software app, use Apogee's Maestro software (installed in your Applications folder in Step 1) to control Duet.
Operation
Duet's settings may be easily changed using either its top panel encoder or the variety of software control panels described on page 10. Though several options are possible, you can choose the hardware and software controls that best suit your individual needs. For example, Logic Pro users may choose to adjust levels with Duet's top panel encoder and change static settings (such as input selection or phase) from the Apogee Control Panel found in Logic Pro 8. For convenience, many settings may be controlled from multiple control panels. The chart on page 9 indicates the settings and functions that may be changed from each control panel.
Duet Top Panel Encoder
Duet's top panel encoder provides simple and immediate control of input and output level settings.
Output level
To change Duet's output level (i.e the listening level of headphone and connected speakers), press and release the encoder repeatedly until the OUT LED lights.
Now, turn the encoder to the desired listening level. The hardware encoder operates in parallel with any software level controls.
Input level
To change Duet's input level (i.e the recording level of mics and instruments), press and release the encoder repeatedly until the IN-1 or IN-2 LED lights.
Now, turn the encoder until the desired recording level is obtained
(as seen in your recording software).
Mute outputs
To mute the line and headphone outputs simultaneously, press and hold down the encoder until the OUT LED blinks; press and hold again to unmute outputs.
MIDI controller
The encoder can also send MIDI Controller and Song Position data to software applications. Please see pages 16-17 for details.
Operation
| Duet Hardware Encoder | Apogee Maestro | Apogee Control Panel (in Logic) | Apogee Duet pane in Garage-Band | Audio MIDI Setup | System Prefs | |
| Input gain |  |  |  |  | ||
| Input Control - Selection, 48v, Group, Phase |  |  |  | |||
| Output Control - Attenuation, Mute |  |  |  |  |  |  |
| Output Control - Nominal Level |  |  |  | |||
| Low Latency Mixer |  | |||||
| Advanced Functions |  | *  |  | |||
| MIDI Controller |  |  | ||||
| Sample Rate (see p.10) |  | |||||
| Assign Duet as Input/ Output for OSX |  |  |
* All but Gain Mode
Operation
Apogee Maestro
Apogee Maestro software provides the most complete control of Duet, including control of all settings, store/recall of configurations and low-latency mixing. If your recording software doesn't include an Apogee control panel, then use Apogee Maestro to make settings.
Maestro low latency mixer
While recording, if you notice a delay between the moment you play or sing a note and when you hear it in your headphones, Maestro's low latency mixer may help. Please see pages 18-21 for more details about the low latency mixer.
For a more complete explanation of Maestro, please see pages 12-26.
Apogee Control Panel (Logic Pro 8, GarageBand)
The Apogee Control Panel, found in Apple's Logic Pro 8 and GarageBand software, provides control of Duet settings and store/recall of configurations. The control panels in these programs duplicate all of the settings found in the Maestro Control panel.
OS X System Preferences
The OS X System Preferences Sound window provides settings to choose Duet for Mac sound input and output. If you didn't choose Duet for Mac sound I/O in step 3 of the Quickstart guide, you may do so in this window.
Choose Apple menu > System Preferences;
Open the Sound preference window by clicking on the speaker icon;
Click on the Output tab and select Duet in the Device window;
Click on the Input tab and select Duet in the Device window.
OS X Audio MIDI Setup
OS X Audio MIDI Setup (found in the Applications/Utilities folder) provides control of Duet's sample rate and output level, as well as settings to choose Duet for Mac sound input and output. To control Duet's output level and muting from AMS or from the Mac keyboard, set Default Output to Duet.
Setting Sample Rate
Duet operates at all standard sample rates between 44k1 and 96k. In most cases the sample rate is set by the audio application with which Duet is communicating. For example, when using Duet with GarageBand, Duet's sample rate is automatically set to 44k1, to match the GarageBand song's sample rate. For those audio applications that don't include a sample rate setting, such as iTunes, Duet's sample rate may be set in Audio Midi Setup.

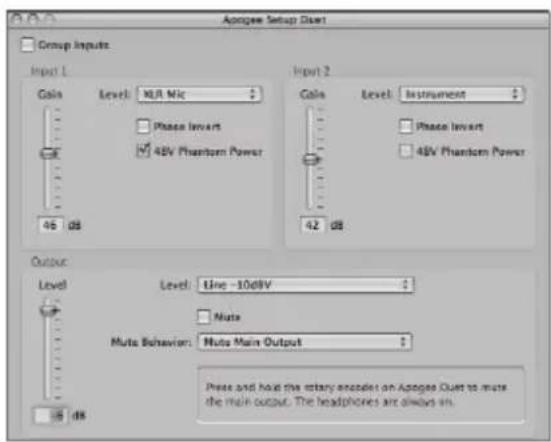
Apogee Control Panel

OS X Audio MIDI Setup

OS x System Preferences
Maestro
Maestro Control – Levels
1 Interface Menu
When Duet is properly detected by Maestro, Duet plus the unit's serial number appears in this menu.
2 Identify Unit
Clicking on this button verifies that communication is established between Maestro software and Duet hardware by lighting all top panel LEDs. Click the button again to return Duet's LEDs to their normal function.
3 Input
This menu is used to select the input connector and level:
XLR Line +4dBu – Set Input to XLR Line +4dBu if you've connected a professional level line input, such as a pro mixing console, to the IN (XLR) connectors.
XLR Line -10 dBV – Set Input to XLR Line -10dBV if you've connected a consumer level line input, such as a CD player, to the IN (XLR) connectors.
XLR Mic – Set Input to XLR Mic if you’ve connected a microphone to the IN (XLR) connectors. The gain is adjustable between 10 and 75 dB.
Instrument – Set Input to Instrument if you've connected a guitar or keyboard to the IN (1/4") connectors; gain is adjustable between 0 and 65 dB. It's also possible to connect CD players and other consumer level (-10 dBV) devices to these inputs.
When Input is set to XLR Mic or Instrument, the following controls are accessible:
4 Group – Check either of these boxes to group the gain setting of both inputs, so that the hardware encoder or one software encoder controls both input gains simultaneously. If a gain offset is present between inputs when Group is checked, this offset is preserved.
5 Input Level Software Encoder – The gain of each input may be controlled from these software encoders. The gain level is indicated in the value box to the right of the encoder.
6 Phase icon – Check this box to reverse the polarity of the input signal. Under certain circumstances when two mics are used on one source, reversing the polarity of one mic may result in a fuller sound. For example, when placing mics over and under a snare drum, a fuller sound is obtained when the polarity of the bottom mic is reversed.
48V – Check this box to enable 48 volt phantom power on the XLR connections. Condenser mics require phantom power to operate.
Maestro


Level
The nominal or average level of the line outputs is set with this menu:
Line out – Set Level to Line out when connecting Duet's OUT-L or OUT-R connectors to powered speakers, a hi-fi system or a mixing console.
Instrument Amp – Set Level to Instrument Amp when connecting Duet's OUT-L or OUT-R connectors to an instrument amp input. The output level is fixed.

Output Level Software Encoder
The level of both line and headphone outputs is controlled simultaneously with this software encoder, when Level is set to Line out. The attenuation level is indicated in the value box to the right of the encoder.

Mute
Checking this box mutes the line and headphone outputs simultaneously.
Maestro
Maestro Control – Advanced

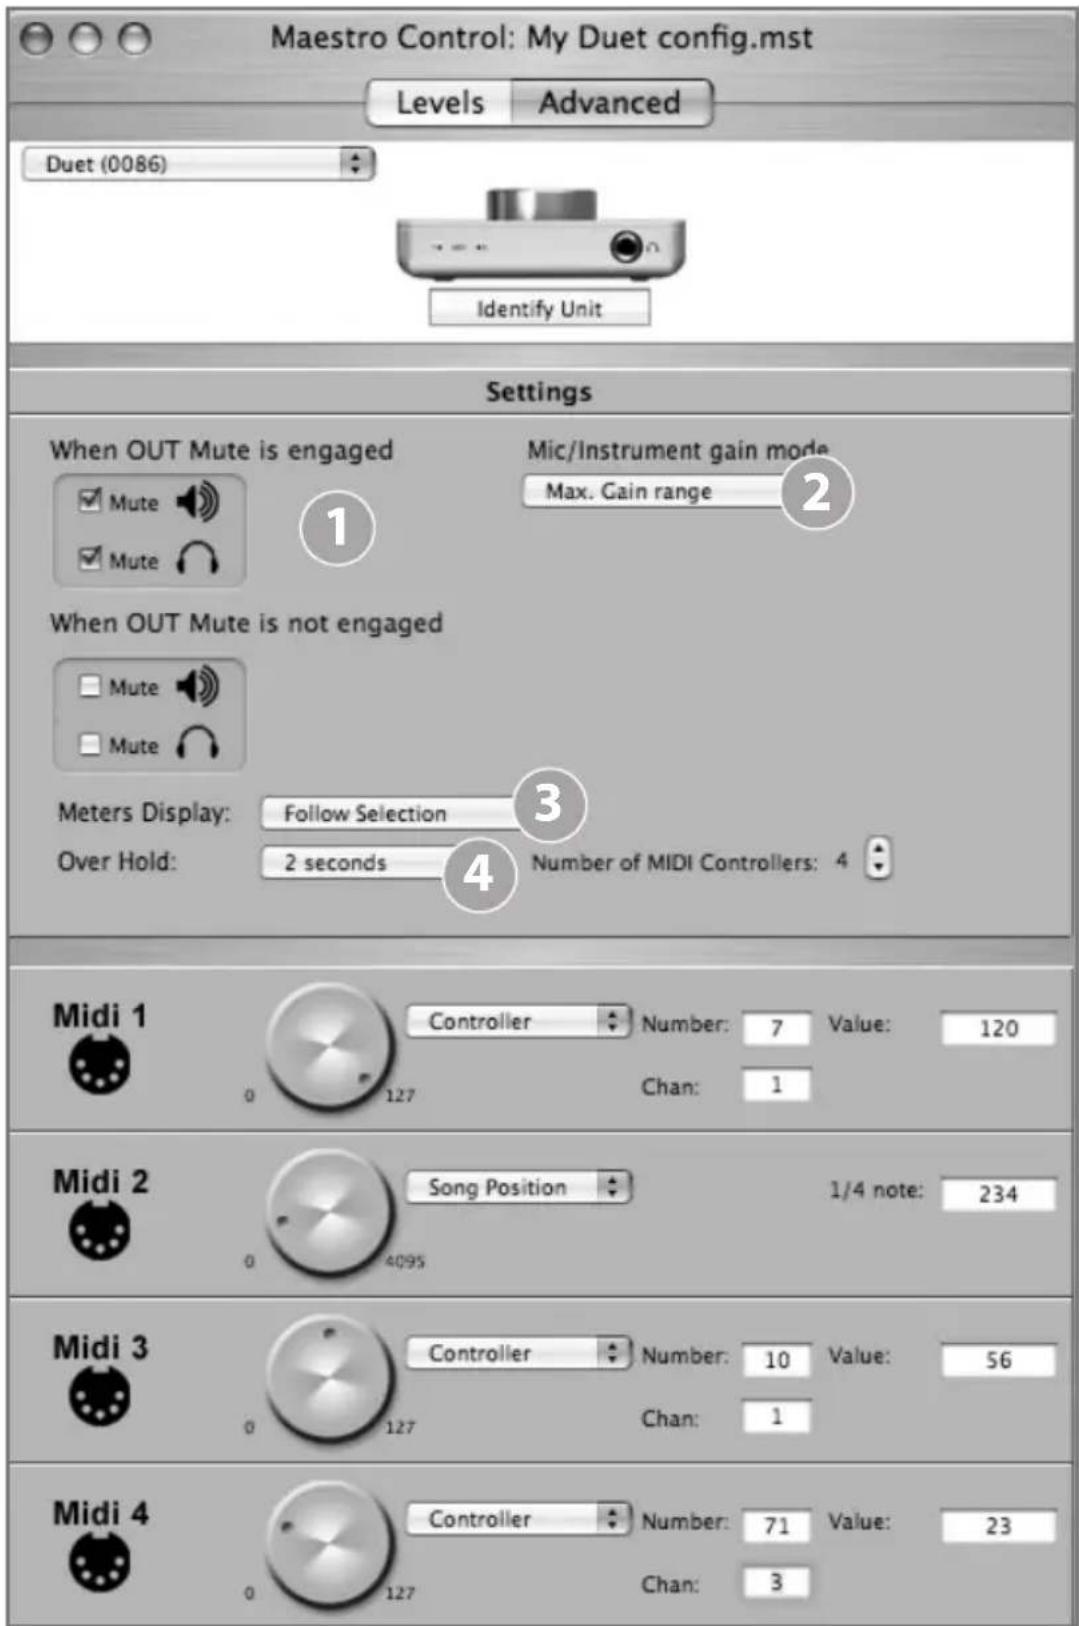
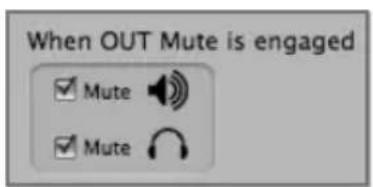
OUT Muting – These check boxes determine which outputs actually mute when the Mute function is engaged. Here are a few example settings:

When boxes are checked as shown at left, it's possible to switch between a recording mode (headphones on, speakers connected to line outputs off) and a playback mode (headphones off, speakers on) with one action – engaging and disengaging Mute. As the volume control for the two outputs is shared, it's a good idea to check your level before unmuting line outs.
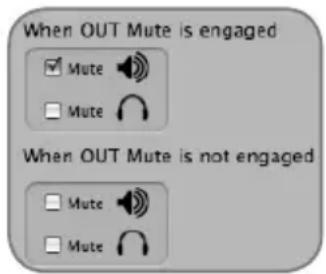
When boxes are checked as shown at left, the headphone outputs are never muted; when Mute is engaged, only the line outputs are muted.

Mic/Instrument gain mode – This menu sets the input gain mode:
Max. Gain range – The full range of gain is available, with a relay switch occurring after the first 10 dB of gain.
Clickless Operation – The gain range is reduced slightly but no relays are employed, resulting in clickless operation regardless of gain setting. An appropriate gain range is set based on the Input and 48V settings.

Meters Display
This menu selects the signal to be displayed on the top panel meters; selections are Input, Output, or Follow Selection. When Follow Selection is chosen, the meter display follows the top panel setting indicator; thus, when either IN-1 or IN-2 is selected, the meter displays both inputs, when OUT is selected, the meter displays the stereo output.

Over Hold
When Over Hold is set to Infinite, Over indications remain “on” until cleared by the user. Overs may be cleared by clicking on the Over indicator or clicking Clear Overs in the Maestro Mixer pane. When Over Hold is set to 2 seconds, Over indications clear automatically after two seconds.
Maestro
Maestro
Maestro Control – Advanced: MIDI Controllers

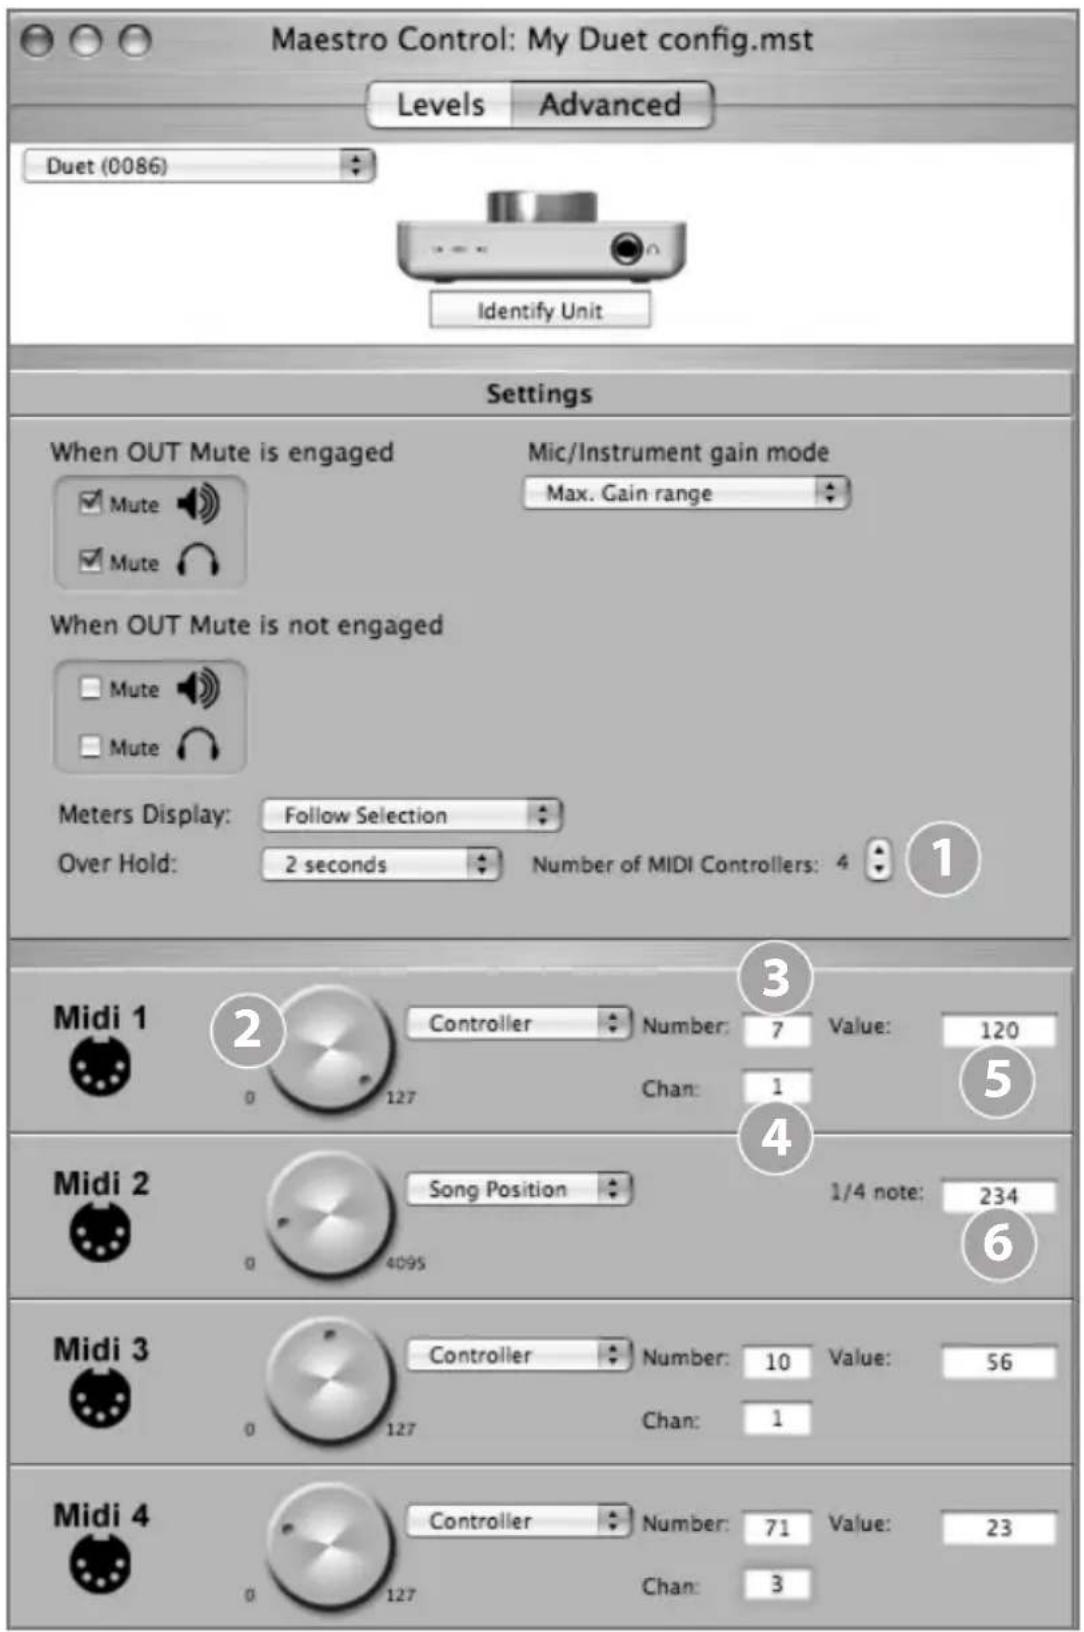
Number of MIDI Controllers – To access Duet's MIDI functionality, instantiate 1 to 4 virtual MIDI controllers using this counter. Once 1 or more MIDI controllers are instantiated, they may be modified with either the top panel encoder or the corresponding software encoder. To select a MIDI controller using the top panel encoder, press the encoder until the Duet pop-up displays selection of the desired MIDI controller (see p. 16 for more about Duet pop-ups). Note that when MIDI controllers are selected, none of the top panel (IN-1, IN-2, OUT) LEDs are lit.
When Number of MIDI Controllers is set to 1 to 4, the following settings are accessible:

MIDI encoder – This software encoder is used to send MIDI Controller or Song Position data to software applications
When the function menu is set to Controller, the following settings are accessible:

Number – This box displays the MIDI Continuous Controller number. The full range of 7-bit controls (0 to 127) may be entered.

Chan: - This box displays the MIDI channel over which controller data is sent. Numbers between 1-16 may be entered.

Value – Numbers in the range 0-127 may be directly entered (followed by Enter or Return keys to accept the value), though rotation of the encoder will override numerical entry.
When the function menu is set to Song Position, the following setting is accessible:

1/4 Note – This box displays the current Song Position location, as defined as the number of 1/4 note beats from the beginning of the song, beat 0
Maestro
Maestro
Low Latency mixing
Before describing the functions of Maestro's Mixer pane, a bit of background information concerning latency and computer-based digital recording setups will help you better understand these functions.
When recording with most computer-based digital audio applications, the delay between the input and output of the recording system often disturbs the timing of the musicians performing. This delay, known as latency, means that the musician hears the notes he's produced a few milliseconds after having produced them. As anyone who has spoken on a phone call with echo knows, relatively short delays can confuse the timing of any conversation, spoken or musical.
To illustrate the effect of latency, figure A depicts the typical signal path of a vocal overdub session. A vocalist sings into a microphone, which is routed to an analog to digital converter, then to the audio software application for recording. In the software application, the vocalist's live signal is mixed with the playback of previously recorded tracks, routed to a digital to analog converter, and finally to the vocalist's headphones. A slight delay accumulates at each conversion stage, while a much greater amount of delay occurs through the software application, resulting in the vocalist hearing his performance in headphones delayed by several milliseconds.

flowchart
graph LR
    A["Figure 1"] --> B["Headphones"]
    B --> C["Hardware Interface"]
    C --> D["Software Application"]
    D --> E["Output from DAW"]
    C --> F["A/D"]
    C --> G["D/A"]
    F --> H["Latency"]
    G --> I["Latency"]
    H --> J["Record enabled track"]
    I --> K["Output from DAW"]
Figure A
Maestro
Low Latency mixing - continued
By routing the hardware input directly to the hardware output and mixing in playback as shown in Figure B, it's possible to provide the vocalist a headphone monitoring signal with a much shorter delay.
First, the signal being recorded (in this case, a vocal mic) is split just after the A/D stage and routed to both the software application for recording and directly back to the hardware outputs without going through the latency-inducing software; this creates a low latency path from mic to headphones. Next, a stereo mix of playback tracks is routed to the low latency mixer and combined with the hardware input(s). This allows the performer to hear himself without a confusing delay while listening to playback tracks in order to record overdubs.
Note that the software application's mixer is used to set a stereo mix of playback tracks while the low latency mixer is used to set the balance between the stereo playback mix and the hardware inputs.

flowchart
graph LR
    A["Figure 2"] --> B["Headphones"]
    B --> C["Latency"]
    C --> D["A/D"]
    D --> E["Hardware Interface"]
    E --> F["Low Latency Mixer"]
    F --> G["D/A"]
    G --> H["Software Application"]
    H --> I["Latency"]
    I --> J["Record enabled track"]
    J --> K["Output from DAW"]
    style A fill:#f9f,stroke:#333
    style H fill:#ccf,stroke:#333
Figure B
Maestro
Maestro Mixer
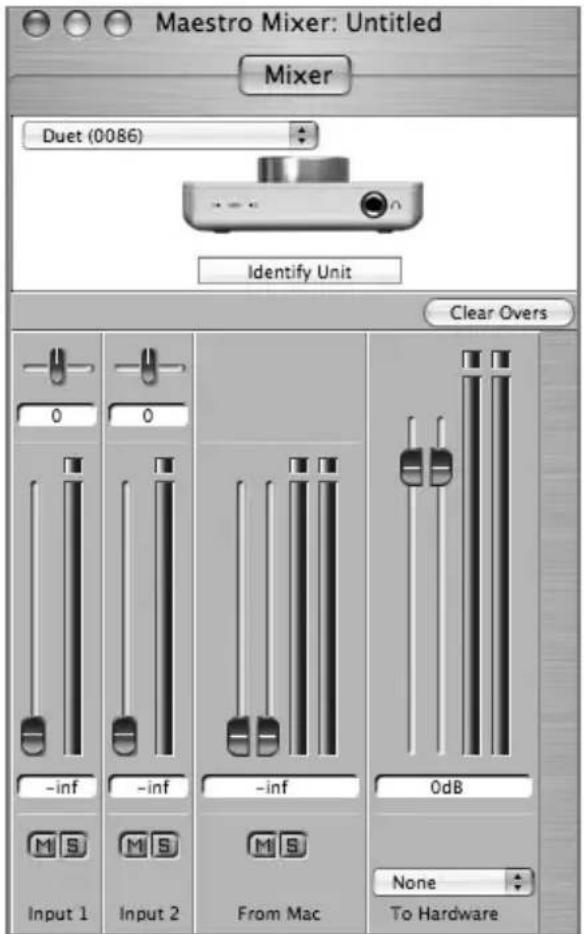
The Maestro mixer provides the ability to blend Duet's hardware inputs with playback from an audio application, and route the resulting mix to Duet's hardware outputs. Using the Maestro mixer, it's possible to create a monitor mix where latency isn't a problem.

Input 1, Input 2 – These channels provide mixing facilities to route and mix signal from each of Duet's hardware inputs directly to Duet's hardware outputs. The actual input source is determined by the Input setting (p. 12).

From Mac - This channel provides mixing facilities to mix the output of an audio application to Duet's hardware outputs.

To Hardware – This channel provides mixer output level and routing.
When To Hardware is set to Out L-R, the mixer's output is sent to Duet's hardware outputs.
When To Hardware is set to None, the mixer is disabled and the audio application's output is sent directly to Duet's hardware outputs, thus bypassing the Maestro Mixer.


Working with the Maestro Mixer
Do I need the Maestro Mixer?
The Maestro mixer serves to provide a low latency monitoring mix while recording.
Therefore if you're using Duet to listen to iTunes or audio from another program, there's no need to use the mixer. Set To Hardware to None to disable the mixer.
It's possible that the latency of your particular recording system is low enough to be unnoticed. The system latency is determined by the recording software's buffer setting, and if your Mac is powerful enough, it's possible to set the buffer to a lower value (shorter latency) without encountering clicks and pops in the audio output. If the latency doesn't pose a problem while recording, the mixer may be disabled by setting To Hardware to None.
Recording software settings
Before using the Maestro mixer, it's necessary to change a few settings in your recording software.
Software monitoring - Because the signal to be recorded is monitored through the Maestro mixer, the outputs of software tracks actively recording should be muted - after all, that's the source of the latency. Most software applications provide an option to turn off software monitoring of recording tracks. In Logic Pro, for example, the software monitoring option is found in the same Audio preferences window used to select Duet as the hardware device (Logic Pro > Preferences > Audio). Uncheck the Software Monitoring box.
Playback mix - In your recording software, set up a mix of all playback tracks and route it to Out L-R. If a master fader controls the global output of the mix, it's suggested to set the fader to 0 dB.
Maestro settings
Maestro Mixer settings - Initially, set the Input, From Mac and To Hardware faders to 0 dB. Set the To Hardware menu to Out L-R.
After making the input selection and setting gain (as described on page 12), the signal should be displayed on both the Input and To Hardware meters. If the Input's Over LED lights, reduce the input gain in the Maestro Control window. If the To Hardware's Over LEDs light, reduce the Input fader.
Now start playback from the session. The playback signal should be displayed on the From Mac and To Hardware's meters. Use the From Mac and Input faders to establish a balance between the input and playback signals. If you've found a good balance but the To Hardware's Over LEDs light, reduce the To Hardware fader.
Maestro
Maestro Preferences – Duet Preferences
The two Maestro preferences specific to Duet are described below. For a description of other preference settings, please see page 24.
Launch Maestro automatically when connecting a device
When this box is checked, Maestro is launched automatically when Duet is discovered on the Mac's FireWire bus. In order for Maestro mixer settings to be recalled after the computer restarts, this box must be checked. If this preference is unchecked, Maestro Mixer settings won't be preserved after the Mac has been shut down or restarted.
Enable Duet pop-ups
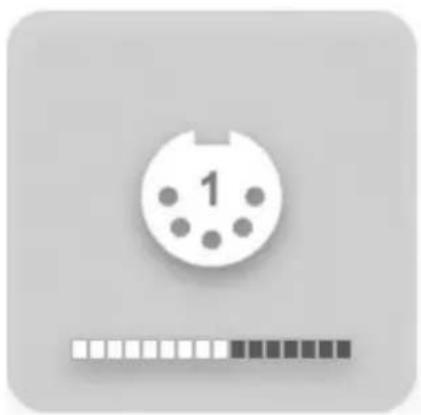
When this box is checked, Encoder pop-ups appear on the Mac which display various Duet settings, including input and output levels, Input, Group and muting. To illustrate, a few examples are shown below:

natural_image
Icon of a microphone with number 1 and a progress bar below (no text or symbols)IN-1 selected,
Input set to XLR Mic,
encoder set to 40 dB

natural_image
Illustration of a microphone and guitar with a color-coded scale bar below (no text or symbols)IN-1 and IN-2 selected,
Group checked,
Input 1 set to XLR Mic,
Input 2 set to Instrument,
encoder 1 set to 30 dB,
encoder 2 set to 40 dB.
Maestro

natural_image
Icon of a white headset with a gray bar below, representing audio or video playback controls (no text or symbols)OUT Level set to -12 dB
Mute engaged
OUT muting set as below


natural_image
Icon set showing a speaker, headphones, and a playback button (no text or symbols)Mute engaged,
OUT muting set as below
natural_image
Simple icon of a circular object with number 1 and a color-coded bar below (no text or symbols)Encoder set to modify MIDI Controller 1
Maestro
Menu by Menu

Maestro > About Maestro
Selecting this menu item opens the window shown at right, which indicates various software and firmware versions.

Maestro > Preferences
Selecting this menu item opens the Preferences window, in which mixer control actions may be defined.
Rotary Controls
Mouse motion - This selection defines the motion of the mouse required to adjust rotary controls.
Fine adjust key – This selection defines the key command to make fine adjustments to any rotary control.

Fader Controls
Fine adjust key - This selection defines the key command to make fine adjustments to any fader control.
0dB key – This selection defines the key command to set the fader to 0 dB when clicking in the level value window.
Ungroup faders - This selection defines the key command to adjust one side of the stereo From Mac and To Hardware faders.
Pan Controls
Fine adjust key - This selection defines the key command to make fine adjustments to any pan control.
Center - This selection defines the key command to set the pan control to <0>, or center, when clicking in the pan value window.
Other
Mute/Solo all - This selection defines the key command to engage all Mutes or Solos when clicking on the Mute or Solo buttons.
Additional Preferences
Launch Maestro automatically when connecting a device - When this box is checked, Maestro is launched automatically when Duet is detected.
Maestro
Menu by Menu
| Maestro | File | Tools |
| About Maestro | ||
| Preferences... | %, | |
| Hide Maestro | %H | |
| Hide Others | \H | |
| Show All | ||
Maestro > Hide Maestro
Choosing this menu item hides the Maestro application.
Maestro > Hide Others
Choosing this menu item hides all other open applications.
Maestro > Show All
If Hide Others has been previously selected, choosing this menu item reveals all open applications in the Finder.
Maestro > Quit Maestro
Choosing this menu item closes the Maestro program.
| File | Tools | Window |
| Open... | ⌘O | |
| Open Recent | ▶ | |
| Close Window | ⌘W | |
| Save | ⌘S | |
| Save As... | 介⌘S |
File:
File > Open
Choose this menu item to navigate to a previously saved Maestro configuration file and open it.
File > Open Recent
Choose this menu item to re-open a recently opened Maestro configuration file.
File > Close Window
Choose this menu item to close the "active", or up-front, window.
File > Save
Choose this menu item to save the current settings of all windows.
File > Save As
Choose this menu item to save the current settings of all windows as a newly named file.
| Tools | Window | Help |
| Maestro Control | #1 | |
| Maestro Mixer | #2 | |
| Reset Symphony Clocking | ||
| Refresh Connections | F5 | |
| Reset Mixer | ||
| Reset Routing | ||
Tools:
Tools > Maestro Control
Choosing this menu item opens the Maestro Control window.
Tools > Maestro Mixer
Choosing this menu item opens the Routing/Mixer window.
Tools > Reset Symphony Clocking
In certain instances Apogee interfaces can't be detected until the clock setting of the first interface has been reset. Choosing Reset Symphony Clocking allows the reset of clock source on the first interface to Internal or External.
Tools > Refresh Connections
Choosing this menu item re-scans computer connections for connected Apogee hardware.
Tools > Reset Mixer
Maestro mixers may be reset with this menu item; choose Reset Displayed to reset the mixer displayed in the Maestro Mixer window; choose Reset All to reset all mixers.
Tools > Reset Routing
Choosing this menu item resets the Input and Output panes to a "pass through" configuration, where hardware and software I/O are connected on a one to one basis.
| Window | Help |
| Minimize | 36 |
| Zoom | |
| Bring All to Front | |
| √ Maestro Control: Apogee.mst | |
Window:
Window > Minimize
Choosing this menu item minimizes the up-front window to the OS Dock.
Window > Zoom
Choosing this menu item maximizes the size of the active Maestro window.
Window > Bring All to Front
Choosing this menu item places all Maestro windows in front of other applications' windows.
Maestro
Duet – User's Guide
Maestro 2
Devices Sidebar

Any Maestro-compatible Apogee interfaces connected to the host computer are displayed in the Devices sidebar, regardless of whether the connection is made via Symphony PCI card, USB or FireWire. Hardware settings are displayed by first selecting one or more interfaces in the Devices sidebar and then clicking on a tab.
Device Icon & ID Button

A device icon and ID button is placed adjacent to each row of parameters to identify the hardware unit to which the row belongs. By clicking on the ID button, the corresponding hardware unit's front panel will illuminate. Each hardware unit is assigned a Peripheral Prefix (A-Z, found in Maestro's Device Settings tab window) which is displayed on the ID button.
Maestro 2
Input Tab Window

- Analog Level - Use this menu to select microphone, instrument, or line input.
- Input Level - The gain of each input is controlled with these software knobs. The gain level is indicated in the value box below the knob.
- Analog Input Meter - This meter displays the level of the analog input after A/D conversion.
- Group On/Off - Use this to group the gain setting of both inputs so that the multifunction knob on Duet or one software gain knob controls both input gains simultaneously. If a gain offset is present between inputs when Group is set to On, this offset is preserved.
- Phase - Check this box to reverse the polarity of the input signal. Under certain circumstances, when two mics are used on one source, reversing the polarity of one mic may result in a fuller sound. For example, when top and bottom mic'ing a snare drum, a fuller sound is obtained when the polarity of the bottom mic is reversed.
- 48 V / Phantom Power - Engage this button for 48 volts phantom power on the XLR connections. Condenser mics require phantom power to operate.
Duet – User's Guide
Maestro 2
Output Tab Window

- Analog Output Meter - This meter displays the level of the analog output before D/A conversion, in the range -48 to 0 dBFS.
- Speaker Out Selection - This menu selects the software output that is sent to the speaker and headphone outputs.
- Speaker Out Level - This knob controls the speaker and headphone output level. Mute - Engage this to mute the speaker and headphone outputs.
Maestro 2
Device Settings Tab Window
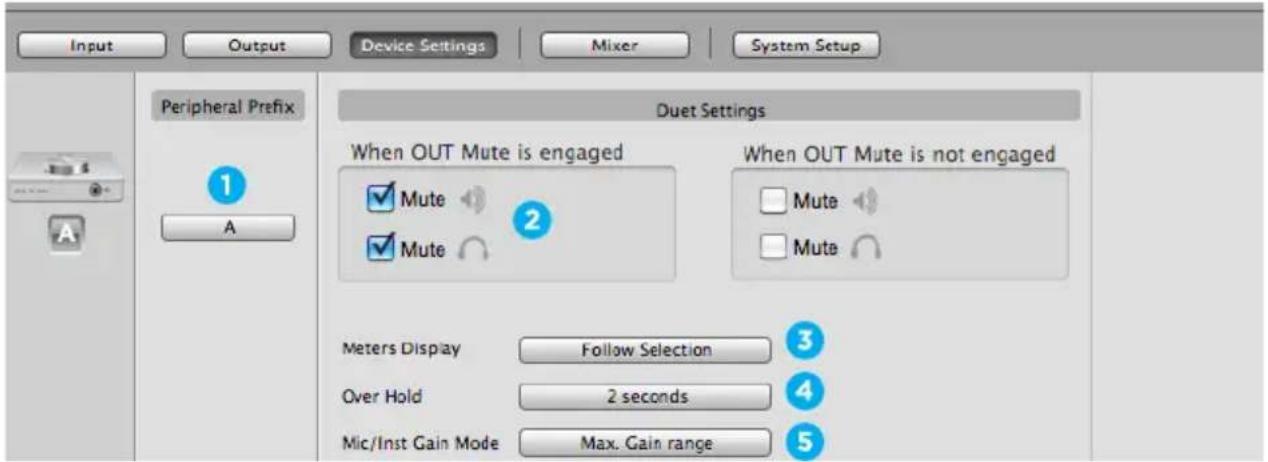
- Peripheral Prefix - Use this drop down menu to assign a letter prefix (A-Z) to each peripheral device displayed in the Devices Sidebar. The letter prefix is included in all graphic representations of the peripheral as well as I/O labels in Maestro and Core Audio compatible applications.
- OUT Muting - These check boxes determine which outputs actually mute when the Mute function is engaged. Here are a few example settings:
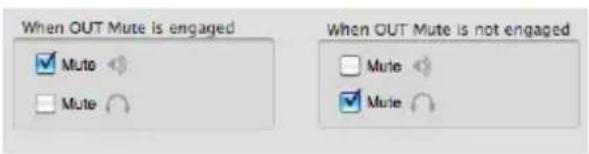
When boxes are checked as shown above, it's possible to switch between a recording mode (headphones on, speakers off) and a playback mode (headphones off, speakers on) with one action – engaging and disengaging Mute. As the volume control for the two outputs is shared, it's a good idea to check your level before unmuting speakers.

When boxes are checked as shown above, the headphone outputs are never muted; when Mute is engaged, only the speaker outputs are muted.
- Meters Display - This menu selects the signal to be displayed on the top panel meters; selections are Input, Output, or Follow Selection. When Follow Selection is chosen, the meter display follows the top panel setting indicator; thus, when either IN-1 or IN-2 is selected, the meter displays both inputs, when OUT is selected, the meter displays the stereo output.
- Over Hold - When Over Hold is set to Infinite, Over indications remain "on" until cleared by the user. Overs may be cleared by clicking on the Over indicator or clicking Clear Overs in the Maestro Mixer pane. When Over Hold is set to 2 seconds, Over indications clear automatically after two seconds.
- Mic/Instrument gain mode - This menu sets the input gain mode: Max. Gain range - The full range of gain is available, with a relay switch occurring after the first 10 dB of gain. Clickless Operation - The gain range is reduced slightly but no relays are employed, resulting in clickless operation regardless of gain setting. An appropriate gain range is set based on the Input and 48V settings.
Maestro 2
Mixer Tab Window
Use the Mixer Tab Window to adjust the Mix of input and output signals as well as configure Low Latency Mixing.

- Pan - This rotary knob pans the input signal between he left and right sides of the Maestro mixer's stereo output.
- Input Level fader - This slider sets the level of the input signal in the Maestro mixer's stereo output.
- Meter - This bargraph style meter displays the pre-fader input level.
- Level Value Window - The level value, between -48 and 0 dBFS.
- Solo - This button mutes all other channels whose Solo buttons are not engaged.
- Mute - This button mutes the input channel.
- Software Return Fader - This stereo input channel provides level control, metering, and mute/solo functions for the signal from the software application containing playback.
- Mixer Master - This is the level control and meter for the mixer's output.
Maestro 2
System Setup Window

- Sample Rate - This drop down selects the sample rate. Under certain circumstances, (for example, when a DAW session is open) this setting will be overridden by software sample rate settings.
Menu Bar Menus

About Apogee Maestro - Choose this menu item to display version information.
Preferences - Choose this menu item to display Maestro's Preference panel.
Check Launch Maestro automatically when connecting a device to launch Maestro when the Mac is started.
Check Display Pop-ups to show top panel encoder adjustments.
Hide Apogee Maestro 2 - Choose this menu item to hide the Maestro application.
Hide Others - Choose this menu item to hide all other open applications.
Show All - If any open applications have been hidden, choose this menu item to reveal all open applications.
Quit Apogee Maestro 2 - Choose this menu item to quit Maestro.
Duet – User's Guide
Maestro 2
Menu Bar Menus

Apogee Maestro 2

Window
Help
Close
W
Rescan
Close - Choose this menu item to close the Preferences panel when opened.
Rescan - Choose this menu item to re-initialize the link between Maestro software and Apogee hardware connected to the Mac, in the case where the hardware is correctly connected and powered on but not detected in Maestro.

Apogee Maestro 2
File
Window
Help
Minimize
M
Zoom
Input
1
Output
2
Device Settings
3
Mixer
4
System Setup
5
√ Maestro 2
Minimize - Choose this menu item to minimize the Maestro window to the OS X Dock. Zoom - Choose this menu item to maximize the size of the Maestro window.
Choose any of the currently active tabs to open the tab window. Type Command + number to open the tab window.
Maestro 2
Low Latency Mixing
While recording, if you notice a delay between the moment you play or sing a note and when you hear it in your headphones you are experiencing latency. Maestro's low latency mixer may help and can be configured by clicking the Mixer tab in Maestro.

bar
| Category | Value | | -------------- | ----- | | Inst 1 | <0> | | Mic 2 | <0> | | Software Return | -48 | | Mixer Master | -48 |Maestro Low Latency mixing
A bit of background information concerning latency and computer-based digital recording setups will help you better understand these functions.
When recording with most computer-based digital audio applications, the delay between the input and output of the recording system often disturbs the timing of the musicians performing. This delay, known as latency, means that the musician hears the notes played a few milliseconds after having actually played them. As anyone who has spoken on a phone call with echo knows, relatively short delays can confuse the timing of any conversation, spoken or musical.
Duet – User's Guide
Maestro 2
Maestro Mixer Settings
Initially, set the Input, Software Return, and Mixer Master faders to 0 dB.

On the Output tab of Maestro, set the speaker, headphone, or both outputs to Mixer.

Maestro 2
Maestro Mixer Settings
After making the input selection and setting gain, the signal should be displayed on both the Input and Mixer Master meters. If the Input's Over LED lights, reduce the input gain in the Maestro Control window. If the Mixer Master's Over LEDs light, reduce the Input fader.
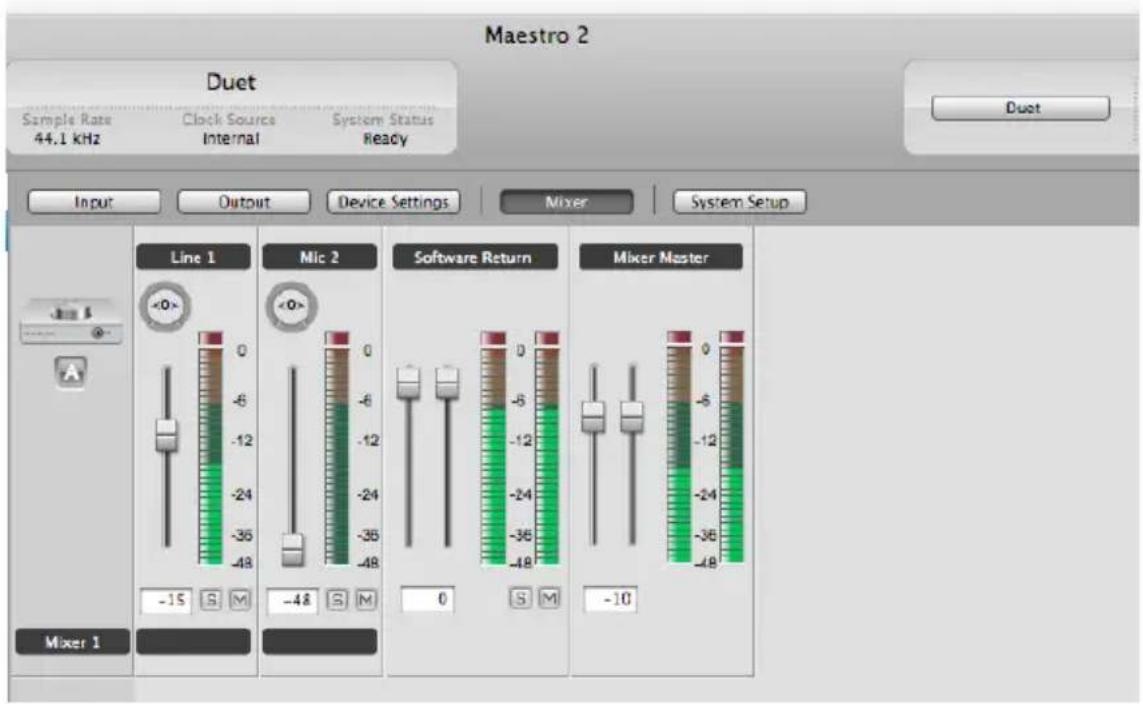
Now start playback in your recording software. The playback signal should be displayed on the Software Return and Mixer Master's meters. Use the Software Return and Input faders to establish your desired balance between the input and playback signals. If you've found a good balance but the Mixer Master's Over LEDs light, reduce the Mixer Master fader.
Duet – User's Guide
Connecting Your Duet:
Monitors and Headphones

Connecting Your Duet:

Duet – User's Guide
Connecting Your Duet:
Instrument and Instrument
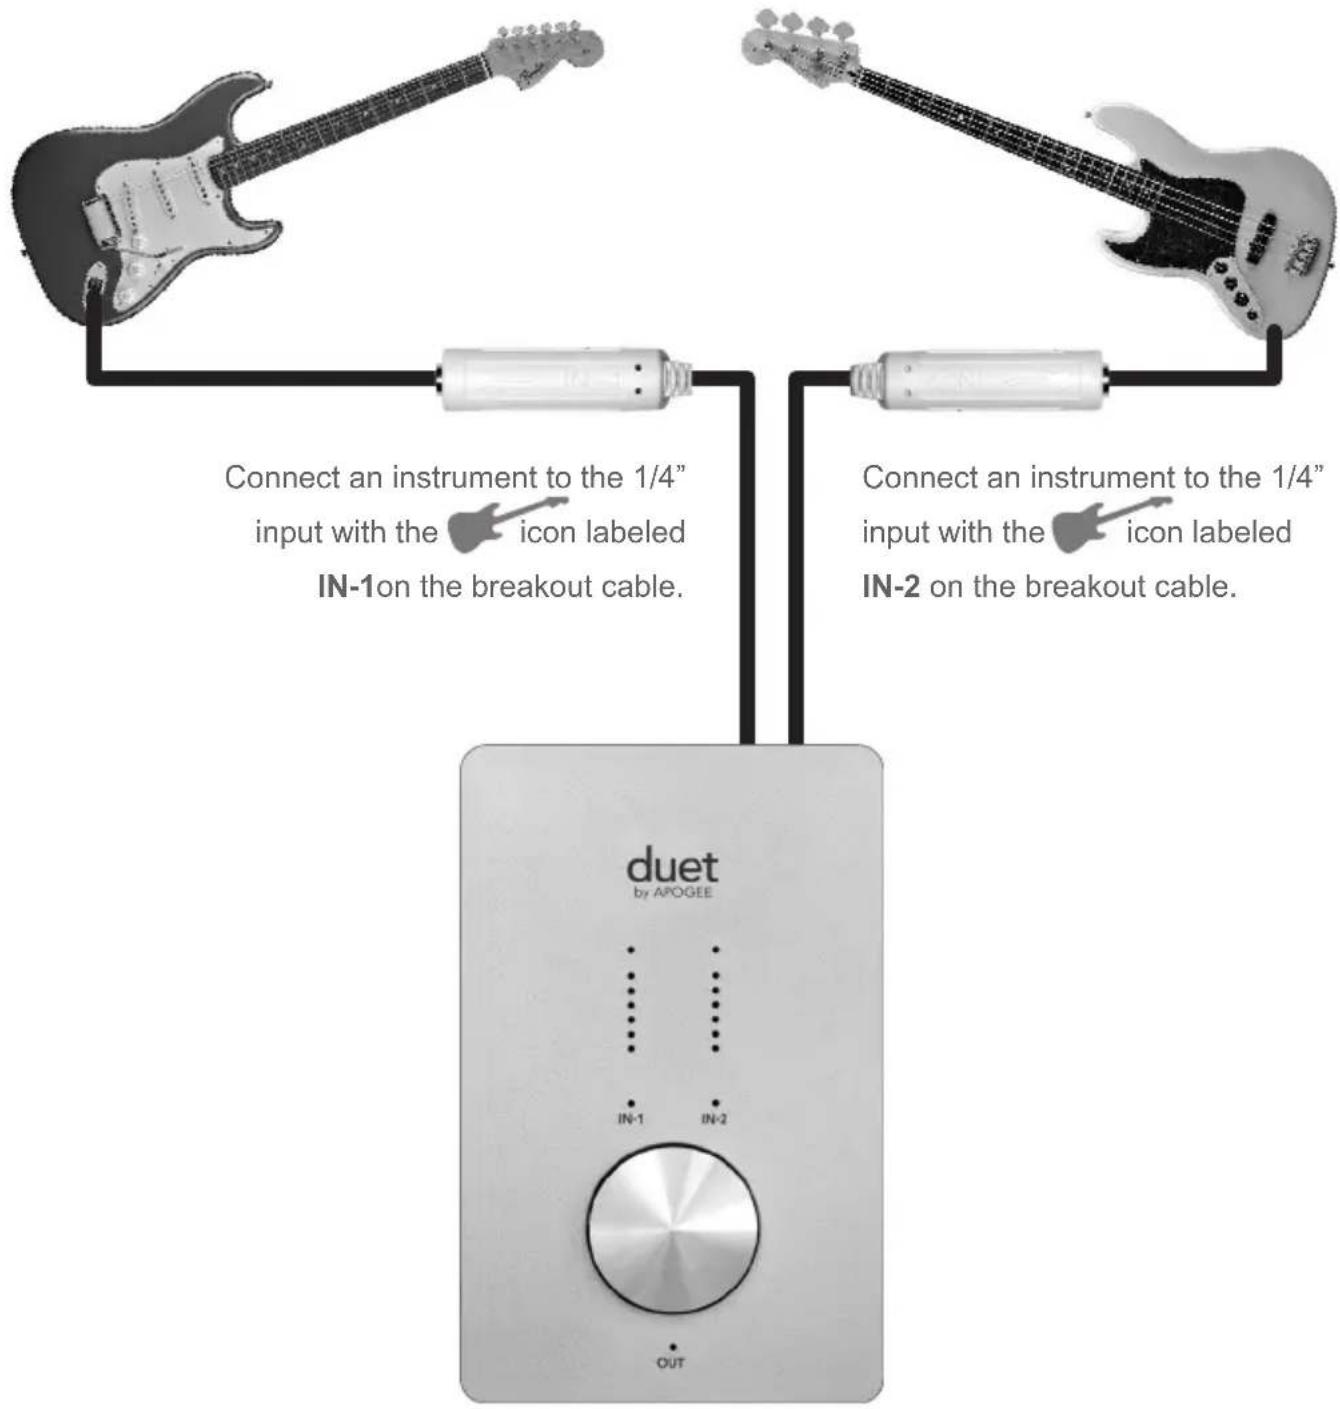
Connecting Your Duet:
Mic and Mic

Duet – User's Guide
Connecting Your Duet
Powered Monitors
Duet is also the best way to listen to audio from your Mac, be it from your iTunes library, an Internet radio station or CD/DVD playback.
To connect Duet's line outputs directly to powered speakers, you'll need 2 cables with 1/4" tip-sleeve plugs on one end to connect to Duet's OUT-L and OUT-R jacks and the appropriate connector on the other ends to connect your speakers. For your convenience, 2 1/4" to RCA adaptors are included with Duet, allowing the use of commonly available RCA to RCA cables when connecting consumer stereo equipment.
When connecting to powered monitors, use Duet's encoder knob to control playback volume.

natural_image
Diagram of a duet audio amplifier connected to two speakers, showing speaker, audio output, and control panel (no text labels or symbols)Connect monitors to the 1/4" outputs with the icons labeled OUT-L and OUT-R on the breakout cable.
Connecting To A Home Stereo:
To connect Duet directly to your home audio system, insert the provided 1/4" to RCA adaptors in Duet's OUT-L and OUT-R jacks and use a commonly available RCA to RCA cable to connect to the AUX or CD input of your receiver.
When connecting to a home audio system, set Duet's output to 0 dB (i.e full volume) and use the receiver's volume control to set playback level.
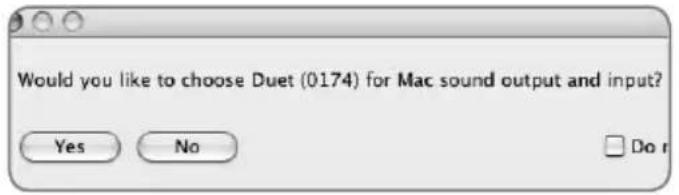
Once audio connections have been made, connect Duet's Firewire port to your Mac. Once connected, the dialog box shown below will appear. Click Yes to choose Duet for Mac sound output and input.
This selection may also be made in the System Preferences > Sound > Output panel.
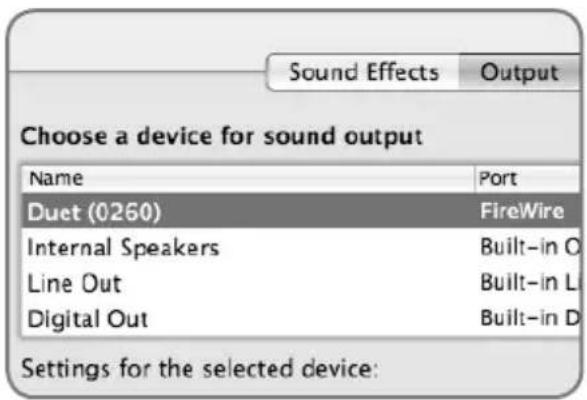
In iTunes, select Computer as the sound output. Any audio that is played back in iTunes will now be routed to Duet and the output will be available on your home audio system.

Troubleshooting
Q: When I press the encoder to select an input or output, the selection is unavailable. Why?
A: When the inputs are set to XLR line or the output is set to Instrument Amp, the encoder disabled, and thus not selectable
Q: When I press the encoder to select an input or output, ALL the LEDs go out. Why?
A: When 1 or more MIDI controllers are instantiated and selected for control by the top panel encoder, all the top panel I/O LEDs are turned off to indicate selection of a MIDI controller. If pop-ups are enabled in Maestro preferences, the MIDI controller selected will be displayed on screen.
Q: I've connected my guitar, but I'm not getting any input. What should I check?
A: In Maestro, be sure to set Input to Instrument.
Q: I'm not getting any output from audio software applications. What should I check?
A: If the OUT LED is flashing, the output is muted. Press and hold down the top panel encoder until the OUT LED stops flashing. Also, if the Maestro Mixer's output has been set to Out L-R, then the From Mac fader must be raised to send audio software application outputs to Duet's outputs.
Q: I want Maestro to open automatically each time I connect Duet. What should I set?
A: Open Maestro > Preferences and check the Launch Maestro automatically when connecting a device checkbox.
Q: Can I set the headphone and line outputs to different levels?
A: The headphone and line outputs are always controlled simultaneously. To set the balance between headphones and speakers connected to the line outputs, set the speaker's amplifier accordingly. It is possible to mute the headphones and line outputs independently.
Q: How do I reset Duet?
A: To reset Duet press and hold the encoder for 5 seconds. All settings will return to their default state.
Core Audio Applications Guide

Using Duet with Apple Soundtrack Pro
Choose Soundtrack Pro > Preferences.

Click on the Recording tab.
Select Duet in both the Input and Monitor menus.
Close the Preferences window after making settings.

Using Duet with Apple MainStage
Choose MainStage > Preferences

Click on the Audio/Midi tab
Select Duet in the Audio Output and Audio Input menus
Set I/O Buffer Size to 128
Close the Preferences window after making settings.

To control Duet directly from your Mainstage session, choose Mainstage > Open Apogee Control Panel.
Core Audio Applications Guide

Using Duet with Apple Final Cut Pro
Choose Final Cut Pro > Audio/Video Settings.
![Audio/Video Settings Audio: [Missing] Apple FireWire NTSC (720 x 480) ✓ Mirror on desktop Audio: Default Duet (D002) Built-in Output Built-in Line Output Built-in Digital Output FireWire DV FireWire DV (DV50) Select to Video ESC (720 x 480)](/content/2026/06/1358420/images/703826981761877771f55560636e29ecd71e3c102cb7263625cf759886dc84df.jpg)
Click on the A/V Devices tab. Select Duet in the Audio menu. Click OK.

Using Duet with Ableton Live
Choose Live > Preferences
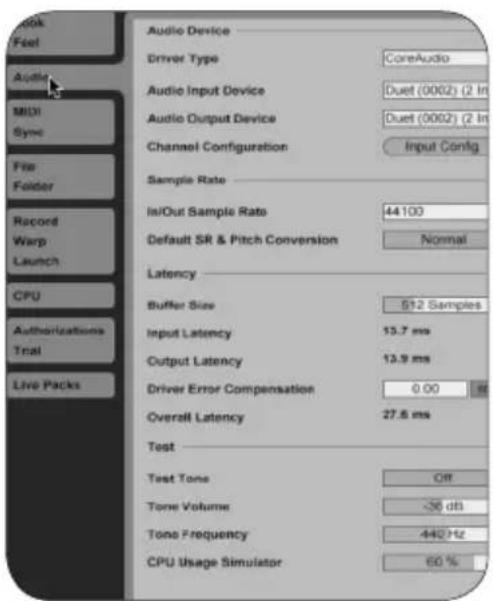
Click on the Audio tab. Select CoreAudio in the Driver Type menu. Select Duet in both the Audio Input Device and Audio Output Device menus. Set Buffer Size to 128. Close the Preferences window after making settings.
Core Audio Applications Guide
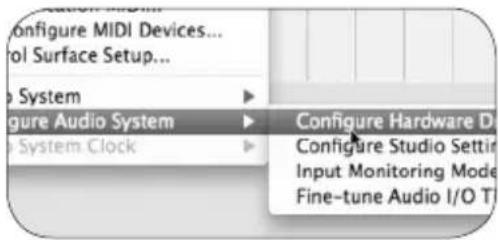
Using Duet with MOTU Digital Performer
Choose Setup > Configure Audio System >Configure Hardware Driver

In the Configure Hardware Driver window, select
CoreAudio in the topmost menu.
Select Duet in the device list.
Set Buffer Size to 128.
Set Host Buffer Multiplier to 1.
Set Work Priority to Low.
Click OK.
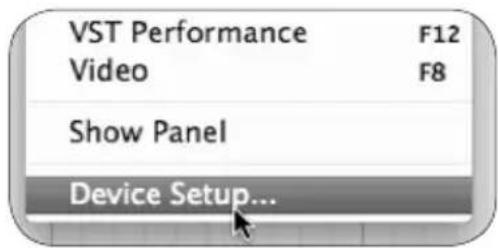
Using Duet with Steinberg Nuendo
Choose Devices > Device Setup
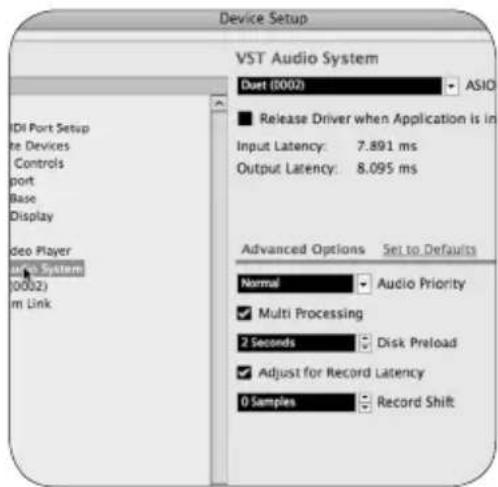
In the Devices window, click on VST Audio System. Select Duet in the ASIO menu.
Once Duet is recognized by Nuendo, select Duet in the Devices window.
Click on Control Panel.
In the ASIO Settings pop-up, set Buffer Size to 128 and click OK.
In the Device Setup window, click OK.
Features & Specifications
- Two channels of professional-quality 24-bit/96kHz audio input and output
- Two balanced XLR inputs, with selectable 48V phantom power on each input
• Maximum input - +4 dBu setting: 20 dBu; -10 dBV setting: +8 dBV
• Mic Pre-amp gain: 10 to 75 dB - Two unbalanced high impedance instrument inputs
• One high-level stereo headphone output - Two unbalanced -10 dBV line outputs for powered speakers
- Multi-function controller knob for volume and input gain control and assignable MIDI control
- Multi-segment LED meters to display input or output levels
- FireWire 400, compatible with Mac OS X Core Audio
- Integration and control with Apple's GarageBand, Logic Pro, Logic Express and Final Cut Studio (Soundtrack Pro)
- Compatible with any Core Audio-compliant audio application
- Apogee's Maestro software for advanced control and low latency mixing
System Requirements
Computer: Mac G4 1GHz or faster, PPC or Intel CPU
Memory: 1 GB RAM minimum, 2 GB recommended
OS X : 10.4.11 or greater must be installed, 10.5.3 or greater highly recommended.
Connection: FireWire 400 port
Notifications
Owner's Record
The serial number is located on the rear panel of the unit. We suggest you record the serial number in the space provided below. Refer to it whenever you call an authorized Apogee Electronics repair facility or the manufacturer. Please be sure to return your completed warranty card immediately!
Duet Serial No.
Purchase Date
Dealer
Phone
Address
CAUTION: Any changes or modifications not expressly approved by APOGEE ELECTRONICS CORPORATION could void your authority to operate this equipment under the FCC rules.
Please register this unit by filling in the included registration card, or registering online at: http://www.apogeedigital.com/register/
Warnings
FCC warning
This equipment has been tested and found to comply with the limits for a Class B digital device, pursuant to Part 15 of the FCC rules. These limits are designed to provide reasonable protection against harmful interference when operated in a commercial environment. This equipment generates, uses, and can radiate radio frequency energy and, if not installed and used in accordance with the instruction manual, may cause harmful interference to radio communications. Operation of this equipment in a residential area is likely to cause harmful interference, in which case the user will be required to take whatever measures necessary to correct the interference at his own expense.
Copyright Notice
The Apogee Duet is a computer-based device, and as such contains and uses software in ROMs. This software, and all related documentation, including this User's Guide contain proprietary information which is protected by copyright laws. All rights are reserved. No part of the software and its related documentation may be copied, transferred, or modified. You may not modify, adapt, translate, lease, distribute, resell for profit or create derivative works based on the software and its related documentation or any part thereof without prior written consent from Apogee Electronics Corporation, U.S.A.
Duet – User's Guide
Registration and Warranty Information
Be sure to register your Duet, either by filling in the enclosed Registration Card or by completing the on-line registration form at our Web site: http://www.apogeedigital.com/support/. If you do so, Apogee can contact you with any update information. As enhancements and upgrades are developed, you will be contacted at the registration address. Firmware updates are free for the first year of ownership unless otherwise stated. Please address any inquiries to your dealer or directly to Apogee at:
APOGEE ELECTRONICS CORPORATION, 1715 Berkeley St., Santa Monica, CA 90404, USA Tel: (310) 584-9394 Fax: (310) 584-9385 Web: http://www.apogeedigital.com
APOGEE ELECTRONICS CORPORATION warrants this product to be free of defects in material and manufacture under normal use for a period of 12 months. The term of this warranty begins on the date of sale to the purchaser. Units returned for warranty repair to Apogee or an authorized Apogee warranty repair facility will be repaired or replaced at the manufacturer's option, free of charge.
ALL UNITS RETURNED TO APOGEE OR AN AUTHORIZED APOGEE REPAIR FACILITY MUST BE PREPAID, INSURED AND PROPERLY PACKAGED, PREFERABLY IN THEIR ORIGINAL BOX. Apogee reserves the right to change or improve design at any time without prior notification. Design changes are not implemented retroactively, and the incorporation of design changes into future units does not imply the availability of an upgrade to existing units.
This warranty is void if Apogee determines, in its sole business judgment, the defect to be the result of abuse, neglect, alteration or attempted repair by unauthorized personnel.
The warranties set forth above are in lieu of all other warranties, expressed or implied, and Apogee specifically disclaims any and all implied warranty of merchantability or of fitness for a particular purpose. The buyer acknowledges and agrees that in no event shall the company be held liable for any special, indirect, incidental or consequential damages, or for injury, loss or damage sustained by any person or property, that may result from this product failing to operate correctly at any time.
USA: Some states do not allow for the exclusion or limitation of implied warranties or liability for incidental or consequential damage, so the above exclusion may not apply to you. This warranty gives you specific legal rights, and you may have other rights which vary from state to state.
Service Information
The Duet contains no user-serviceable components: refer to qualified service personnel for repair or upgrade. Your warranty will be voided if you tamper with the internal components. If you have any questions with regard to the above, please contact Apogee.
In the event your Duet needs to be upgraded or repaired, it is necessary to contact Apogee prior to shipping, and a Return Materials Authorization (RMA) number will be assigned. This number will serve as a reference for you and helps facilitate and expedite the return process. Apogee requires that shipments be pre-paid and insured — unless otherwise authorized in advance.
IMPORTANT: ANY SHIPMENT THAT IS NOT PRE-PAID OR IS SENT WITHOUT AN RMA NUMBER WILL NOT BE ACCEPTED.
Declarations of Conformity
This device complies with Part 15 of the FCC Rules. Operation is subject to the following two conditions:
- This device may not cause harmful interference
- This device must accept any interference received, including interference that may cause undesired operation.
This equipment has been tested and found to comply with the limits of a Class A digital device, pursuant to Part 15 of the FCC Rules. These limits are designed to provide reasonable protection against harmful interference in a residential installation. This equipment generates, uses and can radiate radio frequency energy and, if not installed and used in accordance with the instructions, may cause harmful interference to radio communications. If this equipment does cause harmful interference to radio or television reception, which can be determined by turning the equipment off and on, the user is encouraged to try to correct the interference by one or more of the following measures:
- Re-orient or relocate the receiving antenna.
- Increase the separation between the equipment and receiver.
- Connect the equipment into an outlet on a different circuit from that to which the receiver is connected.
- Consult the dealer or an experienced radio/TV technician for help.
NOTE: The use of non-shielded cable with this equipment is prohibited.
CAUTION: Changes or modifications not expressly approved by the manufacturer responsible for compliance could void the user's authority to operate the equipment.
Apogee Electronics Corporation, Betty Bennett, CEO.
Industry Canada Notice
Declaration of Conformity – CE
Apogee Electronics Corporation hereby declares that the product, the Duet, to which this declaration relates, is in material conformity with the following standards or other normative documents:
EN55022:1998, EN55024:1998
EN61000-3-2, EN61000-3-3, EN61000-4-2, EN61000-4-3, EN61000-4-4, EN61000-4-5, EN61000-4-6, EN61000-4-8, EN61000-4-11
Declaration of Conformity – Japan
Apogee Electronics Corporation hereby declares that the Duet, to which this declaration relates, is in material conformity with the VCCI Class B standard.
Declaration of Conformity – Australia/New Zealand
Apogee Electronics Corporation hereby declares that the Duet is in material conformity with AN/NZS standard requirements.
Duet
User's Guide
May 2011

APOGEE
www.apogeedigital.com


- Duet User's Guide
- Table of Contents
- Package Contents
- Introducing Duet
- Quick Start Guide
- System Requirements
- Install Apogee Software Package
- Connect FireWire cable
- Choose Duet for Mac Sound I/O
- Connect Headphones
- Using Duet with GarageBand 4.0.0 or greater recommended
- Using Duet with Logic Pro/Express 8.0.5 for higher recommended
- Operation
- Duet Top Panel Encoder
- Output level
- Input level
- Mute outputs
- MIDI controller
- Apogee Maestro
- Maestro low latency mixer
- Apogee Control Panel (Logic Pro 8, GarageBand)
- OS X System Preferences
- OS X Audio MIDI Setup
- Setting Sample Rate
- Maestro
- Maestro Control – Levels
- Interface Menu
- Identify Unit
- Input
- Level
- Output Level Software Encoder
- Mute
- Maestro Control – Advanced
- Maestro Control – Advanced: MIDI Controllers
- Low Latency mixing
- Low Latency mixing - continued
- Maestro Mixer
- Working with the Maestro Mixer
- Do I need the Maestro Mixer?
- Recording software settings
- Maestro settings
- Maestro Preferences – Duet Preferences
- Launch Maestro automatically when connecting a device
- Enable Duet pop-ups
- Menu by Menu
- Maestro > About Maestro
- Maestro > Preferences
- Rotary Controls
- Fader Controls
- Pan Controls
- Other
- Additional Preferences
- Maestro > Hide Maestro
- Maestro > Hide Others
- Maestro > Show All
- Maestro > Quit Maestro
- File:
- File > Open
- File > Open Recent
- File > Close Window
- File > Save
- File > Save As
- Tools:
- Tools > Maestro Control
- Tools > Maestro Mixer
- Tools > Reset Symphony Clocking
- Tools > Refresh Connections
- Tools > Reset Mixer
- Tools > Reset Routing
- Window:
- Window > Minimize
- Window > Zoom
- Window > Bring All to Front
- Maestro 2
- Devices Sidebar
- Device Icon & ID Button
- Input Tab Window
- Output Tab Window
- Device Settings Tab Window
- Mixer Tab Window
- System Setup Window
- Menu Bar Menus
- 1
- 2
- 3
- Maestro Low Latency mixing
- Maestro Mixer Settings
- Connecting Your Duet:
- Connecting Your Duet
- Powered Monitors
- Connecting To A Home Stereo:
- Troubleshooting
- Core Audio Applications Guide
- Using Duet with Apple Soundtrack Pro
- Using Duet with Apple MainStage
- Using Duet with Apple Final Cut Pro
- Using Duet with Ableton Live
- Using Duet with MOTU Digital Performer
- Using Duet with Steinberg Nuendo
- Features & Specifications
- Notifications
- Owner's Record
- Warnings
- FCC warning
- Copyright Notice
- Registration and Warranty Information
- Service Information
- Declarations of Conformity
Brand : Apogee
Model : Duet 3
Category : Hi-Fi System