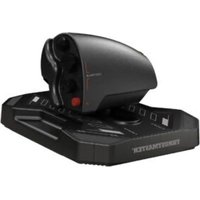
eSwap Pro Controller - Controller THRUSTMASTER - Free user manual and instructions
Find the device manual for free eSwap Pro Controller THRUSTMASTER in PDF.

| Product Type | Professional controller for PS4 and PC |
| Dimensions | Approximately 6.3 x 4.3 x 2.0 in (16 x 11 x 5 cm) |
| Weight | Approximately 220 g (7.8 oz) |
| Power Supply | Wired via USB (power from console/PC) |
| Compatibility | PlayStation 4 and Windows PC |
| Main Functions | Remappable buttons, interchangeable analog sticks, adjustable trigger dead zones, customizable vibration, Thrustmapper software |
| Profiles | 2 onboard profiles, can store up to 2 preset configurations |
| Button Mapping | Supports mapping of all buttons except PS, Share, Options, touchpad, Profile, and Mic buttons |
| Mini-Stick Configuration | Adjustable sensitivity curve (S, M, L zones) and dead zones (center and outer) for left and right sticks |
| Trigger Adjustment | Adjustable dead zones (start and end) for left and right triggers |
| Vibration Control | Maximum intensity adjustment for left and right vibration motors |
| Software | Thrustmapper utility for Windows (download from support.thrustmaster.com) |
| Firmware Update | Via Thrustmapper software; recommended to keep up-to-date |
| Maintenance and Cleaning | Wipe with a soft, dry cloth; avoid liquids and abrasive cleaners |
| Safety Precautions | Keep away from moisture, extreme temperatures, and do not disassemble |
| Spare Parts and Repairability | Interchangeable analog stick modules (sold separately); for other repairs contact Thrustmaster support |
| General Information | Manufactured by Guillemot Corporation; all rights reserved |
Frequently Asked Questions - eSwap Pro Controller THRUSTMASTER
User questions about eSwap Pro Controller THRUSTMASTER
0 question about this device. Answer the ones you know or ask your own.
Ask a new question about this device
Download the instructions for your Controller in PDF format for free! Find your manual eSwap Pro Controller - THRUSTMASTER and take your electronic device back in hand. On this page are published all the documents necessary for the use of your device. eSwap Pro Controller by THRUSTMASTER.
USER MANUAL eSwap Pro Controller THRUSTMASTER
Click on a title in this table of contents to access the corresponding section
CONTENTS....1
- Installing the Thrustmapper software 2
- Launching the Thrustmapper software.... 2
- Home page.... 3
3.1. Managing profiles.... 4
3.2. Managing presets....7 - Mapping of buttons....8
- Configuring the mini-sticks.... 10
- Configuring the triggers.... 14
- Configuring the vibrations.... 16
- Verifying and updating the different elements 18
INTRODUCTION
Take advantage of Thrustmaster's expertise in programming software to extend the ESWAP PRO CONTROLLER experience and push the boundaries of programmability.
1. Installing the Thrustmapper software
Download and install the Thrustmapper software available at https://support.thrustmaster.com. Click Gamepads / eSwap Pro Controller / Drivers.
Follow the instructions to install:
- The Thrustmapper software
- The driver for your gamepad
Please note: We strongly recommend that you update your gamepad with the latest firmware version in order to get the most out of the Thrustmapper software experience.
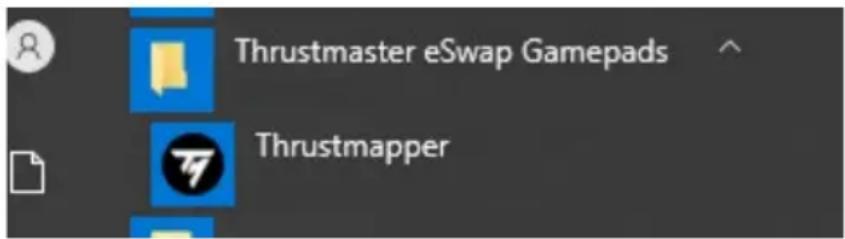
2. Launching the Thrustmapper software
To launch the Thrustmapper software: in the Windows Start menu, go to Thrustmaster eSwap Gamepads, and click Thrustmapper.
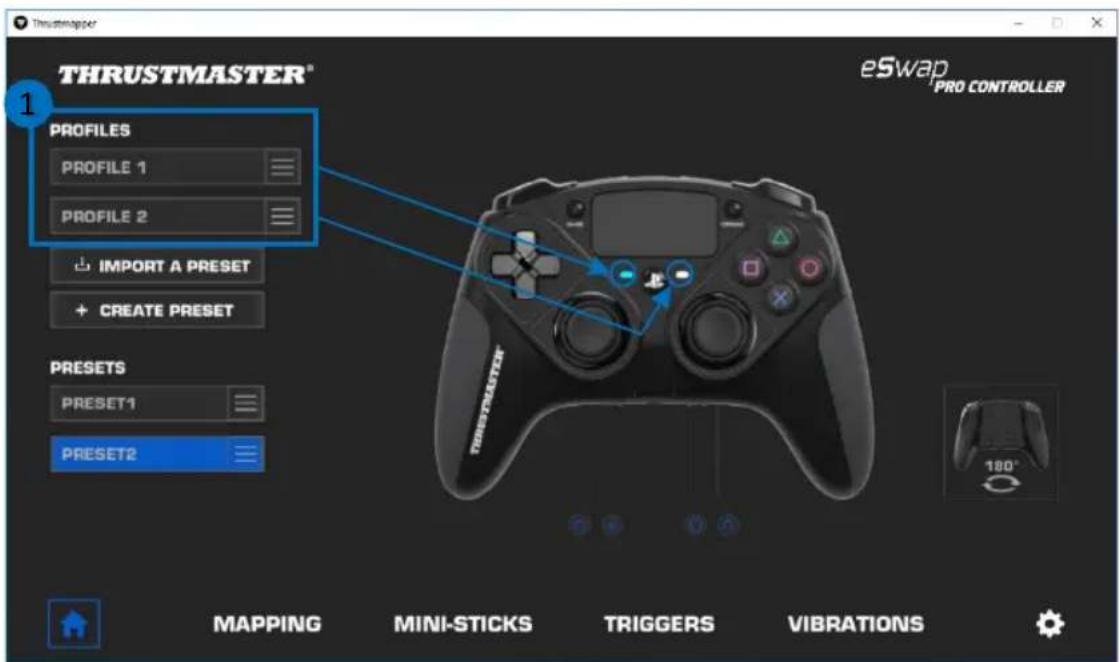
3. Home page
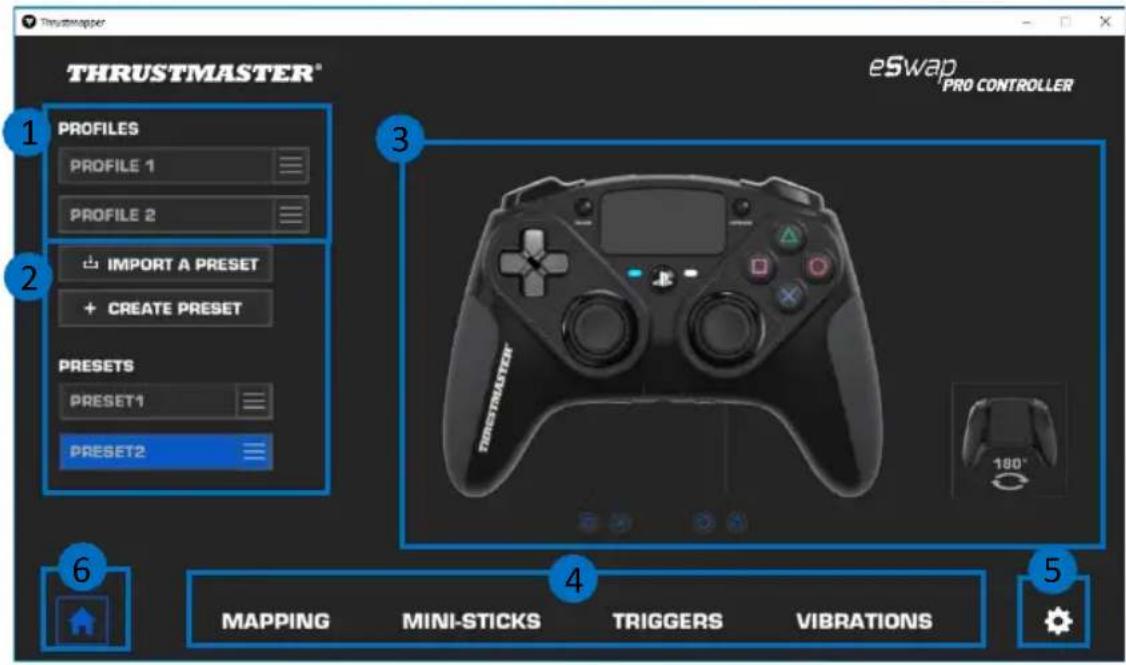
- Select one of the gamepad's two profiles in order to modify it (1).
- Create or import presets grouping together all of your customized settings. These presets can then be saved in one of the two profiles for your ESWAP PRO CONTROLLER (2).
- Quickly view the mapping of buttons for the selected profile or preset (3).
- Access advanced settings for the selected profile or preset (4):
MAPPING: remap buttons according to your gaming style.
MINI-STICKS: adjust the response curve and the dead zones for the left and right mini-sticks.
TRIGGERS: precisely adjust the dead zones for the left and right triggers.
VIBRATIONS: set the maximum intensity of the left and right vibrations on your ESWAP PRO CONTROLLER.
- Verify the current firmware version for your gamepad, the current driver version for your gamepad, and the current version of the Thrustmapper software, and update these elements if necessary (5).
- Return to the home page from other menus (6).
3.1. Managing profiles
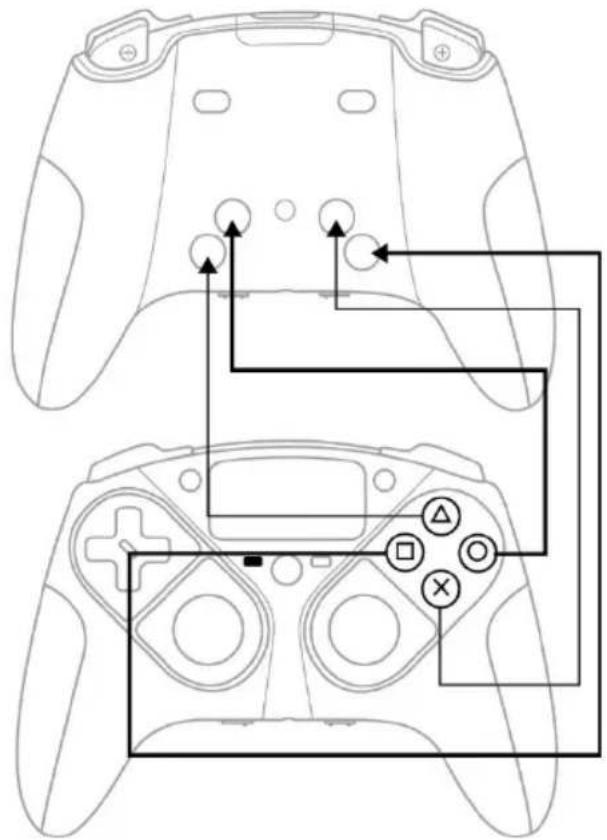
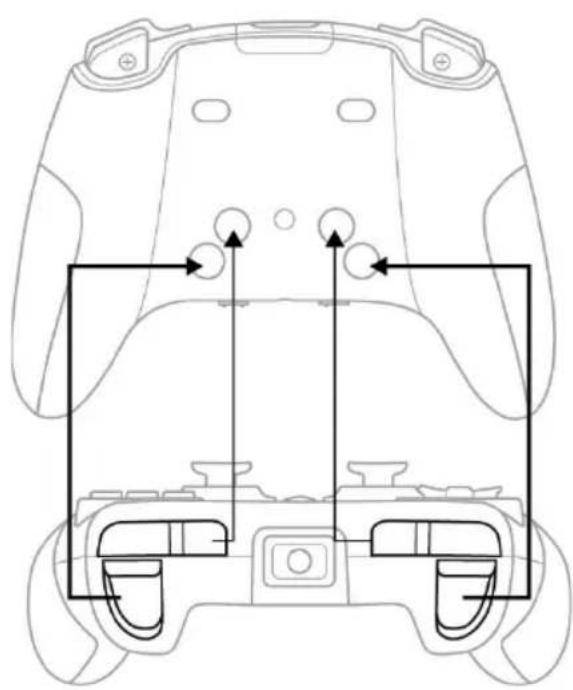
The gamepad includes two profiles loaded by default (1). Each profile corresponds to a storage space in which you can save the changes made with Thrustmapper and use them in games on your PlayStation®4 or your PC.
By default, the profiles include the following mapping for buttons:
Profile 1:
Cross, Triangle, Square and Circle are duplicated on rear buttons 1 through 4.
Profile 2:
L1, L2, R1 and R2 are duplicated on rear buttons 1 through 4.
natural_image
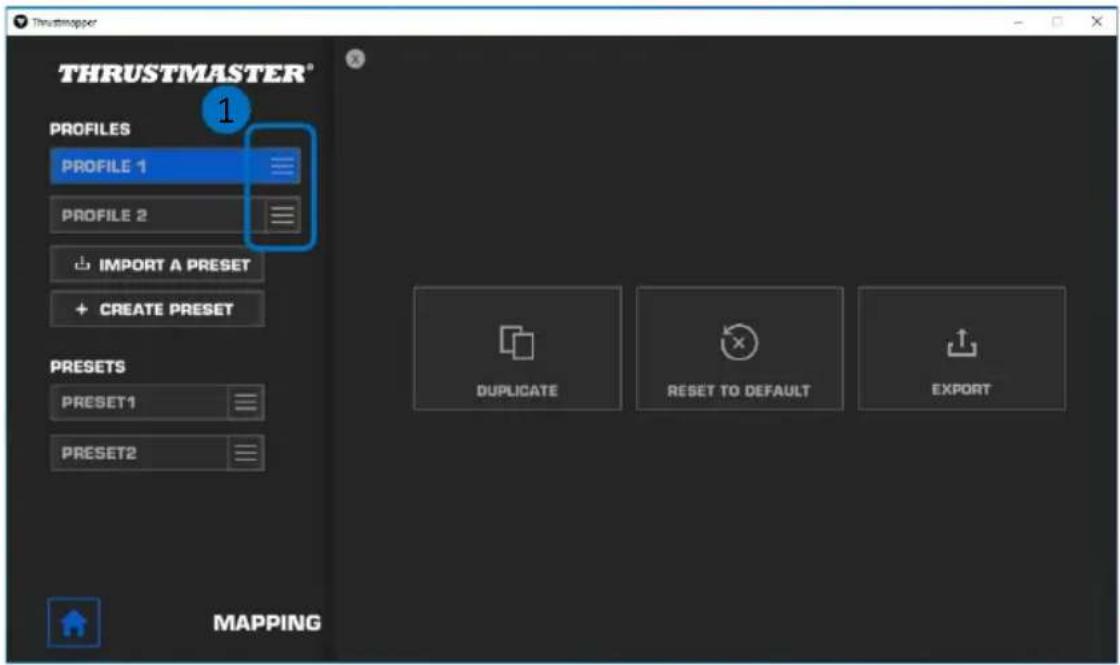
Top-down schematic of a game controller head with front and back views, showing key components (no text or labels)Click on the right-hand side of a profile (1) in order to:
- Duplicate the profile, which will export all of these settings to a new preset.
■ Reset the default settings for the profile. - Export the profile, allowing you to export all of these settings to a file, which can then either be shared or reimported in the software.
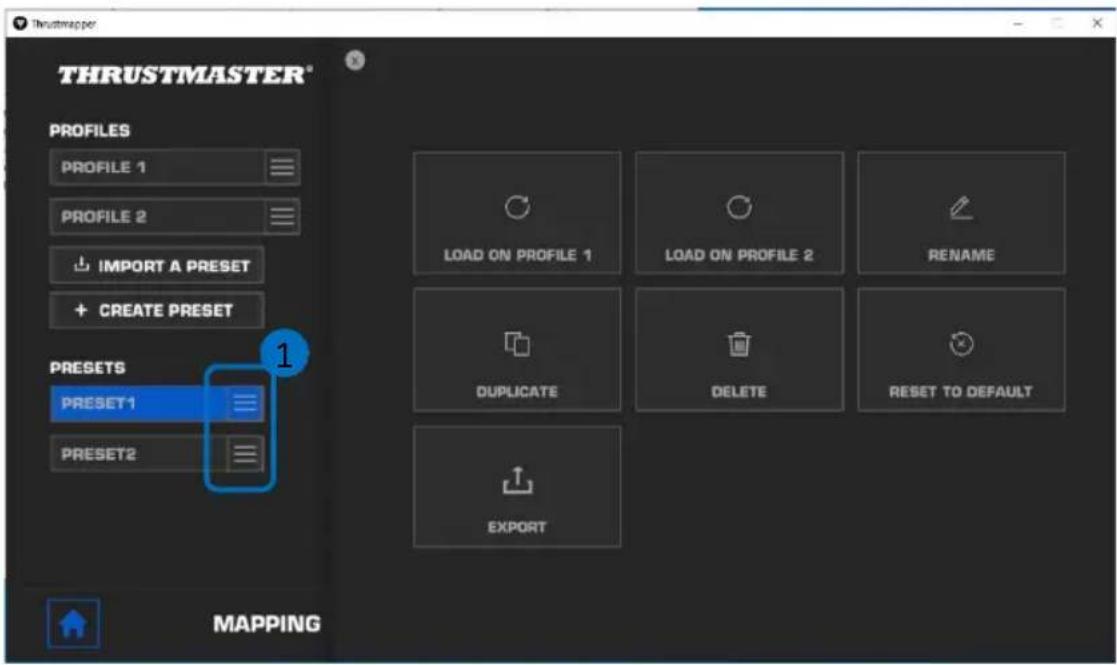
3.2. Managing presets
Presets work the same way as profiles, but are stored in the Thrustmapper software and not directly in the gamepad.
In this way, you can create as many presets as you like, and save them in one of the gamepad's profiles (1 or 2) so that they can be used in games on PS4™ and PC.
Click on the right-hand side of a preset (1) in order to:
- Load it into profile 1 or profile 2 for your ESWAP PRO CONTROLLER.
- Rename the preset.
■ Duplicate the preset: create a copy of the settings in a new preset. - Delete the preset.
■ Reset the default settings for the preset.
- Export the preset: create a copy of the settings in a file, which can then either be shared or reimported in the software.
4. Mapping of buttons
You can modify the mapping of the gamepad's buttons according to your gaming preferences.
- You can modify the functions of all buttons apart from: PS, Share, Options, the touchpad (button and gestures), as well as the Profile and Microphone buttons.
- Only the M1, M2, M3, M4, M5 and M6 buttons can be mapped with a duplicate button.
- You can only map a single button onto another button: no combos (i.e. combinations of two or more buttons) are possible.
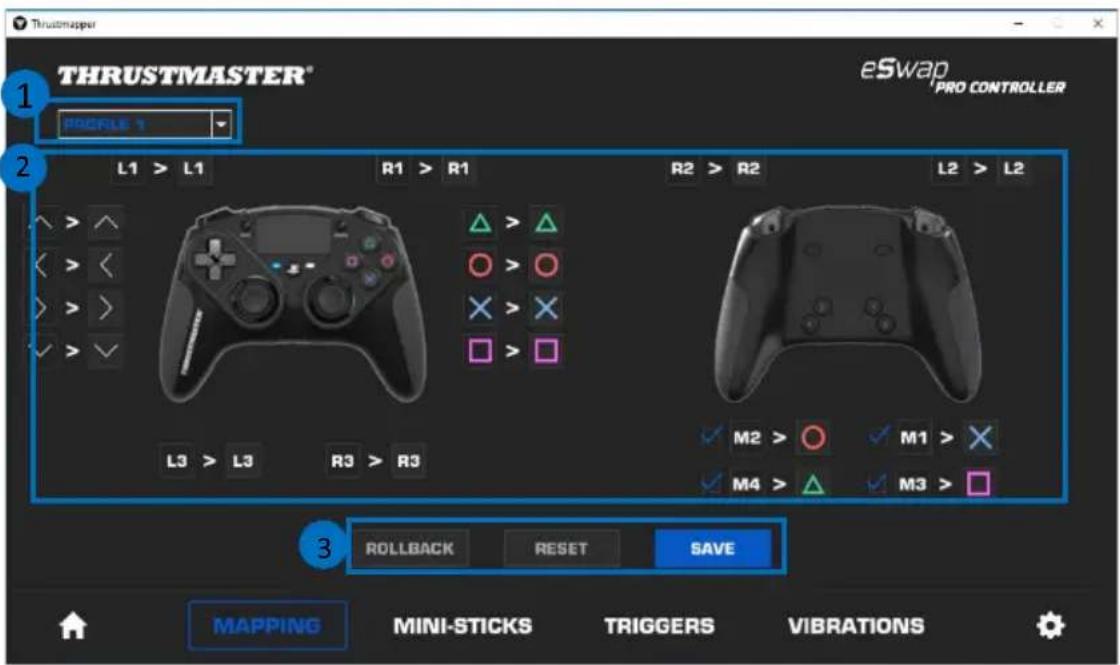
- The drop-down menu in the upper left-hand corner (1) lets you switch between profiles and presets in the MAPPING page.
- You can modify the mapping of the gamepad's buttons by swapping their functions (2).
- ROLLBACK, RESET and SAVE buttons (3):
ROLLBACK: return to the previous settings, since the last save.
RESET: reset all of the settings and content to their default values.
SAVE: save the current settings in the selected profile or preset.
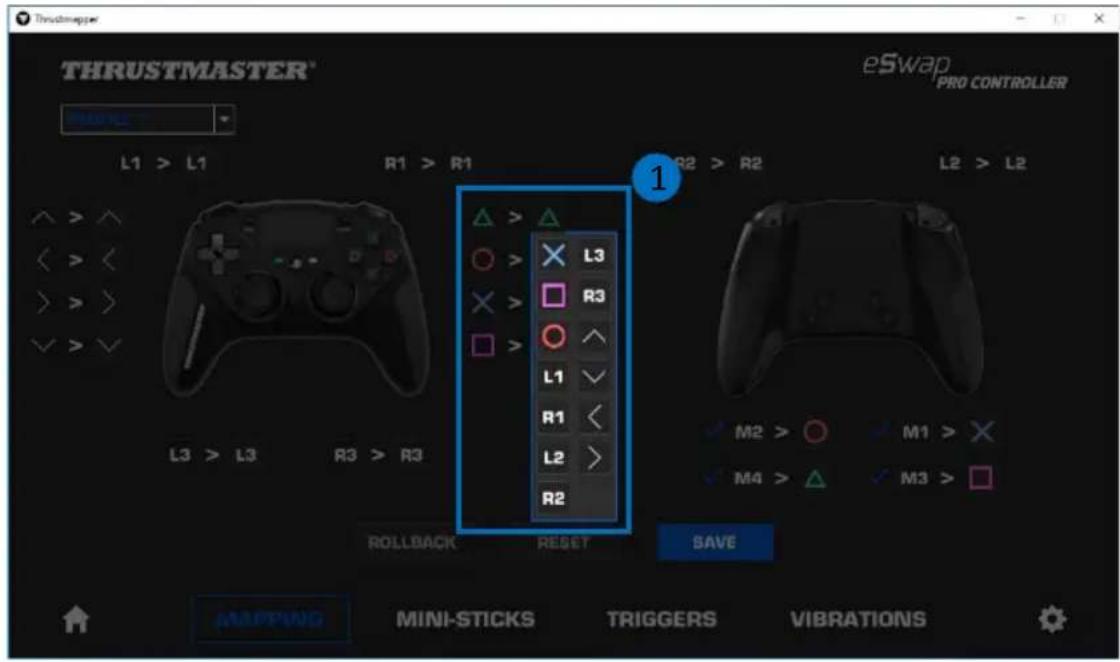
To remap the buttons:
- Click on the button whose function you would like to change.
- From the list, select the new function that will be assigned to this button (1).
5. Configuring the mini-sticks
Adjust the sensitivity curve and the dead zones for the left and right mini-sticks, for optimal control of your movements.
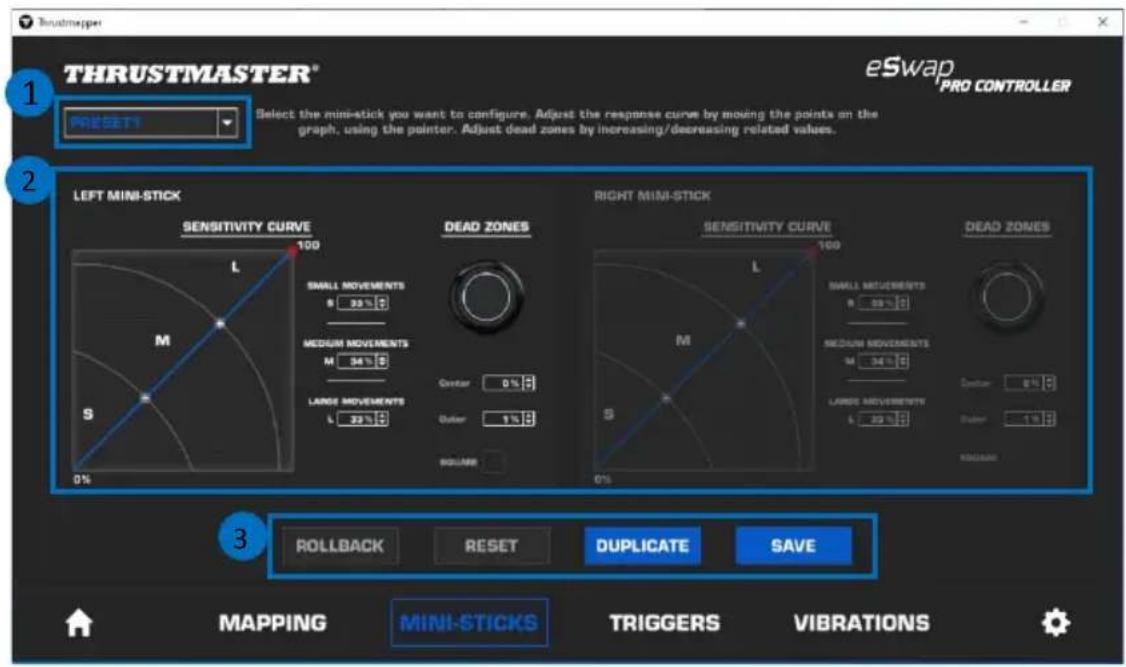
- The drop-down menu in the upper left-hand corner (1) lets you switch between profiles and presets in the MINI-STICKS page.
- Adjust the sensitivity curve and the dead zones for the left and right mini-sticks independently of one another (2).
- ROLLBACK, RESET, DUPLICATE and SAVE buttons (3):
ROLLBACK: return to the previous settings, since the last save.
RESET: reset all of the settings and content to their default values.
DUPLICATE: duplicate the settings for the selected mini-stick on the second mini-stick.
SAVE: save the current settings in the selected profile or preset.
The sensitivity curve is divided into 3 different zones: small, medium and large movements (S, M, L). Increasing the size of one (or more) of the zones (S, M, L) will provide more sensitivity — and therefore more precision — for the zone(s) in question.
For example, if you increase the S zone, your movements near the center of the mini-stick will be more precise.
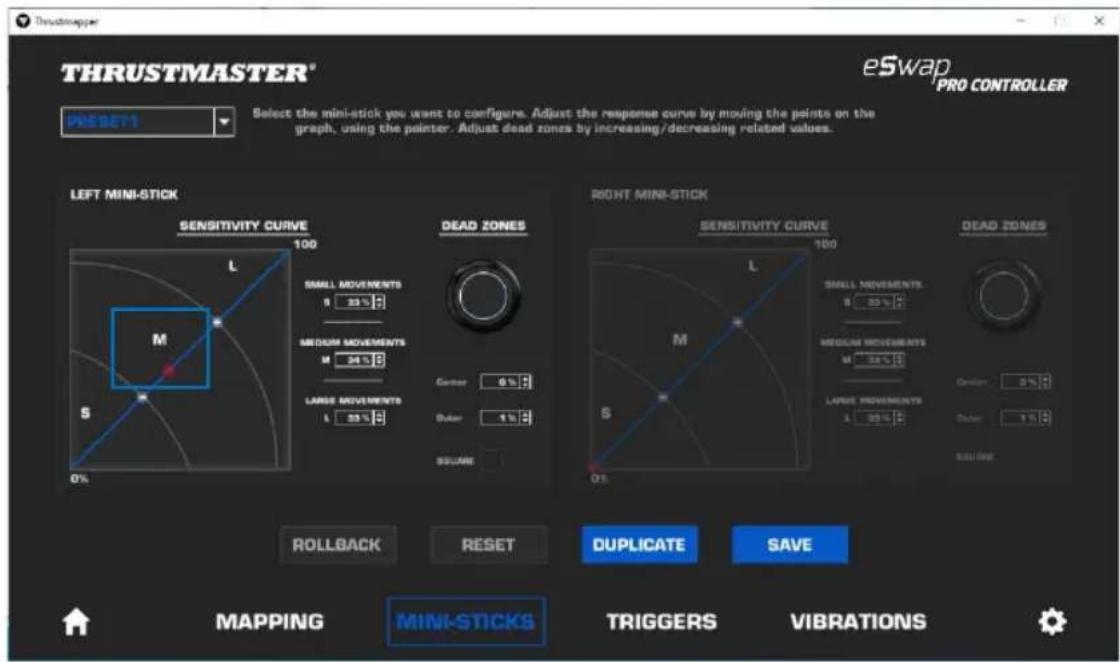
To modify the sensitivity curve for the mini-sticks, you can:
- Move the points directly on the graph (1).
- Modify the values in the 3 different zones (small, medium and large movements) (2).
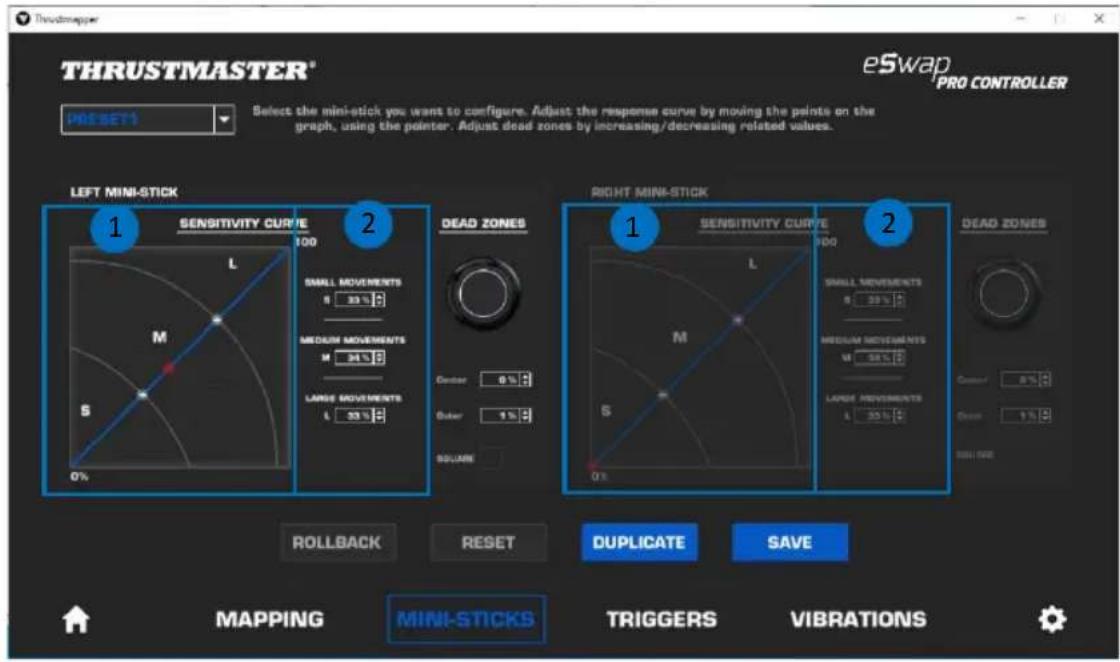
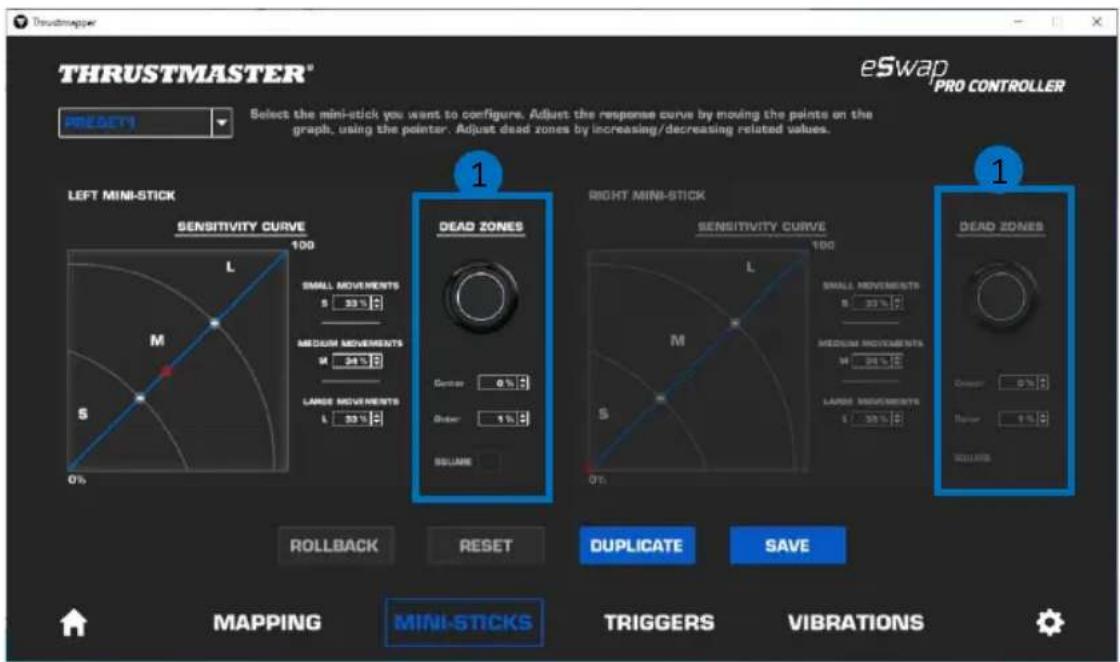
You can also customize the center and outer dead zones for the mini-sticks (1).
A dead zone corresponds to the zones defined for the mini-stick which do not respond to movements, at the beginning (center) or at the end (outer) of its travel.
You can also define an end (outer) dead zone in the shape of a square by selecting the "SQUARE" option.
Move the mini-stick in question to test your settings.
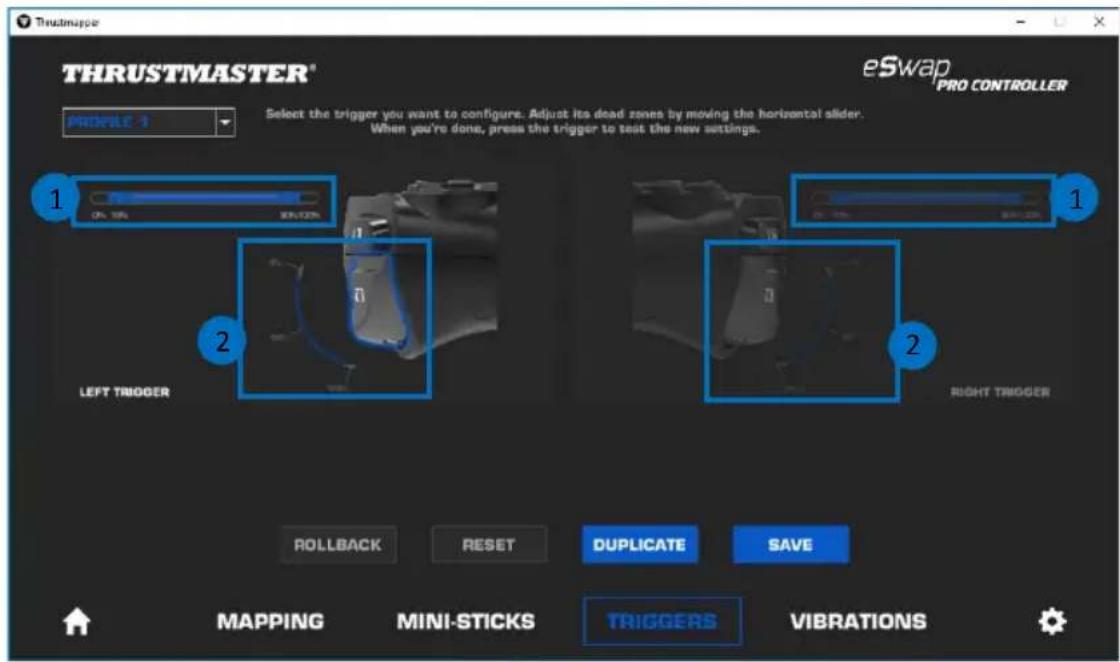
6. Configuring the triggers
Adjust the dead zones for the left and right triggers, in order to optimize your comfort and responsiveness in games.
A dead zone corresponds to the zones defined for the trigger which do not respond to movements, at the beginning (center) or at the end (outer) of its travel.
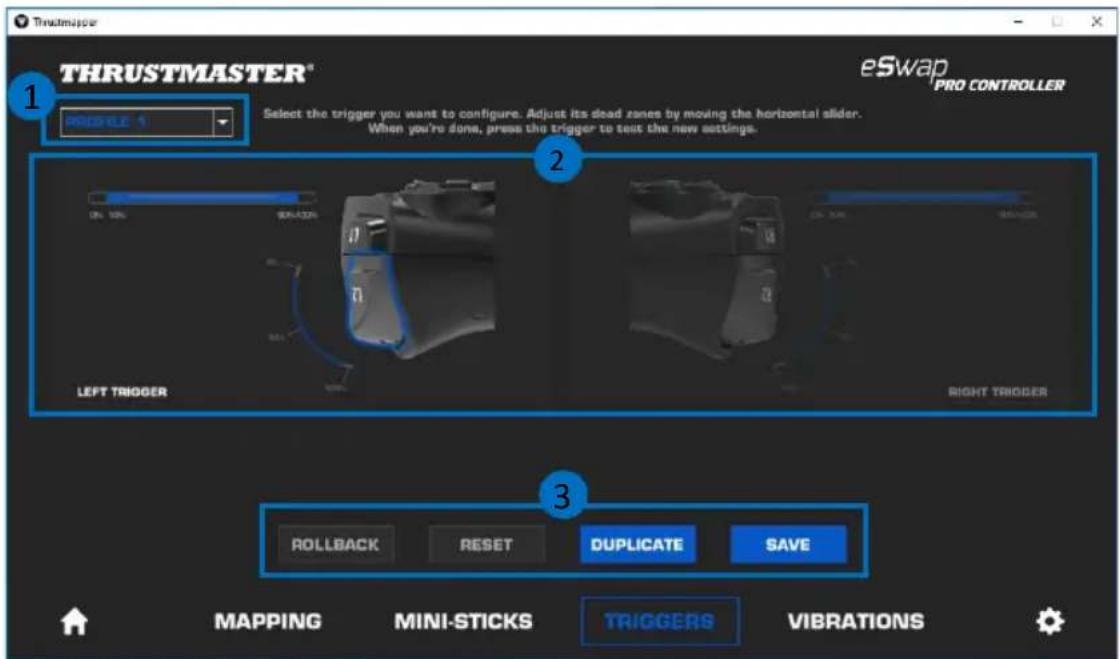
- The drop-down menu in the upper left-hand corner (1) lets you switch between profiles and presets in the TRIGGERS page.
- Adjust the dead zones for the left and right triggers independently of one another (2).
- ROLLBACK, RESET, DUPLICATE and SAVE buttons (3):
ROLLBACK: return to the previous settings, since the last save.
RESET: reset all of the settings and content to their default values.
DUPLICATE: duplicate the settings for the selected trigger on the second trigger.
SAVE: save the current settings in the selected profile or preset.
To set the active zone for the triggers:
- Move the sliders representing the beginning and end of the dead zone on the selected trigger (1).
- Press the trigger to directly test your settings: the blue gauge indicates your position on the curve of the trigger (2).
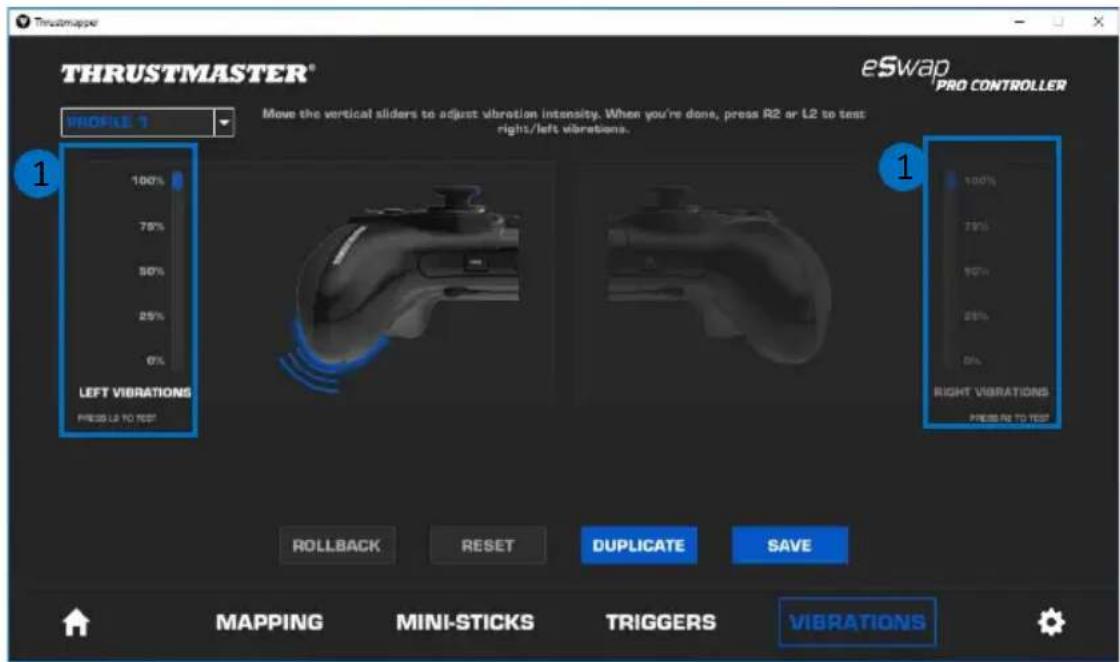
7. Configuring the vibrations
Set the maximum intensity of the left and right vibrations on your gamepad.
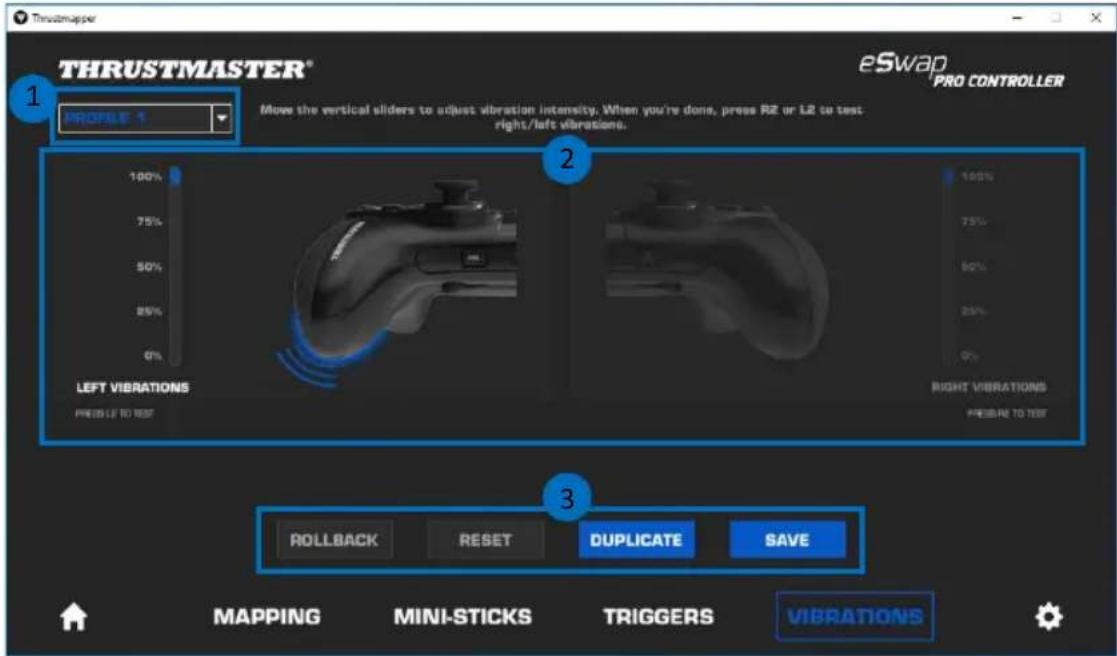
- The drop-down menu in the upper left-hand corner (1) lets you switch between profiles and presets in the VIBRATIONS page.
- Adjust the left and right vibrations independently of one another (2).
- ROLLBACK, RESET, DUPLICATE and SAVE buttons (3):
ROLLBACK: return to the previous settings, since the last save.
RESET: reset all of the settings and content to their default values.
DUPLICATE: duplicate the settings for the vibrations on one side (left or right) on the other side.
SAVE: save the current settings in the selected profile or preset.
To set the maximum intensity of the vibrations:
- Move the sliders to set the maximum intensity of both the left and right vibrations (1).
- Press the left or right trigger to feel the selected vibration intensity on the left or right-hand side of your gamepad, respectively.
8. Verifying and updating the different elements

Click the 📄 icon for information regarding the current firmware version for your gamepad, the current driver version for your gamepad, and the current version of the software, as well as to access the online user manual.
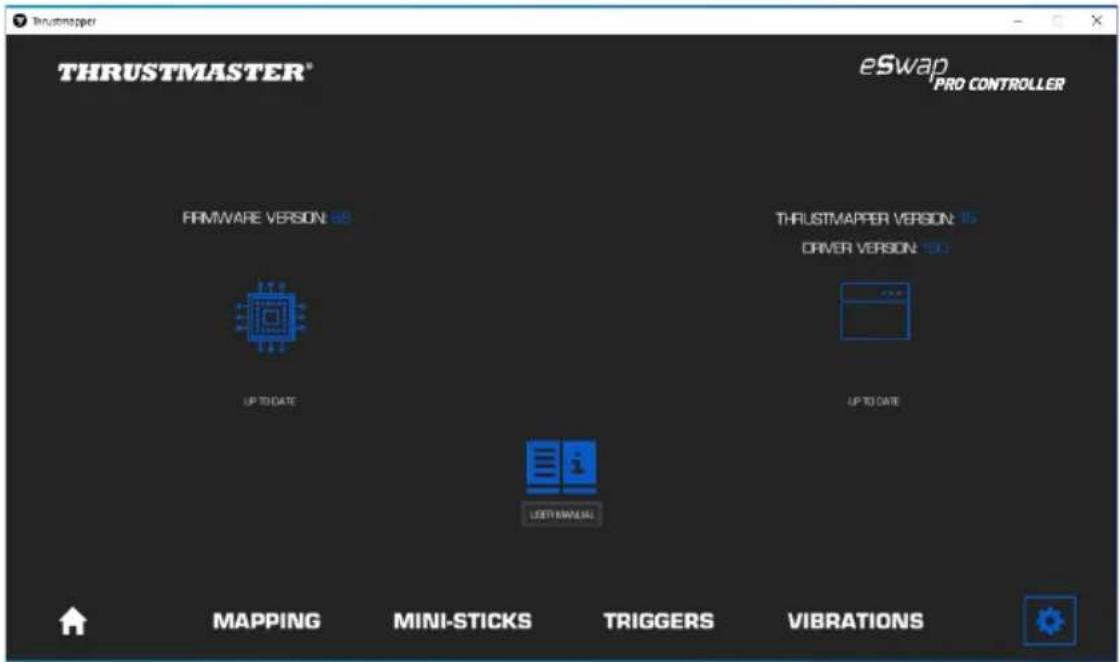
Follow the instructions to proceed with updates, if necessary.
Please note: We strongly recommend that you update your gamepad with the latest firmware version, in order to get the most out of the Thrustmapper software experience.
COPYRIGHT
© 2020 Guillemot Corporation S.A. All rights reserved. Thrustmaster® is a registered trademark of Guillemot Corporation S.A. PlayStation® is a registered trademark of Sony Interactive Entertainment Inc. Windows® is a registered trademark of Microsoft Corporation in the United States and/or in other countries. All other trademarks and brand names are hereby acknowledged and are the property of their respective owners. Illustrations not binding. Contents, designs and specifications are subject to change without notice and may vary from one country to another. Made in China.
No part of this manual may be reproduced, summarized, transmitted, transcribed, stored in a retrieval system, or translated into any language or computer language, in any form or by any means, electronic, mechanical, magnetic, manual, via photocopying, recording, or other, without the express written consent of Guillemot Corporation S.A.
End User License Agreement applicable to the THRUSTMAPPER software
Please read the License Agreement displayed during installation of the THRUSTMAPPER software carefully.