
TD 1601 - Turntable THORENS - Free user manual and instructions
Find the device manual for free TD 1601 THORENS in PDF.

| Product Type | Belt-drive turntable |
| Model | TD 1601 |
| Brand | Thorens |
| Dimensions (L x l x h) | 455 x 365 x 140 mm |
| Weight | 8 kg |
| Power supply | 230 V / 50 Hz |
| Speeds | 33 ⅓ RPM, 45 RPM |
| Drive | Belt |
| Motor | Synchronous |
| Tonearm | TP 160 |
| Included cartridge | Yes, moving magnet cartridge |
| Built-in phono preamp | No (external phono preamp recommended) |
| Main functions | Playback of vinyl records, speed change, start/stop |
| Maintenance and cleaning | Regular cleaning of the stylus and record with an anti-static brush; dusting of the platter |
| Usage tips | Place the turntable on a stable, level surface; avoid vibrations |
| Safety | Unplug before any cleaning; do not expose to moisture |
| Available spare parts | Belt, cartridge, platter, anti-vibration feet |
| Repairability | Repairable by a qualified technician; parts available from the manufacturer |
| Warranty | 2 years (depending on country) |
| Included manual | User manual and instructions (downloadable PDF) |
Frequently Asked Questions - TD 1601 THORENS
User questions about TD 1601 THORENS
0 question about this device. Answer the ones you know or ask your own.
Ask a new question about this device
Download the instructions for your Turntable in PDF format for free! Find your manual TD 1601 - THORENS and take your electronic device back in hand. On this page are published all the documents necessary for the use of your device. TD 1601 by THORENS.
USER MANUAL TD 1601 THORENS
natural_image
Circular metallic object with two red arrows pointing outward from its top, no visible text or symbols.natural_image
Close-up of a metallic mechanical component with a cylindrical top and central shaft, mounted on a workbench (no visible text or symbols)Fig. 2
7 AUSPACKEN UND MONTAGE DES LAUFWERKS
natural_image
Close-up of a circular metallic disc mounted on a stand, with no visible text or symbols.natural_image
Top-down view of a vintage CD or DVD disc with concentric rings and a metal stand (no visible text or symbols)Fig. 4
natural_image
Close-up of two metallic clips attached to a curved metallic object, labeled 'THORENS' (no other text or symbols visible)Fig. 5
natural_image
Hand holding a black clip attached to a white object, possibly part of a device or tool (no visible text or symbols)Fig. 6 Fig. 7

natural_image
Close-up of a vintage rotary disc on a stand with hands adjusting its rim (no visible text or symbols)9 AUSPACKEN UND MONTAGE DES LAUFWERKS
natural_image
Close-up of a mechanical optical instrument with a metallic lever and cylindrical component (no visible text or symbols)Fig. 8
natural_image
Close-up of a metallic mechanical component with a curved shaft and mounting bracket (no visible text or symbols)Fig. 9
11 TONARM UND TONABNEHMERSYSTEM
natural_image
Close-up of a mechanical component with a metallic bracket and threaded end (no visible text or symbols)Fig. 10
natural_image
Close-up of a mechanical gear assembly with a metallic shaft and mounted components (no visible text or symbols)Fig. 11
natural_image
Close-up of a mechanical optical instrument with metallic components and a central rotating shaft (no visible text or symbols)Fig. 16

natural_image
Close-up of a mechanical optical device with metallic components and a central shaft (no visible text or symbols)Fig. 17
Thorens TD 1601
natural_image
Close-up of a metallic curved surface with a green circular mark and 'THORE' logo on the right side (no readable text or symbols in the main image)Fig. 18

natural_image
Close-up of a mechanical clamp and screwdriver on a car wheel, with a red circular symbol (no text or labels visible)Fig. 19
Dear THORENS customer 23
WARRANTY 24
Safety instructions 25
Thorens series 1600 26
Unpacking and set-up 27
Tonearm and Cartridge 30
Height adjustment of the tonearm (VTA) 33
Placement of the turntable 34
The suspended Sub chassis 34
Placement 34
Electrical connections 35
Operation 36
Thorens TD 1600 37
Thorens TD 1601 38
Adjusting speed 39
Technical specifications 40
Dear THORENS customer,
Thank you very much for your confidence in our product, the record player TD 1600 or TD 1601. With the purchase of this device you have acquired a precision instrument for the purpose of playing back analogue records. This appliance however requires your attention with respect to setup, placement and handling in order to achieve a flawless operation.
The TD 1600 series will guarantee you the highest quality to be maintained for years to come. Understandably, you want to listen to your beloved records right away but we strongly advise that you read these instructions attentively before proceeding with the setup, simply to ensure long-lasting listening pleasure. We have spared no efforts to pack all necessary information and comprehensive guidance into this manual, yet in the event that you have any further queries regarding your new record player please do not hesitate to ask your THORENS dealer for further assistance.
Sincerely yours,
THORENS TEAM
23 DEAR THORENS CUSTOMER
WARRANTY
Legal warranty directives and regulations are to be applied here. In case a failure or malfunction occurs in your record player during the warranty period please inform your THORENS dealer or general representative and describe the malfunction that has occurred. If the malfunction cannot be remedied on site by sending you the respective user-serviceable spare part, you are kindly requested to send the unit in its original shipping box to the THORENS representative in your country.
If the original shipping box is no longer in your possession your THORENS representative will be in the position to supply a new one for a small charge.
Shipping costs to THORENS or to an authorized service centre must be prepaid because otherwise the parcel will be rejected upon arrival. After repair or service the unit will be returned to you free of charge. Whenever you ship this turntable kindly use the screws for the security during transportation.
In the event that you have further queries or need assistance please do not hesitate to contact your authorised THORENS service.
WARNING!
To prevent fire or shock hazard, do not expose this product rain or moisture.
Please make sure before switching on the unit that all electrical connections are set correctly and the power supply is set to the correct currency of your country (115V / 230V).
To reduce risk of electric shock, do not remove the cover (or back). No user-serviceable parts inside.
WARNING
TO PREVENT FIRE OR SHOCK HAZARD, DO NOT EXPOSE THIS APPLIANCE TO RAIN OR MOISTURE.
EXPLANATION OF GRAPHICAL SYMBOLS
The lightning flash with arrowhead symbol, within an equilateral triangle, is intended to alert you to the presence of uninsulated 'dangerous voltage' within the product's enclosure that may be of sufficient magnitude to constitute an electric shock to persons.

The exclamation point within an equilateral triangle is intended to alert you to the presence of important operating and maintenance (servicing) instructions in the literature accompanying the appliance.

This product was tested and complies with all the requirements for the CE Mark.
Compliant to 2002/95/EC (RoHS)

IMPORTANT: DISPOSAL OF WASTE EQUIPMENT BY USERS IN PRIVATE HOUSEHOLDS IN THE EUROPEAN UNION
This symbol on the product or on its packaging indicates that this product must not be disposed off with your other household waste. Instead, it is your responsibility to dispose of your waste equipment by handing it over to a designated collection point for the recycling of waste electrical and electronic equipment. The separate collection and recycling of your waste equipment at the time of disposal will help to conserve natural resources and ensure that it is recycled in a manner that protects human health and the environment. For more information about where you can drop off your waste equipment for recycling, please contact your local city office, your household waste disposal service or the shop where you purchased the product.
Thorens series 1600
Both turntables TD 1600 and TD 1601 are high precision record players that combine 21st century technology with the brands tradition of famous TD 160 models with their high reputation in former times.
The suspended and almost wobble free sub chassis that stands on three cone springs, the high class tonearm Thorens TP 92, a precise controlled AC motor and the classical Thorens belt drive mechanism transfer the fascination of the old Thorens turntables into our century.
Both models come with real balanced and unbalanced outputs in XLR and RCA.
The difference between TD 1600 and TD 1601 lies in ease of use. TD 1600 is a puristic manual turntable while TD 1601 adds an electrical lift and a contactless auto shut off function that raises the tonearm at the end of the record.
Unpacking and set-up
Carefully take the record player and all accessories out of the carton.
Warning: The external power supply is placed in a separate compartment inside the Styrofoam packaging.
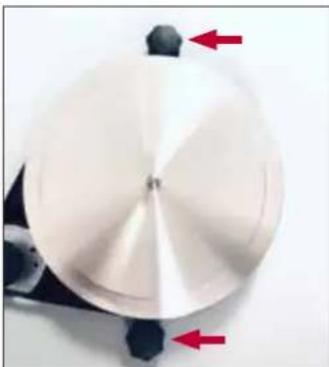
Remove the two transport locking screws next to the inner plate (Fig. 1). you
are located in front of and behind the inner plate and fix the sub chassis for transport.
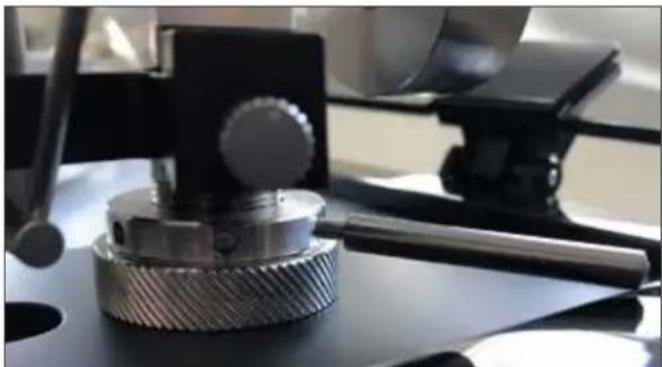
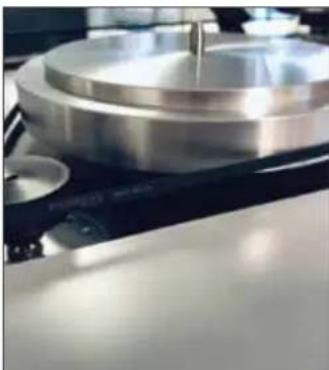
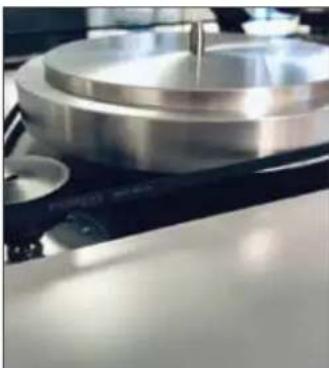
Remove the drive belt of the packaging and place it around the inner platter and then around the drive pulley of the motor to the left of the inner platter (Fig. 2). When the belt is placed, turn the platter a few rounds by hand so that the belt lays evenly around the plate.
natural_image
Circular metallic object with two red arrows pointing outward from its top, no visible text or symbols.Fig. 1, seen from left side

natural_image
Close-up of a metallic mechanical component with a cylindrical top and central shaft, mounted on a workbench (no visible text or symbols)Fig. 2
27 UNPACKING AND SET-UP
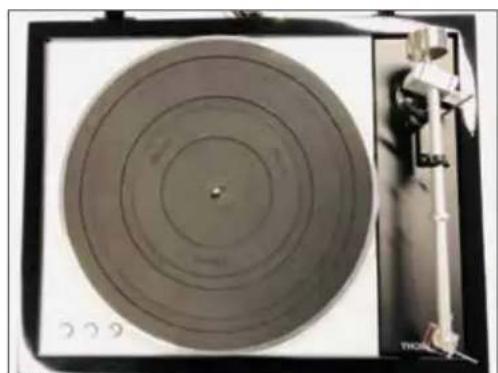
Carefully place the outer platter on the inner platter without jamming (Fig. 3). The sub chassis lowers a bit due to the additional weight. Then place the rubber mat on the platter (Fig. 4).
This completes the drive installation.

natural_image
Close-up of a circular metallic disc mounted on a stand, with no visible text or symbols.Fig. 3

natural_image
Close-up of a vintage CD or DVD disc with visible concentric rings and a metal stand (no text or symbols)Fig. 4
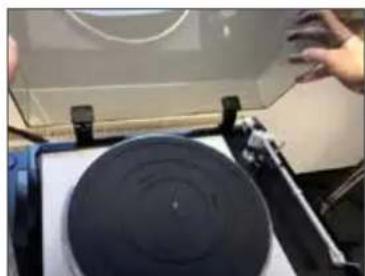
In the next step, you now put on the dust cover. If you want to operate the device without a dust cover, skip this step.
To do this, remove the dust cover and hinges of the packaging and install the it as described in the following steps:
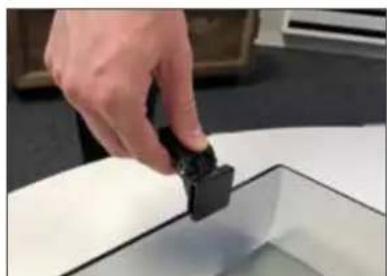
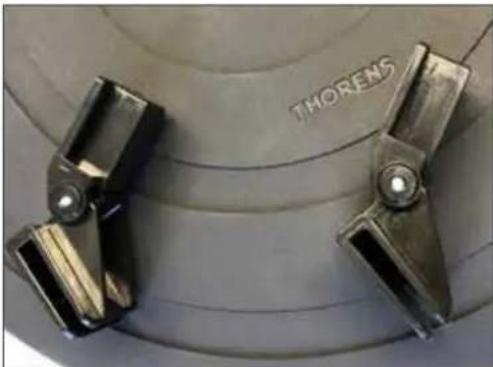
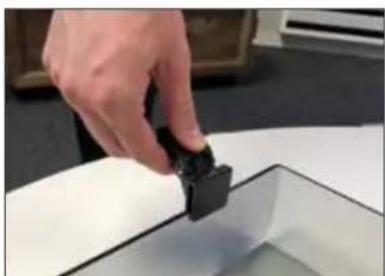
First, put the two hinges ready to use (Fig. 5) and push with the open side over the recesses prepared in the rear wall of the hood (Fig. 6). Conveniently, the dust cover lies flat on the top, for example on a table.
Now take the thus prepared dust cover and carefully push the lower part of the hinges into the corresponding guides on the frame (Fig. 7).
natural_image
Close-up of two metallic clips attached to a curved metallic object, labeled 'THORENS' (no other text or symbols visible)Fig. 5

natural_image
Hand holding a black clip attached to a white object, possibly part of a device or tool (no visible text or symbols)Fig. 6 Fig. 7
natural_image
Close-up of a vintage rotary disc on a stand with hands adjusting its rim (no visible text or symbols)29 UNPACKING AND SET-UP
Tonearm and Cartridge
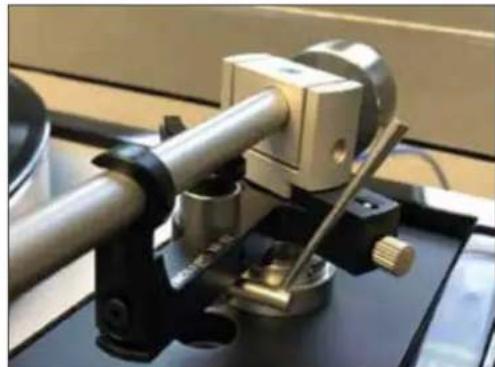
The tonearm weight was removed for transport. When mounting the turntable, turn it from behind onto the tonearm and then adjust the tracking force and anti skating.
On the TP 92 tonearm a lot of available pickups can be mounted with a 12.5 mm (½ „) mounting hole spacing.
To connect the cartridge, the four color-coded cables are pushed onto the corresponding connection pins at the back of the cartridge.
If the cartridge does not have a color code, connect to the following scheme:
R right Channel (Signal) → red
G righ Channel (Ground) → green
L left Channel (Signal) → white
G left Channel (Ground) → blue
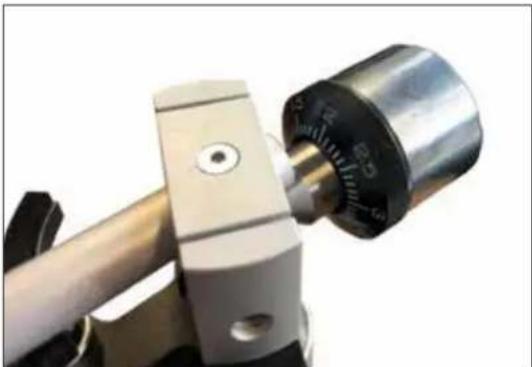
Adjustment of the tracking force is achieved by turning the tonearm counter weight (Fig. 8). The further the weight is turned forwards towards the cartridge, the greater the tracking force.
natural_image
Close-up of a mechanical optical instrument with a metallic lever and cylindrical component (no visible text or symbols)Fig. 8
- Insert the counterweight on the end of the tone arm, rotating it until it threads into place.
- Rotate the antiskating knob clockwise until the mark is right outside.
- Place the lever for the tone arm lift in the front position so that the lift bank lowers. For TD1601 push the lift button so that the lift bank lowers.
- Open the tone arm lock. Seize the handle of the tone arm and move it just outside the edge of the platter so that it can float up and down. Remove the protective cap from the stylus. (Be careful not to hit the stylus against anything.)
- Turn the counterweight until the tone arm floats level. If the tone arm moves up: Turn the counterweight counter-clockwise. If the tone arm moves down: Turn the counter clockwise
- Put the tone arm back onto the arm rest and lock it.
- The counterweight has a rotary ring with a scale. Without turning the counterweight, only turn the ring until the zero "0" aligns with the indicator line.
- The scale indicates the stylus pressure in
grams. Adjust the stylus pressure and the antiskating indicated to the corresponding specifications.
Be extremely careful not to damage the stylus of the cartridge!
Note: The correct tracking force depends on the cartridge used. Please consult the manual of your cartridge.
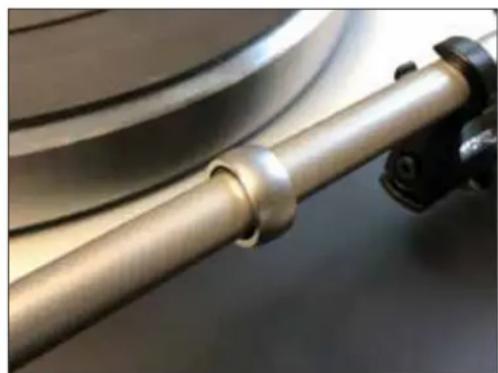
The damping ring (Fig. 9) in the middle of the tonearm tube must not be moved. It is a resonant damper, which is only effective at this position!
natural_image
Close-up of a metallic mechanical component with a curved shaft and mounting bracket (no visible text or symbols)Fig. 9
31 TONEARM AND CARTRIDGE
By interacting the frictional force of the disc grooves with the tracking forces on the pickup, a force component is produced when playing a record that pulls the tonearm inwards: the skating force. To compensate them, there is an anti-skating adjustment, which is magnetically realized on the TP 92 tonearm.
The anti-skating force is adjusted via a set screw (Fig. 10).
Turn counterclockwise to increase the force and clockwise to decrease the force. The white dot above the adjusting screw serves to display the current setting.
natural_image
Close-up of a mechanical component with a metallic bracket and threaded end (no visible text or symbols)Fig. 10
Height adjustment of the tonearm (VTA)
In order to be able to use cartridges of different heights, the tonearm Thorens TP 92 can be adjusted in height. The VTA (vertical tracking angle) is adjusted by gently loosening the upper circlip with the enclosed tool and then twisting the lower, fluted ring. Each revolution of the lower ring corresponds to a height change of 1 mm (FIG. 11). After correct adjustment of the VTA, the circlip is tightened again.
natural_image
Close-up of a mechanical gear assembly with a metallic shaft and mounted components (no visible text or symbols)Fig. 11
33 HEIGHT ADJUSTMENT OF THE TONEARM (VTA)
Placement of the turntable
The suspended Sub chassis
The Thorens TD 1600 and TD 1601 are equipped with a spring-mounted sub chassis that neutralises mechanical disturbances from the ground and resonances of the drive motor.
This sub chassis consists of a specially shaped MDF board, which stands on three damped cone springs, which are bolted to the bottom plate of the turntable. This principle of spring and damper is best compared with a suspension in the car, here is a spring combined with a shock absorber to prevent an uncontrolled swinging. Platter bearing and tone arm board are mounted on the sub chassis, while the motor and cover plate are connected to the bottom or the frame. Thus, the moving parts are isolated from the solid.
The sub chassis itself must be tuned to the particular turntable, the spring tension is regulated so that it vibrates evenly and as if piston-like with a stimulation without breaking laterally and the height must be adjusted so that when the device is aligned horizontally, turntable and tone arm board are parallel to the fixed top board and the platter. Platter must not touch top board in operation.
The correct settings are already made in the factory and normally must not be changed by the user of the turntable. If something has to be readjusted, the necessary adjustment screws are accessible from the underside of the turntable. A qualified retailer or our service specialist will be happy to help if a readjustment is required later.
Placement
Turntables with sub chassis require a different kind of installation than record players with a fixed chassis or so-called mass drives, which prefer a stable base with high mass. However, sub chassis drives like Thorens TD 1600 and TD 1601 can be placed on a light but stable surface. A light, stable table, with the plate and legs firmly connected, fits very well, for example.
It is important that the turntable is in the balance. For this it is possible to screw the feet up or down.
Electrical connections
To power the turntable, connect the 16V output of the power supply (Figure 12) to the input on the right side of the terminal on the back of the TD 1600 / TD 1601 using the enclosed cable (Figure 13). The plugs should be locked in place for safe operation with the knurled nuts.
The mains voltage can be switched depending on the country at the bottom of the power supply by a switch between 115V / 60 Hz and 230V / 50 Hz (Fig. 14).
Warning: before starting operation make sure that the mains frequency and voltage are set correctly. Otherwise there is a risk of damage to the device.
Only then do connect the power supply to the mains power socket with the included power cable.
Below the connector on the back of the power supply is the main electrical switch which turns the power to the unit on and off. When the switch is in position 0, the unit is completely disconnected from the mains.

Fig. 12
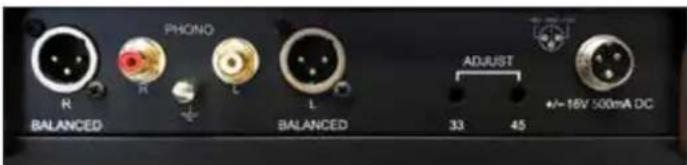
Fig. 13
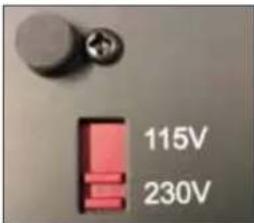
Fig. 14
Operation
On the back of the power supply (Figure 12) is located below the jack for the power cord, the main electrical switch. If this is in position "1", the turntable can be put into operation. In position "0", however, the turntable is completely disconnected from the mains. Set the power switch to "1" and put a record on the platter.
To play a record, the motor is started by pressing the desired speed button 33 or 45 (Figure 15).
The platter starts to turn. Due to the electronic control system used, it is possible to switch between the two speeds without first stopping.
Pressing the key "0" stops the motor and the platter stops.
In the operation of the tonearm, the two models Thorens TD 1600 and TD 1601 differ.
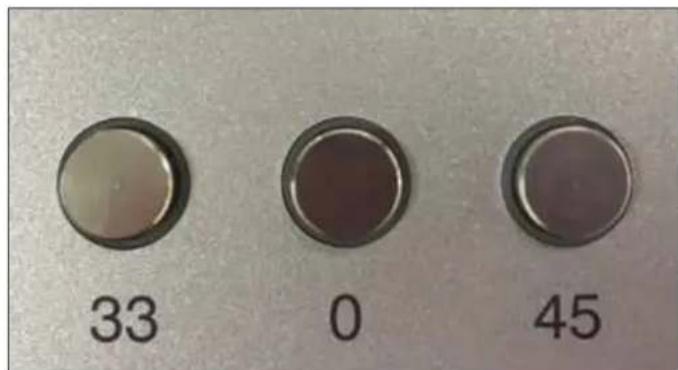
Fig. 15
Thorens TD 1600
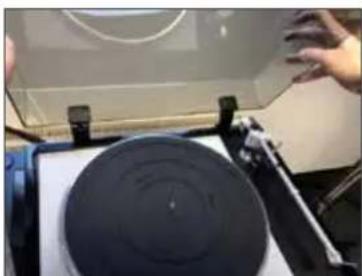
The TD 1600 is a purely manual turntable. When a record is to be played, the motor is started by selecting the speed (Fig. 15), the tonearm lift is up (Fig. 16), the tonearm is manually guided out of its rest via the inlet groove and lowered with the lift (Fig 17). When the record side has been played or at any other place, the arm must be manually raised with the lift and returned to the rest.
Pressing the button "0" switches off motor and the platter stops turning.
natural_image
Close-up of a mechanical optical bench with metallic components and a brass clamp (no visible text or symbols)Fig. 16

natural_image
Close-up of a mechanical optical device with metallic components and a central shaft (no visible text or symbols)Fig. 17
Thorens TD 1601
The Thorens TD 1601 is a semi-automatic turntable with a built-in electric lift and contactless auto stop function. Therefore, the tonearm of the TD 1601 does not have a manual lift lever but is controlled by a touch-tone button.
The platter is started just like the TD 1600 by selecting the speed.
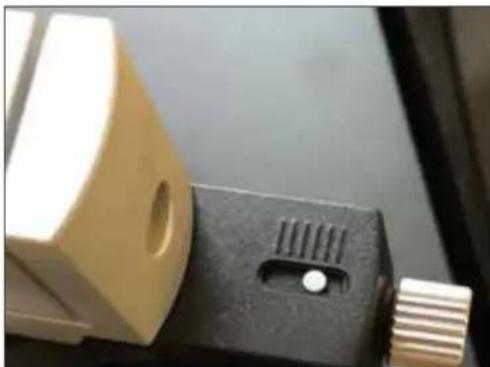
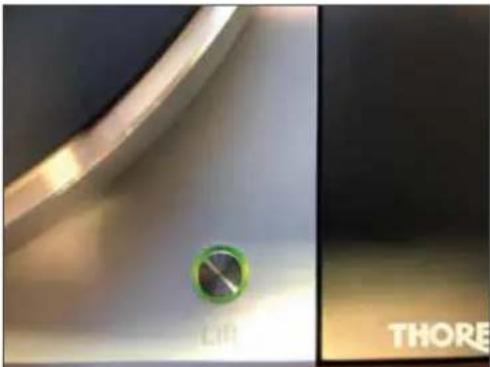
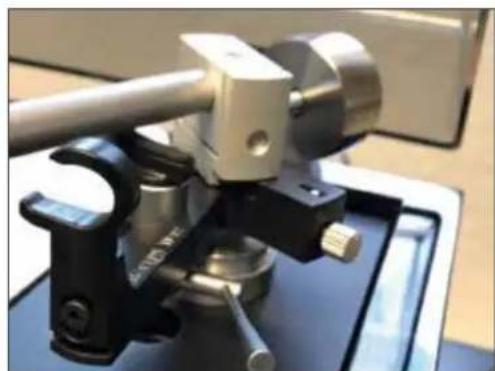
The electrical lift
Basically, the lift is controlled by a button on the front right of the cover plate (Fig. 18). The color of the encircling ring indicates whether it is above (green) or below (red).
Once the main power switch on the power supply (Fig. 12) is switched on, the lift is operational. By pressing the button (Fig. 18) it will move up or down independent of the motor.
In default position, after switching on TD 1601, the lift is in position "up", coloured by a green ring around the switch button marked (Fig. 18).
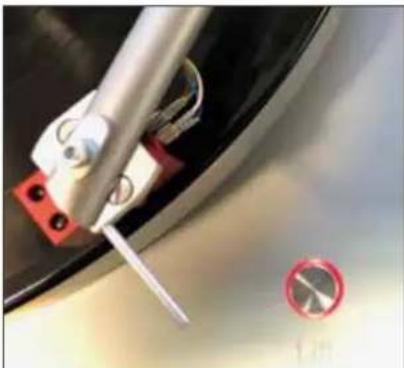
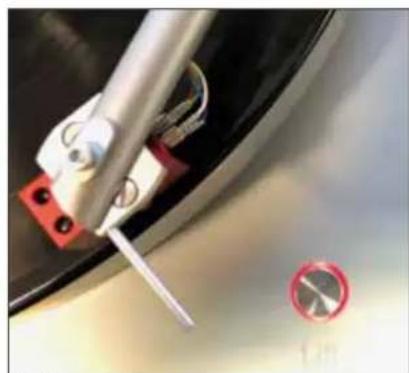
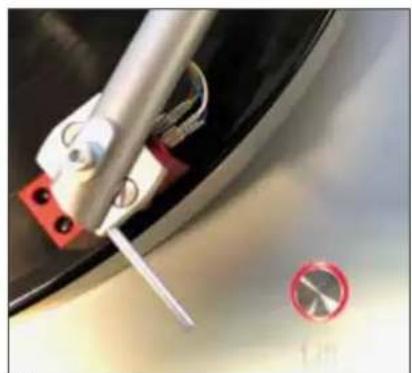
The tonearm is manually guided over the record and lowered by pressing the button again. The color of the ring around the button changes to red (Fig. 19).
natural_image
Close-up of a metallic curved surface with a green circular button, next to a dark panel (no visible text or symbols)Fig. 18
natural_image
Close-up of a mechanical clamp securing a red-handled tool, with a red prohibition symbol nearby (no readable text or symbols)Fig. 19
At the end of the record side or if it is stopped by another pressure on the lift button, the tonearm is lifted and the indicator lights green again.
Auto shut off
When the electronics detects the end of the record side, the lift is released, the arm raised and the motor shuts off. The platter stops. The shut off function works completely contact-free via optical detection. An intervention of the user is not required, he only has to move the tonearm by hand back to its rest.
Adjusting speed
The playback speed can be fine tuned for both rotational speeds (33.3 / 45 rpm) within a range of +/- 6%. For this purpose, openings with underlying slot screws are provided on the rear side in the connection terminal (Fig. 13) underneath the inscription ADJUST.
Technical specifications
(typical values)
Drive type Belt, electronically controlled AC motor
Mains 115 V /230 V (AC)
Mains frequency 50 / 60 Hz
Power consumption 18 W
RPM 33,3 , 45 RPM
Wow & Flutter DIN/WRMS <=0,05 %
Platter Two parts, Aluminium, 3,2 kg
Effective lenght TP 92 232,8 mm
Offset angle 23,66°
Overhang 17,8 mm
Effective mass 11 g
Capacitance <=110pF
Dimensions (W x H x D) (mm) 440 x 180 x 370
TD 1600 / TD 1601
BEDIENUNGSANLEITUNG
USER GUIDE
To reduce risk of electric shock, do not remove the cover (or back). No user-serviceable parts inside.
WARNING
TO PREVENT FIRE OR SHOCK HAZARD, DO NOT EXPOSE THIS APPLIANCE TO RAIN OR MOISTURE.
EXPLANATION OF GRAPHICAL SYMBOLS
The lightning flash with arrowhead symbol, within an equilateral triangle, is intended to alert you to the presence of uninsulated 'dangerous voltage' within the product's enclosure that may be of sufficient magnitude to constitute an electric shock to persons.
The exclamation point within an equilateral triangle is intended to alert you to the presence of important operating and maintenance (servicing) instructions in the literature accompanying the appliance.

This product was tested and complies with all the requirements for the CE Mark.
Compliant to 2002/95/EC (RoHS)

IMPORTANT: DISPOSAL OF WASTE EQUIPMENT BY USERS IN PRIVATE HOUSEHOLDS IN THE EUROPEAN UNION
This symbol on the product or on its packaging indicates that this product must not be disposed off with your other household waste. Instead, it is your responsibility to dispose of your waste equipment by handing it over to a designated collection point for the recycling of waste electrical and electronic equipment. The separate collection and recycling of your waste equipment at the time of disposal will help to conserve natural resources and ensure that it is recycled in a manner that protects human health and the environment. For more information about where you can drop off your waste equipment for recycling, please contact your local city office, your household waste disposal service or the shop where you purchased the product.
Thorens серия 1600
natural_image
Close-up of a metallic circular object with two red arrows pointing to its edges (no text or symbols visible)Рис. 1, вид слева
natural_image
Close-up of a metallic mechanical component with a cylindrical top and central shaft, mounted on a workbench (no visible text or symbols)Рис. 2
natural_image
Close-up of a circular metallic disc mounted on a stand, with no visible text or symbols.Рис. 3

natural_image
Top-down view of a vintage CD or DVD disc with visible concentric rings and a stand (no text or symbols)Рис. 4
natural_image
Close-up of two metallic clips attached to a curved metallic object, labeled 'THORENS' (no other text or symbols visible)Рис. 5
natural_image
Close-up of a hand holding a black rectangular object over a white surface, with no visible text or symbols.Рис. 6 Рис. 7
natural_image
Close-up of a vintage typewriter with a black circular disc and white base, showing hands interacting with the screen (no visible text or symbols)natural_image
Close-up of a mechanical optical instrument with a metallic lever and circular dial (no visible text or symbols)Рис. 8
natural_image
Close-up of a metallic mechanical component with a curved shaft and mounting bracket (no visible text or symbols)Рис. 9
natural_image
Close-up of a mechanical component with a metallic bracket and threaded end (no visible text or symbols)Рис. 10
natural_image
Close-up of a mechanical gear assembly with a metallic shaft and mounted components (no visible text or symbols)Рис. 11
natural_image
Close-up of a mechanical optical bench with metallic components and a brass clamp (no visible text or symbols)Рис. 16

natural_image
Close-up of a mechanical optical device with metallic components and a central shaft (no visible text or symbols)Рис. 17
57 THORENS TD 1600
Thorens TD 1601
natural_image
Close-up of a metallic curved surface with a green circular mark and 'THORE' logo on the right side (no readable text or symbols in the main image)Рис. 18

natural_image
Close-up of a mechanical clamp and screwdriver on a car wheel, with a red circular symbol (no text or labels visible)Рис. 19
To reduce risk of electric shock, do not remove the cover (or back). No user-serviceable parts inside.
WARNING
TO PREVENT FIRE OR SHOCK HAZARD, DO NOT EXPOSE THIS APPLIANCE TO RAIN OR MOISTURE.

EXPLANATION OF GRAPHICAL SYMBOLS
The lightning flash with arrowhead symbol, within an equilateral triangle, is intended to alert you to the presence of uninsulated 'dangerous voltage' within the product's enclosure that may be of sufficient magnitude to constitute an electric shock to persons.

The exclamation point within an equilateral triangle is intended to alert you to the presence of important operating and maintenance (servicing) instructions in the literature accompanying the appliance.

This product was tested and complies with all the requirements for the CE Mark.
Compliant to 2002/95/EC (RoHS)

IMPORTANT: DISPOSAL OF WASTE EQUIPMENT BY USERS IN PRIVATE HOUSEHOLDS IN THE EUROPEAN UNION
This symbol on the product or on its packaging indicates that this product must not be disposed off with your other household waste. Instead, it is your responsibility to dispose of your waste equipment by handing it over to a designated collection point for the recycling of waste electrical and electronic equipment. The separate collection and recycling of your waste equipment at the time of disposal will help to conserve natural resources and ensure that it is recycled in a manner that protects human health and the environment. For more information about where you can drop off your waste equipment for recycling, please contact your local city office, your household waste disposal service or the shop where you purchased the product.
natural_image
Circular metallic object with two red arrows pointing outward from its top, no visible text or symbols.III. 1, seen from left side
natural_image
Close-up of a metallic mechanical component on a workbench, no visible text or symbolsIII. 2
natural_image
Close-up of a circular metallic disc mounted on a stand, with no visible text or symbols.III.3

natural_image
Close-up of a vintage CD or DVD disc with visible concentric rings and a metal stand (no text or symbols)III. 4
natural_image
Close-up of metallic mechanical clips attached to a circular surface, no visible text or symbolsIII.5

natural_image
Close-up of a hand holding a black clip attached to a white rectangular object (no visible text or symbols)III. 6 III. 7

natural_image
Close-up of a vintage rotary disc on a stand with hands adjusting its rim (no visible text or symbols)69 DÉBALLER ET MONTER LE PLATEAU TOURNANT
natural_image
Close-up of a mechanical optical instrument with a metallic lever and cylindrical component (no visible text or symbols)III. 8
natural_image
Close-up of a metallic mechanical component with a curved shaft and mounting bracket (no visible text or symbols)III. 9
71 BRAS DE LECTURE ET CELLULE DE LECTURE
natural_image
Close-up of a mechanical component with a metallic bracket and threaded end (no visible text or symbols)III. 10
natural_image
Close-up of a mechanical gear assembly with a metallic shaft and mounted components (no visible text or symbols)III. 11
73 RÉGLAGE DE LA HAUTEUR DU BRAS DE LECTURE
natural_image
Close-up of a mechanical optical bench with metallic components and a brass clamp (no visible text or symbols)III. 16

natural_image
Close-up of a mechanical optical device with metallic components and a central shaft (no visible text or symbols)III. 17
Thorens TD 1601
natural_image
Close-up of a metallic curved surface with a green circular button, next to a black rectangular panel labeled 'THORE' (no other text or symbols visible)III. 18
natural_image
Close-up of a mechanical component with a red pin and circular warning symbol (no readable text or symbols)III. 19
To reduce risk of electric shock, do not remove the cover (or back). No user-serviceable parts inside.
WARNING
TO PREVENT FIRE OR SHOCK HAZARD, DO NOT EXPOSE THIS APPLIANCE TO RAIN OR MOISTURE.

EXPLANATION OF GRAPHICAL SYMBOLS
The lightning flash with arrowhead symbol, within an equilateral triangle, is intended to alert you to the presence of uninsulated 'dangerous voltage' within the product's enclosure that may be of sufficient magnitude to constitute an electric shock to persons.

The exclamation point within an equilateral triangle is intended to alert you to the presence of important operating and maintenance (servicing) instructions in the literature accompanying the appliance.

This product was tested and complies with all the requirements for the CE Mark.
Compliant to 2002/95/EC (RoHS)
IMPORTANT: DISPOSAL OF WASTE EQUIPMENT BY USERS IN PRIVATE HOUSEHOLDS IN THE EUROPEAN UNION
This symbol on the product or on its packaging indicates that this product must not be disposed off with your other household waste. Instead, it is your responsibility to dispose of your waste equipment by handing it over to a designated collection point for the recycling of waste electrical and electronic equipment. The separate collection and recycling of your waste equipment at the time of disposal will help to conserve natural resources and ensure that it is recycled in a manner that protects human health and the environment. For more information about where you can drop off your waste equipment for recycling, please contact your local city office, your household waste disposal service or the shop where you purchased the product.
Thorens系列1600
natural_image
Close-up of a metallic circular object with two red arrows pointing to its edges (no text or symbols visible)如左图一

natural_image
Close-up of a metallic mechanical component with a cylindrical top and central shaft, mounted on a black workbench (no visible text or symbols)图二
这样就完成了驱动器的安装。
natural_image
Close-up of a circular metallic disc mounted on a stand, with no visible text or symbols.图三
natural_image
Close-up of a vintage CD or DVD disc with visible concentric rings and metal stand (no text or symbols)图四
natural_image
Close-up of metallic mechanical clips attached to a circular metallic object (no visible text or symbols)图五

natural_image
Hand holding a black clip attached to a white rectangular object (no visible text or symbols)图六 图七

natural_image
Close-up of a vintage gramophone with a black disc and stand, no visible text or symbols唱臂和唱针
natural_image
Close-up of a mechanical optical instrument with a metallic lever and circular dial (no visible text or symbols)图八
natural_image
Close-up of a metallic mechanical component with a curved shaft and mounting bracket (no visible text or symbols)图九
natural_image
Close-up of a mechanical component with a beige block and black handle, showing a circular hole and a threaded end (no text or symbols visible)图十
唱臂的高度调节 (VTA)
natural_image
Close-up of a mechanical gear assembly with a metallic shaft and mounted components (no visible text or symbols)图十一
转盘放置
悬挂式副底盘
natural_image
Close-up of a mechanical optical bench with metallic components and a brass clamp (no visible text or symbols)图16
natural_image
Close-up of a mechanical optical device with metallic components and a central shaft (no visible text or symbols)图17
Thorens TD 1601
natural_image
Close-up of a metallic curved surface with a green circular button, next to a black rectangular panel labeled 'THORE' (no other text or symbols visible)图十八
natural_image
Close-up of a mechanical component with a red pin and circular symbol (no readable text or symbols)图十
调整速度


- AUSPACKEN UND MONTAGE DES LAUFWERKS
- TONARM UND TONABNEHMERSYSTEM
- Thorens TD 1601
- Dear THORENS customer,
- WARRANTY
- WARNING!
- WARNING
- EXPLANATION OF GRAPHICAL SYMBOLS
- Compliant to 2002/95/EC (RoHS)
- IMPORTANT: DISPOSAL OF WASTE EQUIPMENT BY USERS IN PRIVATE HOUSEHOLDS IN THE EUROPEAN UNION
- Thorens series 1600
- Unpacking and set-up
- Tonearm and Cartridge
- Be extremely careful not to damage the stylus of the cartridge!
- TONEARM AND CARTRIDGE
- Height adjustment of the tonearm (VTA)
- Placement of the turntable
- The suspended Sub chassis
- Placement
- Electrical connections
- Operation
- Thorens TD 1600
- The electrical lift
- Auto shut off
- Adjusting speed
- Technical specifications
- (typical values)
- TD 1600 / TD 1601
- Thorens серия 1600
- BRAS DE LECTURE ET CELLULE DE LECTURE
- Thorens系列1600
- 唱臂和唱针
- 唱臂的高度调节 (VTA)
- 转盘放置
- 悬挂式副底盘
- 调整速度
Brand : THORENS
Model : TD 1601
Category : Turntable