
TD 700 - Turntable THORENS - Free user manual and instructions
Find the device manual for free TD 700 THORENS in PDF.
| Product Type | Belt-drive turntable |
| Brand | THORENS |
| Model | TD 700 |
| Dimensions (W x D x H) | 465 x 350 x 145 mm |
| Weight | 10.1 kg |
| Power supply | Country-specific plug-in power supply |
| Speeds | 33 and 45 rpm (electronic switching) |
| Platter | Acrylic 300 mm (12 inches), 2.4 kg |
| Tone arm | Thorens TP 42 with Audio Technica AT-95E cartridge |
| Antiskating | Magnetic, adjustable by knob |
| Tracking force | Adjustable via counterweight (recommended for AT-95E: 20 mN or 2.0 g) |
| Automatic stop | No, manual stop at end of record |
| Output | RCA cable with ground braid |
| Cable capacitance | 160 pF |
| Package contents | Chassis, inner and outer platter, belt, dust cover, counterweight, power supply, RCA cable, 17 cm adapter |
| Maintenance and cleaning | Avoid oil/grease on belt and platter; clean with a soft cloth moistened with pure alcohol |
| Safety | Do not open the chassis; do not expose to rain or moisture |
| After-sales service | Contact the distributor or Thorens Export Company SA (www.thorens.com) |
| Manufacturing | Made in EEC |
Frequently Asked Questions - TD 700 THORENS
User questions about TD 700 THORENS
0 question about this device. Answer the ones you know or ask your own.
Ask a new question about this device
Download the instructions for your Turntable in PDF format for free! Find your manual TD 700 - THORENS and take your electronic device back in hand. On this page are published all the documents necessary for the use of your device. TD 700 by THORENS.
USER MANUAL TD 700 THORENS
To reduce risk of electric shock, do not remove the cover (or back). No user-serviceable parts inside.
WARNING
TO PREVENT FIRE OR SHOCK HAZARD, DO NOT EXPOSE THIS APPLIANCE TO RAIN OR MOISTURE.


EXPLANATION OF GRAPHICAL SYMBOLS
The lightning flash with arrowhead symbol, within an equilateral triangle, is intended to alert you to the presence of uninsulated 'dangerous voltage' within the product's enclosure that may be of sufficient magnitude to constitute an electric shock to persons.
The exclamation point within an equilateral triangle is intended to alert you to the presence of important operating and maintenance (servicing) instructions in the literature accompanying the appliance.

This product was tested and complies with all the requirements for the CE Mark.

IMPORTANT: DISPOSAL OF WASTE EQUIPMENT BY USERS IN PRIVATE HOUSEHOLDS IN THE EUROPEAN UNION
This symbol on the product or on its packaging indicates that this product must not be disposed off with your other household waste. Instead, it is your responsibility to dispose of your waste equipment by handing it over to a designated collection point for the recycling of waste electrical and electronic equipment. The separate collection and recycling of your waste equipment at the time of disposal will help to conserve natural resources and ensure that it is recycled in a manner that protects human health and the environment. For more information about where you can drop off your waste equipment for recycling, please contact your local city office, your household waste disposal service or the shop where you purchased the product.
Unpacking and set-up
Carefully take the record player and its accessories out of the carton and check if each of the following items has been supplied:
1 x User manual
1 x Plinth with sub-platter and tonearm
1 x Thorens drive belt
1 x Platter with felt mat
1 x Dust cover
1 x Tonearm counterweight
1 x External mains adapter
1 x RCA interconnecting leads with ground wire
1 x Adaptor for single records
Loop the drive belt around the sub-platter and motor pulley (Fig. 1). Carefully put the main platter, depression beneath, onto the sub-platter.
Please make sure that no oil or greasy substances can get onto the belt and the transmission area of the subplatter. If necessary, both parts may be cleaned with an alcoholic dilution added to a lint-free cloth.
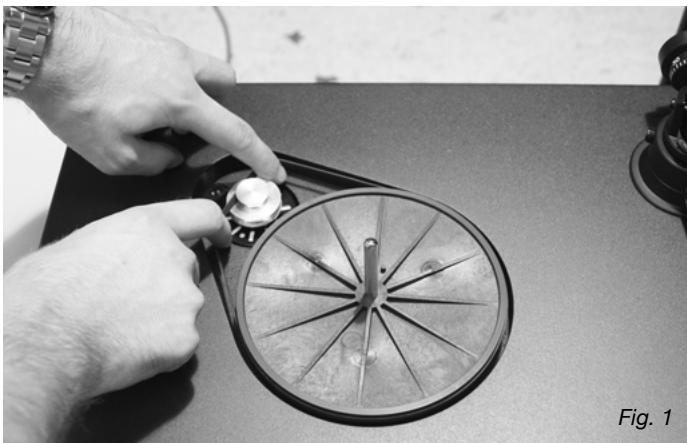
Fig. 1
Attach dust cover to the hinges at the rear side of the plinth – Your record player is now completely mounted.
IMPORTANT: It is highly recommended to save the shipping box and all packing material in case the record player needs to be packed again for transportation. Thorens cannot be held responsible for any damage that may occur during transport on the ground that the record player has not been properly packed.
Placement and connections
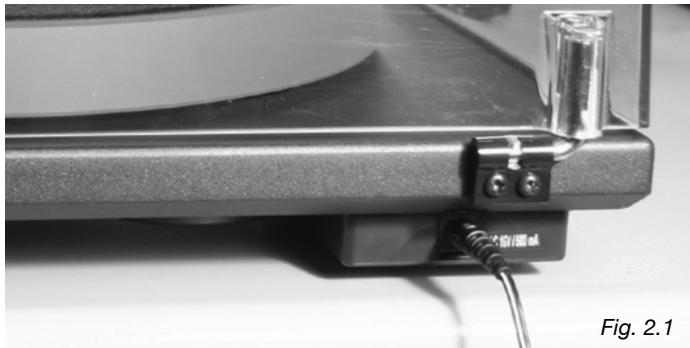
By employing the appropriate (country-specific) Thorens mains adapter this record player can be connected to nearly any mains voltage supply. The low-tension plug of the cord coming from the mains adaptor is to be inserted into the respective socket at the rear side (right) of the record player (Fig. 2.1).
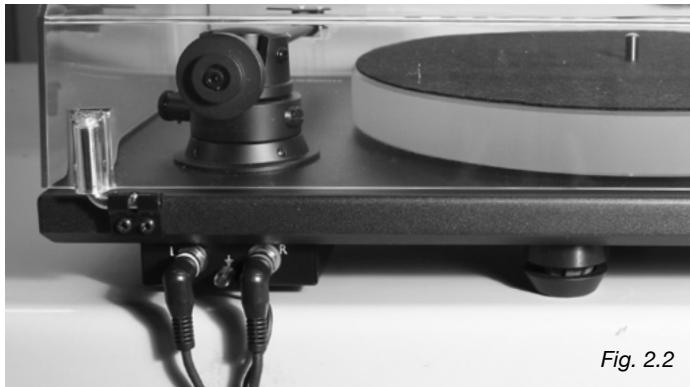
Use the supplied RCA leads to connect the record player to the phono input jack (RCA) of your amplifier or receiver (Fig. 2.2). HINT: Make sure that the polarity is correct, i.e. right/left channel output at the record player is to correspond with the right/left channel input.
For amplifiers/receivers featuring a 5-pin DIN-socket at the phono input section you will need a special adaptor (RCA to DIN) which may be acquired from your Thorens dealer.
The separate thinner lead is used to make a connection to ground. Connect this lead between the ground post of the record player (Fig. 2.2) and the respective ground post (GND) of your amplifier/receiver. If your amplifier does not feature a separate ground post you may alternatively attach the lead to the outer part of an unused RCA input jack at the amplifier.
The many possibilities of grounding an audio chain may sometimes cause trouble in so far that a certain hum can be heard through the speakers. This humming noise becomes louder if the volume knob is turned up. If there is audible hum we advise to re-check the ground connection if it is securely fixed, or if perhaps an alternative ground spot may remedy the problem. In the event that causes for hum cannot be localised and eventually eliminated please contact your Thorens dealer for help.
When placing the record player onto its final position makes sure that it is a fair distance away from your other audio devices, such as amplifier, receiver or CD player. This measure is to avoid electro-magnetic interferences which can yield a distorting effect in the sensitive pickup cartridge. This may be audible as hum during playback.
Electro-magnetic interferences however can be disclosed and eliminated by simply changing the position of the record player with respect to the other devices.
Thorens record players are relatively insensitive when subject to foot-fall shocks or airborne resonance. Nevertheless, a general problem remains when it comes to playing back vinyl records with a high-quality pickup cartridge. It is therefore highly recommended to choose a sturdy piece of furniture for placement and to avoid the proximity of the record player to the loudspeakers.
Under certain circumstances all these precautions may not be good enough in older houses with wooden floor construction. Here, in most cases a solid shelf firmly mounted to a supporting wall can be very beneficial for the sonic properties of the record player if it is placed on such a shelf or console.
Tonearm and pickup cartridge
Your new Thorens TD 700 is supplied with pre-mounted tonearm Thorens TP 42 and pickup cartridge Audio Technica AT-95E (Fig. 3).
HINT: the following mounting procedures are applicable only in case you want to change to an other cartridge.
The tonearm TP 42 is made to accept nearly any pickup cartridge with standardised 12.5 ~mm (1/2") fixing holes.
The four colour-coded litz wires of the tonearm's headshell are attached to the respective pins (identical colours) at the rear side of the cartridge.
Some cartridges of yesterday however may not have colour-coded pins but show letters instead. We therefore advise to connect the litz wires as follows:
R right channel = red wire (signal)
G right channel = green wire (ground)
L left channel = white wire (signal)
G left channel = blue wire (ground)
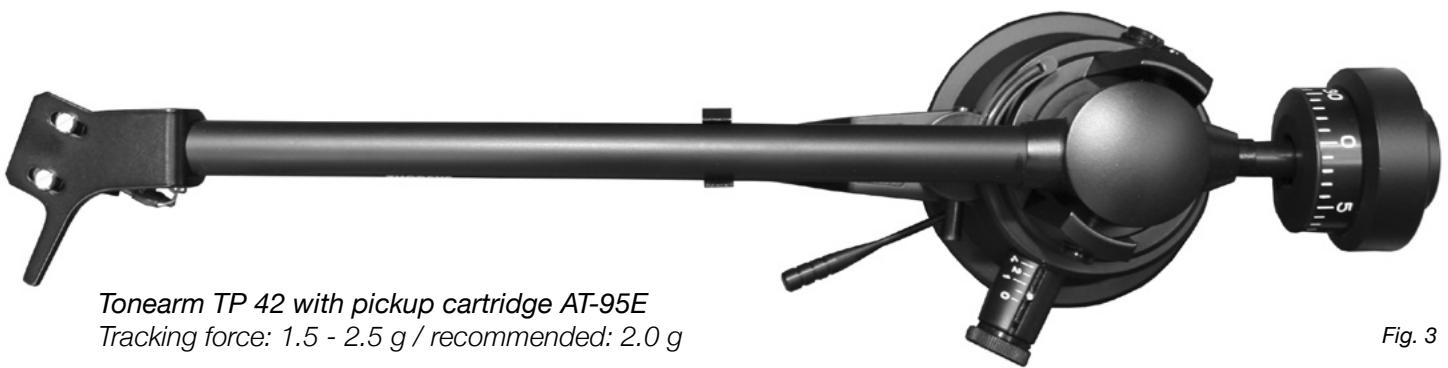
Fig. 3
Tracking force
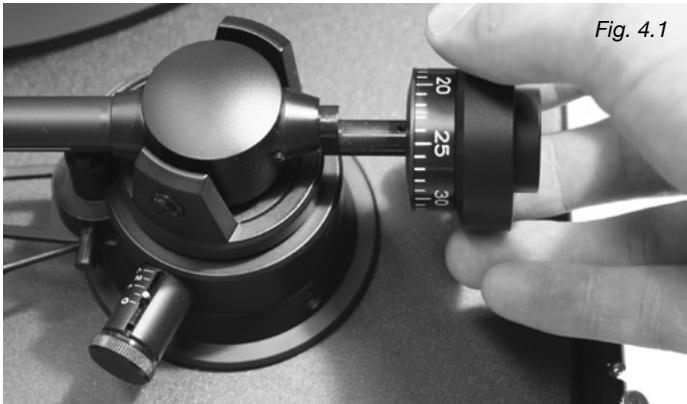
The counterweight is attached to the rear end of the to-neckarm tube by carefully rotating it clockwise onto the tube (Fig. 4.1).
Lower the lift lever (see page 12) and move the tonearm to a position in between the tonearm rest and the outer rim or the platter. Now balance the tonearm by rotating the counterweight either clockwise or counter-clockwise until total equilibrium has been achieved. HINT: before doing so please remove the (detachable) stylus guard of the cartridge.
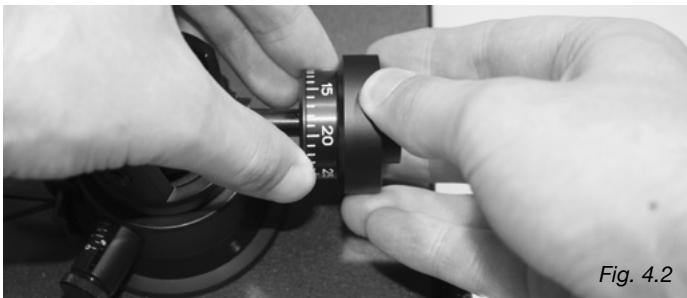
Move the tonearm back to its rest and lock. In order to adjust tracking force hold the main piece of the counterweight tight with the fingers of one hand to prevent it from turning whilst the fingers of your other hand rotate the tracking force dial until "0" on the dial is flush with the white line on the rear tonearm tube (Fig. 4.2).
Tracking force can now be adjusted by slowly rotating the counterweight clockwise (the dial is coupled to the weight) until you have reached the tracking force recommended by the manufacturer of the pickup cartridge, “20” for instance (= 20mN = 2.0g- recommended for the AT-95E).
Anti-skating force
The friction of the pickup stylus in the record groove and the geometrical off-set position of the pickup in the head-shell are generating a so-called skating force while playing a record. This force tends to drag the tonearm towards the centre of the record.
The TP 42 however features a built-in magnet for the compensation (anti-skating) of this unavoidable movement.
Anti-skating force is adjusted by a control knob at the base of the tonearm (Fig. 5) whereby the settings correspond to the applied tracking force (in mN), thus:
0 no effective anti-skating force
1 5-10mN
2 10-15mN
3 15 - 20 mN
4 >20mN
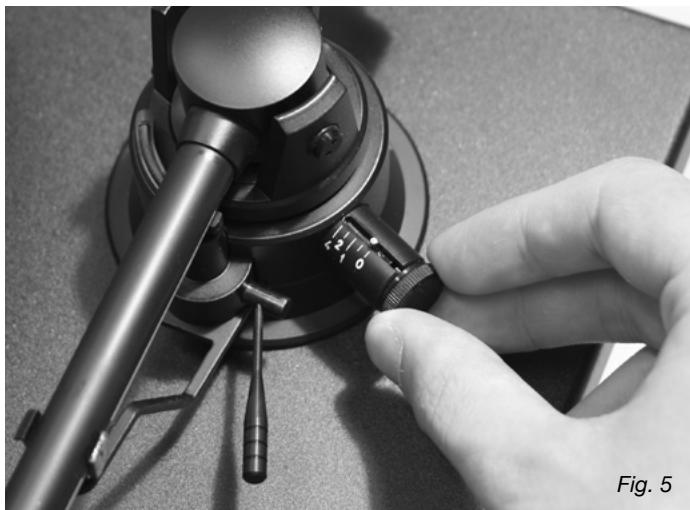
5
Operation
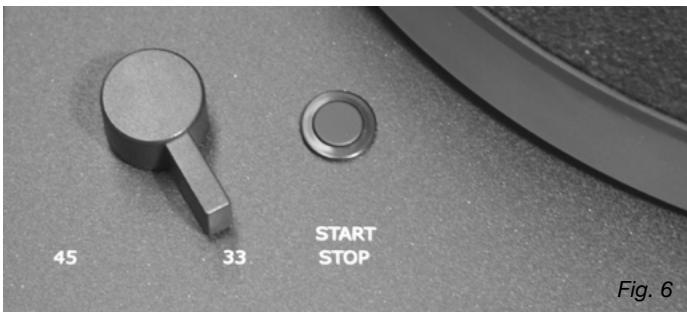
The lever switch situated at the left side of the platter selects the platter speed. There are two speeds provided: 33 (rpm) for LPs and 45 (rpm) for singles. Next to this switch on the right is the Start/Stop button (Fig. 6).
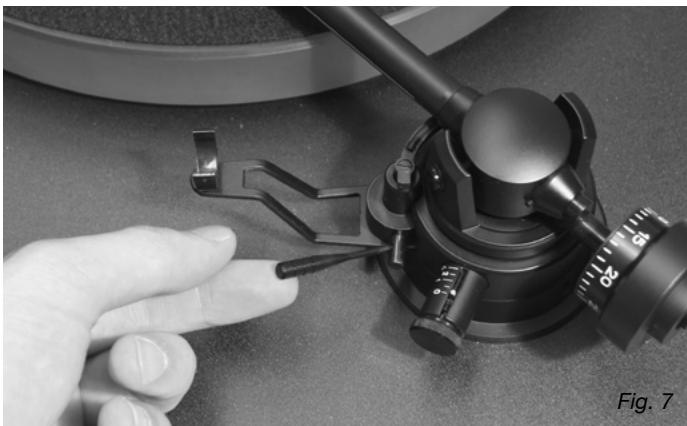
For playing back a record select the appropriate speed and press the Start/Stop button. Then lift the tonearm up by slowly pushing the lift lever up and back (Fig. 7). Move the tonearm from its rest and position it above the lead-in groove or above the desired piece/track to be played. Slowly move the lift lever down whereupon the tonearm is smoothly descending.
This record player does not feature any automatic end-of-record shut-off facility. Therefore, as soon as the stylus has reached the lead-out groove, the tonearm is to be lifted up manually by the lever and the motor switched of by pressing the Start/Stop button.
Technical specifications
Drive system
Motor
Speed
Speed change
Platter
Tonearm
Anti-skating
Automatic functions
Automatic shut-off
Capacity of leads
Voltage/Power supply
Dimensions
Weight
belt drive (beneath platter)
electronically controlled
AC synchronous motor
33 and 45 rpm
electronically
Acryl 300 mm (12") 2.4 kg
Thorens TP 42
with pickup cartridge AT-95E
magnetic
n/a
n/a
160 pF
country-specified mains adapter
465 × 350 × 145 mm( W × D × H)
10,1 kg
Customer Service
Your Thorens dealer or distribution partner shall be pleased to assist you in the event that you have any further queries or need additional information concerning Thorens products.
You may contact Thorens also directly:
Thorens Export Company Ltd.
Im Huebel 1, CH-4304 Giebenach, Switzerland
www.thorens.com, info@thorens.com
HINT: In case of warranty claims, you are kindly requested to contact your Thorens dealer or distribution partner first
Further information may also be obtained from: www.thorens.com
Notes
A LIRE ATTENTIVEMENT AVANT LA PREMIÈRE MISE EN SERVICE!
ATTENTION
Installation et raccordement
© 2006 Thorens Export Company AG