
Netflix Stranger Things Lucas BMX Bike - Bike Schwinn - Free user manual and instructions
Find the device manual for free Netflix Stranger Things Lucas BMX Bike Schwinn in PDF.


| Product Type | BMX Bike |
| Brand | Schwinn |
| Model | Netflix Stranger Things Lucas BMX Bike |
| Frame Material | Steel |
| Wheel Size | 20 inches |
| Brakes | Front and rear caliper brakes |
| Recommended Rider Height | 4 ft 6 in to 5 ft 6 in (137-168 cm) |
| Maximum Rider Weight | 150 lbs (68 kg) |
| Weight | Approximately 25 lbs (11.3 kg) |
| Dimensions (L x H) | 60 x 36 in (152 x 91 cm) |
| Seat Height | Adjustable, 28-34 in (71-86 cm) |
| Handlebar Type | BMX style, steel |
| Number of Speeds | Single speed |
| Pedals | Platform pedals |
| Chain Guard | Included |
| Maintenance | Regular lubrication of chain and moving parts; check tire pressure periodically |
| Safety Features | Reflectors, padded seat, and safety grips |
| Spare Parts Availability | Common BMX parts compatible; contact Schwinn dealer |
| Repairability | Repairable by standard bicycle tools; user can replace tires, tubes, brake pads, chain |
| Intended Use | Recreational riding, BMX stunts, and tricks |
| Age Recommendation | Ages 8 and up |
| Assembly Required | Yes, partial assembly (handlebars, seat, pedals) |
Frequently Asked Questions - Netflix Stranger Things Lucas BMX Bike Schwinn
User questions about Netflix Stranger Things Lucas BMX Bike Schwinn
0 question about this device. Answer the ones you know or ask your own.
Ask a new question about this device
Download the instructions for your Bike in PDF format for free! Find your manual Netflix Stranger Things Lucas BMX Bike - Schwinn and take your electronic device back in hand. On this page are published all the documents necessary for the use of your device. Netflix Stranger Things Lucas BMX Bike by Schwinn.
USER MANUAL Netflix Stranger Things Lucas BMX Bike Schwinn
Owner's Manual BMX Bicycle
This manual contains important safety, performance and maintenance information. Read the manual before taking your first ride on your new bicycle, and keep the manual handy for future reference.
To register your bike visit www.schwinnbikes.com/registerbike

text_image
SCHWINN QUALITY LIMITED LIFETIME WARRANTY FOR AS LONG AS YOU OWN THE BIKE SOME RESTRICTIONS APPIX. DETAILS AT SCHWINNBIKEX.COMContents
1 Safety 4
Safety Signal Words 4
User Responsibility....4
Bicycle Setup 5
Personal Safety....8
Riding Safety....11
Before You Ride Safety Checklist 13
2 Parts Identification 14
3 Assembly 16
Tools Required 16
Getting Started....17
Attach the Handlebar....18
Cable Detangler 24
Attach the Front Brake Cable 26
Attach the Front Wheel 27
Attach the Seat....29
Attach the Pedals 32
Attach the Pegs. 33
4 Adjustments....34
Tools Required 34
Adjusting the Brakes 35
Adjusting the Seat Height 42
Adjusting the Handlebar 44
Adjusting the Headset 46
Adjusting the Bottom Bracket. 50
5 Use....52
Brake Operation....52
Security 54
6 Maintenance 55
Basic Maintenance....55
Lubrication Schedule 56
Parts Maintenance 57
Hub Bearings....60
Inflating the Tire Tube 60
Repairing a Flat Tire....61
Troubleshooting Guide 62
7 Warranty....65
Purchase Record....66
Congratulations
on your new bicycle! Proper assembly and operation of your bicycle is important for your safety and enjoyment. Our customer service department is dedicated to your satisfaction with Pacific Cycle and its products. If you have questions or need advice regarding assembly, parts, performance, or returns, please contact the experts at Pacific Cycle. Enjoy the ride!
Toll free: 1-800-626-2811.
Customer Service hours: Monday - Friday 8 AM- 5 PM Central Standard Time (CST)
You may also reach us at:
Web: www.pacific-cycle.com
Email: customerservice@pacific-cycle.com
Mail: P. O. Box 344
4730 E. Radio Tower Lane
Olney, IL 62450
Do not return this item to the store. Please call Pacific Cycle customer service if you need assistance. You will need your model number and date code located on the service sticker near the bottom bracket area. See Section 7: Purchase Record for the location of the model number on your bicycle.
About This Manual
It is important for you to understand your new bicycle. By reading this manual before you go out on your first ride, you'll know how to get better performance, comfort, and enjoyment from your new bicycle. It is also important that your first ride on your new bicycle is taken in a controlled environment, away from cars, obstacles and other cyclists.
This manual contains important information regarding safety, assembly, use, and maintenance of the bicycle but is not intended to be a complete or comprehensive manual covering all aspects concerning bicycle ownership. We recommend consulting a bicycle specialist if you have any doubts or concerns regarding your experience or ability to properly assemble and maintain the bicycle.
A Special Note For Parents and Guardians
It is a tragic fact that most bicycle accidents involve children. As a parent or guardian, you bear the responsibility for the activities and safety of your minor child. Among these responsibilities are to make sure that the bicycle which your child is riding is properly fitted to the child; that it is in good repair and safe operating condition; that you and your child have learned, understand and obey not only the applicable local motor vehicle, bicycle, and traffic laws, but also the common sense rules of safe and responsible bicycling. As a parent, you should read this manual before letting your child ride the bicycle. Please make sure that your child always wears an approved bicycle helmet when riding.
Helmets Save Lives!
• ALWAYS WEAR A PROPERLY FITTED HELMET WHEN RIDING YOUR BICYCLE
• DO NOT RIDE AT NIGHT
• AVOID RIDING IN WET CONDITIONS
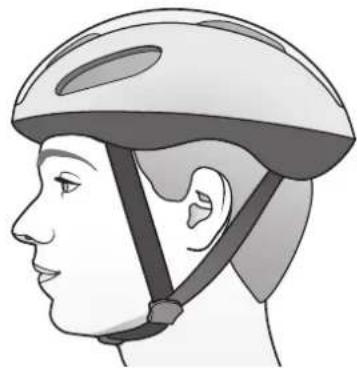
natural_image
Side profile illustration of a person wearing a helmet and harness (no text or symbols)Correct Fitting
Make sure your helmet covers your forehead
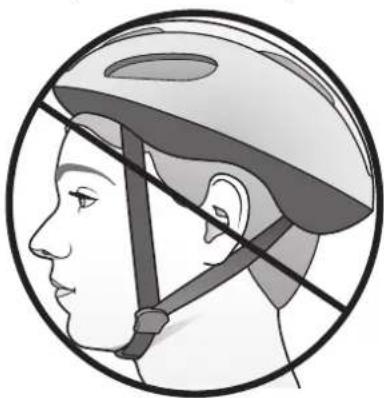
natural_image
Side profile illustration of a person wearing a helmet and using a bicycle brake system (no text or symbols)Incorrect Fitting
Forehead is exposed and vulnerable to serious injury
① Safety
SAFETY SIGNAL WORDS
The following safety signal words indicate a safety message. The symbol alerts you to potential hazards. Failure to follow the warning may result in damage to property, injury, or death.
This manual contains many Warnings and Cautions concerning the consequences of failure to follow safety warnings. Because any fall can result in serious injury or even death, we do not repeat the warning of possible injury or death whenever the risk of falling is mentioned.
WARNING!
Indicates a hazard or unsafe practice that will result in severe injury or death. Failure to read, understand and follow the safety information in this manual may result in serious injury or death.
CAUTION!
Indicates a hazard or unsafe practice that could result in minor injury.
NOTICE
Indicates a hazard unrelated to personal injury, such as property damage.
USER RESPONSIBILITY
WARNING!
Do not install any kind of power plant or internal combustion engine to a bicycle. Adapting a bicycle in this manner poses an extreme safety risk to rider and could result in loss of control or death.
All persons assembling, using, and maintaining the bicycle must read and understand the safety warnings and operating instructions in this manual before using the bicycle.
It is the responsibility of the user, or in the case of a child rider, an adult, to ensure the bicycle is properly maintained and in proper operating condition. Doing so will reduce the risk of injury. Always conduct regular maintenance and inspection of your bicycle. Complete the Safety Checklist at the end of this section before each use.
A responsible adult must always supervise the use of the bicycle by a child. You must ensure:
- The child is wearing the proper protective attire and approved bicycle helmet.
- The child is seated securely and the bicycle is properly fitted to the child.
- The child understands applicable laws and common sense rules of safe responsible bicycling.
BICYCLE SETUP
Safety 1
WARNING!
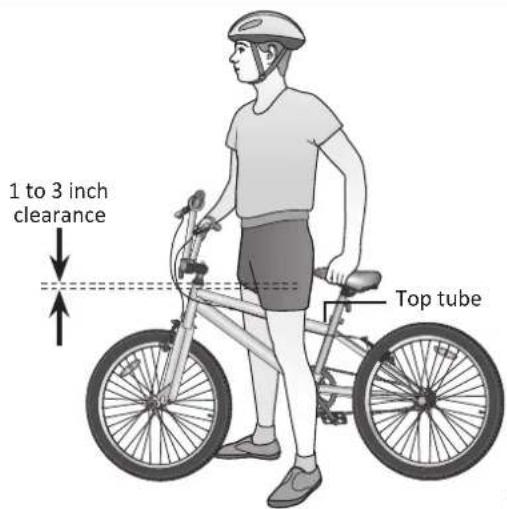
Inability to safely reach the handlebars and dismount the bicycle may result in loss of control of the bicycle. If the bicycle has a top tube on the frame, ensure there is one to three inches of clearance between the rider and the top tube.
Improper setup or maintenance of the bicycle may result in an unexpected movement, loss of control, and serious injury or death.
Correct Bicycle Size
Riding a bicycle that is not correctly sized to the rider may result in the rider's feet not being able to touch the ground and balance the bicycle, properly reach the handlebar for steering or braking, and loss of control when pedaling.
Use the wheel size in the following table as a guide to match the rider and bicycle. For example, bicycles with a wheel size of 12 inches fit a rider that is 28 to 38 inches tall. Note: Some bicycles such as folding bicycles may have smaller wheels but still fit adults.
If the bicycle has a top tube on the frame, check that there is one to three inches of clearance between the rider and the top tube. Figure 1.1
Wheel Size Riders Approximate Height
| 12 inch 28 - 38 inches tall | |
| 16 inch 38 - 48 inches tall | |
| 18 inch 42 - 52 inches tall | |
| 20 inch 48 - 60 inches tall | |
| 24 inch 56 - 66 inches tall | |
| 26 inch, 27.5 inch, 29 inch, 700c | 64 - 74 inches tall |
text_image
1 to 3 inch clearance Top tubeFigure 1.1
1 Safety
Seat Height and Handlebar Reach

WARNING!
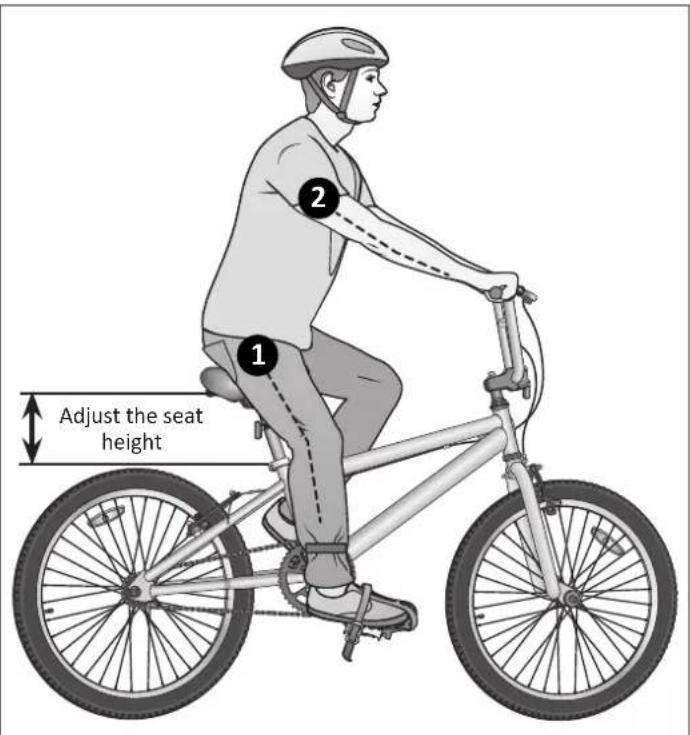
Improperly adjusted seat height could affect the rider's ability to reach the handlebar and pedals may result in an unexpected movement, loss of control, and serious injury or death. Follow these guidelines when adjusting the seat height. Always ensure the seat post minimum insertion marks are below the seat clamp and cannot be seen. Ensure the seat clamp is locked and the seat cannot move.
1 Your legs should be almost completely straight when the pedal is in the down most position, just a slight bend in the knee. Figure 1.2
Note: The rider's feet may not touch the ground easily. If this is the case the rider can simply move forward off the seat to mount and dismount the bicycle or the seat can be adjusted lower if the rider is uncomfortable with the height, but note that riding is more difficult with the seat too low, as the legs are in an unnatural position.
Do not raise the seat so much the knees lock straight when pedaling or you have to move forward off the seat to pedal. This is unsafe and the bicycle cannot be controlled in this condition.
2 You should be able to safely reach the handlebar with your arms bent slightly (approximately 10 degrees) at the elbow.
text_image
Adjust the seat heightFigure 1.2
Safety 1
Quick-release Levers

WARNING!
Improper setup or maintenance of the quick-release levers may result in an unexpected movement, loss of control, and serious injury or death. Before riding always check that the quick-release lever is firmly locked in place and the seat does not move.
Seat Post
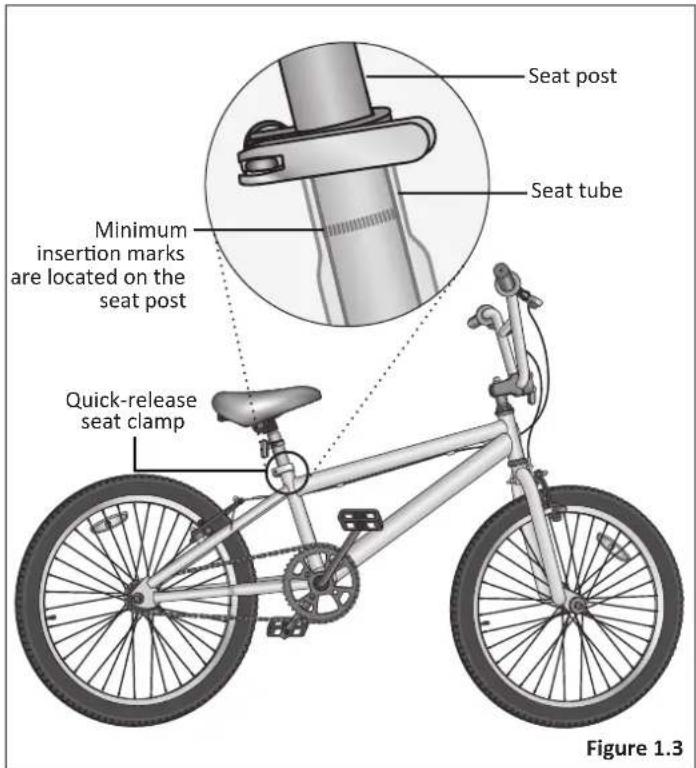
Ensure the seat post's minimum insertion marks are not visible above the quick-release seat clamp and the clamp is locked in place. Figure 1.3
Note: See Section 4: Adjusting the Seat Height if adjustments are needed.
text_image
Seat post Seat tube Minimum insertion marks are located on the seat post Quick-release seat clamp Figure 1.31 Safety
PERSONAL SAFETY

WARNING!
Riding a bicycle without protective gear, clothing, or a helmet may result in serious injury or death. Always wear protective gear, clothing, and helmet when riding the bicycle. Ensure protective gear does not interfere with steering, braking, and pedaling.
Protective Gear and Clothing
Always wear: Figure 1.4
- Colors that are easily seen and, if possible, reflective clothing.
• Clothing appropriate for the weather conditions. - Use of protective gear such as pads for the knees and elbows is highly recommended for children.
- A properly fitted, ASTM or SNELL approved, bicycle helmet shall be worn at all times by riders of the bicycle. For information regarding how to properly fit a helmet visit: http://www.nhtsa.gov/people/injury/pedbimot/bike/easystepsweb
Do not wear:
- Loose clothing parts, strings, or jewelry that may become entangled with moving parts on the bicycle or interfere with handling of the bicycle.
- Pants with loose pant legs. If necessary, always tuck pant legs into a sock or use a leg band to avoid the clothing becoming caught in the drive chain.
• Shoes with untied shoe laces.

text_image
Properly fitted helmet Easily seen or reflective clothing Elbow pads Knee pads Leg band Shoes fastened or tied Figure 1.4Safety 1
Helmet Use
Important! Many states have passed helmet laws regarding children. Make sure you know your state's helmet laws. It is your job to enforce these rules with your children. Even if your state does not have a children's helmet law, it is recommended that everyone wear a helmet when cycling. When riding with a child carrier seat or trailer, children must wear a helmet.
It is strongly advised that a properly fitting, ASTM or SNELL approved, bicycle safety helmet be worn at all times when riding your bicycle. In addition, if you are carrying a passenger in a child safety seat, they must also be wearing a helmet.
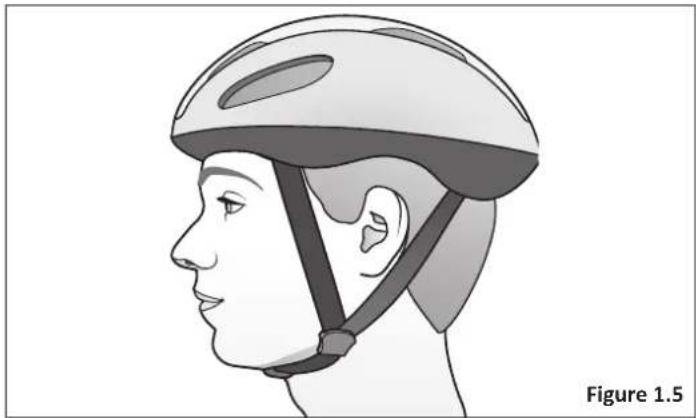
The correct helmet should: Figure 1.5
- Be comfortable
- Have good ventilation
- Fit correctly
- Cover forehead
Incorrect helmet position: Figure 1.6
- Helmet does not cover the forehead
natural_image
Side profile illustration of a person wearing a helmet and harness (no text or symbols)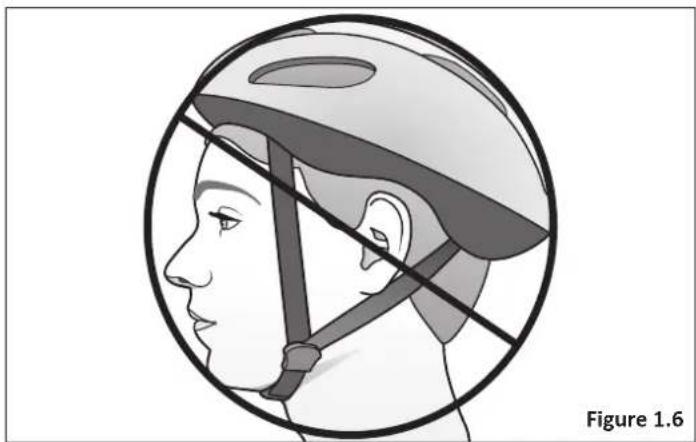
natural_image
Side profile illustration of a person wearing a helmet and using a horizontal bar device (no text or symbols)1 Safety
Reflectors

WARNING!
Missing, damaged, or dirty reflectors will affect the ability of others to see and recognize you as a moving bicyclist increasing the risk of being hit, serious injury or death. Always check the reflectors are in place and make sure they are clean, straight, unbroken and securely mounted before riding the bicycle.
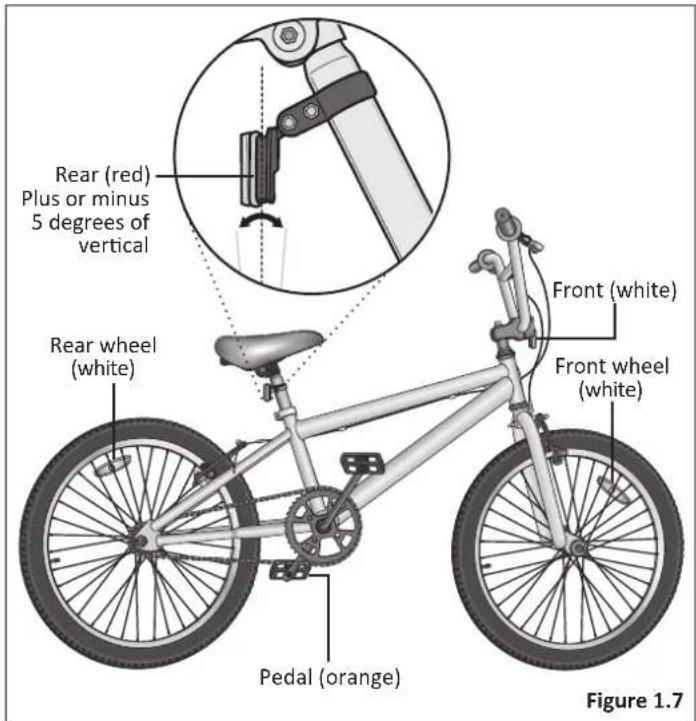
Important! Federal regulations require every bicycle over 16 inches to be equipped with front, rear, wheel, and pedal reflectors. Many states require specific safety devices. It is your responsibility to familiarize yourself with the laws of the state where you ride and to comply with all applicable laws, including properly equipping yourself and your bike as the law requires. Bicycles under 16 inches are considered "sidewalk bicycles" and may not be fitted with reflectors. These bicycles should not be ridden on streets, at night or unsupervised by an adult.
Check and confirm the front and rear reflectors are in the correct position: Figure 1.7
- Front Reflector: Should aim forward (when viewed from above) and be mounted so it is within 5 degrees of vertical.
- Rear Reflector: Should aim straight back (when viewed from above) and be mounted so it is within 5 degrees of vertical.
text_image
Rear (red) Plus or minus 5 degrees of vertical Rear wheel (white) Pedal (orange) Front (white) Front wheel (white) Figure 1.7RIDING SAFETY
WARNING!
Riding the bicycle in unsafe conditions (i.e. at night), in an unsafe manner, or disregarding traffic laws may result in an unexpected movement, loss of control, and serious injury or death.
General Safety
- Familiarize yourself with all the bicycle's features before riding. Practice gear shifts, braking, and the use of toe clips and straps, if installed.
- Always ride defensively in a predictable, straight line. Never ride against traffic.
- Expect the unexpected (e.g., opening car doors or cars backing out of concealed driveways).
- Take extra care at intersections and when preparing to pass other vehicles.
- Maintain a comfortable stopping distance from all other riders, vehicles and objects. Safe braking distances and forces are subject to the prevailing weather conditions. Do not lock up the brakes. When braking, always apply the rear brake first, then the front. The front brake is more powerful and if it is not correctly applied, you may lose control and fall.
- Always use the correct hand signals to indicate turning or stopping.
- Obey the traffic laws (e.g., stopping at a red light or stop sign, giving way to pedestrians).
Safety 1
- Wear proper riding attire, reflective if possible, and avoid open toe shoes.
- Do not use items that may restrict your hearing and vision.
- Do not carry packages or passengers that will interfere with your visibility or control of the bicycle.
Road Conditions
- Be aware of road conditions. Concentrate on the path ahead. Avoid pot holes, gravel, wet road markings, oil, curbs, speed bumps, drain grates and other obstacles.
- Cross train tracks at a 90 degree angle or walk your bicycle across.
Wet Weather
- When riding in wet weather always wear reflective clothing and use safety lights to enhance visibility.
• Exercise extreme caution when riding in wet conditions. - Ride at a slower speed. Turn corners gradually and avoid sudden braking.
- Brake earlier, it will take a longer distance to stop.
- Pot holes and slippery surfaces such as line markings and train tracks all become more hazardous when wet.
1 Safety
Night Riding
- Important! Riding a bicycle at night is not recommended. Check your local laws regarding night riding.
- Ensure bicycle is equipped with a full set of correctly positioned and clean reflectors.
- Use a white light on the front and a red light on the rear. Use lights with flashing capability for enhanced visibility.
- If using battery powered lights, make sure batteries are well charged.
- Wear reflective and light colored clothing. Wear reflective clothing and use safety lights for increased visibility.
- Ride at night only if necessary. Slow down and use familiar roads with street lighting.
Hill Technique
- Gear down before a climb and continue gearing down as required to maintain pedaling speed.
- If you reach the lowest gear and are struggling, stand up on your pedals. You will then obtain more power from each pedal revolution.
- On the descent, use the high gears to avoid rapid pedaling.
- Do not exceed a comfortable speed; maintain control and take additional care.
- Braking will require additional distance. Initiate braking slowly and earlier than usual.
Cornering Technique
- Brake slightly before cornering and prepare to lean your body into the corner.
- Maintain the inside pedal at the 12 o'clock position and slightly point the inside knee in the direction you are turning.
- Keep the other leg straight, do not pedal through fast or tight corners.
- Decrease your riding speed, avoid sudden braking and sharp turns.
Safe Riding Rules for Children
- Many states require that children wear a helmet while cycling. Always wear a properly fitted helmet.
- Do not play in driveways or the road.
- Do not ride on busy streets.
- Do not ride at night.
- Obey all the traffic laws, especially stop signs and red lights.
- Be aware of other road vehicles behind and nearby.
- Before entering a street: Stop, look left, right, and left again for traffic. If there's no traffic, proceed into the roadway.
- If riding downhill, be extra careful. Slow down using the brakes and maintain control of the steering.
- Never take your hands off the handlebars, or your feet off the pedals when riding downhill.
BEFORE YOU RIDE SAFETY CHECKLIST
Before every ride, it is important to carry out the following safety checks. Do not ride a bicycle that is not in proper working condition!
Accessories
☐ The reflectors are properly placed and not obscured. Note: Bicycles 16" and under may not be equipped with reflectors since small children should not ride at night.
☐ All other fittings on the bike are properly and securely fastened, and functioning.
☐ The rider is wearing a properly fitted helmet (protective gear if necessary) and that clothing and loose items are properly constrained.
Bearings
☐ All bearings are lubricated, run freely and display no excess movement, grinding or rattling.
Brakes
☐ The front and rear brakes work properly.
☐ The brake shoe pads are not overly worn and are correctly positioned in relation to the rims.
☐ The brake control cables are lubricated, correctly adjusted and display no obvious wear.
☐ The brake control levers are lubricated and tightly secured to the handlebar.
Chains
☐ The chain is oiled, clean and running smoothly.
Cranks and Pedals
☐ The pedals are securely tightened to the crank arms.
☐ The crank arms are secured to the axle and are not bent.
Frame and Fork
☐ The frame and fork are not bent or broken.
☐ The quick-release clamps are locked in place.
Steering
☐ The handlebar and post are correctly adjusted and tightened, and allow proper steering.
☐ The handlebars are set correctly in relation to the forks and the direction of travel.
☐ The handlebar binder bolt is tightened.
Wheels and Tires
☐ The rims do not have dirt or grease on them.
☐ The wheels are properly attached to the bicycle and axle.
☐ The tires are properly inflated within the recommended pressures displayed on the tires sidewall.
☐ The tires have the proper amount of tread, no bulges or excessive wear.
② Parts Identification
BMX Bicycle
Get to know the parts of your bicycle. This will help with assembly, maintenance, and troubleshooting. Models vary in color and style.
| Part name Torque (in.-lb) | ||
| 1 | Handlebar grip | - |
| 2 | Rear brake lever | 55 - 70 |
| 3 | Brake cable | - |
| 4 | Handlebar | - |
| 5 | Stem binder bolt 100 - 120 | |
| 6 | Handlebar binder bolt(s) | 145 - 200 |
| 7 | Stem | - |
| 8 | Headset | 175 - 260 |
| 9 | Caliper brake assembly | 50 - 70 |
| 9A Brake cable pinch bolt | 50 - 70 | |
| 9B | Brake pads | - |
| 9C Brake pads hardware | 50 - 60 | |
| 10 | Caliper brake attaching nut | 70-85 |
| 11 | Wheel axle nut (front) | 180-240 |
| 11A | Wheel axle nut (rear) | 240-300 |
| 12 Tire | - | |
| 13 Rim | - | |
| 14 Spoke | - | |
| 15 Valve stem | - | |
| Part name Torque (in.-lb) | ||
| 16 | Fork dropout - | |
| 17 | Fork - | |
| 18 | Pedal 300-360 | |
| 19 | Crank arm (1-piece) 300 | |
| 19A | Crank arm (3-piece) 390 | |
| 20 | Chain - | |
| 21 | Chainwheel - | |
| 22 | Bottom bracket lockring 300 | |
| 23 | Seat post - | |
| 24 | Seat post attaching hardware | 130-170 |
| 25 | Saddle (seat) | - |
| 26 | Seat post clamp | 60-80 |
| 27 | Linear brake assembly | - |
| 27A | Brake cable pinch bolt | 50-70 |
| 27B | Brake pad | - |
| 27C | Brake pad hardware | 50-60 |
| 27D | Brake spring | - |
| 27E | Brake pivot bolt | 17-20 |
| 28 | Freewheel | - |
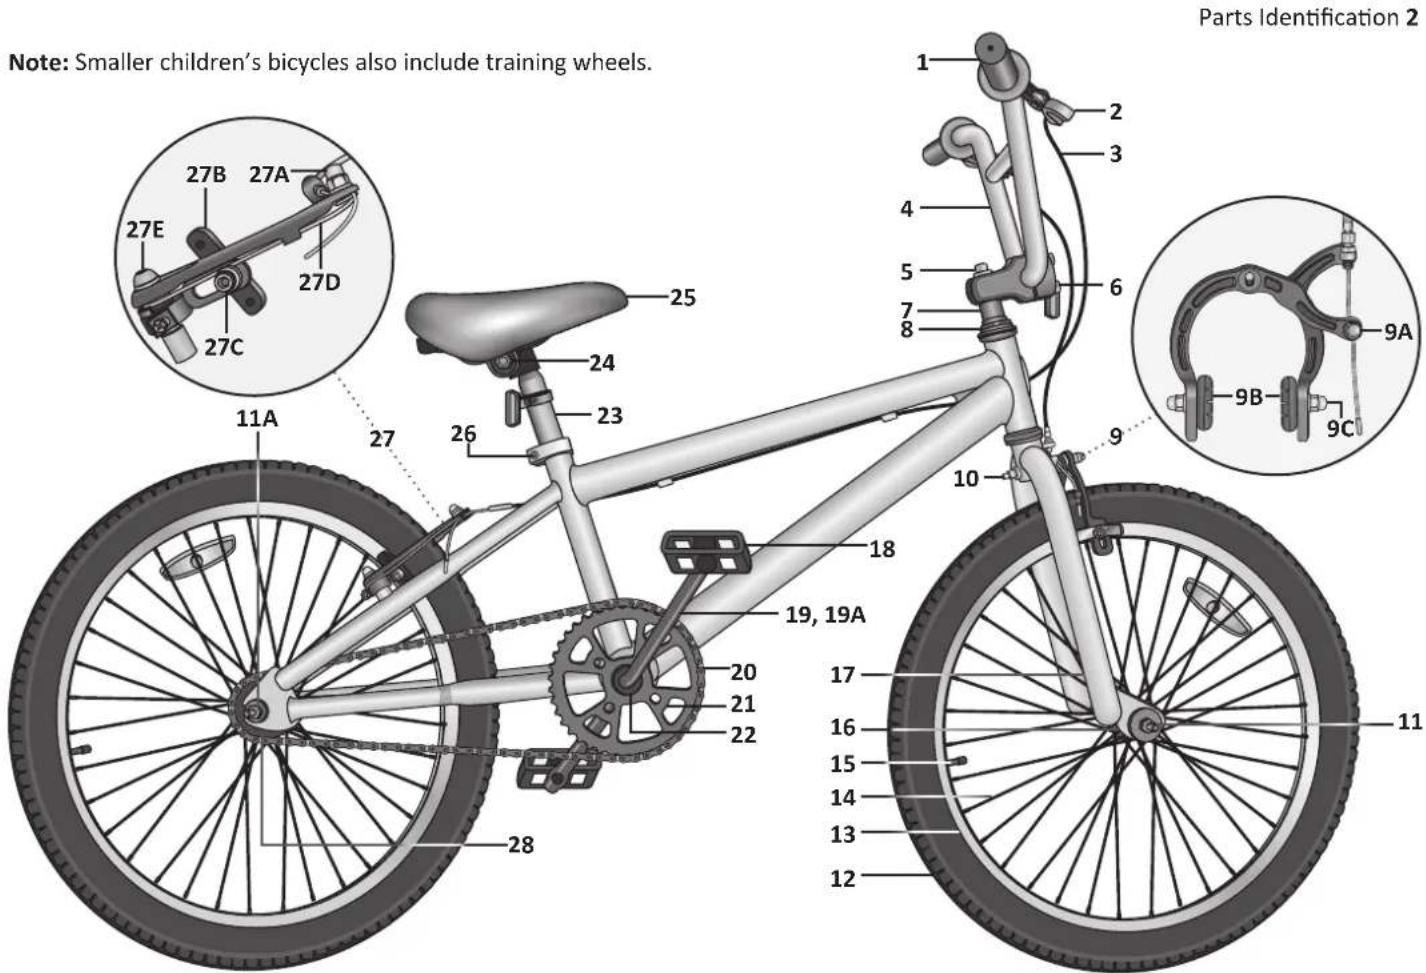
text_image
Note: Smaller children's bicycles also include training wheels. Parts Identification 2 1 2 3 4 5 6 7 8 9 10 11 12 13 14 15 16 17 18 19, 19A 20 21 22 23 24 25 26 27 27A 27B 27C 27D 27E③ Assembly
WARNING!
- Improper assembly of this product may result in serious injury or death. Always follow the instructions in this manual and check critical components (e.g. wheels, seat, pedals, brakes, derailleurs, tires) before each use.
- We recommend that you consult a bicycle specialist if you have doubts or concerns as to your experience or ability to properly assemble, repair, or maintain your bicycle. If your bicycle was obtained assembled, we recommend that you read these instructions and perform checks specified in this manual before riding.
Your new bicycle was assembled and tuned in the factory and then partially disassembled for shipping. You may have purchased the bicycle already fully assembled and ready to ride or in the shipping carton in the partially disassembled form. The following instructions will enable you to prepare your bicycle for years of enjoyable cycling.
For more details on inspection, lubrication, maintenance and adjustment of any area please refer to the relevant sections in this manual. If you have questions about your ability to properly assemble this unit, please consult a qualified specialist before riding.
If you need replacement parts or have questions pertaining to the assembly of your bicycle, call the service line direct at: 1-800-626-2811. Monday - Friday 8:00 am to 5:00 pm Central Standard Time (CST).
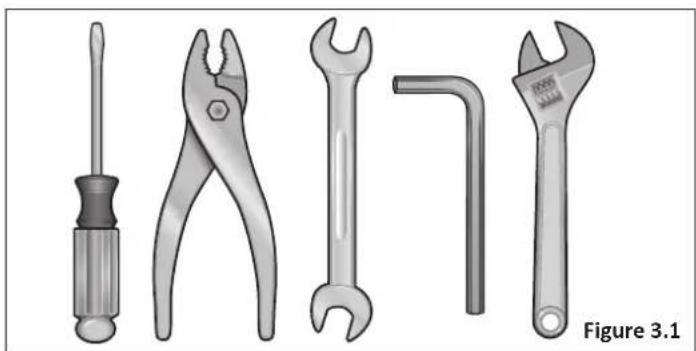
TOOLS REQUIRED
• Phillips head screw driver
• 4 mm, 5 mm, 6 mm and 8 mm Allen wrench
- Adjustable wrench or a 9 mm, 10 mm, 14 mm and 15 mm open and box end wrenches
• A pair of pliers with cable cutting ability
natural_image
Five different wrench and screwdriver tools arranged in a row, labeled as Figure 3.1 (no text or symbols on the tools themselves)Assembly 3
GETTING STARTED
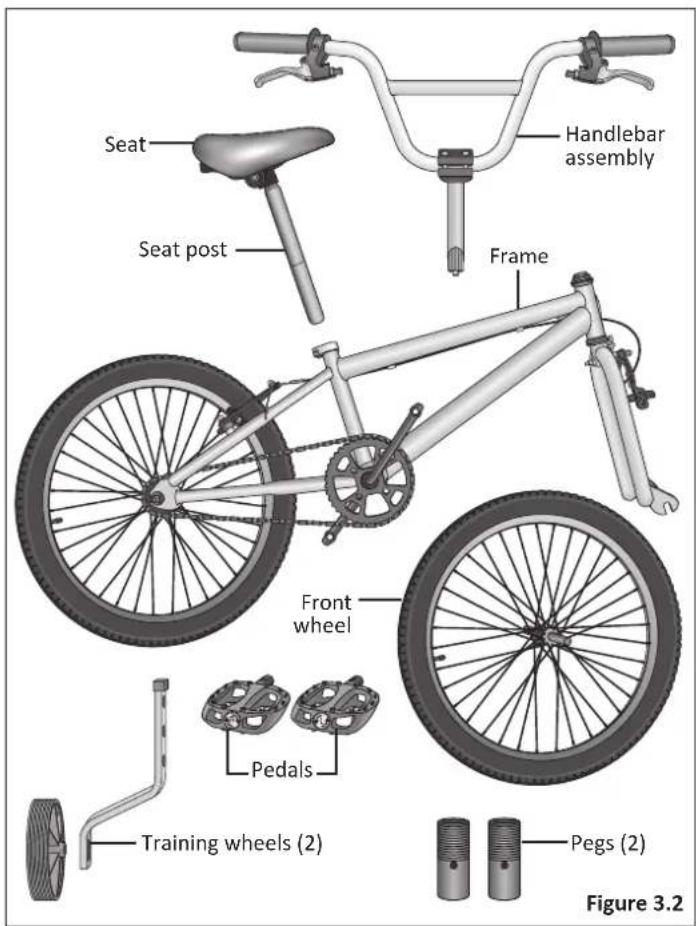
① Open the carton from the top and remove the bicycle. Figure 3.2
2 Remove the straps and protective packaging from the bicycle. Important! Do not discard packing materials until assembly is complete to ensure that no required parts are accidentally discarded.
3 Inspect the bicycle and all accessories and parts for possible shortages. It is recommended that the threads and all moving parts in the parts package be lubricated prior to installation. Note: We recommend using a lithium based grease on the parts before assembly.
text_image
Seat Handlebar assembly Seat post Frame Front wheel Pedals Training wheels (2) Pegs (2) Figure 3.23 Assembly
ATTACH THE HANDLEBAR
WARNING!
- Improper attachment of the handlebar may result in damage to the stem post, steering tube and result in loss of control, serious injury or death. Ensure the minimum insertion marks on the stem post are not visible above the top of the headset.
- Failure to properly tighten handlebar components may result in loss of control, serious injury or death. Always check the handlebar cannot move and is secured to the frame before riding the bicycle.
There are four types of stems that attach the handlebar to the steerer tube. It is either a quill, clamp (threadless), front load and top load stems.
Attaching a Quill Stem
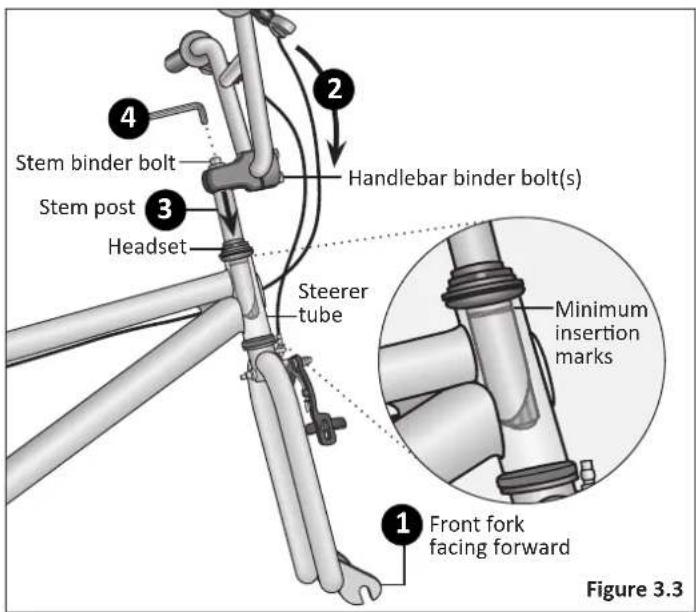
① Turn the front fork to face forward. Figure 3.3
2 Position the handlebar assembly over the steerer tube. Look at all the cables to be sure they run in a smooth arc from the shifter or brake lever to the front brake or cable stop on the frame. Important! If they are twisted or kinked, the shifting and braking will not work.
3 Insert the stem post into the steerer tube and adjust the handlebar until the rider feels they have control of the bicycle and are comfortable.
See Section 1, Fig. 1.2: Seat Height and Handlebar Reach for guidelines. Important! Be sure the minimum insertion marks do not go above the top of the headset and are not visible.
4 Using a 6 mm Allen wrench tighten the stem binder bolt at the top of the stem post. Check the handlebar binder bolt(s) to be sure they are properly tightened and the handlebar is clamped in place. Note: See Section 4: Adjusting the Handlebar if adjustments are needed.
text_image
4 Stem binder bolt Stem post 3 Headset 2 Handlebar binder bolt(s) Steerer tube 1 Front fork facing forward Figure 3.3Attaching a Threadless Stem
Important! Do not disassemble the headset or lose any parts. Be sure the end of the fork is on the ground or being held with your free hand, because once you loosen the top cap the fork assembly may fall out of the frame.
1 Turn the front fork to face forward (i.e. the fork dropout is in the furthest forward position). Figure 3.3
2 Using a 5 mm Allen wrench loosen the top cap bolt on the steerer tube and remove the top cap and bolt. Important! Do not remove the spacers. Figure 3.4
3 Position the handlebar assembly over the steerer tube. Look at all the cables to be sure they run in a smooth arc from the shifter or brake lever to the front brake or cable stop on the frame. Important! If they are twisted or kinked, the shifting and braking will not work.
4 While holding the fork assembly in place, use a 6 mm Allen wrench and loosen the stem pinch bolts. Slide the handlebar assembly onto the steerer tube.
5 Align and center the stem to the fork and wheel. Tighten the stem pinch bolts until there is no play between the stem and stem tube. Note: There should be a 3 to 5 mm (1/8" - 3/16") gap between the top of the stem and stem post. Figure 3.5
6 Place the top cap onto the top of the steerer tube. Insert and tighten the top cap bolt until it is snug. Do not over tighten.
7 Using a 5 mm Allen wrench tighten the top cap bolt. Do the following checks to determine if the headset is properly set. Tighten or loosen the top cap bolt if necessary.
- Lift up the front wheel of the bicycle, if the wheel does not move freely left to right the headset is too tight.
- Hold the handlebar, close the brakes and rock the fork back and forth. If you hear a knock or clunking sound the headset is too loose.
Note: If needed, see Section 4: Adjusting the Headset for more detailed information. See Section 4: Adjusting the Handlebar for information on aligning the handlebar.
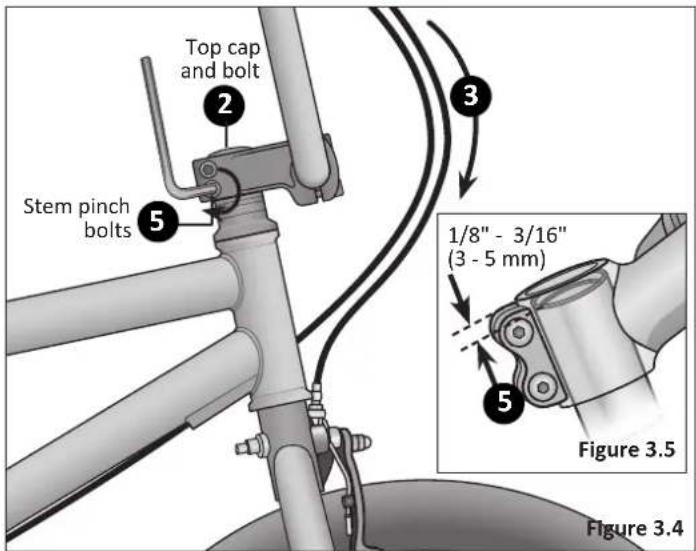
text_image
Top cap and bolt Stem pinch bolts 1/8" - 3/16" (3 - 5 mm) Figure 3.5 Figure 3.43 Assembly
Attaching a Front Load Stem
Important! Do not disassemble the headset or lose any parts. Be sure the end of the fork is on the ground or being held with your free hand, because once you loosen the top cap the fork assembly may fall out of the frame.
1 Turn the front fork to face forward (i.e. the fork dropout is in the furthest forward position). Figure 3.6
② Using a 5 mm Allen wrench loosen the top cap bolt on the steerer tube and remove the top cap and bolt. Important! Do not remove the spacers. Figure 3.7
3 While holding the fork assembly in place, use a 6 mm Allen wrench and loosen the stem pinch bolts. Slide the stem down onto the steerer tube. Figure 3.8
4 There should be 1/4" space from the top of the steerer tube to the top of the stem opening. If you have more than 1/4" space, remove one or more of the headset spacers.
Figure 3.9
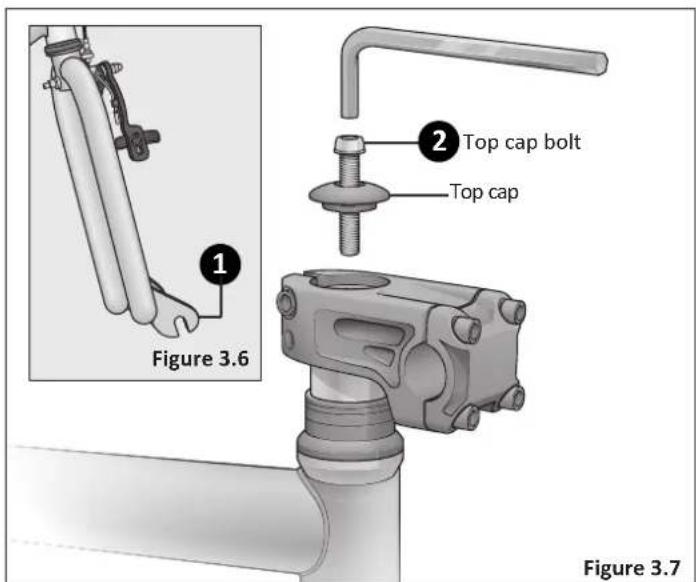
text_image
1 Figure 3.6 2 Top cap bolt Top cap Figure 3.7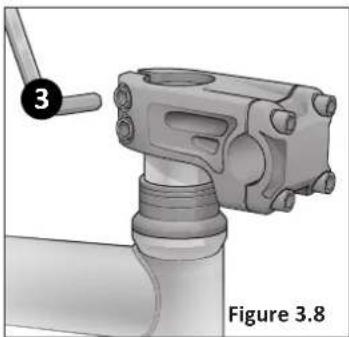
natural_image
Mechanical assembly diagram showing a pipe fitting with a lever and labeled part (no text or symbols beyond label)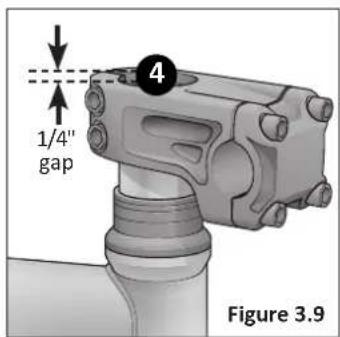
text_image
1/4" gap Figure 3.9Assembly 3
5 Place the top cap onto the top of the steerer tube. Insert and tighten the top cap bolt until it is snug. Do not tighten completely at this time. Figure 3.10
6 Loosen and remove the pinch bolts holding the stem face plate on the front of the stem.
7 Apply a bit of grease to the threads of the bolts before threading them back into the stem.
8 Insert the handlebar into the stem. Note: use the rough area of the handlebar to help center them into the stem.
9 Place the face plate over the handlebar.
10 Begin threading the pinch bolts into the stem body. Tighten the pinch bolts in a cross pattern. Do not overtighten the bolts. As you tighten the bolts the gap between the face plate and the stem body should be the same all around.
11 Look from the side of the bike and check that the handlebar is parallel with the fork. Figure 3.11
12 Look down over the handle and stem and check that the stem is parallel with the tire. Figure 3.12
13 Finish tightening the pinch bolts and stem cap bolt. Figure 3.10
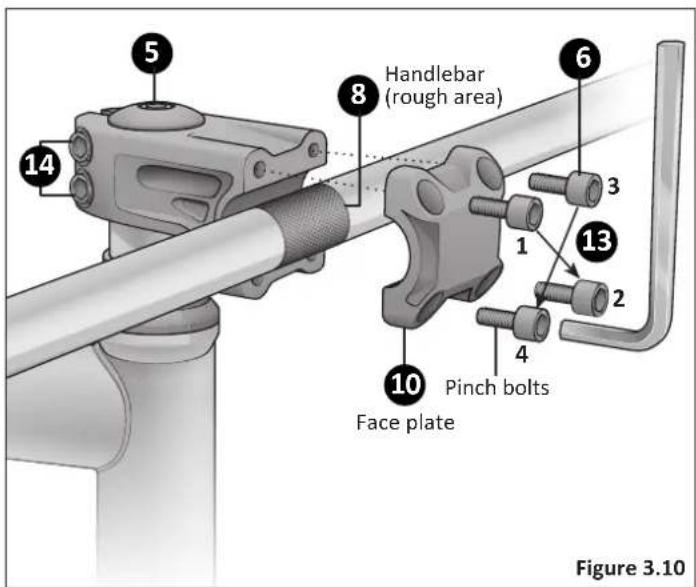
text_image
5 8 Handlebar (rough area) 6 14 3 13 2 10 Pinch bolts Face plate 4 Figure 3.10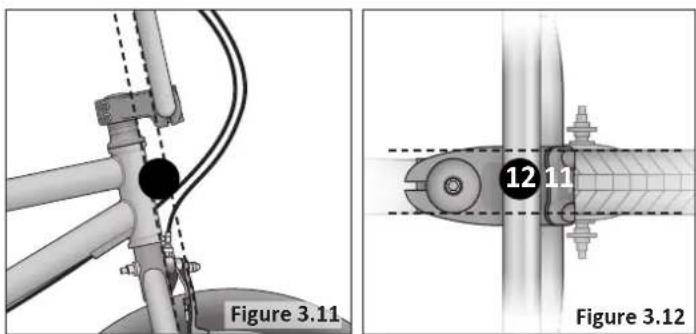
text_image
Figure 3.11 12 11 Figure 3.123 Assembly
Attaching a Top Load Stem
Important! Do not disassemble the headset or lose any parts. Be sure the end of the fork is on the ground or being held with your free hand, because once you loosen the top cap the fork assembly may fall out of the frame.
1 Turn the front fork to face forward (i.e. the fork dropout is in the furthest forward position). Figure 3.13
② Using a 5 mm Allen wrench loosen the top cap bolt on the steerer tube and remove the top cap and bolt. Important! Do not remove the spacers. Figure 3.14
3 While holding the fork assembly in place, use a 6 mm Allen wrench and loosen the stem pinch bolts. Slide the stem down onto the steerer tube. Figure 3.15
4 There should be 1/4" space from the top of the steerer tube to the top of the stem opening. If you have more than 1/4" space, remove one or more of the headset spacers.
Figure 3.16
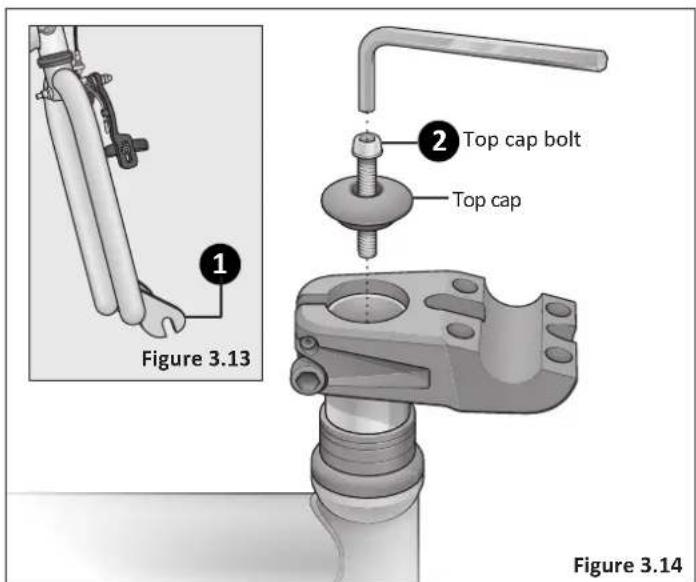
text_image
1 Figure 3.13 2 Top cap bolt Top cap Figure 3.14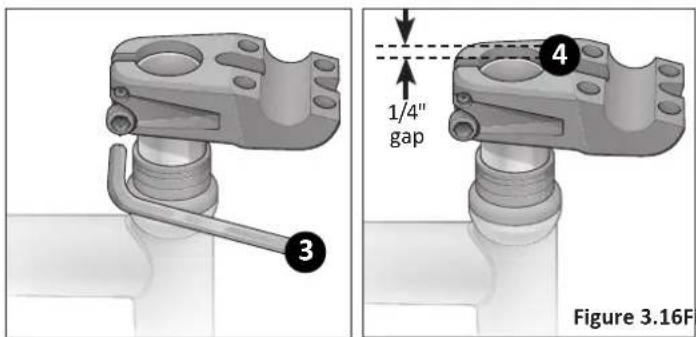
text_image
3 1/4" gap 4 Figure 3.16FAssembly 3
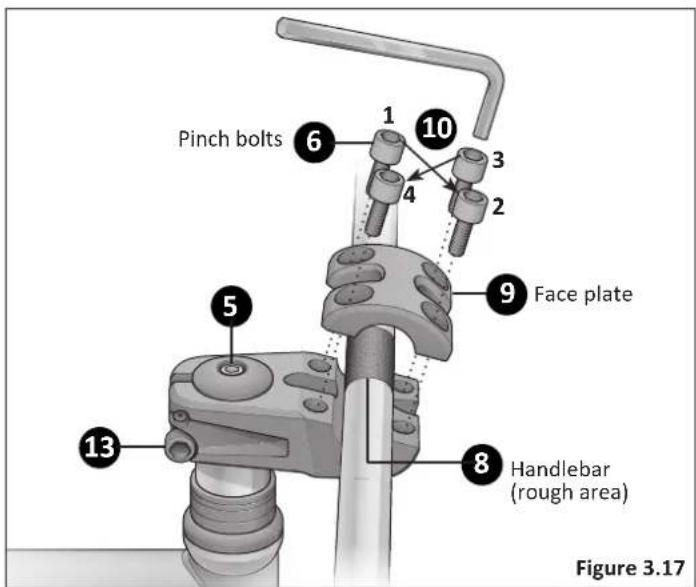
5 Place the top cap onto the top of the steerer tube. Insert and tighten the top cap bolt until it is snug. Do not tighten completely at this time. Figure 3.17
6 Loosen and remove the pinch clamp bolts holding the stem face plate on the front of the stem.
7 Apply a bit of grease to the threads of the bolts before threading them back into the stem.
8 Insert the handlebar into the stem. Note: use the rough area of the handlebar to help center them into the stem.
9 Place the face plate over the handlebar.
10 Begin threading the pinch bolts into the stem body. Tighten the pinch bolts in a cross pattern. Do not overtighten the bolts. As you tighten the bolts the gap between the face plate and the stem body should be the same all around.
11 Look from the side of the bike and check that the handlebar is parallel with the fork. Figure 3.18
12 Look down over the handle and stem and check that the stem is parallel with the tire. Figure 3.19
13 Finish tightening the pinch bolts and stem cap bolt. Figure 3.17
text_image
Pinch bolts 6 1 10 3 4 2 5 9 Face plate 8 Handlebar (rough area) Figure 3.17
natural_image
Technical diagram of a pipe fitting with a numbered component (11), no text or symbols present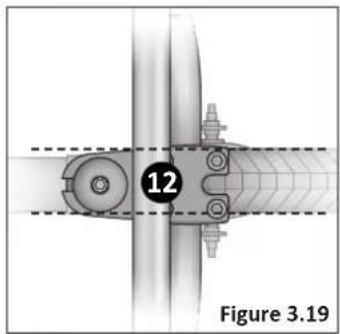
natural_image
Mechanical assembly diagram showing a shaft and housing with labeled component 12, no readable text or symbols beyond labels3 Assembly
CABLE DETANGLER
Some BMX freestyle bicycles are equipped with a cable detangler for the rear brake. If the upper cable is not already assembled perform the following steps. Figure 3.20
1 Insert the cable barrel end into the right (rear) brake lever.
2 Adjust the brake lever adjustment barrel so that the slots line up with the brake lever and insert the upper cable through the brake barrel slots.
3 Rotate the barrel so that the slots are no longer in line. Note: One of the upper cable casings is shorter than the other. The shorter side should be on the right. This is the shorter distance between the brake lever and the upper detangler plate.
4 Thread the adjusting barrels in on both sides and hook the cable end into the bearing unit. Note: The lower cable should already be hooked into the lower tabs of the bearing unit.
5 Next try squeezing the brake lever several times to be sure all the cables are seated in the adjustment barrels. If there is excess play before the brake cable starts to move, this can be adjusted by unscrewing one or more of the adjustment barrels.
a. First adjust the barrel adjuster at the mid point of the upper cable until the brake lever does not have any free play.
b. Next squeeze the brake lever and allow it to return.
c. Check to see if the bearing unit bottoms out on the lower detangler plate. If so, unscrew the adjustment barrel further until the bearing unit sits about 1 mm above the lower plate. This is the correct position for the bearing unit.
6 Rotate the handlebars back and forth and then turn them completely around 360 degrees. Note if the bearing unit spins quietly, or if it "flops" back and forth. If it has any flop, this can be fine-tuned with the four adjustment barrels in the upper and lower detangler plates. The goal is to reduce or eliminate as much of the flop as possible, while keeping the brake function consistent.
7 Turn the handlebars 360 degrees and note whether the plate flops forward and back, or if it flops the same way. If it flops forward and back, adjust the upper cable barrel adjusters until the flop is reduced. If the flop is the same way, then adjust the lower cables until the flop is reduced. Sometimes both need to be adjusted. The best thing to do is to adjust the lower cables first until the bearing unit has an equal gap on the left and right sides, then adjust the upper barrel adjusters until the flop is minimal or none at all.
8 Follow the brake adjustments for the type of brake the bike is equipped with (linear pull or caliper brakes).
Assembly 3

text_image
Front View of Bike Brake cable slot Cable adjuster Cable splitter Single cable casing Upper cable (short casing) Upper cable (long casing) Rear brake lever Cable barrel end 4 When brake is engaged - minimum 1 mm (1/32") Bearing 7 Lower plate Lower cable Lower cable Adjusting barrel Locknut Keyed washer When brake is disengaged - minimum 1 mm (1/32") Locknut Front brake cable Cable adjusting barrel Front brake lever Figure 3.203 Assembly
Failure to properly set the brakes may result in the inability to stop the bicycle movement and cause serious injury or death. Be sure the brakes are functioning properly before using the bicycle.
If the brakes are not attached follow these steps:
1 Rotate the cable adjustment barrel and cable nut until the slots are aligned with the slot on the brake lever body. Figure 3.21
2 Press the brake lever towards the grip.
3 Slide the brake cable through the slots and place the cable head into the brake lever. Figure 3.22
4 Release the brake lever. Figure 3.23
5 Lightly pull on the cable and rotate the cable nut and cable barrel so they are no longer aligned.
Note: See Section 4: Adjusting the Brakes if adjustments are needed.
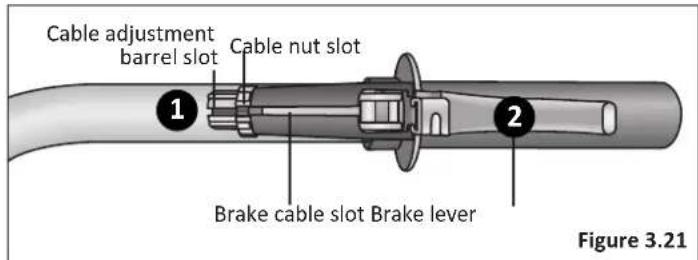
text_image
Cable adjustment barrel slot Cable nut slot 1 2 Brake cable slot Brake lever Figure 3.21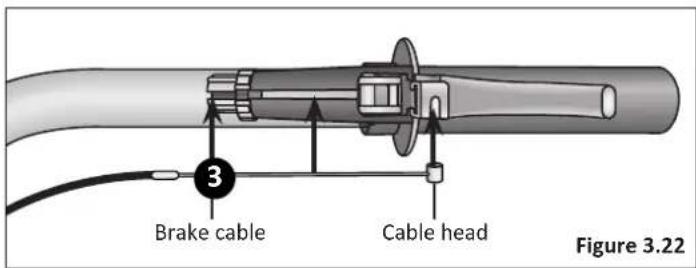
text_image
3 Brake cable Cable head Figure 3.22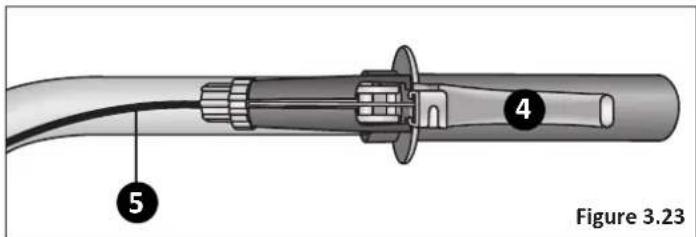
text_image
Figure 3.23ATTACH THE FRONT WHEEL
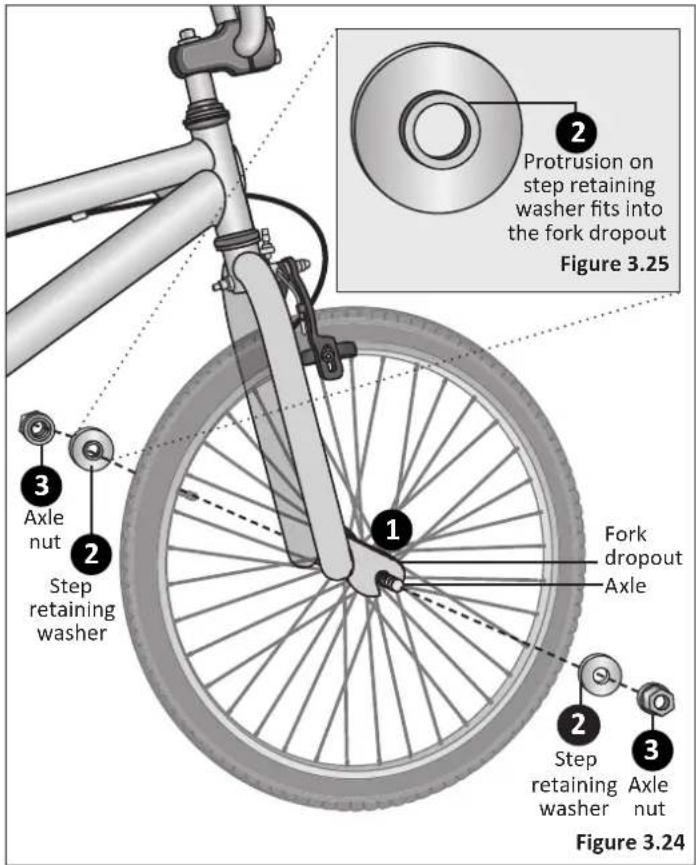
There are three types of front wheel assemblies; nutted with step retaining washer, nutted with clip retaining washer and quick-release. Note: Some tire tread patterns have a direction, so compare your front tire and rear tire of the bicycle so that both tread patterns face the same way.
Nutted with Step Retaining Washer
1 Position the front wheel between the front fork legs with the axle resting inside the fork drop outs. Important! Be sure the wheel is as centered as possible between the fork legs. Figure 3.24
2 Place a step washer on each end of the axle and slide it into the fork drop out. Note: The flat side of the step washer must be facing out and the protrusion on the washer must fit into the fork drop out. Figure 3.25
3 Attach the two axle nuts on the axle. Tighten one nut part way, then tighten the other nut. Repeat until both sides are tightened securely. Be sure that the wheel is centered between the fork legs.
4 If the wheel is off center, loosen the axle nut on the side that has a smaller gap between tire and fork leg and use your hand to push the wheel to a centered position; hold the wheel with one hand and tighten the axle nut and check again. Repeat if needed to be sure the wheel is centered and securely tightened.
text_image
Protrusion on step retaining washer fits into the fork dropout Figure 3.25 1 2 3 Axle nut Step retaining washer Fork dropout Axle 2 Step retaining washer Axle nut Figure 3.243 Assembly
Nutted with Clip Retaining Washer
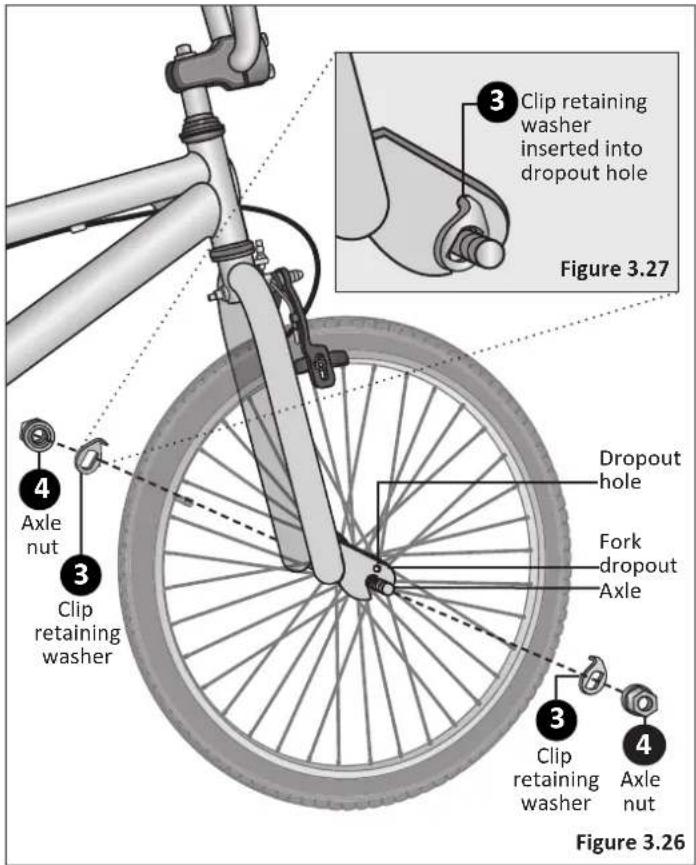
1 Loosen the axle nuts on the front wheel. If there is a washer inside of the axle nut, it belongs outside of the fork dropouts.
2 Position the front wheel between the front fork legs with the axle resting inside the fork drop out. Figure 3.26
Important! Be sure the wheel is as centered as possible between the fork legs.
3 Place the clip retaining washer on the axle and slide it up against the fork drop out. Make sure the hooked end is inside the small hole of the fork dropout. Figure 3.27
4 Place the two outer axle nuts on and tighten evenly. Tighten one side part way, then tighten the other side and repeat until both sides are tightened securely. Be sure that the wheel remained centered between the fork legs.
5 If it is off center, loosen the axle nut on the side that has a smaller gap between tire and fork leg and use your hand to push the wheel to a centered position; hold the wheel with one hand and tighten the axle nut and check again. Repeat if needed to be sure the wheel is centered and securely tightened.
text_image
Clip retaining washer inserted into dropout hole Figure 3.27 Dropout hole Fork dropout Axle Clip retaining washer Clip retaining washer Axle nut Figure 3.26ATTACH THE SEAT

WARNING!
Improperly adjusted seat height could affect the rider's ability to reach the handlebar and pedals resulting in unexpected movement, loss of control and serious injury or death. Follow these guidelines when adjusting the seat height. Always ensure the seat post minimum insertion marks are below the seat clamp and cannot be seen. Ensure the seat clamp is locked and the seat cannot move.
There are two kinds of seat clamps; bolted and quick-release. The seat assembly should be adjusted with the seat centered on the rails and level. It is recommended to add some grease to all threads and binders on a bicycle, especially on the outside of the seat post. Otherwise it may corrode over time and not be able to be adjusted again.
Bolted Seat Clamp
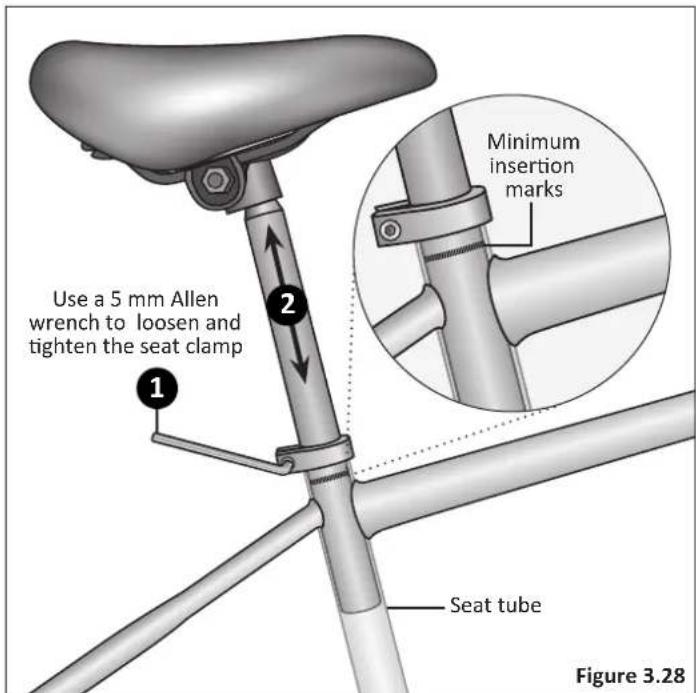
1 Using a 5 mm Allen wrench, loosen the seat clamp bolt and insert the seat post into the seat tube. Figure 3.28
2 Adjust the seat height up or down until the rider feels they have control of the bicycle and are comfortable.
Important! Be sure the minimum insertion marks do not go past the top of the seat clamp and are not visible. See Section 1, Fig. 1.2: Seat Height and Handlebar Reach.
3 Tighten the seat clamp bolt to lock the seat in place.
4 Check the seat to be sure it does not move.
text_image
Use a 5 mm Allen wrench to loosen and tighten the seat clamp 1 2 Seat tube Minimum insertion marks Figure 3.283 Assembly
Bolted Seat Clamp with Pivotal Seat (optional)
① Using a 5 mm Allen wrench, loosen the seat clamp bolt and insert the seat post into the seat tube. Figure 3.29
2 Adjust the seat height up or down until the rider feels they have control of the bicycle and are comfortable.
Important! Be sure the minimum insertion marks do not go past the top of the seat clamp and are not visible. See Section 1, Fig. 1.2: Seat Height and Handlebar Reach.
3 Tighten the seat clamp bolt to lock the seat in place.
4 Remove the cover on top of the seat.
5 Using a 6 mm Allen wrench loosen the seat bolt until the seat moves freely.
6 Adjust the angle of the seat until the rider feels comfortable and is still able to control the bicycle.
7 Tighten the seat bolt and lock the seat in place. Replace the cover on the seat.
8 Check the seat to be sure it does not move.
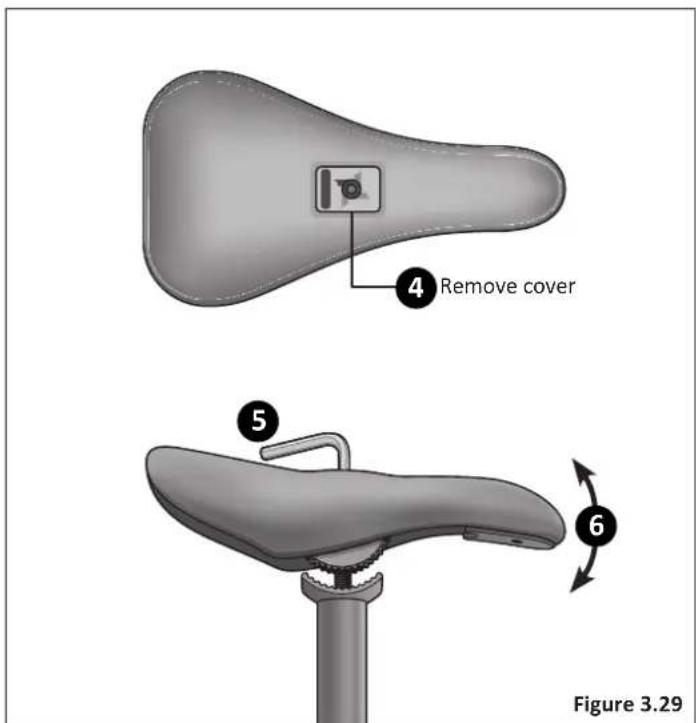
text_image
4 Remove cover 5 6 Figure 3.29Assembly 3
Quick-release Seat Clamp
1 Unlock the quick-release lever and insert the seat post into the seat tube. Figure 3.30
2 Adjust the seat height up or down until the rider feels they have control of the bicycle and are comfortable.
Important! Be sure the minimum insertion marks do not go past the top of the seat clamp and are not visible. See Section 1, Fig. 1.2: Seat Height and Handlebar Reach.
3 Close the quick-release lever and lock the seat in place. If there is not enough pressure to hold the seat in place open the quick-release lever. With one hand on the quick-release lever and one hand on the adjustment nut, start to hand tighten the adjustment nut until you start to feel some resistance against the post clamp. Do not attempt to tighten by turning the quick-release lever. The quick-release lever is for closing, the adjustment nut is for adjusting the pressure. Figure 3.32
4 Try to close the quick-release lever. If it closes easily, open it up and tighten the adjustment nut further. If it is too difficult to close, open the quick-release lever up and loosen the adjustment nut a little and try again.
Important! You should feel resistance when you close the quick-release lever that should leave a temporary impression on your fingers. Open and close the handle to ensure the seat is securely locked in place.
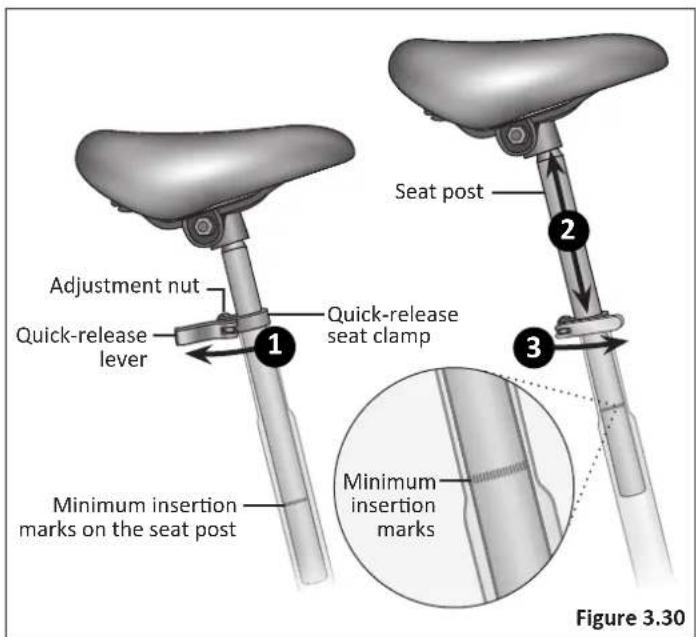
text_image
Adjustment nut Quick-release lever 1 Quick-release seat clamp Seat post 2 3 Minimum insertion marks on the seat post Figure 3.303 Assembly
ATTACH THE PEDALS
WARNING!
- Attachment of an incorrect pedal into a crank arm can strip pedal threads and cause irreparable damage. Visually match the R and L stickers on the pedal and crank arm before attaching the pedals. Before your first ride, please check to ensure your pedals are attached correctly.
- It is very important that you check the crank set for correct adjustment and tightness before riding your bicycle.
1 Match the pedal marked R with the right-hand crank arm and match the pedal marked L with the left-hand crank arm. Figure 3.31
2 Place the threaded pedal into the threaded hole on the crank arm.
3 By hand, slowly turn the spindle the correct direction. Clockwise for right side pedal, counterclockwise for left side pedal. Important! Stop if you feel resistance! This may be an indication the spindle is entering the hole at an angle. Remove the spindle and repeat step two and three.
4 If the spindle is entering the hole cleanly then use a 15 mm wrench or pliers to tighten completely.
5 Repeat steps 1-4 for the remaining pedal.
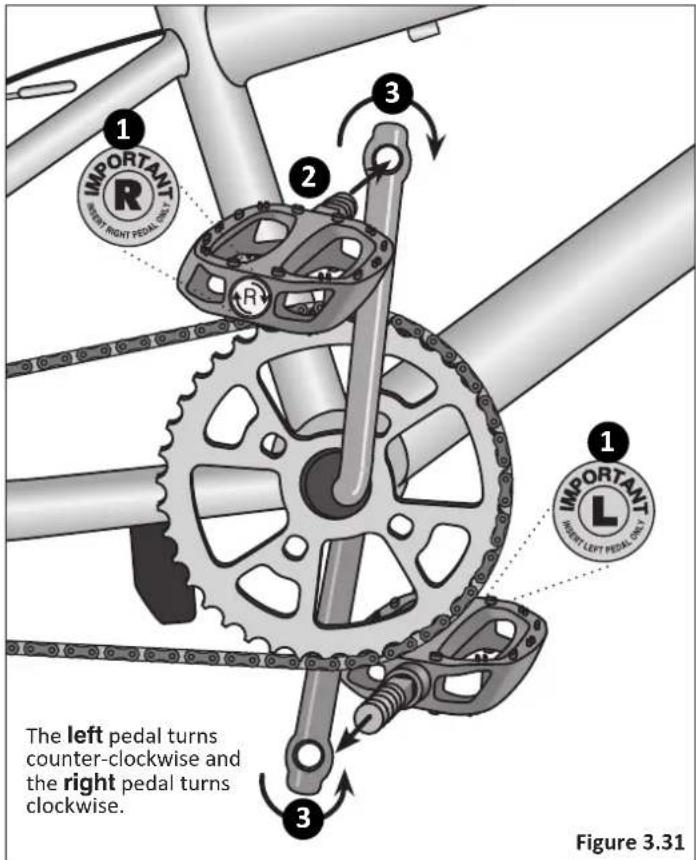
text_image
1 IMPORTANT RIGHT RIGHT PIEDAL ONLY 2 3 1 IMPORTANT RIGHT LEFT PIEDAL ONLY The left pedal turns counter-clockwise and the right pedal turns clockwise. 3 Figure 3.31ATTACH THE PEGS
Important! Periodically check to make sure pegs are tight. Some models may come equipped with 2 or 4 pegs. To install pegs:
① Do not loosen or remove axle nuts.
2 Check to make sure axle nuts are properly tightened before installing pegs.
③ Thread the pegs on the axle over the axle nut. Figure 3.32
4 Insert a screwdriver or similar tool through the peg holes and tighten by turning the peg with the tool. Figure 3.33
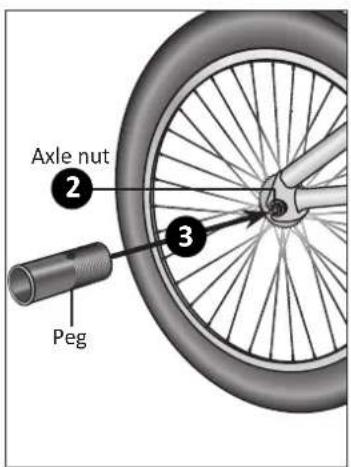
text_image
Axle nut 2 3 Peg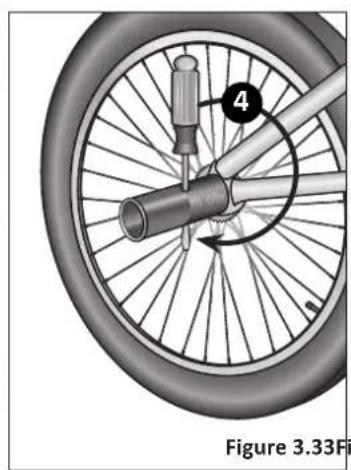
natural_image
Diagram of a bicycle wheel with a screwdriver and labeled component (no text or symbols beyond label)Figure 3.33 Figure 3.32
Deep Socket Pegs
5 Remove one of the axle nuts with the ratchet; then remove any remaining washers.
6 Screw on the axle adapter washer if needed. When the pegs are larger than the axle, a special washer is needed so that the pegs fit properly. If your pegs and axle are the same size, skip this step.
7 Insert anti-roll pins into the peg so that the pegs remain stationary while performing tricks. Screw the pin tightly, using an Allen wrench.
8 Slide the peg over the axle; secure the anti-roll pin and loosely tighten with the deep-well socket.
9 Ensure there is no friction between the wheel and the chain stays and brake pads. Adjust the wheel if necessary so that all parts work freely. Once parts are in working order, use the deep-well socket to tighten the axle nut.
4 Adjustments
After your bicycle is assembled you will need to make adjustments. If you need replacement parts or have questions pertaining to the assembly of your bicycle, call the service line direct at: 1-800-626-2811. Monday - Friday 8:00 am to 5:00 pm Central Standard Time (CST).
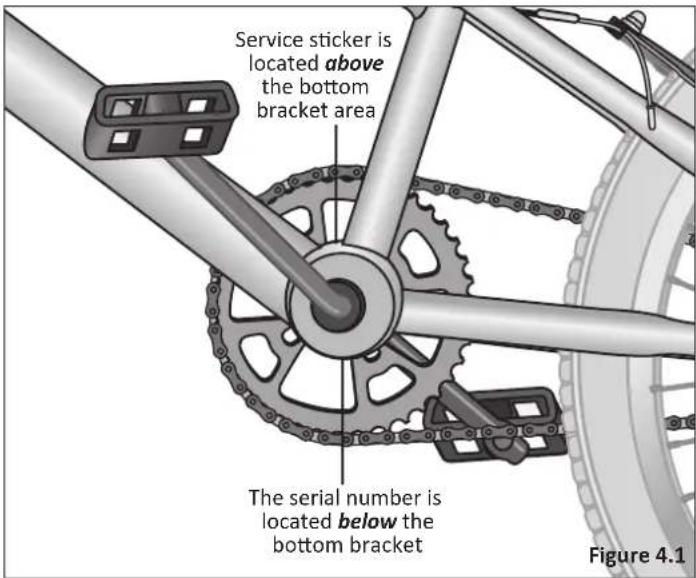
Note: You will need your model number and date code located on the service sticker near the bottom bracket area. Figure 4.1
TOOLS REQUIRED
• Phillips head screw driver
• 4 mm, 5 mm, 6 mm and 8 mm Allen wrench
- Adjustable wrench or a 9 mm, 10 mm, 14 mm and 15 mm open and box end wrenches
• A pair of pliers with cable cutting ability
text_image
Service sticker is located above the bottom bracket area The serial number is located below the bottom bracket Figure 4.1
natural_image
Five different wrench and screwdriver tools arranged in a row, labeled as Figure 4.2 (no text or symbols on the tools themselves)Failure to properly set the brakes may result in the inability to stop the bicycle movement and cause serious injury or death. Be sure the brakes are functioning properly before using the bicycle.
Adjusting Linear Pull Brakes
Attaching the Brake Cable to the Brake Carrier
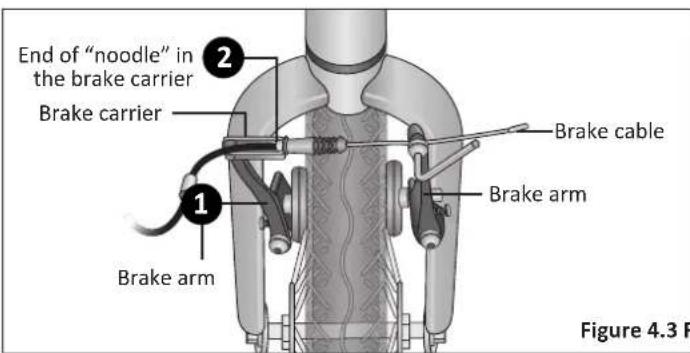
① Squeeze the two brake arms together until the brake pads touch the wheel rim. Figure 4.3
2 With your other hand, pull on the brake cable and insert the end of the "noodle" into the brake carrier.
text_image
End of "noodle" in the brake carrier Brake carrier Brake arm Brake cable Brake arm Figure 4.3 FFigure 4.3 Figure 4.4
Adjusting the Brake Pads
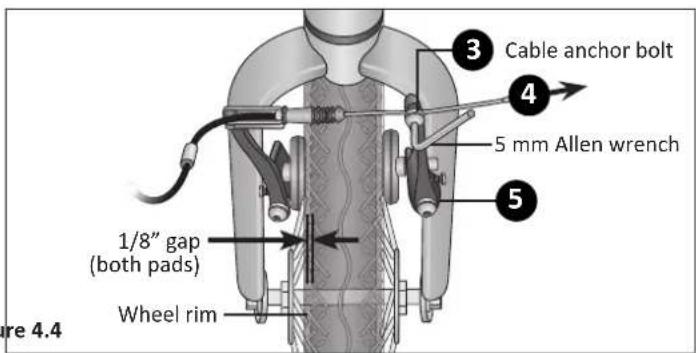
3 Check the brake cable is seated in the brake lever. Using a 5 mm allen wrench loosen the cable anchor bolt enough so the brake cable can move freely. Figure 4.4
4 Pull the brake cable through the cable anchor so the left brake arm moves towards the rim and there is approximately a 1/8" (3 mm) gap between the brake pad and rim.
5 Move the right brake arm towards the rim until there is approximately a 1/8" (3 mm) gap between the brake pad and rim.
6 Using the 5 mm allen wrench, firmly tighten the cable anchor bolt completely.
text_image
3 Cable anchor bolt 4 5 mm Allen wrench 5 1/8" gap (both pads) Wheel rim Figure 4.44 Adjustments
Important! Before riding the bicycle it is important to check the brakes. If you squeeze the brake lever and one brake arm moves more than the other (or not at all) the brake is not centered. You will need to fine-tune the brake pads. Multiple adjustments may be necessary to center the brake pads, correctly set the brake pressure and set the gap between the brake pad and rim.
Adjust the Brake Pad Alignment
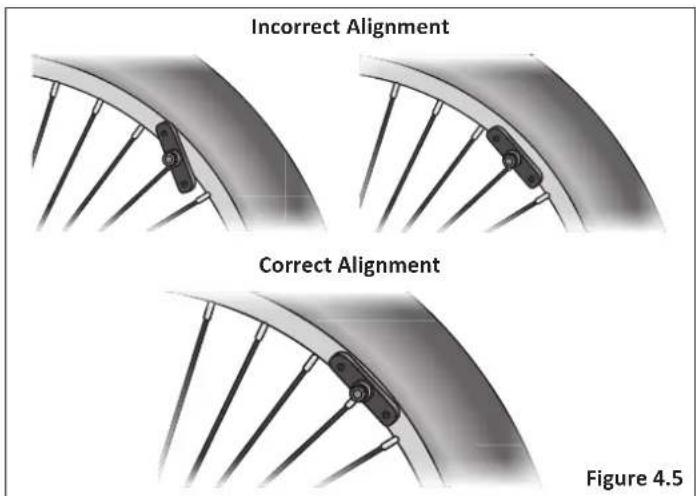
Check that all brake pads are aligned correctly. If not, use a 5 mm allen wrench and loosen the bolt enough so you can reposition the pad. Position the pad so it is evenly centered on the rim. Retighten the bolt after positioning the pad correctly.
Figure 4.5
text_image
Incorrect Alignment Correct Alignment Figure 4.5Center the Brake Pads
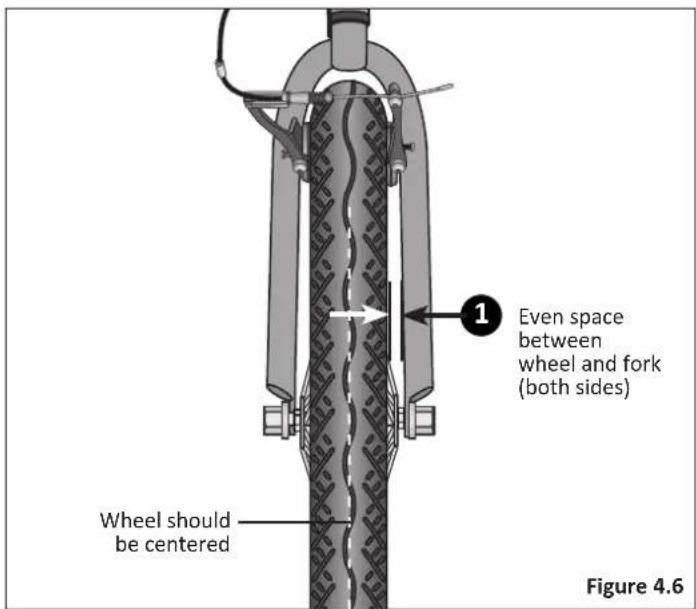
Rotate the wheel and look straight down at the gap between the rim, brake pads and fork. If you find the gap between these are uneven it indicates the wheel, the brake pads, or both are not centered.
1 If you see the gap between the fork and wheel is uneven loosen the axle nuts and adjust the wheel until centered.
Figure 4.6
text_image
Even space between wheel and fork (both sides) Wheel should be centered Figure 4.6Adjustments 4
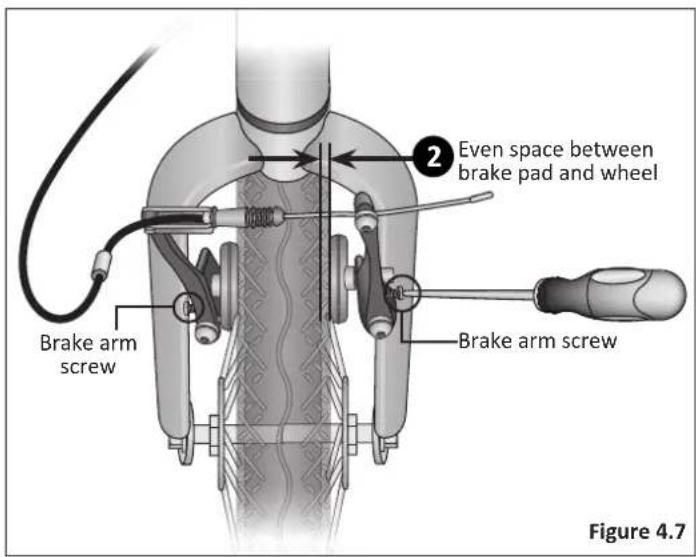
2 If the gap between the brake pad and wheel is uneven, adjust the position of the brake pad.
- Using a phillips head screwdriver, adjust the brake arm screws on either side of the brake arm. Note: Turning the screw clockwise moves the pad away from the rim. Turning the screw counterclockwise moves the pad towards the rim. Figure 4.7
- Start with the side where the pad is closest to the rim or is not moving properly. Turn the screw to move the pad towards or away from the rim.
- Adjustments to these screws should be made in small increments, one-quarter to one-half turn then checked by activating the brake lever three to four times after each adjustment. If you continue to adjust the screw until you have noticeable movement you will run out of adjustment.
3 Pull and release the brake lever a few times and check if the pads are centered.
4 If necessary, repeat steps one through three until the brake pads are centered and the gap between the pads and rim is close to 1/8 inch.
Note: If you run out of adjustment capability on one side, adjust the screw on the opposite side. If you run out of adjustment capability on both screws do a minor adjustment to the brake cable. Adjustments should be made to each side as equally as possible to prevent running out of adjustment capability.
text_image
Brake arm screw Even space between brake pad and wheel Brake arm screw Figure 4.74 Adjustments
Adjusting the Side-pull Caliper Brake
Attaching the Brake Cable to the Brake Carrier
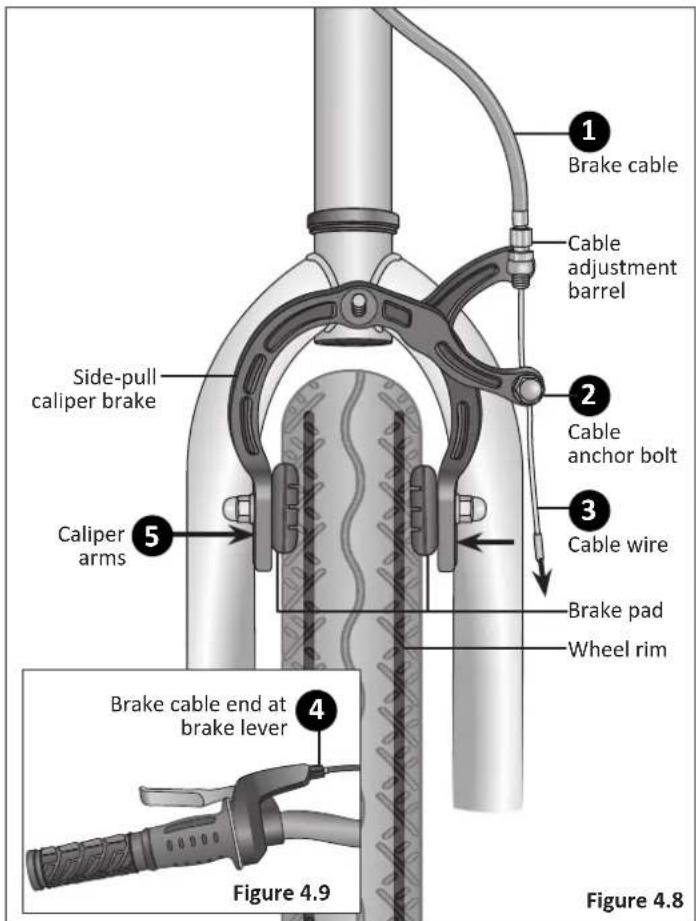
1 If the brake cable is disconnected at the caliper, thread the brake wire through the adjustment barrel. Figure 4.8
2 Loosen the cable anchor bolt until you can see a gap large enough for the cable wire.
3 Thread the cable wire through the gap. By hand, screw the cable anchor bolt snug enough to hold the cable wire.
4 Check the cable end is seated in the brake lever.
5 With one hand squeeze the caliper arms until both brake pads contact the rim. Loosen the cable anchor bolt just enough to allow the cable wire to move freely.
6 While holding the caliper closed, use your other hand to pull the brake cable tight (through the cable anchor bolt). Check that the cable end is seated in the brake lever and the barrel adjuster of the brake.
7 Tighten the cable anchor bolt as much as you can by hand and then while still squeezing the caliper arms until both brake pads contact the rim, tighten the cable anchor bolt fully with a 10 mm box wrench. Note: Use the adjustment barrel(s) to fine-tune the brake cable tension. Turning the barrel clockwise will loosen the brake cable tension, counterclockwise will tighten the brake cable tension. Figure 4.9
text_image
1 Brake cable Cable adjustment barrel 2 Cable anchor bolt 3 Cable wire 5 Caliper arms Brake pad Wheel rim 4 Brake cable end at brake lever Figure 4.9 Figure 4.8Adjusting the Brake Pads
Important! Before riding the bicycle it is important to check the brakes. If you squeeze the brake lever and one brake arm moves more than the other (or not at all) the brake is not centered. You will need to fine-tune the brake pads. Multiple adjustments may be necessary to center the brake pads, correctly set the brake pressure and set the gap between the brake pad and rim.
Check that all brake pads are aligned correctly. If not, use a 5 mm Allen wrench and loosen the bolt enough so you can reposition the pad. Position the pad so it is evenly centered on the rim. Retighten the bolt after positioning the pad correctly. Figure 4.10
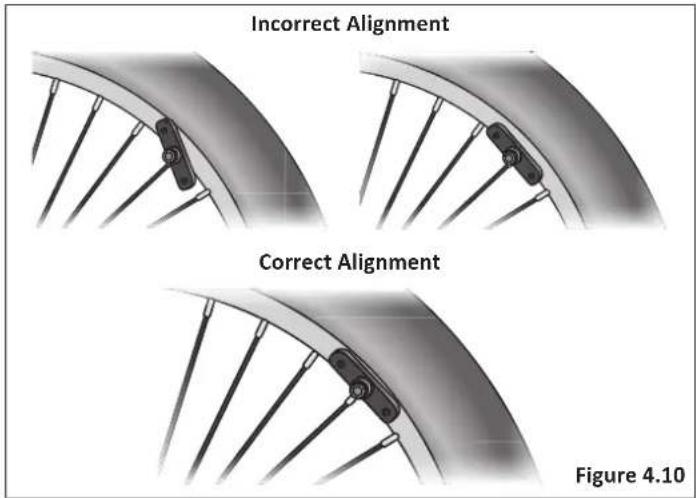
text_image
Incorrect Alignment Correct Alignment Figure 4.10Center the Brake Pads
Rotate the wheel and look straight down at the gap between the rim, brake pads and fork. If you find the gap between these are uneven it indicates the wheel, the brake pads, or both are not centered.
1 If you see the gap between the fork and wheel is uneven loosen the axle nuts and adjust the wheel until centered.
Figure 4.11
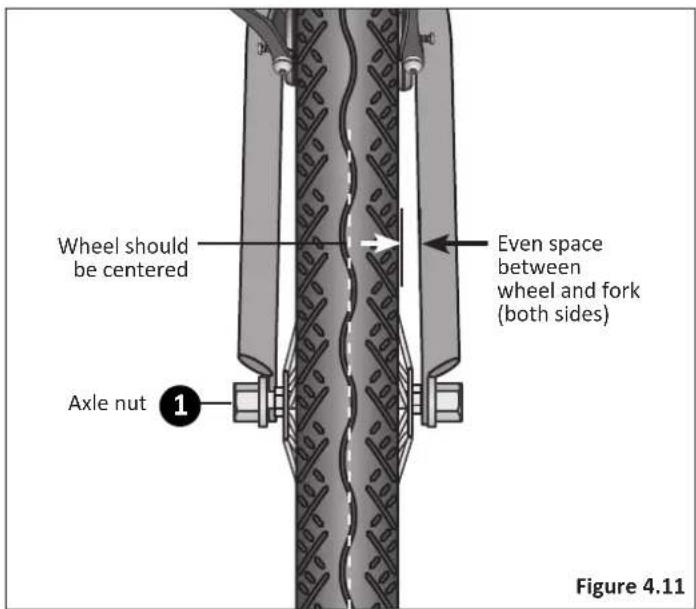
text_image
Wheel should be centered Axle nut ① Even space between wheel and fork (both sides) Figure 4.114 Adjustments
2 If the gap between the brake pad and wheel is uneven, adjust the cable tension. Figure 4.13
2a Loosen the cable anchor nut. 2b Using one hand, squeeze the brake pads against the rim.
2c Pull the slack out of the cable. 2d While holding tension on the cable, tighten the cable anchor nut.
Note: Watch the brake if it begins to shift or rotate, then release the brake lever and use your hand to rotate the brake caliper back until both sides of the brake move equally. Sometimes it is necessary to over-rotate the brake slightly, so that as you tighten the caliper locknut, the brake will end up centered. Figure 4.12
3 Pull and release the brake lever a few times and check if the pads are centered.
4 If necessary, repeat steps one through three until the brake pads are centered and the gap between the pads and rim is close to 1/8 inch.
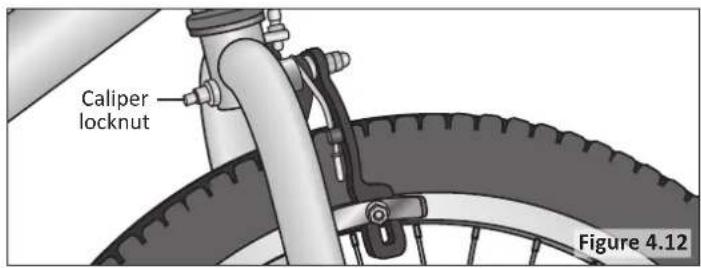
text_image
Caliper locknut Figure 4.12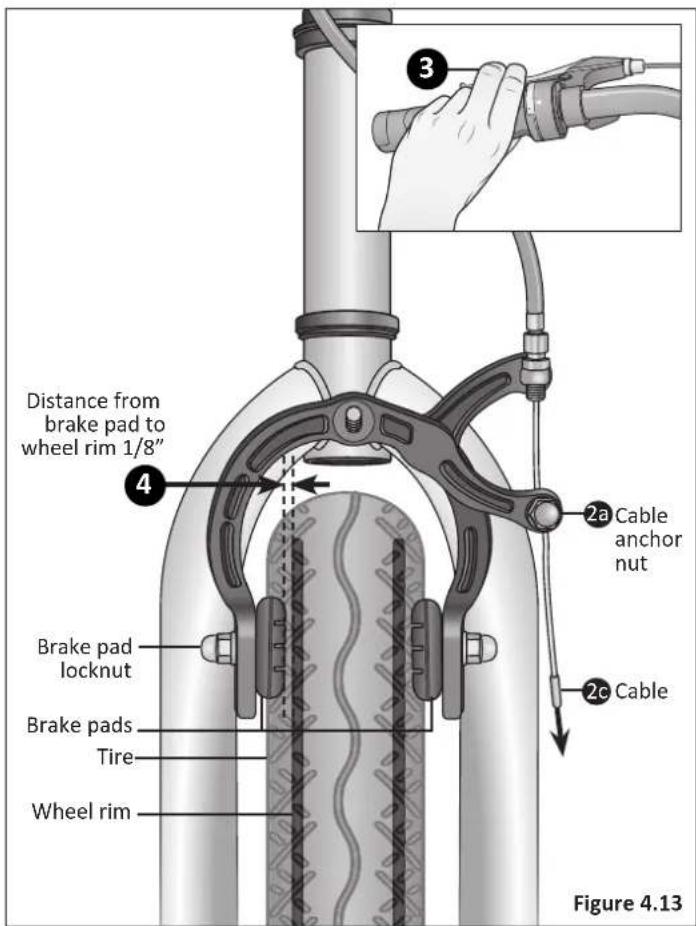
text_image
Distance from brake pad to wheel rim 1/8" 4 Brake pad locknut Brake pads Tire Wheel rim 2a Cable anchor nut 2c Cable Figure 4.13Check the Brakes
1 After adjusting the brake, squeeze the brake lever as hard as you can several times and re-inspect the brake pads, centering and brake lever travel. If the brake pads are no longer square to the rim, repeat brake pad adjustments. Figure 4.14
2 Be sure that brake pads return to a centered position by spinning the wheel and listening for the brake pad rubbing the rim on either side. Re-adjust as needed.
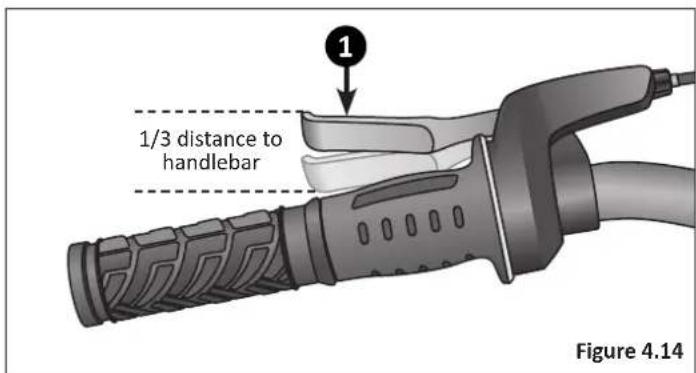
3 Check that the brake cable tension allows the brake lever about 1/3 of the travel before the brake pads contact the rim. If the cable has stretched or slipped, re-adjust the brake cable tension by loosening cable anchor bolt and pulling more cable through the anchor or use brake adjustment barrels for fine tuning brake cable tension.
Brake is correctly adjusted when:
- The brake pads do not drag on the rim when the brake is open. Figure 4.15
- Both brake pads move away from the rim equally when the brake is released.
- When the brake is applied, the brake pads contact the rim before the brake lever reaches about 1/3 of the way to the handlebar.
text_image
1/3 distance to handlebar Figure 4.14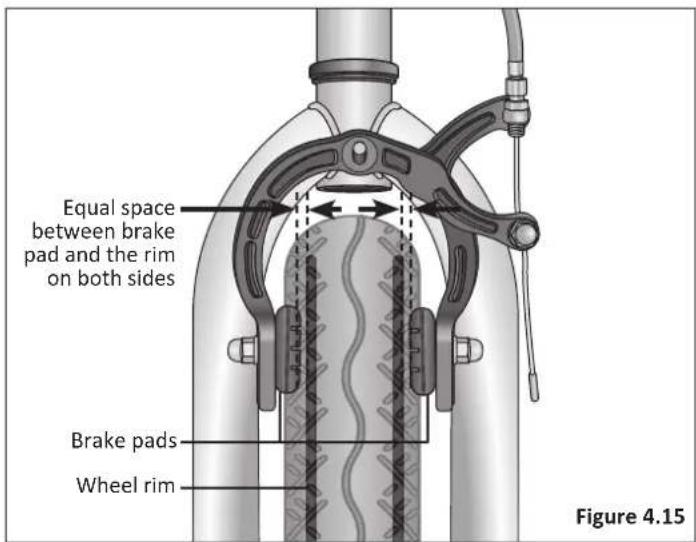
text_image
Equal space between brake pad and the rim on both sides Brake pads Wheel rim Figure 4.154 Adjustments
ADJUSTING THE SEAT HEIGHT

WARNING!
Improperly adjusted seat height could affect the rider's ability to reach the handlebar and pedals resulting in unexpected movement, loss of control and serious injury or death. Follow these guidelines when adjusting the seat height. Always ensure the seat post minimum insertion marks are below the seat clamp and cannot be seen. Ensure the seat clamp is locked and the seat cannot move.
Bolted Seat Clamp
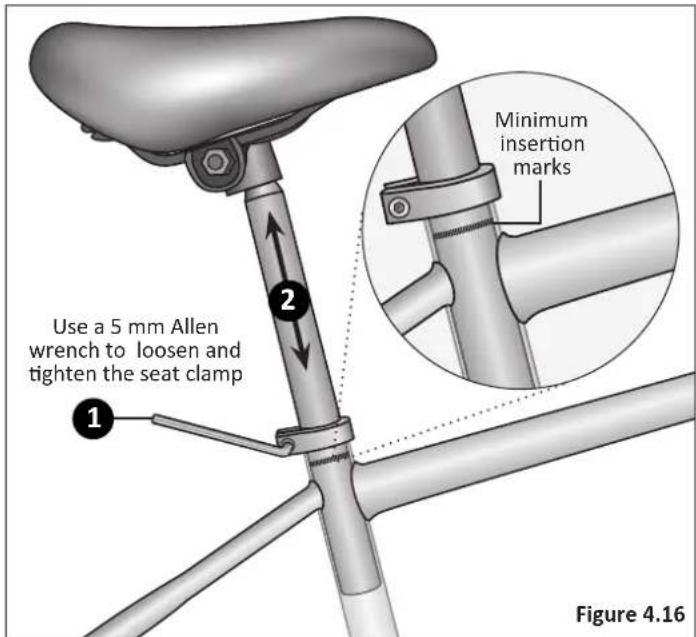
① Using a 5 mm Allen wrench, loosen the seat clamp bolt. Figure 4.16
2 Adjust the seat height up or down until the rider feels they have control of the bicycle and are comfortable.
Important! Be sure the minimum insertion marks do not go past the top of the seat clamp and are not visible. See Section 1, Fig. 1.2: Seat Height and Handlebar Reach.
3 Tighten the seat clamp bolt to lock the seat in place.
4 Check the seat to be sure it does not move.
text_image
Use a 5 mm Allen wrench to loosen and tighten the seat clamp 1 2 Minimum insertion marks Figure 4.16Quick-release Seat Clamp
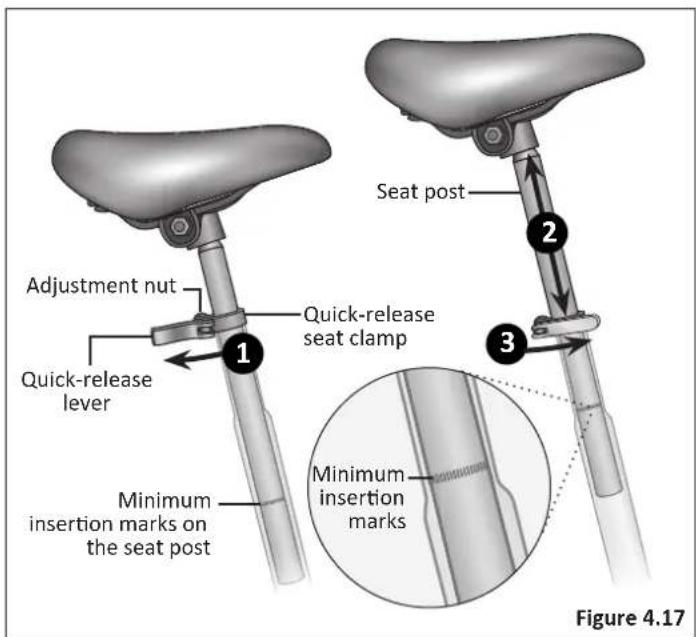
① Unlock the quick-release lever. Figure 4.17
2 Adjust the seat height up or down until the rider feels they have control of the bicycle and are comfortable.
Important! Be sure the minimum insertion marks do not go past the top of the seat clamp and are not visible. See Section 1, Fig. 1.2: Seat Height and Handlebar Reach.
3 Close the quick-release lever and lock the seat in place. If there is not enough pressure to hold the seat in place open the quick-release lever. With one hand on the quick-release lever and one hand on the adjustment nut, start to hand tighten the adjustment nut until you start to feel some resistance against the seat clamp. Do not attempt to tighten by turning the quick-release lever. The quick-release lever is for closing, the adjustment nut is for adjusting the pressure.
4 Try to close the quick-release lever. If it closes easily, open it up and tighten the adjustment nut further. If it is too difficult to close, open the quick-release lever, loosen the adjustment nut a little and try again.
Important! You should feel resistance when you close the quick-release lever that should leave a temporary impression on your fingers. Open and close the handle to ensure the seat is securely locked in place.
text_image
Adjustment nut Quick-release lever 1 Quick-release seat clamp Seat post 2 3 Minimum insertion marks on the seat post Figure 4.174 Adjustments
ADJUSTING THE HANDLEBAR Align the Handlebar (with quill stem)
WARNING!
- Improper adjustment of the handlebar may result in damage to the stem post, steering tube and result in loss of control, serious injury or death. Ensure the minimum insertion marks on the stem post are not visible above the top of the headset.
- Failure to properly tighten handlebar components may result in loss of control, serious injury or death. Always check the handlebar cannot move and is secured to the frame before riding the bicycle.
Adjusting the Handlebar Height
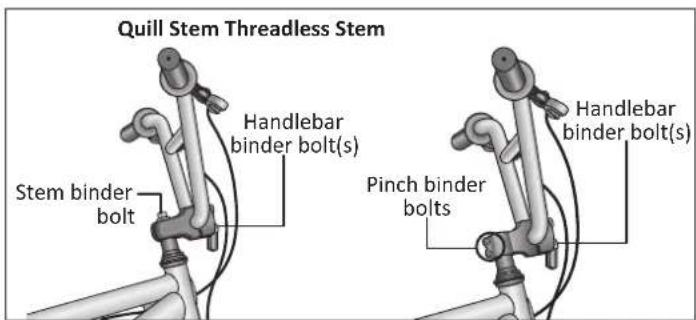
Instructions for adjusting the handlebar height depend on whether your bicycle has a quill or clamp (threadless) stem.
Figure 4.18
text_image
Quill Stem Threadless Stem Handlebar binder bolt(s) Stem binder bolt Pinch binder bolts Handlebar binder bolt(s)1 Stand in front of the handlebar and hold the front wheel between your legs.
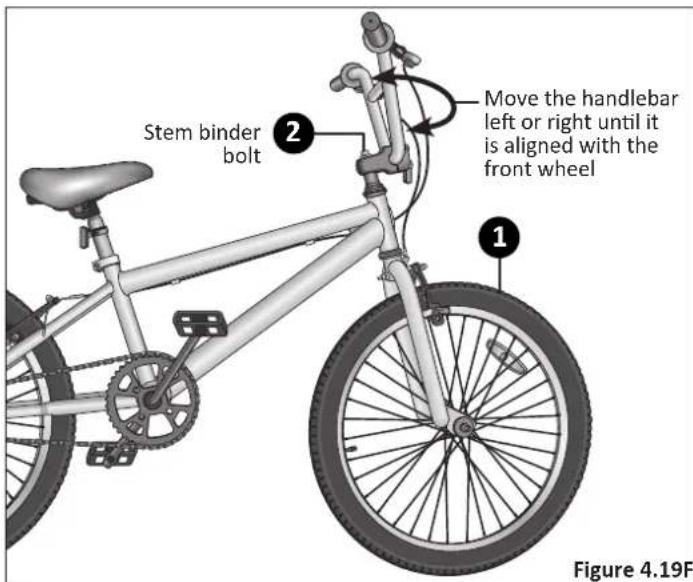
2 Using a 6 mm Allen wrench, loosen the stem binder bolt, or pinch binder bolts and move the handle bar left or right until it is aligned with the front wheel. Figure 4.19
3 Tighten the stem binder bolt and check the handlebar is securely attached and cannot move.
text_image
Stem binder bolt Move the handlebar left or right until it is aligned with the front wheel Figure 4.19FFigure 4.19 Figure 4.
Align the Handlebar (with threadless stem)
1 Stand in front of the handlebar and hold the front wheel between your legs.
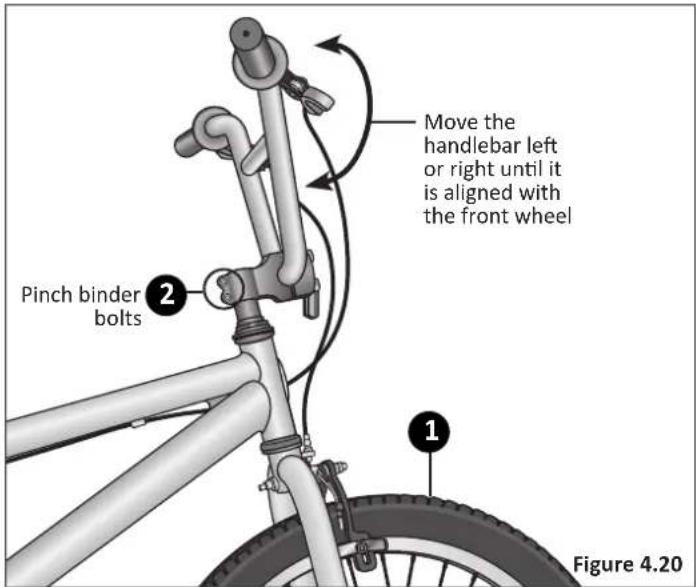
2 Using a 6 mm Allen wrench, loosen the pinch binder bolts and move the handle bar left or right until it is aligned with the front wheel. Figure 4.20
3 Tighten the pinch binder bolts and check the handlebar is securely attached and cannot move.
text_image
Move the handlebar left or right until it is aligned with the front wheel Pinch binder bolts Figure 4.20Adjust the Handlebar Angle (all stem types)
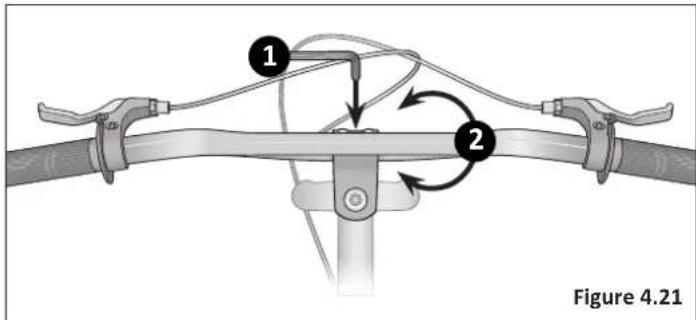
1 Using a 6 mm Allen wrench loosen the handlebar binder bolt(s). Figure 4.21
2 Rotate the handlebar into the desired position.
3 Check that the handlebar is centered to the frame and front wheel. Sit on the seat and check your reach to grips, shifters and brakes. Refer to Section 1, Fig. 1.2: Seat Height and Handlebar Reach for guidelines.
4 Tighten the handlebar binder bolt(s) and check the handlebar is securely attached and cannot move.
text_image
Figure 4.214 Adjustments
ADJUSTING THE HEADSET
The headset is an assembly of parts that connects the front fork and the head tube of the frame. It is the rotational interface that enables the fork to turn. There are two types of headsets: threaded and threadless.
Adjusting a Threaded Headset
A typical threaded headset consists of two cups that are pressed into the top and bottom of the head tube. Inside the two cups are bearings which provide a low friction contact between the bearing cup and the steerer. The short tube through which the steerer of the fork passes is called the head tube.
Adjustment of the headset is needed if the headset is too loose (shakiness), too tight (stiffness). Note: It is possible that the bearings have become worn or damaged and cause stiffness. Replacement of the parts may be necessary.
Conduct the following checks to determine if there is play in the headset:
1 Shakiness: Apply the front brake and push the handlebars back and forth, front to back. Or if the bicycle is on a workstand and the front wheel removed, push and pull on the forks. If you feel a knocking sensation or "clunk" it means the headset is too loose. Figure 4.22
2 Stiffness: Lift the front of the frame so the front wheel is off the ground. The handlebar and wheel should flop to one side or another. If there is drag or binding the headset is too tight.
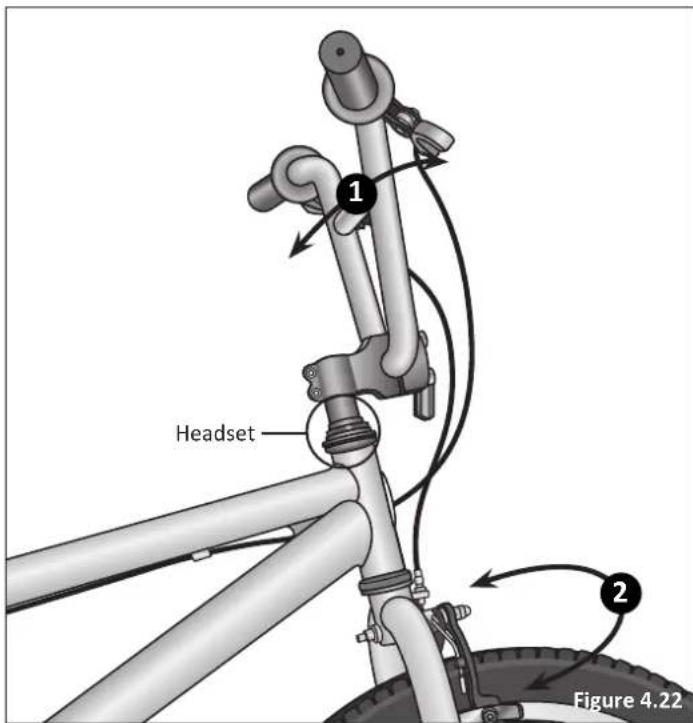
text_image
1 Headset 2 Figure 4.22Adjustments 4
3 With the front wheel resting on the ground, use an adjustable, or headset wrench and hold the upper threaded race in place. Figure 4.23
4 Loosen the locknut clockwise about 1/32nd of a turn.
Note: The front wheel must be straight to gauge adjustment.
5 By hand, screw the upper threaded race down until bearings begin to bind. Then back the race off about 1/8 turn.
6 Tighten the locknut and test that there is no shakiness or stiffness (ie. play) in the headset. Repeat steps 3 - 6 until there is no play in the headset.
If the play in the headset cannot be rectified with these adjustments see a qualified bicycle mechanic for these repairs.
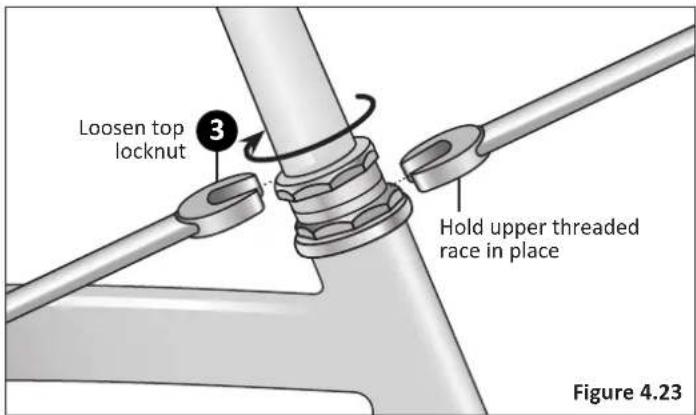
text_image
Loosen top locknut 3 Hold upper threaded race in place Figure 4.23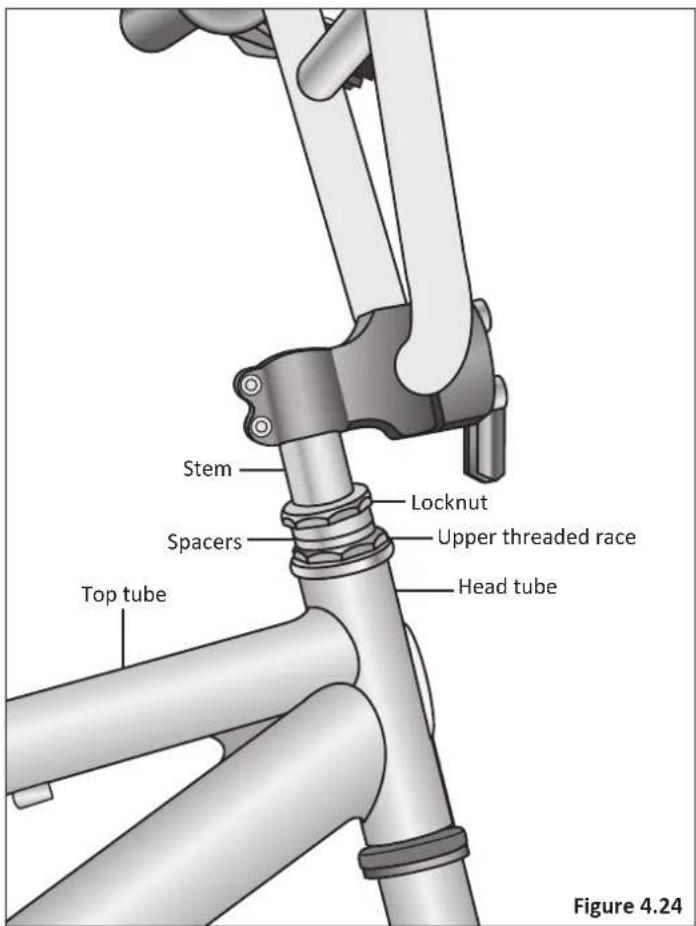
text_image
Stem Locknut Spacers Upper threaded race Head tube Top tube Figure 4.244 Adjustments
Adjusting a Threadless Headset
Threadless headsets are similar to threaded headsets, they use two sets of bearings and bearing cups. Unlike a threaded headset, a threadless headset does not have an upper threaded race or use a threaded steerer tube. Instead the steerer tube extends from the fork all the way through the head tube and above the headset and is held in place by the stem clamped on top.
Conduct the following checks to determine if there is play in the headset:
1 Shakiness: Apply the front brake and push the handlebars back and forth, front to back. Or if the bicycle is on a workstand and the front wheel removed, push and pull on the forks. If you feel a knocking sensation or "clunk" it means the headset is too loose. Figure 4.25
2 Stiffness: Lift the front of the frame so the front wheel is off the ground. The handlebar and wheel should flop to one side or another. If there is drag or binding the headset is too tight.

text_image
1 Headset 2 Figure 4.25① Loosen the top cap bolt and remove the top cap.
Important! Do not disassemble the headset or lose any parts. Be sure the end of the fork is on the ground or being held with your free hand, because once you loosen the top cap the fork assembly may fall out of the frame. Figure 4.27
2 Check that the gap between the top of the steerer tube and top of the stem is between 3 - 5 mm (1/8" - 3/16").
Figure 4.26
If the gap is not correct add or remove spacers until it is. The stem needs to press down on the spacers in order to adjust the bearings. If the gap is correct then re-install the top cap and tighten the top cap bolt until it is snug. Do not over tighten.
3 Slightly loosen the stem pinch bolts. The stem probably won't move but make sure the stem remains aligned with the fork and wheel.
4 Re-install and tighten the top cap down with a 1/4 to 1/2 turn of the top cap screw and test for shakiness in the headset. If there is still play in the headset then turn the top cap bolt another 1/4 to 1/2 turn. Repeat this process until the shakiness is gone.
5 Lift up the front wheel of the bicycle, if the wheel does not move freely left to right the top cap bolt is too tight. If this is the case turn the top cap bolt back some.
6 Repeat steps 3 and 4 until there is no play in the headset. If the play in the headset cannot be rectified with these adjustments see a qualified bicycle mechanic for these repairs.
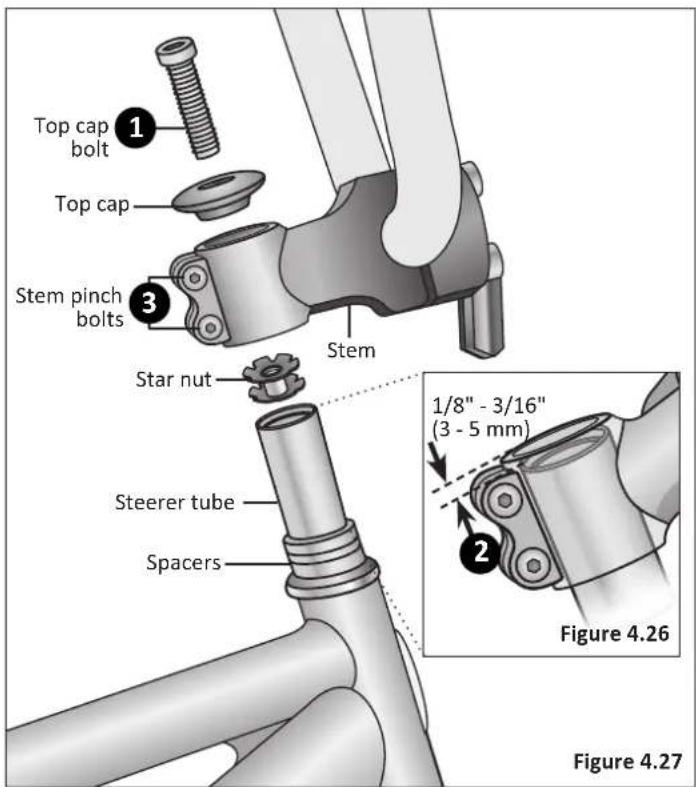
text_image
Top cap bolt Top cap Stem pinch bolts 3 Stem Star nut Steerer tube Spacers 1/8" - 3/16" (3 - 5 mm) 2 Figure 4.26 Figure 4.274 Adjustments
ADJUSTING THE BOTTOM BRACKET
Three piece bottom bracket: Adjustable
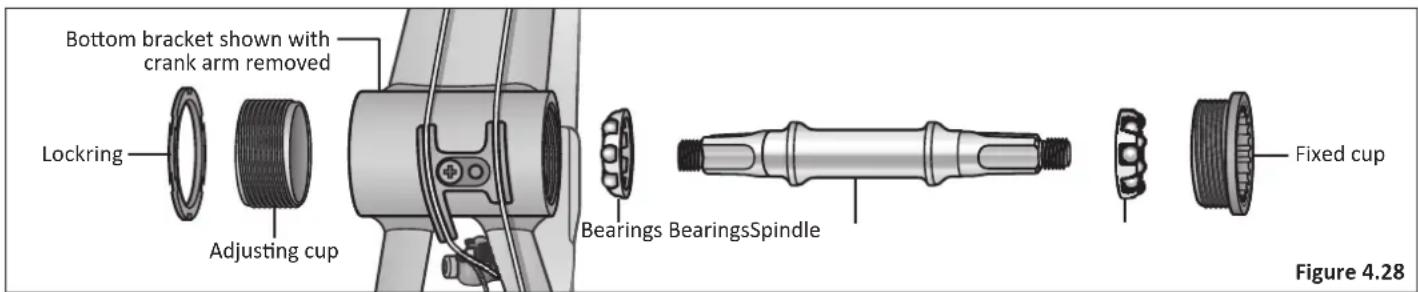
Typically the bottom bracket contains four major pieces: lockring, adjustable cup, spindle and fixed cup. The lockring has notched rings and the adjustable cup may have holes for a pin spanner, or notches for a wrench. The fixed cup will have wrench flats, but no lockring. Cups and the spindle may be removed and replaced separately. A set of round ball bearings are found in each cup, typically eleven balls per side of 1/4 inch diameter. This type of bracket may be cleaned, greased and adjusted.
Bearing Adjustment
The basic concept for bearing adjustments is to get the bearings adjusted as loose as possible but without play. Start by purposely beginning with play in the adjustment and then tightening in small increments until play is gone. Note: Extended use may cause the bearings, cups (or cones) to become worn and pitted. In this case, bearing adjustment will not be possible. If bottom bracket is correctly adjusted, but grinds when spun, cups and/or cones are worn and should be replaced. Figure 4.28
1 Loosen the locknut. Turn adjusting cone counter-clockwise until it hits the ball bearing, then turn back clockwise to loosen 1/4 turn.
② Secure the locknut.
3 Grab the end of the crankarms and rock it sideways to check for play. If play is present, loosen locknut and turn adjusting cone counter-clockwise slightly to tighten. Re-secure locknut and check again.
4 Repeat process of checking for play and re-tightening cone a slight amount until no play is felt.
text_image
Bottom bracket shown with crank arm removed Lockring Adjusting cup Bearings BearingsSpindle Fixed cup Figure 4.28One Piece Bottom Bracket
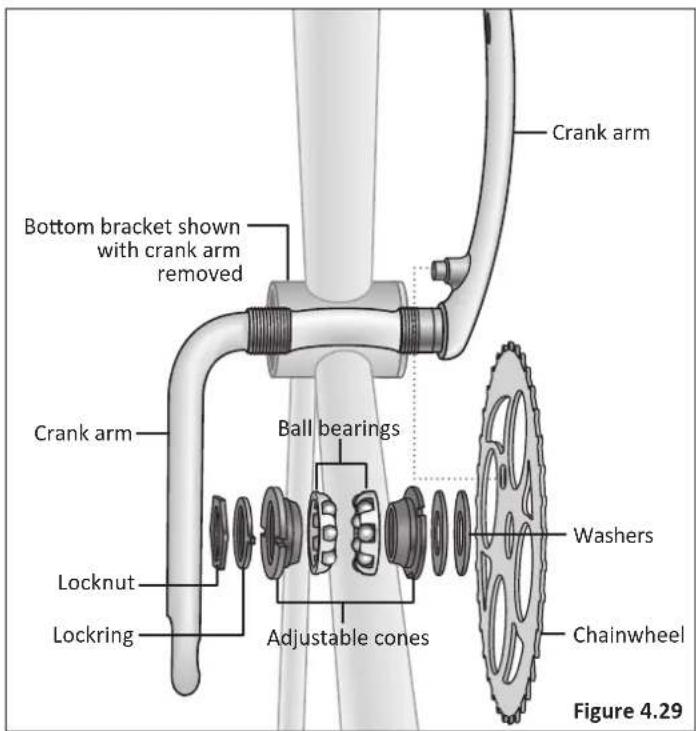
Typically the bottom bracket contains four major pieces: lockring, adjustable cone, bearings, and washers. The lockring has notches. The adjustable cone will have notches for a spanner wrench or bottom bracket tool. The cones can be removed and replaced separately. A set of round ball bearings are found in each adjustable cone. A typical ball bearing is 5/16" in diameter and contains nine balls. This type of bottom bracket may be cleaned, greased and adjusted.
Bearing Adjustment
The basic concept for bearing adjustments is to get the bearings adjusted as loose as possible but without play. Start by purposely beginning with play in the adjustment and then tightening in small increments until play is gone. Note: Extended use may cause the bearings, cups (or cones) to become worn and pitted. In this case, bearing adjustment will not be possible. If bottom bracket is correctly adjusted, but grinds when spun, cups and/or cones are worn and should be replaced. Figure 4.29
1 Loosen the locknut. Turn adjusting cone counter-clockwise until it hits the ball bearing, then turn back clockwise to loosen 1/4 turn.
② Secure the locknut.
3 Grab the end of the crank arms and rock it sideways to check for play. If play is present, loosen locknut and turn adjusting cone counter-clockwise slightly to tighten. Re-secure locknut and check again.
4 Repeat process of checking for play and re-tightening cone a slight amount until no play is felt. Note: The one-piece crank systems do not use a polished bearing system. There will be some roughness to a correctly adjusted bottom bracket. Adjust as loose as possible but without play in the crank assembly.
text_image
Crank arm Bottom bracket shown with crank arm removed Crank arm Ball bearings Locknut Lockring Adjustable cones Washers Chainwheel Figure 4.29
Use
WARNING!
Failure to follow all local and state regulations and laws pertaining to bicycle use as well as the safety warnings in this manual may result in serious injury or death. Always follow all local and state regulations and laws pertaining to bicycle use, follow the safety warnings in this manual and use common sense when riding the bicycle. Always conduct a pre-ride check of the bicycle condition before riding.
BRAKE OPERATION
There are two types of braking systems for bicycles; foot operated and hand operated.
Foot Operated Brakes
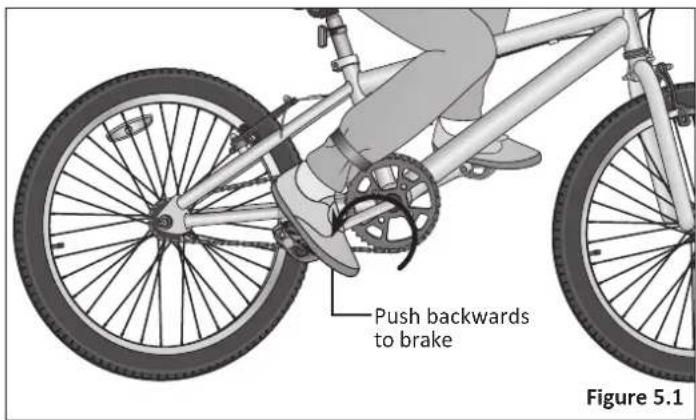
Foot operated brakes allow the rider to pedal forward to accelerate the bicycle, and pedal backwards to brake. The harder you push back on the pedals, the more braking force is applied to the rear wheel. Figure 5.1
In most cases a foot operated brake is strong enough to lock up (stop the wheel from turning) the rear wheel and cause the tire to skid. While this will decelerate the bicycle quickly, it will also cause unnecessary wear on the tire, and terrain, and can cause a loss of steering control.
It is recommended to practice braking so that you have control over how quickly the bicycle comes to a stop. It is also important
to know the environment that you are riding on. For example, a dry paved road is very predictable when stopping. But if you add rain, gravel, snow or anything else, the rider needs to be extra careful, and allow extra stopping distance, and slow down before turning. The rider should also be careful as terrain changes to keep the bicycle at a controllable speed.
Some models may have a combination of foot and hand operated brakes. It is OK to operate them at the same time or independently. However, if the bicycle is equipped with a front wheel hand brake, be careful to use front and rear brake simultaneously, and avoid locking up the front wheel, as this can cause a loss of steering control, and cause a crash. See hand operated brakes on the next page for more detail.
text_image
Push backwards to brake Figure 5.1Hand Operated Brakes
WARNING!
If the front brake is applied too quickly or too hard, the front wheel can stop turning resulting in a front pitch over or cause the bicycle to lose steering function leading to a crash.
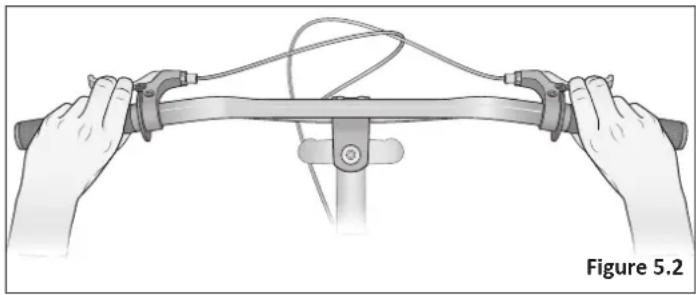
Hand operated brakes have a separate hand lever to operate front and rear brakes. Front hand brake levers are located on the left side of the handlebar, and rear hand brake levers are located on the right side of the handlebar. Figure 5.2
Hand operated brakes may be used alone or on some models in conjunction with foot operated brakes. It is OK to operate one brake at a time, or all together, depending on your style, comfort, and riding conditions, however, be careful to pay close attention to front brakes locking up.
To best avoid this:
- Apply the front and rear brakes simultaneously, while shifting your body weight back slightly to compensate for braking force.
-
As terrain changes, the rider must practice and learn how the bicycle will respond in a new terrain or weather change. The same bicycle will react differently if it is wet, or if there is gravel on the road etc.
-
Always test the brakes and be sure you feel comfortable with the reaction. If the riding conditions are too steep (off road for example) and you are unsure, dismount the bicycle and walk past the questionable terrain before riding again.
- Remember that as you apply the brakes your weight will want to shift forward, and the wheels will want to stop.
Note: See Section 4: Adjusting the Brakes for information on brake adjustment.
natural_image
Illustration of hands holding a mechanical clamp or bracket with wires, labeled Figure 5.2 (no text or symbols on the diagram itself)5 Use
SECURITY
You just bought a new bicycle! Don't lose it. It is advisable that the following steps be taken to prepare for and help prevent possible theft:
- Maintain a record of the bicycle's serial number, generally located on the frame underneath the bottom bracket.
Figure 5.3
- Register the bicycle with the local police and/or bicycle registry.
- Invest in a high quality bicycle lock that will resist hacksaws and bolt cutters.
- Always lock your bicycle to an immovable object if it is left unattended. Keep in mind that individual parts of a bicycle may be stolen. Most commonly, if you lock just a wheel or just the frame, other parts may be removed from the bicycle. Although it is impossible to lock all the parts, it is suggested to lock the major components if possible. Figure 5.4
- Use a lock that is long enough to lock the frame and both wheels if possible. Some models with quick-release front wheels allow the front wheel to be placed beside the frame so a smaller lock can be used to lock all 3 components.
- Be aware that a quick-release seat post can be stolen. It is recommended to remove the seat post and saddle and carry it with you if you believe that this is a risk.
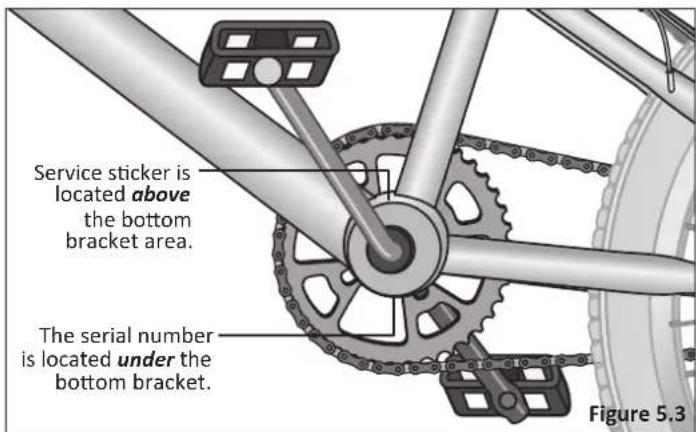
text_image
Service sticker is located above the bottom bracket area. The serial number is located under the bottom bracket. Figure 5.3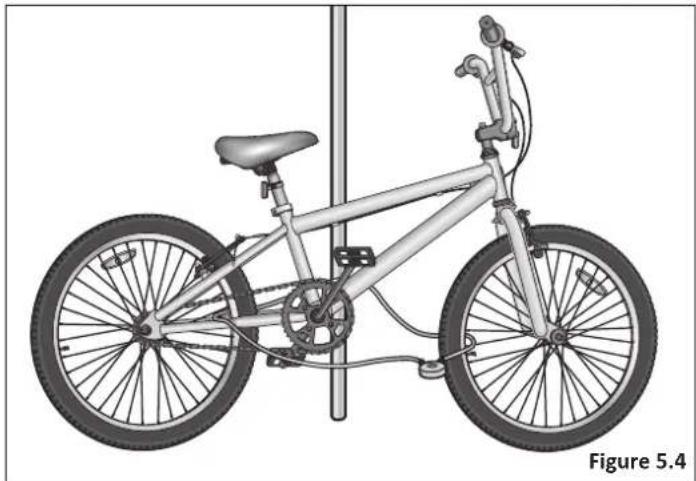
natural_image
Illustration of a bicycle with front wheel, suspension panel, and vertical pole (no text or symbols)
Maintenance
WARNING!
- Failure to conduct maintenance on the bicycle may result in malfunction of a critical part and serious injury or death. Proper maintenance is critical to the performance and safe operation of the bicycle.
- The recommended intervals and need for lubrication and maintenance may vary depending on conditions the bicycle is exposed to. Always inspect the bicycle and conduct necessary maintenance before each use of the bicycle.
This section presents important information on maintenance and will assist you in determining the proper course of action to take if you do have a problem with the operation of the bicycle. If you have questions regarding maintenance please call our customer service, toll free, at 1-800-626-2811 or see a qualified bicycle mechanic. Do not call the store where the bicycle was purchased.
Correct routine maintenance of your new bike will ensure:
- Smooth running
- Longer lasting components
- Safer riding
- Lower running costs
BASIC MAINTENANCE
The following procedures will help you maintain your bicycle for years of enjoyable riding.
- For painted frames, dust the surface and remove any loose dirt with a dry cloth. To clean, wipe with a damp cloth soaked in a mild detergent mixture. Dry with a cloth and polish with car or furniture wax. Use soap and water to clean plastic parts and rubber tires. Chrome plated bikes should be wiped over with a rust preventative fluid.
- Store your bicycle under shelter. Avoid leaving it in the rain or exposed to corrosive materials.
- Riding on the beach or in coastal areas exposes your bicycle to salt which is very corrosive. Wash your bicycle frequently and wipe or spray all unpainted parts with an anti-rust treatment. Make sure wheel rims are dry so braking performance is not affected. After rain, dry your bicycle and apply anti-rust treatment. If the hub and bottom bracket bearings of your bicycle have been submerged in water, they should be taken out and re-greased. This will prevent accelerated bearing deterioration.
- If paint has become scratched or chipped to the metal, use touch up paint to prevent rust. Clear nail polish can also be used as a preventative measure.
- Regularly clean and lubricate all moving parts, tighten components and make adjustments as required.
6 Maintenance
LUBRICATION SCHEDULE
| Component Lubricant Method | ||
| Weekly | ||
| Chains Chain lube or light oil Brush on or squirt | ||
| Brake calipers OilThree drops from oil can | ||
| Brake levers OilTwo drops from oil can | ||
| Freewheel OilTwo drops from oil can | ||
| Brake cables Lithium based grease | Remove cable from casing. Grease entire length. Wipe off excess lubrication from other surfaces. | |
| Brake lever and caliper pivot points | Light oil Two to three drops from oil can | |
| Yearly | ||
| Bottom bracket Lithium based grease Disassemble | ||
| Pedals | Lithium based grease Disassemble | |
| Wheel bearings Lithium based grease Disassemble | ||
| Headset | Lithium based grease | Disassemble |
| Seat stem | Lithium based grease Disassemble | |
| Pedals: that can be disassembled | See bicycle mechanic for maintenance. | |
Note: The frequency of maintenance should increase with use in wet or dusty conditions. Do not over lubricate. Remove excess lubricant to prevent dirt build up. Never use a degreaser to lubricate your chains (WD-40 ^® ).
PARTS MAINTENANCE
Tires
Frequency: Inspect and maintain at least each use.
| Inspect Action Maintenance | ||
| Tire Inflation Check tire pressure. Inflate tire to the pressure indicated on the tire sidewall. See “Inflating a Tire Tube” for more detail. If the tire is flat see “Fixing a Flat Tire” for more detail. | ||
| Bead Seating Check for broken or loose spokes. See bicycle mechanic for repair. | ||
| Tread Inspect for signs of excessive wear, flat spots or cuts and damage. | Replace tire. | |
| Valves Check that valve caps are fitted and free of dirt. Clean dirt from the valve. | ||
Wheels
Frequency: Inspect and maintain at least each use.
| Inspect Action Maintenance | ||
| Rims Inspect for dirt and grease. Use a clean rag or wash with soapy water, rinse, and air dry. | ||
| Wheels | Check the wheels are securely fastened to the bicycle and axle nuts are tight. | Adjust if necessary and tighten axle nuts. |
| Spin wheel and check rotation / alignment is true | See bicycle mechanic for repair. | |
| Spokes | Check for broken or loose spokes. | See bicycle mechanic for repair. |
| Hub Bearings | Lift each wheel and see if there is movement side to side. | See bicycle mechanic for repair. |
Drivetrain (pedals, chains, chainwheel, crank set, freewheel)
Frequency: as noted
| Inspect Action Maintenance | ||
| Pedals Every month | check each pedal is securely set and tighten into the crank arm. | If necessary, re-set and tighten. |
| Before each ride, check each front and rear pedal reflectors are clean and in place. | Clean or replace. | |
| Pedal Bearings Every ride, check the pedal bearings are properly adjusted.Move the pedal up and down, left and right. If looseness or roughness is detected adjustment, lubrication or replacement is required. | See bicycle mechanic for repair. | |
| Chains Every week, check the chain is clean, properly lubricated,rust-free, and is not stretched, broken, or has stiff links. | Lubricate if necessary. Replace if rusted,stretched, or broken. | |
| Crank Set Every month, check the crank set (crank arms, chain rings, and bottom bracket axle and bearings) is correctly adjusted and tight. | See bicycle mechanic for repair. | |
Brakes
Frequency: Inspect and maintain before each use
| Inspect Action Maintenance | ||
| Levers | Check the levers are securely fastened to the handlebar. | Position the levers to fit the rider's grip and screw tight to handlebar. |
| Pads | Check pad position, gap and pressure. | See Section 4: Adjusting the Brakes |
| Cables Check the outer casing for kinks, stretched coils and damage.Check cables for kinks, rust, broken strands or frayed ends.Check the outer casing for kinks, stretched coils and damage. | Replace cable. | |
| Check the housing is seated properly into each cable stop of the bicycle. | It is recommended that the cables and housing be replaced every riding season. | |
6 Maintenance
Hub bearings require special thin wrenches called cone wrenches. If you do not own these tools, do not attempt hub bearing adjustments. Have a qualified bicycle mechanic perform the adjustment if you have any doubts.
① Check to make sure neither locknut is loose.
2 To adjust, remove wheel from bicycle and loosen the locknut on one side of the hub while holding the bearing cone on the same side with a cone wrench.
3 Rotate the adjusting cone as needed to eliminate free play.
4 Re-tighten the locknut while holding the adjusting cone in position.
5 Re-check that the wheel can turn freely without excessive side play.
INFLATING THE TIRE TUBEHUB BEARINGS
WARNING!
- An unseated tire can rupture unexpectedly and cause serious injury or death. Be sure the tire is properly seated when inflating the tube.
- Over inflation or inflating the tube too quickly may result in the tire blowing off the rim and damaging the bicycle or causing injury to the rider. Always use a hand pump to inflate the tube. Do not use a gas station service pump to inflate the tube.
Follow these steps to inflate a tire:
① Remove the valve cap and add air.
② Be sure the tire is evenly seated on the rim, both sides.
3 Spin the wheel and check for high and low areas.
4 Complete inflation to the recommended psi found on the sidewall of the tire.
5 Be sure the tire is evenly seated on the rim, both sides. If not, release some air and repeat steps three through six.
6 Check for dirt in the valve cap or stem. Clean dirt from cap or stem.
⑦ Securely replace the valve cap on the stem.
REPAIRING A FLAT TIRE
WARNING!
An unseated tire can rupture unexpectedly and cause serious injury or death. Be sure the tire is properly seated when inflating the tube.
Follow these steps to fix a flat tire:
① Match tube size and tire size (see tire sidewall for size).
2 Remove the wheel from the bicycle. Deflate the tire tube completely.
③ Squeeze the tire beads into the center of the rim.
4 Opposite the valve, use a bicycle tire lever to pry the tire bead up and out of the rim. Repeat around the wheel until one bead is off the rim.
⑤ Remove tube. Release second tire bead.
6 Remove tire.
⑦ Carefully inspect inside of the rim and tire for the cause of the flat.
⑧ Inflate the tube ¼ full and place inside tire.
9 Insert the valve stem through valve stem hole in rim.
10 Start at the valve stem and install the first bead onto the rim. Repeat for the second bead.
11 Slowly inflate the tire tube, checking the tire is seated properly and not pinched as the tire tube is inflated.
12 Inflate to recommended pressure (see tire sidewall).
TROUBLESHOOTING GUIDE
| Problem Possible Cause Remedy | ||
| Slipping chain • Excessively worn/chipped chain wheel or freewheel sprocket teeth• Chain worn/stretched• Stiff link in chain• Non compatible chain/chain wheel freewheel | • Replace chain wheel, sprockets and chain• Replace chain• Lubricate or replace link• Seek advice at a bicycle shop | |
| Chain jumping off freewheel sprocket or chain wheel | • Chain wheel out of true• Chain wheel loose• Chain wheel teeth bent or broken | • Re-true if possible, or replace• Tighten mounting bolts• Repair or replace chain wheel/set |
| Constant clicking noises when pedaling | • Stiff chain link• Loose pedal axle/bearing• Loose bottom bracket axle/bearings• Bent bottom bracket or pedal axle• Loose crankset | • Lubricate chain/adjust chain link• Adjust bearings/axle nut• Adjust bottom bracket• Replace bottom bracket axle or pedals• Tighten crank bolts |
| Grinding noise when pedaling | • Pedal bearings too tight• Bottom bracket bearings too tight | • Adjust bearings• Adjust bearings• Adjust chain line |
| Freewheel does not rotate | • Freewheel internal pawl pins are jammed • Lubricate. If | problem persists, replace freewheel |
| Problem Possible | Cause Remedy | |
| Brakes not working effectively | Brake pads worn downBrake pads/rim greasy, wet or dirtyBrake cables are binding/stretched/damagedBrake levers are bindingBrakes out of adjustment | Replace brake padsClean pads and rimClean/adjust/replace cablesAdjust brake leversCenter brakes |
| When applying the brakes they squeal/squeak | Brake pads worn downBrake pads toe-in incorrectBrake pads/rim dirty or wetBrake arms loose | Replace padsCorrect pads toe-inClean pads and rimTighten mounting bolts |
| Knocking or shuddering when applying brakes | Bulge in the rim or rim out of trueBrake mounting bolts looseBrakes out of adjustmentFork loose in head tube | True wheel or take to a bike shop for repairTighten boltsCenter brakes and/or adjust brake pads toe-inTighten headset |
| Wobbling wheel • Axle | brokenWheel out of trueHub comes looseHeadset bindingHub bearings collapsedQuick-release mechanism loose | Replace axleTrue wheelAdjust hub bearingsAdjust headsetReplace bearingsAdjust quick-release mechanism |
6 Maintenance
| Problem Possible Cause Remedy | ||
| Steering not accurate | Wheels not aligned in frameHeadset loose or bindingFront forks or frame bent | Align wheels correctlyAdjust/tighten headsetTake bike to a bike shop for possible frame realignment |
| Frequent punctures | Inner tube old or faultyTire tread/casing wornTire unsuited to rimTire not checked after previous punctureTire pressure too lowSpoke protruding into rim | Replace inner tubeReplace tireReplace with correct tireRemove sharp object embedded in tireCorrect tire pressureFile down spoke |
⑦ Warranty
LIMITED LIFETIME WARRANTY AND POLICY ON REPLACEMENT PROCEDURES AND RESPONSIBILITIES
Your purchase includes the following warranty which is in lieu of all other express warranties. This warranty is extended only to the initial consumer purchaser. No warranty registration is required. This warranty gives you specific legal rights and you may have other rights which vary from state to state.
FRAME
Steel, aluminum and dual suspension frames are guaranteed against faulty materials and workmanship for as long as the initial consumer purchaser has the bicycle, subject to the Terms and Conditions of this Limited Warranty. If frame failure should occur due to faulty materials or workmanship during the guarantee period, the frame will be replaced. For frame replacement under this Limited Warranty, contact us, stating the nature of the failure, model number, date received and the name of the store from which the bike was received, at the address given on this page. Frame must be returned for inspection at customer's expense. Please note: the fork is not part of the frame. A lifetime warranty on your frame does not guarantee that the product will last forever. The length of the useful life cycle will vary depending on the type of bike, riding conditions and care the bicycle receives. Competition, jumping, downhill racing, trick riding, trial riding, riding in severe conditions or climates, riding with heavy loads or any other non-standard use can substantially shorten the useful product life cycle. Any one or a combination of these conditions may result in an unpredictable failure that is not covered by this warranty. All bicycles and frame sets should be periodically checked by an authorized dealer for indications of potential problems, inappropriate use or abuse. These are important safety checks and are very important to help prevent accidents, bodily injury to the rider and shortened useful product life cycle.
PARTS
All other parts of the bicycle, except Normal Wear Parts, are warranted against defective materials and workmanship for as long as the initial consumer purchaser has the bicycle, subject to the Terms and Conditions of this Limited Warranty. If failure of any part should occur due to faulty materials or workmanship during the warranty period, the part will be replaced. All warranty claims must be submitted to the address in the front of the manual and must be shipped prepaid and accompanied by proof of purchase. Any other warranty claims not included in this statement are void. This especially includes installation, assembly, and disassembly costs. This warranty does not cover paint damage, rust, or any modifications made to the bicycle. Normal Wear Parts are defined as grips, tires, tubes, cables, brake shoes and saddle covering. These parts are warranted to be free from defects in material and workmanship as delivered with the product. Any claim for repair or replacement of Normal Wear Parts (grips, tubes, tires, cables, brake shoes and saddle covering) and missing parts must be made within thirty (30) days of the date of purchase.
CONDITIONS OF WARRANTY
- Your bicycle has been designed for general transportation and recreational use, but has not been designed to withstand abuse associated with stunting and jumping. This warranty ceases when you rent, sell, or give away the bicycle, ride with more than one person, or use the bicycle for stunting or jumping. 2. This warranty does not cover ordinary wear and tear or anything you break accidentally or deliberately. 3. This warranty does not cover normal wear and tear, improper assembly or maintenance, or installation of parts or accessories not originally intended or compatible with the bicycle as sold. The warranty does not apply to damage or failure due to accident, abuse, misuse, neglect, or theft. Claims involving these issues will not be honored. 4. It is the responsibility of the individual consumer purchaser to assure that all parts included in the factory-sealed carton are properly installed, all functional parts are initially adjusted properly, and subsequent normal maintenance services and adjustments necessary to keep the bicycle in good operating condition are properly made. 5. This warranty does not apply to damage due to improper installation of parts, installation of any kind of power plant or internal combustion engine, modification or alteration of the brakes, drive train, or frame in any way, or failure to properly maintain or adjust the bicycle.
NOTICE: Bicycle specifications subject to change without notice.
Pacific Cycle · PO Box 344 Olney, IL 62450
7 Warranty
PURCHASE RECORD
Fill in immediately and retain as a record of your purchase.
Please retain your sales receipt for any possible warranty claims.
Name:
Address:
City:
State:
Date Purchased:
Place of Purchase:
Model & Brand Information:
Wheel Size:
Color:
Model Number:
Date Code:
Serial Number:
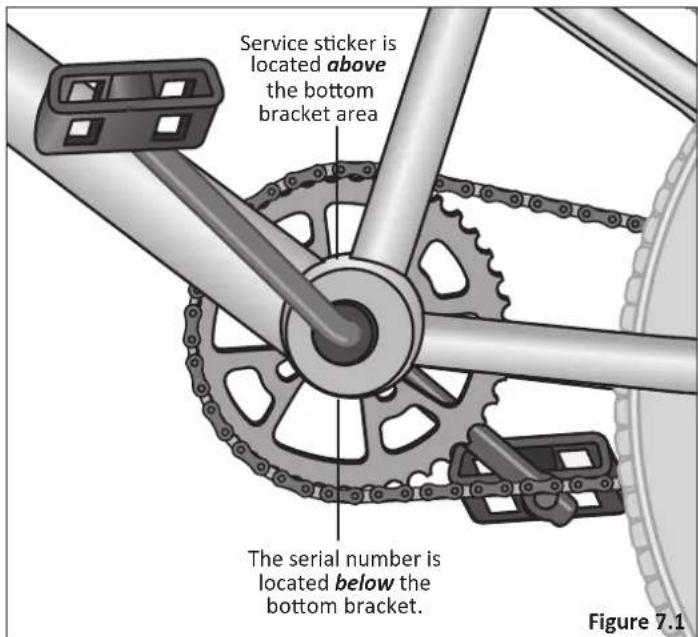
text_image
Service sticker is located above the bottom bracket area The serial number is located below the bottom bracket. Figure 7.1
text_image
SCHWINN QUALITY®SCHWINN®
EST. 1895
MANUAL DE LA BICICLETA PARA LOS DUENOS
ESTE MANUAL CONTIENE IMPORTANTE INFORMACION DE SEGURIDAD, FUNCIONAMIENTO, Y MANTENIMIENTO. LEE EL MANUAL ANTES DE IR A EL PRIMER PASEO EN SU BICICLETA NUEVA, Y GUARDE EL MANUAL REFERENCIA FUTURE.
Para registrar su bicicleta visite www.schwinnbikes.com/registerbike
Contenido
1 Seguridad 4
Web: www.pacific-cycle.com
Correo electrónico:customerservice@Pacific-Cycle.com
Correo: P. O. Box 344
4730 E. Radio Tower Lane
Olney, IL 62450
natural_image
Side profile illustration of a person wearing a helmet and harness (no text or symbols)Ajuste correcto
natural_image
Profile view of a person wearing a helmet and using a bicycle brake system (no text or symbols)natural_image
Side profile illustration of a person wearing a helmet and harness (no text or symbols)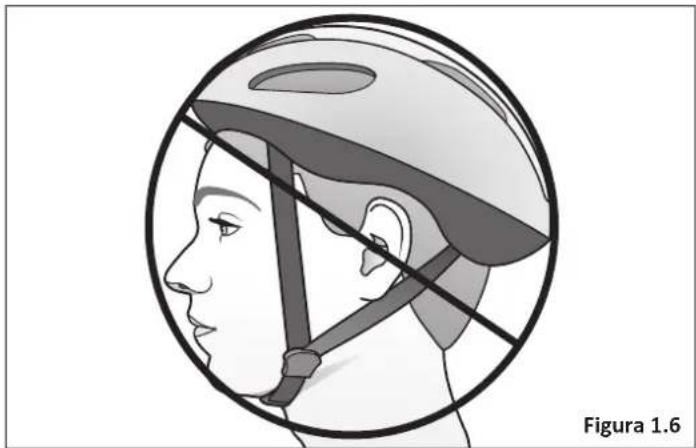
natural_image
Side profile illustration of a person wearing a helmet and using a horizontal bar device (no text or symbols)Reflectores
¡ADVERTENCIA!
natural_image
Illustration of five different wrenches and screwdriver tools (no text or labels)Figura 3.1
PARA EMPEZAR
natural_image
Pure mechanical piping diagram without any text, numbers, or symbols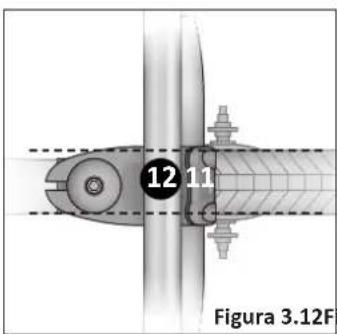
text_image
12 11 Figura 3.12FFigura 3.12 Figura 3.11
natural_image
Pure mechanical pipe connection diagram without any text, numbers, or symbols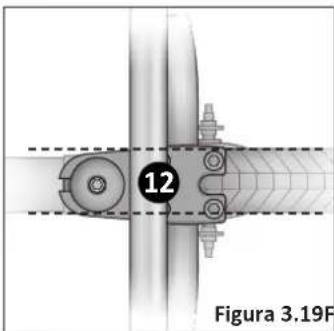
natural_image
Mechanical assembly diagram showing a shaft and housing with no visible text or symbolsFigura 3.19 Figura 3.
3 Ensamblado
natural_image
Close-up of a bicycle wheel with a screwdriver inserted, showing the wheel rim and spokes (no text or symbols)gura 3.33
Reposapiés de copa larga
natural_image
Illustration of five different wrenches and screwdriver tools arranged in a row, labeled Figura 4.2 (no text or symbols on the tools themselves)AJUSTAR LOS FRENOS
¡ADVERTENCIA!
natural_image
Illustration of hands holding a mechanical clamp or bracket with wires, labeled Figura 5.2 (no text or symbols on the diagram itself)5 Uso
SEGURIDAD
natural_image
Illustration of a bicycle with front wheel, suspension bridge, and vertical pole (no text or symbols)6 Mantenimiento
¡ADVERTENCIA!
WWW.SCHWINNBIKES.COM
⚠ WARNING: This product can expose you to chemicals including lead, which is known to the State of California to cause cancer and birth defects or other reproductive harm. For more information go to www.P65Warnings.ca.gov.
OMSCBMX
©2017 Pacific Cycle, Inc.