
A45 - Elliptical bike Schwinn - Free user manual and instructions
Find the device manual for free A45 Schwinn in PDF.


| Product Type | Elliptical Trainer |
| Brand | Schwinn |
| Model | A45 |
| Dimensions (L x W x H) | Approx. 70" x 28" x 63" (178 x 71 x 160 cm) |
| Product Weight | Approx. 150 lbs (68 kg) |
| Max User Weight | 300 lbs (136 kg) |
| Flywheel Weight | 18 lbs (8.2 kg) |
| Resistance Type | Magnetic (manual or motorized) |
| Resistance Levels | 16 |
| Display Type | LCD (Liquid Crystal Display) |
| Display Metrics | Time, Distance, Speed, Calories, Heart Rate, RPM |
| Programs | 12 Pre-set Programs + Manual |
| Heart Rate Monitoring | Contact grips and telemetry (chest strap optional) |
| Pedals | Oversized, cushioned with adjustable straps |
| Stride Length | 18" (46 cm) |
| Power Source | Self-powered (generator) or 6V DC adapter |
| Water Bottle Holder | Yes |
| Transport Wheels | Yes |
| Leveling Feet | Yes |
| Assembly Required | Yes (step-by-step manual included) |
| Warranty | Frame: 10 years, Parts: 2 years, Labor: 1 year |
Frequently Asked Questions - A45 Schwinn
User questions about A45 Schwinn
0 question about this device. Answer the ones you know or ask your own.
Ask a new question about this device
Download the instructions for your Elliptical bike in PDF format for free! Find your manual A45 - Schwinn and take your electronic device back in hand. On this page are published all the documents necessary for the use of your device. A45 by Schwinn.
USER MANUAL A45 Schwinn
| Important Safety Instructions - Assembly 3 | |
| Safety Warning Labels / Serial Number 4 | |
| Specifications | 4 |
| Before Assembly 5 | |
| Parts | 6 |
| Hardware | 7 |
| Tools | 7 |
| Assembly | 8 |
| Leveling the Bike 16 | |
| Moving the Bike 16 | |
| Important Safety Instructions - Owner's 17 | |
| Features | 18 |
| Console Features 19 | |
| Contact Heart Rate (CHR) 20 | |
| Operations | 22 |
| Mounting and Dismounting 22 | |
| Quick Start / Manual Program 22 | |
| Profile Programs 23 | |
| Pausing or Stopping 23 | |
| Results | 23 |
| Changing Unit Measures(English Imperial/Metric) | 23 |
| Maintenance | 24 |
| Troubleshooting | 27 |
| Warranty | 31 |
To validate warranty support, keep the original proof of purchase and record the following information:
Serial Number ____
Date of Purchase ____
To register your product warranty, go to: www.SchwinnFitness.com/register
Or call 1 (800) 605-3369.
If you have questions or problems with your product, please call 1 (800) NAUTILUS (628–8458)
Or go to: www.SchwinnFitness.com
Nautilus, Inc., (800) NAUTILUS / (800) 628-8458, www.NautilusInc.com - Customer Service: North America (800) 605-3369, csnls@nautilus.com | outside U.S. +01-360-859-5180, technics-APLA@nautilus.com | Printed in China | © 2012 Nautilus, Inc.
This icon means a potentially hazardous situation which, if not avoided, could result in death or serious injury.
Obey the following warnings:
Read and understand all warnings on this machine. Carefully read and understand the Assembly instructions.
- Keep bystanders and children away from the product you are assembling at all times.
- Do not connect power supply to the machine until instructed to do so.
- Do not assemble this machine outdoors or in a wet or moist location.
• Make sure assembly is done in an appropriate work space away from foot traffic and exposure to bystanders. - Some components of the machine can be heavy or awkward. Use a second person when doing the assembly steps involving these parts. Do not do steps that involve heavy lifting or awkward movements on your own.
- Set up this machine on a solid, level, horizontal surface.
- Do not try to change the design or functionality of this machine. This could compromise the safety of this machine and will void the warranty.
- If replacement parts are necessary, use only genuine Nautilus® replacement parts and hardware. Failure to use genuine replacement parts can cause a risk to users, keep the machine from operating correctly and void the warranty.
- Do not use until the machine has been fully assembled and inspected for correct performance in accordance with the Manual.
- Read and understand the complete Manual supplied with this machine before first use. Keep the Manual for future reference.
- Do all assembly steps in the sequence given. Incorrect assembly can lead to injury or incorrect function.
- This product contains magnets. Magnetic fields can interfere with the normal use of certain medical devices at a close range. Users may come into proximity of the magnets in the assembly, maintenance, and/or use of the product. Given the obvious importance of these devices, such as a pacemaker, it is important that you consult with your medical provider in connection with the use of this equipment. Please consult the "Safety Warning Labels and Serial Number" section to determine the location of the magnets on this product.
SAFETY WARNING LABELS AND SERIAL NUMBER
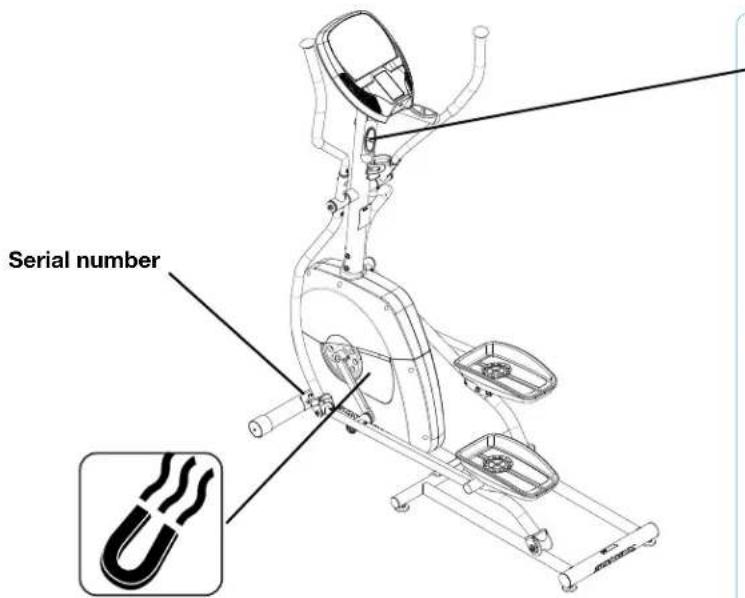
WARNING
- Keep children away.
- Prior to use, read and understand the Owners Manual.
- Injury or death is possible if Caution is not used while using this machine.
• The maximum user weight for this machine is 275 lbs (125Kg). - Replace any "Caution" "Warning" or "Danger" label that is illegible, damaged, or removed.
• This machine is for home use only.
▲ AVERTISSEMENT
Changes or modifications to this unit not expressly approved by the party responsible for compliance could void the user's authority to operate the equipment.
The power supply complies with part 15 of the FCC rules. Operation is subject to the following two conditions: (1) This device may not cause harmful interference, and (2) this device must accept any interference received, including interference that may cause undesired operation.
Note: This power supply has been tested and found to comply with the limits for a Class B digital device, pursuant to Part 15 of the FCC Rules. These limits are designed to provide reasonable protection against harmful interference in a residential installation. This equipment generates, uses and can radiate radio frequency energy and, if not installed and used in accordance with the instructions, may cause harmful interference to radio communications.
However, there is no guarantee that interference will not occur in a particular installation. If this equipment does cause harmful interference to radio or television reception, which can be determined by turning the equipment off and on, the user is encouraged to try to correct the interference by one or more of the following measures:
- Reorient or relocate the receiving antenna.
- Increase the separation between the equipment and receiver.
- Connect the equipment into an outlet on a circuit different from that to which the receiver is connected.
- Consult the dealer or an experienced radio/TV technician for help.
Maximum User Weight: 275 lbs. (125 kg)
Power Requirements: 4 D Batteries (LR20) – not included Operational Voltage: 6VDC
Regulatory Approvals:
Optional AC Power Adapter: UL listed, CSA certified (or equivalent), Rated 120V60Hz Input, 9VDC, 0.5 A Output. Class 2 or LPS.

This product, its packaging, and components contain chemicals known to the State of California to cause cancer, birth defects, or reproductive harm. This Notice is provided in accordance with California's Proposition 65. If you would like additional information, please refer to our website at www.nautilus.com/prop65.

Before Assembly
Select the area where you are going to set up and operate your machine. For safe operation, the location must be on a hard, level surface. Allow a workout area of a minimum 72" x 107" (183 cm x 272 cm). Be sure that the workout space you are utilizing has adequate height clearance, taking into consideration the height of the user and the maximum incline of the elliptical machine.
Basic Assembly Tips
Follow these basic points when you assemble your machine:
- Read and understand the "Important Safety Instructions" before assembly.
- Collect all the pieces necessary for each assembly step.
- Using the recommended wrenches, turn the bolts and nuts to the right (clockwise) to tighten, and the left (counterclockwise) to loosen, unless instructed otherwise.
- When attaching 2 pieces, lightly lift and look through the bolt holes to help insert the bolt through the holes.
- The assembly requires 2 people.
Note: Some axles contain oil. Use caution to avoid staining clothes or carpet.
PARTS

A decal has been applied to all right ("R") and left ("L") parts to assist with assembly.
| Item Qty Description | |||||
| 1 1 Frame 9 2 Pedals | |||||
| 2 1 Front Stabilizer 10 1 Pedal Arm, Right | |||||
| 3 1 Water Bottle Holder 11 1 Pedal Arm, Left | |||||
| 4 1 Console 12 1 Lower Left Handlebar Arm | |||||
| 5 1 Console Mast 13 1 Lower Right Handlebar Arm | |||||
| 6 1 Leg, Left 14 1 Upper Left Handlebar Arm | |||||
| 7 1 Leg, Right 15 1 Upper Right Handlebar Arm | |||||
| 8 1 Rail Assembly 16 1 Static Handlebar | |||||
Note: Media Cable is in the Console box.
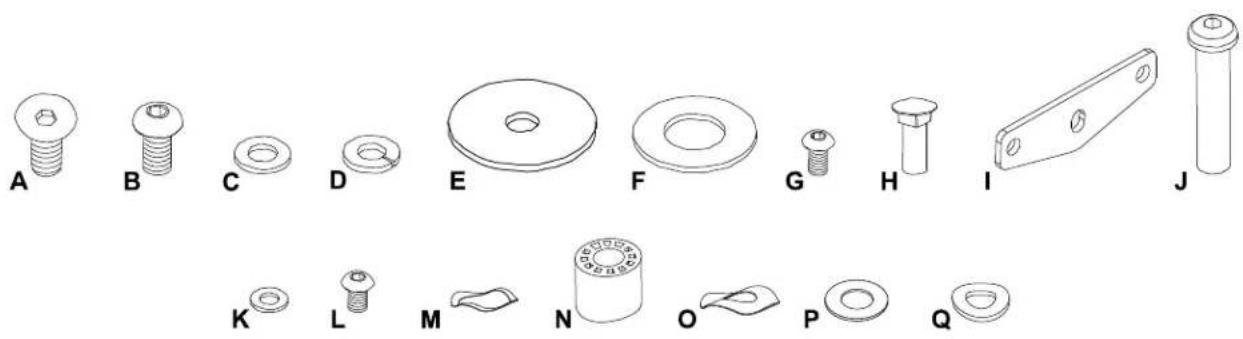
natural_image
Technical line drawings of various mechanical parts (no text or symbols)| Item Qty Description | |||||
| A | 6 | Flat Head Hex Screw, M8x20 | J | 2 | Shaft |
| B | 18 | Button Head Hex Screw, M8x15 | K | 6 | Flat Washer, M6 |
| C | 8 | Flat Washer, M8 | L | 4 | Button Head Hex Screw, M6x12 |
| D | 18 | Spring Washer, M8 | M | 2 | Wave Washer, Large (D20) |
| E | 4 | Flat Washer, Wide | N | 2 | Sleeve, Plastic |
| F | 2 | Washer | O | 2 | Wave Washer, Small (D16.5) |
| G | 6 | Button Head Hex Screw, M6x14 | P | 4 | Plastic Washer (D16.2) |
| H | 4 | Carriage Bolt, M6x25 | Q | 6 | Washer, Curved |
| I | 2 | Pedal Mount Plate | |||
Tools
Included

4 mm
5 mm

6 mm/#2 (2)
Not
Included
(recommended)

Note: Do not fully tighten the Hardware until the machine is completely assembled.
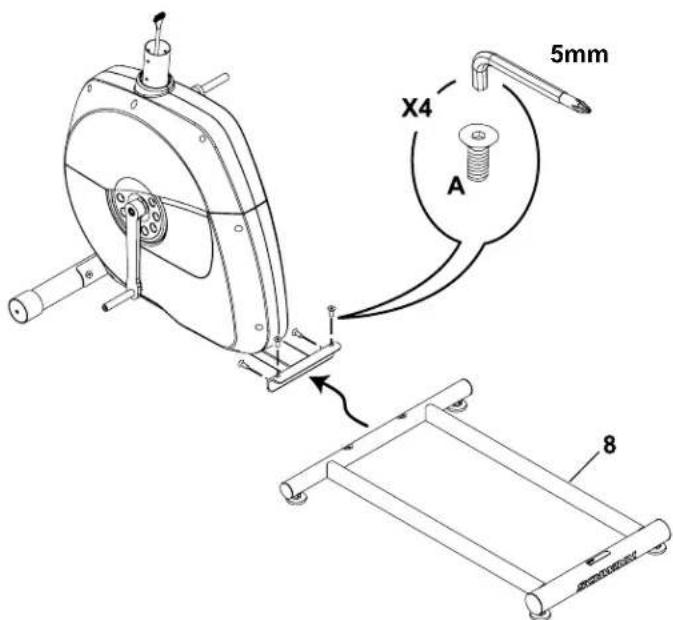
1. Attach Front Stabilizer to Frame

2. Attach Rail Assembly to Frame Assembly
3. Connect the Console Cable
NOTICE: Align the clips on the cable connectors and make sure the connectors lock. Do not crimp the Console Cable.

4. Attach Console Mast to Frame Assembly
NOTICE: Do not crimp the Console Cable.

5. Install the Static Handlebar to the Console Mast
Note: Hardware is pre-installed on Static Handlebar and not on Hardware Card. Make sure that the Console Cable does not fall into the Console Mast.
NOTICE: Do not crimp cables.

6. Attach Legs to Frame Assembly

7. Attach Lower Handlebar Arms to Frame Assembly

8. Attach Pedals to Pedal Arms

9. Attach Pedal Arms to Legs and Lower Handlebar Arms
NOTICE: To avoid damage to the Arms, attach Pedal Arms to Legs first.
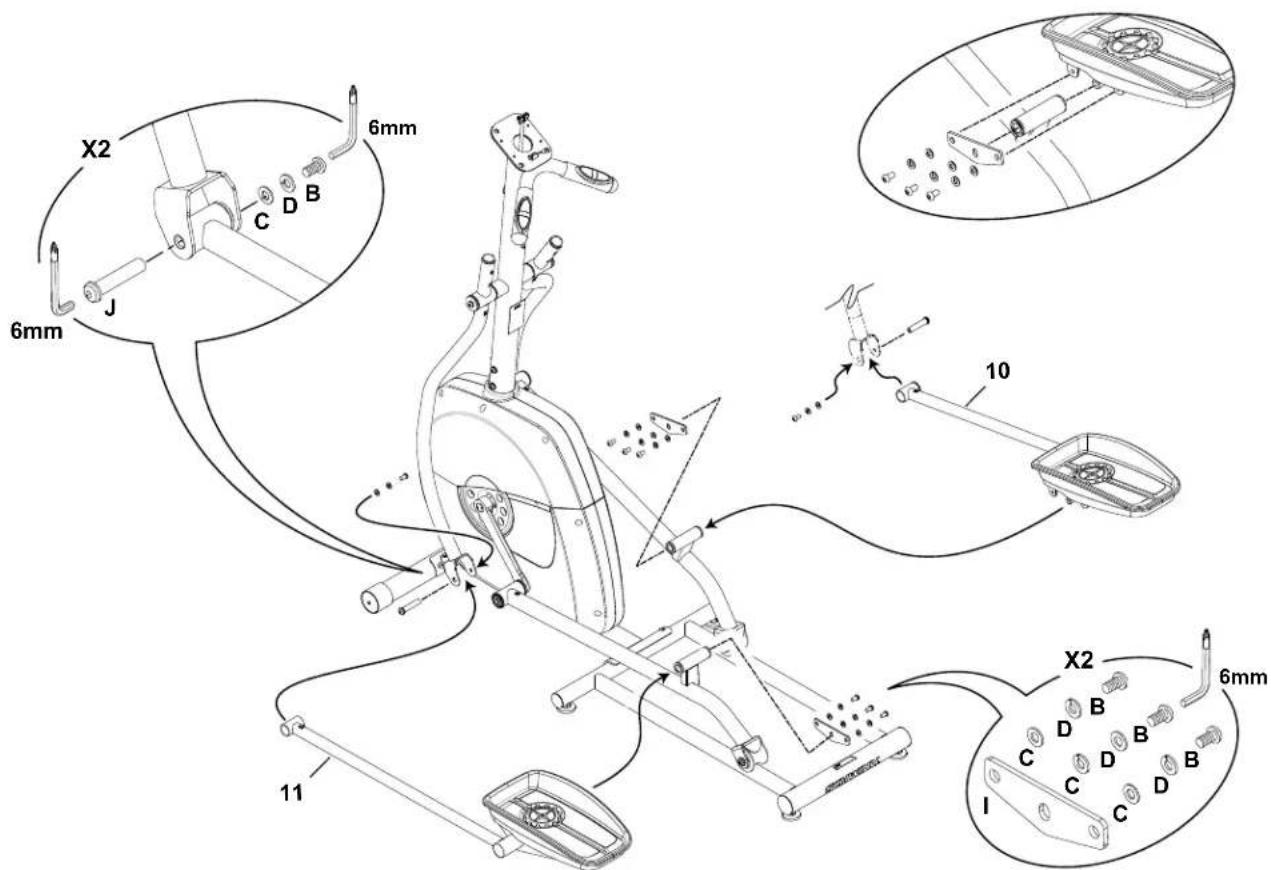
10. Attach Upper Handlebar Arms to Frame Assembly

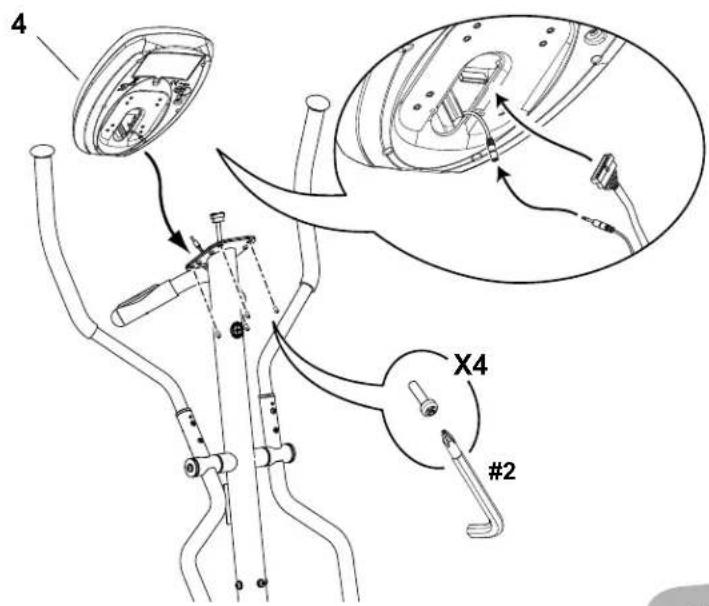
11. Install the Console to the Console Mast
Note: Hardware is pre-installed on Console and not on Hardware Card.
NOTICE: Do not crimp cables. Make sure that the switch on the back of the Console is set to E (elliptical).
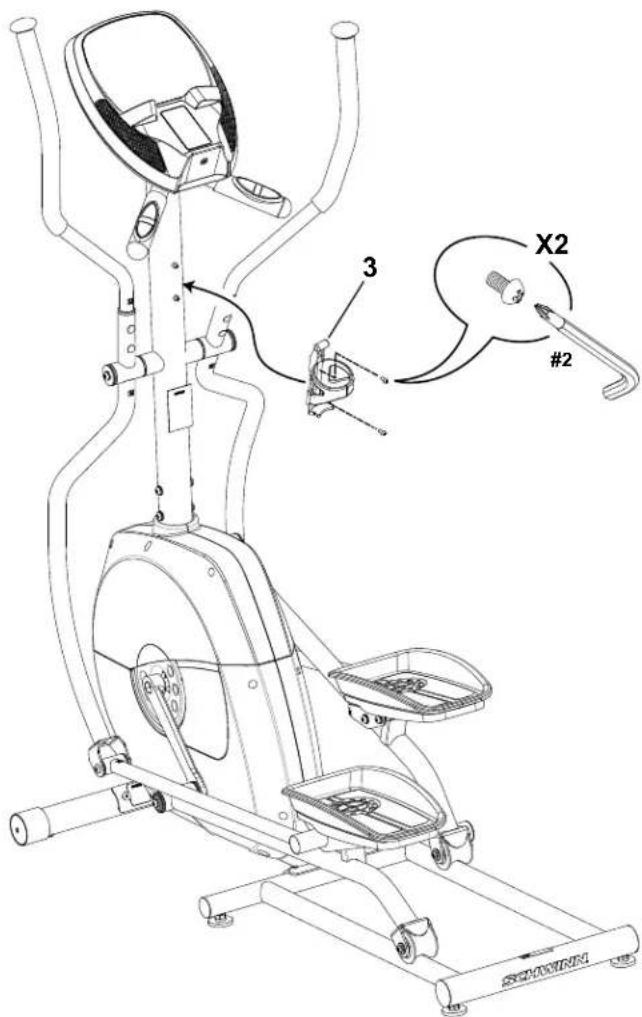
12. Install Water Bottle Holder
Note: Hardware is pre-installed on Console Mast and not on Hardware Card.
13. Tighten all Hardware
Note: Fully tighten all Hardware from the previous steps. Make sure that the machine is level. If necessary, adjust the levelers (refer to the "Leveling the Machine" section).
14. Install Batteries in Console
Note: The console uses D size batteries (LR20). Make sure that the batteries point in the direction of the +/- indicators in the battery bay. If you use rechargeable batteries, the optional power adapter will not recharge the batteries.

Do not mix old and new batteries.
Do not mix alkaline, standard (carbon-zinc), or rechargeable (Ni-Cd, Ni-MH, etc) batteries.

Optional Power Adapter
The console for your machine can operate on battery power or AC power. For AC power, it is necessary to order the optional Power Adapter. If batteries and the Power Adapter are installed, the console will use the Power Adapter to operate.
Note: If you use rechargeable batteries, the optional Power Adapter will not recharge the batteries.
After the machine is fully assembled, connect the Power Adaptor to the console and the wall outlet.
NOTICE: If you use a power adapter for your bike, make sure that the cord stays clear of the path of the pedals. Attach the cord to the machine as shown:

natural_image
Technical line drawing of a stationary exercise machine with attached electrical cable and motor (no text or symbols)NOTICE: It is recommended to remove batteries when they are not used, to avoid damage from battery corrosion.
To order the optional Power Adapter, go to: www.schwinnfitness.com/powersupply
Or call 1 (800) 605-3369.
15. Final Inspection
Inspect your machine to ensure that all hardware is tight and components are properly assembled.
Be sure to record the serial number in the field provided at the front of this manual.

Do not use or put the machine into service until the machine has been fully assembled and inspected for correct performance in accordance with the Owner's Manual.
BEFORE YOU START
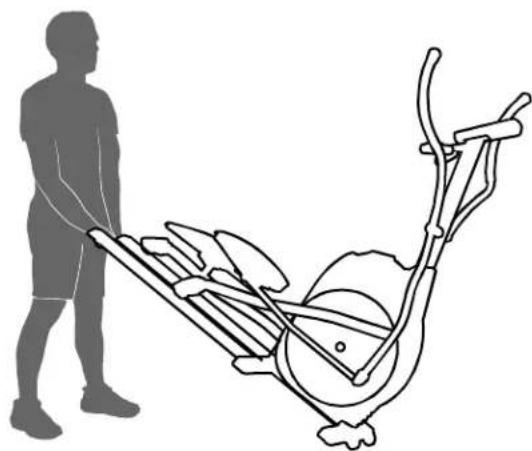
Moving the Machine

The machine may be moved by one or more persons depending on their physical abilities and capacities. Make sure that you and others are all physically fit and able to move the machine safely.
- Remove the power cord (if equipped).
- Use the Transport Handle to carefully lift the machine onto the transport rollers.
- Push the machine into position.
- Carefully lower the machine into position.
NOTICE: Be careful when you move the elliptical. Abrupt motions can affect the computer operation.
natural_image
Silhouette of a person standing next to an exercise bike with a circular body (no text or symbols visible)Leveling the Machine
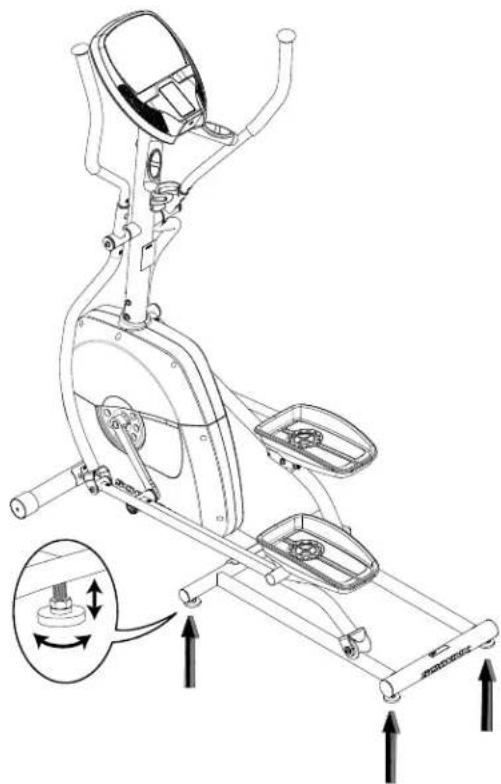
The machine needs to be leveled if your workout area is uneven or if the Rail Assembly is slightly off the floor. To adjust:
- Place the machine in your workout area.
- Safely stand on the back of the Rail Assembly for approximately 20 seconds.
- Step off the machine.
- Loosen the locking wing nuts and adjust the levelers until they all contact the floor.

Do not adjust the levelers to such a height that they detach or unscrew from the machine. Injury to you or damage to the machine can occur.
- Adjust until the machine is level. Tighten the locking wing nuts.
Make sure the machine is level and stable before you exercise.
natural_image
Line drawing of an exercise bike with overhead control panel and directional arrows indicating motion (no text or symbols)
This icon means a potentially hazardous situation which, if not avoided, could result in death or serious injury.
Before using this equipment, obey the following warnings:

Read and understand the complete Owner's Manual. Keep the Owner's Manual for future reference.
Read and understand all warnings on this machine. If at any time the Warning stickers become loose, unreadable or dislodged, contact Nautilus® Customer Service for replacement stickers.
- Children must not be let on or near to this machine. Moving parts and other features of the machine can be dangerous to children.
• Not intended for use by anyone under 14 years of age. - Consult a physician before you start an exercise program. Stop exercising if you feel pain or tightness in your chest, become short of breath, or feel faint. Contact your doctor before you use the machine again. Use the values calculated or measured by the machine's computer for reference purposes only.
- Before each use, examine this machine for loose parts or signs of wear. Do not use if found in this condition. Monitor the Pedals and Crank Arms closely. Contact Nautilus® Customer Service for repair information.
• Maximum user weight limit: 275 lbs. (125 kg). Do not use if you are over this weight.
• This machine is for home use only. - Do not wear loose clothing or jewelry. This machine contains moving parts. Do not put fingers or other objects into moving parts of the exercise equipment.
- Set up and operate this machine on a solid, level, horizontal surface.
• Make the Foot Pedals stable before you step on them. Use caution when you step on and off the machine. - Disconnect all power before servicing this machine.
- Do not operate this machine outdoors or in moist or wet locations.
- Keep at least 24" (0.6 m) on each side of the machine clear. This is the recommended safe distance for access and passage around and emergency dismounts from the machine. Keep third parties out of this space when machine is in use.
- Do not over exert yourself during exercise. Operate the machine in the manner described in this manual.
- Keep the Foot Pedals clean and dry.
- Exercise on this machine requires coordination and balance. Be sure to anticipate that changes in speed and resistance level can occur during workouts, and be attentive in order to avoid loss of balance and possible injury.

| A Console K Water Bottle Holder | ||
| B Swing Handlebar Arm L Contact Heart Rate (CHR) sensors | ||
| C Static Handlebar M Power Connector | ||
| D Main Frame Assembly N Battery Bay | ||
| E Transport Wheels O Machine Type Switch | ||
| F Stabilizer Bars P Media Tray | ||
| G Levelers Q MP3 Input | ||
| H Rail Assembly R Speakers | ||
| I Rollers | $ Headphones Output | |
| J Foot Pedals | T Media Cable | |
Console Features
The Console provides important information about your workout and lets you control the resistance levels while you exercise. The Console has a grid display with touch control buttons to navigate you through the exercise programs.
Keypad Functions
QUICK START Begins a Quick Start workout
START/STOP Starts a Program workout, pauses an active workout, and if pushed again, will end the workout
FUN RIDES Begins selection of a FUN RIDES workout
MOUNTAINS Begins selection of a MOUNTAINS workout
CHALLENGES Begins selection of a CHALLENGES workout
ENTERConfirmsinformation
Increase (▲) Increases a value (time or workout resistance level)
Decrease (▼) Decreases a value (time or workout resistance level)

Note: The Console keypad will not adjust the sound output for a connected media device. Use the volume control on the media device.
LCD Display Data
Program Display
The Program Display shows the name of the program selection and the grid area shows the course profile for the program. Each column in the profile shows one interval (workout segment). The higher the column, the higher the resistance level for that interval. The flashing column shows your current interval.

Time
The TIME display field shows the time count in the workout. If no preset time is set up for the current workout program, the display value starts at zero and counts forward until the end of the workout. Maximum time is 99:59.
If the workout has a preset time, the display starts at the preset value and counts down to zero. The display shows the total time count for the workout.
Speed / Distance
The SPEED/DISTANCE display field shows the machine speed in kilometers per hour (km/h) or miles per hour (mph) for 6 seconds, then the Distance for 6 seconds. The Distance display shows the distance count (miles or km) in the workout.
Note: To change the measurement units to English Imperial or metric, refer to the “Changing Unit Measures” section in this manual.
RPM / KCAL (Calories)
The RPM/KCAL display field shows the machine revolutions per minute (RPM) for 6 seconds, then the KCAL display shows the estimated calories that you have burned during the exercise for 6 seconds.
Level / HR (Heart Rate)
The LEVEL/HR display field shows the current resistance level (1–8) for 6 seconds, then your Heart Rate for 6 seconds.
The HR display shows the heart rate in beats per minute (BPM) from the Contact Heart Rate sensors.

Consult a physician before you start an exercise program. Stop exercising if you feel pain or tightness in your chest, become short of breath, or feel faint. Contact your doctor before you use the machine again. Use the values calculated or measured by the machine's computer for reference purposes only.
Results Indicator
The RESULTS indicator comes on when the Console shows the workout data results.
Battery Indicator
The Battery Indicator comes on when the battery power is low.
Contact Heart Rate Sensors
Contact Heart Rate (CHR) sensors send your heart rate signals to the Console. The CHR sensors are the stainless steel parts of the Handlebars. To use, put your hands comfortably around the sensors. Be sure that your hands touch both the top and the bottom of the sensors. Hold firm, but not too tight or loose. Both hands must make contact with the sensors for the Console to detect a pulse. After the Console detects four stable pulse signals, your initial pulse rate will be shown.
Once the Console has your initial heart rate, do not move or shift your hands for 10 to 15 seconds. The Console will now validate the heart rate. Many factors influence the ability of the sensors to detect your heart rate signal:
- Movement of the upper body muscles (including arms) produces an electrical signal (muscle artifact) that can interfere with pulse detection. Slight hand movement while in contact with the sensors can also produce interference.
- Calluses and hand lotion may act as an insulating layer to reduce the signal strength.
• Some Electrocardiogram (EKG) signals generated by individuals are not strong enough to be detected by the sensors.
CHR detection may be limited to walking or slow jogging due to the extreme muscle artifacts and hand motion generated by a comfortable running style. If your heart rate signal ever seems erratic after validation, wipe off your hands and the sensors and try again.
Heart Rate Calculations
Your maximum heart rate usually decreases from 220 Beats Per Minute (BPM) in childhood to approximately 160 BPM by age 60. This fall in heart rate is usually linear, decreasing by approximately one BPM for each year. There is no indication that training influences the decrease in maximum heart rate. Individuals of the same age could have different maximum heart rates. It is more accurate to find this value by getting a stress test than by using an age related formula.
Your at-rest heart rate is influenced by endurance training. The typical adult has an at rest heart rate of approximately 72 BPM, whereas highly trained runners may have readings of 40 BPM or lower.
The Heart Rate table is an estimate of what Heart Rate Zone (HRZ) is effective to burn fat and better your cardiovascular system. Physical conditions vary, therefore, your individual HRZ could be several beats higher or lower than what is shown.
The most efficient procedure to burn fat during exercise is to start at a slow pace and gradually increase your intensity until your heart rate reaches between 60 – 85% of your maximum heart rate. Continue at that pace, keeping your heart rate in that target zone for over 20 minutes. The longer you maintain your target heart rate, the more fat your body will burn.
The graph is a brief guideline, describing the generally suggested target heart rates based on age. As noted above, your optimal target rate may be higher or lower. Consult your physician for your individual target heart rate zone.
Note: As with all exercises and fitness regimens, always use your best judgment when you increase your exercise time or intensity.
FAT-BURNING TARGET HEART RATE

line
| Age | Heart Rate BPM (beats per minute) | |-------|-----------------------------------| | 20-24 | 196 | | 20-24 | 167 | | 20-24 | 118 | | 25-29 | 191 | | 25-29 | 162 | | 25-29 | 115 | | 30-34 | 186 | | 30-34 | 158 | | 30-34 | 112 | | 35-39 | 181 | | 35-39 | 154 | | 35-39 | 109 | | 40-44 | 176 | | 40-44 | 150 | | 40-44 | 106 | | 45-49 | 171 | | 45-49 | 145 | | 45-49 | 103 | | 50-54 | 166 | | 50-54 | 141 | | 50-54 | 100 | | 55-59 | 161 | | 55-59 | 137 | | 55-59 | 97 | | 60-64 | 156 | | 60-64 | 133 | | 60-64 | 94 | | 65-69 | 151 | | 65-69 | 128 | | 65-69 | 91 | | 70+ | 146 | | 70+ | 126 | | 70+ | 88 |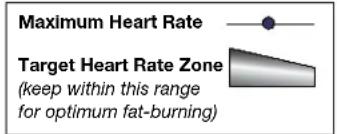
What to Wear
Wear rubber-soled athletic shoes. You will need the appropriate clothes for exercise that allow you to move freely.
How Often Should You Exercise

Consult a physician before you start an exercise program. Stop exercising if you feel pain or tightness in your chest, become short of breath, or feel faint. Contact your doctor before you use the machine again. Use the values calculated or measured by the machine's computer for reference purposes only.
• 3 times a week for 30 minutes each day.
- Schedule workouts in advance and try to follow the schedule.
Mounting and Dismounting Your Machine

Care should be used when mounting or dismounting the machine.
Be aware that the Pedals and the Handlebars are connected and when either of these parts move the other does as well. In order to avoid possible serious injury, only grasp the Static Handlebars to steady yourself.
To mount your fitness machine:
- Move the Pedals until the one nearest you is in the lowest position.
- Grasp the Static Handlebars under the Console.
- Steadying yourself with the Static Handlebars, step up onto the lowest pedal and place your other foot on the opposite Pedal.
To dismount your fitness machine:
- Move the Pedal you want to dismount from to the lowest position, and bring the machine to a complete stop.

This machine is not equipped with a free-wheel. Pedal speed should be reduced in a controlled manner.
- Steady yourself with the Handlebar Arms.
- With your weight on the dismount foot, bring the opposite foot over the machine and down onto the floor.
- Step off of the machine and release your grip from the Handlebar Arms.
Workout Stride
The Elliptical lets you do a forward or backward workout stride. You can even change the direction during a workout. To change your stride, slow the Pedals until they stop and change direction.
Power-Up / Idle Mode
The Console operates on (4) D sized batteries. Once installed, the Console will enter POWER-UP mode if any button is pushed, or if it receives an indication from the RPM sensor as a result of pedaling the machine.
Note: An optional power adapter is available from www.schwinnfitness.com/powersupply or call 1(800) 605-3369.
Auto Shut-Off (Sleep Mode)
If the Console does not receive any input or there is no pedal movement in approximately 5 minutes, it will automatically shut off. The LCD display is off while in Sleep Mode.
Note: The Console does not have an On/Off switch.
Quick Start / Manual Program
The Quick Start / Manual program lets you start a workout without entering any information.
- Stand on the machine.
- Push the QUICK START button and start to pedal.
- To change the resistance level, push the Increase/Decrease buttons. The default Quick Start resistance level is 1. The time will count up from 00:00.
Changing Resistance Levels
Push the Increase(▲) or Decrease(▼) buttons to change the resistance level at any time in a workout program.
Profile Programs
These programs automate different resistances and workout levels.
Fun Rides

To start a Profile Program:
- Step on the machine.
- Push the button for the desired Profile Program type: Fun Rides, Mountains or Challenges. The display shows the first option for that type—for example, the Rolling Hills program for the Fun Rides type. Push the button again to toggle between option 1 and option 2.
- To adjust the time of the workout, push ENTER. The default value is 15 minutes. Use the Increase(▲) or Decrease(▼) buttons to change it, and push ENTER.
- Use the Increase(▲) and Decrease(▼) buttons to change the resistance level (default level is 3, maximum level is 8), and push ENTER.
- Push the START/STOP button to start the Profile workout.
Pausing or Stopping
- Push the START / STOP button to pause your workout.
- Push START / STOP to continue the workout, or push and hold the START / STOP button for 3 seconds to end the workout.
Results
When you complete, pause or cancel a workout, the Console will show your current workout value totals and averages. If there is no activity for 5 minutes, the Console will enter Sleep Mode.
Changing Unit Measures (English Imperial/Metric)
To change the measurement units (for distance and speed) to English Imperial or metric:
- Push and hold the ENTER and START / STOP buttons for 3 seconds to go to Engineering Mode.
- The display shows the current unit of measurement. Push the Increase/Decrease buttons to change between English Imperial (MILES) or Metric (KM) units.
- Push ENTER to set your selection.
Read all maintenance instructions fully before you start any repair work. In some conditions, an assistant is required to do the necessary tasks.

Equipment must be regularly examined for damage and repairs. The owner is responsible to make sure that regular maintenance is done. Worn or damaged components must be repaired or replaced immediately. Only manufacturer supplied components can be used to maintain and repair the equipment.
DANGER
To reduce the risk of electrical shock or unsupervised usage of the equipment, always unplug the power cord from the wall outlet and the machine and wait 5 minutes before cleaning, maintaining or repairing the machine.
Daily:
Before each use, examine the exercise machine for loose, broken, damaged, or worn parts.
Do not use if found in this condition. Repair or replace all parts at the first sign of wear or damage.
After each workout, use a damp cloth to wipe your machine and Console free of sweat.
Note: Avoid excessive moisture on the Console.
Weekly:
Check for smooth roller operation. Wipe the machine to remove dust, dirt, or grime. Clean the rails and surface of the rollers with a damp cloth.
Note: Do not use petroleum based products.
Monthly
Make sure all bolts and screws are tight. Tighten as necessary.
or after 20 hours:
Yearly:
Replace the batteries every year (or as necessary).
NOTICE: Do not clean with a petroleum based solvent or an automotive cleaner. Be sure to keep the Console free of moisture.
Maintenance Parts

| A Console M Shroud, Right Y HR Cable | |||||
| B Static Handlebar N Rails Z Data Cable | |||||
| C Console Mast O Leveler AA Battery Bay | |||||
| D | Water Bottle Holder | P | Front Stabilizer | BB | Machine Type Switch |
| E | Upper Right Handlebar Arm | Q | Transport Roller | CC | AC Adapter Plug |
| F | Lower Right Handlebar Arm | R | Shroud, Left | DD | Brake Magnet Assembly |
| G | Crank, Right | S | Leg, Left | EE | Speed Sensor |
| H | Pedal Arm, Right | T | Crank, Left | FF | Speed Sensor Magnet |
| I | Pedal | U | Pedal Arm, Left | GG | Drive Pulley |
| J | Leg, Right | V | Lower Left Handlebar Arm | HH | Servomotor |
| K | Roller | W | Upper Left Handlebar Arm | II | Drive Belt |
| L | Plate | X | CHR Sensors | JJ | Flywheel |
Replacing the Console Batteries
If the Battery Indicator comes on, replace the batteries in the back of the console with fresh batteries. Make sure the batteries point in the +/- direction shown in the battery bay.
Note: The console uses D size batteries (LR20). If you use rechargeable batteries, the optional power adapter will not recharge the batteries.

Do not mix old and new batteries.
Do not mix alkaline, standard (carbon-zinc), or rechargeable (Ni-Cd, Ni-MH, etc) batteries.

Machine Type Switch
The Machine Type switch on the Console is preset at the factory to B (bike) or E (elliptical). If you replace the console, it will possibly be necessary to set the switch for your machine. After you set the switch, it is necessary to turn the power off and then turn it back on to start the new mode of operation.
NOTICE: Make sure that the Machine Type is set correctly to give more accurate calculations for Distance, Speed and Calories values.
| Condition/Problem Things to Check Solution | ||
| No display/partial display/unit will not turn on | Check electrical (wall) outlet | Make sure unit is plugged into a functioning wall outlet. |
| Check connection at front (recumbent) or rear (upright) of unit | Connection should be secure and undamaged. Replace adapter or connection at unit if either are damaged. | |
| Check data cable integrity All wires in data cable (inside console mast) should be intact. If any are visibly crimped or cut, replace cable. | ||
| Check data cable connections/orientation | Be sure cable is connected securely and oriented properly. Small latch on connector should line up and snap into place. | |
| Check console display for damage | Check for visual sign that console display is cracked or otherwise damaged. Replace Console if damaged. | |
| Console Display If Console only has partial display and all connections are fine, replace the Console. | ||
| If the above steps do not resolve the problem, contact Customer Care for further assistance. | ||
| Unit operates but Contact HR not displayed | HR cable connection at Console | Be sure cable is connected securely to Console. |
| Sensor grip Be sure hands are centered on HR sensors. Hands must be kept still with relatively equal pressure applied to each side. | ||
| Dry or calloused hands Sensors may have difficulty with dried out or calloused hands. A conductive electrode cream such as “Signa Crème” or “Buh-Bump” can help make better conduct. These are available on the web or at medical or some larger fitness stores. | ||
| Static Handlebar If tests reveal no other issues, the console handlebar assembly should be replaced. | ||
| Console displays “E2” error code | Check data cable integrity All wires in cable should be intact. If any are cut or crimped, replace cable. | |
| Check data cable connections/orientation | Be sure cable is connected securely and oriented properly. Small latch on connector should line up and snap into place. | |
| Console Electronics If tests reveal no other issues, Console should be replaced. | ||
| No speed/RPM reading, or Console displays “E3” error code | Check data cable integrity All wires in cable should be intact. If any are cut or crimped, replace cable. | |
| Check data cable connections/orientation | Be sure cable is connected securely and oriented properly. Small latch on connector should line up and snap into place. | |
| Check magnet position (requires shroud removal) | Magnet should be in place on pulley. | |
| Check RPM Sensor (requires shroud removal) | RPM sensor should be aligned with magnet and wiring should be intact. Realign sensor if necessary. Replace if there is any damage to the sensor or the connecting wire. | |
| Console shuts off (enters sleep mode) while in use | Check data cable integrity All wires in the cable should be intact. If any are cut or crimped, replace cable. | |
| Check data cable connections/orientation | Be sure cable is connected securely and oriented properly. Small latch on connector should line up and snap into place. | |
| Reset machine Unplug unit from electrical outlet for 3 minutes. Reconnect to outlet. | ||
| Check magnet position (requires shroud removal) | Magnet should be in place on pulley. | |
| Check RPM Sensor (requires shroud removal) | RPM sensor should be aligned with magnet and connected to data cable. Re-align sensor if necessary, replace if any damage to sensor or connecting wire. | |
| Fan (if equipped) will not turn on or will not turn off | Check data cable integrity All wires in cable should be intact. If any are cut or crimped, replace cable. | |
| Check data cable connections/orientation | Be sure cable is connected securely and oriented properly. Small latch on connector should line up and snap into place. | |
| Reset machine Unplug unit from electrical outlet for 3 minutes. Reconnect to outlet. | ||
| Unit rocks/does not sit level | Check leveler adjustment Leveling feet may be turned in or out to level the machine. | |
| Check surface under unit Adjustment may not be able to compensate for extremely uneven surfaces. Move the machine to level area. | ||
| Resistance does not change | Check that unit powers up If machine powers up and otherwise functions normally, contact Customer Care for assistance. | |
| Drive train click/tick noise once per full crank revolution | Check crank/pulley assembly | Disconnect left and right foot assemblies and rotate crank. If sound persists, replace crank/pulley assembly. If sound does not come from rotating crank, check foot assemblies and upper/lower handlebars. |
| Check foot assemblies, leg assemblies, handlebar assemblies | Manually move foot, leg, and handlebar assemblies to isolate sound. Replace part making sound. | |
| Squeaking noise that appears a few minutes into a workout and normally will get progressively worse as the workout continues | Bolt that connects the swing arms to the axle running through the console mast | Loosen pivot rod bolt slightly until noise goes away. See video for demonstration. White lithium grease can also be applied for a temporary fix. Contact Customer Care for assistance. |
This page intentionally left blank.
This page intentionally left blank.
Who Is Covered
This warranty is valid only to the original purchaser and is not transferable or applicable to any other person(s).
What Is Covered
Nautilus, Inc. warrants that this product is free from defects in materials and workmanship, when used for the purpose intended, under normal conditions, and provided it receives proper care and maintenance as described in the Product's Assembly and Owner's manual. This warranty is good only for authentic, original, legitimate machines manufactured by Nautilus, Inc. and sold through an authorized agent and used in the United States or Canada.
Terms
Frame 3 years
• Mechanical parts 1 year
• Electronics 1 year
- Wear items 60 days
• Labor 60 days
(Labor support does not include the installation of replacement parts involved in the initial product assembly and preventative maintenance services.)
How Nautilus Will Support the Warranty
Throughout the terms of the warranty coverage, Nautilus, Inc. will repair any machine that proves to be defective in materials or workmanship. Nautilus reserves the right to replace the product in the event a repair is not possible. When Nautilus determines replacement is the correct remedy, Nautilus may apply a limited credit reimbursement toward another Nautilus Inc. brand Product, at our discretion. This reimbursement may be prorated based on length of ownership. Nautilus, Inc. provides repair service within major metropolitan areas. Nautilus, Inc reserves the right to charge the consumer for travel outside these areas. Nautilus Inc. is not responsible for dealer labor or maintenance charges beyond the applicable warranty period(s) stated herein. Nautilus, Inc. reserves the right to substitute material, parts or products of equal or better quality if identical materials or products are not available at the time of service under this warranty. Any replacement of the product under the terms of the Warranty in no way extends the original Warranty period. Any limited credit reimbursement may be prorated based on length of ownership. THESE REMEDIES ARE THE EXCLUSIVE AND SOLE REMEDIES FOR ANY BREACH OF WARRANTY.
What You Must Do
- Retain appropriate and acceptable Proof of Purchase.
• Operate, maintain, and inspect the Product as specified in the Product Documentation (Manuals, (Assembly, Owner's Manuals, etc.).
• Product must be used exclusively for the purpose intended. - Notify Nautilus within 30 days after detecting an issue with the Product.
• Install replacement parts or components in accordance with any Nautilus instructions.
• Perform diagnostic procedures with a trained Nautilus, Inc representative if requested.
What Is Not Covered
- Damage due to abuse, tampering or modification of the Product, failure to properly follow assembly instructions, maintenance instructions, or safety warnings as stated in the Product Documentation (Assembly, Owner's Manuals, etc), damage due to improper storage or the effect of environmental conditions such as moisture or weather, misuse, mishandling, accident, natural disasters, power surges.
- A machine placed or used in a commercial or institutional setting. This includes gyms, corporations, work places, clubs, fitness centers and any public or privately entity that has a machine for use by its members, customers, employees or affiliates.
• Damage caused by exceeding maximum user weights as defined in the Product's Owner's manual or warning label.
• Damage due to normal usage and wear and tear.
• This warranty does not extend to any territories or countries outside the United States and Canada.
How to Obtain Service
For Products purchased directly from Nautilus, Inc. contact the Nautilus office listed on the Contacts page of the products Owner's manual. You may be required to return the defective component to a specified address for repair or inspection, at your expense. Standard ground shipping of any warranty replacement parts will be paid by Nautilus, Inc. For products purchased from a retailer, you may be asked to contact your retailer for warranty support.
Exclusions
The preceding warranties are the sole and exclusive express warranties made by Nautilus, Inc. They supersede any prior, contrary or additional representations, whether oral or written. No agent, representative, dealer, person or employee has the authority to alter or increase the obligations or limitations of this warranty. Any implied warranties, including the WARRANTY OF MERCHANTABILITY and any WARRANTY OF FITNESS FOR A PARTICULAR PURPOSE, are limited in duration to the term of the applicable express warranty provided above, whichever is longer. Some states do not allow limitations on how long an implied warranty lasts, so the above limitation may not apply to you.
Limitation of Remedies
EXCEPT AS OTHERWISE REQUIRED BY APPLICABLE LAW, THE PURCHASER'S EXCLUSIVE REMEDY IS LIMITED TO REPAIR OR REPLACEMENT OF ANY COMPONENT DEEMED BY NAUTILUS, INC. TO BE DEFECTIVE UNDER THE TERMS AND CONDITIONS STATED HEREIN. IN NO EVENT WILL NAUTILUS, INC. BE LIABLE FOR ANY SPECIAL, CONSEQUENTIAL, INCIDENTAL, INDIRECT OR ECONOMIC DAMAGES, REGARDLESS OF THE THEORY OF LIABILITY (INCLUDING, WITHOUT LIMITATION, PRODUCT LIABILITY, NEGLIGENCE OR OTHER TORT) OR FOR ANY LOST REVENUE, PROFIT, DATA, PRIVACY OR FOR ANY PUNITIVE DAMAGES ARISING OUT OF OR RELATED TO THE USE OF THE FITNESS MACHINE EVEN IF NAUTILUS, INC. HAS BEEN ADVISED OF THE POSSIBILITY OF SUCH DAMAGES. THIS EXCLUSION AND LIMITATION SHALL APPLY EVEN IF ANY REMEDY FAILS OF ITS ESSENTIAL PURPOSE. SOME STATES DO NOT ALLOW THE EXCLUSION OR LIMITATION OF CONSEQUENTIAL OR INCIDENTAL TYPE DAMAGES SO THE ABOVE LIMITATION MAY NOT APPLY TO YOU.
State Laws
This warranty gives you specific legal rights. You may also have other rights, which vary from state to state.
Expirations
If the warranty has expired, Nautilus, Inc. may assist with replacements or repairs to parts and labor, but there will be a charge for these services. Contact a Nautilus® office for information on post-warranty parts and services. Nautilus® does not guarantee availability of spare parts after expiration of warranty period.
International Purchases
If you purchased your machine outside of the United States consult your local distributor or dealer for warranty coverage.


- Obey the following warnings:
- SAFETY WARNING LABELS AND SERIAL NUMBER
- WARNING
- ▲ AVERTISSEMENT
- Regulatory Approvals:
- Before Assembly
- Basic Assembly Tips
- PARTS
- Tools
- Attach Front Stabilizer to Frame
- Attach Rail Assembly to Frame Assembly
- Connect the Console Cable
- Attach Console Mast to Frame Assembly
- Install the Static Handlebar to the Console Mast
- Attach Legs to Frame Assembly
- Attach Lower Handlebar Arms to Frame Assembly
- Attach Pedals to Pedal Arms
- Attach Pedal Arms to Legs and Lower Handlebar Arms
- Attach Upper Handlebar Arms to Frame Assembly
- Install the Console to the Console Mast
- Install Water Bottle Holder
- Tighten all Hardware
- Install Batteries in Console
- Optional Power Adapter
- Final Inspection
- BEFORE YOU START
- Moving the Machine
- Leveling the Machine
- Before using this equipment, obey the following warnings:
- Console Features
- Keypad Functions
- LCD Display Data
- Program Display
- Time
- Speed / Distance
- RPM / KCAL (Calories)
- Level / HR (Heart Rate)
- Results Indicator
- Battery Indicator
- Contact Heart Rate Sensors
- Heart Rate Calculations
- What to Wear
- How Often Should You Exercise
- Mounting and Dismounting Your Machine
- Workout Stride
- Power-Up / Idle Mode
- Auto Shut-Off (Sleep Mode)
- Quick Start / Manual Program
- Changing Resistance Levels
- Profile Programs
- Pausing or Stopping
- Results
- Changing Unit Measures (English Imperial/Metric)
- DANGER
- Daily:
- Weekly:
- Monthly
- or after 20 hours:
- Yearly:
- Replacing the Console Batteries
- Machine Type Switch
- Who Is Covered
- What Is Covered
- Terms
- How Nautilus Will Support the Warranty
- What You Must Do
- What Is Not Covered
- How to Obtain Service
- Exclusions
- Limitation of Remedies
- State Laws
- Expirations
- International Purchases
Brand : Schwinn
Model : A45
Category : Elliptical bike