
IAN 103761 - Fitness Equipment CRIVIT - Free user manual and instructions
Find the device manual for free IAN 103761 CRIVIT in PDF.

| Product Type | Suspension Trainer (Sling Trainer) |
| Brand | Crivit |
| Model | IAN 103761 |
| Weight | Approx. 970 g |
| Maximum User Weight | 120 kg |
| Scope of Delivery | 1 x Suspension trainer, 1 x Door anchor, 1 x Door sign, 1 x A3 exercise poster, 1 x Training DVD, 1 x Storage bag, Instructions for use |
| Intended Use | Private indoor training for whole body; attach only to doors opening outward |
| Safety Features | Anti-slip handles, adjustment buckles, door anchor with hook-and-loop fastener; must lock door and use door sign |
| Adjustment | Shortening/lengthening via adjustment buckles; multiple anchor loop positions |
| Recommended Training Area | Approx. 3.00 x 1.80 m (L x W); attachment height 1.80–2.30 m |
| Material | Nylon straps, metal buckles, plastic grips |
| Care and Storage | Store dry, clean, temperature-controlled; inspect regularly for wear |
| Warranty | 3 years from date of purchase |
| Service Contact | GB Service: Tel. 0871 5000 720 (£0.10/min), Email: deltasport@lidl.co.uk |
Frequently Asked Questions - IAN 103761 CRIVIT
User questions about IAN 103761 CRIVIT
0 question about this device. Answer the ones you know or ask your own.
Ask a new question about this device
Download the instructions for your Fitness Equipment in PDF format for free! Find your manual IAN 103761 - CRIVIT and take your electronic device back in hand. On this page are published all the documents necessary for the use of your device. IAN 103761 by CRIVIT.
USER MANUAL IAN 103761 CRIVIT
natural_image
Black and white photo of a multi-lane outdoor fitness harness with metal chains and straps (no text or symbols visible)
APARAT DE ANTRENAMENT CU CORZI
RO
APARAT DE ANTRENAMENT CU CORZI
Instructions for use
IAN 103761
RO
Furnitura 12
Date tehnice 12
Denumirea pieselor 12
Scope of delivery 22
Technical data 22
Part names 22
Correct use 22
Safety notes 22 - 23
Assembly instructions 23
Shortening and lengthening
the sling trainer....23
Recommended length of the sling trainer .....24
Training notes 24
Warming up and stretching 24 - 25
Training 25-28
Cool down 28 - 29
Care and storage 29
Advice on disposal 29
3 Years Warranty ....30
natural_image
Person climbing a vertical bar on a wall, wearing athletic wear (no text or symbols visible)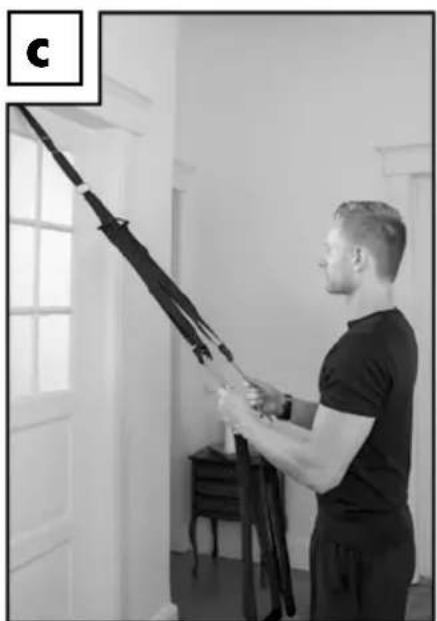
natural_image
Person performing a resistance band exercise indoors, no visible text or symbols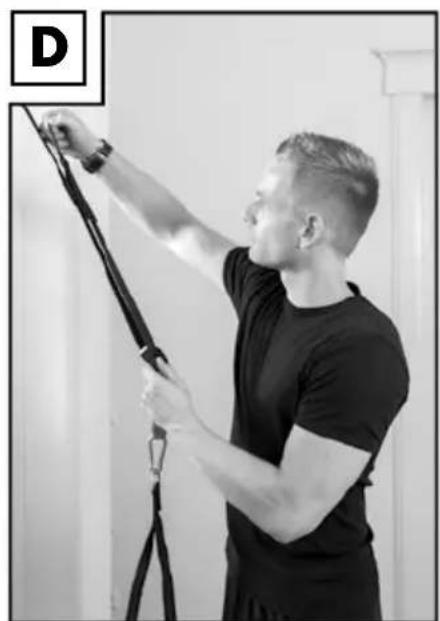
natural_image
Man performing a resistance band exercise, no visible text or symbols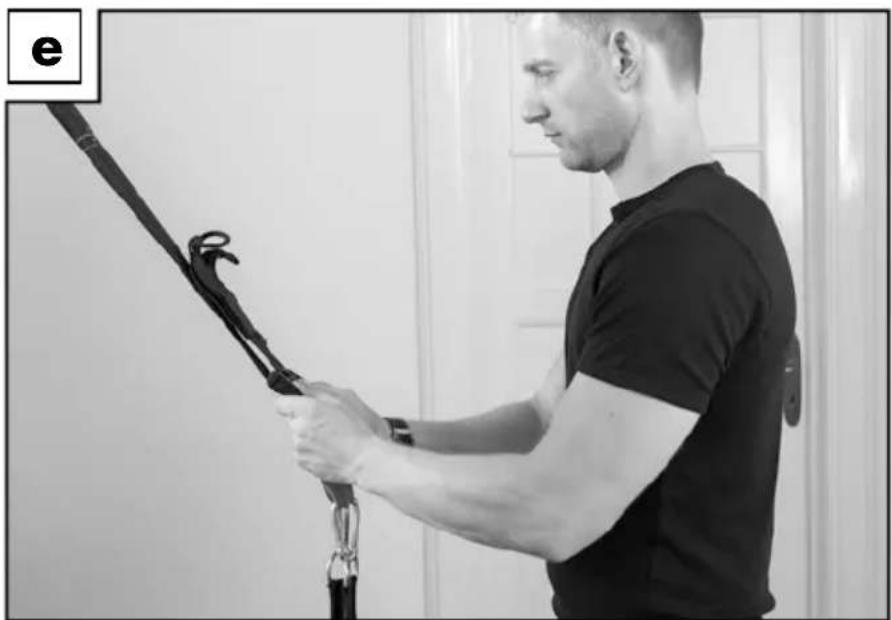
natural_image
Side profile of a man performing a resistance band exercise, no visible text or symbols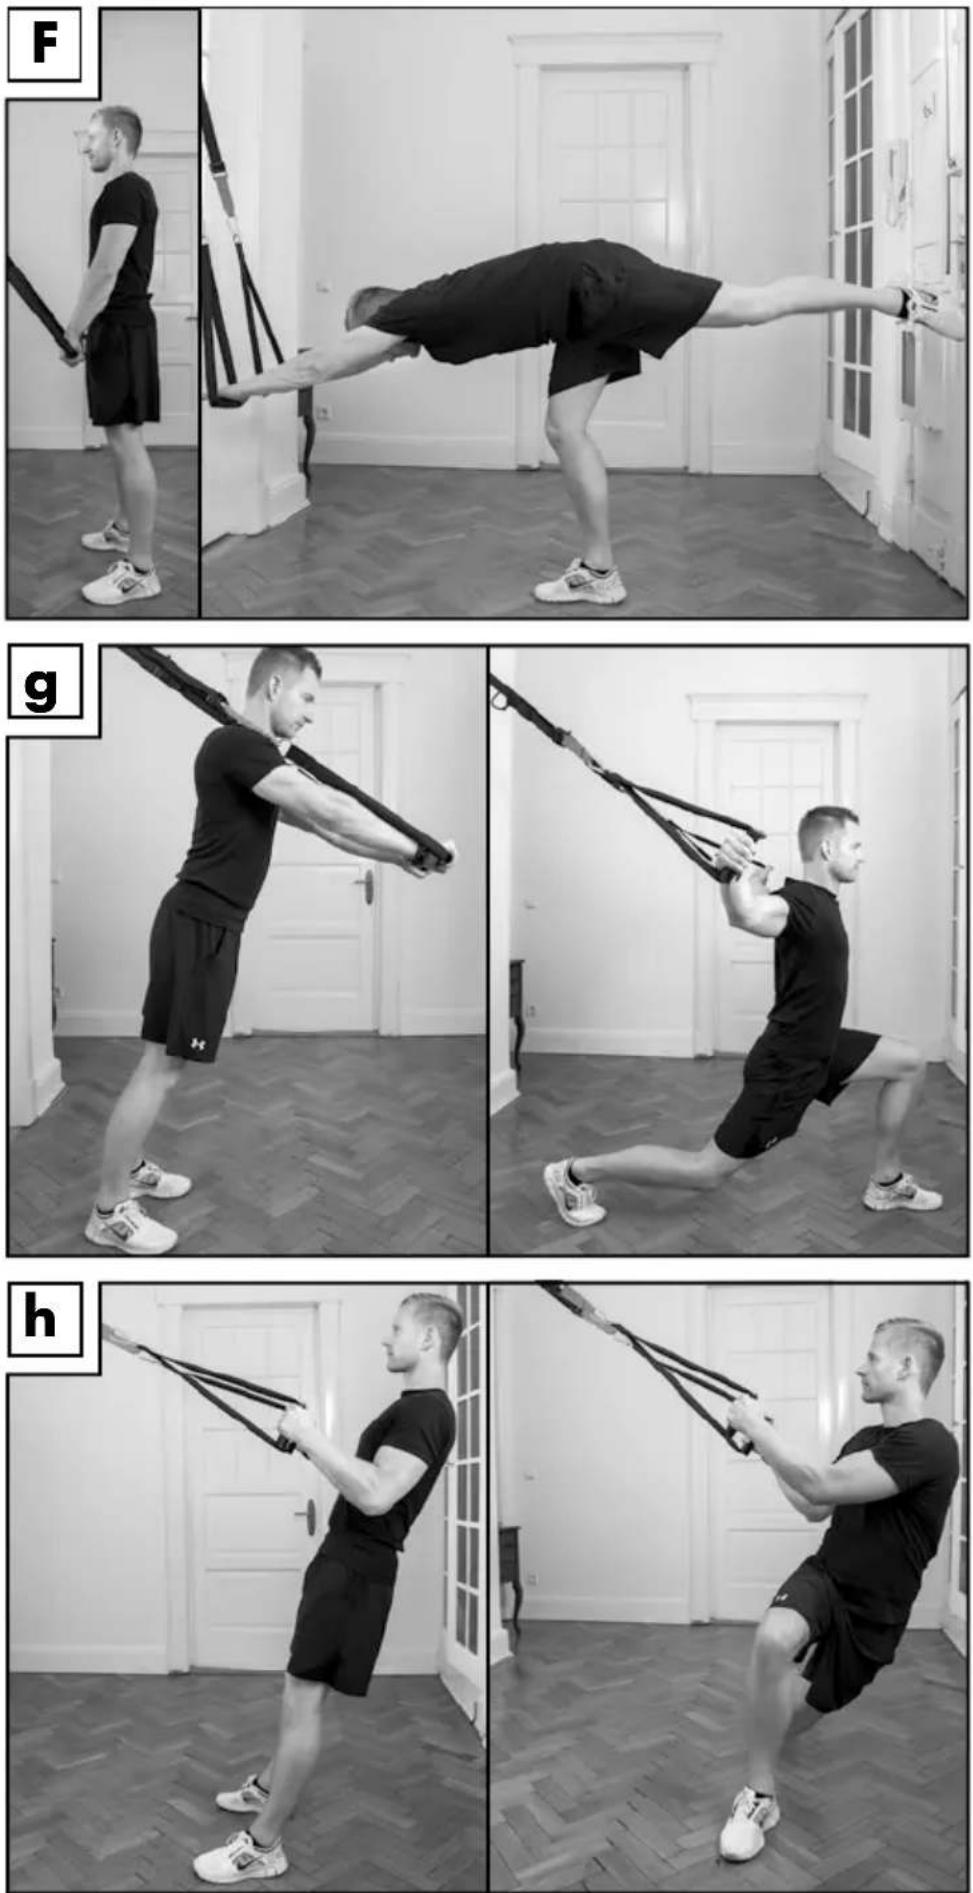
natural_image
Four-panel sequence showing a person performing a leg lift exercise using a resistance band machine, indoors with no visible text or symbols.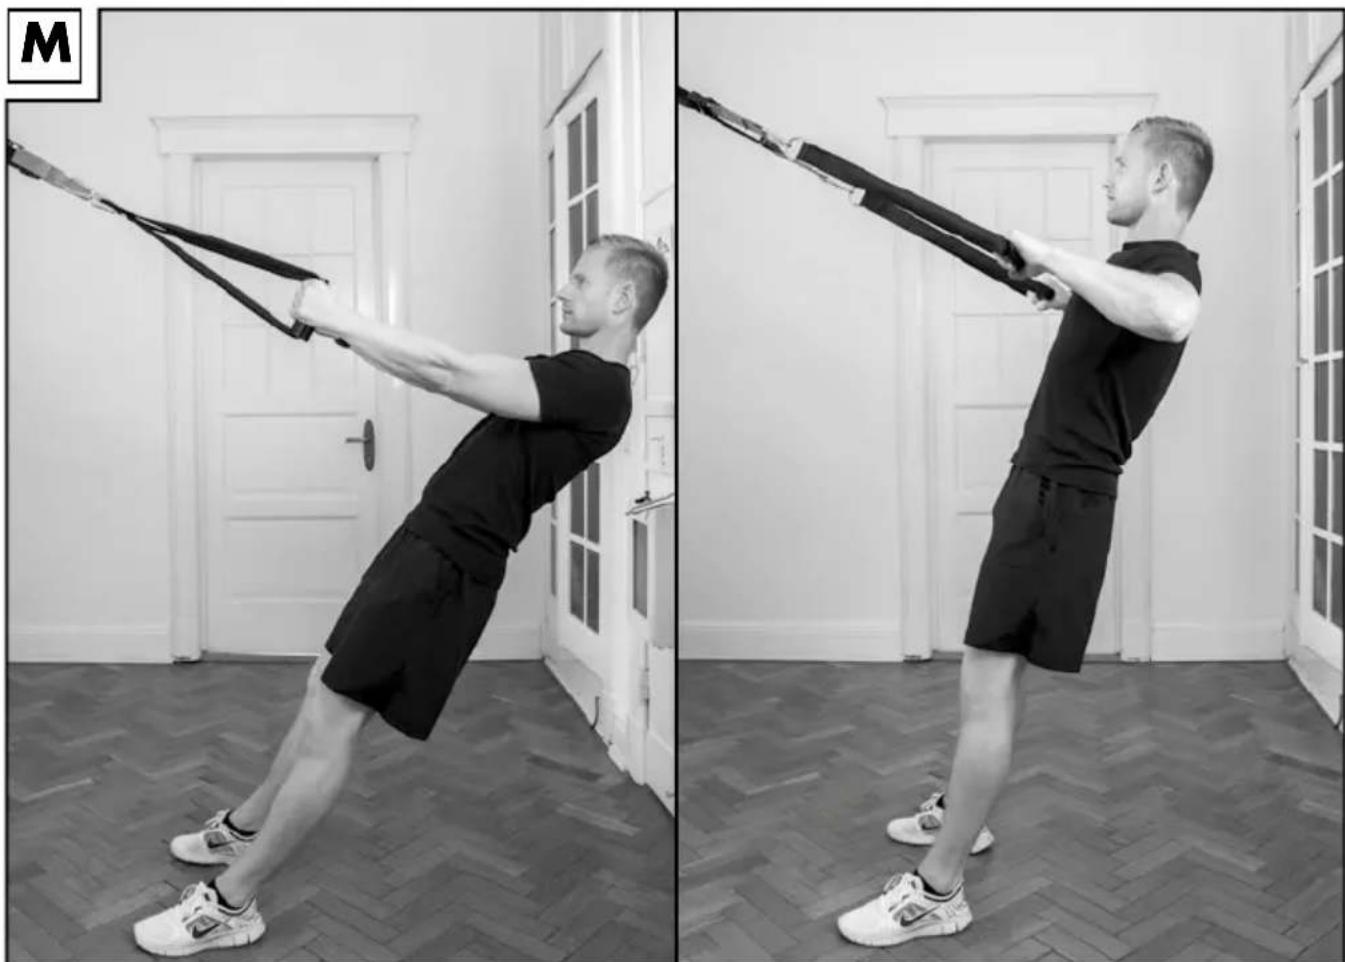
natural_image
Black-and-white photo showing a man performing a resistance band exercise indoors, no text or symbols visible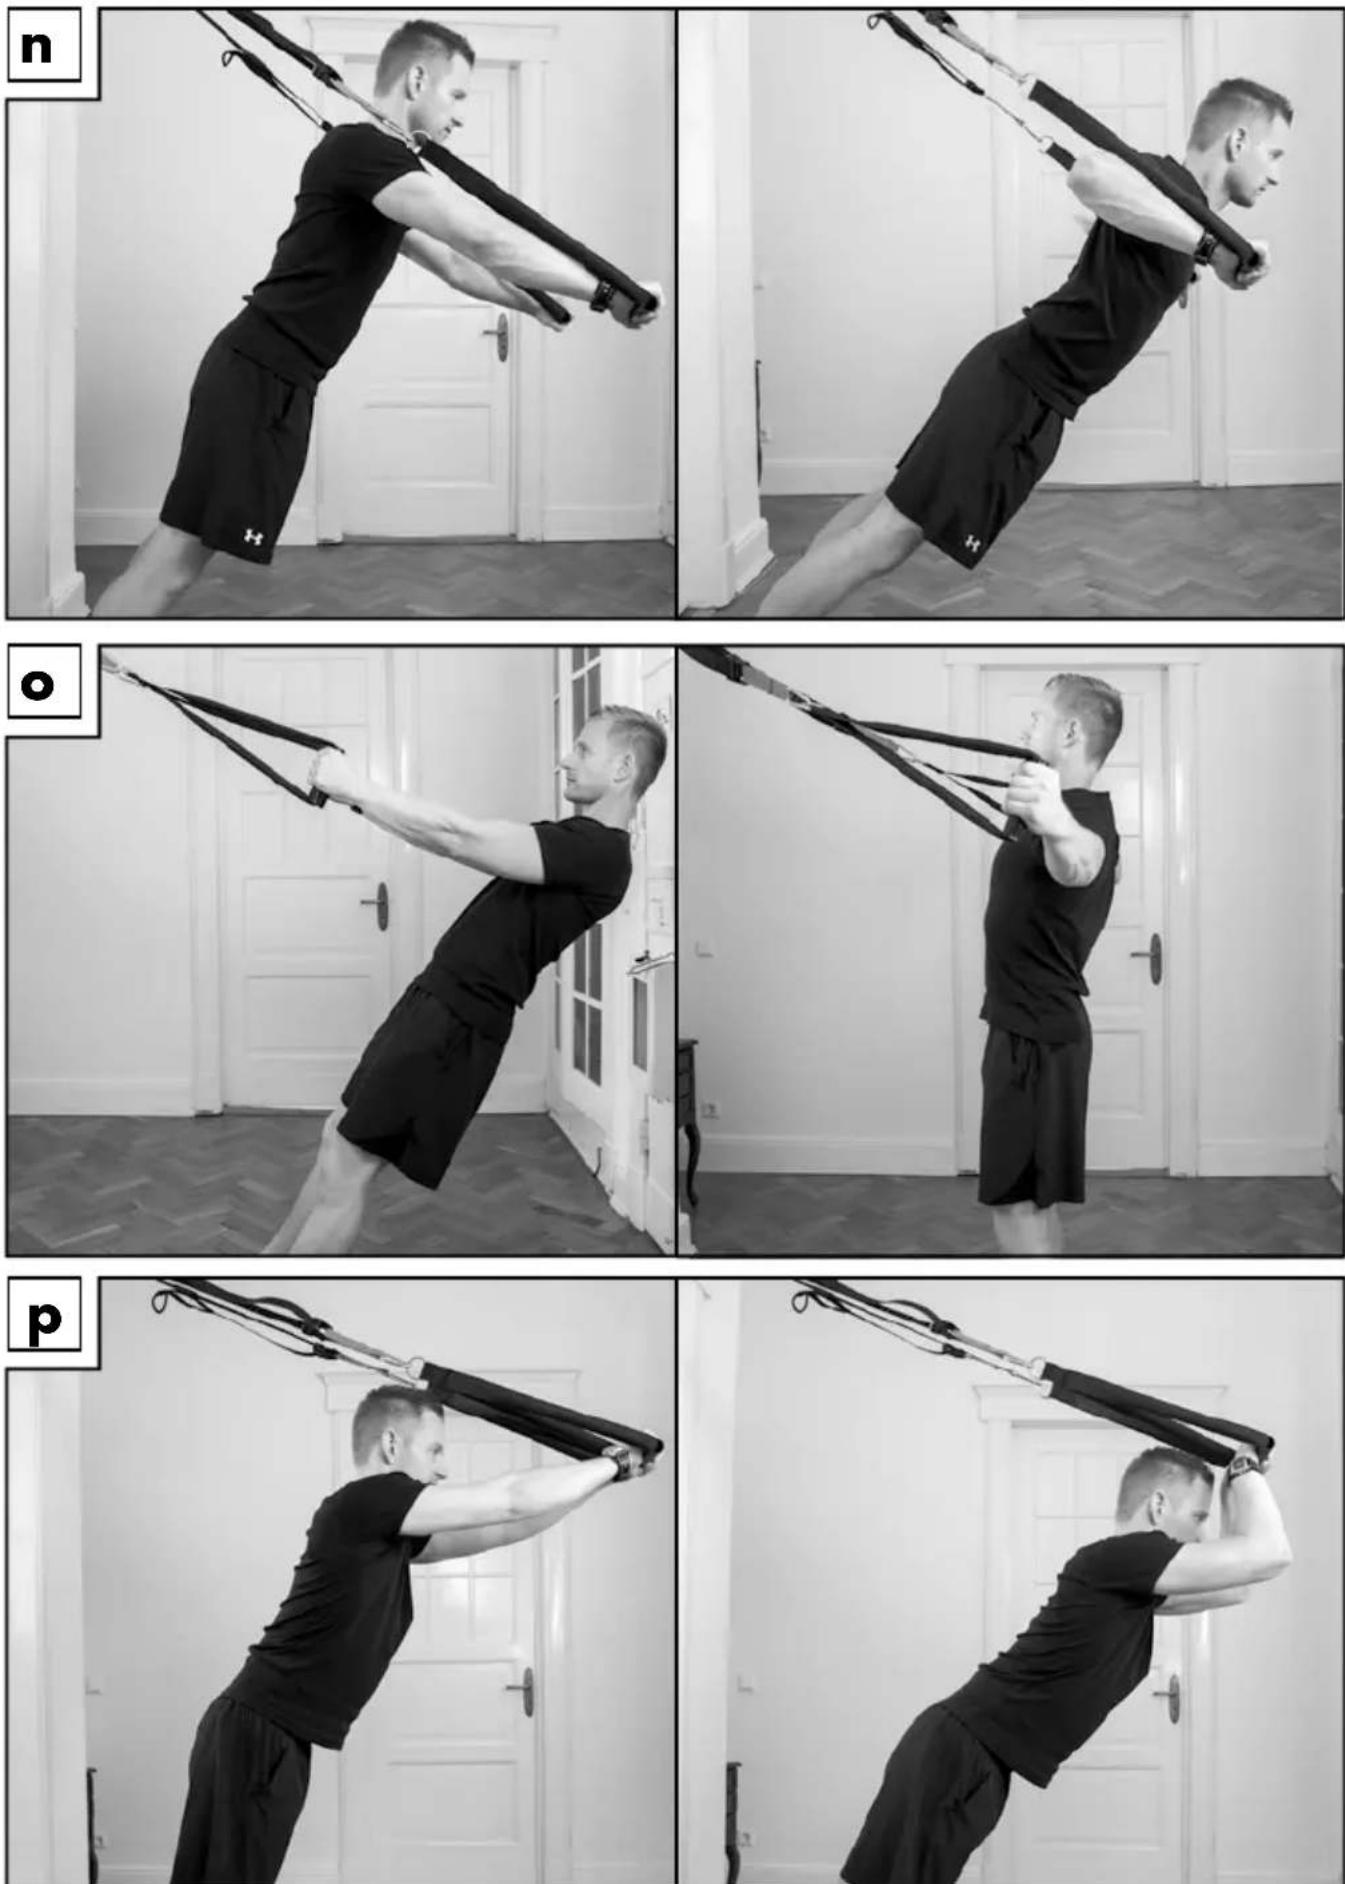

Felicitări!
With your purchase you have decided on a high-quality product. Get to know the product before you start to use it. Carefully read the following instructions for use. Use the product only as described and only for the given areas of application. Keep these instructions safe. When passing the product on to a third party, always make sure that the documentation is included.
Scope of delivery
1 x Instructions for use
1 x Suspension trainer (suspension training)
1 x Door anchor
1 x Door sign
1 x A3 exercise poster
1 x Training DVD
1 x Storage bag
Technical data
Weight: approx. 970g
Maximum weight of user: 120kg
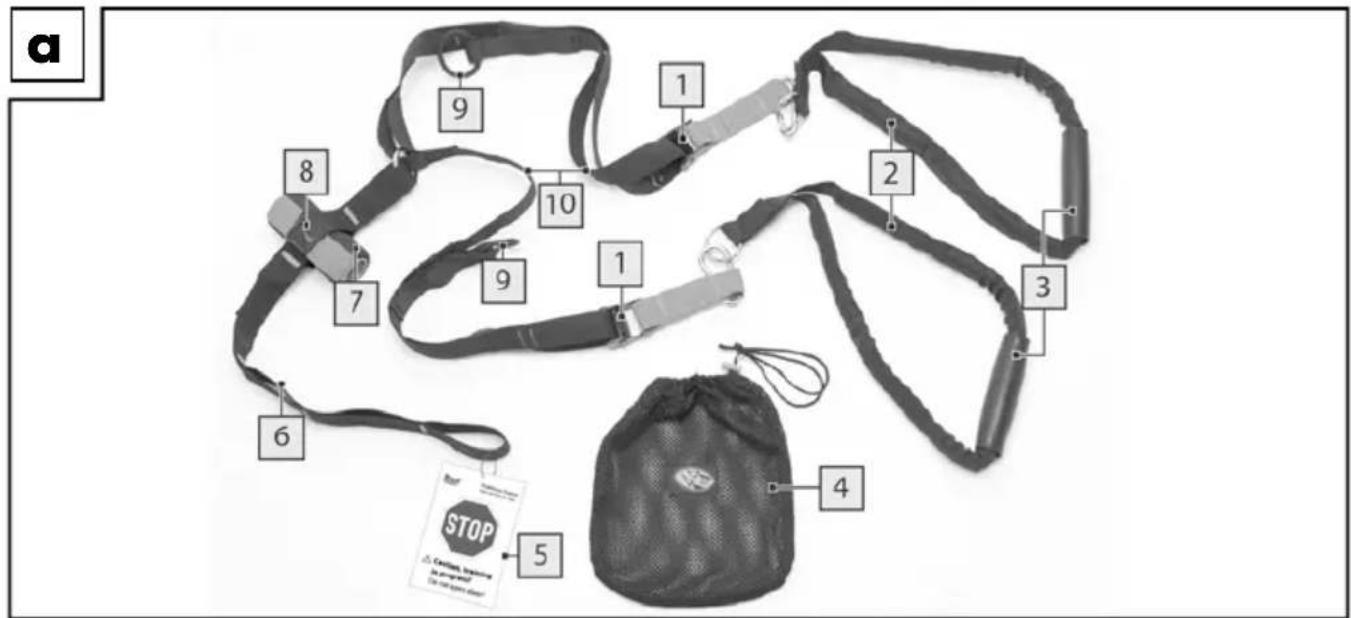
Part names (figure A)
(1) Adjustment buckles
(2) Foot loops
(3) Handles
(4) Storage bag
(5) Door sign
(6) Anchor loop
(7) Door anchor
(8) Hook-and-loop fastener
(9) Adjustment loops
(10) Belt strap
Correct use
This article was developed as a piece of training equipment that can be used to train your whole body. The sling trainer was designed for private use, and it is not suitable for medical and commercial use. The product was designed for indoor use and may only be used on doors by attaching the door anchor that is supplied with the trainer.

Safety notes
Warning! Risk of injury!
- Consult a doctor before beginning training. Please ensure that you are in a good state of health for this training.
• Always remember to warm up before training and train in accordance with your current abilities. There is a risk of incurring serious injury, if you use too much effort and overtrain. If you experience any complaints, feel weak or tired, you must stop training immediately and contact your doctor. - This article may only be used under adult supervision and must not be used as a toy.
- Keep the instructions for use and the exercise instructions to hand at all times.
- In order to train safely you need sufficient space. Carry out the exercises with enough space between you and objects or other people so that no one can be injured.
- Only train on a flat, non-slip surface.
- Do not use this article close to stairs or steps.
- Do not exceed the prescribed user weight of 120kg.
- Caution! Only attach the sling trainer to doors!
• Warning! Risk of injury!
Only attach the sling trainer to doors that open outwards (away from you)! Never mount the sling trainer on doors that open inwards (towards you). The door could open and this could lead to serious injury!
• Warning! Risk of injury!
Always lock the door to which you have attached the sling trainer!
- Caution! Always use the door sign (included with the product) while training. Ensure that it is easily legible and on the other side of the door.

Particular caution - k of injury to children!
- Never allow children to use this product without supervision. Instruct them on the correct use of the training equipment and supervise them. Only allow use if the mental and physical development of the child permits the use. This product is not suitable for use as a toy.

Hazards through wear
- The article may only be used in perfect condition. Check the article for damage or wear before each use. The safety of the sling trainer can only be guaranteed if it is examined regularly for damage and wear.
- Only use original replacement parts.
- Protect the product from extreme temperatures, sunlight, and moisture. Unsuitable storage and use of the article can lead to premature wear and possible fractures, which can lead to injury.
- Do not attach the product to objects with sharp edges, e.g. door hinges. Nylon will tear if it rubs against sharp edges.
- Do not saw! Sawing movements lead to premature wear.
- Examine the article regularly for damage or wear. Discontinue use of the product if damage is found.
Beware of material damage
- Never allow the sling trainer to fall or to rebound against the door as this could cause damage to the door.
Assembly instructions
- Select a training area with dimensions of approx. 3.00 × 1.80m (L × W).
- Attach the sling trainer at a height between 1.80 and 2.30m.
- Only train on a level, non-slip surface.
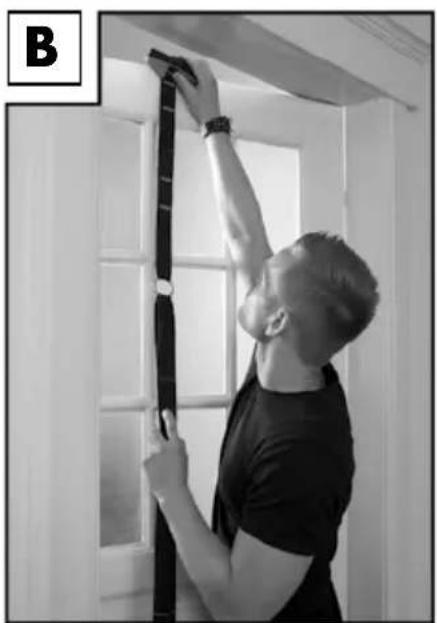
- Only mount the sling trainer on doors that open outwards (i.e. away from you) (figure B).
- Lay the anchor over the top of the door in the centre (figure B).
- Lock the door securely.

Caution! Risk of injury! ays lock the door!
- Use the door sign that is included with the product!
• Make sure the door that you attach the anchor on the sling trainer is stable and robust, and that it can support your body weight and that the anchor is securely attached. Pull hard on the bands a few times to test this (figure C).
Shortening and lengthening the sling trainer
Note: Before making adjustments always ensure that the bands are not twisted!
Shortening:
- To shorten the bands, hold onto the belt on the sling trainer.
- Use your thumb on one hand to press down on the adjustment buckle on the belt and take the black adjustment loop in the other hand.
- Press the buckle down and at the same time pull up on the band with the adjustment loop, towards the attachment point. Repeat the process for the other band (figure D).
- If the bands are still too long for some exercises, you can change the anchor point. To do this, open the hook-and-loop fastener on the door anchor and remove the anchor from the anchor loop. Put it in one of the lower loops and secure the anchor using the hook-and-loop fastener on the loop.
- Caution! Only position the anchor in the anchor loops that are marked on both sides with orange markings.
- Caution! Risk of injury! Never wind the hanging belt around the anchor to shorten it. The band could come loose.
Lengthening:
- To lengthen the bands, press both adjustment buckles down at the same time and pull the bands downward, away from the attachment point (figure E).
Recommended length of the sling trainer
Adjust the length of the sling trainer for each exercise as described below:
Length of sling trainer: short
Shorten the sling trainer as much as possible.
Length of sling trainer: medium length
Adjust the sling trainer to a medium length by fixing the black adjustment loops to the orange double markings that are sewn onto the middle of the band.
Length of sling trainer: knee height
Adjust the sling trainer so that the handles are just below your knees.
Length of sling trainer: long
Pull the bands on the sling trainer out fully so that the handles are approximately 7cm above the floor.
Training notes
- The following exercises are only a selection. You can find more exercises in the relevant technical literature.
- Wear comfortable sports clothing and non-slip sports shoes.
- Warm up well before each training session.
- Keep to the sequences of movements in the training notes and do not overestimate your ability. Take sufficiently long breaks between exercises and drink enough fluids.
- Do not train if you are sick or feel ill.
- Pregnant women should obtain approval from their doctor.
• Always ensure that you keep your body axis straight and hold good body tension. - If possible, have an experienced physiotherapist show you the correct way to carry out the exercises before you begin.
Warming up and stretching
Take enough time before and after training to warm up or cool down. See below for some simple exercises for this.
1. Use this exercise to warm up your thigh, hip, and trunk muscles (figure F)
Length of sling trainer: short
Starting position:
- Stand up straight, facing the attachment point.
- Hold on to the handle loops with your palms facing downward.
- With your feet together hold your hands at hip height in front of your body.
Movement:
- Bend forward with your upper body with arms straight and at the same time lift one leg up straight behind you. Your hips should be facing down to the floor.
- Hold this position for 5 seconds, go back to the starting position, and then repeat the exercise with the other leg.
- Carry out this exercise 3 times with each leg.
Tip:
- Make sure that your body is straight and extended and keep your stomach muscles tense.
2. Use this exercise to stretch your chest and shoulders and warm up your hips and legs (figure G)
Length of sling trainer: medium length
Starting position:
- Stand up straight, facing away from the attachment point. With your feet together move your arms and upper body slightly forward.
Movement:
- Lunge forward with one leg and bend your knees while opening your arms to the sides at shoulder height. Your elbows should be slightly bent.
- Hold this position for 5 seconds and then go back to the starting position by pressing your shoulders and arms together and pulling your front leg back to the starting position.
- Repeat the exercise with the other leg.
- Carry out the exercise 5 times with each leg.
Tip:
- Hold your upper body extended and keep your stomach muscles tense.
3. Use this exercise to stretch your hips, legs, and trunk (figure H)
Length of sling trainer: medium length
Starting position:
- Stand up straight, facing the attachment point. Place your feet shoulder-width apart with your elbows bent.
Movement:
- Cross one leg over the other while lowering your pelvis towards the floor.
- Keep the bands tense in order to hold your balance.
- Return to the starting position by tensing your stomach muscles, turning your hips back and placing your leg back in the starting position.
- Repeat the exercise with the other leg.
- Carry out the exercise 5 times with each leg.
Tip:
• Control the movement from your hips and stomach, not from your knees.
- Increase the intensity by increasing your speed.
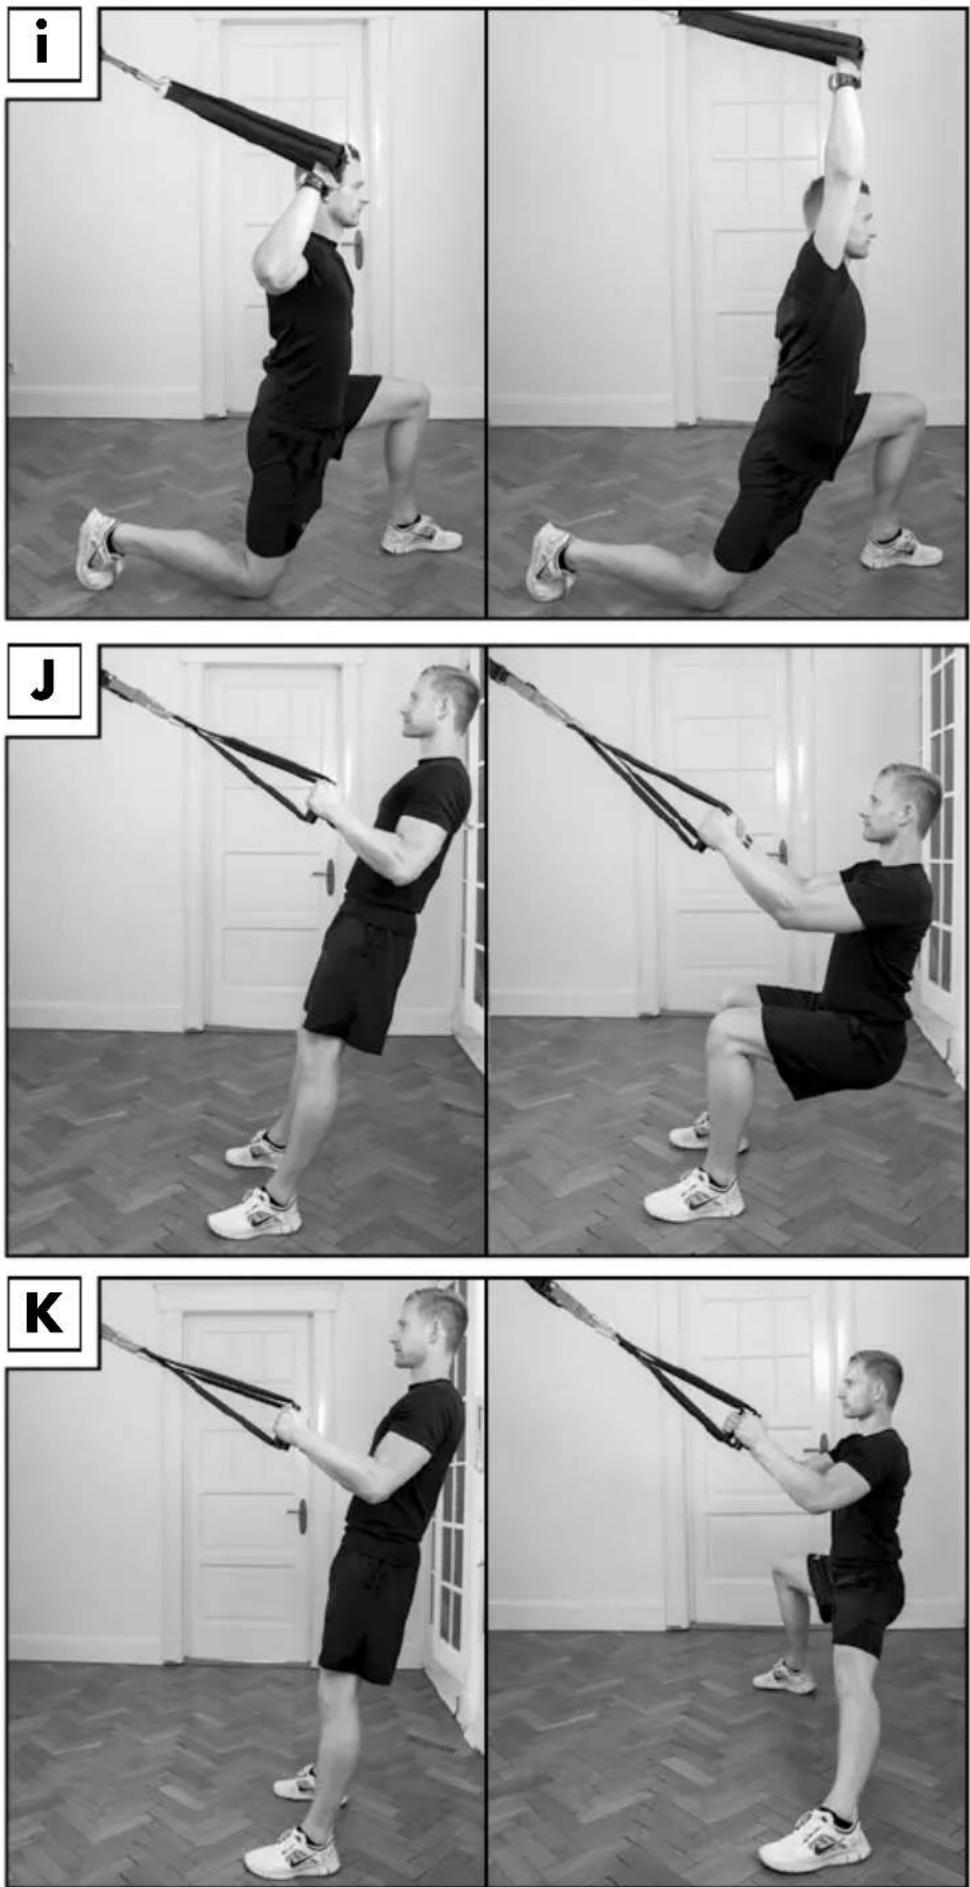
4. Use this exercise to stretch your chest, shoulders, and legs (figure I)
Length of sling trainer: medium length
Starting position:
- Kneel down on one leg, facing away from the attachment point. Hold both handles in one hand (on the same side as the lowered knee). Keep your elbow bent and your hand with the handles at head height.
- The other arm should hang loosely next to your body.
Movement:
- Now take the hand with the handles upward and your hips forward in one movement.
- Keep the heel of your front foot on the floor while pushing your knee forward.
- Hold this position and return to the starting position.
- Repeat the exercise with the other arm and the other leg.
- Carry out the exercise 5 times on each side.
Tip:
- Place your weight on the lower knee in order to ensure a straight body position thus intensify the hip stretch.
Training
Caution! Always wear non-slip sports shoes!
1. Squats: use this exercise to strengthen the muscles in your thighs and buttocks (figure J)
Length of sling trainer: medium length
Starting position:
- Stand up straight, facing the attachment point. Place your feet shoulder-width apart with your elbows bent at your sides.
- Place a little tension on the sling trainer by leaning back slightly.
Movement:
- Squat down. Your knees should be in line with your toes. Keep your heels securely on the floor.
- Return to the starting position.
- Repeat the exercise 15 times.
Tipp:
- Increase the intensity of the exercise by increasing your speed or by doing the exercise on one leg.
2. Side squats: use this exercise to strengthen the muscles of your inner thighs (figure K)
Length of sling trainer: medium length
Starting position:
- Stand up straight, facing the attachment point. Place your feet slightly more than shoulder-width apart with your elbows bent.
Movement:
- Squat sideways using one leg.
- Stretch out the other leg and your arms.
- Hold this position for 5 seconds and then return to the starting position by pushing your hips back to the centre, helping a little with your arms.
- Repeat the exercise with the other leg.
- Carry out the exercise 10 times with each leg.
Tip:
- Keep your body extended and keep your stomach muscles tense.
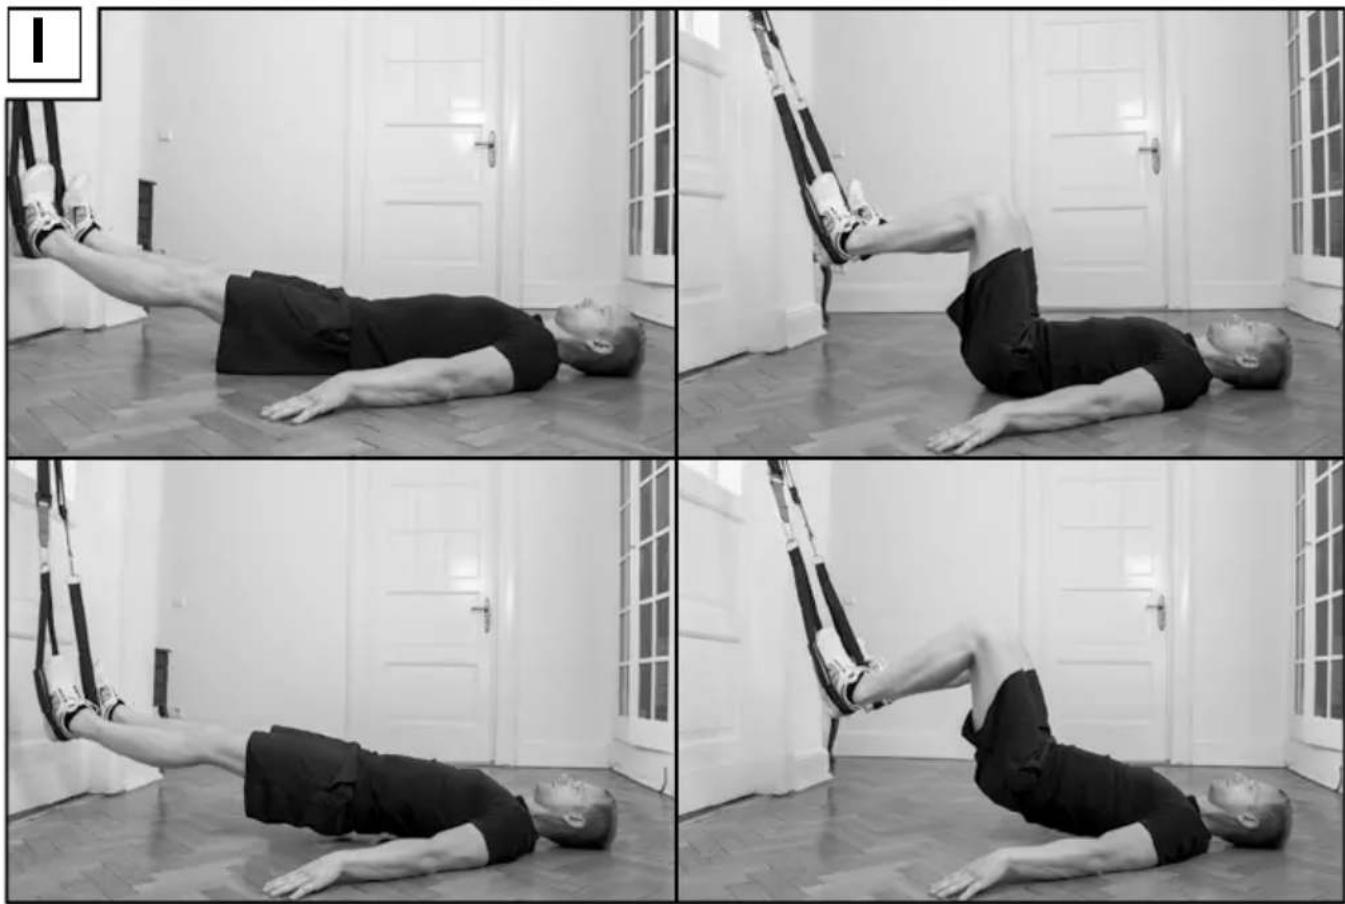
3. Leg curls: use this exercise to strengthen your hip, thigh, and trunk muscles (figure L)
Length of sling trainer: knee height
Starting position:
- Lie down facing upward and place your heels in the handle loops.
Note: For a more comfortable foot position in the handle loops push the plastic grips in the handles upward. - Your arms should be by your sides.
Movement:
- Pull your heels up to your pelvis.
- Slowly return to the starting position.
- Repeat the exercise 10 times.
Tip:
- Press your heels hard into the handle loops during the entire movement.
- Increase the intensity by lifting your pelvis during the exercise.
4. Rowing: use this exercise to strengthen your back, trunk, and arm muscles (figure M)
Length of sling trainer: short
Starting position:
- Stand up straight, facing the attachment point. Place your feet shoulder-width apart.
- Hold both handle loops with your arms at full extension.
- Lean back and then move forward until you are at a reasonable resistance angle.
Movement:
- Pull your upper body forward while tensing your back muscles.
- Your elbows should be at a 90° angle to your body.
- Return to the starting position.
- Repeat the exercise 10 times.
Tip:
- While pulling yourself forward, press your shoulder blades together.
- Most exercises become more difficult in a standing position where your base is smaller. The exercise is easiest with straddled legs. If you stand with your feet together then it becomes more difficult and it is most difficult standing on one leg.
5. Chest press: use this exercise to strengthen your chest, shoulders, and trunk muscles (figure N)
Length of sling trainer: long
Starting position:
- Stand up straight, facing away from the attachment point.
- Stretch your arms out forward and take a few steps backward until you are at a reasonable resistance angle.
- Hold your arms high enough that the bands do not rub on your arms.
Movement:
- Move your upper body downward as if doing a push up.
- Return to the starting position.
- Repeat the exercise 10 times.
Tip:
- This exercise becomes increasingly difficult as the angle of your body becomes steeper. Place your feet closer to the attachment point to increase the difficulty (and vice versa).
6. Delta muscle flight: use this exercise to strengthen your delta muscles (figure O)
Length of sling trainer: medium length
Starting position:
- Stand up straight, facing the attachment point. Place your feet a little more than shoulder-width apart.
• Take some steps forward with your feet until you are at a reasonable resistance angle. - Lean back and stretch your arms out forward.
Movement:
- Pull yourself up slowly by extending your arms to the sides.
- Lean back again slowly. Do not let yourself fall. Control your movement!
- Repeat the exercise 10 times.
Tip:
- Keep your body tense during the entire movement and do not use your momentum.
7. Triceps rotation: use this exercise to strengthen your triceps and the muscles in your lower arms (figure P)
Length of sling trainer: long
Starting position:
- Stand up straight, facing the attachment point, with your feet together.
- Hold both the handle loops with your palms facing upward.
- Extend your arms forward and taken a few steps forward with your feet until you are at a reasonable resistance angle.
Movement:
- Lean into the bands and slowly bend your elbows.
- Return to the starting position in one slow, controlled movement.
- Repeat the exercise 10 times.
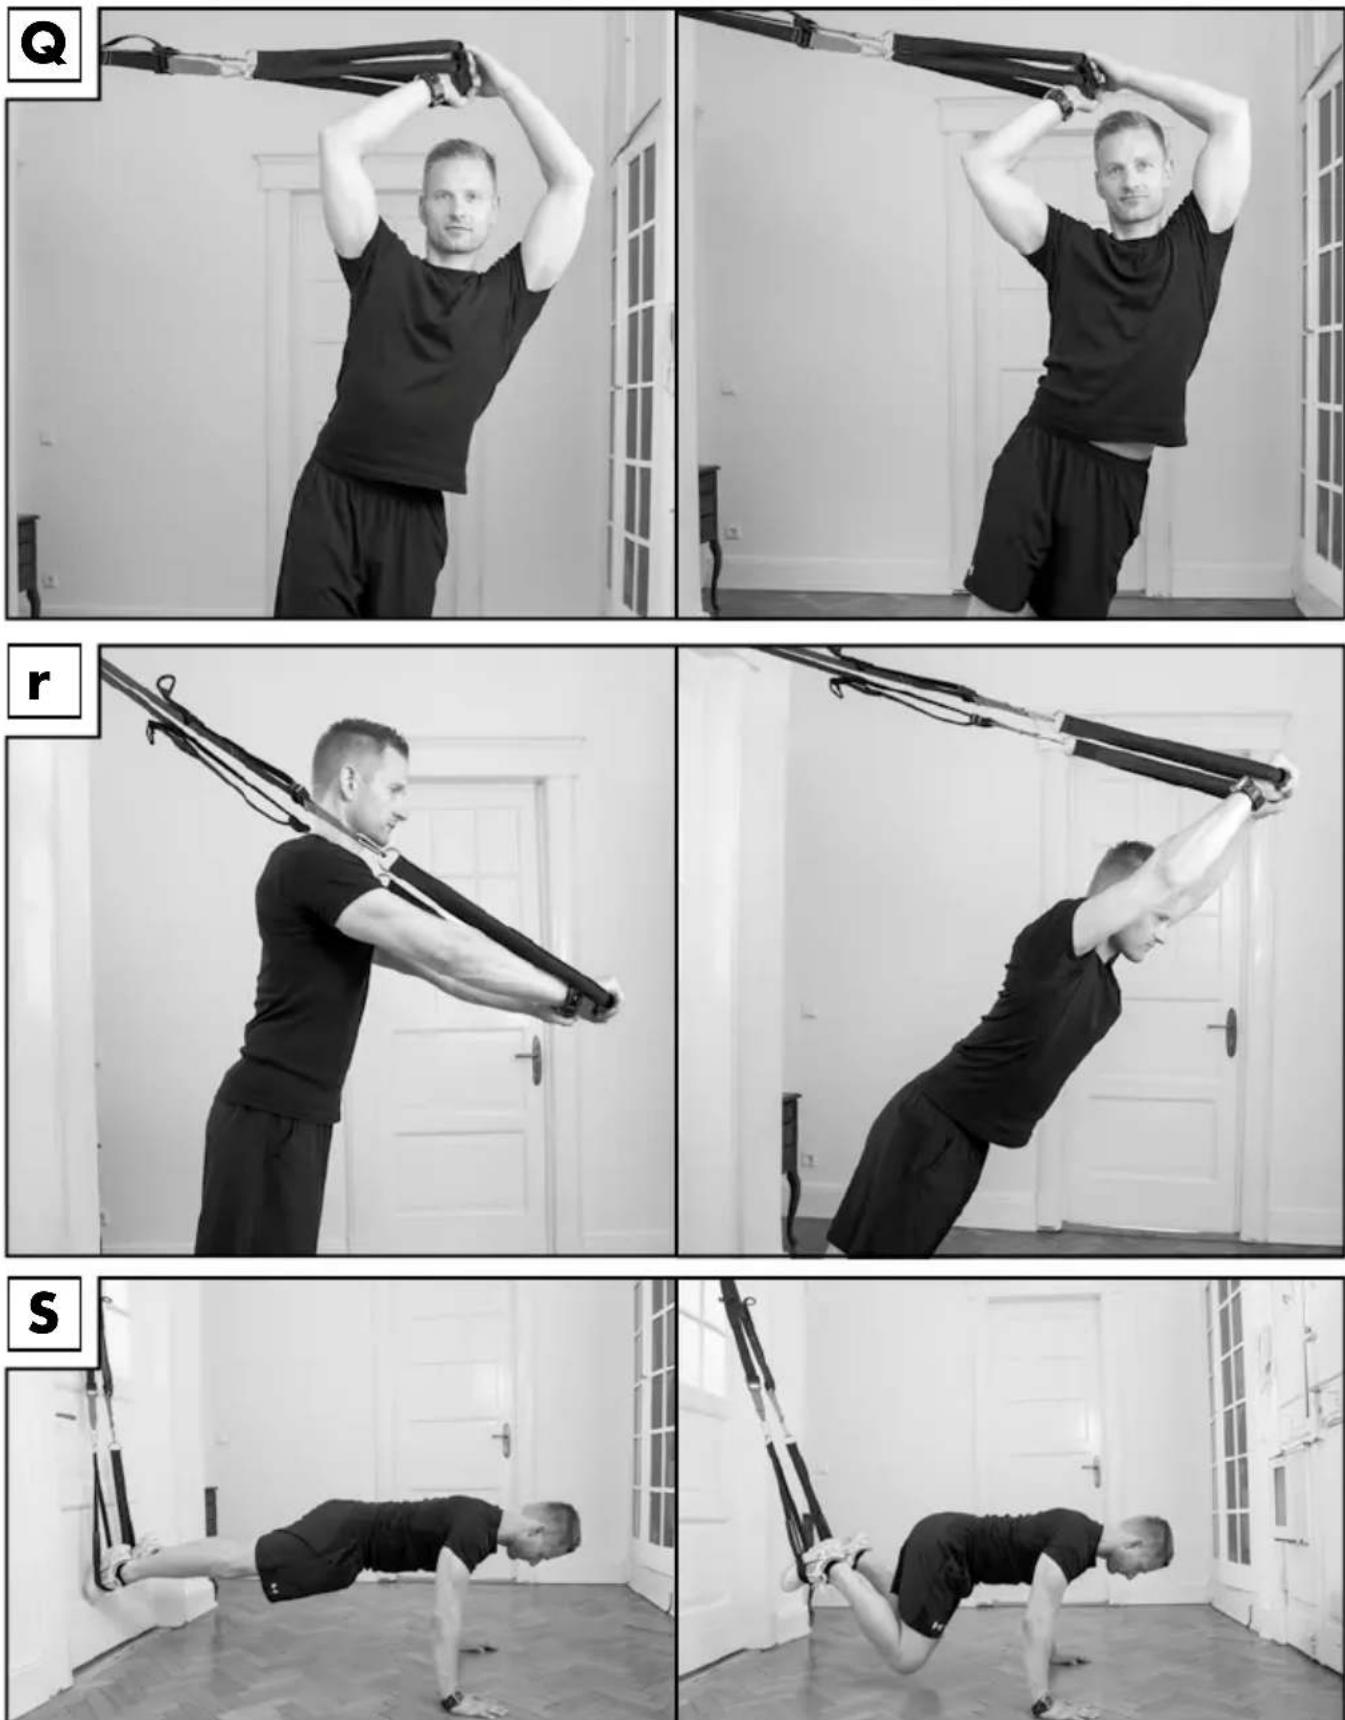
8. Hip drops: use this exercise to train the flexibility of your upper body, back, and hips (figure Q)
Length of sling trainer: long
Starting position:
- Stand sideways to the attachment point and hold the handle loops above your head.
• Take a step forward with your inside leg with your feet in line. - Lean away from the attachment point and keep the bands tense.
Movement:
- Lean your hips outward, away from the attachment point.
- Carry out the movement in a comfortable, slow, and controlled manner.
- Return to the starting position by tensing up your stomach muscles.
- Repeat the exercise with the other leg.
- Carry out the exercise 10 times with each leg.
Tip:
- Keep your body tense during the entire movement. Hold your elbows wide and in line with your hips.
9. Roll up: use this exercise to strengthen the muscles in your trunk (figure R)
Length of sling trainer: long
Starting position:
- Stand up, facing away from the attachment point, with your feet shoulder-width apart.
• Take a few steps backward until you are at a reasonable resistance angle. - Extend your arms forward and lean into the bands.
Movement:
- Slowly lift your arms upward. Make sure that you retain your body position during this forward movement.
- Return to the starting position.
- Repeat the exercise 15 times.
Tip:
- Most standing exercises become easier if you place one foot slightly forward and support some of your body weight on this foot. An offset foot position is also more stable.
10. Crunches: use this exercise to strengthen the muscles in your stomach and buttocks (figure S)
Length of sling trainer: knee height
Starting position:
- Place your feet in the handle loops with your toes pointing downward.
Note: For a more comfortable foot position, push the plastic grips in the handles upward.
• Take up the plank position on your hands.
Movement:
- Pull your knees to your chest.
- Return to the starting position.
- Repeat the exercise 15 times.
Tip:
- Keep your body tense and keep a good body posture.
- Most plank exercises on the floor are easier if you support yourself on your lower arms. If you support yourself on your extended arms and hands, the exercise becomes more difficult.
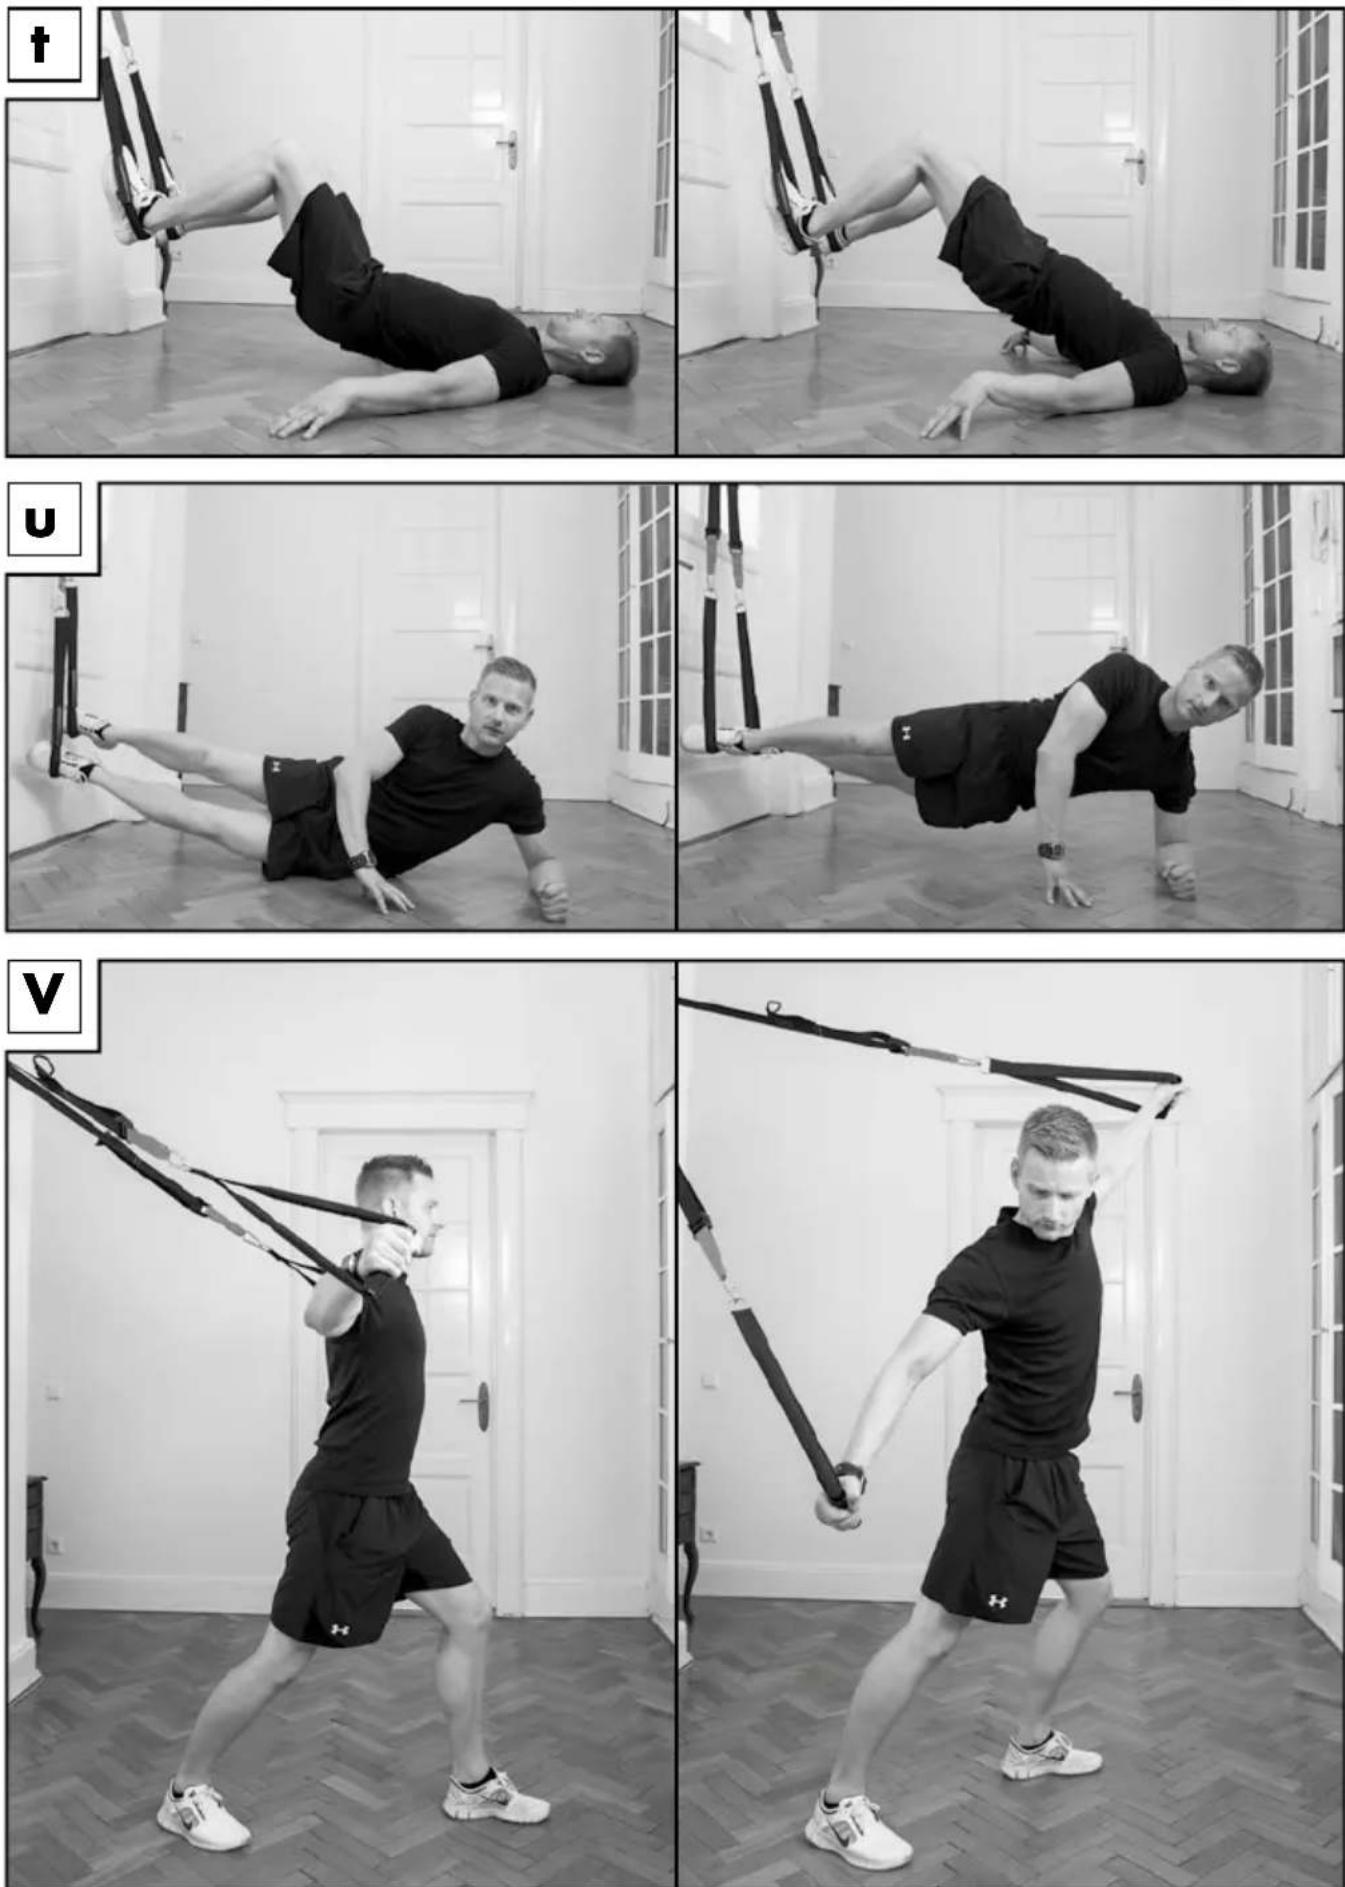
11. Hip lifts: use this exercise to strengthen the muscles in your hips, shoulders, and back (figure T)
Length of sling trainer: knee height
Starting position:
- Lie on your back with your heels in the handle loops.
- Hold your arms next to your body with your palms flat on the floor.
- Tense your trunk muscles before lifting your pelvis.
Movement:
- Lift your pelvis from the floor by pressing your heels into the handle loops.
- Lower the pelvis again half way down.
- Repeat the exercise 15 times.
Tip:
- Keep your body tense and keep a good body posture.
- The more difficult most floor exercises become, the further you are away from the attachment point (and vice versa).
12. Side plank: Use this exercise to strengthen your hips, arms, and trunk (figure U)
Length of sling trainer: knee height
Starting position:
- Lie on your left hip and support yourself on your left lower arm, with your toes in the handle loops under the attachment point.
- Place your upper leg in front of the lower.
Movement:
- Lift your pelvis to a plank position and hold this for 10 seconds.
- Return to the starting position.
- Repeat 10 times on this arm and then 10 times on the other.
Tip:
- Increase the intensity by resting your free arm on your hip or lifting it above you.
Cool down
1. Use this exercise to stretch your chest and shoulders (figure V)
Length of sling trainer: medium length
Starting position:
- Stand straight, facing away from the attachment point, with your feet shoulder-width apart.
• Take one step forward with your left foot and extend your arms to the sides at shoulder height. - Push your upper body forward until you feel the stretch in your chest and arms.
Movement:
- Extend your left arm upward and lower the right arm. Turn your upper body to the right and look at your right hand.
- Then extend your right hand upward, turn your upper body to the left and look at your left hand.
- Repeat the exercise with the other leg.
- Carry out the exercise 3 times with each leg.
Tip:
- Breathe in and out deeply.
- Press your back heel firmly into the floor, bend your front knee, and tense up your buttock muscles to stretch your hips and calves.
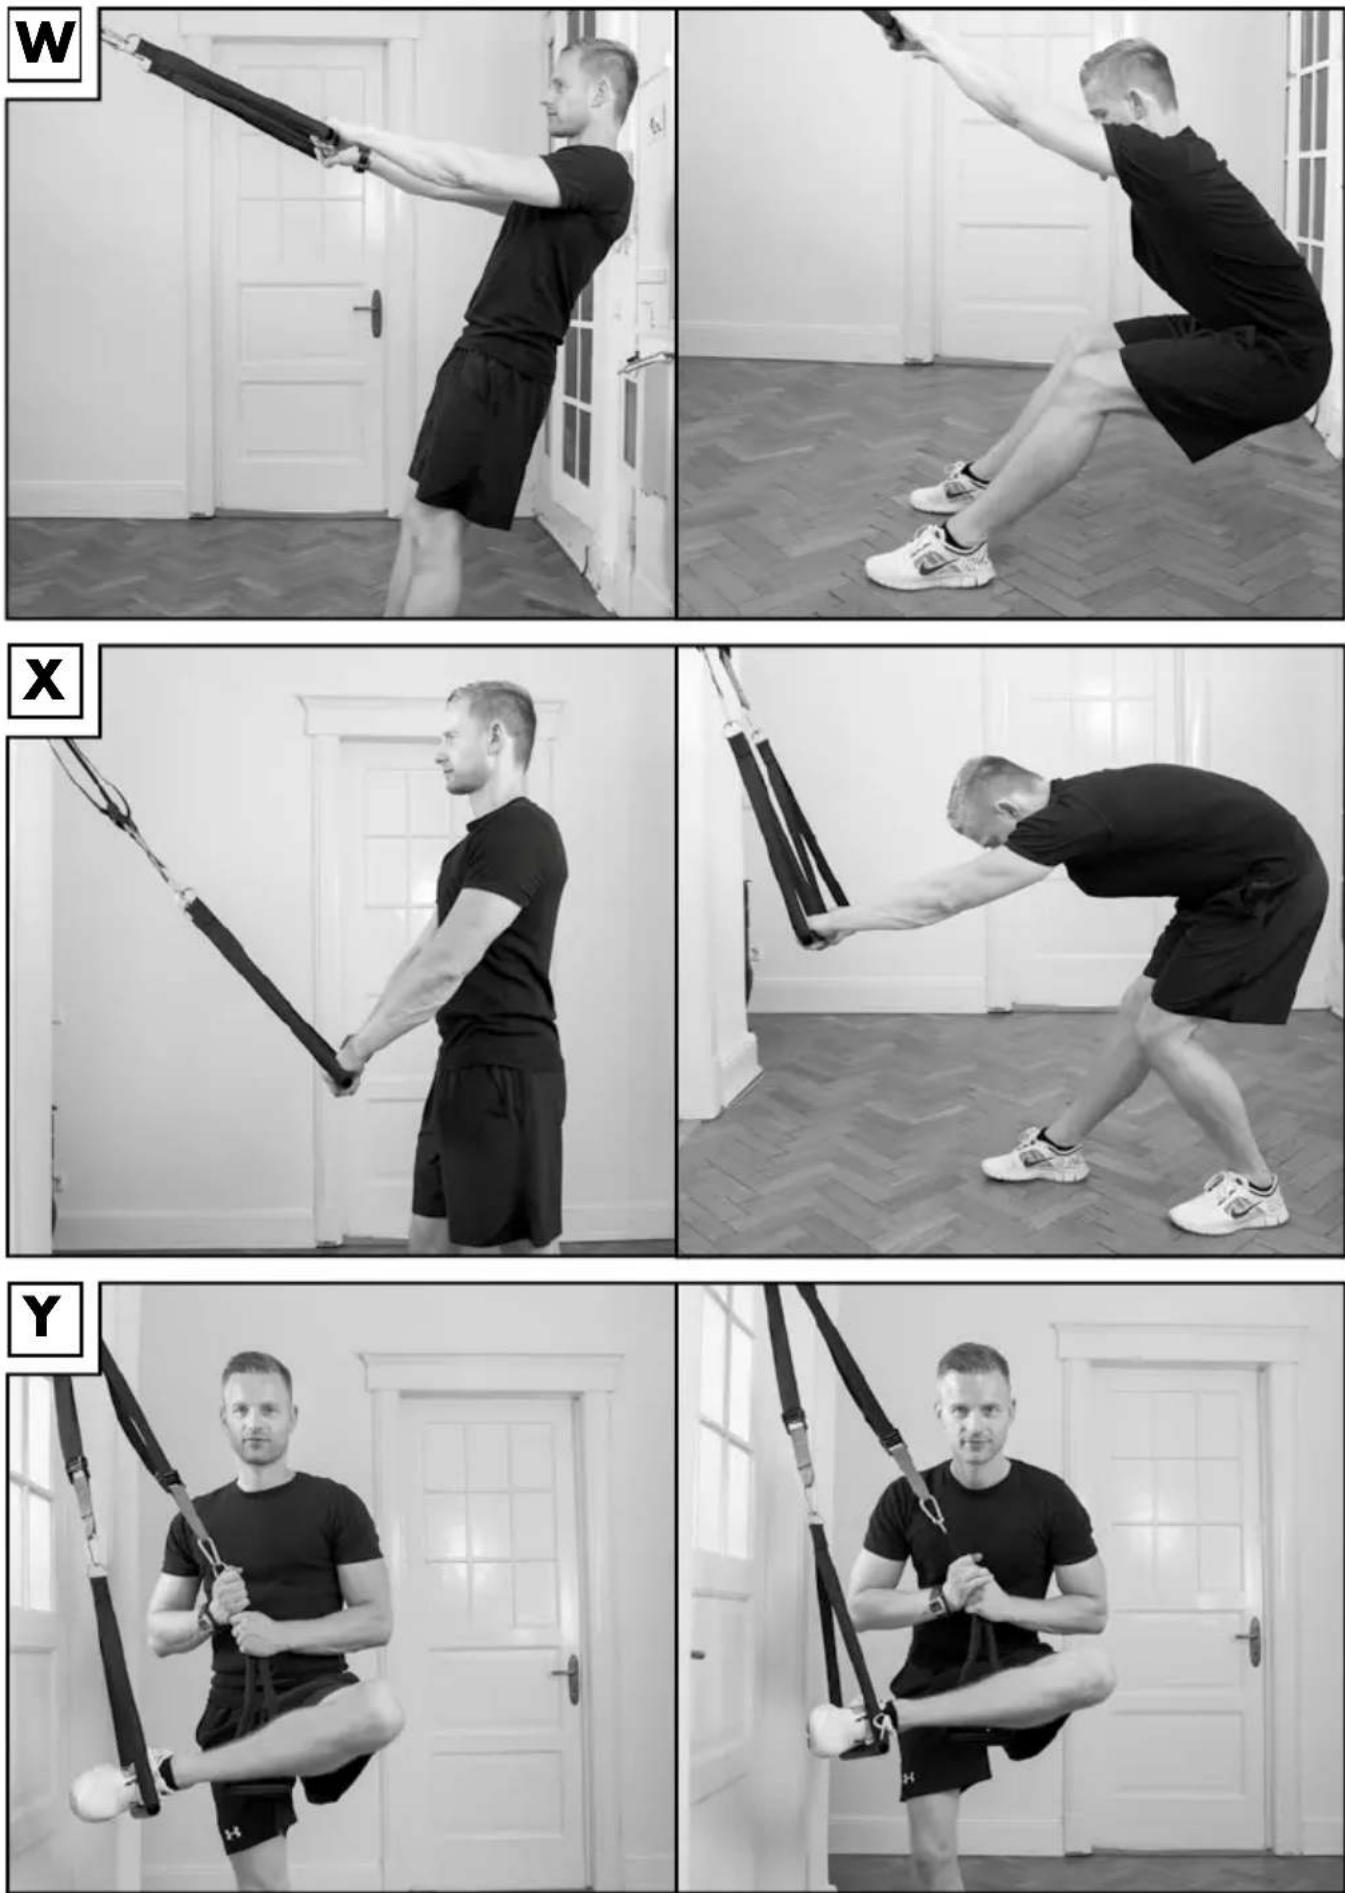
2. Hip bend: use this exercise to stretch your back (figure W)
Length of sling trainer: short
Starting position:
- Stand up straight, facing the attachment point.
- Extend your arms out forward.
Movement:
- Pull your pelvis down and keep your knees slightly bent.
- Hold this position for 10 seconds and repeat the exercise 5 times.
Tip:
- Make sure you keep your upper body extended.
3. Use this exercise to stretch your back and calves (figure X)
Length of sling trainer: medium length
Starting position:
- Stand up straight, facing the attachment point.
- Extend your arms out forward.
- Lunge forward.
Movement:
- Exert pressure on the handle loops and bend your upper body forward.
- Feel the stretch in your calf, lower back, and shoulders.
- Hold this position for 30 seconds and repeat the stretch with the other leg.
Tip:
- Keep your back flat. Relax during the stretch and breathe calmly.
4. Use this exercise to stretch your back, hips, and legs (figure Y)
Length of sling trainer: short
Starting position:
- Stand sideways to the attachment point.
- Place one foot in the handle loop with your toes pointing forward and your leg bent.
- Use the other band to keep your balance.
- Keep your standing leg extended.
Movement:
- Bend forward and stretch your hip.
- Breathe calmly and relax during the stretch.
- Hold this position for 30 seconds, take your foot out of the loop and carefully allow your foot to lower again.
- Repeat the exercise with the other leg.
Care and storage
Always store the article in a dry, clean and temperature-controlled place.
Advice on disposal
Please dispose of the packaging and the article in an environmentally-friendly way, and separated into types of material! Dispose of this item through an authorised disposal company, or through your local authority waste disposal amenity. Be sure to comply with the current, valid regulations.
3 Years Warranty
The product was produced with great care and under constant supervision. You receive a three-year warranty for this product from the date of purchase. Please retain your receipt.
The warranty applies only to material and workmanship and does not apply to misuse or improper handling. Your statutory rights, especially the warranty rights, are not affected by this warranty.
With regard to complaints, please contact the following service hotline or contact us by e-mail.
Our service employees will advise as to the subsequent procedure as quickly as possible.
We will be personally available to discuss the situation with you.
Any repairs under the warranty, statutory guarantees or through goodwill do not extend the warranty period. This also applies to replaced and repaired parts.
Repairs after the warranty are subject to a charge.
IAN: 103761
GB Service Great Britain
Tel.: 0871 5000 720
(£ 0.10/Min.)
E-Mail: deltasport@lidl.co.uk
You can also find spare parts for your product at:
www.delta-sport.com, category Service - Lidl Spare Parts
Service

- APARAT DE ANTRENAMENT CU CORZI
- RO
- Felicitări!
- Scope of delivery
- Technical data
- Part names (figure A)
- Correct use
- Safety notes
- Warning! Risk of injury!
- Particular caution - k of injury to children!
- Hazards through wear
- Beware of material damage
- Assembly instructions
- Caution! Risk of injury! ays lock the door!
- Shortening and lengthening the sling trainer
- Note: Before making adjustments always ensure that the bands are not twisted!
- Shortening:
- Lengthening:
- Recommended length of the sling trainer
- Adjust the length of the sling trainer for each exercise as described below:
- Training notes
- Warming up and stretching
- Use this exercise to warm up your thigh, hip, and trunk muscles (figure F)
- Starting position:
- Movement:
- Tip:
- Use this exercise to stretch your chest and shoulders and warm up your hips and legs (figure G)
- Use this exercise to stretch your hips, legs, and trunk (figure H)
- Use this exercise to stretch your chest, shoulders, and legs (figure I)
- Training
- Caution! Always wear non-slip sports shoes!
- Squats: use this exercise to strengthen the muscles in your thighs and buttocks (figure J)
- Tipp:
- Side squats: use this exercise to strengthen the muscles of your inner thighs (figure K)
- Leg curls: use this exercise to strengthen your hip, thigh, and trunk muscles (figure L)
- Rowing: use this exercise to strengthen your back, trunk, and arm muscles (figure M)
- Chest press: use this exercise to strengthen your chest, shoulders, and trunk muscles (figure N)
- Delta muscle flight: use this exercise to strengthen your delta muscles (figure O)
- Triceps rotation: use this exercise to strengthen your triceps and the muscles in your lower arms (figure P)
- Hip drops: use this exercise to train the flexibility of your upper body, back, and hips (figure Q)
- Roll up: use this exercise to strengthen the muscles in your trunk (figure R)
- Crunches: use this exercise to strengthen the muscles in your stomach and buttocks (figure S)
- Hip lifts: use this exercise to strengthen the muscles in your hips, shoulders, and back (figure T)
- Side plank: Use this exercise to strengthen your hips, arms, and trunk (figure U)
- Cool down
- Use this exercise to stretch your chest and shoulders (figure V)
- Hip bend: use this exercise to stretch your back (figure W)
- Use this exercise to stretch your back and calves (figure X)
- Use this exercise to stretch your back, hips, and legs (figure Y)
- Care and storage
- Advice on disposal
- Years Warranty
Brand : CRIVIT
Model : IAN 103761
Category : Fitness Equipment